

Intune App Factory is an automated solution that combines the flexibility and power of Azure DevOps Pipelines together with the IntuneWin32App PowerShell module, intended to simplify and streamline the application packaging process in Intune.

Intune App Factory does this by reducing the overall manual steps involved in the process, replacing these with automated tasks such as:
- Check for new available application versions
- Detect and download the latest application content
- Prepare and package the latest application
- Create the application in Intune
In addition to the automated steps mentioned above, Intune App Factory was built to automatically incorporate the PowerShell App Deployment Toolkit into every application it creates in Intune.
How does it really work?
With application packaging, it’s almost impossible to automate every involved step, but those that are repetitive should definitely be taken out of the equation. Intune App Factory was designed to work with the concept of ‘onboarded applications’. What this means is that you as the administrator define how Intune App Factory should handle one said application. For instance, let’s assume you want to onboard 7-Zip and let Intune App Factory handle the whole application packaging process from detecting there’s a new version available to having it deployable from Intune. For this to happen, the onboarding process comes into play. Onboarding an application in Intune App Factory means that you define the following in a manifest file:
- Application name, publisher and branding
- Source from where to check for new versions
- Source specific detection configuration
- Application detection rule logic
- Unattended installation configuration
When all of the above have been defined, the onboarding of the application has completed, and Intune App Factory will take over and periodically check for newer versions when such become available. It’s fair to say, but not limited to in all situations, that the onboarding process is a one-time operation per application.
What sources does Intune App Factory work with?
Winget, Evergreen, Storage Account
What applications can be onboarded?
Everything available in the sources, but with the Storage Account source type, essentially everything.
Table of content
- Prerequisites
- Create a Key Vault in Azure
- Create a Log Analytics workspace for analytics
- Create Storage Account
- Create Entra ID service principals
- Service Connection service principal
- Create Service Connection service principal Client Secret
- Assign Key Vault Secrets User role to Service Connection service principal
- Add access for Service Connection service principal to Key Vault
- Intune App Factory service principal
- Add Graph API permissions for the Intune App Factory service principal
- Create Intune App Factory service principal Client Secret
- Add Intune App Factory service principal Client Secret in Key Vault
- Create an Azure DevOps Project
- Import Intune App Factory data to new repository
- Setup Service Connection in Azure DevOps
- Create an Agent pool in Azure DevOps
- Setup Azure DevOps self-hosted agent
- Configure Pipeline variables groups
- Create the Intune App Factory pipeline
- Clone Intune App Factory repository locally
Prerequisites
Before you can get started to setup Intune App Factory, you will need to ensure the following prerequisites are in place. Intune App Factory requires you to have access to the following including the specified permissions:
- Azure DevOps Organization
- You require access to a project within an Azure DevOps Organization within your company. Preferably, Project Administrator permissions is recommended to complete the setup steps.
- Azure subscription
- Contributor access to subscription or Contributor access to a resource group where an Azure Key Vault can be created.
- Entra ID
- Permission to create app registrations (service principals).
License requirements
To gain access to Azure DevOps, there’s two possibilities from a license perspective. You can either purchase direct Azure DevOps licenses or gain access if you have an active Visual Studio subscription. In terms of being compliant, but also for certain functionality within Azure DevOps to even appear once you’ve entered into your project, it’s recommended that you speak to whoever manages licenses within your company to obtain the correct license.
Your user must have a valid license or subscription for Azure DevOps, otherwise you’ll at least not have access to Repositories and potentially other required features such as Pipelines, that Intune App Factory makes use of.
For subscribers of Visual Studio (formerly known as MSDN subscriptions), you can get more details regarding licenses and what’s included:
Azure DevOps benefits for Visual Studio subscribers | Microsoft Learn
In my lab environment, being a MVP, Microsoft kindly provides us with a Visual Studio Enterprise subscription, that I’ll be using through writing these setup instructions:
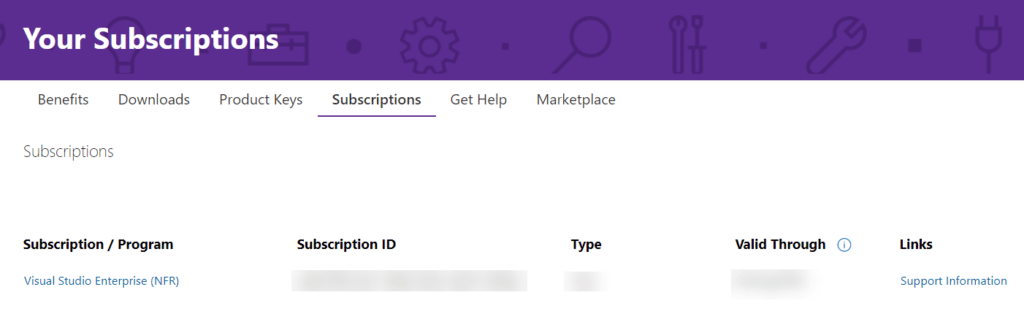
In the event that you’ll at some point throughout following along in setting up Intune App Factory, where you for instance don’t have access to Pipelines or other features of Azure DevOps, consult your license and what features it includes, as that’s most likely the culprit.
Azure DevOps Organization
It’s very likely that you company already makes use of Azure DevOps in any form, and have setup existing organizational structures. Intune App Factory was built to be used with Pipelines with the source coded hosted within a Repository of a Project within an Organization of Azure DevOps. Initial setup of Azure DevOps is not covered in these instructions, and if Azure DevOps is already in use, it’s recommended that you reach out to the department that manages access. Request access to a new Project within your existing Azure DevOps Organization.
In the event Azure DevOps is not already used within your company, the process for setting it up is very well documented by Microsoft already and therefor not covered in these instructions. You will find everything you need to get started here:
Create an organization – Azure DevOps | Microsoft Learn
Azure subscription
Intune App Factory will require access to a single or multiple, depending on your desired configuration regarding high availability of the host agents that will perform all the heavy duty work, virtual machines but also access to secrets that will be stored securely in a Key Vault. For this, an Azure subscription is required, where such resources can be created.
Entra ID
As we’re going to store client secrets of service principals in an Azure Key Vault resource, Azure DevOps must have access to reading the secrets. In addition to reading secrets, Intune App Factory will also make use of service principal with permissions to create Win32 application type objects in Intune.
Create a Key Vault in Azure
It’s a good practice to make use of an Azure Key Vault to store secrets, especially when dealing with service principals in Entra ID. Storing a client secret for a service principal in a Key Vault, isn’t only a good security practice, it can also benefit from all the application and services that can interact with the Key Vault, to retrieve the secrets in a secure manner, restricted by access policies in the Key Vault.
Intune App Factory doesn’t require a Key Vault, however the setup guide assumes that you creates one and follows good security practices. It’s also easier to follow along through the setup instructions. If your organization already uses processes around storing secrets for Azure resources in a Key Vault, make use of the existing Key Vault instead if applicable.
Follow the instructions below from Microsoft on how to create an Azure Key Vault resource:
Quickstart – Create an Azure Key Vault with the Azure portal | Microsoft Learn
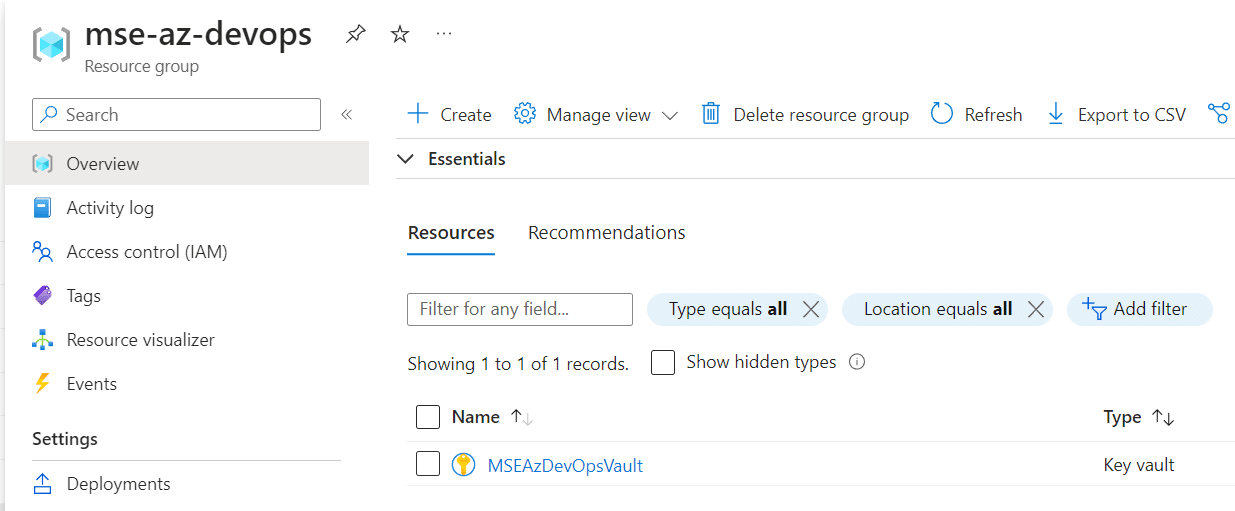
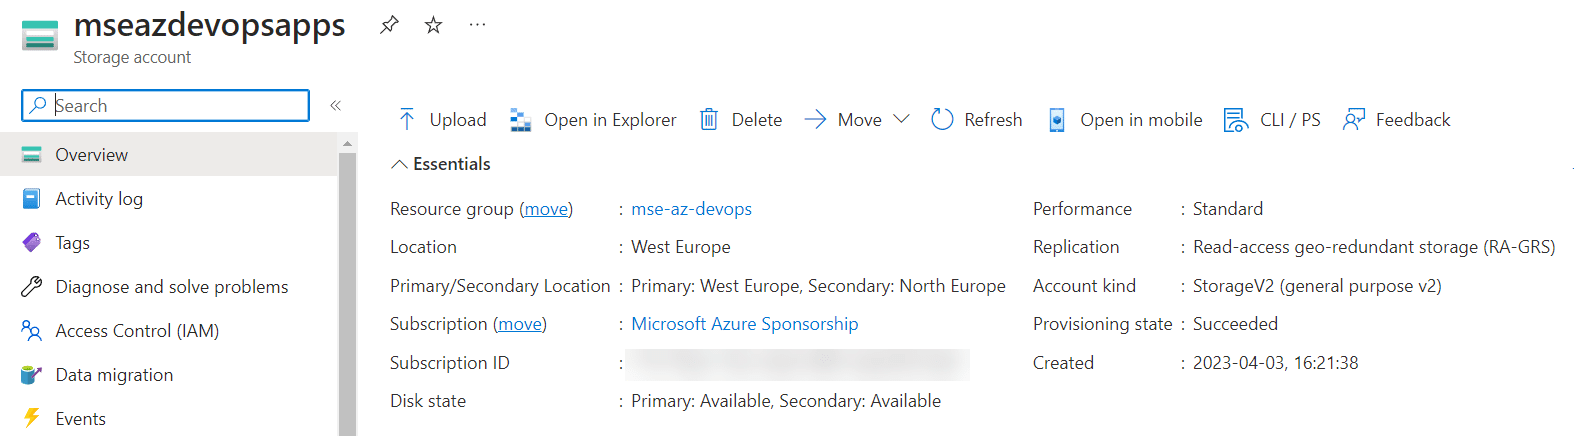
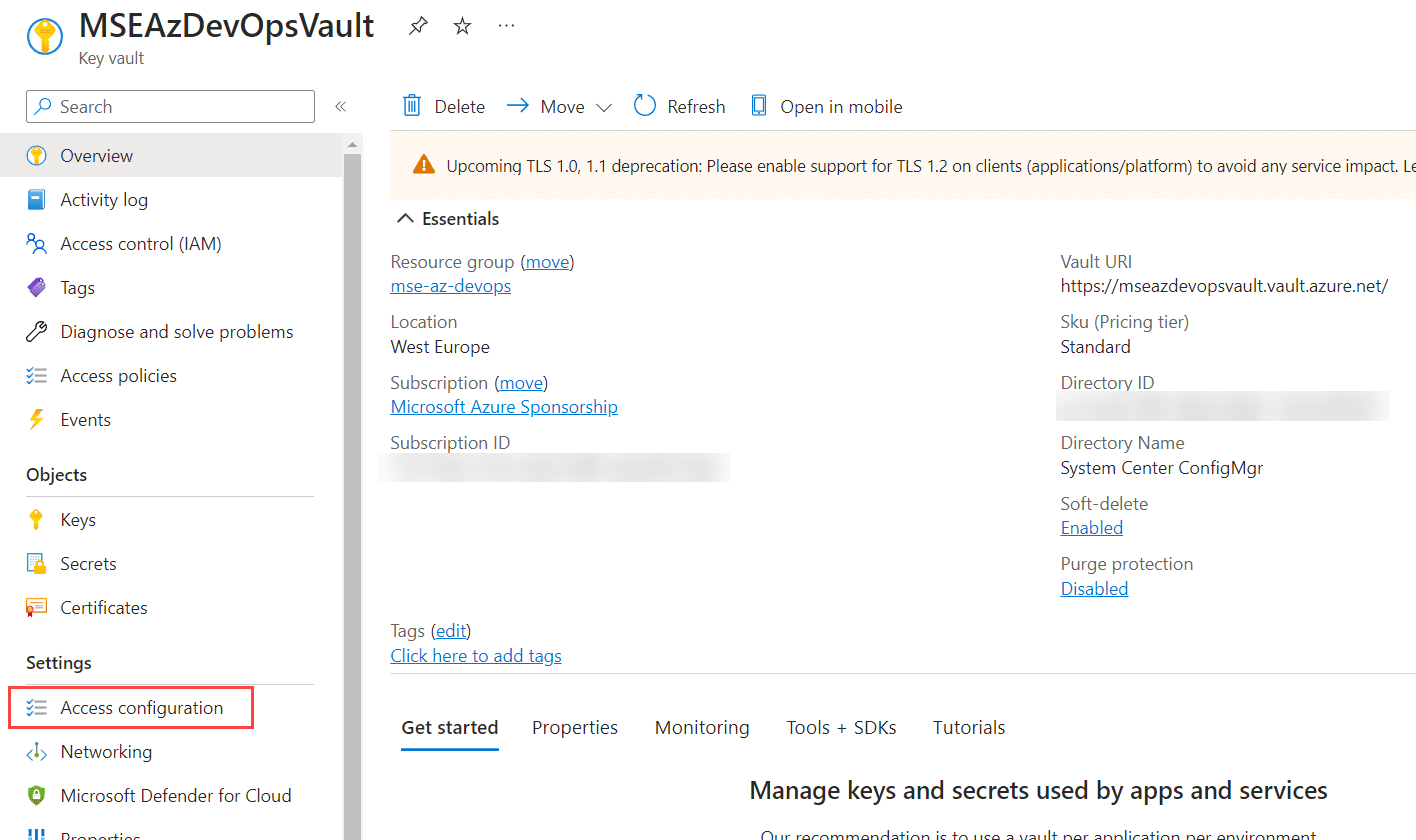
Throughout these setup instructions, the following Key Vault resource will be used, available in a resource group named ‘mse-az-devops’:
Create a Log Analytics workspace for analytics
Log Analytics workspaces are useful for sending log data for analytics purposes and more. Intune App Factory make use of a Log Analytics workspace merely to send a log event of a newly published application it has created in Intune.
Follow the instructions below from Microsoft on how to create a Log Analytics workspace resource:
Create Log Analytics workspaces – Azure Monitor | Microsoft Learn
Add Log Analytics workspace Primary Key to Key Vault
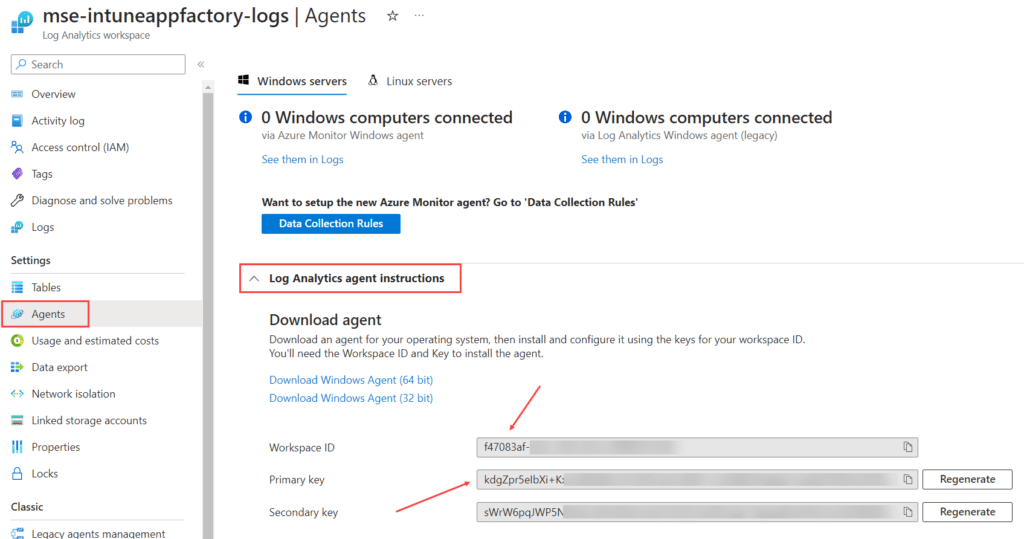
Once the workspace has been created, browse to the resource and click on Agents under Settings. Expand Log Analytics agent instructions under Windows servers. Make a note of the Workspace ID, as it will be used later when configuring the Azure DevOps Pipeline variable groups. Copy the Primary Key value.
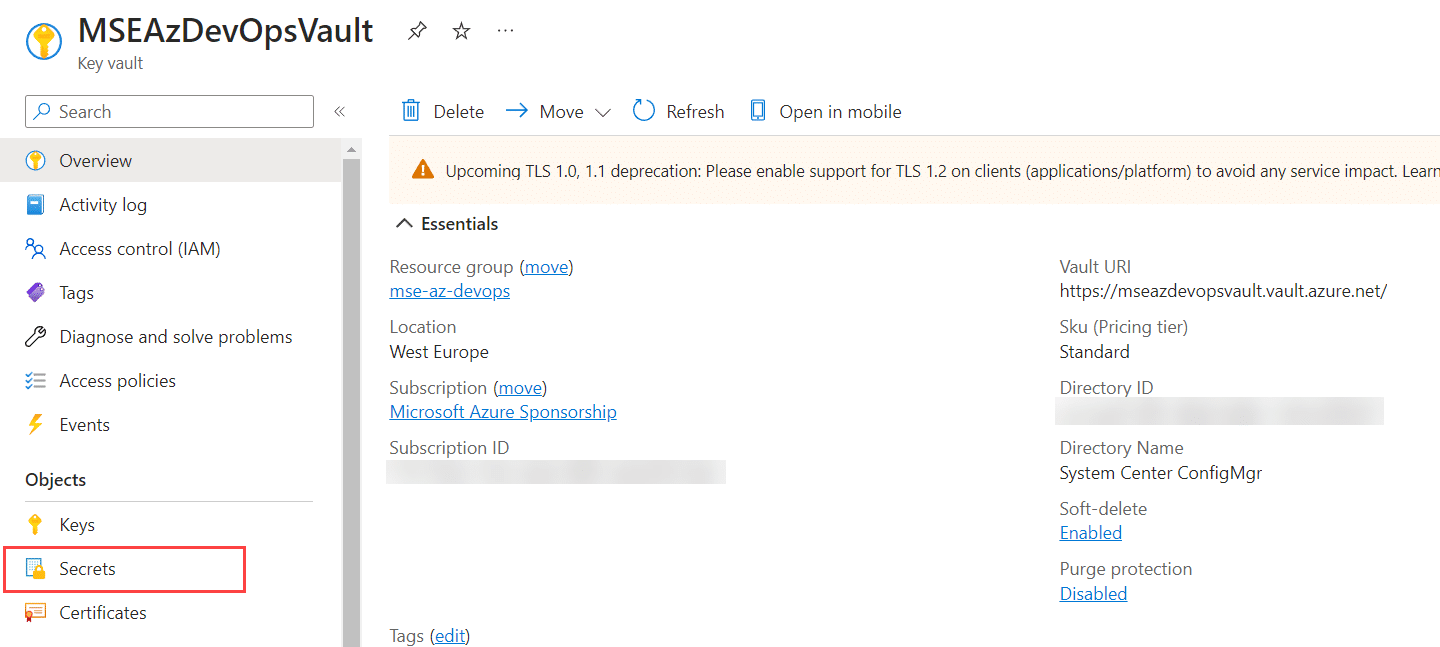
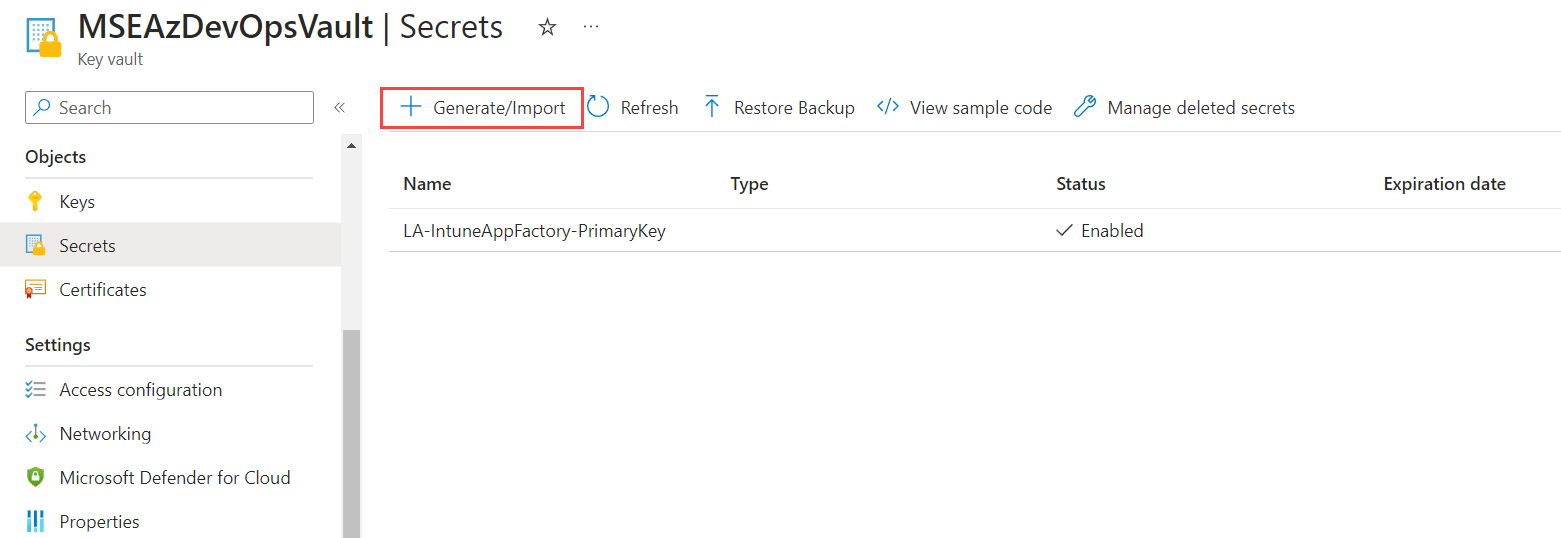
Browse to your Key Vault and click on Secrets under the Objects section. Click on Secrets.
Click on Generate / Import.
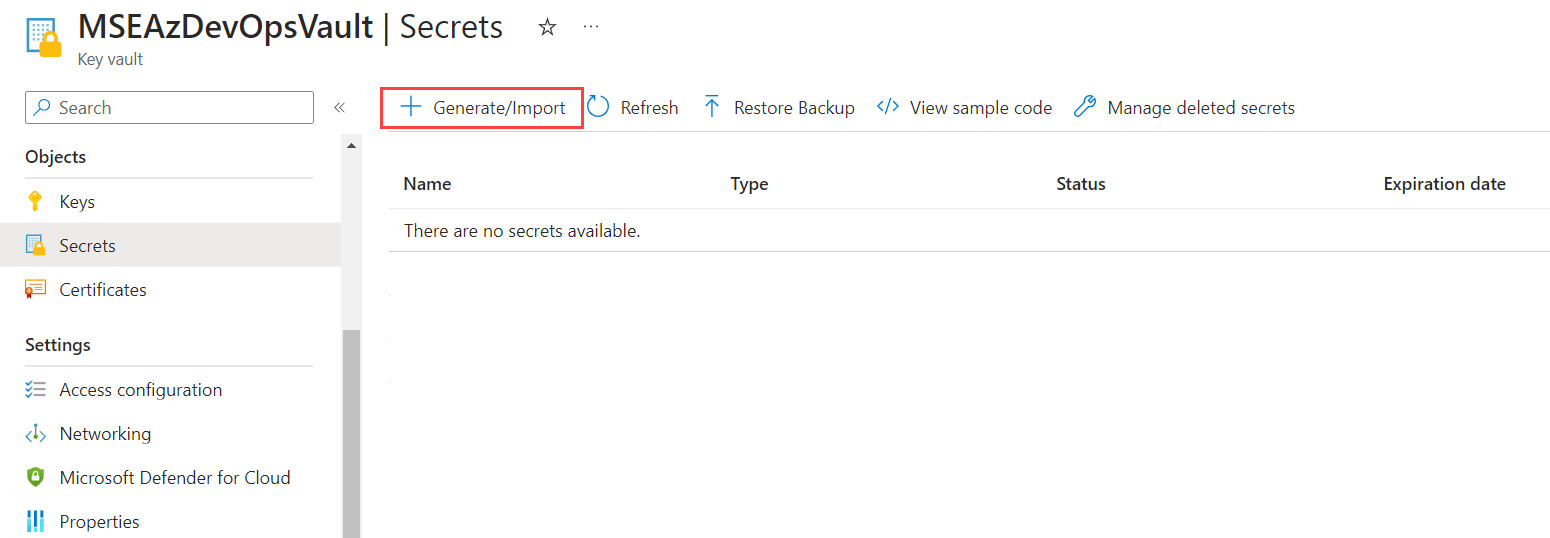
Provide a name for the new secret, e.g. LA-IntuneAppFactory-PrimaryKey. Enter the previously copied Primary Key value from the Log Analytics workspace in the Secret value field. Depending on your internal processes, configure the additional fields as required. Click Create.

You should now see the new secret object created.
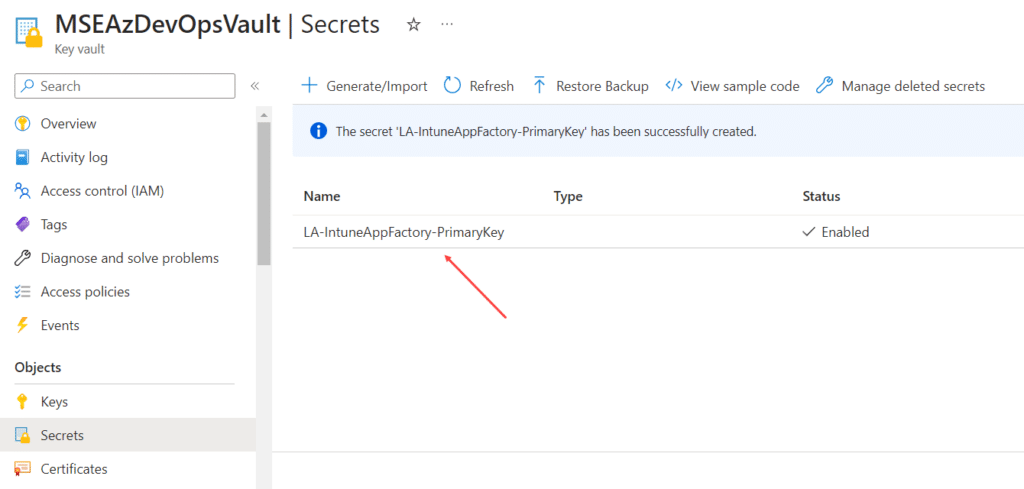
Make a note of the name for this Secret object, as it will be used later when configuring the Intune App Factory pipeline. This object is later referred to as the following in the pipeline configuration:
- LA-IntuneAppFactory-PrimaryKey
Create Storage Account
Intune App Factory have the capabilities to archive all the packaged applications it publishes to Intune, but also use a Storage Account as an alternative source for applications to be onboarded into the solution, when they’re not available in any of the supported repositories (Winget and Evergreen).
This section is required to be configure, but the Intune App Factory does not by default archive the application packages it publishes, but it can be set to do so in the pipeline configuration. It will by default require the Storage Account to be setup and the access key added to the Key Vault, to be able to at least support the Storage Account as an alternative source for onboarded applications that does not leverage the Winget or Evergreen source repositories.
Browse the Azure portal for Storage accounts and click Create.

Storage Accounts have many configuration options, hence these setup instructions can’t cover all aspects of them, but will provide the required configuration for it to function with Intune App Factory.
Select or create a new Resource group, provide a name for the Storage Account, select a region and select GRS for redundancy (LRS is also an option).

Uncheck Allow enabling public access on containers, as it’s not required and access to the Storage Account will be accessed using an access key.
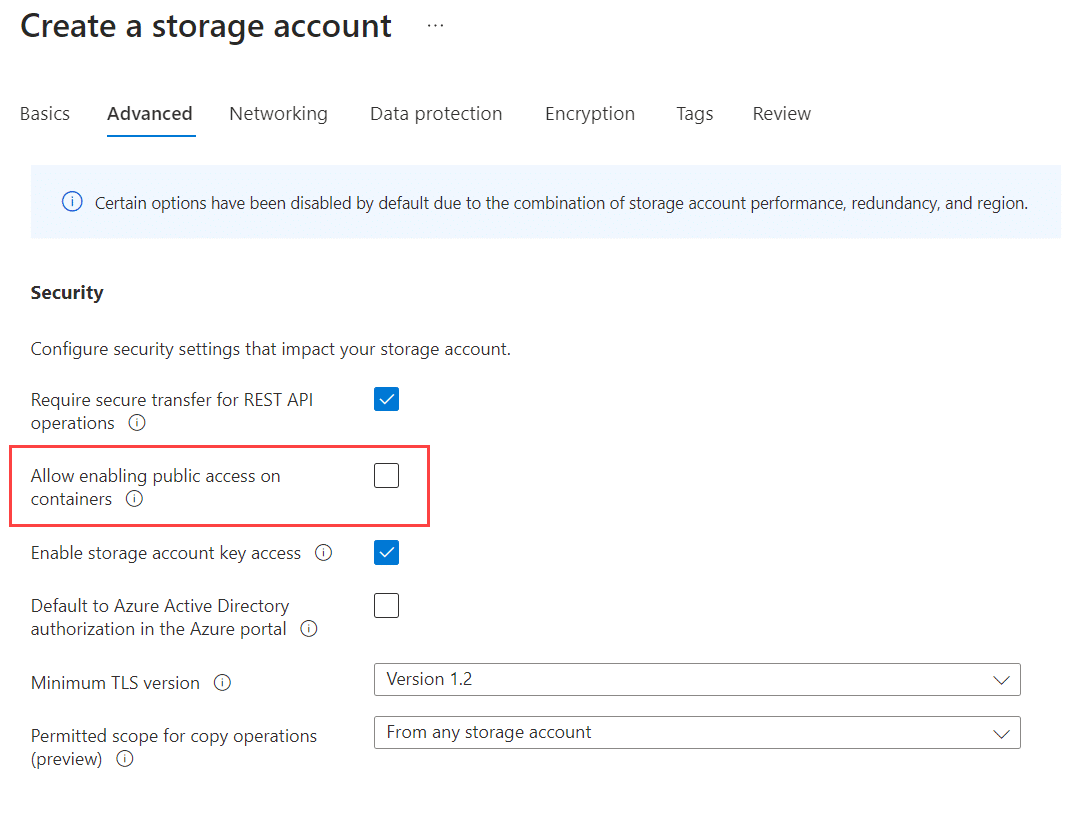
Ensure public access from all networks is selected.

When configured with the above mentioned minimum requirements, select to create the Storage Account.
Create archiving Storage Account container
This section apart from the previous Storage Account creation section, is optional. For the archiving functionality built-in to Intune App Factory to work properly, a container must be created within the Storage Account.
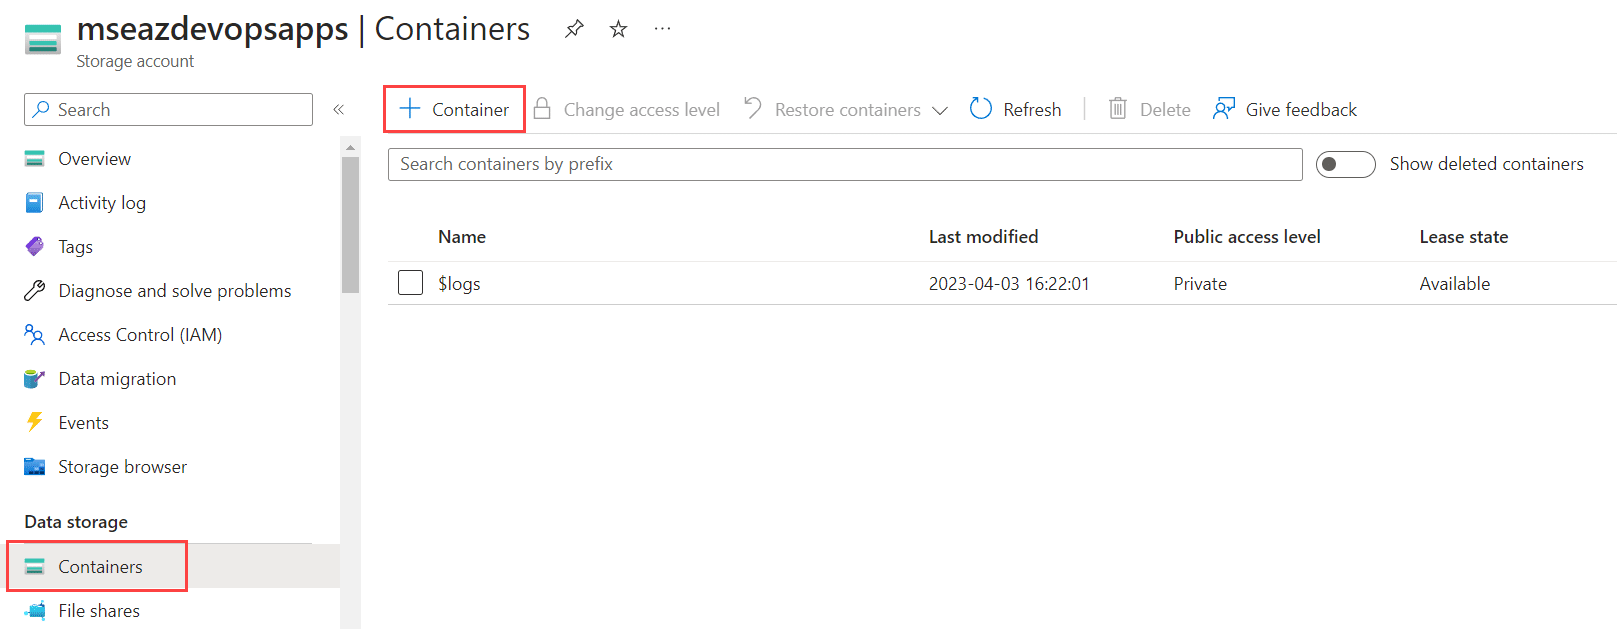
In the Azure portal, browser to the Storage Account resource recently created, click Containers and then the + Container button.
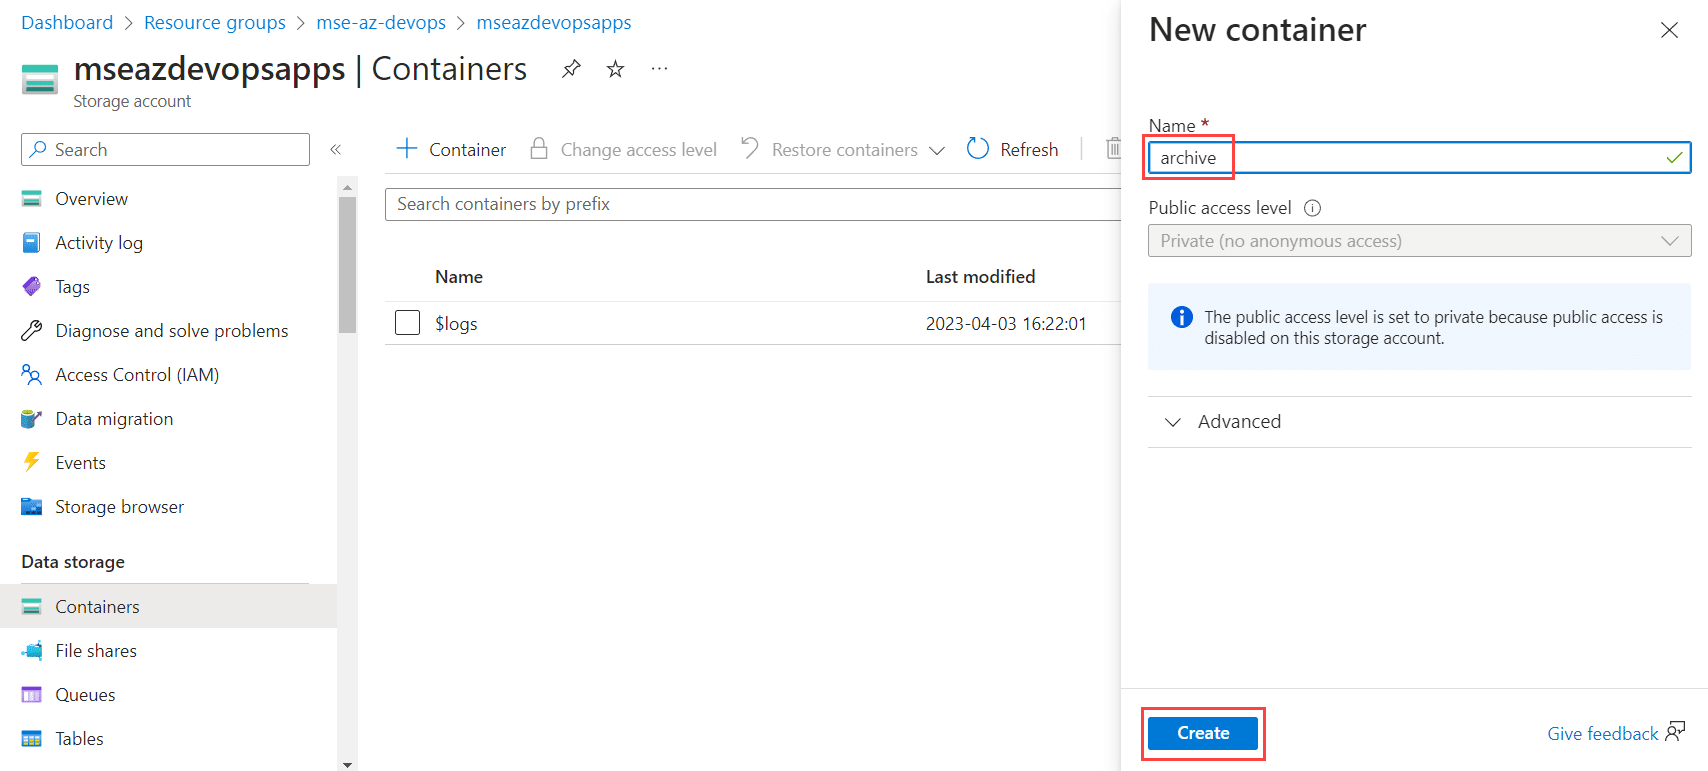
Provide a name, such as archive and click Create.
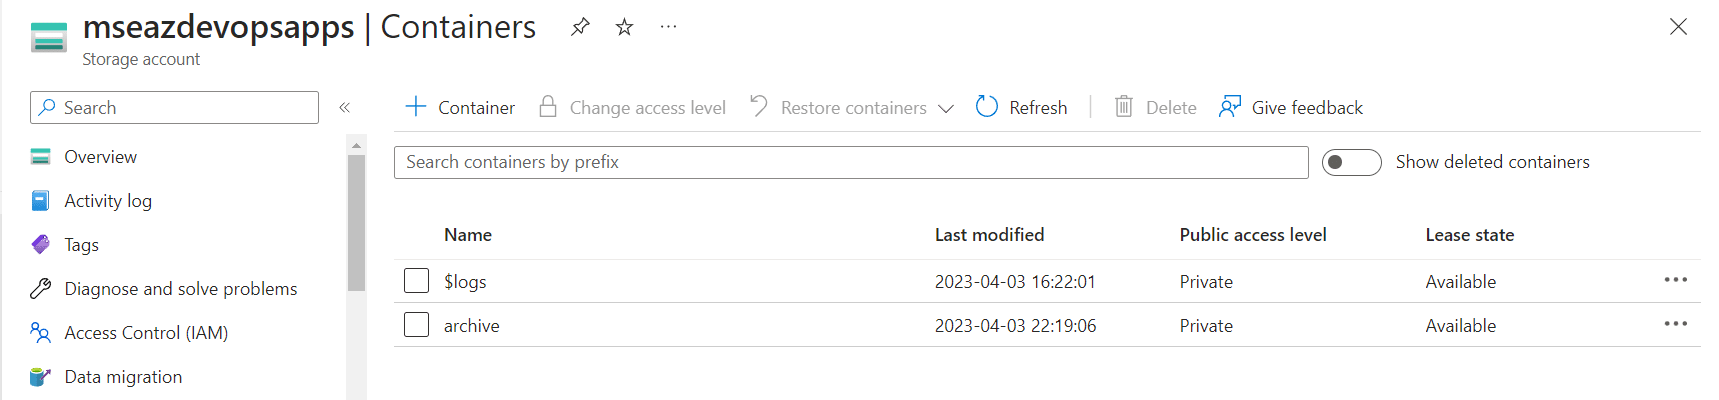
The container has now been created. The name of the container will later be added as a variable value when setting up the variable groups for the pipeline configuration.
Add Storage Account Access Key to Key Vault
Under the Security + networking section of the Storage Account, click on Access key and copy the value of the key1.

In the Key Vault, under the Object section, click on Secrets and then Generate/Import.
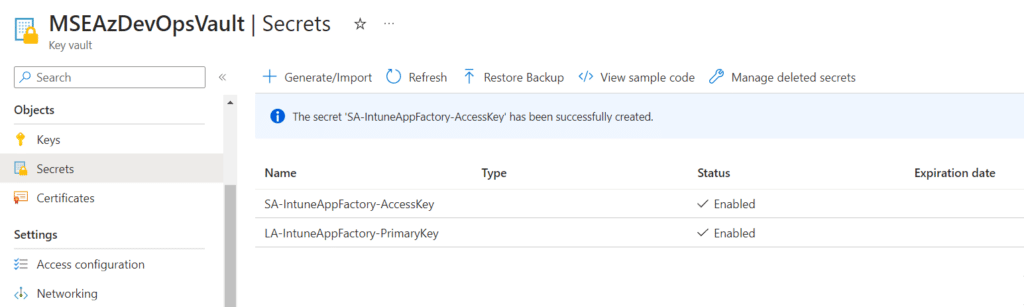
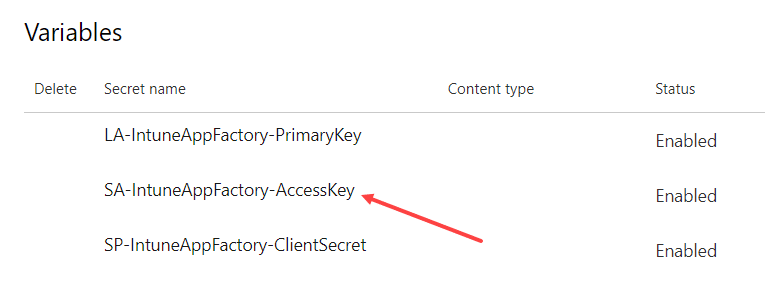
Provide a name for the secret, e.g. SA-IntuneAppFactory-AccessKey, paste in the access key from the Storage Account and click Create.
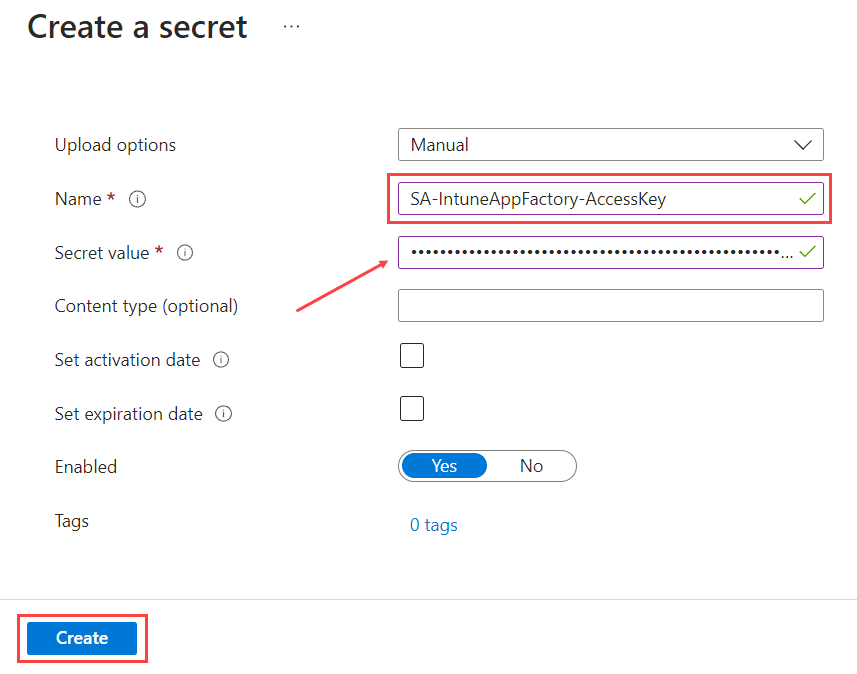
You should now see the new secret object created.
Make a note of the name for this Secret object, as it will be used later when configuring the Intune App Factory pipeline. This object is later referred to as the following in the pipeline configuration:
- SA-IntuneAppFactory-AccessKey
Create Entra ID service principals
Intune App Factory makes use of two different service principals that must be created in Azure AD.
- Service Connection service principal
- Used to authenticate against the Azure subscription and Key Vault
- Intune service principal
- Used to authenticate against Graph API and Intune
Service Connection service principal
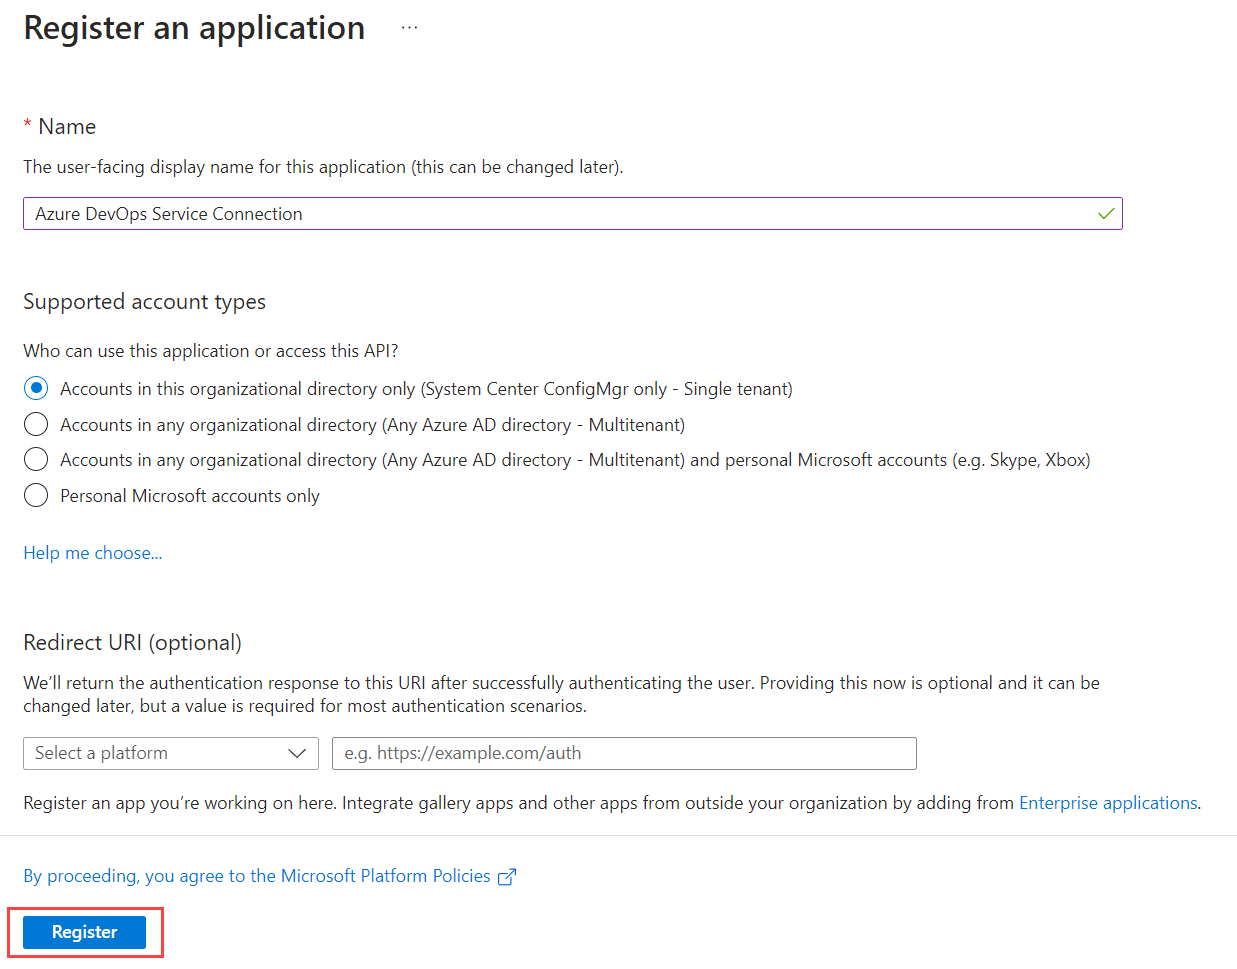
In the Azure portal, browse to Microsoft Entra ID and App registrations. Click on New registration.

Provide a name for the app registration, e.g. Azure DevOps Service Connection. Ensure that Account in this organizational directory only is selected. Do not configure anything for Redirect URI. Click Register.
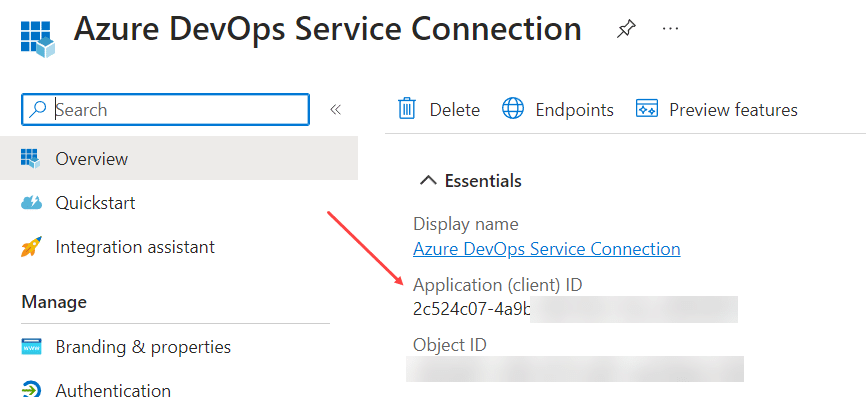
The new service principal have now been registered. Make a note of the Application (Client) ID in the Overview section, as it will be required later in the setup instructions when creating the Service Connection in Azure DevOps.
Create Service Connection service principal Client Secret
Click on Certificates & secrets and click New client secret.

Provide a name for the secret and select the expiry configuration in accordance with your organizational policies. Click Add.

The new client secret has been added and the value is shown in the portal. Make sure that you temporarily copy the value as it will be used later when setting up the Service Connection in Azure DevOps. While it’s not required for Intune App Factory, you could safely store this client secret in the newly created Key Vault, which would be recommended, if you did not have a Key Vault prior to following these setup instructions.
Assign Key Vault Secrets User role to Service Connection service principal
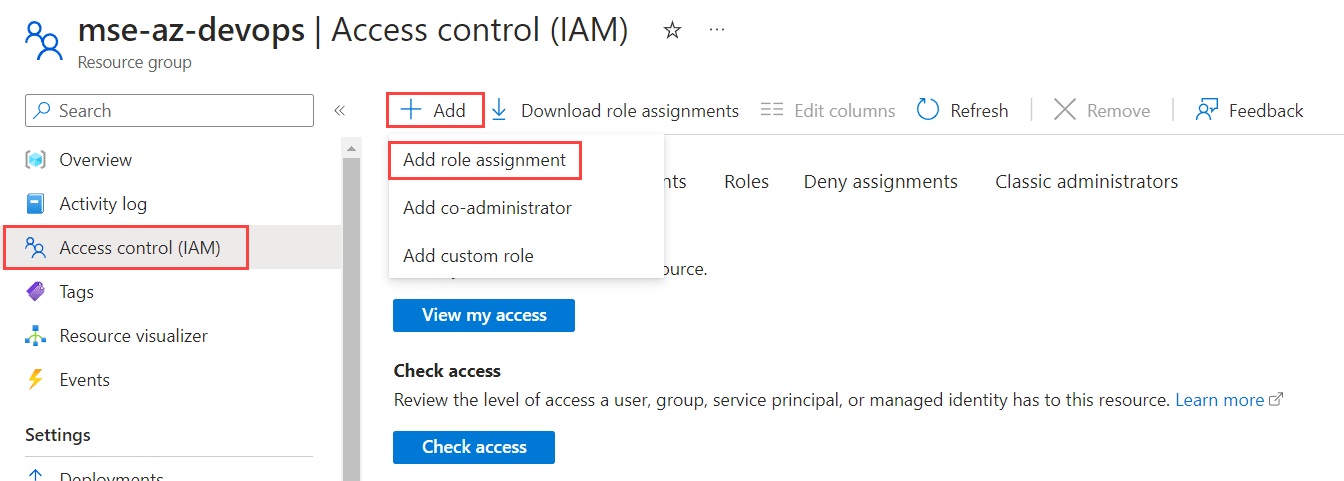
In the Azure portal, browser to the resource group where the Key Vault is located.
Click Access control (IAM), click Add and select Add role assignment.
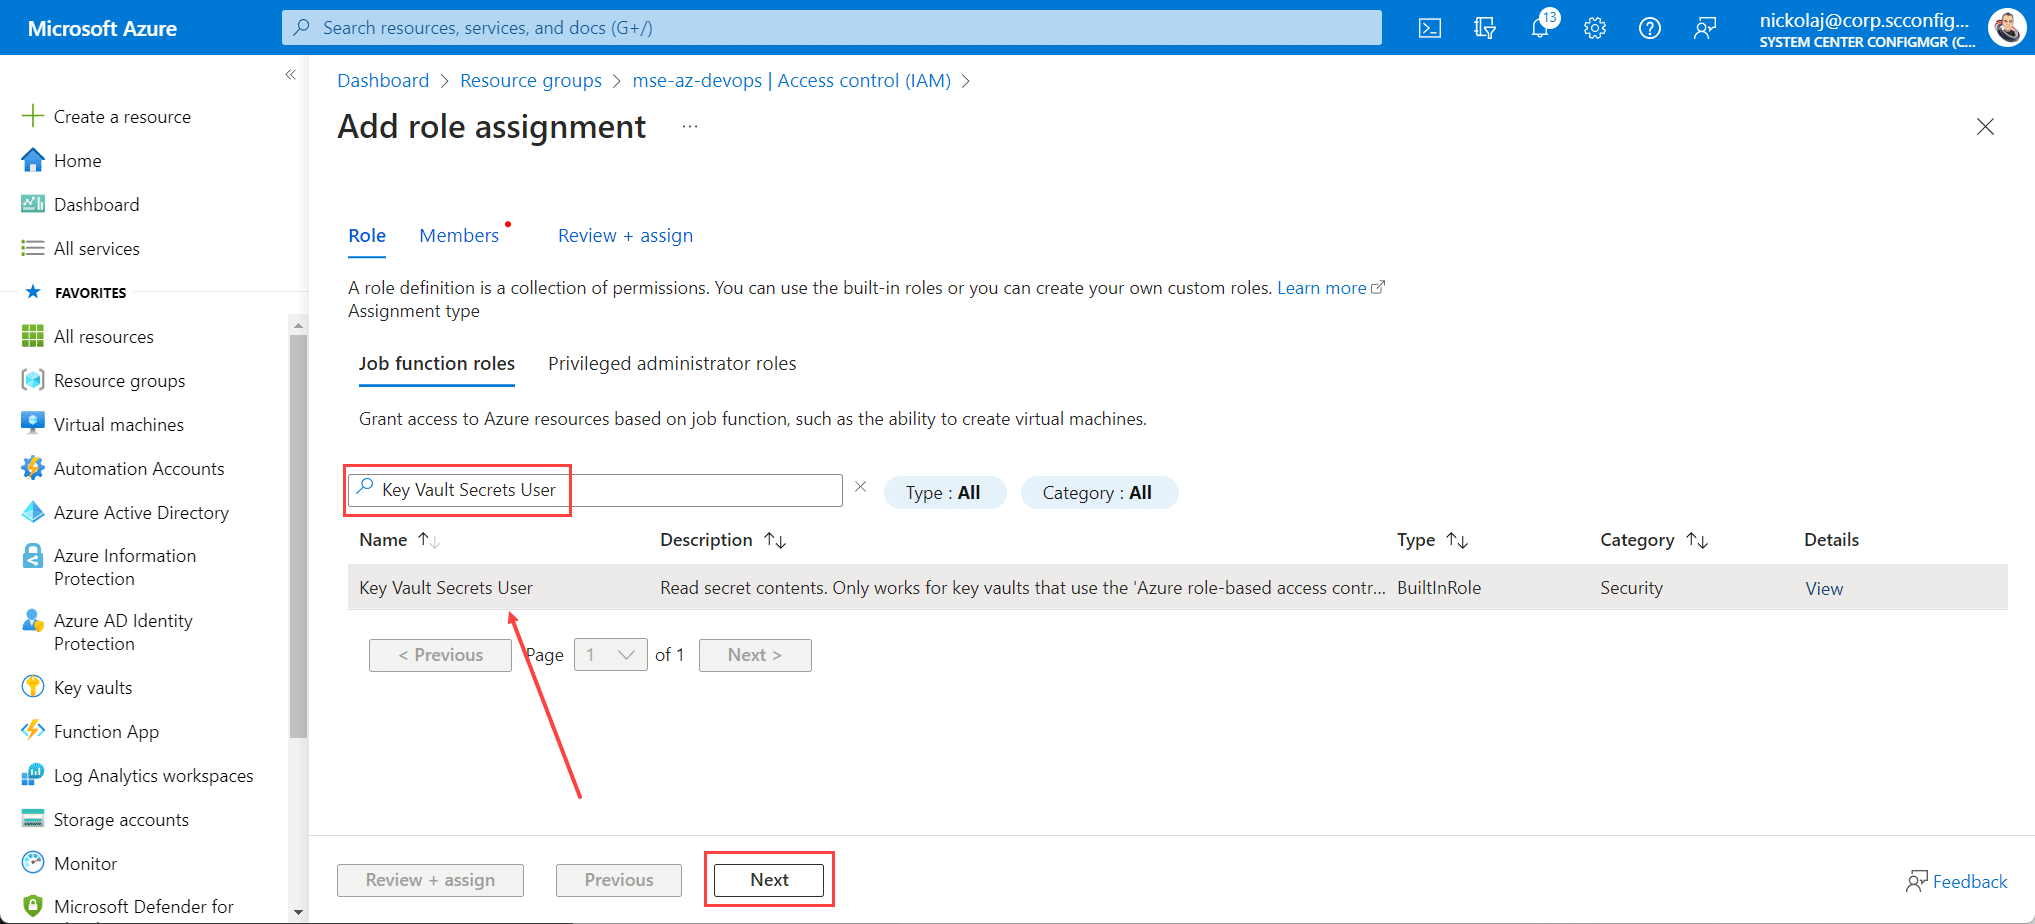
Search for Key Vault Secrets User role in the text field, select the role in the role result list and click Next.
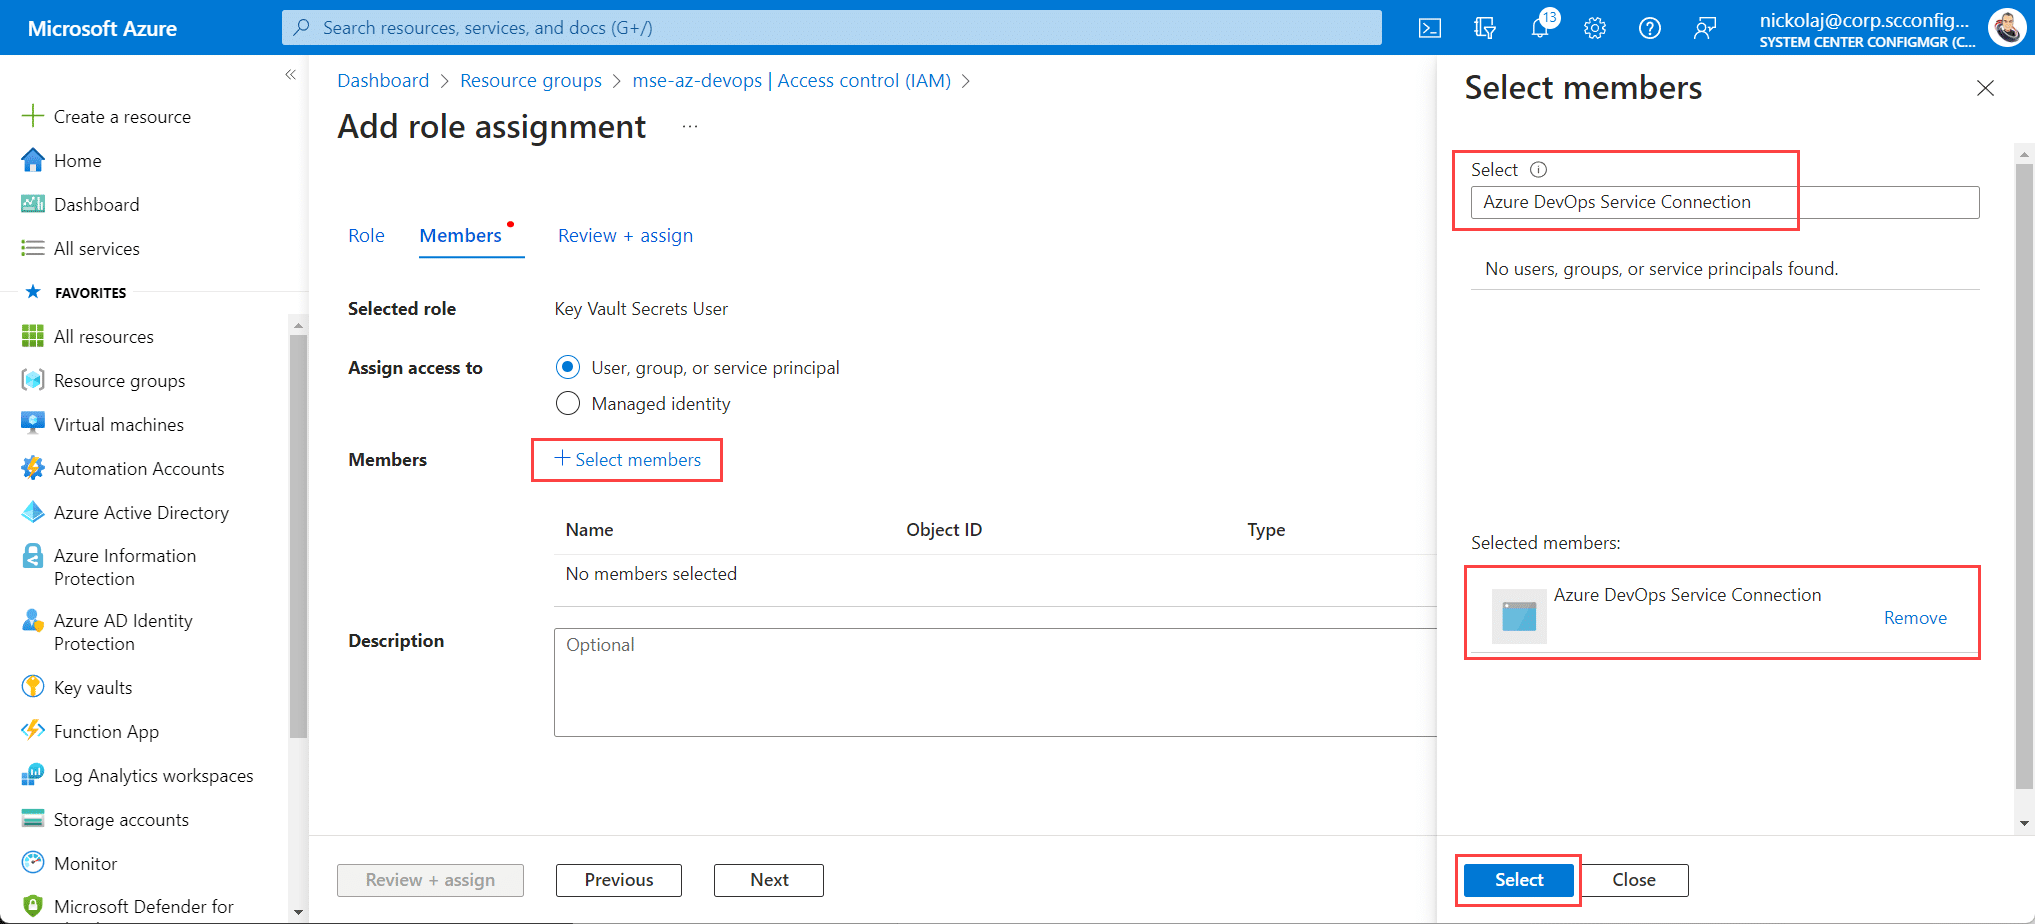
Click Select members, in the Select field search for the name of the Service Connection service principal, select it from the search results and click Select.
Click Review + assign two times.
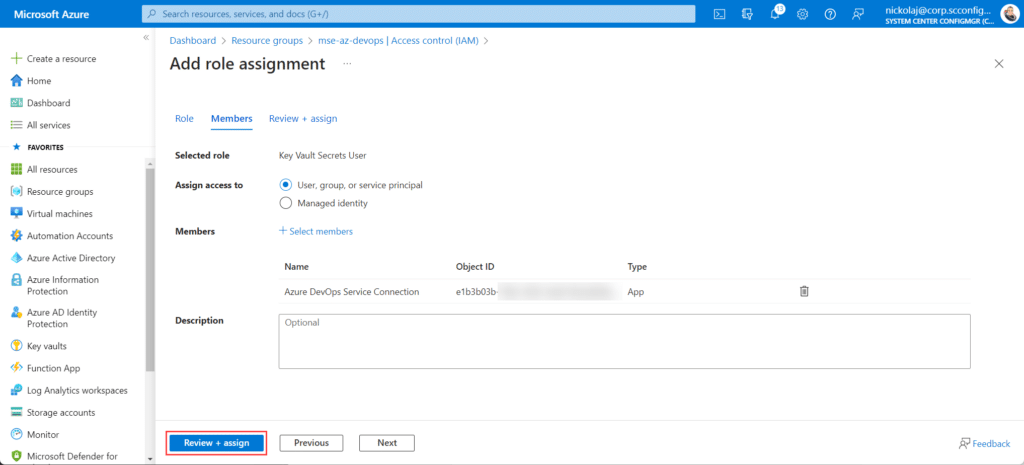
Required permissions for the Service Connection principal is now configured for it to have at minimum read access to secrets within the Key Vault.
Add access for Service Connection service principal to Key Vault
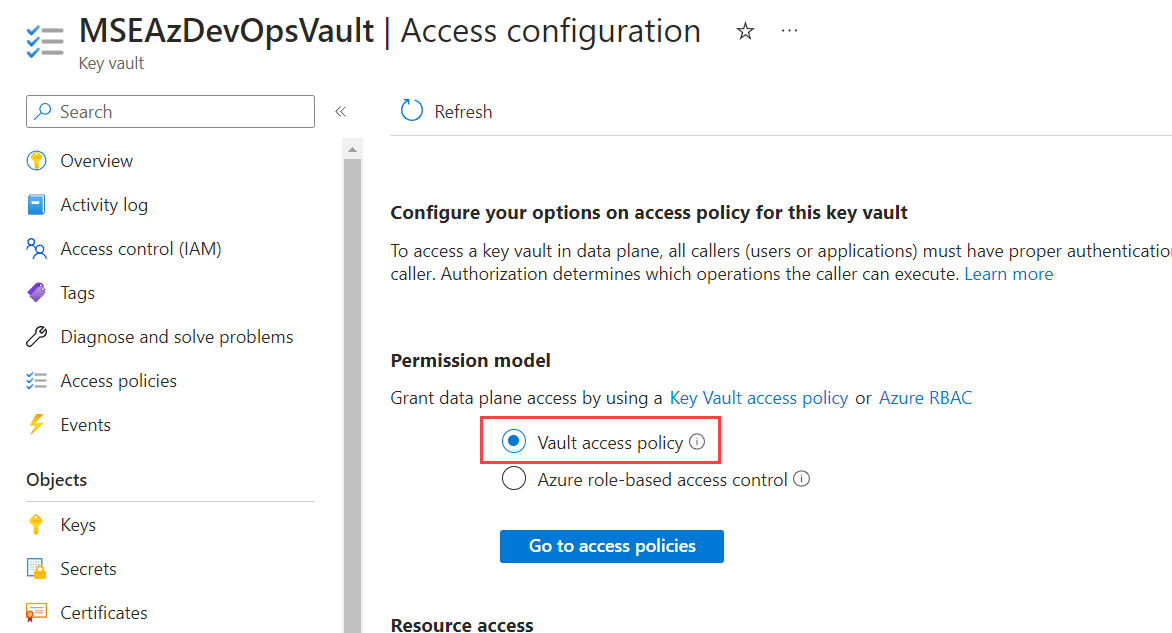
Browse to your Key Vault and click on Access configuration.
Ensure the permission model is set to Vault access policy.
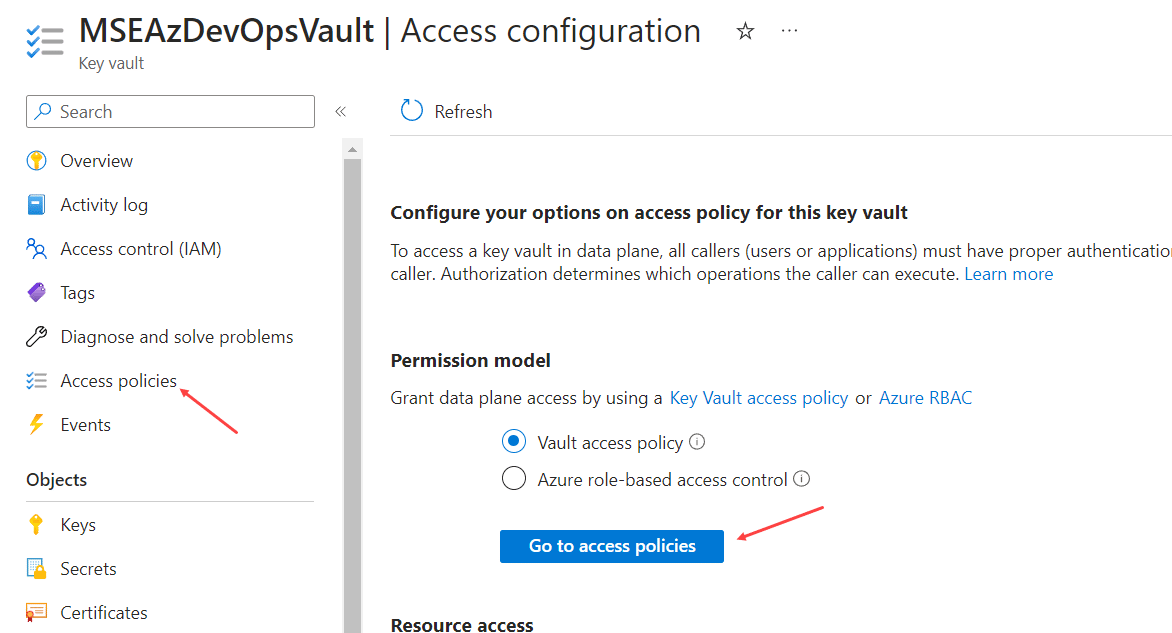
Click on Access policies to the left or click on the button Go to access policies.
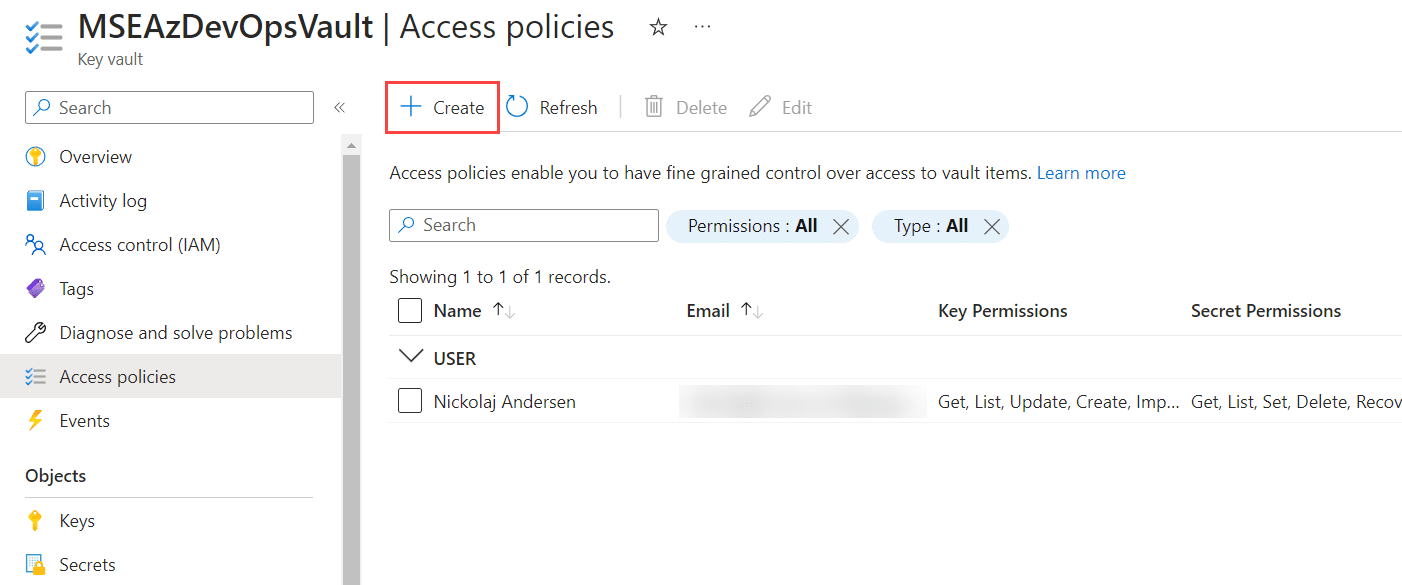
Click Create.
Under Secret permissions, check both Get and List permissions and click Next.
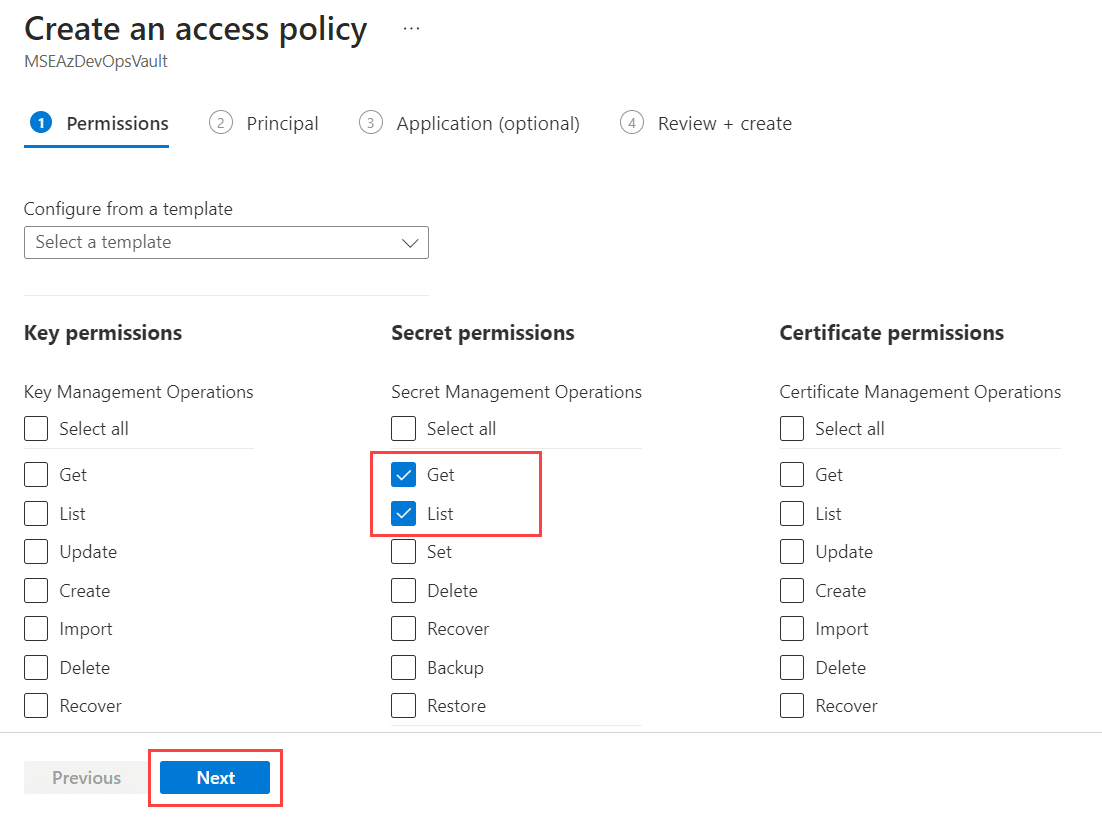
Search for the name of the Service Connection service principal (named Azure DevOps Service Connection in these instructions), ensure it’s the selected item and click Next.

Click Next in the Application (optional) section.
Click Create in the final Review + create section.
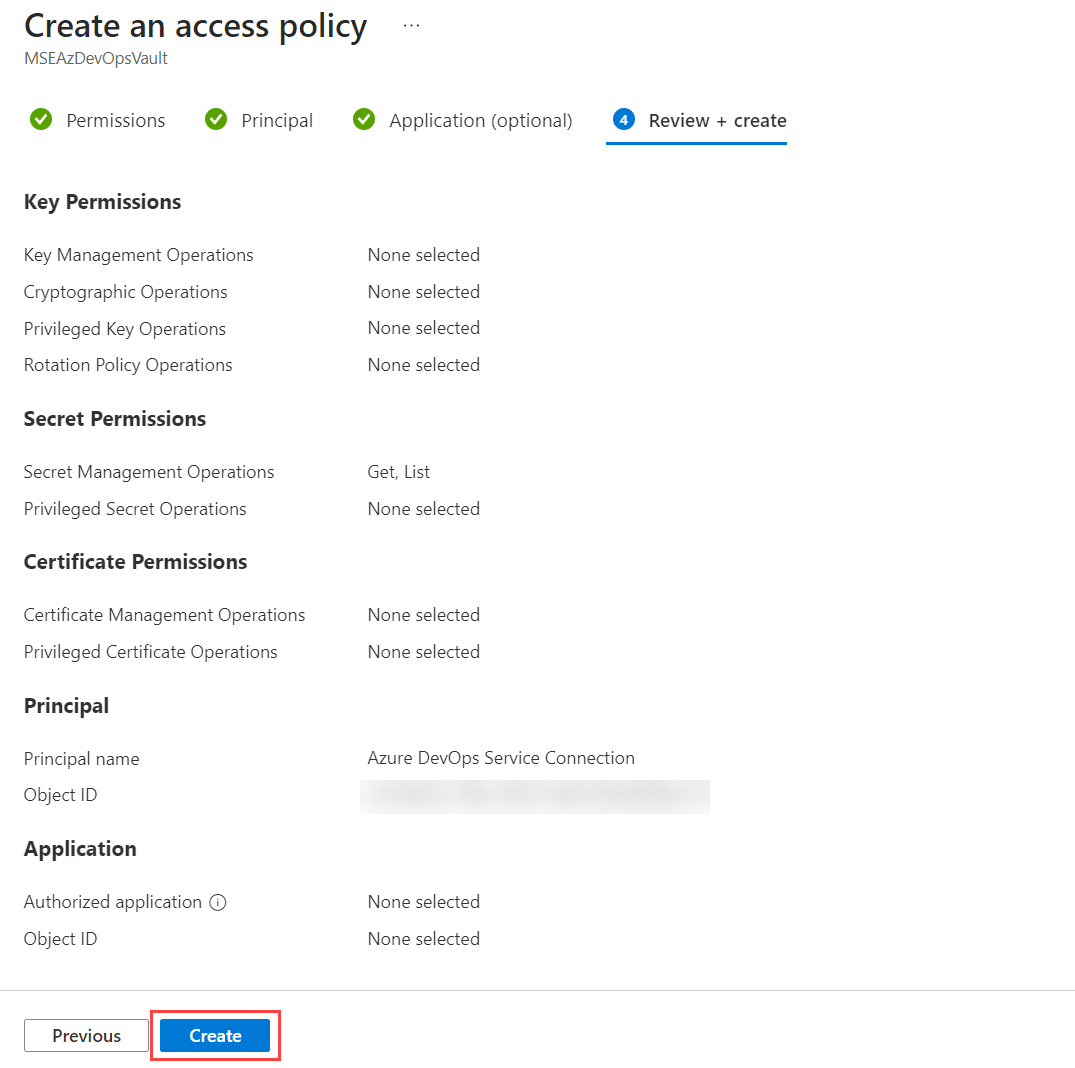
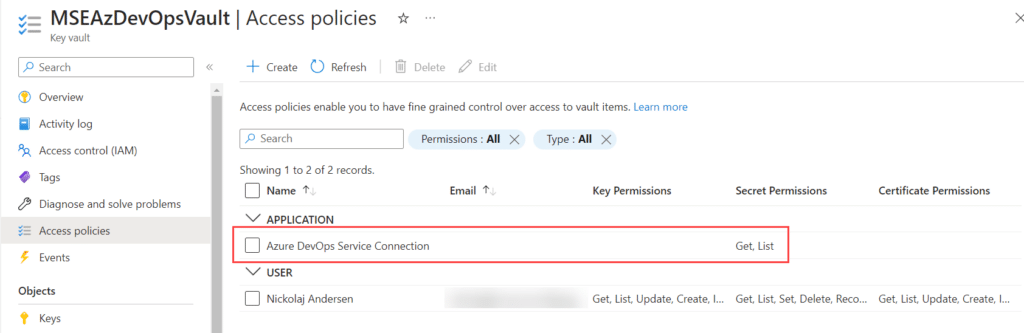
Access to the Key Vault has now been granted for the Service Connection service principal.
Intune App Factory service principal
In the Azure portal, browse to Microsoft Entra ID and App registrations. Click on New registration.
Provide a name for the app registration, e.g. Azure DevOps Service Connection. Ensure that Account in this organizational directory only is selected. Do not configure anything for Redirect URI. Click Register.

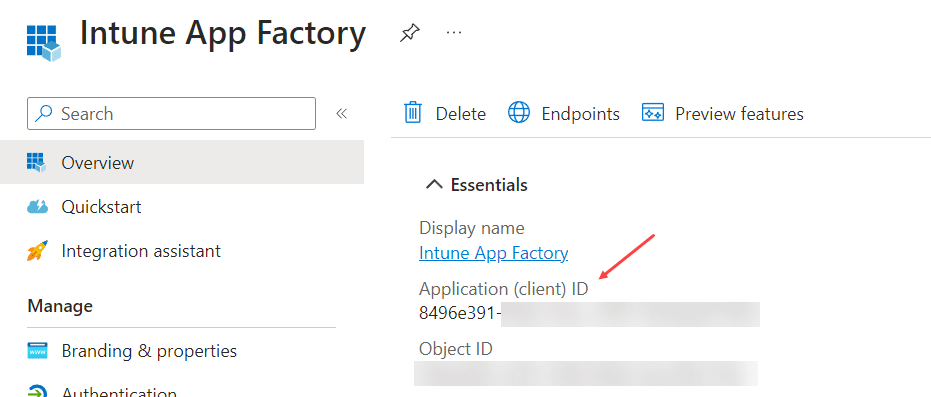
The new service principal have now been registered. Make a note of the Application (Client) ID in the Overview section, as it will be required later in the setup instructions when creating a variable group in the Pipeline Library in Azure DevOps.
Add Graph API permissions for the Intune App Factory service principal
Click on API Permissions under the Manage section of the Intune App Factory service principal.

Click on the ellipsis button next to the User.Read permissions and select Remove permission.

In the prompt, select Yes, remove.

Click Add a permission.

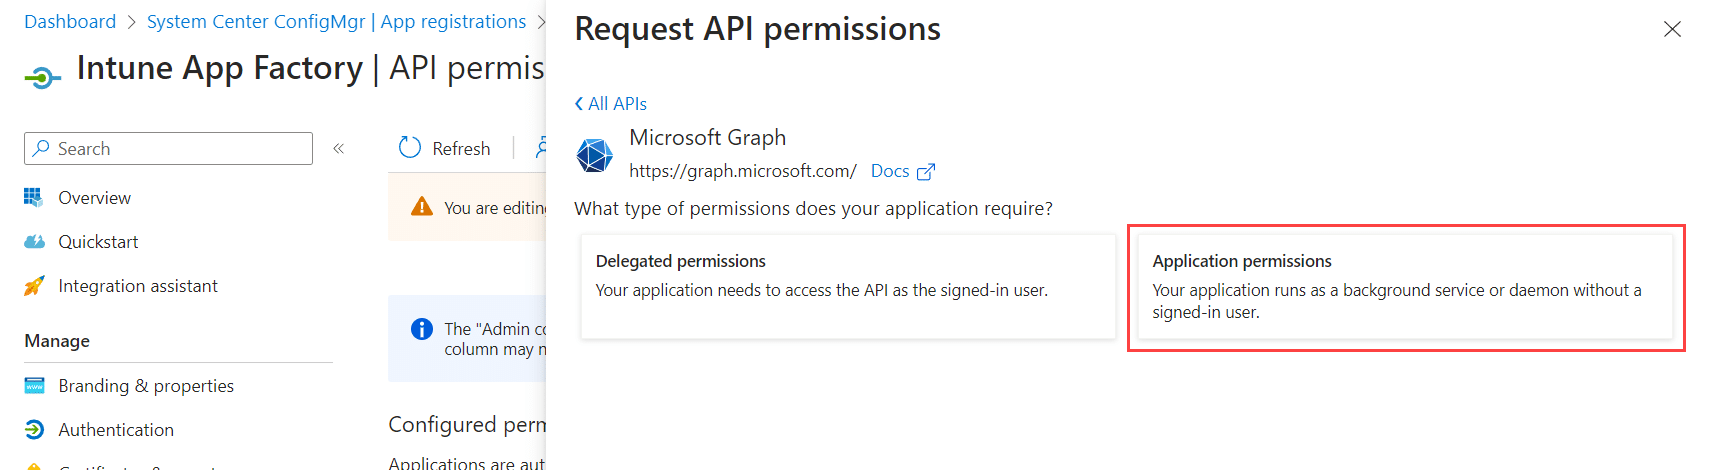
Click on Microsoft Graph.

Click on Application permissions.
Search for DeviceManagementApps.ReadWrite.All under Select permissions. Expand DeviceManagementApps and check the DeviceManagementApps.ReadWrite.All permission. Click Add permissions.
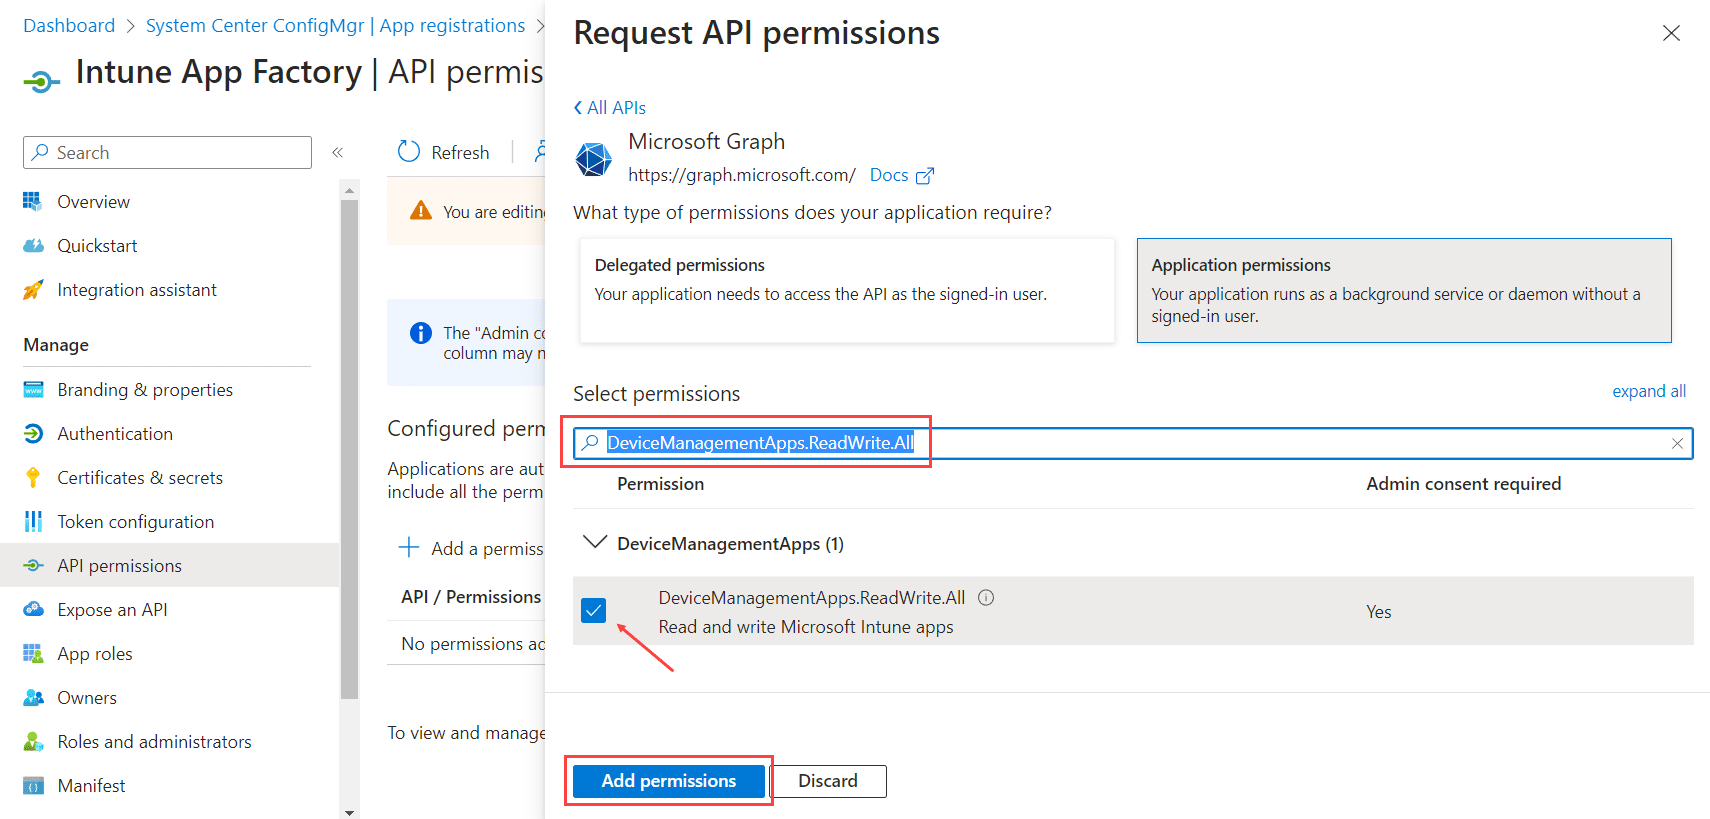
Perform the same steps above and add the following permission:
- DeviceManagementRBAC.ReadWrite.All
The required permissions have now been added, but they require a an admin consent to be granted. Click Grant admin consent for <tenant name>.

Click Yes in the prompt that appears.

Admin consent should now have been successfully granted. If your organization doesn’t allow you to consent to these permissions, contact the team or department that manages those aspects.

Create Intune App Factory service principal Client Secret
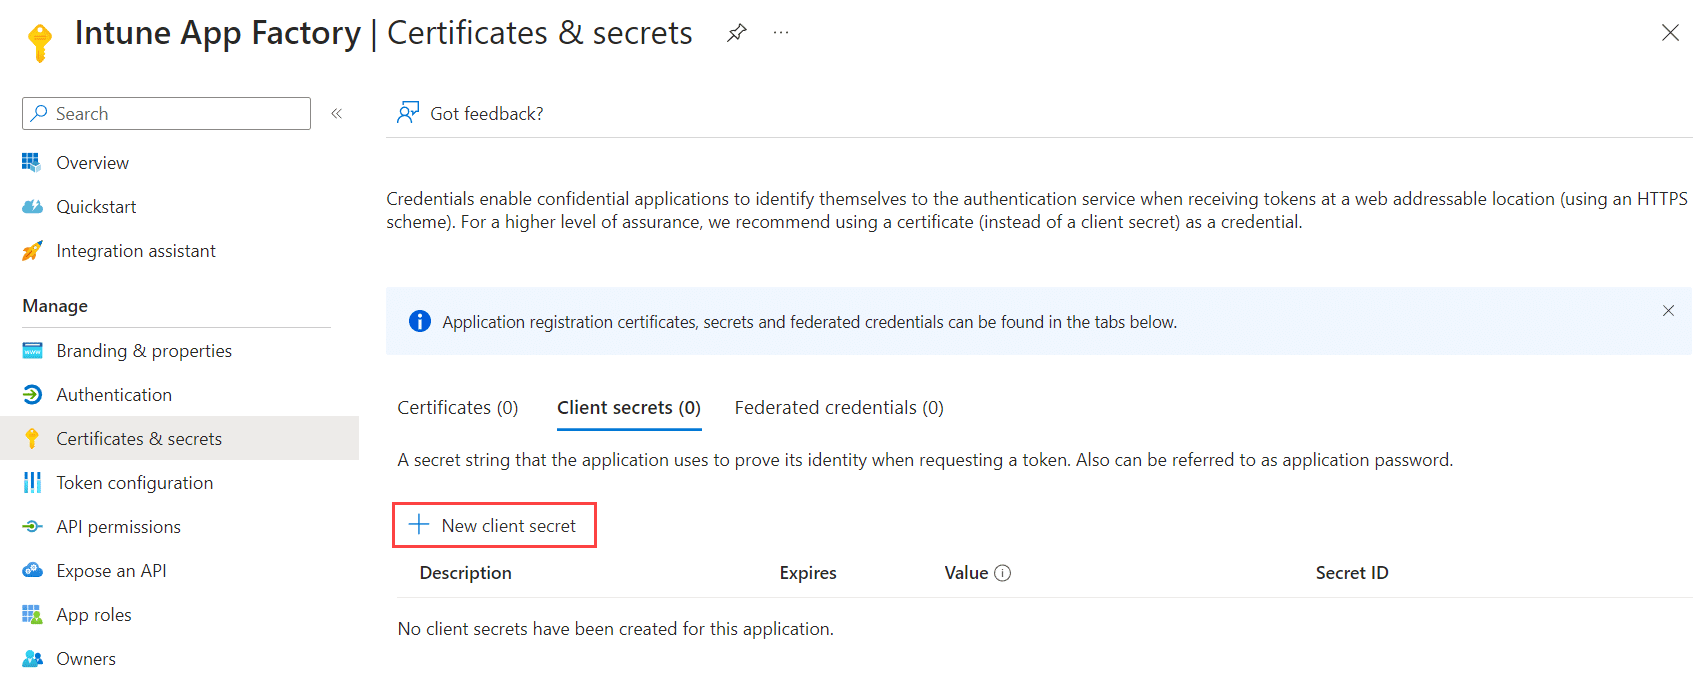
Click on Certificates & secrets and click New client secret.
Provide a name for the secret and select the expiry configuration in accordance with your organizational policies. Click Add.
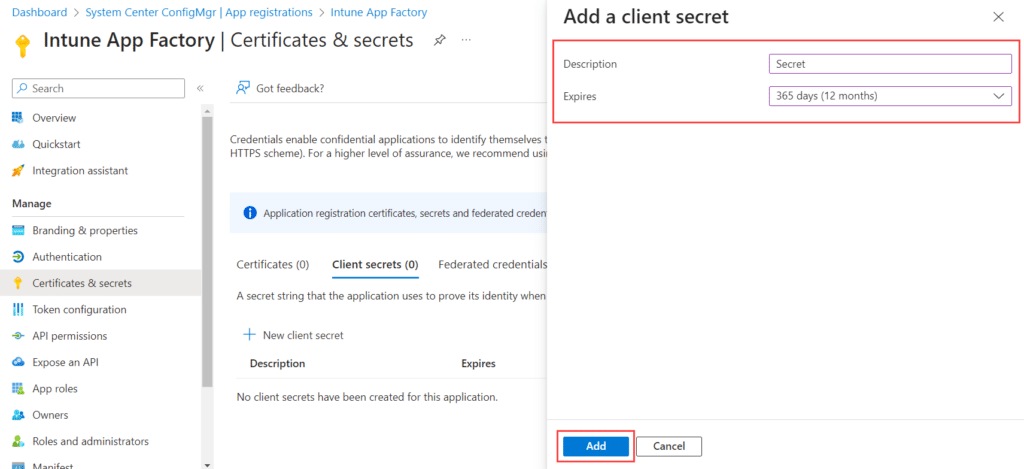
The new client secret has been added and the value is shown in the portal. Make sure that you temporarily copy the value as it will be used later when setting up
Add Intune App Factory service principal Client Secret in Key Vault
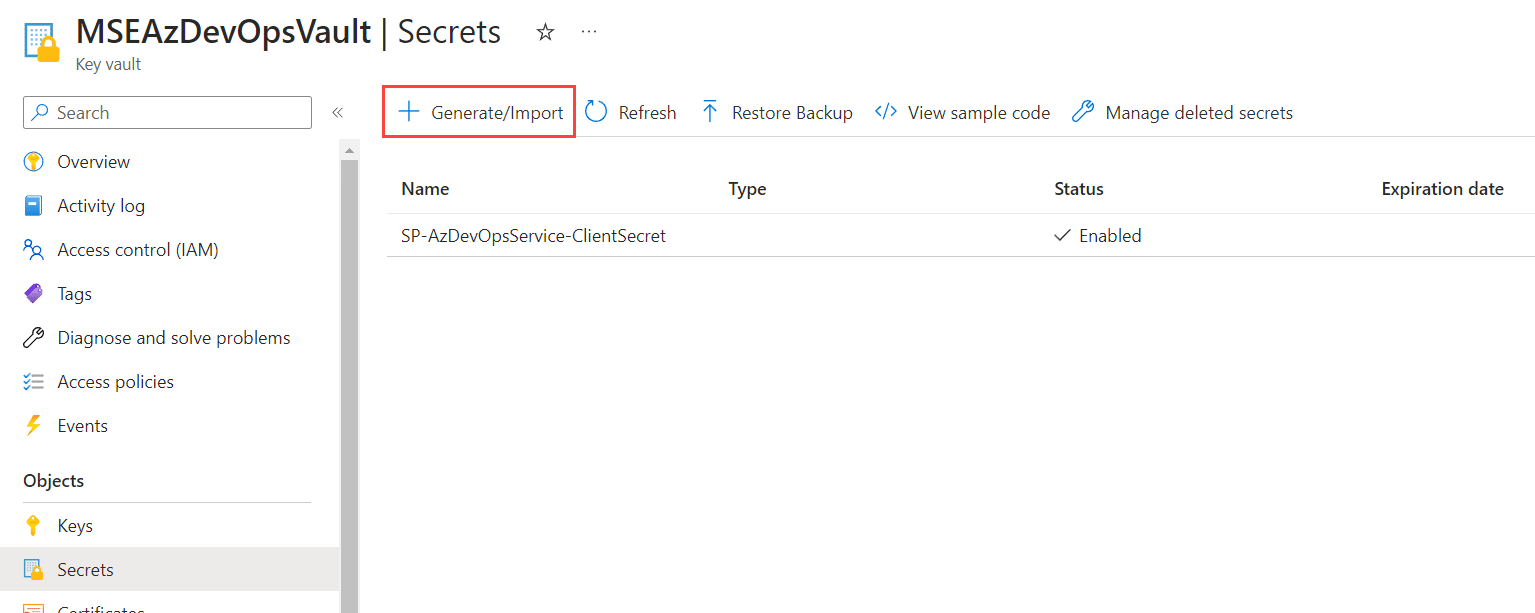
Browse to your Key Vault and click on Secrets under the Objects section. Click on Secrets.
Click on Generate / Import.
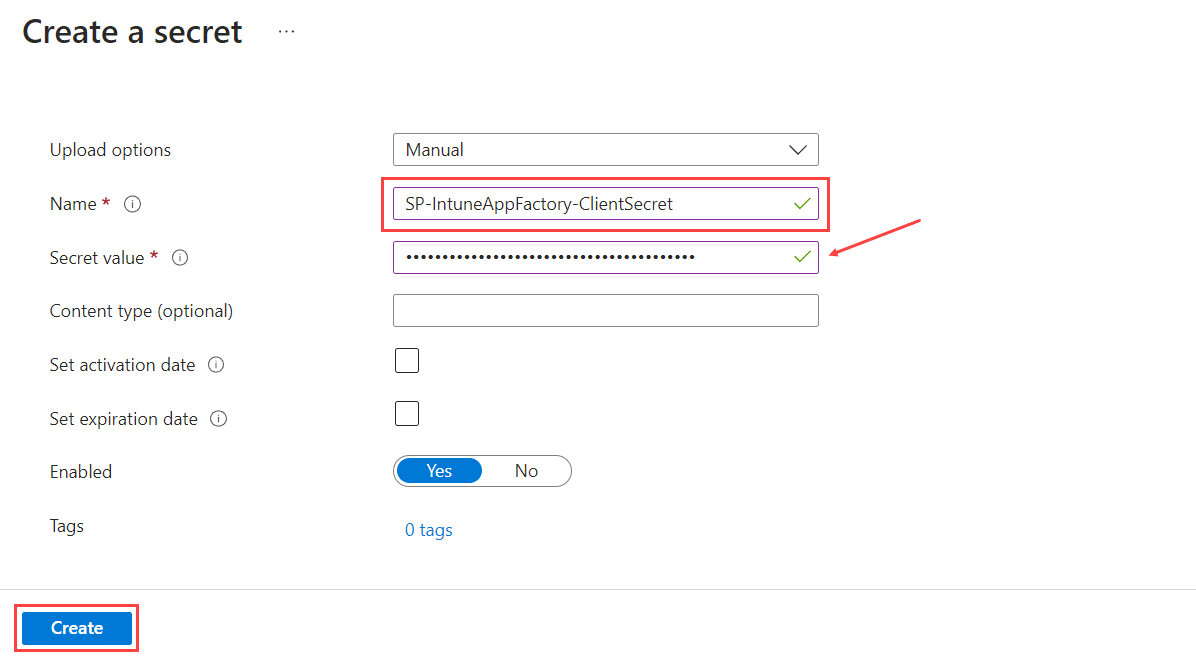
Provide a name for the new secret, e.g. SP-IntuneAppFactory-ClientSecret. Enter the previously copied client secret value from the Intune App Factory service principal in the Secret value field. Depending on your internal processes, configure the additional fields as required. Click Create.
You should now see the new secret object created.
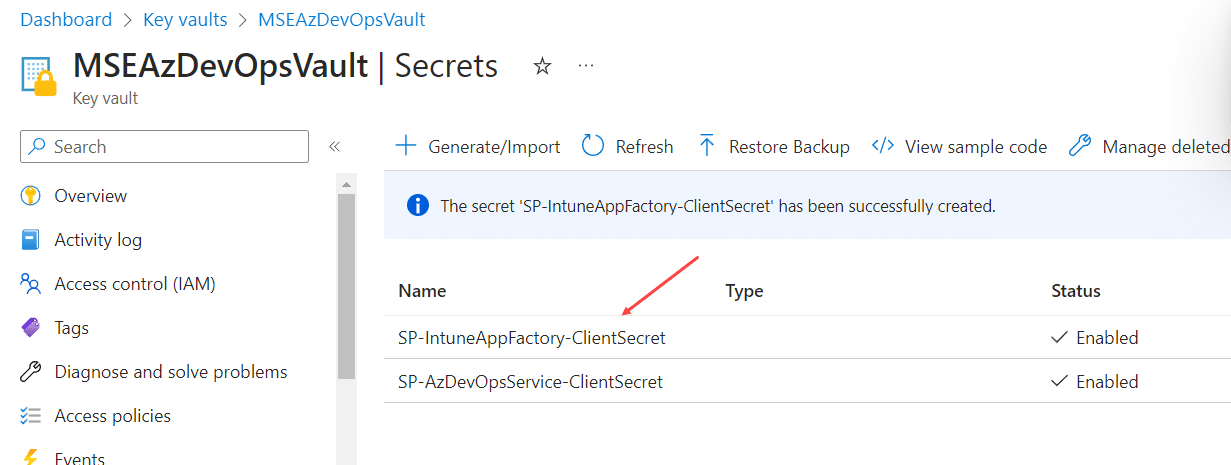
Make a note of the name for this Secret object, as it will be used later when configuring the Intune App Factory pipeline. This object is later referred to as the following in the pipeline configuration:
- SP-IntuneAppFactory-ClientSecret
Create an Azure DevOps Project
Skip this step if your company have already provided you with access to a project, that you requested prior.
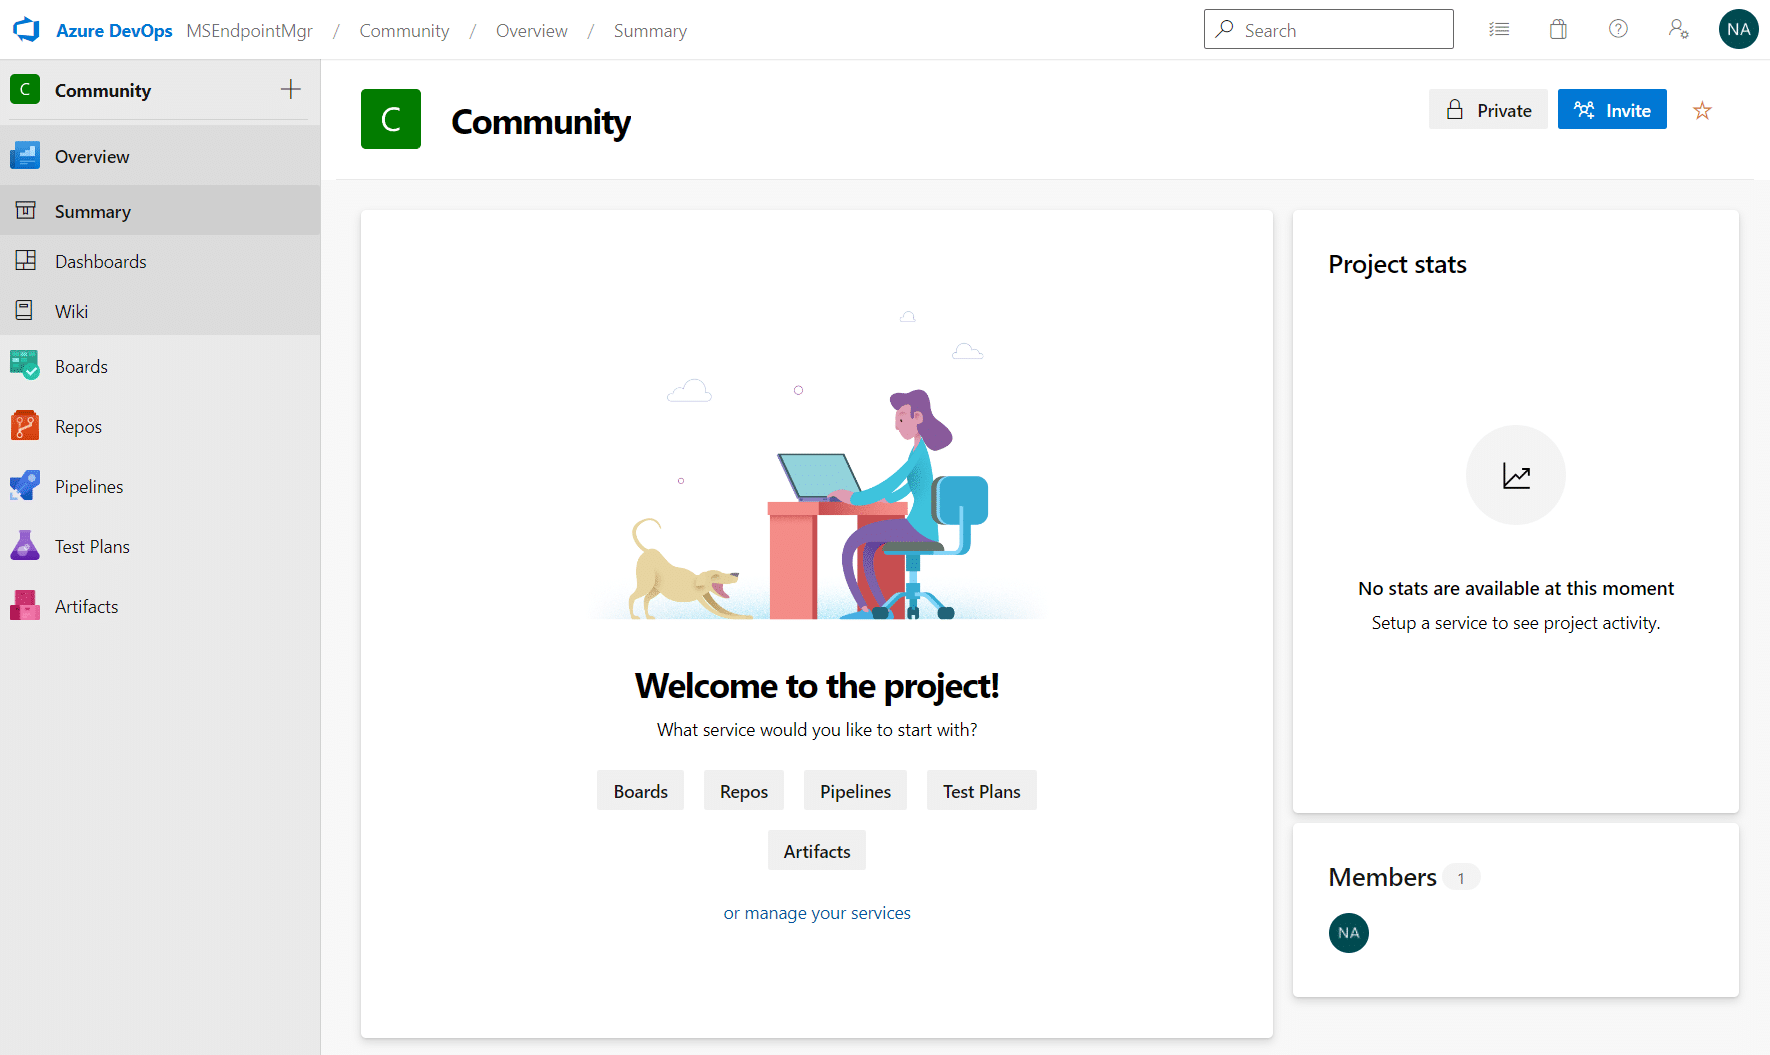
From within the organization that was just created by following the Microsoft documentation, you’re automatically asked to create a Project, the first time you visit the following page:
https://dev.azure.com/<organization_name>
In the Project name field, enter a project name and optionally a description and ensure the visibility is set to Private. It’s recommended to name the project something that resembles your department or team that you work in, instead of just naming it Intune App Factory. While it’s perfectly fine doing so, a project is much more in the DevOps world. I think it’s fair to draw the resemblance with an Azure subscription, where you can have multiple items or resources scattered across resource groups. A resource group in this case translates to a repository in the Azure DevOps world.
If you wish to make changes under the Advanced section, do so, but it’s recommended that you keep the default.
Click Create project.

Once created, you’ll be taken to the Project start page. It’s recommended that you bookmark this page, as this is the place where most of the configuration is performed in order to setup Intune App Factory.
The project start page can always be accessed again from the following URL:
https://dev.azure.com/<organization_name>/<project_name>
Import Intune App Factory data to new repository
All the scripts, pipeline and other resources that the Intune App Factory solution consists of is available publicly on our GitHub repository. In this step we’ll import that repository data into Azure DevOps. But before we do that, let’s explore the Repository settings of the Project to better understand where to make changes to a repository, from a settings perspective.
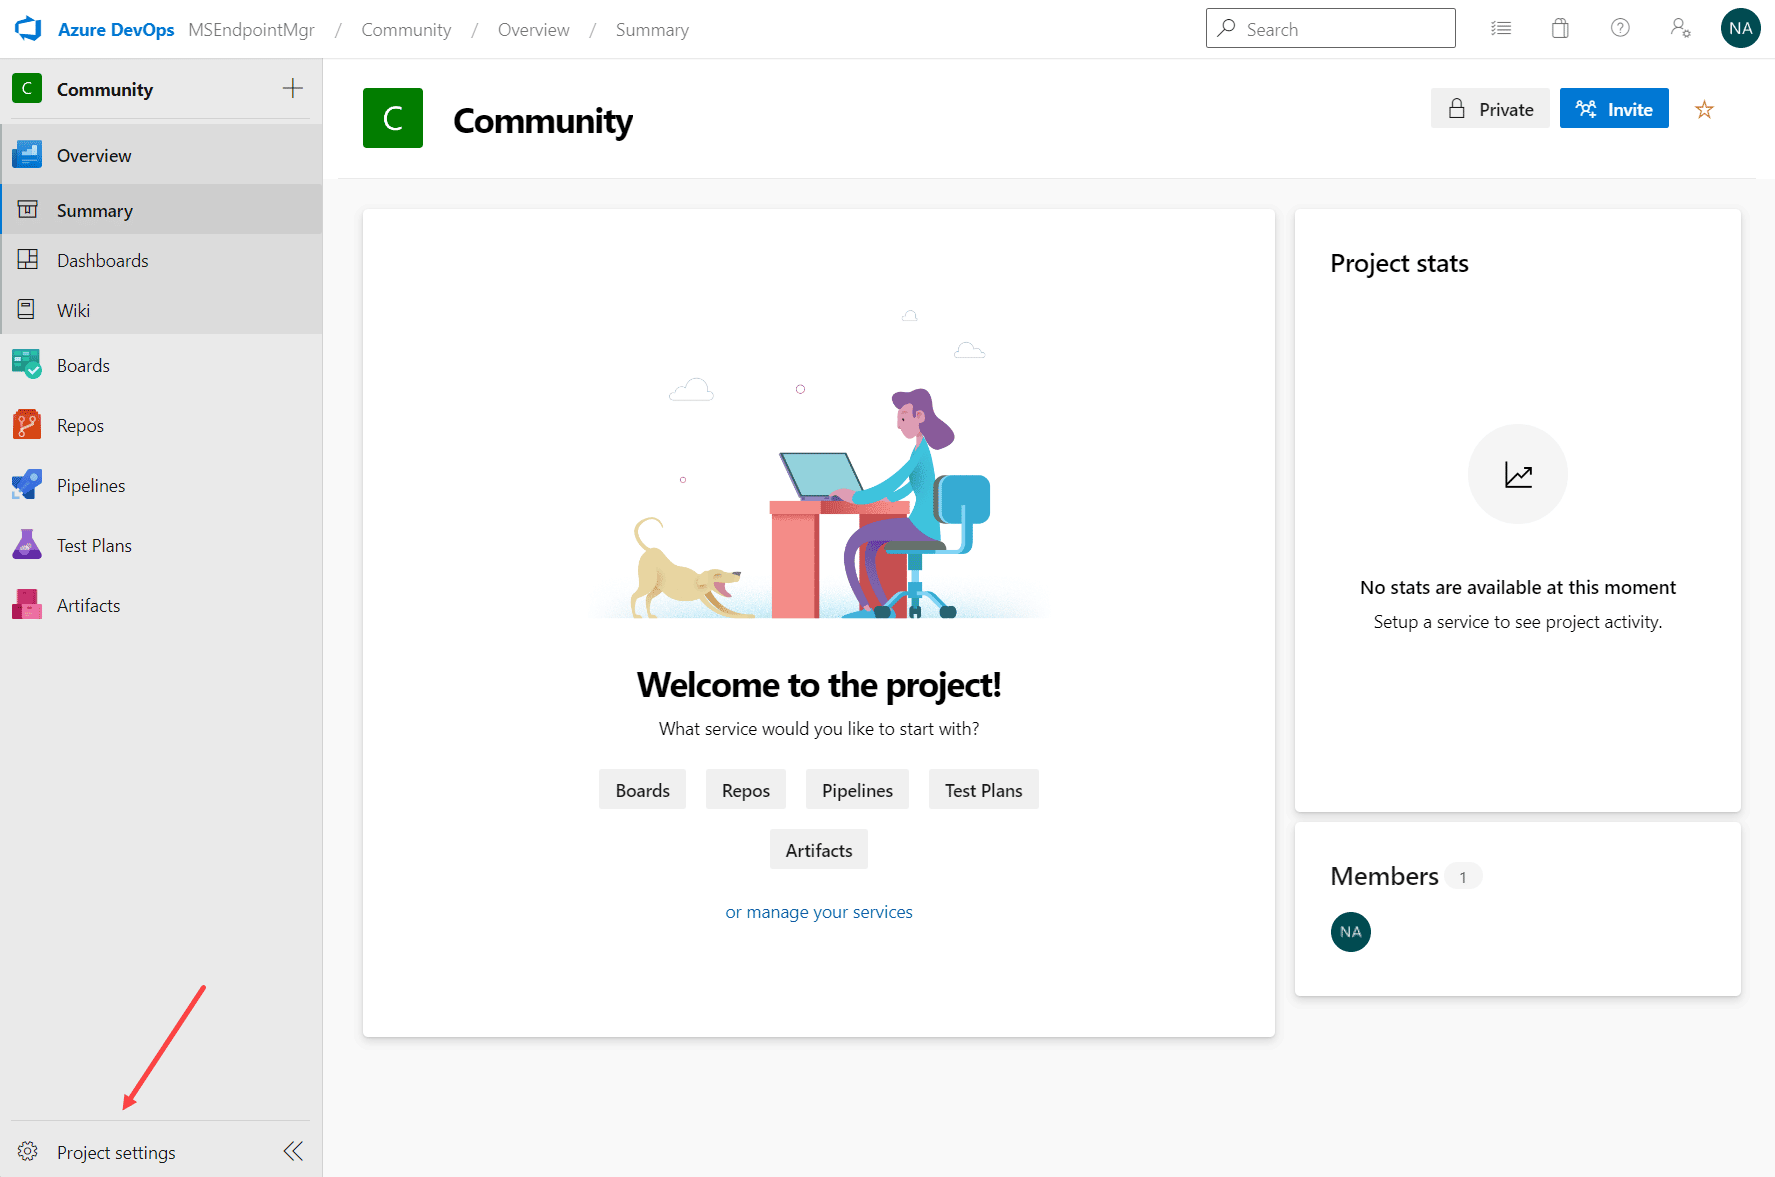
From the Project start page, in the bottom left corner click Project settings.
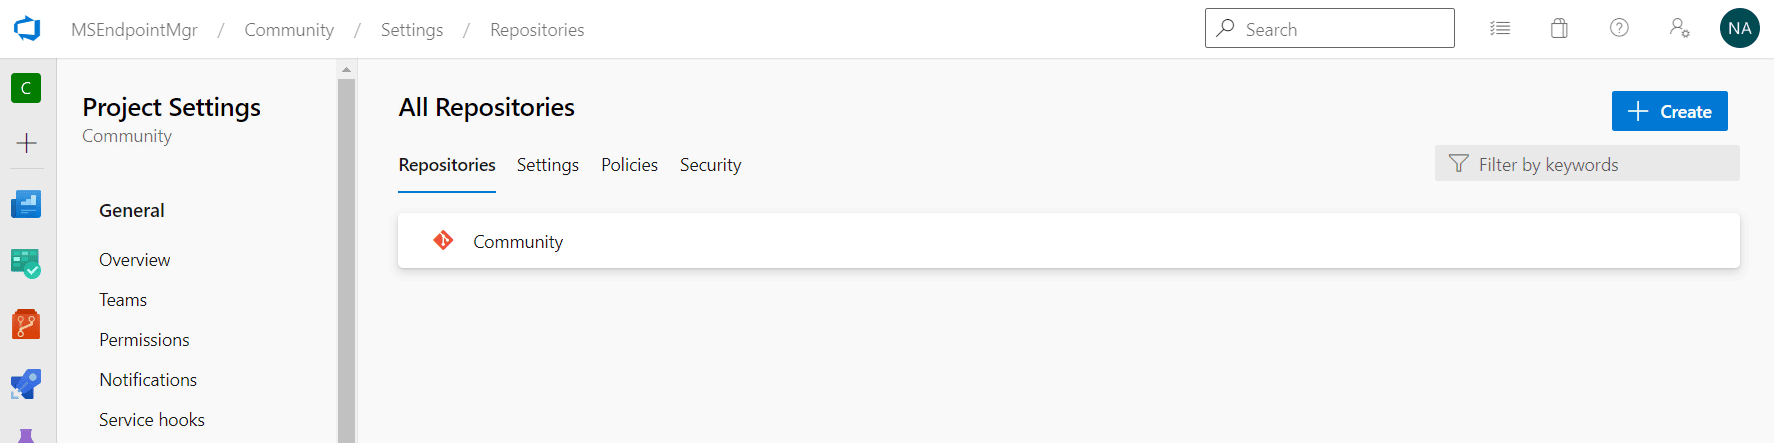
Under Repos, click on Repositories.

When the project was first setup, a default repository with the same name was also created. This default repository is not going to be used, and could from here be deleted once we’ve imported the new repository from GitHub.
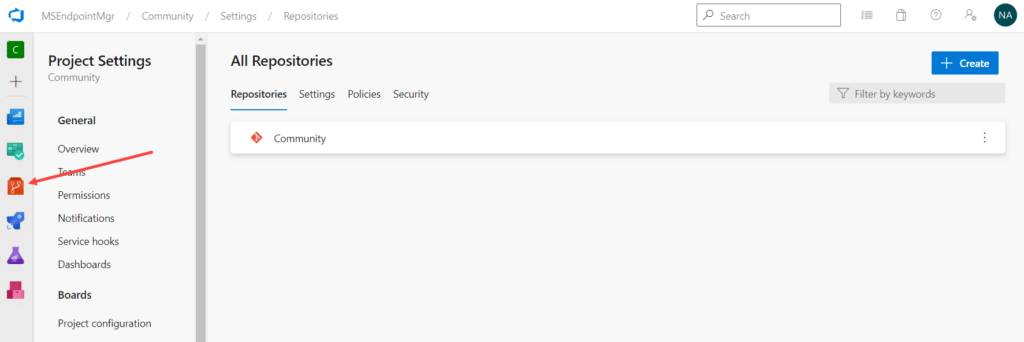
Familiarize yourself with the default available repository from this view in the Project settings. You can go back here and remove the repository with the same name as your Project, in case you wish to do so. It’s not a requirement, however it will make navigating Azure DevOps a bit easier.
Go back to Repos, by clicking on the Repos node in the left navigation pane.
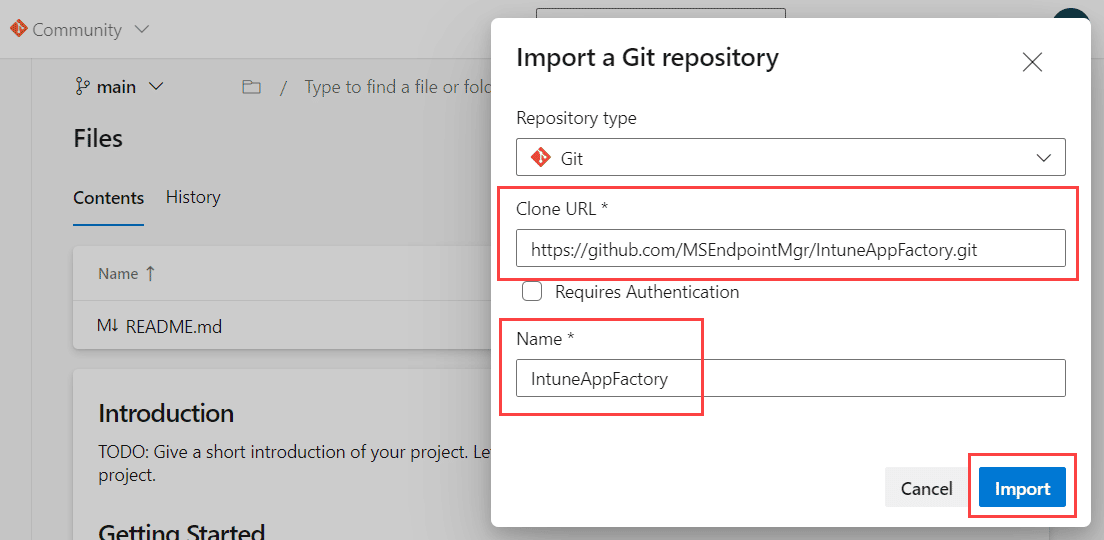
From the top navigation ‘bread crumb’, click the repository name and then Import repository.
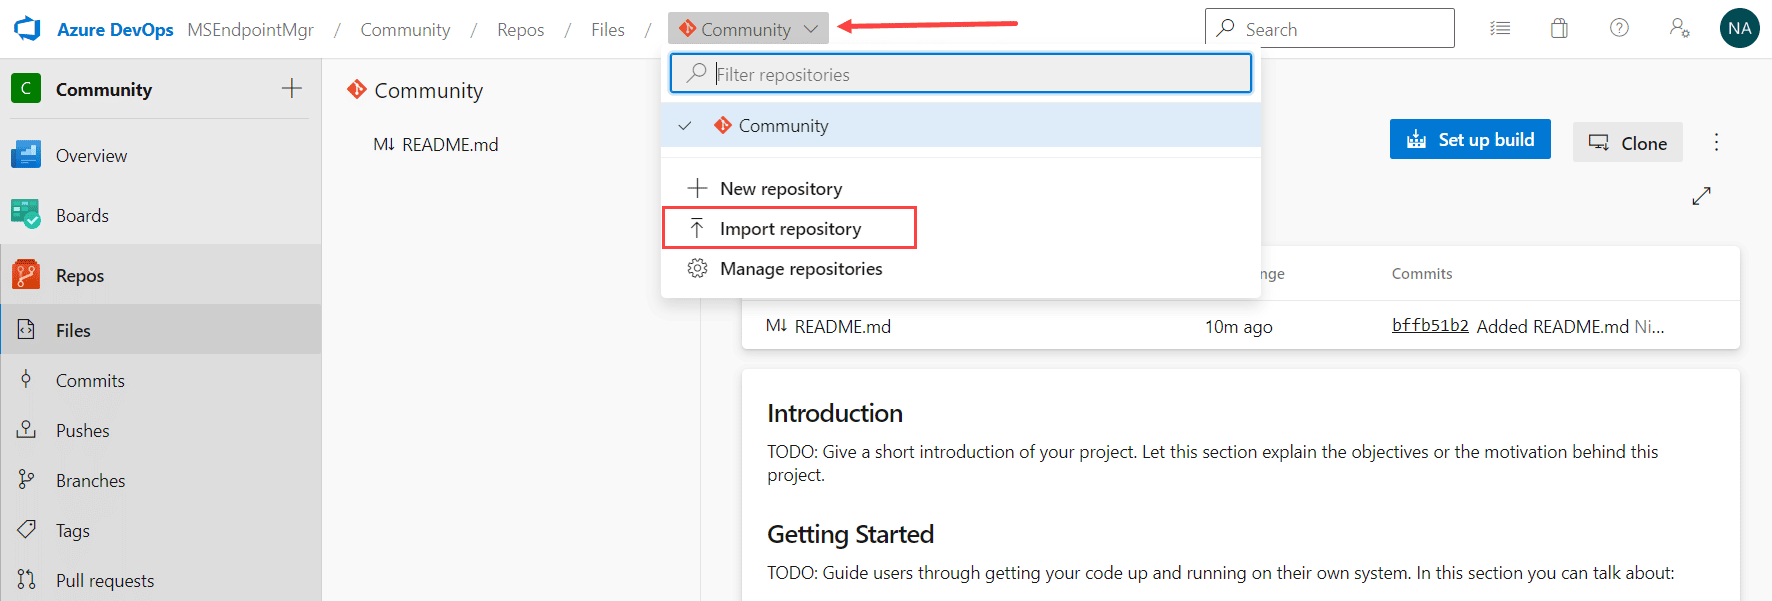
In the Clone URL field, enter the following URL:
https://github.com/MSEndpointMgr/IntuneAppFactory.git
Ensure the Name field is amended to IntuneAppFactory only, as it automatically adds .git at the end of the name. Click Import.
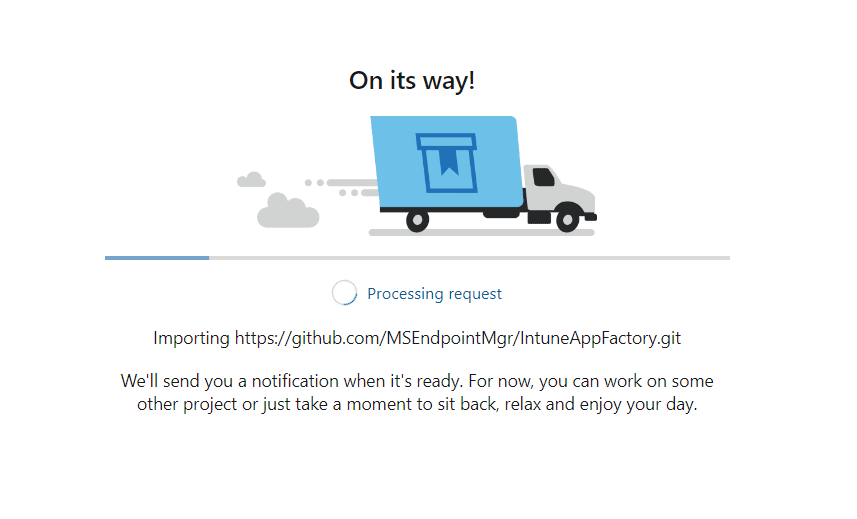
Wait for the import to complete, it only takes a short while.
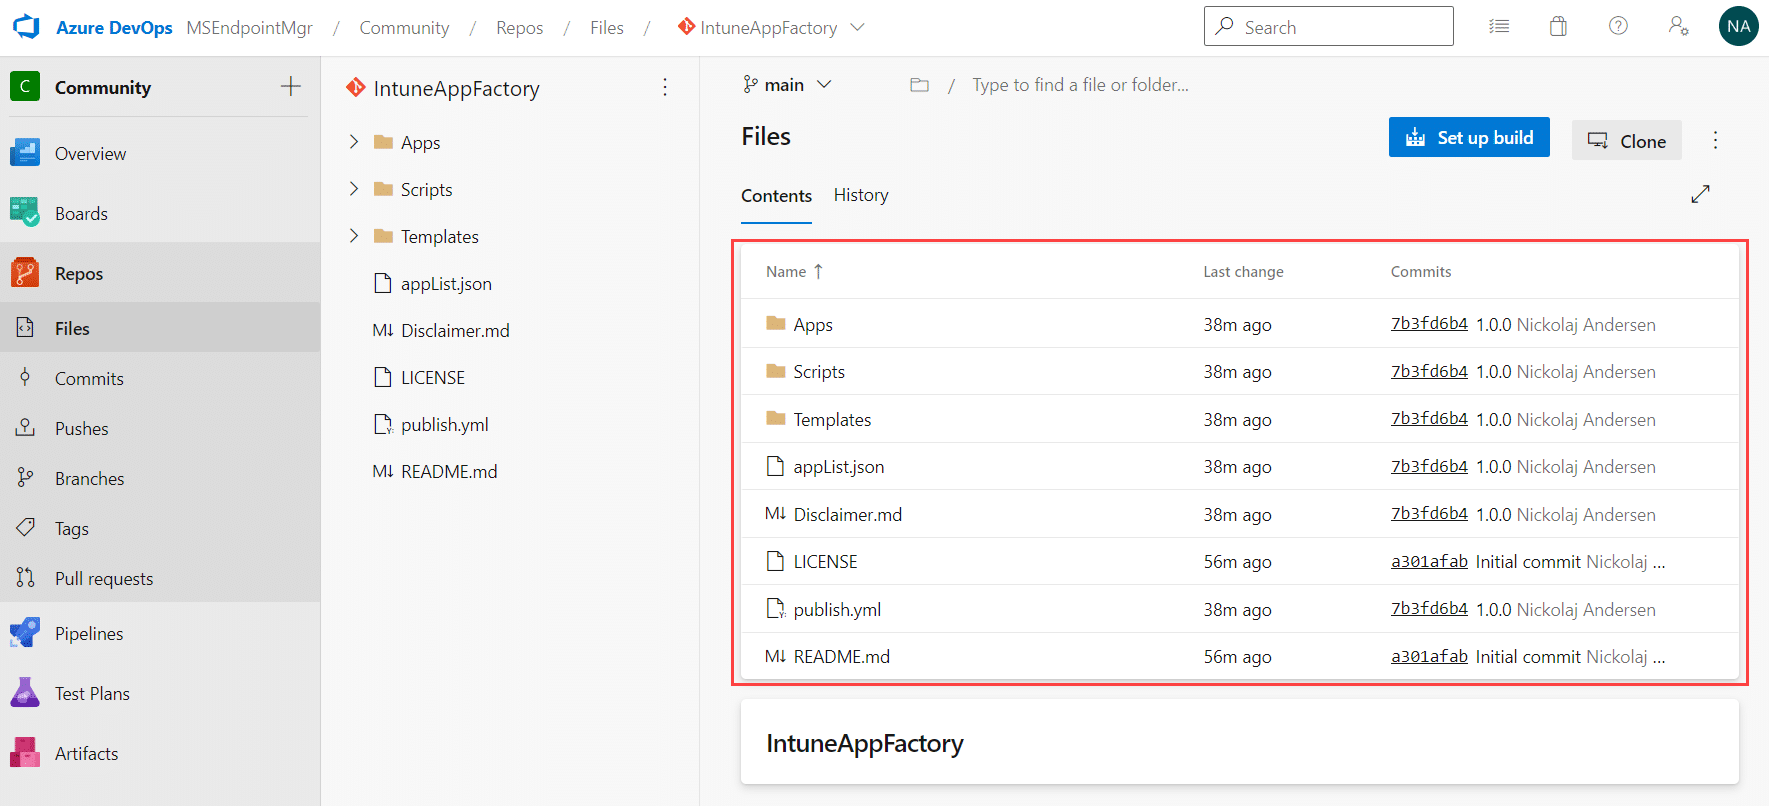
Once imported, all the files available on the public GitHub repository has now been imported to Azure DevOps, in a new repository named IntuneAppFactory.
Setup Service Connection in Azure DevOps
A Service Connection in Azure DevOps could be used for various things, such as reaching out to fetch resources and data from external services. For Intune App Factory, you have already stored the client secret for the Intune service principal in the Key Vault created earlier. For the pipeline to be able to make use of the client secret in a secure fashion, it needs to be made available to it, e.g. through a variable. Setting up a Service Connection to Azure Resource Manager, would allow Azure DevOps to pull in data from the Key Vault and present the client secret to the pipeline when needed.
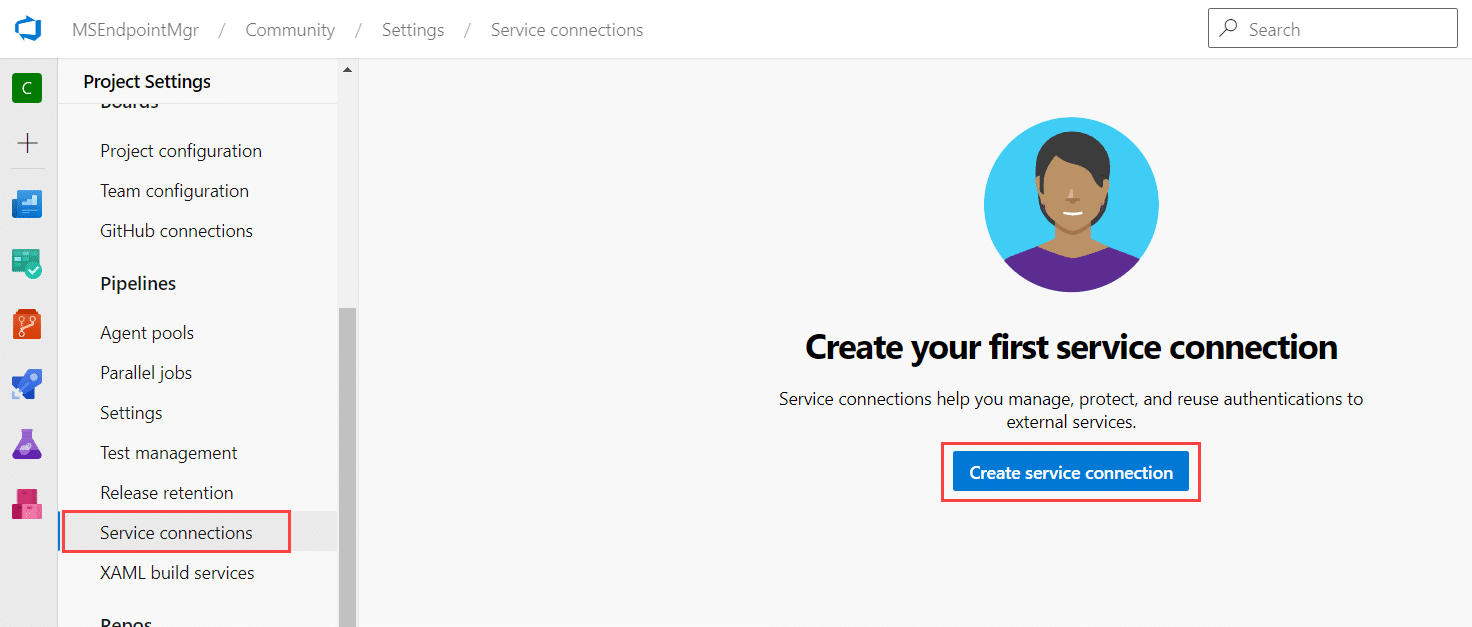
Click Project settings in the left menu bar.

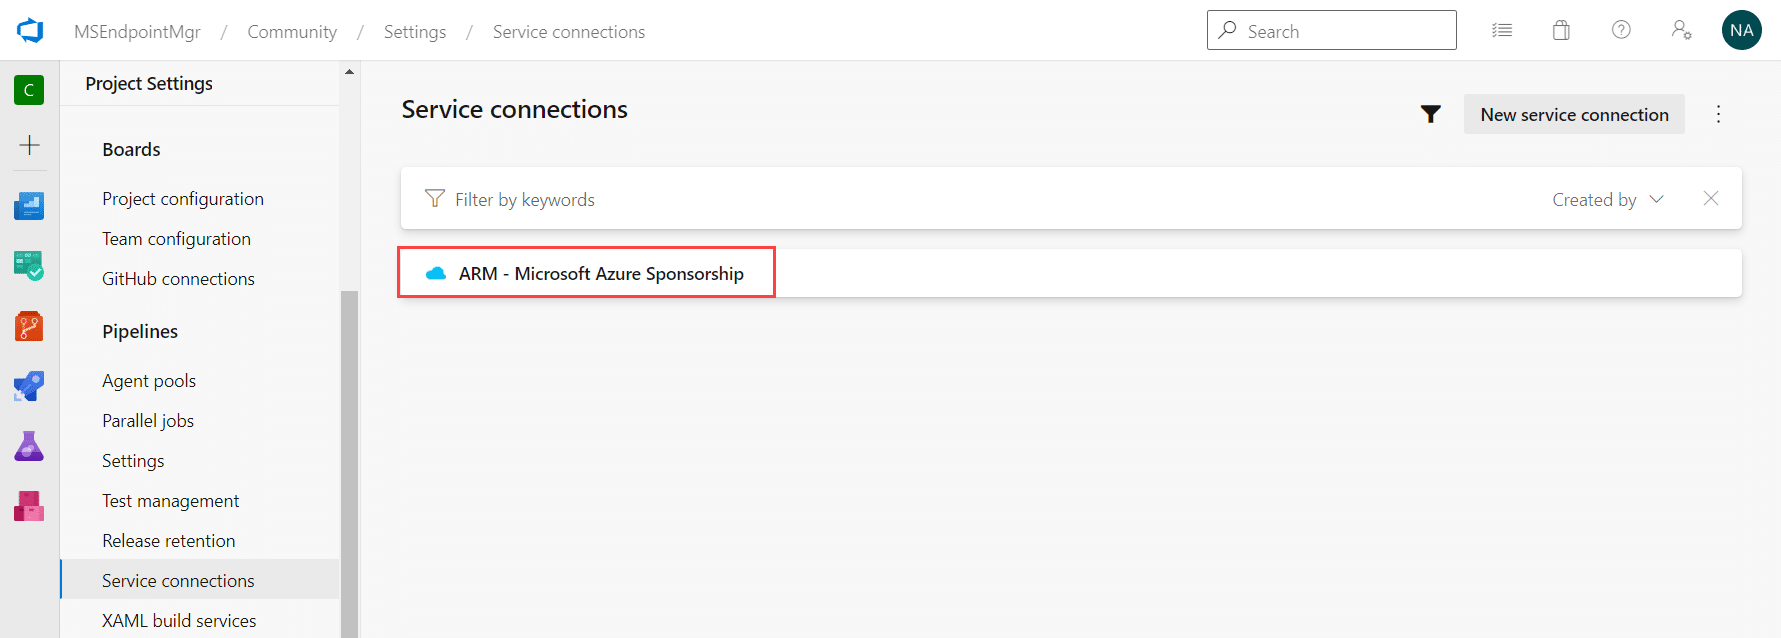
Scroll down through the Project settings menu, click on Service connections and then Create service connection.
Select Azure Resource Manager and click Next.
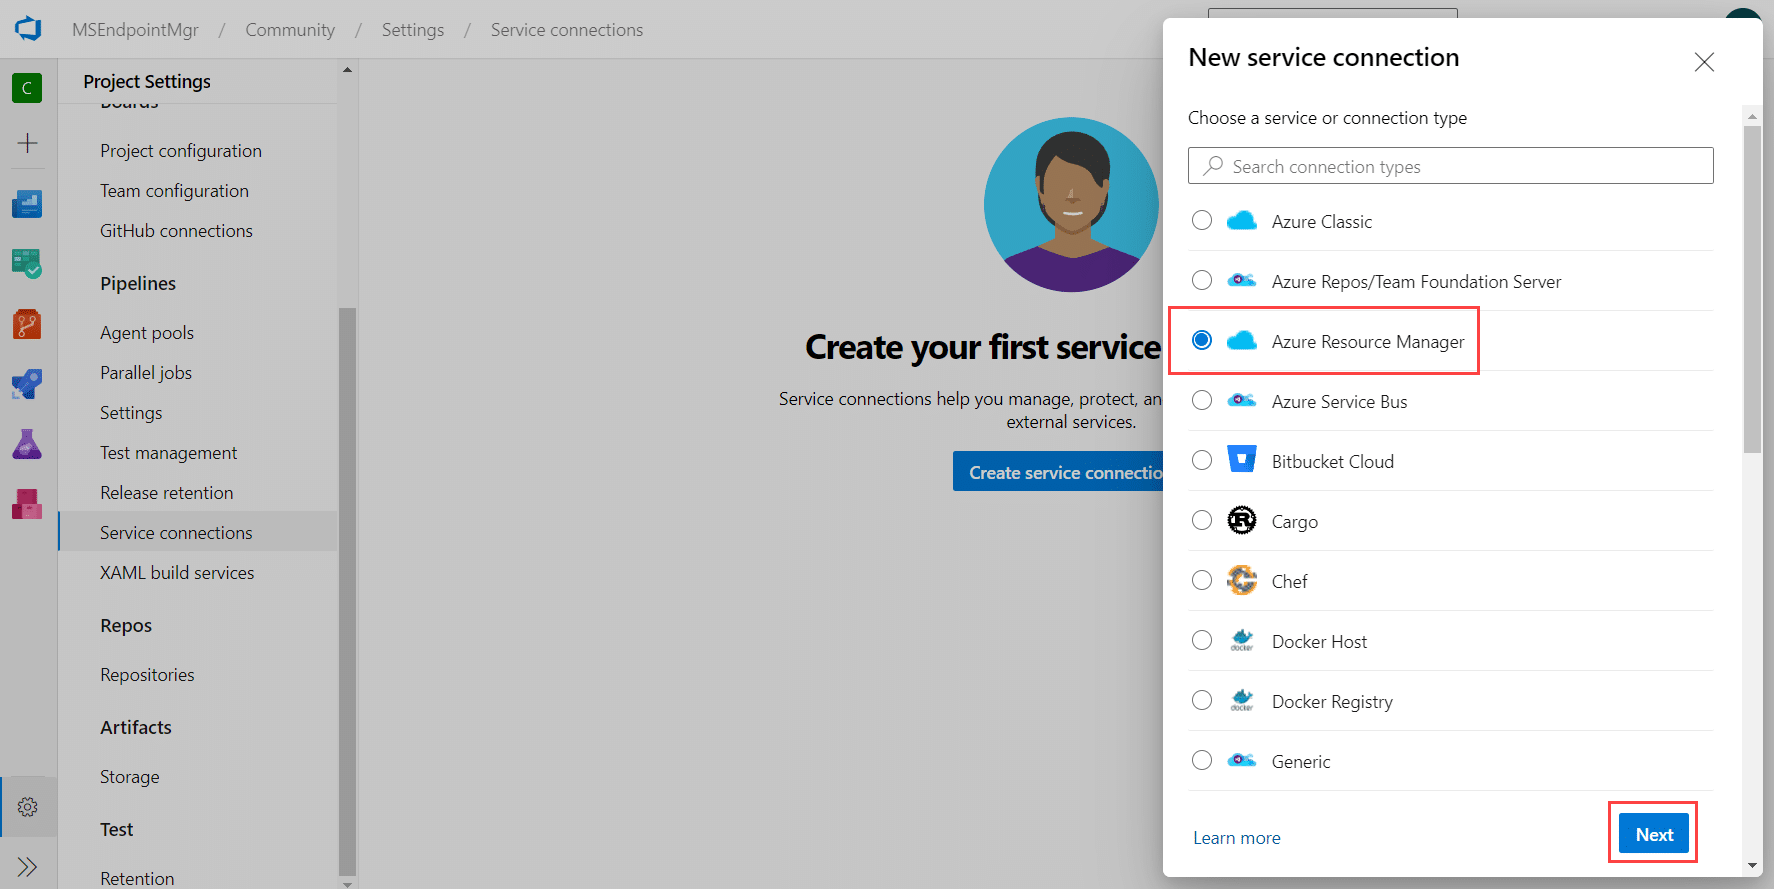
Select Service principal (manual) and click Next. Note, while there are more options available today than what’s shown in the image below, it’s recommended that you read up on the available connection types and configures the one that fits your organisation’s security guidelines. For more information, read the following documentation from Microsoft.

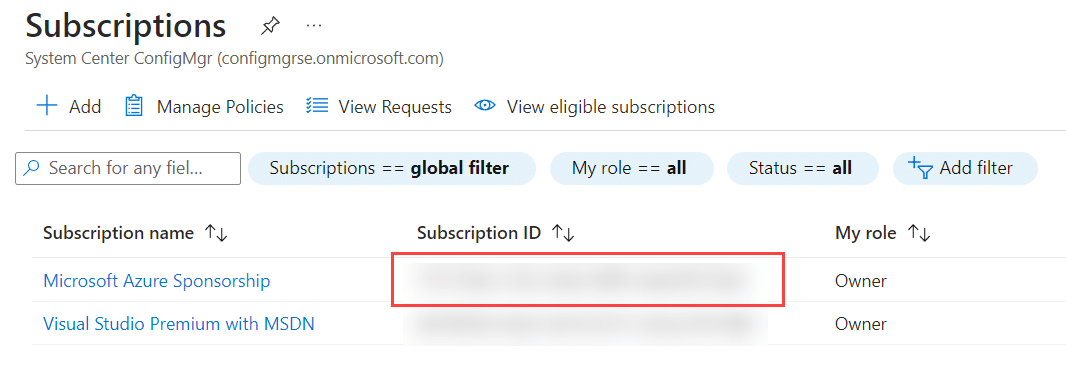
Locate the Subscription ID of the Azure subscription where the Key Vault resource resides. The ID can be found when searching for Subscriptions in the Azure portal, and in the Subscription ID column showing all subscriptions you have access to.
Enter the Subscription ID in the New Azure service connection configuration window. Additionally, enter the name of the subscription. Then in the Service Principal ID field, enter the Application (Client) ID of the Service Connection service principal (named Azure DevOps Service Connection in these instructions).
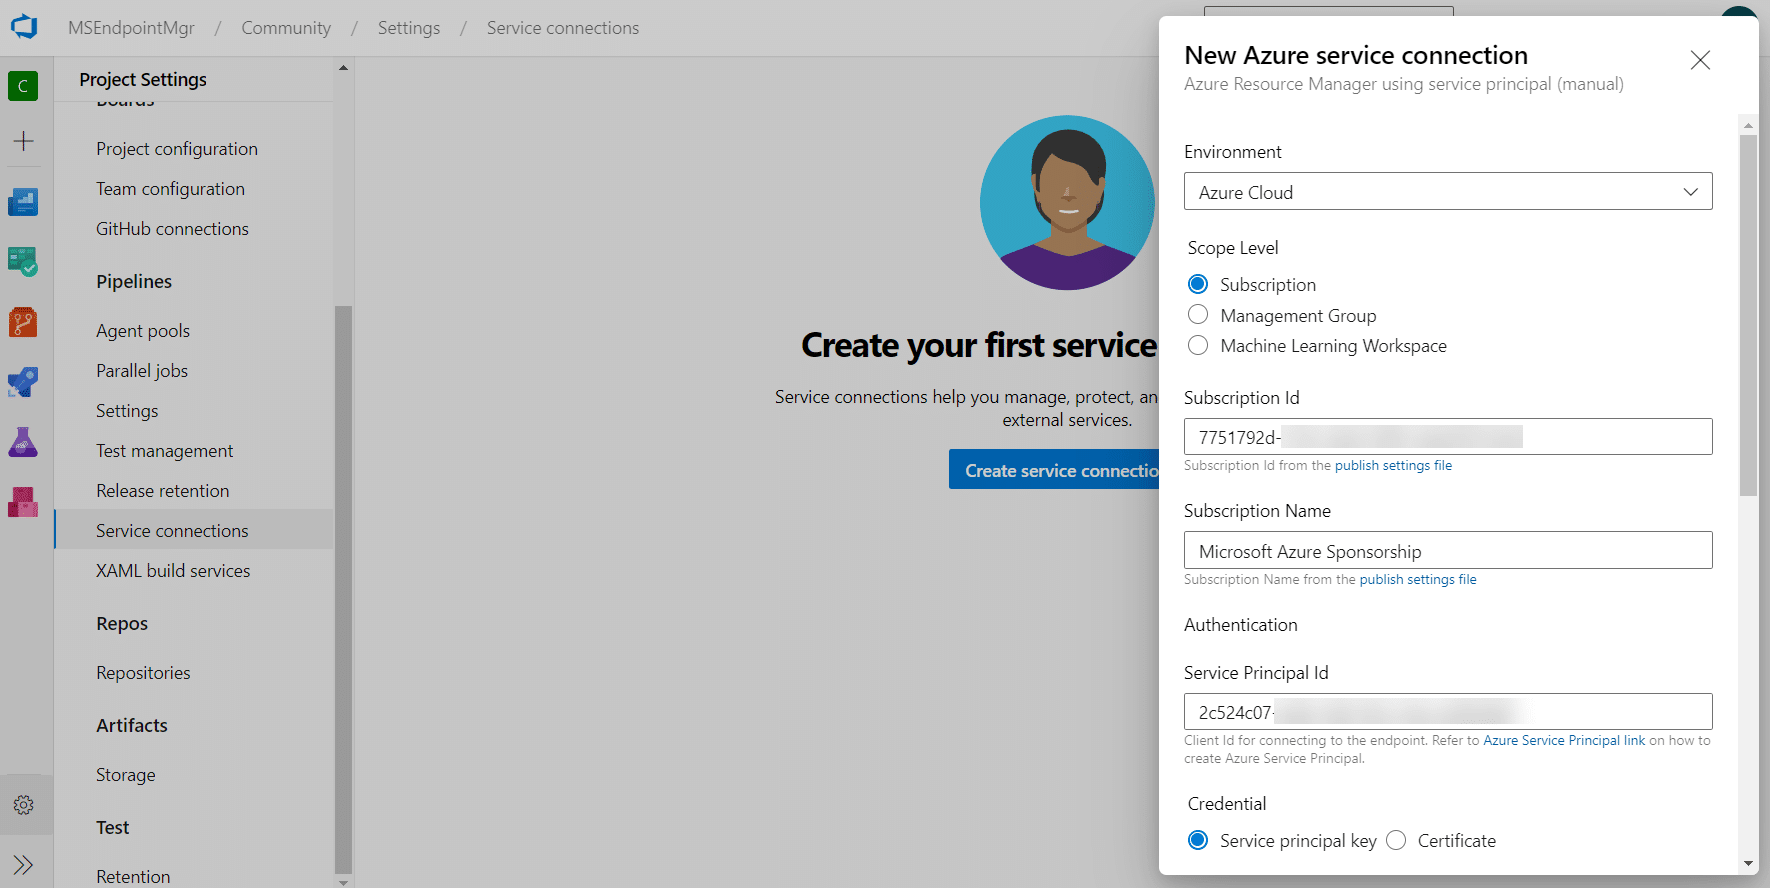
Enter the client secret of the Service Connection service principal created earlier in the Service Principal key field. Enter the Entra ID Tenant ID in the Tenant ID field. Provide a suitable name for the Service Connection, ensure the Grant access permissions to all pipelines check box is checked and expand the Verify and save button to select Save without verification.

In the event that you might click Verify and save instead, failure message would appear similar to the one below, stating that you’ve not provided the necessary permissions for the Service Connection service principal (named Azure DevOps Service Connection in these instructions) on the subscription itself, which is in fact true. This is not required when only accessing secrets from within a Key Vault.
Failed to query service connection API: 'https://management.azure.com/subscriptions/#SubscriptionID#?api-version=2016-06-01'. Status Code: 'Forbidden', Response from server: '{"error":{"code":"AuthorizationFailed","message":"The client '#ClientID#' with object id '#ObjectID#' does not have authorization to perform action 'Microsoft.Resources/subscriptions/read' over scope '/subscriptions/#SubscriptionID#' or the scope is invalid. If access was recently granted, please refresh your credentials."}}'
Changes to the service connection setup flow was made in 2024, now requiring a federated credential and therefor additional configuration is now required. A Convert button as highlighted below is shown. Clicking on this will. attempt to convert the manually created service connection, however it will fail unless we update the Azure DevOps Service Connection service principal.

Browser to portal.azure.com and open the Microsoft Entra ID blade. Go to App registration and search for the service principal. It’s important that you ensure you make the following changes on the correct service principal, to not cause service interruption.

You can verify that the Application (client) ID identifier from the Azure portal, is the same that’s mentioned for the service connection in Azure DevOps, under the Application (Client) ID field for Authentication conversion:

When the correct service principal is found, click on it and then go to the Certificates & secrets blade. Click on the Federated credentials tab and click Add credential.

Select Other issuer as Federated credential scenario. In the Connect your account section, copy and paste the Issuer and Subject Identifier from the Authentication conversion section of the service connection in the Azure DevOps portal. Provide a name for this credential, e.g. some that is distinctive for its usage.

Click Add.
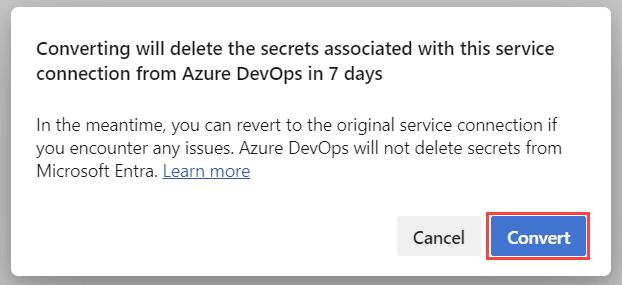
Back in the Azure DevOps portal, click Convert.

This brings up a warning about client secrets for this service principal (App Registration), will be removed, which is fine. We want to remove and stop using the client secret and convert the service connection into a Workload identity federation service connection instead, using the same service principal.
Click on Convert again.
After a while, once the conversion completes, verify that the service connection is now setup as using workload identity federation:

The Service Connection has now been saved and should be visible in the list of service connections.

Create an Agent pool in Azure DevOps
This part of the setup instructions can be skipped and when setting up the Azure Pipelines agent on a self-hosted virtual machine, the Default host group can be selected. However it’s a good practice to create your own host group of agents to separate load and jobs sent to the agent, if there are other Azure DevOps projects within your organization that you don’t want to potentially share resources with.
Also, in the initial version of Intune App Factory, it has not been fully verified if the solution is supported using the default Azure Pipelines host group.
Click on Project Settings in the Azure DevOps portal and then select Agent pools.
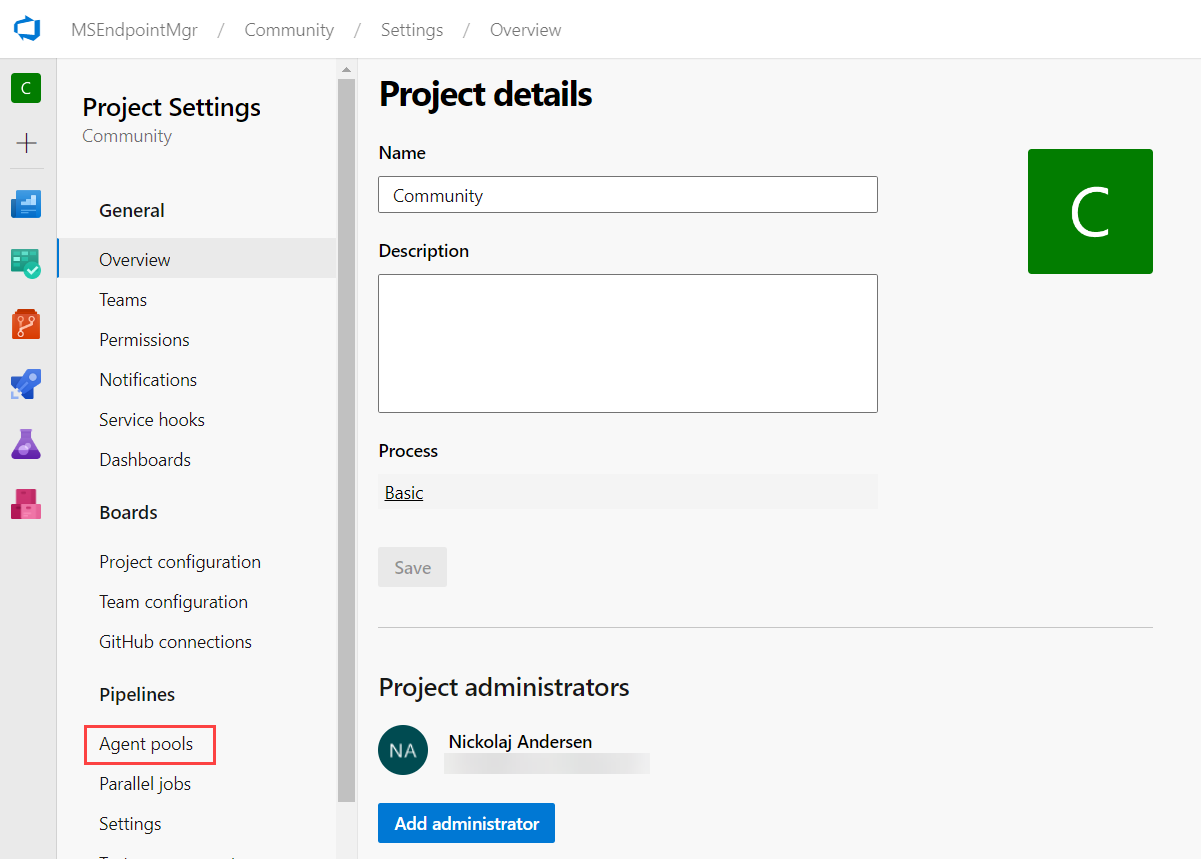
Click on Add pool.
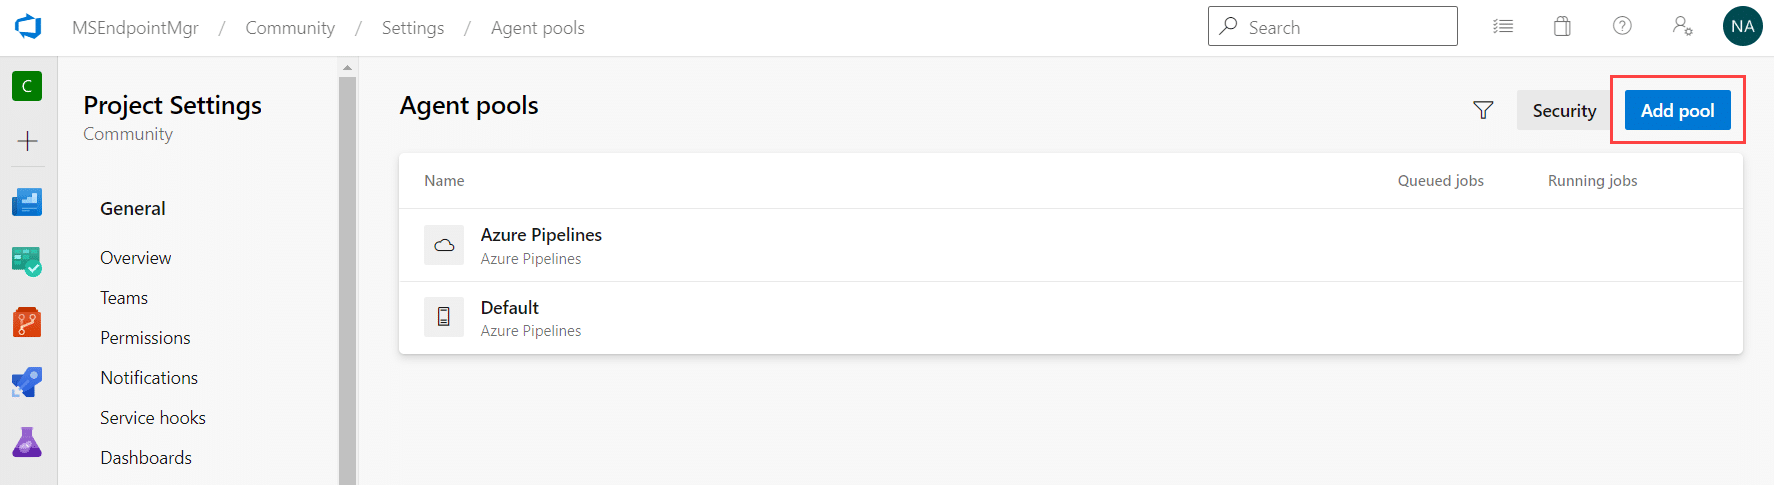
Select Self-hosted as Pool type, provide a name for the agent pool, check Grant access permissions to all pipelines and click Create.
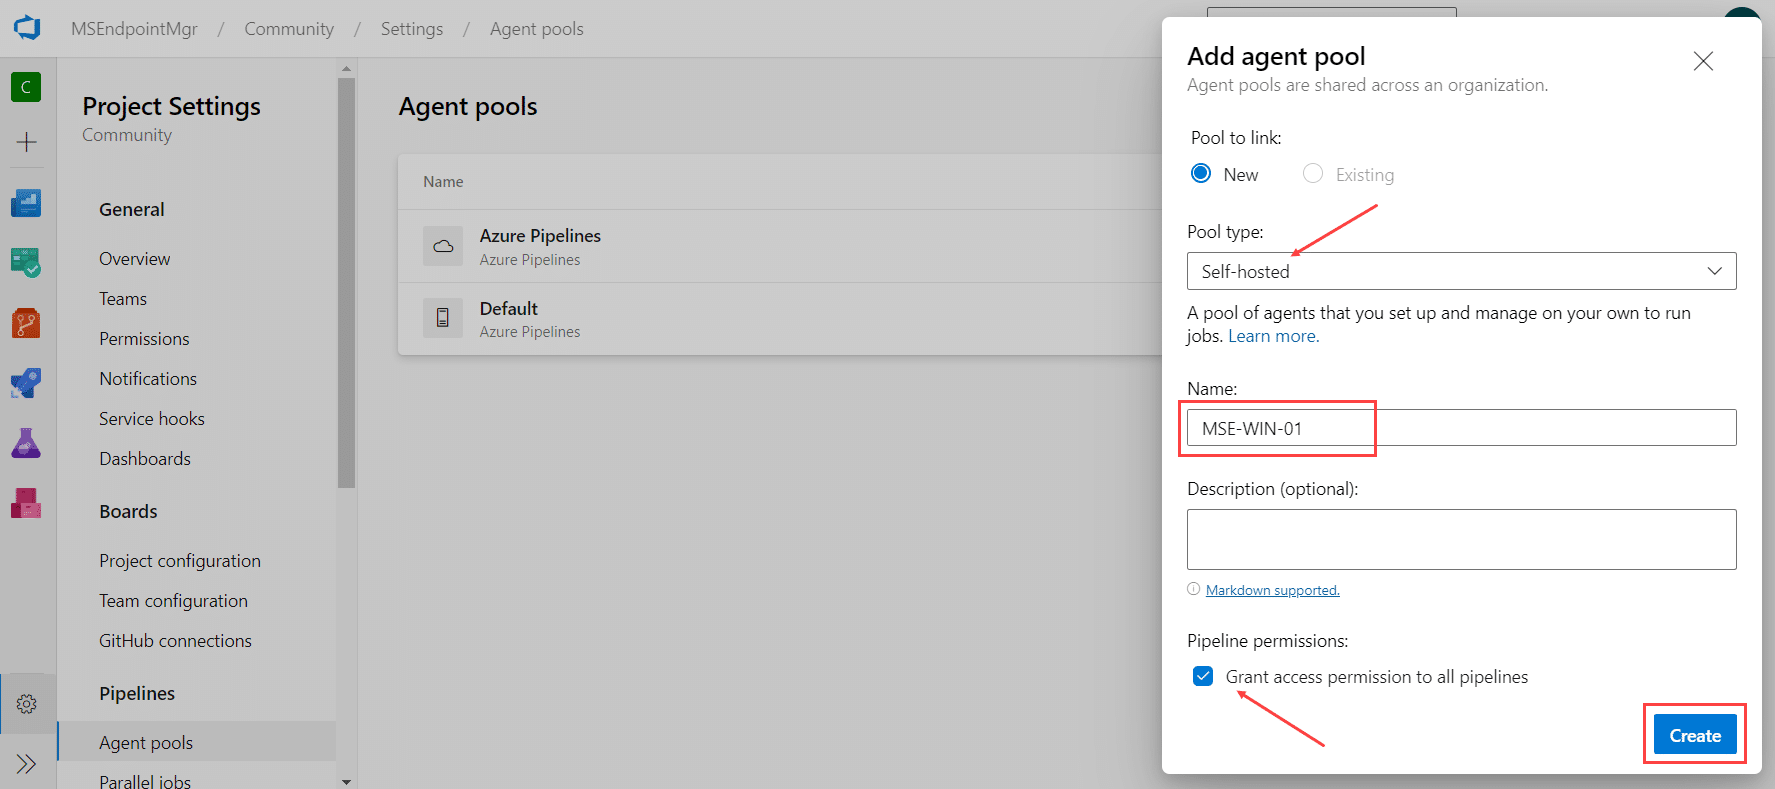
The newly created agent pool should now be visible in the list of agent pools.

Make a note of the agent pool name, as it will be provided during the agent setup and configuration.
Setup Azure DevOps self-hosted agent
Setting up the self-hosted agent for Azure DevOps is involves creating a new virtual machine and configuration of that virtual machine.
Create the self-hosted agent virtual machine
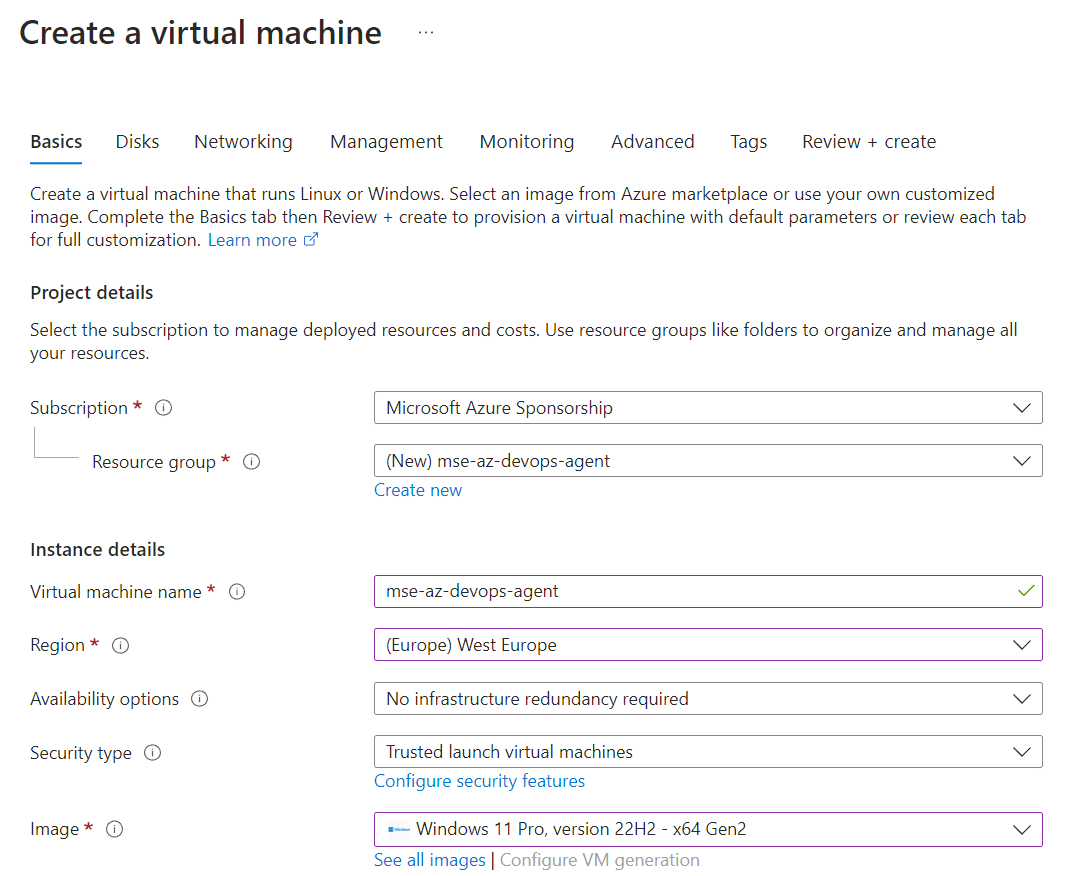
A virtual machine in Azure can be deployed in various ways, either through the portal or using ARM templates (easily created with Bicep). Due to all the configuration options available, it’s impossible to cover all scenarios for each organizations, hence these setup instructions only provides a recommended setup, that should not be considered best practice to follow but it gives you an indication of the general configuration needed, such as:
- Running Windows 10 or 11 (or later)
- Internet access is required
Apart from the absolute minimum requirements above, the virtual machine can be configured any way that is aligned with your organizational policies for Azure resources.
From within the Azure portal, browse to Virtual Machines and click Create.
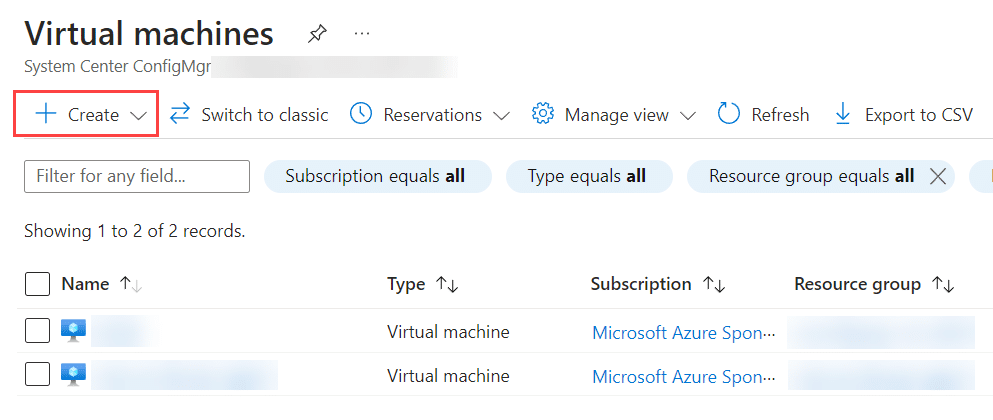
Below screenshot illustrates how a virtual machine running Windows 11 Pro is configured to be able to run the Azure DevOps self-hosted agent.
Additional configuration is shown below.
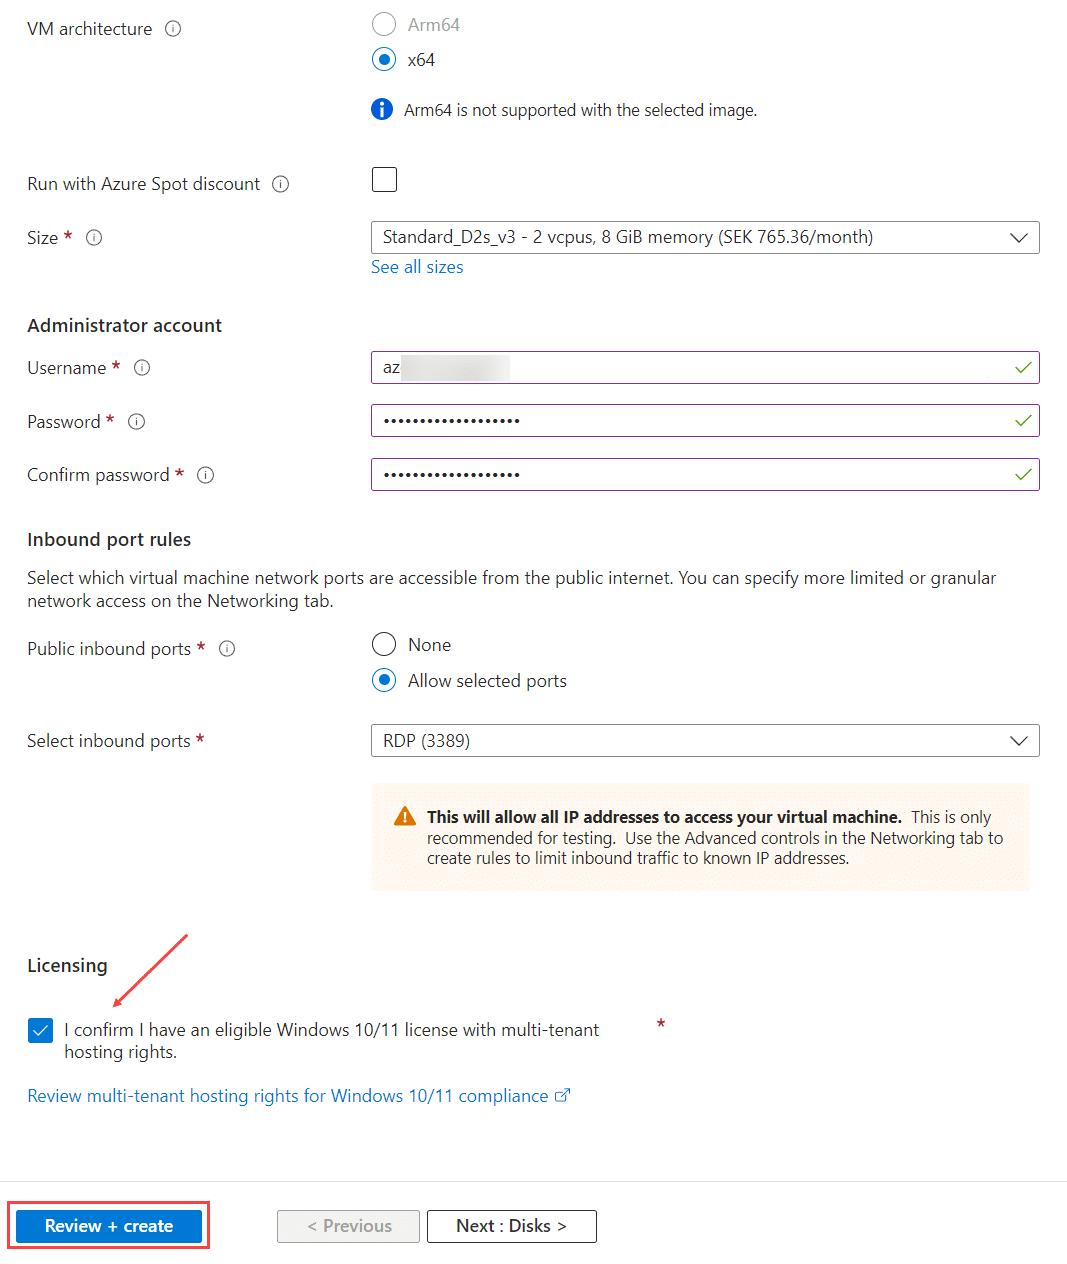
Allowing inbound communication on port 3389 is not a recommendation, but during the initial configuration of the self-hosted agent, it’s a requirement. When the agent configuration has been completed, the RDP access should be turned off.
Retrieve Personal Access Token (PAT)
A Personal Access Token (PAT) is used during the self-hosted agent setup on the virtual machine, to authenticate against Azure DevOps. Consider this token as a secret to protect, and store it securely. When setting up the agent, the PAT is used as a one-time authentication token and is not used anymore by the agent software afterwards.
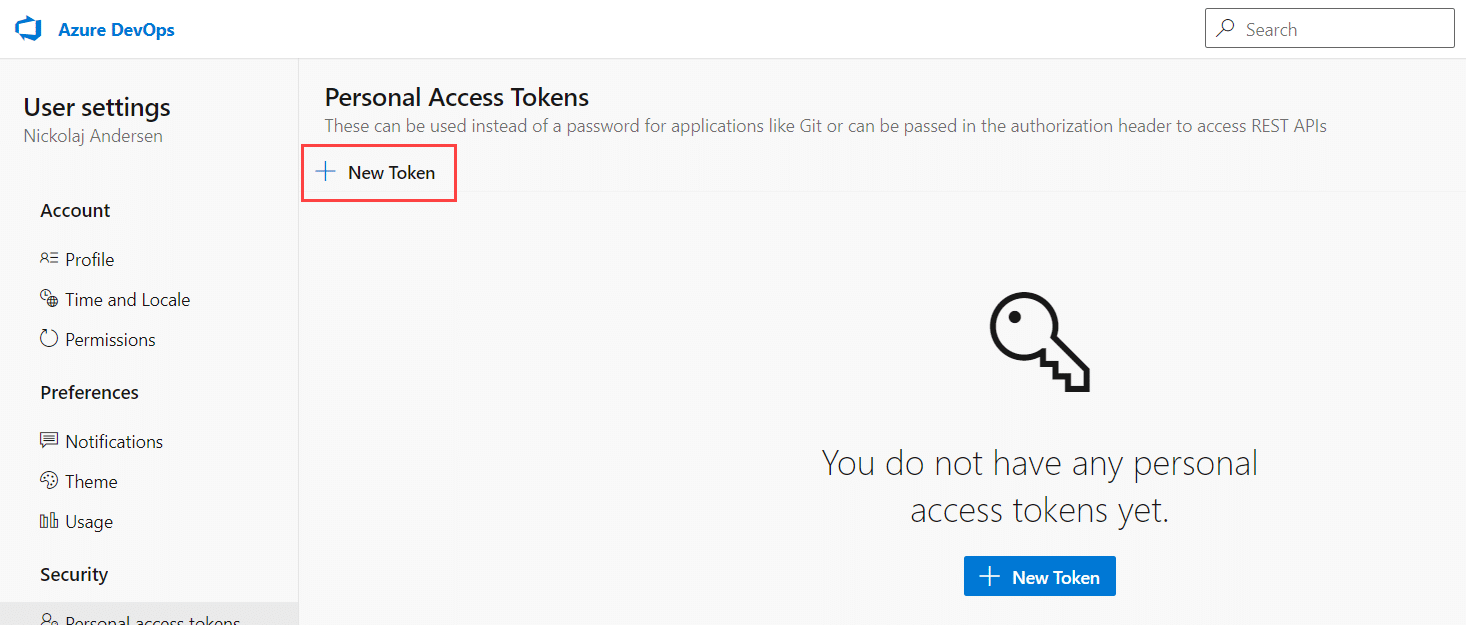
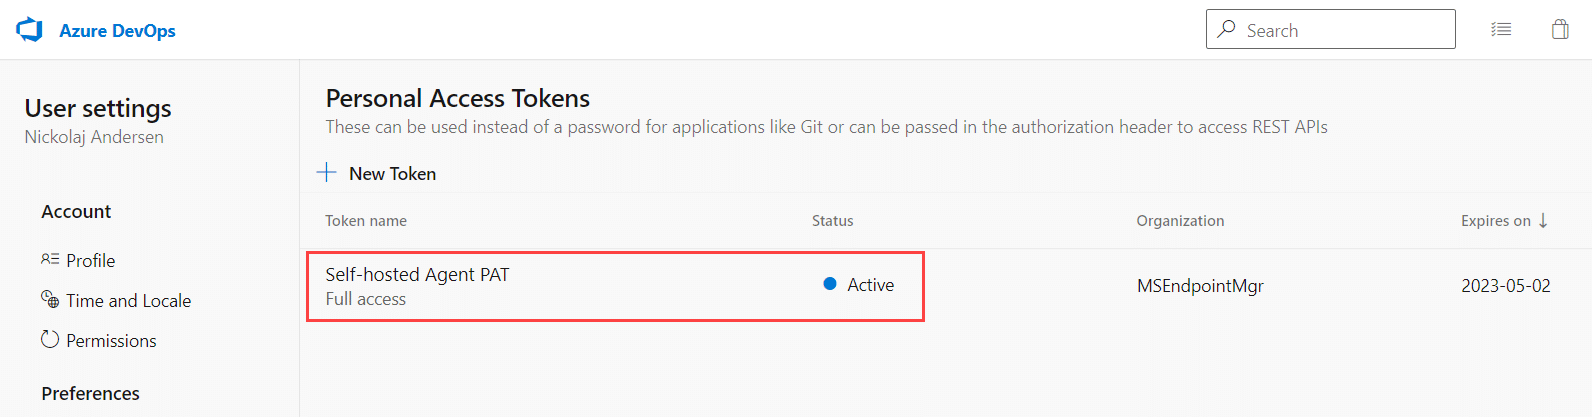
Back in the Azure DevOps portal, click on the User settings icon in the top right corner and select Personal access tokens.

Click on New Token.
Provide a name for the PAT, ensure Full access is selected under Scopes and click Create.
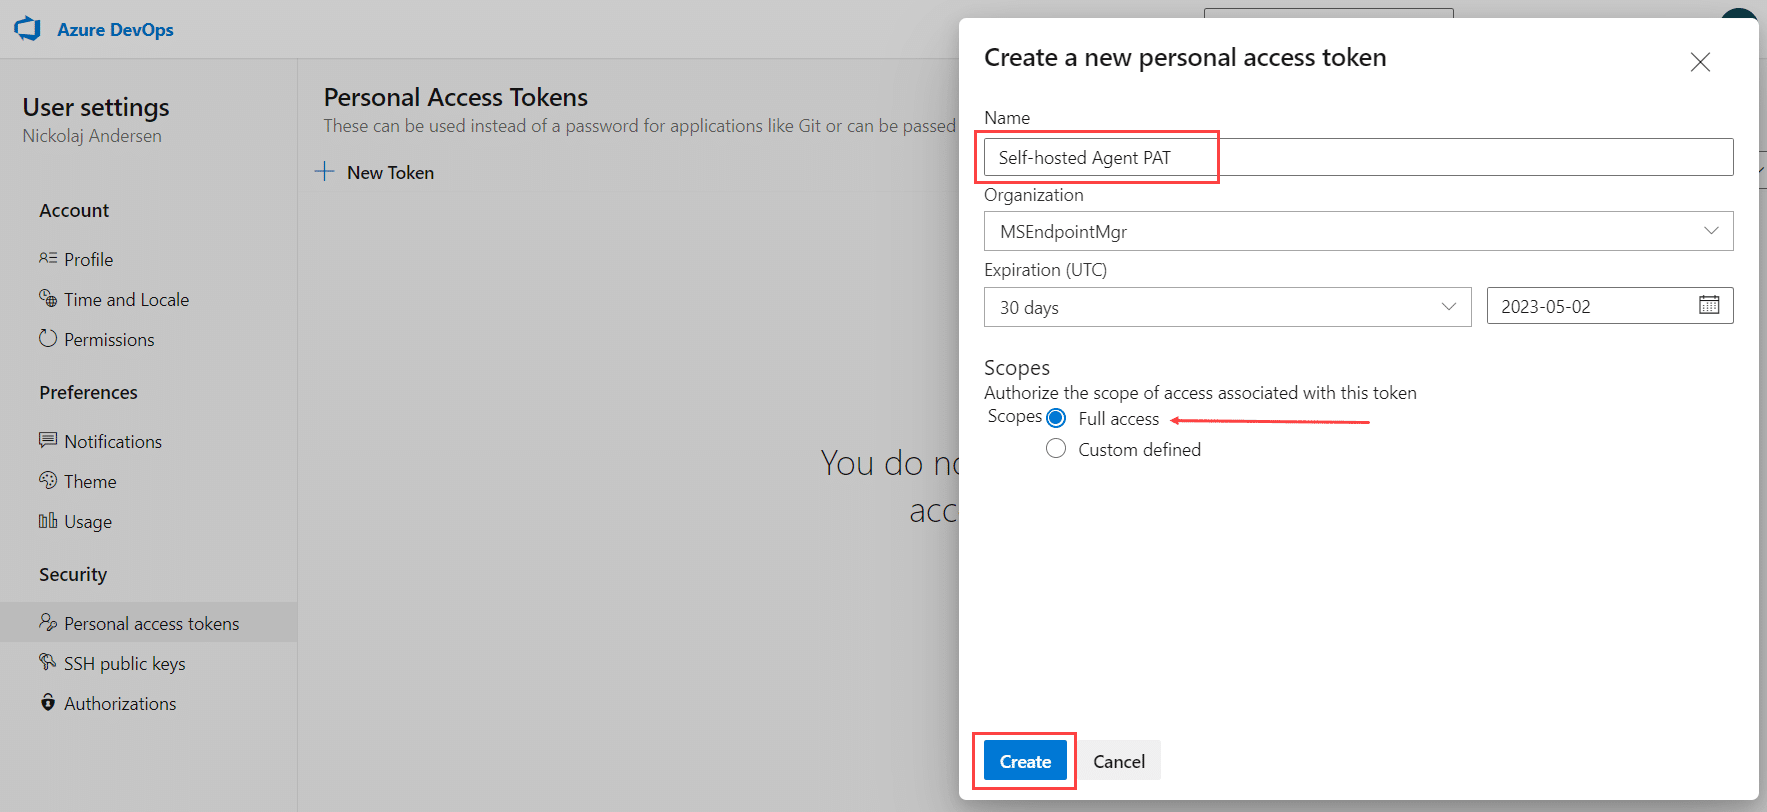
The PAT is now revealed, copy it and store it securely. It will be used later when configuring the self-hosted agent on the virtual machine.
Click on the Azure DevOps logo or step backwards to get back to the main part of the portal.
Add a new agent to the agent pool
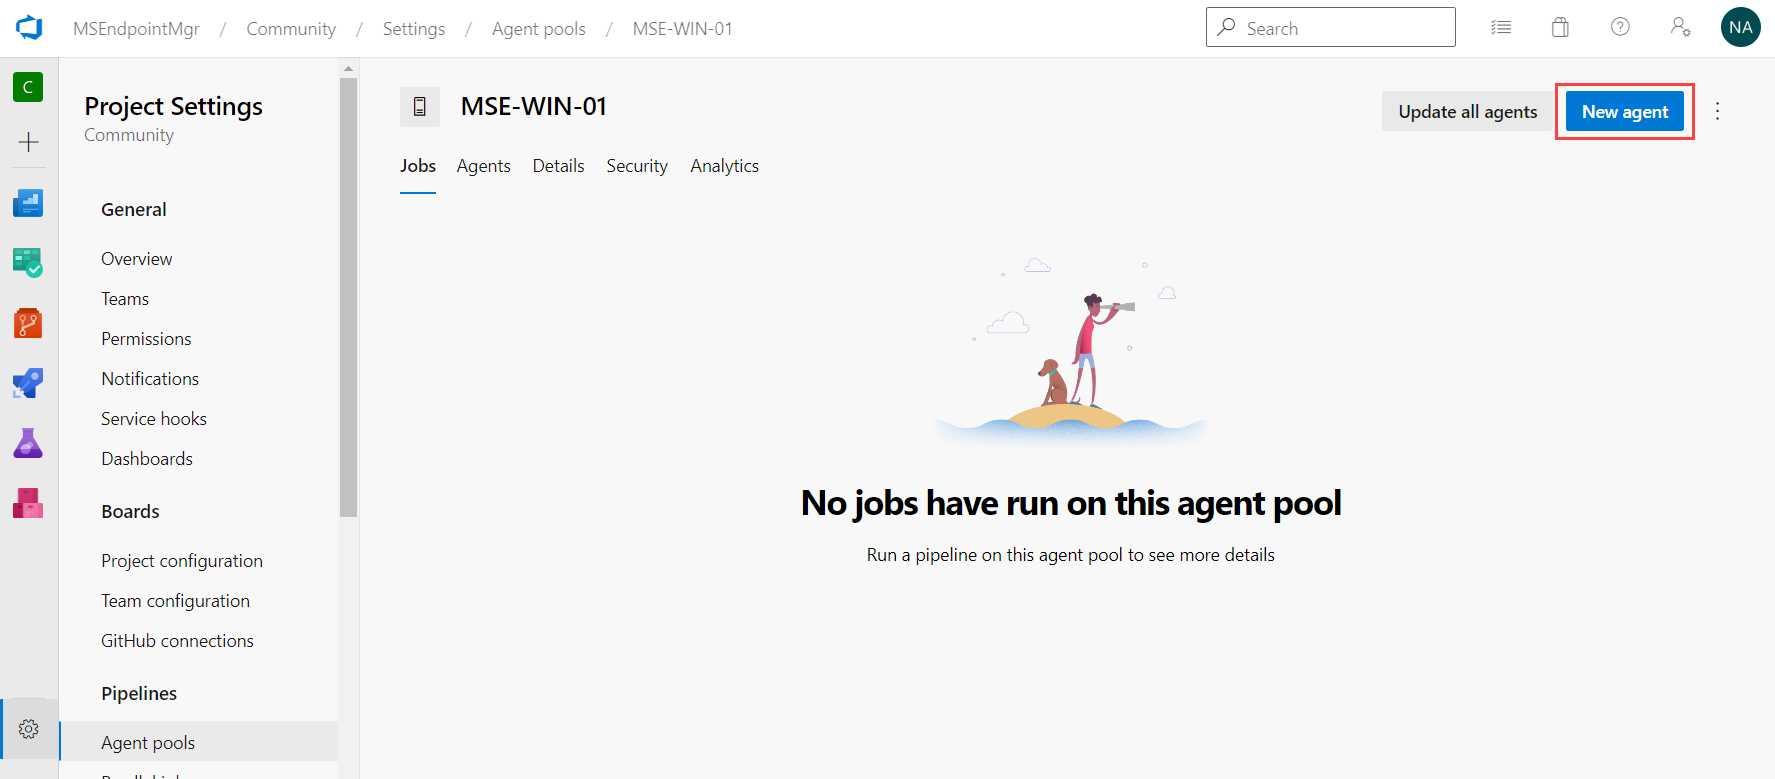
In the Project settings, click Agent pools under Pipelines and select the previously created agent pool.

Click New agent.
Click the Download button to start the download of the agent software.
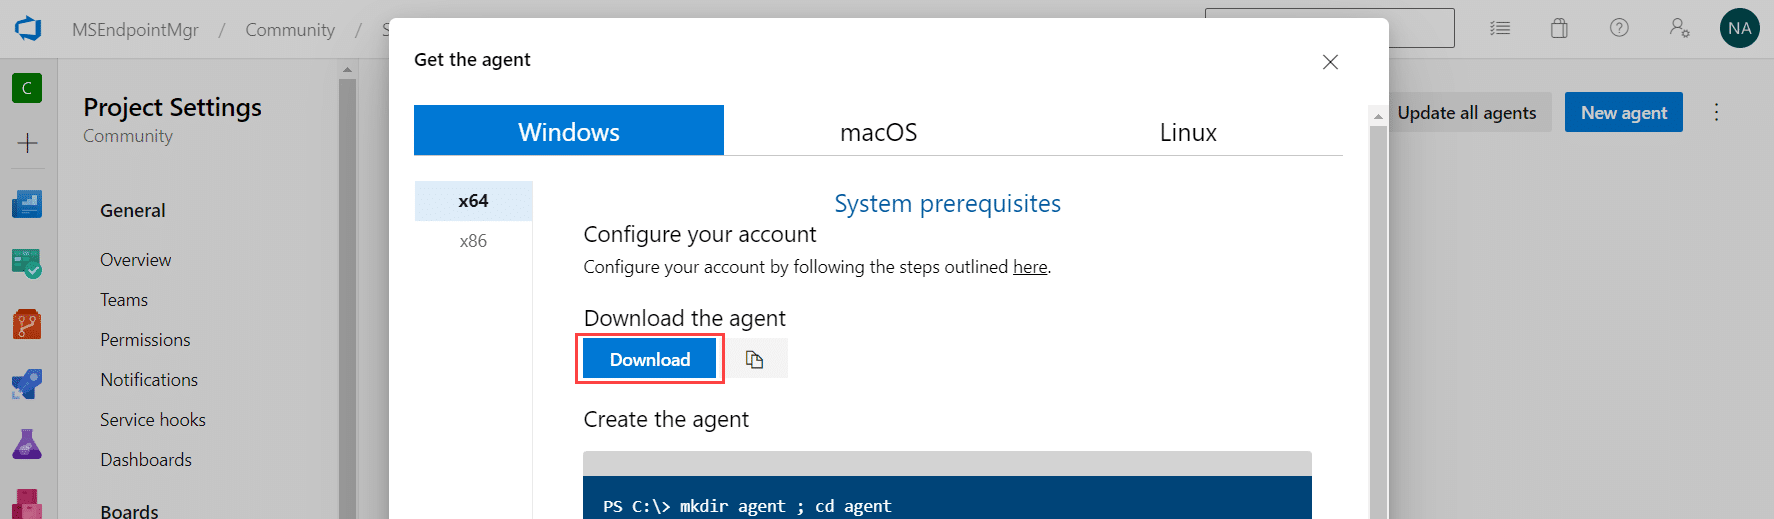
A filed named similar to vsts-agent-win-x64-3.218.0.zip (it’s named differently depending on the latest version available when these setup instructions are following) is now downloaded. This is the agent software compressed file that will be copied to the virtual machine in the next section, and used to setup and configure the self-hosted agent.
Configure the self-hosted agent virtual machine
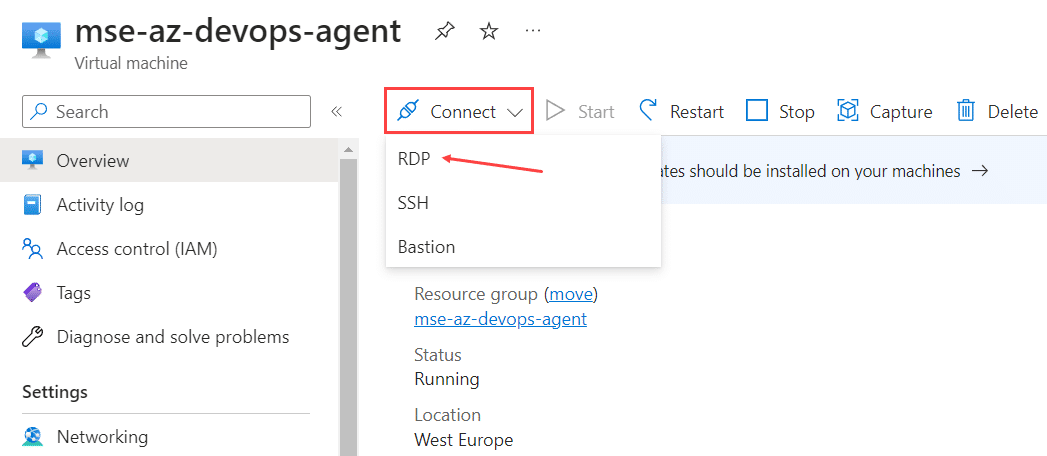
To configure the self-hosted agent virtual machine, we need to connect to it using RDP. Browse to your virtual machine, click Connect and select RDP.
Click on Download RDP File after all the connection tests successfully completes.

Establish a connection using the username and password set when creating the virtual machine in the previous steps. Once connected, you should have an active RDP session towards your virtual machine.

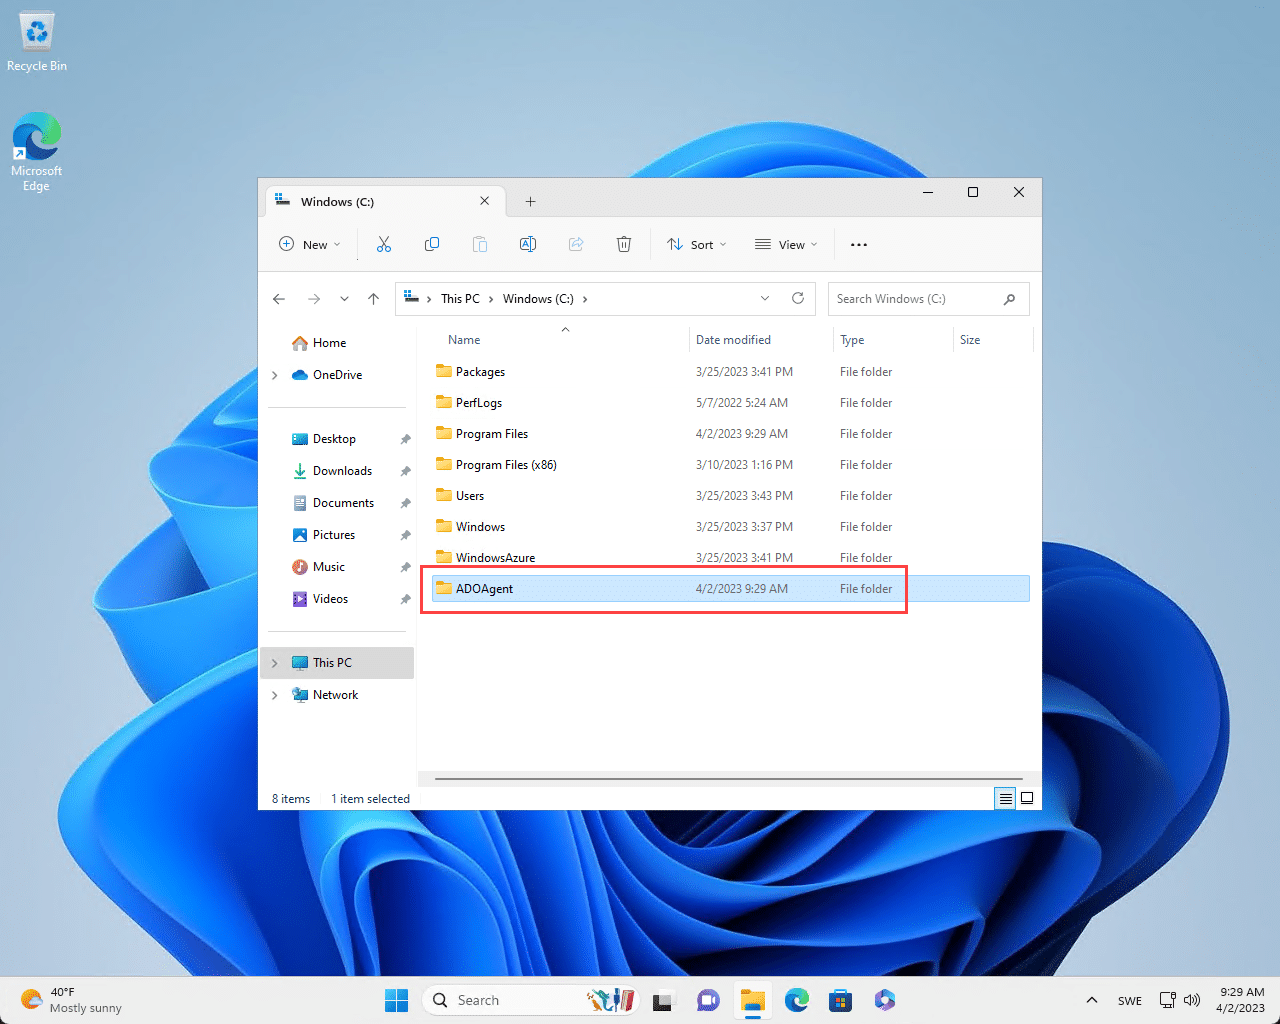
Open File Explorer and create a new folder named ADOAgent in the root of the C drive.
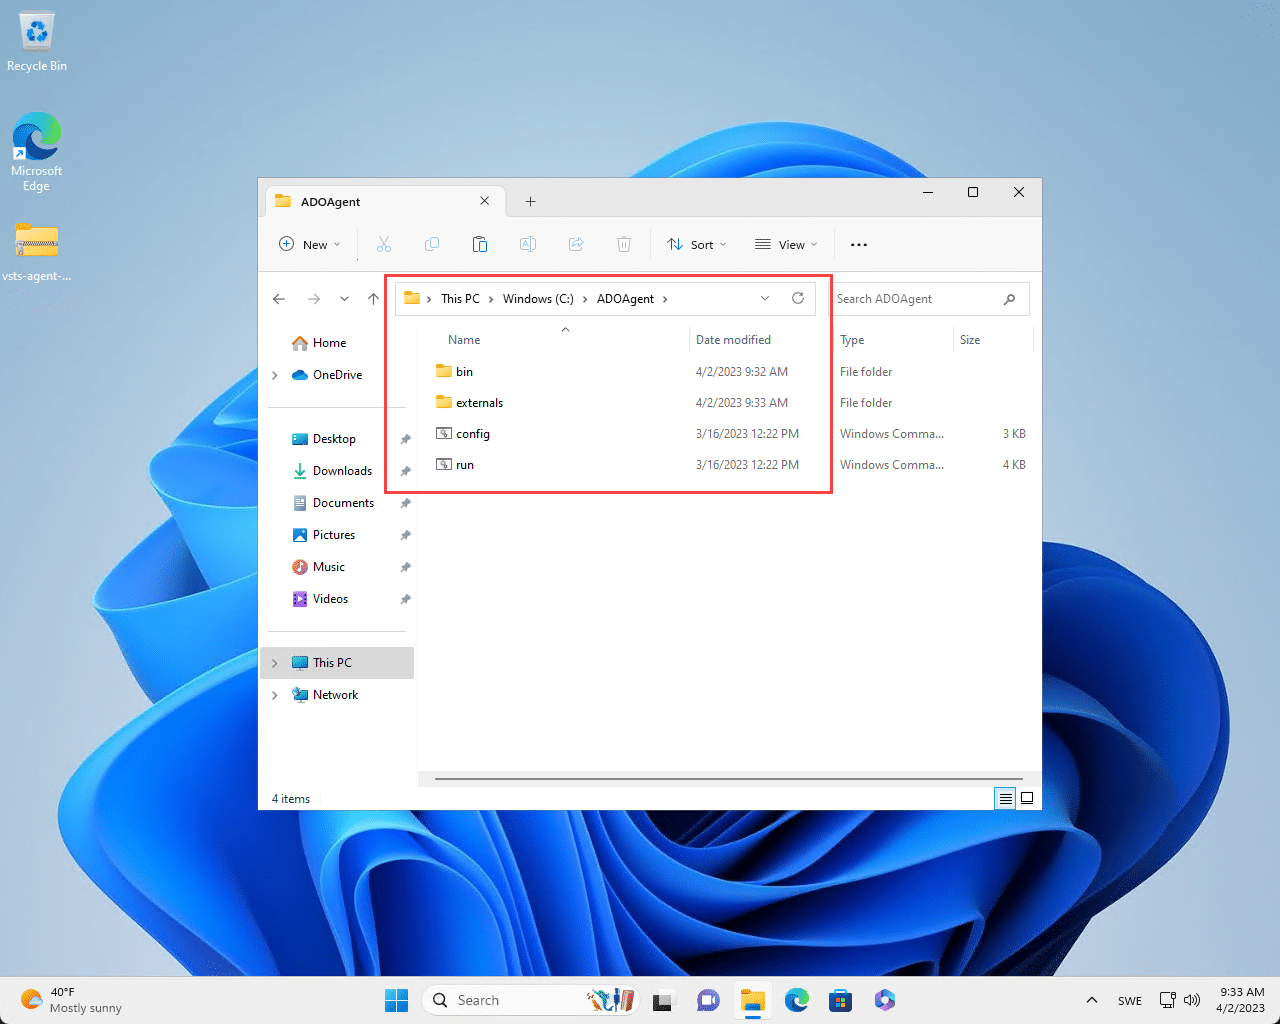
Copy the compressed agent software file to the virtual machine and un-compress it’s content into the ADOAgent folder recently created.
Since the agent will utilize the Windows Package Manager (winget) and other repository sources, it needs to be running under a local user account context, rather than the default NT AUTHORITY\NETWORK SERVICE.
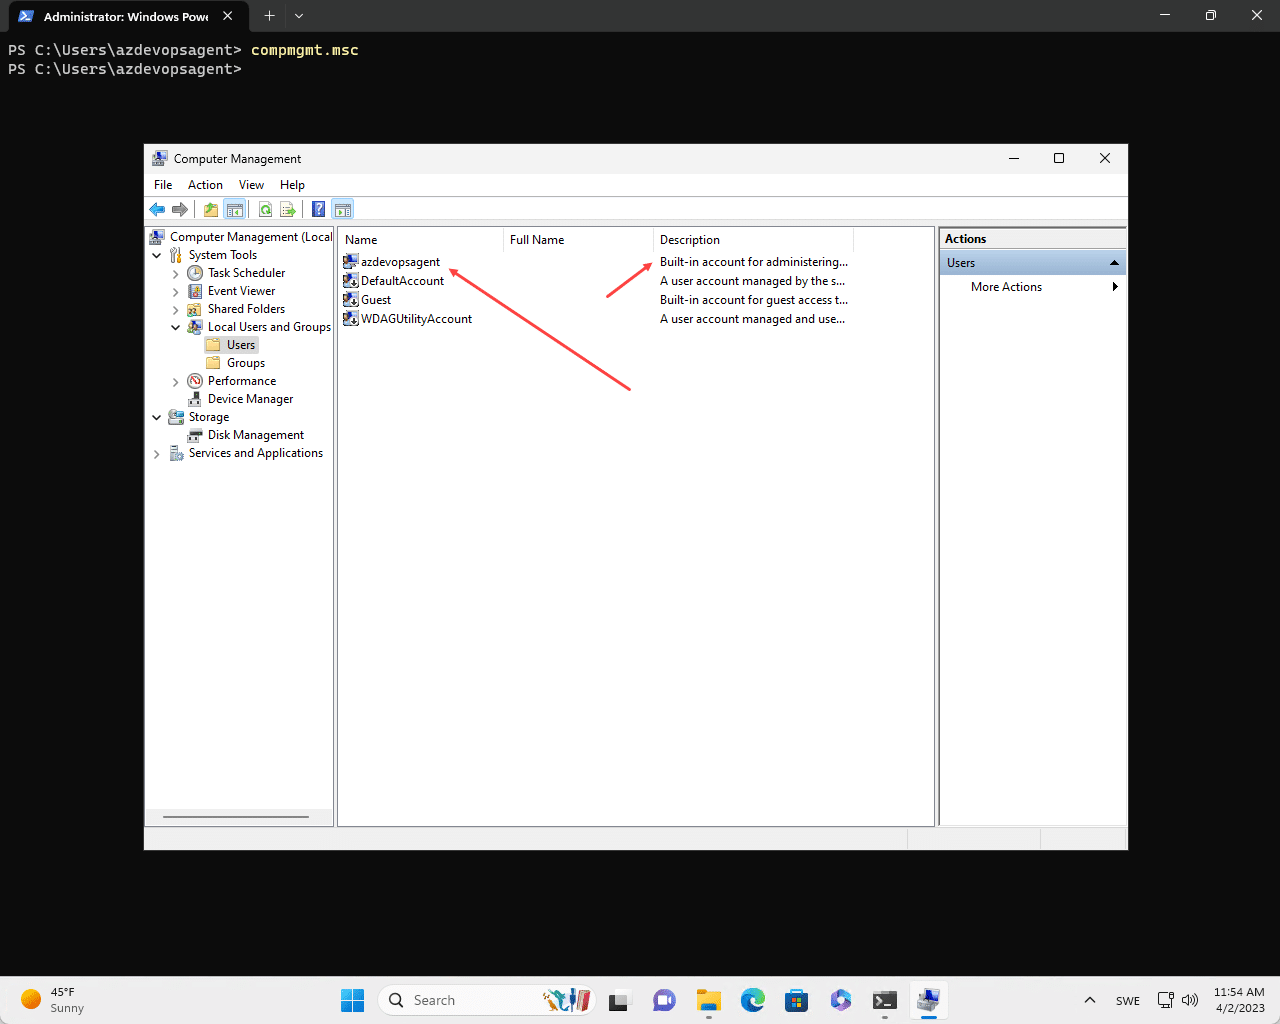
Launch compmgmt.msc from a PowerShell prompt or from the Start menu, and take a note of the local administrator account. The agent configuration will ask for input of a user account the service will be configured to run as. It’s also possible, and also more secure to create a new local user account that’s not a member of the local Administrators group, but for simplicity these setup instructions will be using the built-in administrator account. If you opt for creating a new local user account, it’s important that you follow the steps under the section named ‘Additional virtual machine configuration prerequisites’.
Before you run the agent configuration, ensure you have the Personal Access Token (PAT), agent pool name and the Azure DevOps organization URL available. The URL is normally in the following schema:
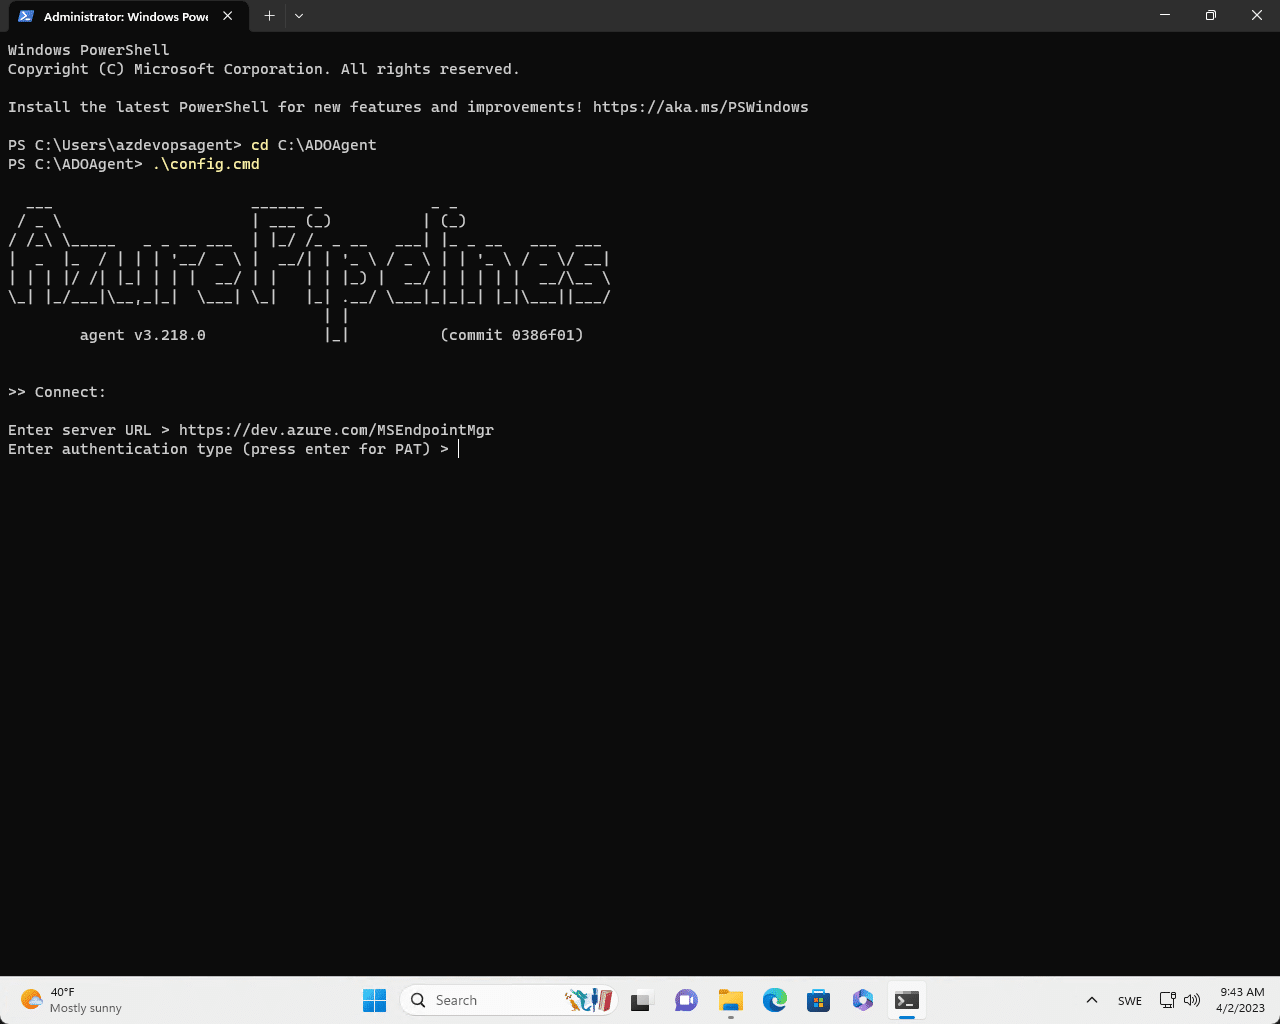
https://dev.azure.com/{your-organization}Open an elevated PowerShell prompt (Terminal on Windows 11) and browser to the C:\ADOAgent folder.
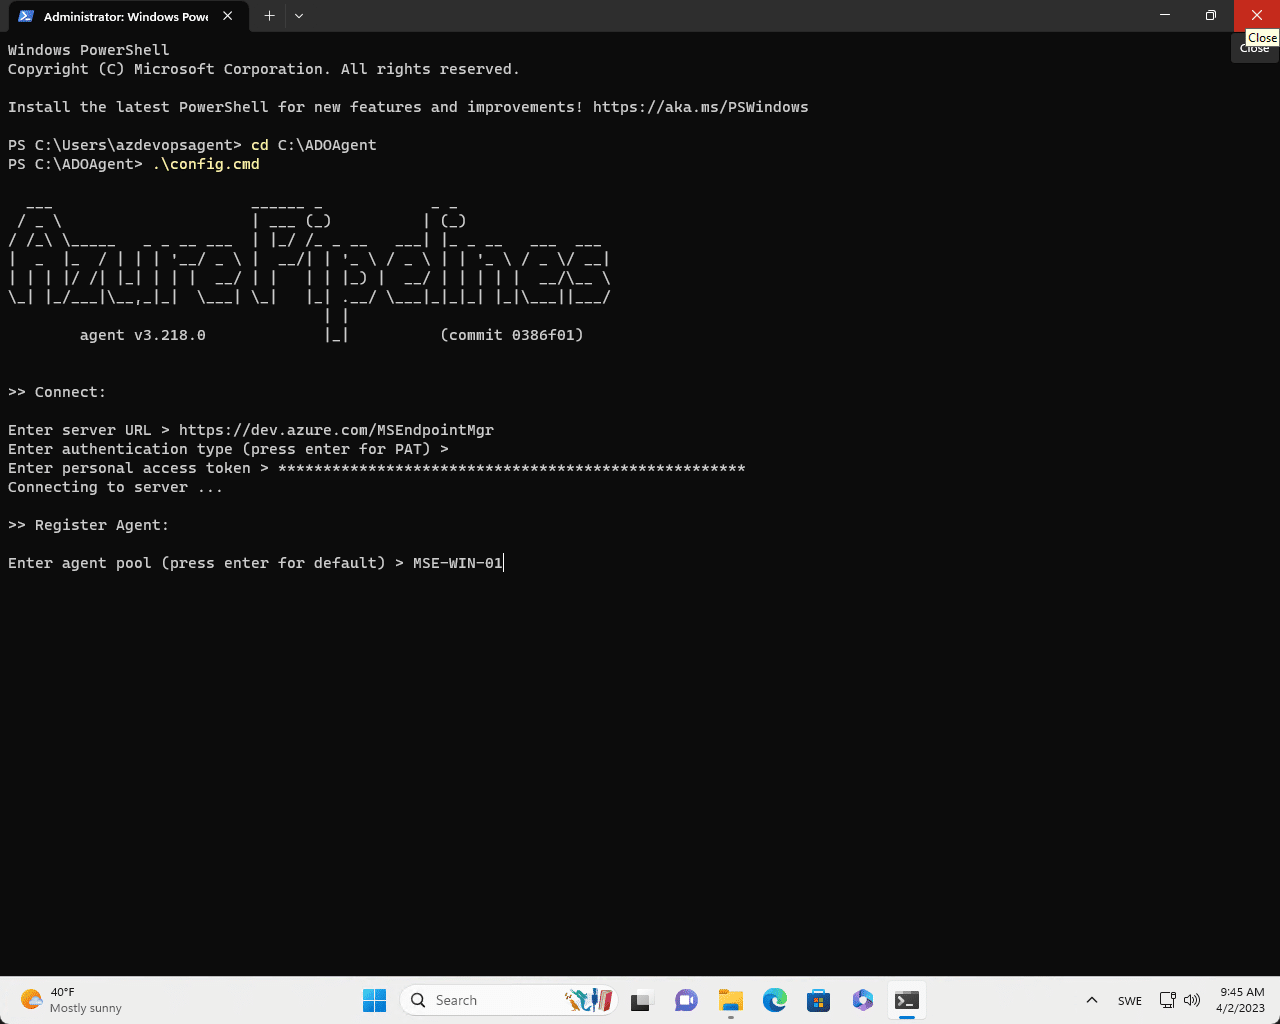
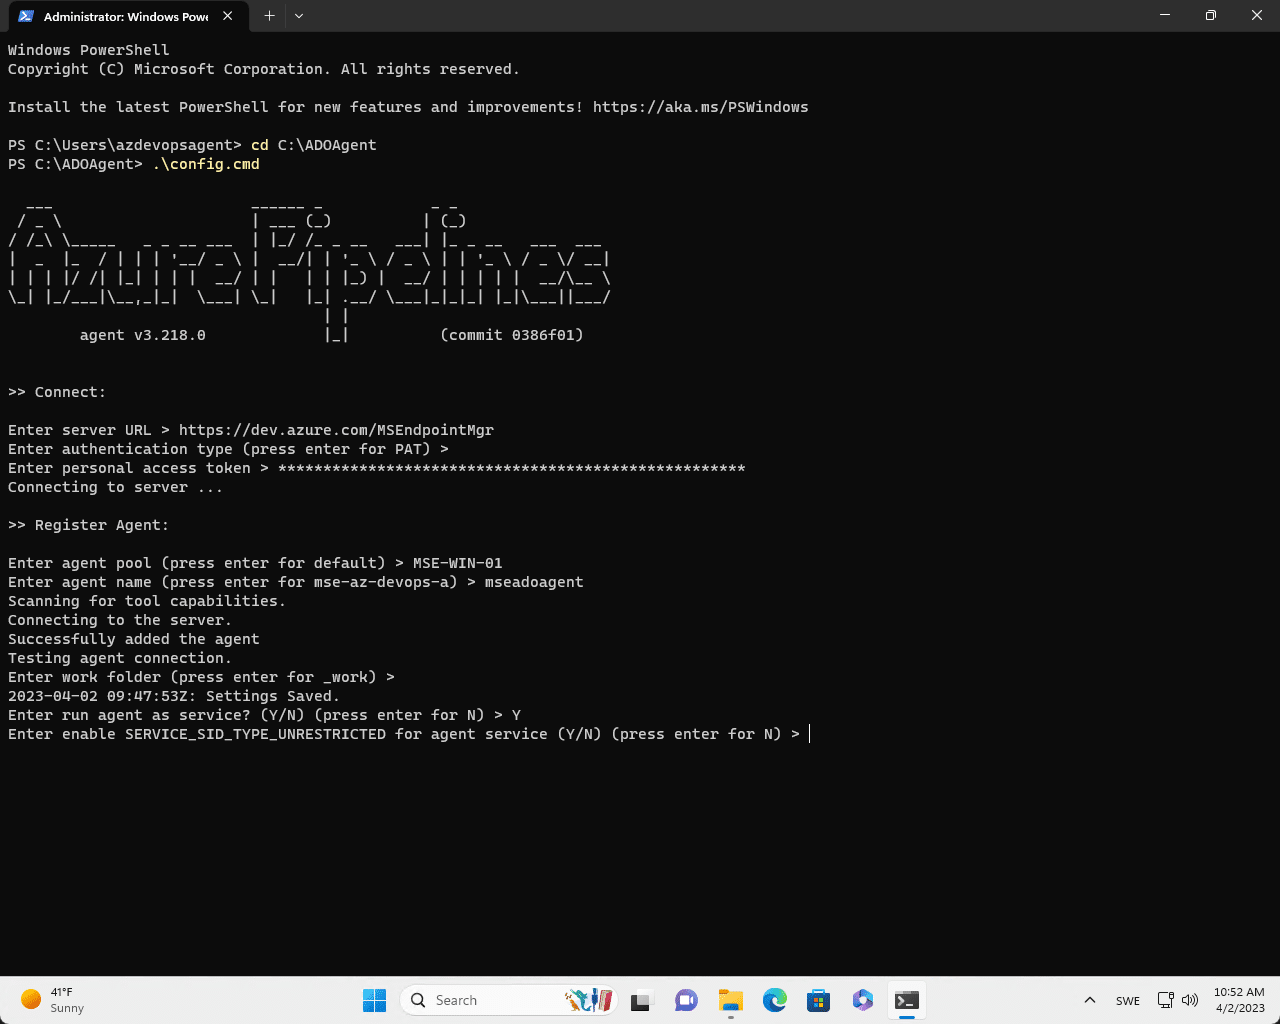
Run the config.cmd file in the ADOAgent folder by typing in the following in the PowerShell prompt:
.\config.cmd
The agent configuration script is an interactive experience that consists of a series of questions where you’re asked to supply the configuration with values.

Enter the server URL, e.g. https://dev.azure.com/<organization> where <organization> is your organization name.
Press Enter to authenticate with your PAT.
Enter the PAT into the prompt and press Enter to confirm.

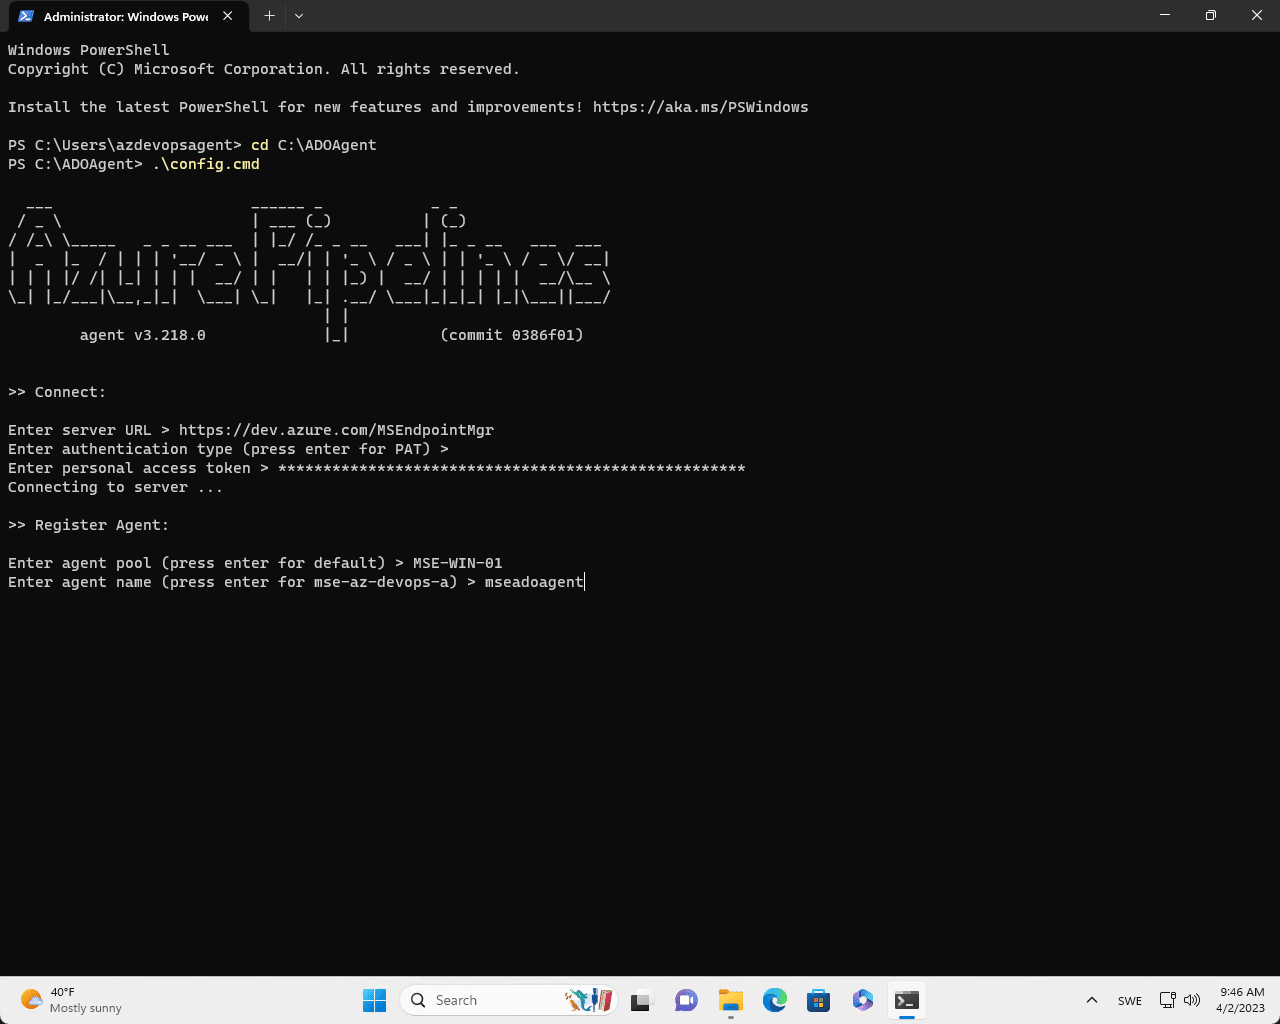
Enter the agent pool name that was previously created.
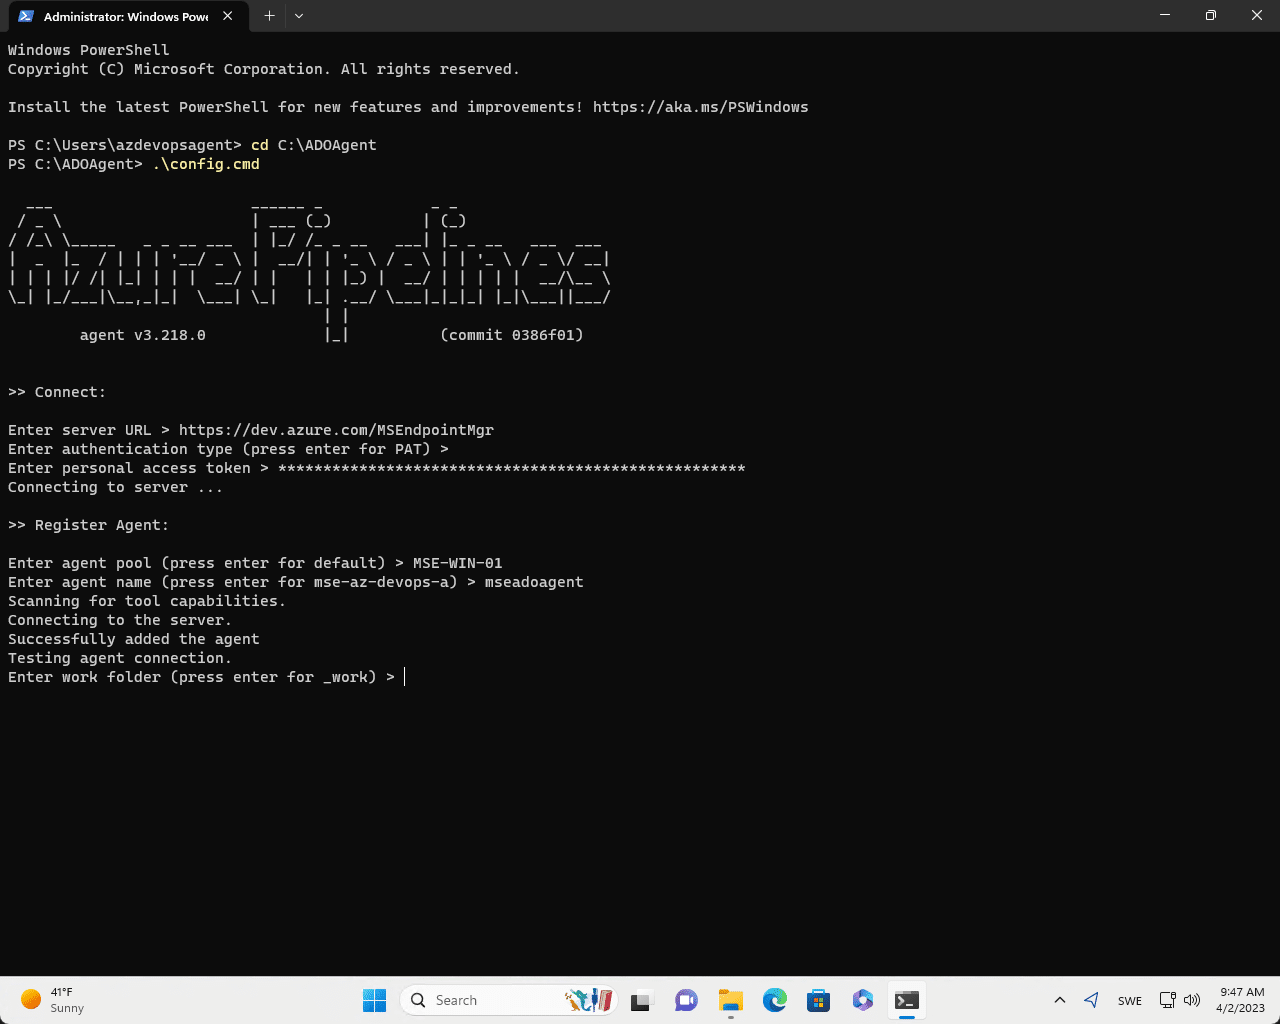
Press Enter to select the default suggested agent name, or provide a custom one.
Press Enter when asked for work folder to use the default.
Type Y to setup the agent to run as a service.
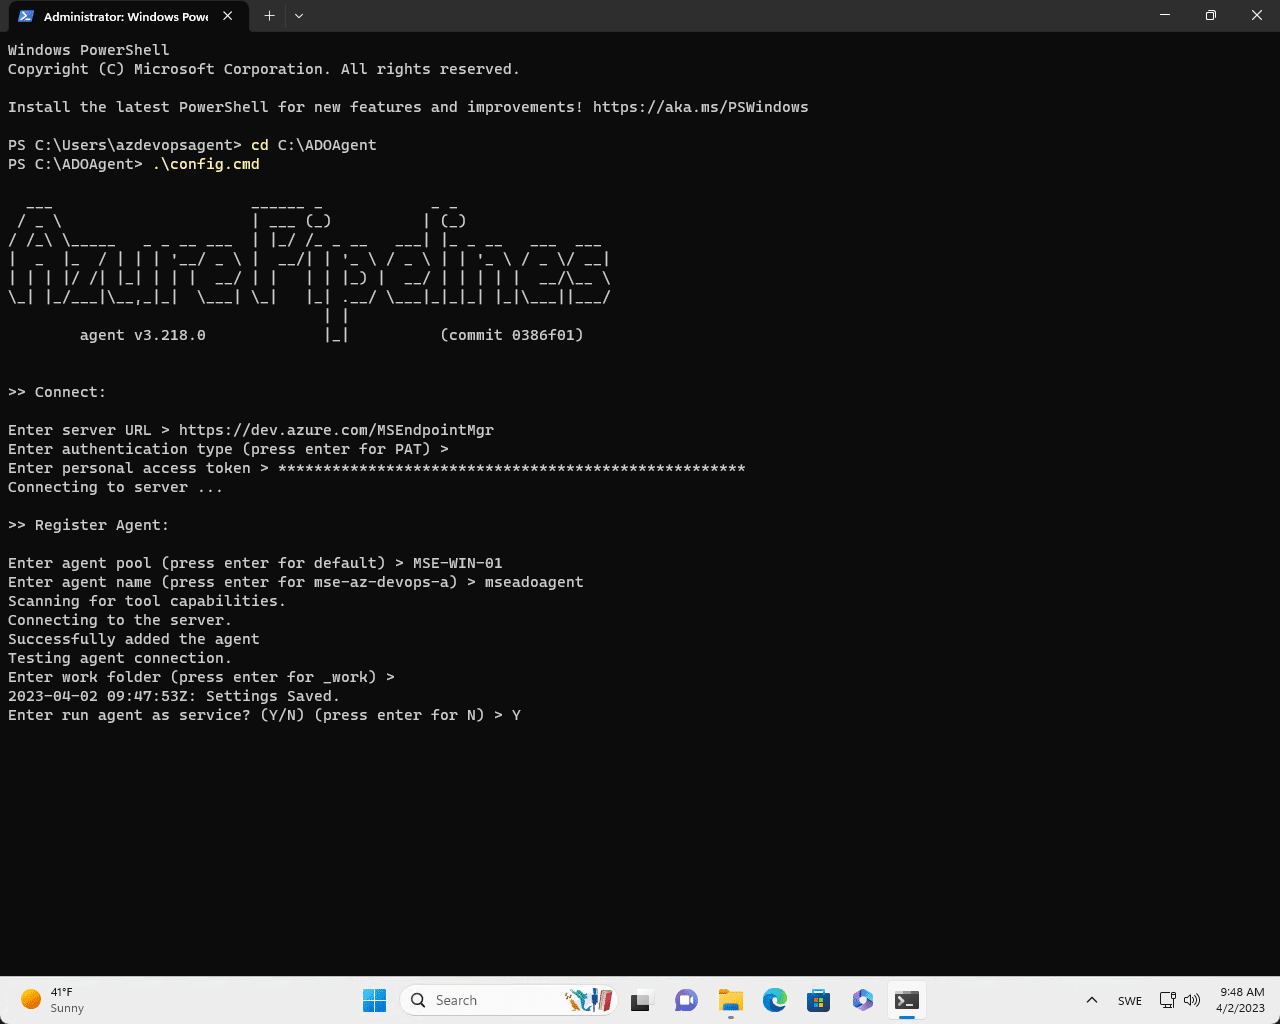
Type Y when asked to enable SERVICE_SID_TYPE_UNRESTRICTED. This will allow for assigning permissions to resources locally on the virtual machine, if needed.
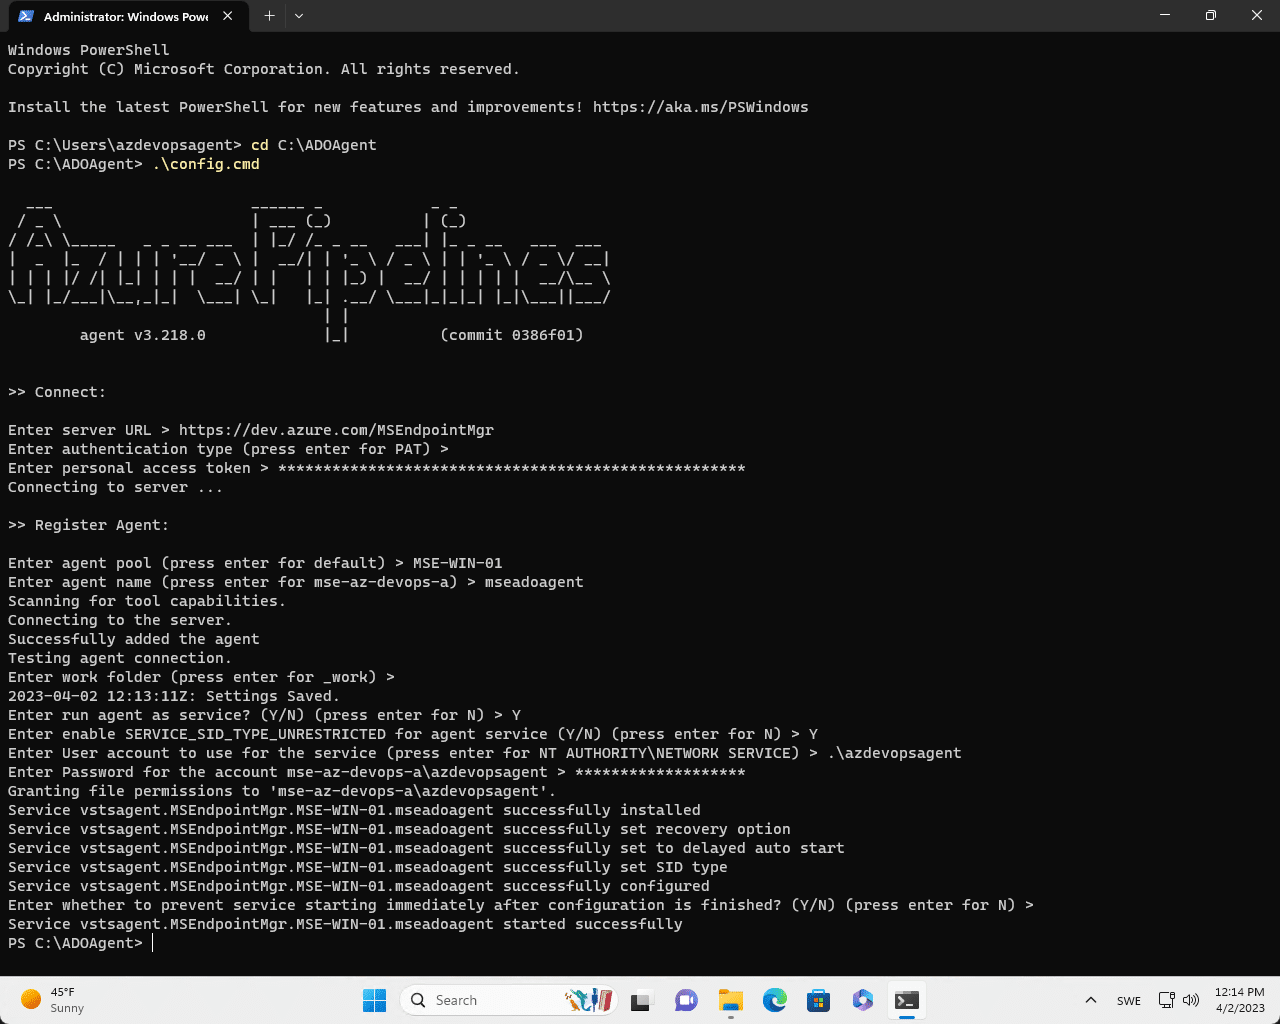
Enter the local user account (local administrator or if you created a different account than what’s used in these instructions) when asked what account to use for the service.

Enter the password for the account selected.

Press Enter when asked whether to prevent the agent service to start immediately after configuration is finished.

The self-hosted agent software is not configured and running as a service on the virtual machine.
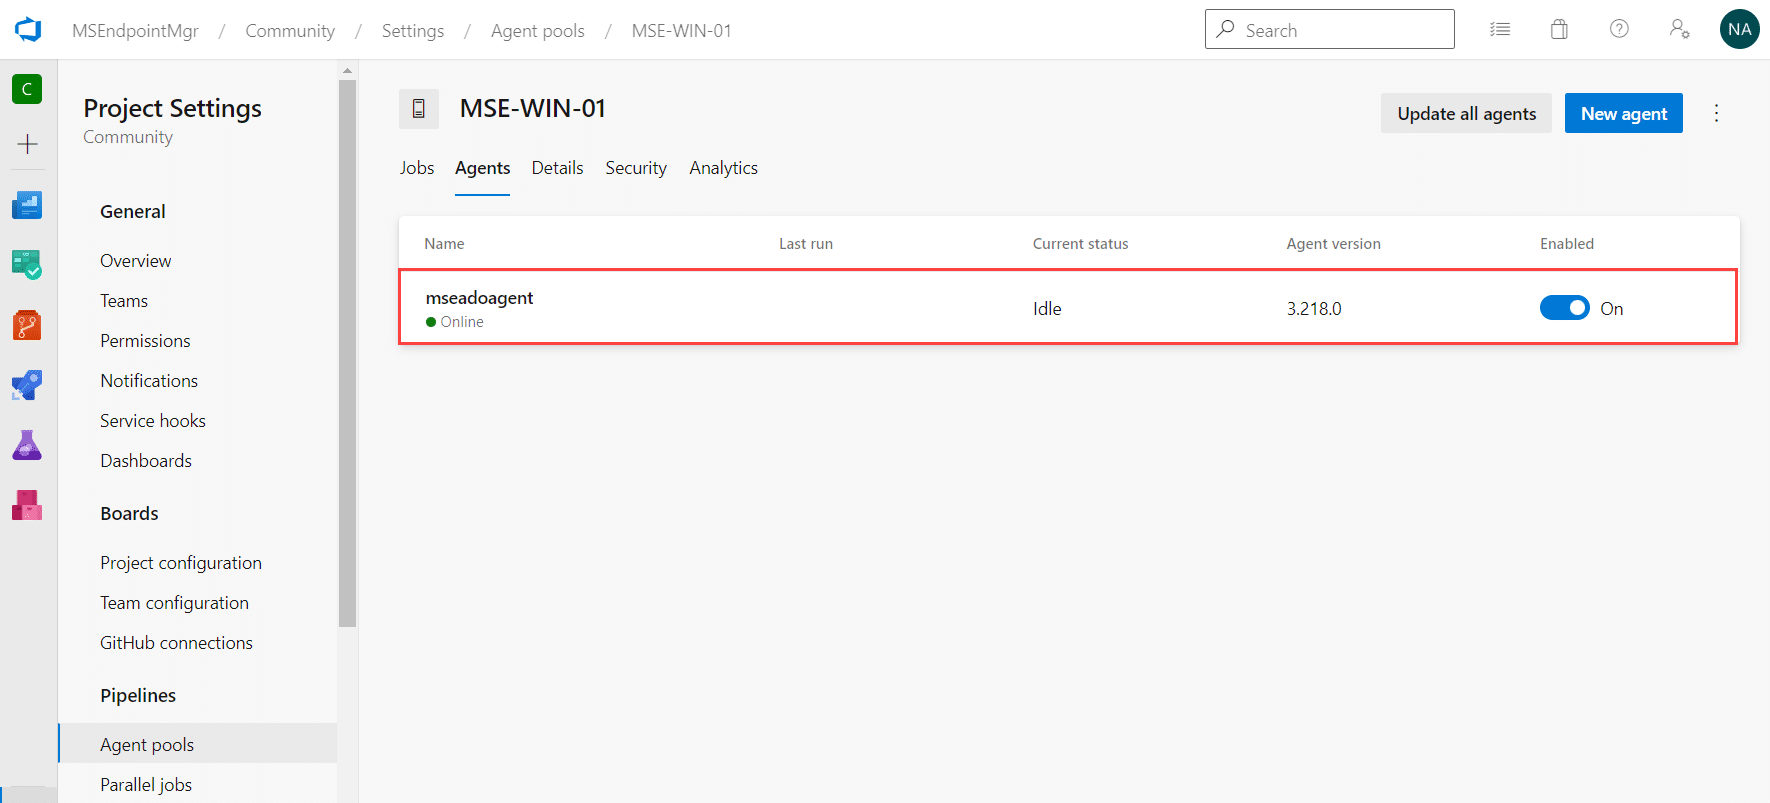
In the Azure DevOps portal, the agent will now appear under the agent pool as shown below.
Additional virtual machine configuration prerequisites
The first time Winget is used to search it’s sources (the community repository and Microsoft Store by default), it asks for you to agree to the Microsoft Store Terms of Transaction. If this is not accepted prior to running the Intune App Factory, the pipeline execution will result in a failure (for applications that’s are onboarded using the winget method).
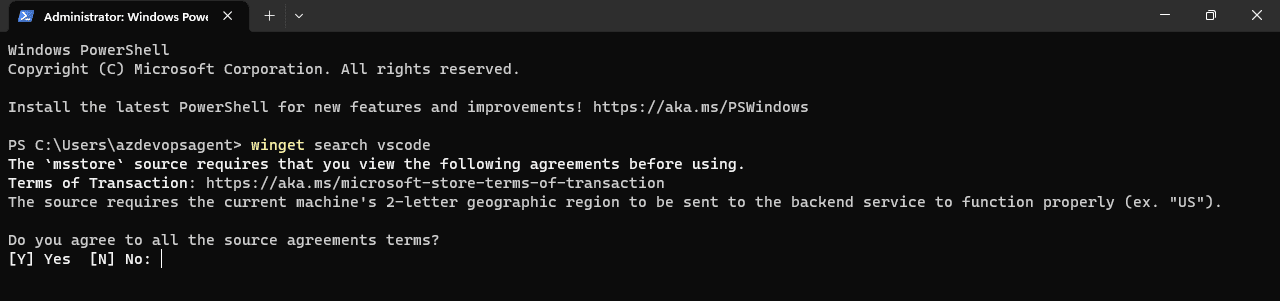
It’s possible that Winget requires an update to even be able to run the above command. Refer to the Microsoft Store app and search for updates.
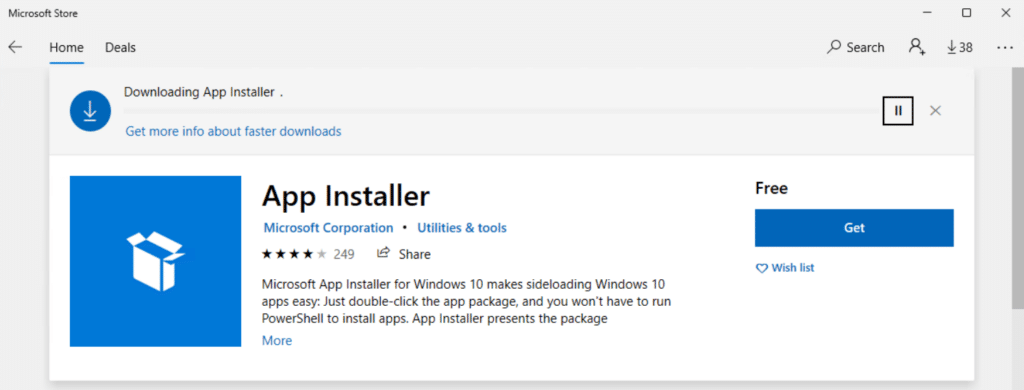
Since it doesn’t really make any sense to package applications available from within the Microsoft Store, especially now since Intune has started to support Win32 applications from the Store using a new application type, it’s recommended to remove the Microsoft Store as a source from winget.
Run the following command in a PowerShell prompt.
winget source remove msstore

Validate the removal of the source by running e.g. the following command.
winget search vscode
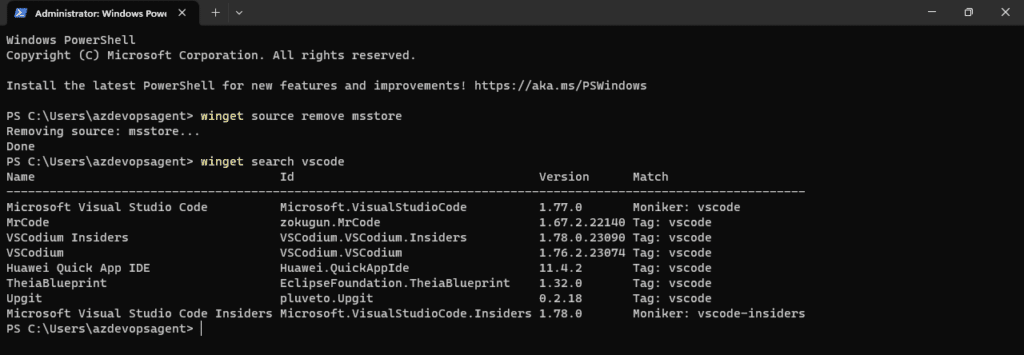
Observe that there were no longer any prompt to accept the terms of transaction, once the source has been removed.
Configure Pipeline variables groups
Variables groups are used by the Intune App Factory to read secrets and other data that’s then commonly used for parameter input for the various PowerShell scripts the solution consists of. Intune App Factory makes use of two variable groups, already configured in the YAML pipeline file that exists in the repository that was created earlier in these setup instructions.
- IntuneAppFactory
- This variable group will contains solution specific variables such as application (client) ID, tenant ID and other non-secretive information that’s not meant to be stored in a Key Vault, but that’s specific to each environment and is easier to manage rather than specifying it directly in the pipeline configuration
- KeyVault
- This variable group will contain the specified secret objects from the Key Vault created previously in these setup instructions, protecting the objects from being hard-coded into the pipeline configuration
Create IntuneAppFactory variable group
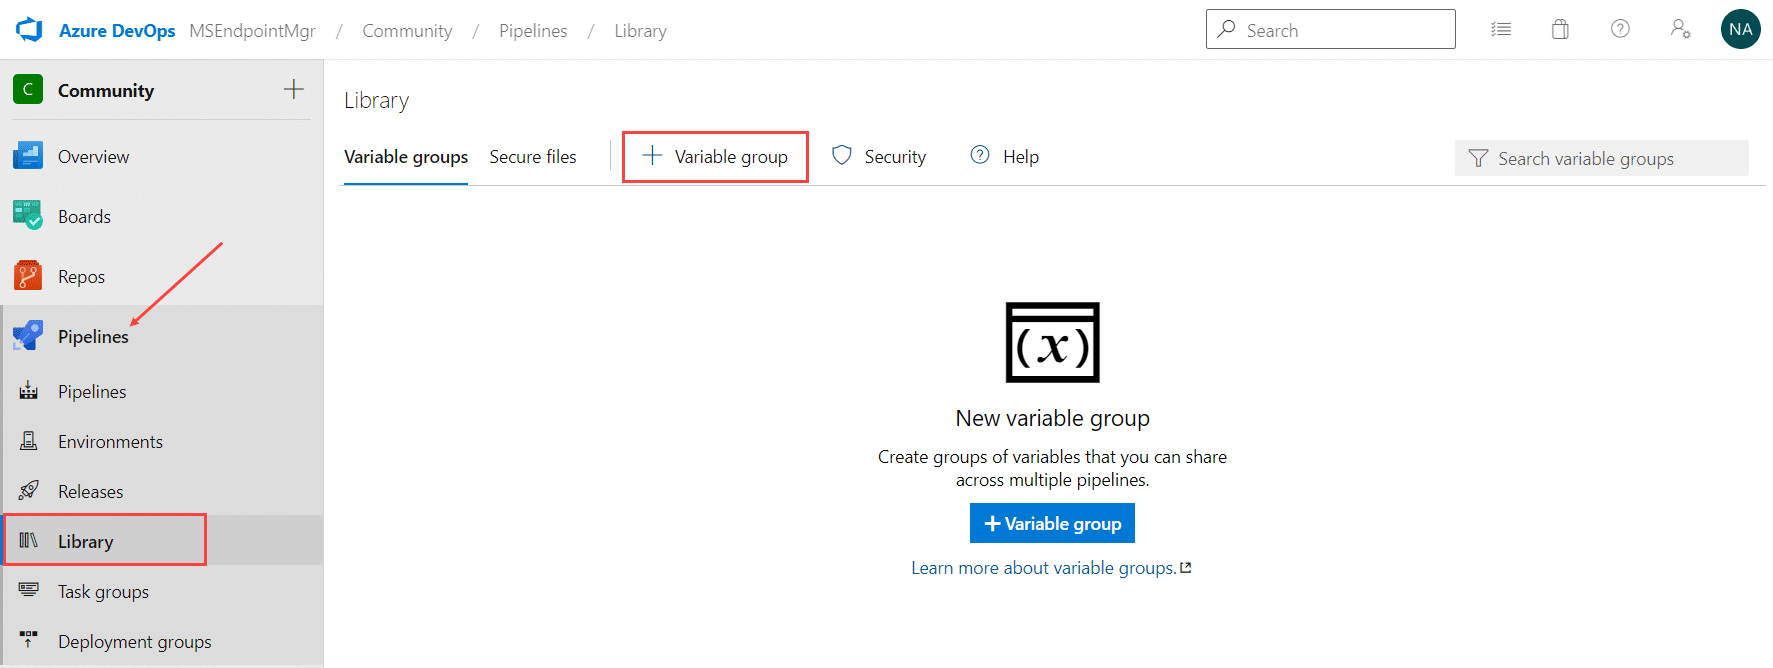
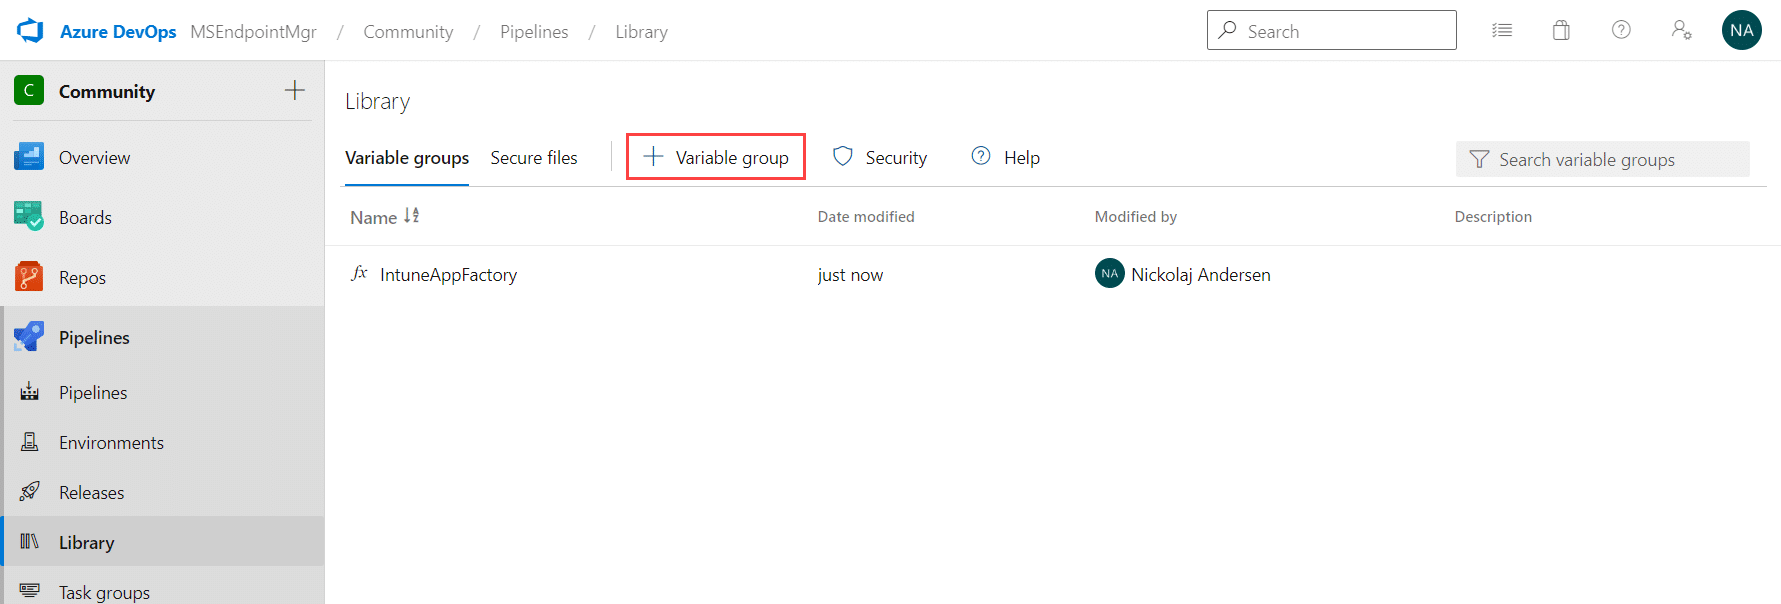
In the Azure DevOps portal, click on Pipelines and then Library. Click on the + Variable group button.
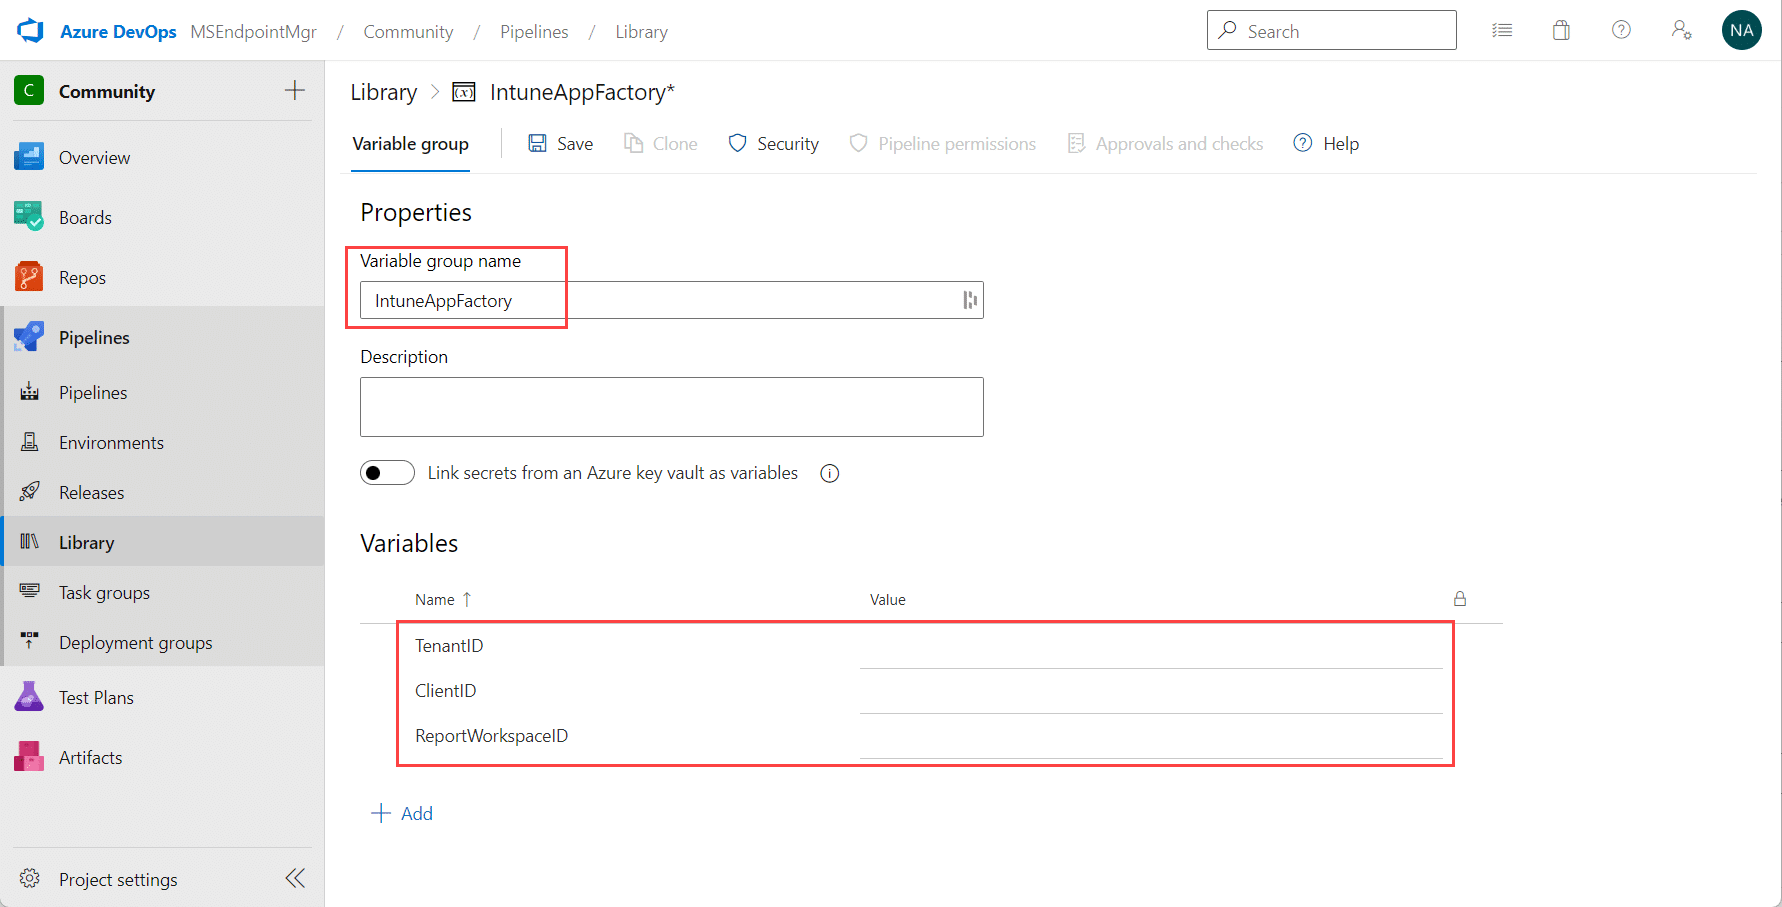
Name the variable group IntuneAppFactory. It’s necessary that you name it correctly, otherwise the pipeline configuration would have to be amended to reflect the given variable group name. It’s by default hard-coded as IntuneAppFactory in the pipeline configuration.
Add the following variables, and provide their corresponding values:
- TenantID
- Enter the tenant ID of your Azure Active Directory tenant
- ClientID
- Enter the Client (application) ID of the Intune Service Principal created earlier in these setup instructions
- ReportWorkspaceID
- Enter the Log Analytics workspace ID created earlier in these setup instructions
If the archiving functionality built-in to Intune App Factory is meant to be used, two additional variables needs to be created:
- ArchiveStorageAccountName
- Enter the Storage Account name of the resource created earlier in these setup instructions
- ArchiveContainerName
- Enter the container name setup previously in these setup instructions for the archiving functionality, e.g. archive
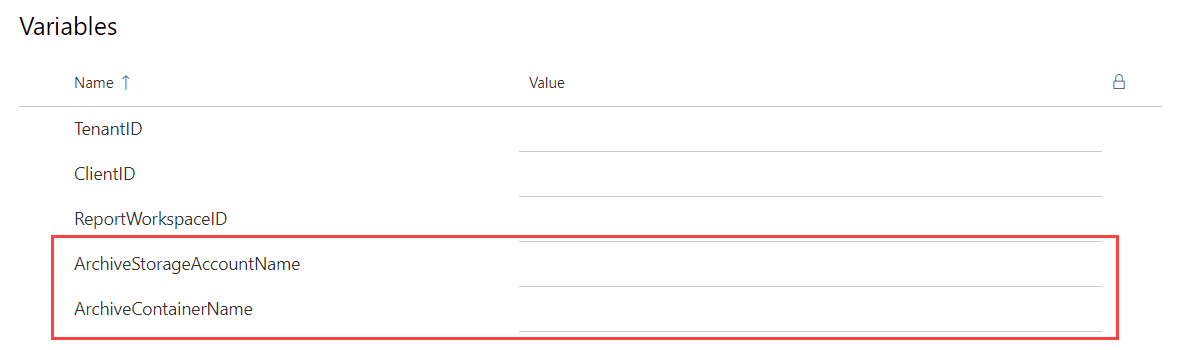
When the necessary variables with the corresponding values have been configured, click the Save button.

Create KeyVault variable group
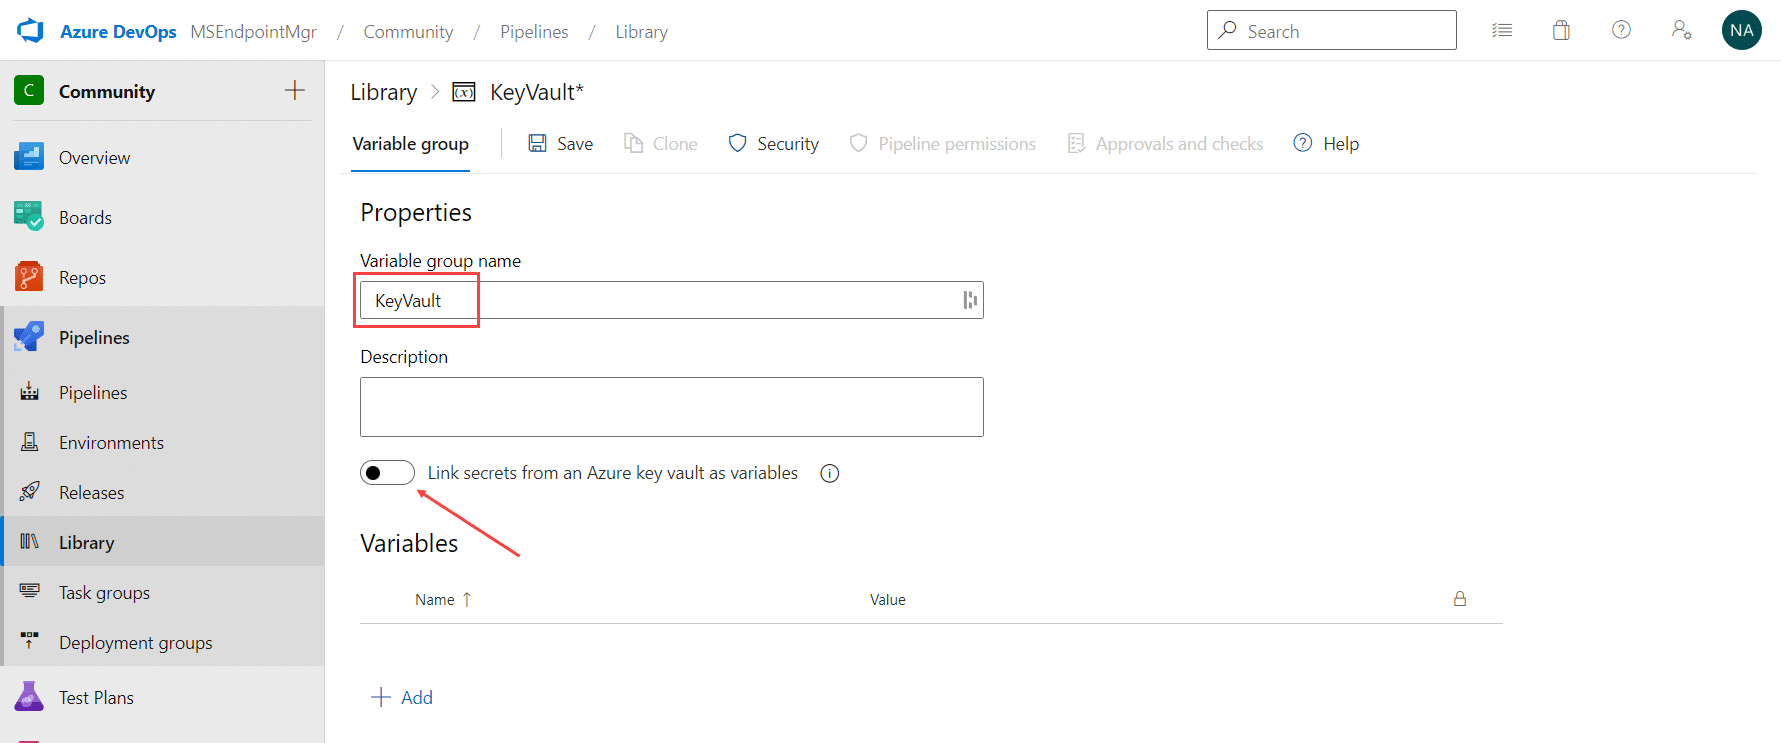
Create a new Variable group.
Name the variable group KeyVault. Same naming reference with the default pipeline configuration applies to this group, as to the IntuneAppFactory variable group.
Click Link secrets from an Azure key vault as variables switch.
In the Azure subscription field, do not make a selection, but enter the name of the Service Connection setup previously in these setup instruction, which can be seen under Project Settings – Service connections in the Azure DevOps portal.
Enter the name of the Key Vault resource in the Key vault name field.

All previously shown error messages or instructions to authorize a connection towards Azure should not be shown at this point.
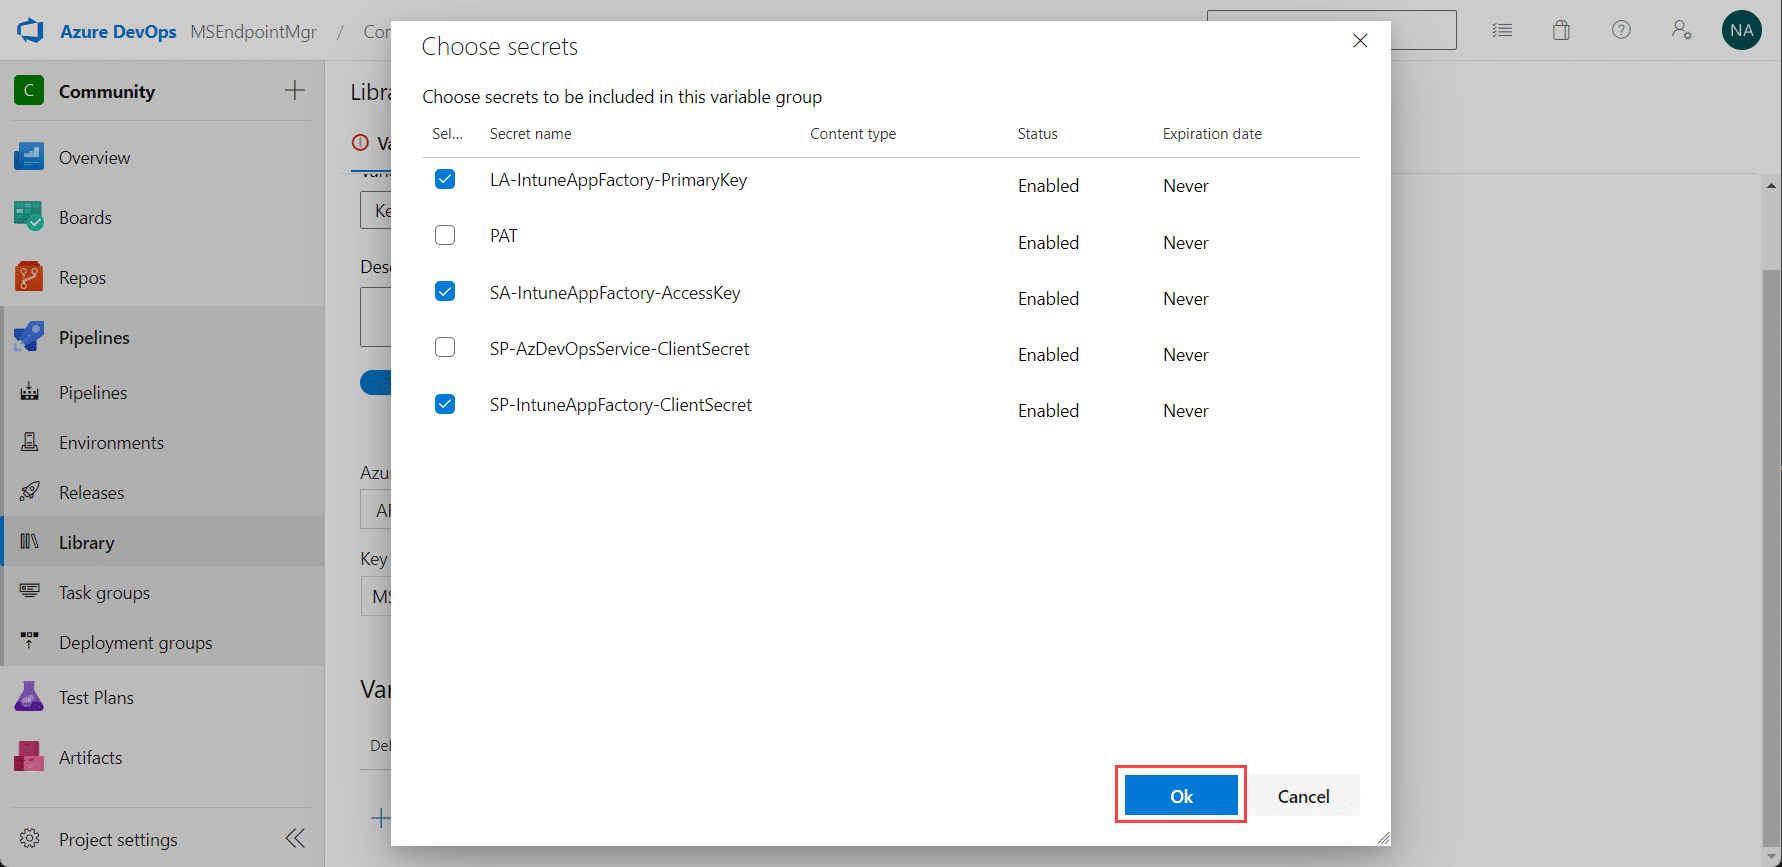
Click Add under Variables.
Make the following selection of secret objects:
- LA-IntuneAppFactory-PrimaryKey
- SP-IntuneAppFactory-ClientSecret
- SA-IntuneAppFactory-AccessKey
Click OK.
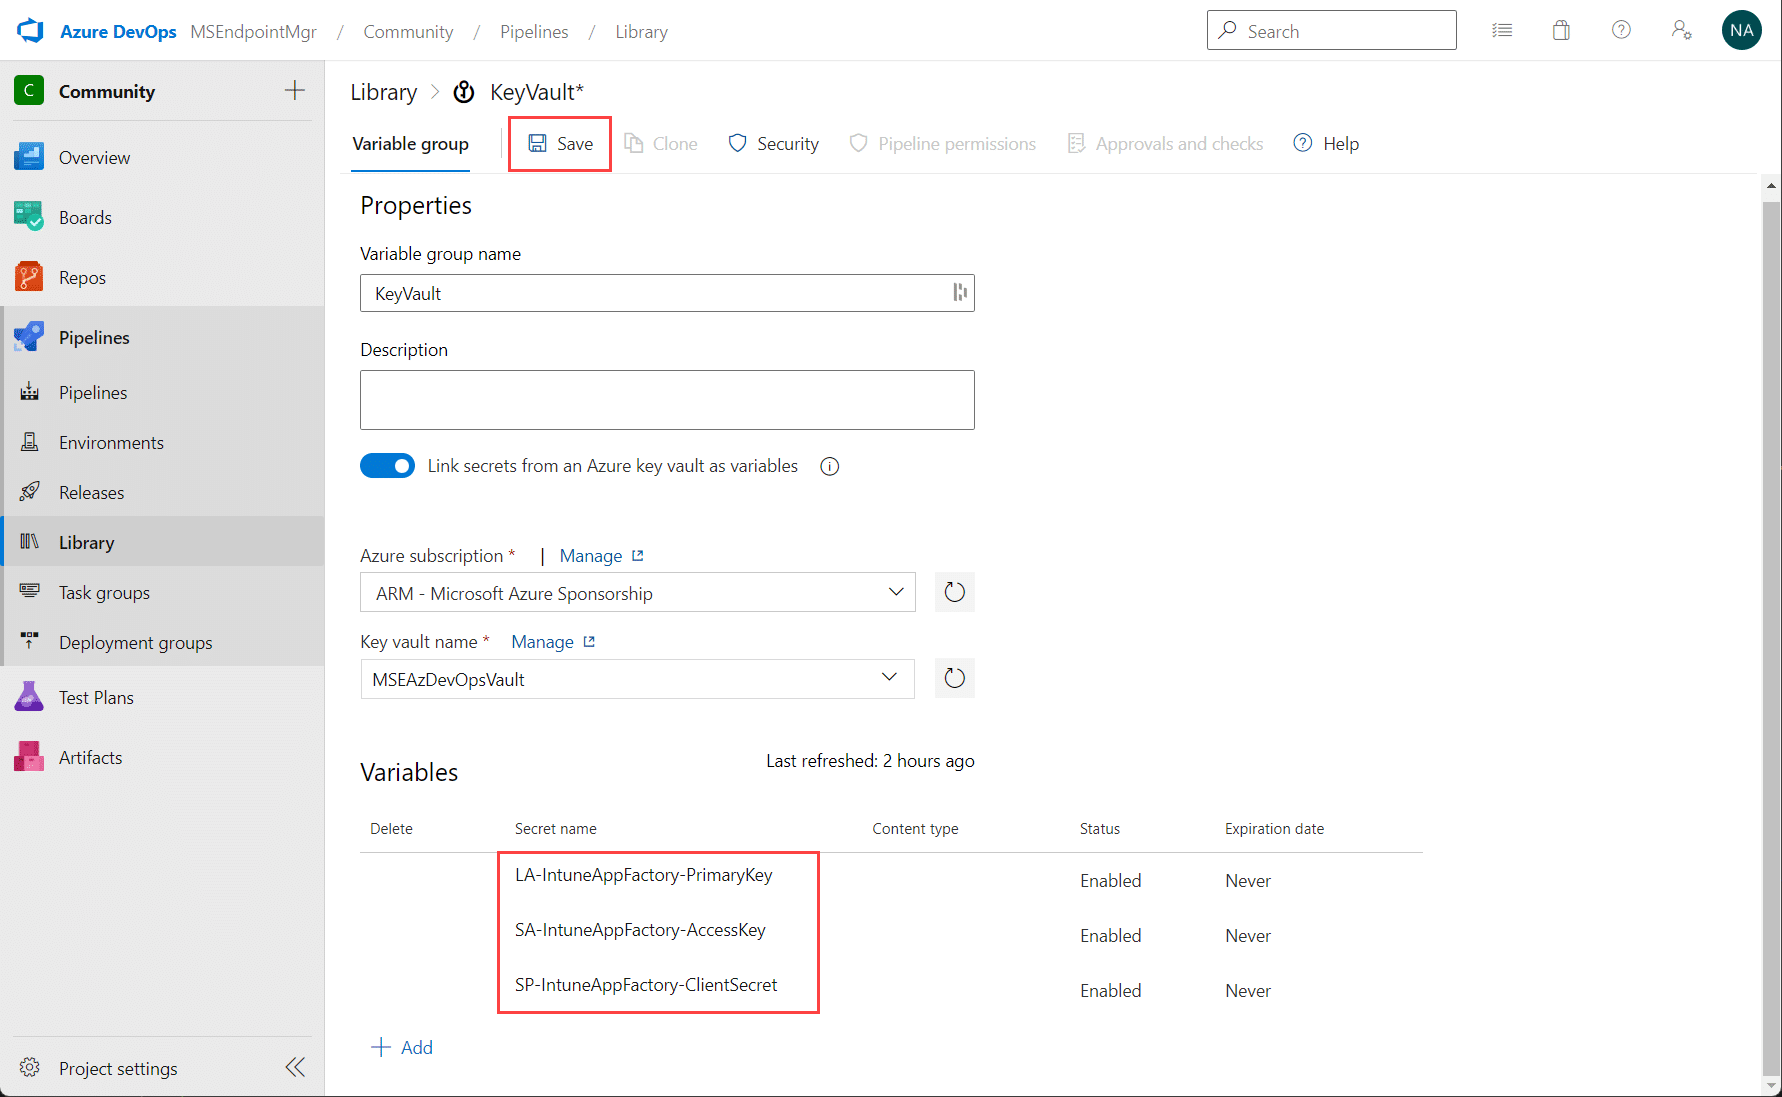
The selected secret objects from the Key Vault are now added as variables in the KeyVault variable group. Ensure the desired variables are in place and click Save.
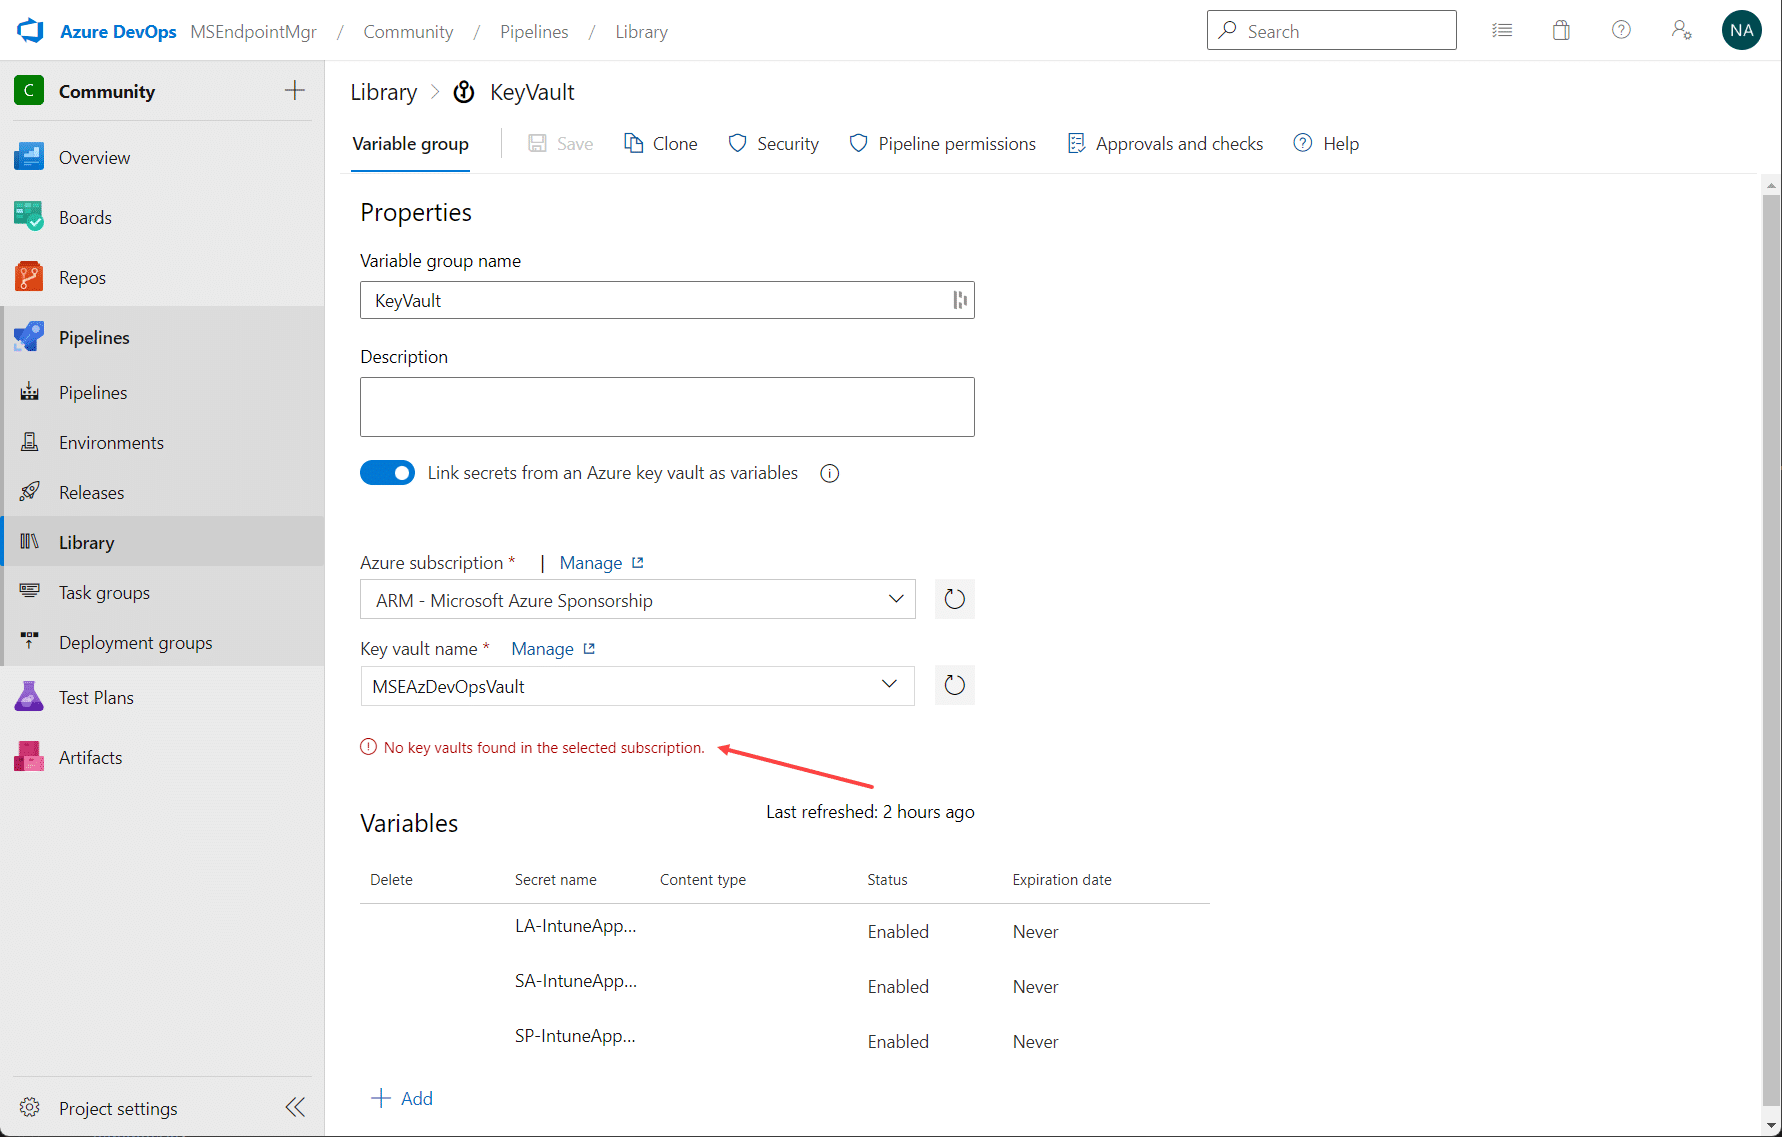
Once saved, ignore the No key vaults found in the selected subscription warning message that appears.
Create the Intune App Factory pipeline
Within the imported repository for Intune App Factory, in the root there’s a file named publish.yml. This is actual pipeline configuration file. In this section of the setup instructions, this file will be used to create the actual Pipeline in Azure DevOps.
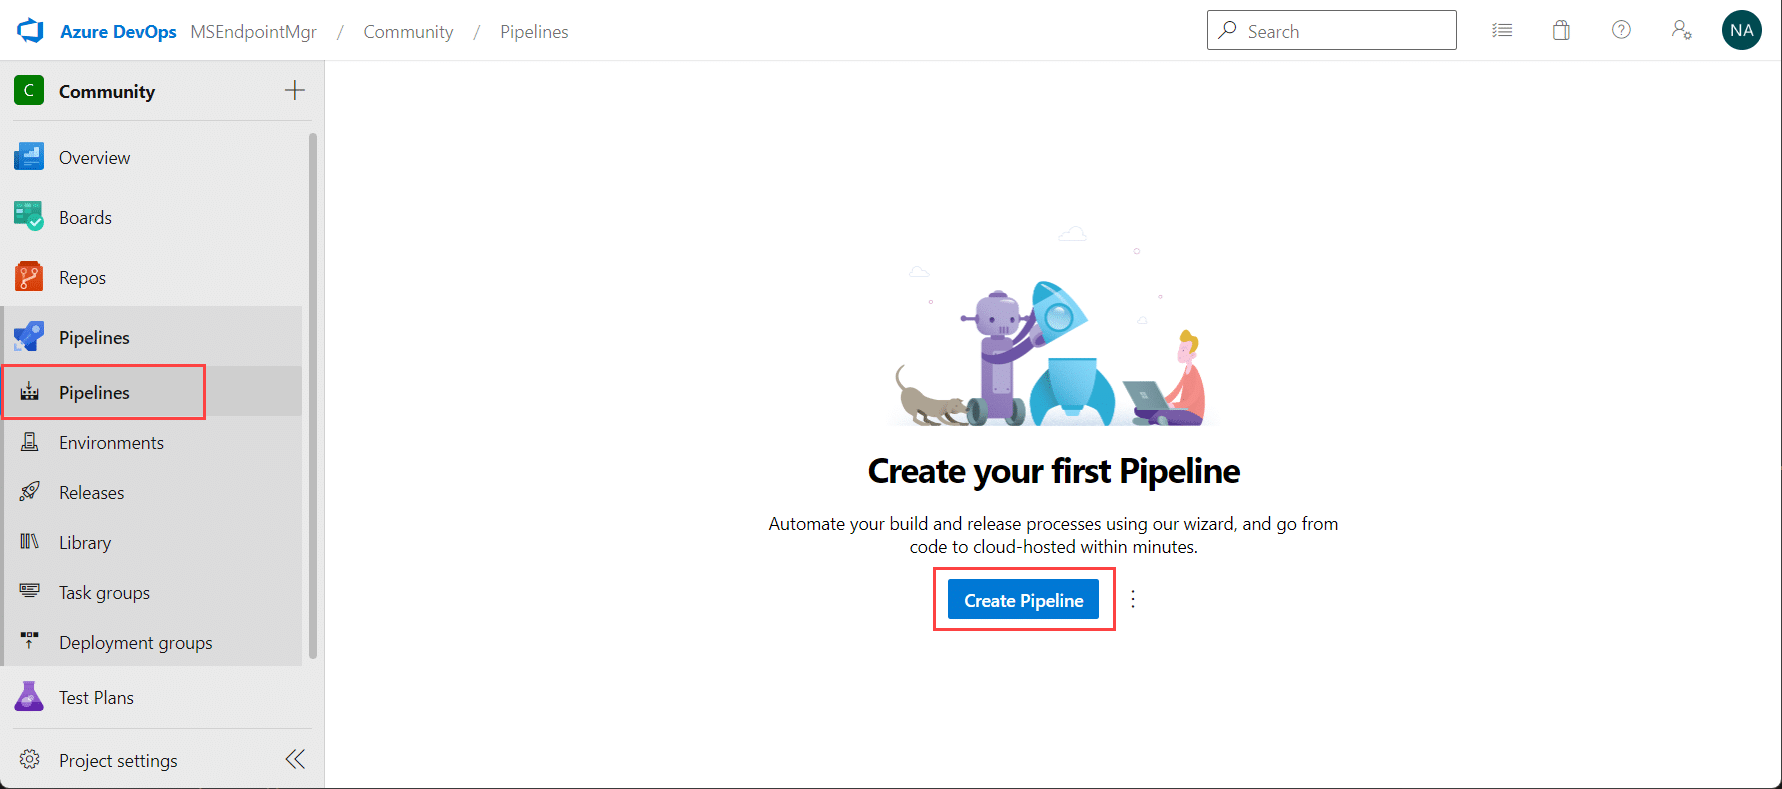
Select Pipelines in the Azure DevOps portal, click on Pipelines and click on Create Pipeline.
Select Azure Repos Git.

Select the IntuneAppFactory repository.

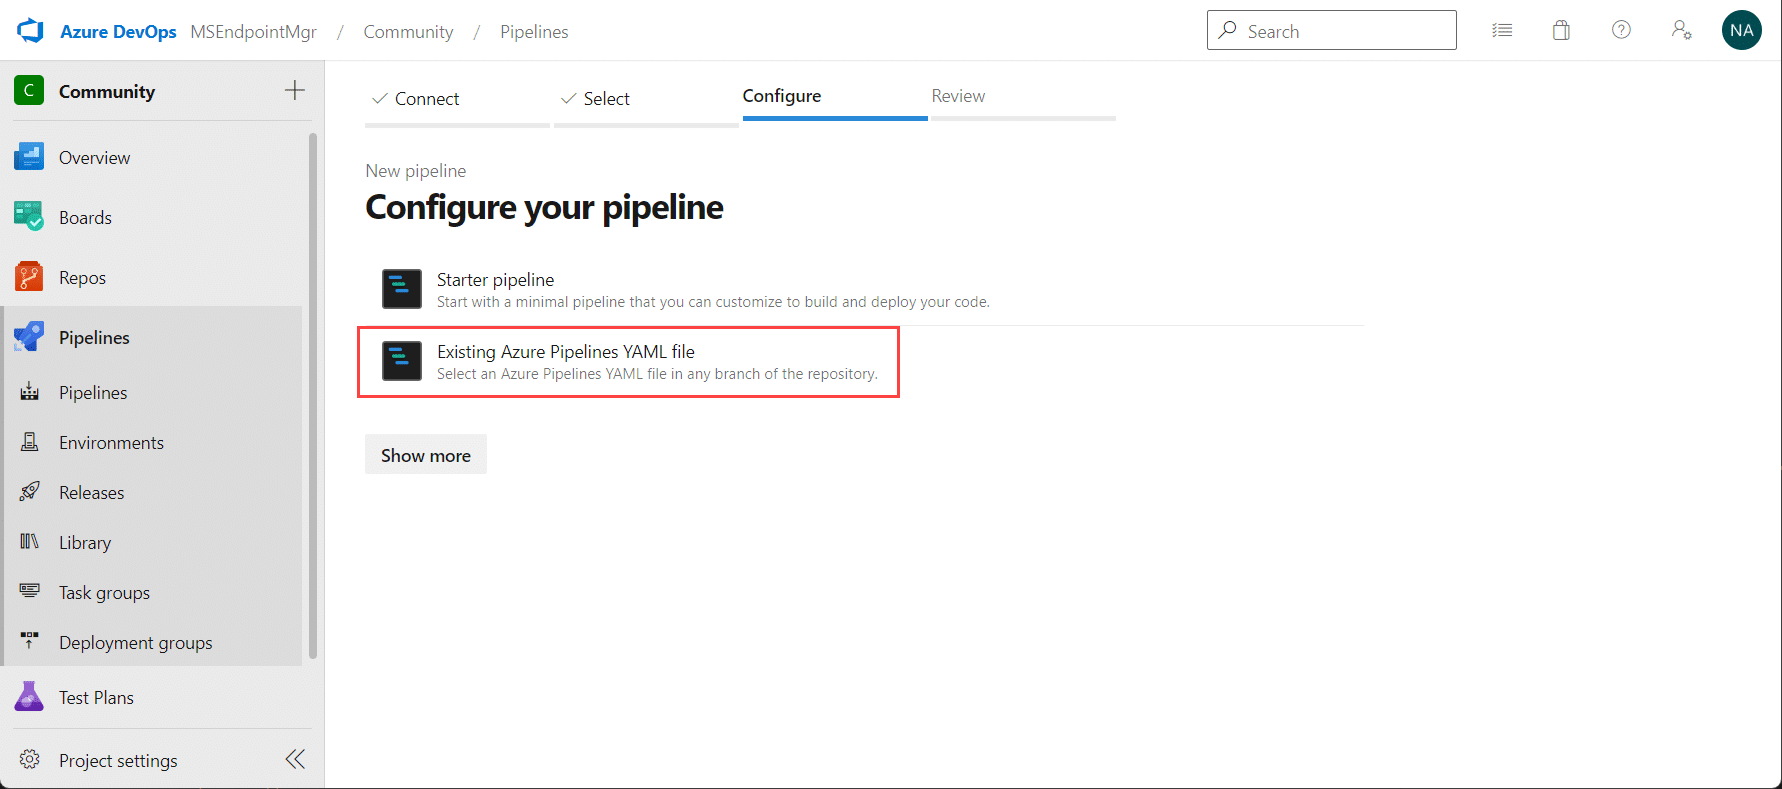
Select Existing Azure Pipelines YAML file.
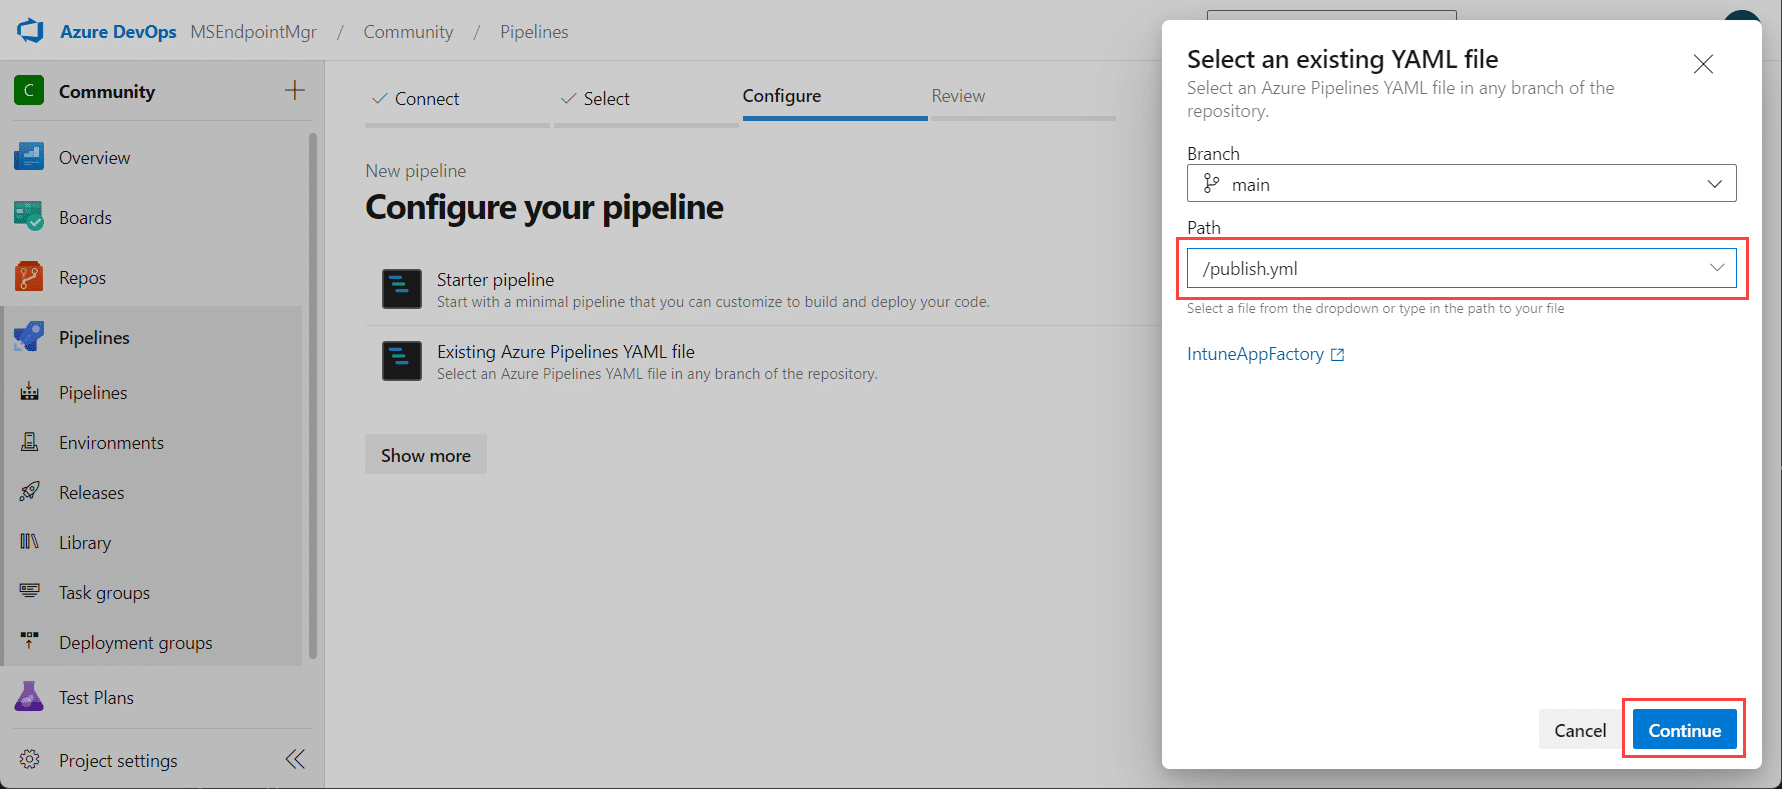
Ensure Branch is set to main (there should be no other branches), click the drop-down menu under Path and select the /publish.yml location. Click Continue.
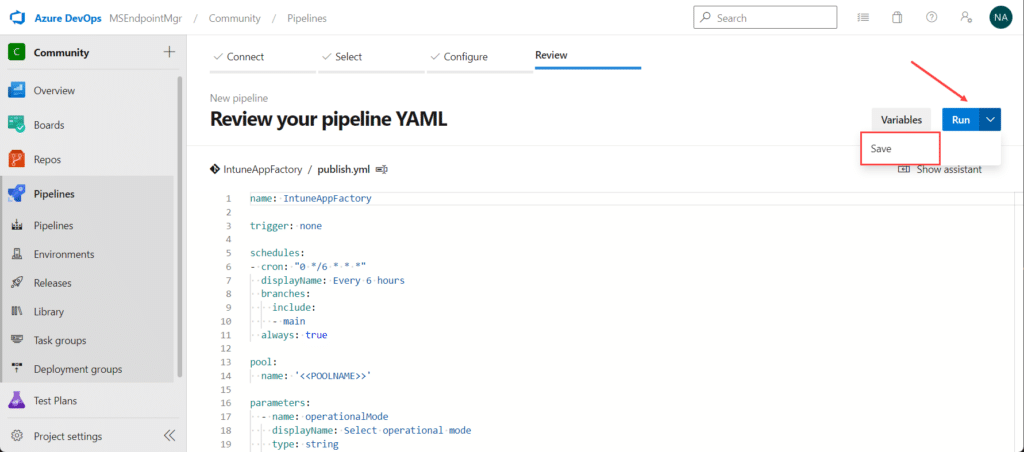
At this point, don’t run the pipeline, click the arrow down next to Run and select Save.
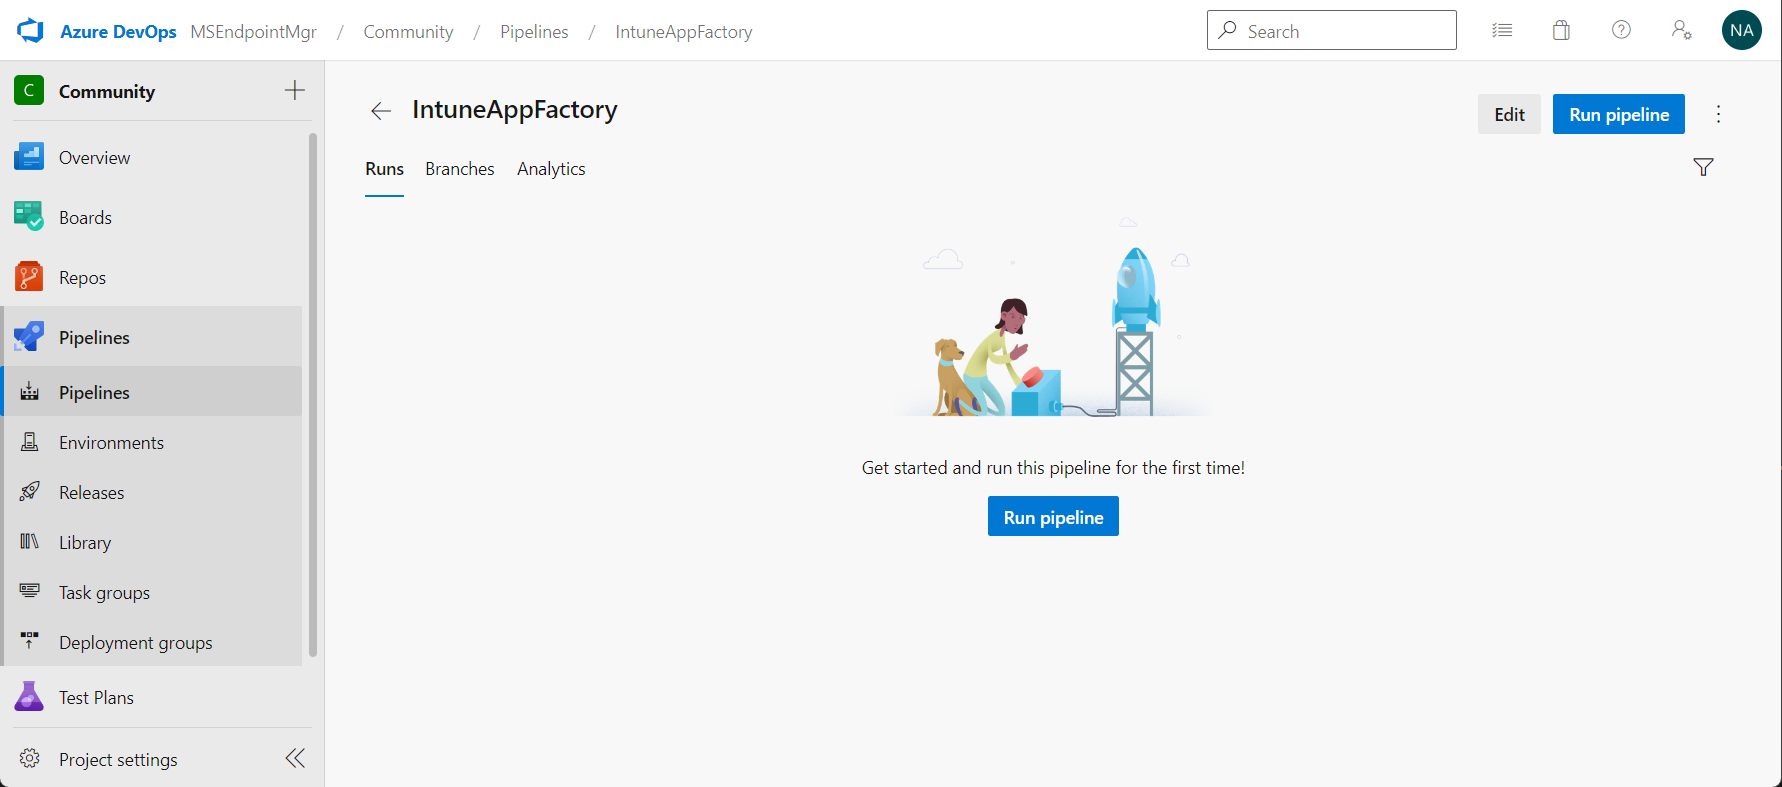
The Intune App Factory pipeline is now created, however there’s a few configuration steps that needs to be completed before the whole solution will function properly, which are covered in the next section.
Only one step remains at this point, which is to provide the imported pipeline with permissions to access the variables groups created earlier.
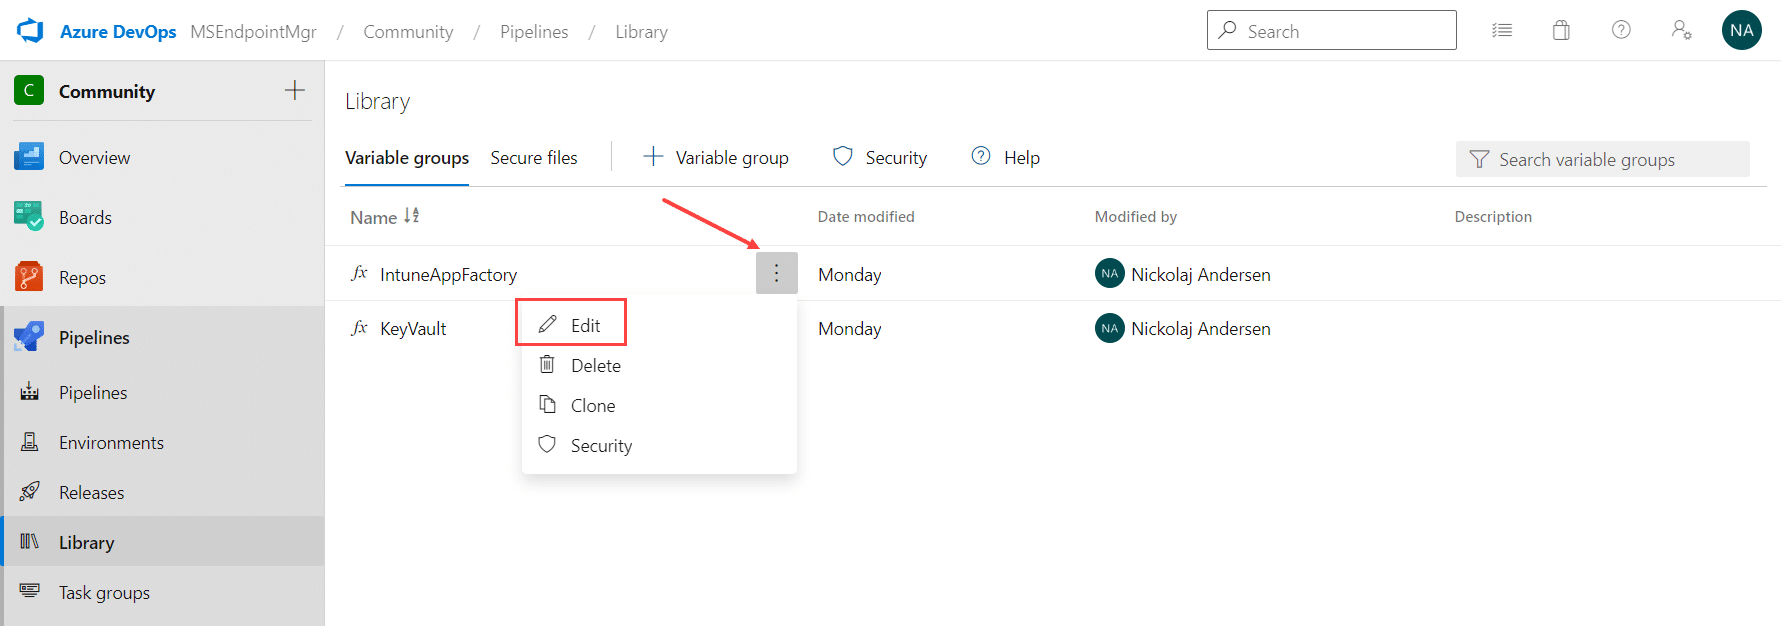
Click on Pipeline and then Library section in the left navigation, click the three dots next to the IntuneAppFactory variable group and select Edit.
Click Pipeline permissions.

Click on the + button and select the IntuneAppFactory pipeline.

Perform the same steps for the KeyVault variable group as well.
Configure the Intune App Factory pipeline
The final configurational piece in these setup instructions, involves the actual Intune App Factory pipeline itself, more specifically the publish.yml file that was just recently imported from the repository into Azure DevOps.
The Intune App Factory pipeline is the key driver of the whole solution, as it’s orchestrates the whole workflow from detecting whether new application versions are available to publishing the packaged application to Intune.
Throughout these setup instructions, a lot of resources have been created and configured, where it’s now time to tie it all together. By default, the Intune App Factory comes with two already onboarded applications, 7-Zip and Notepad++, that can be used to validate the complete setup but also to provide a starting point from an application onboarding perspective.
In this section, the pipeline will have to be configured and somewhat customized to meet your environment and how you’ve opted to follow the instructions throughout the Intune App Factory setup instructions. First of all, the agent pool must be defined within the pipeline configuration file. Additionally, if you’ve opted to name the secret objects stored in the Key Vault differently, such references must be updated to provide full functionality of the pipeline. By default the pipeline has been set to use the naming convention mentioned in these setup instructions, and does not need to be amended if the same secret object names have been chosen. Below is the list of referenced secret objects used within the pipeline configuration file:
- LA-IntuneAppFactory-PrimaryKey
- SP-IntuneAppFactory-ClientSecret
- SA-IntuneAppFactory-AccessKey
Within the Azure DevOps portal, browse to newly imported pipeline named IntuneAppFactory, click the three dots on the right and select Edit.

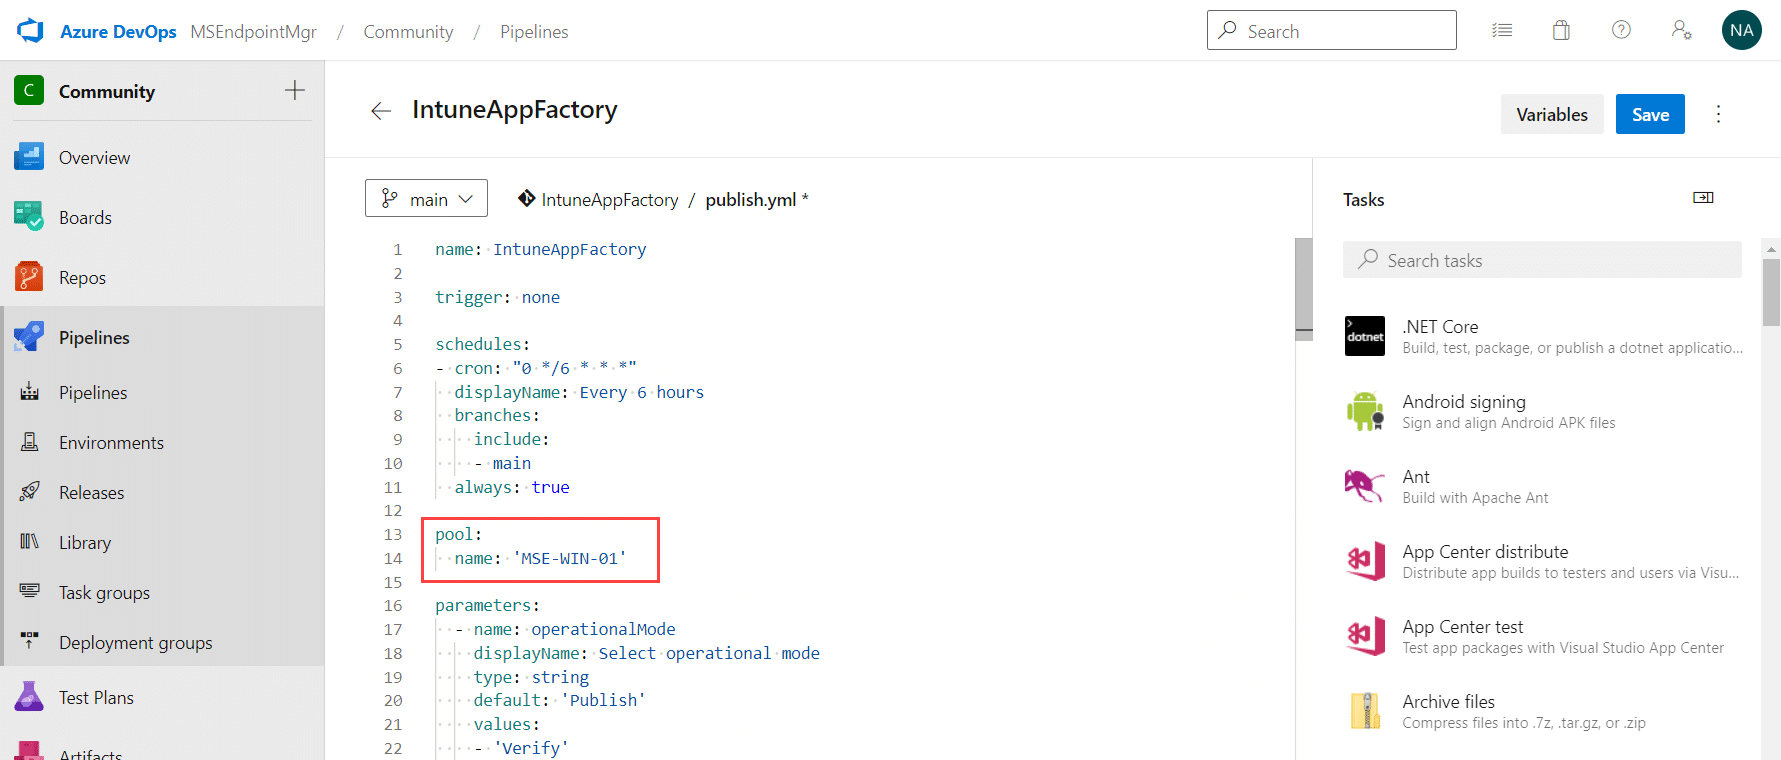
The pipeline can now be fully modified using the native editor of Azure DevOps. First, the agent pool name must be updated, instructing the pipeline to use the agent pool previously configured with the self-hosted agent.
In the top of the publish.yml file, there’s a root section named pool. Replace <<POOLNAME>> with the actual name of the agent pool.
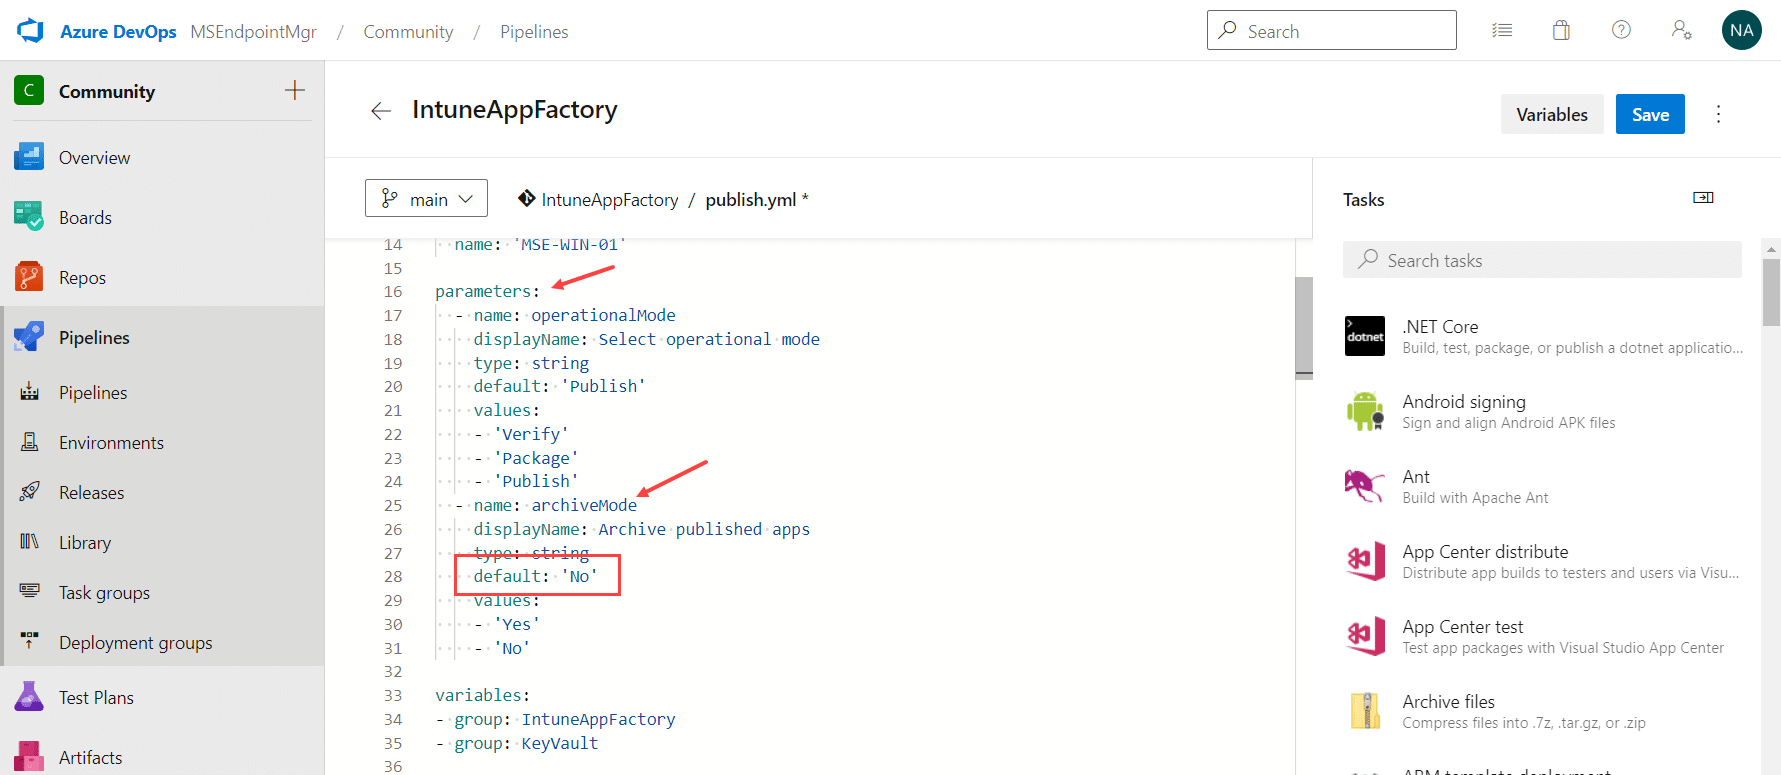
If you wish to enable the archiving functionality, locate the parameters section in the top of the file, locate the archiveMode parameter and amend it’s default value of No to Yes.
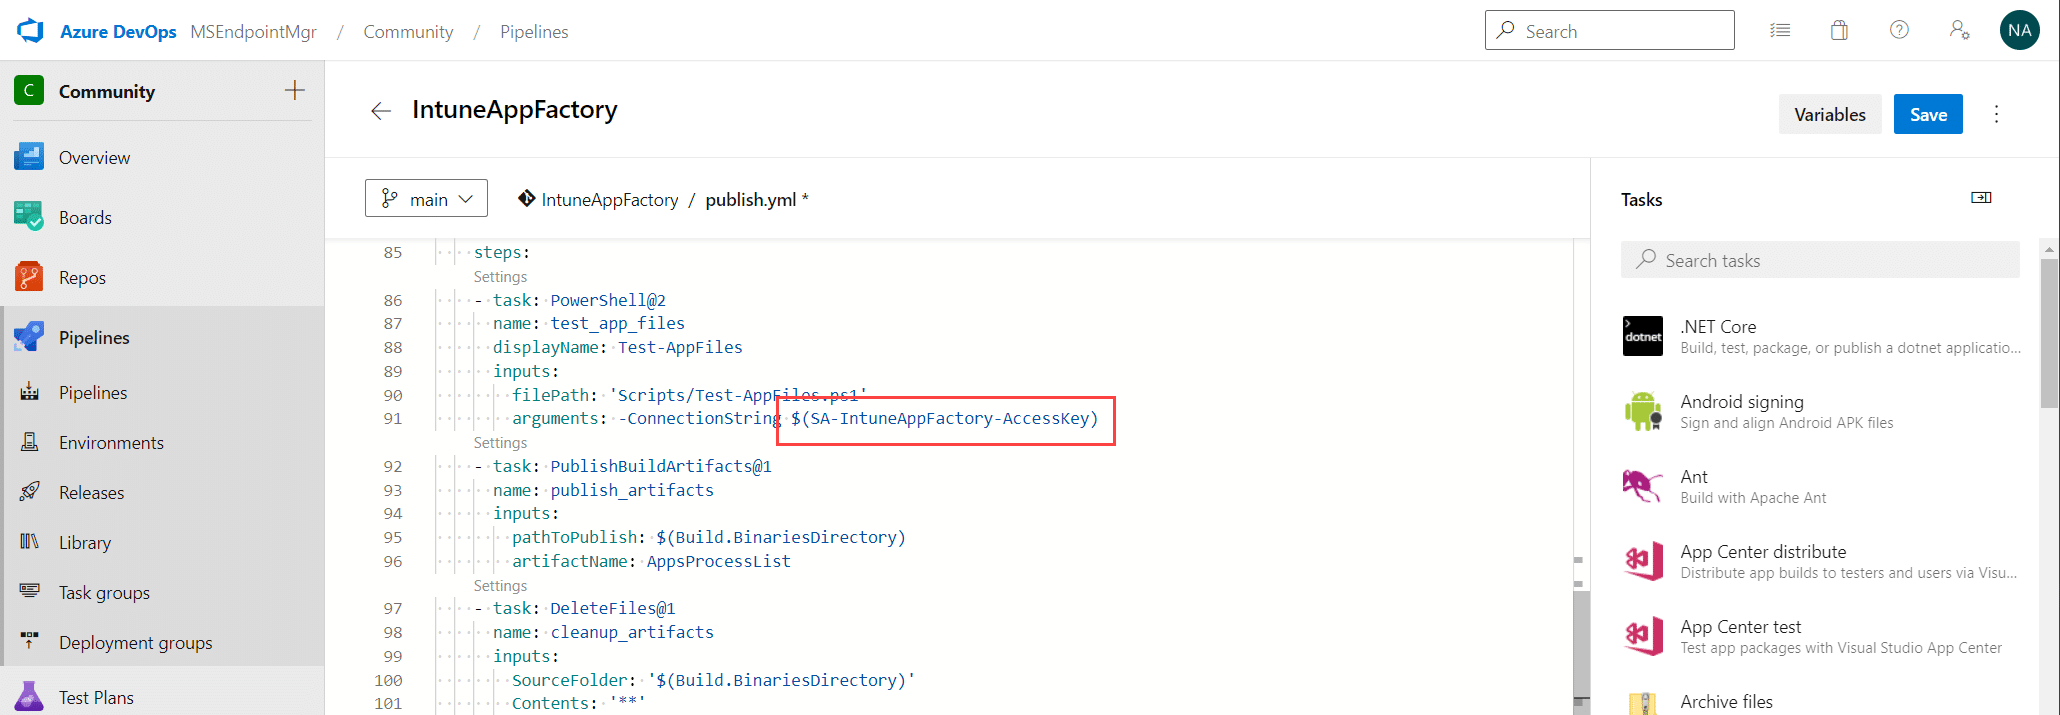
At this point, as already mentioned, replace the variables in the places within the pipeline configuration file that references the imported secret object names if you’ve chosen to name them different in the Key Vault.
For instance, replace SA-IntuneAppFactory-AccessKey with the name of the secret object you’ve given it.
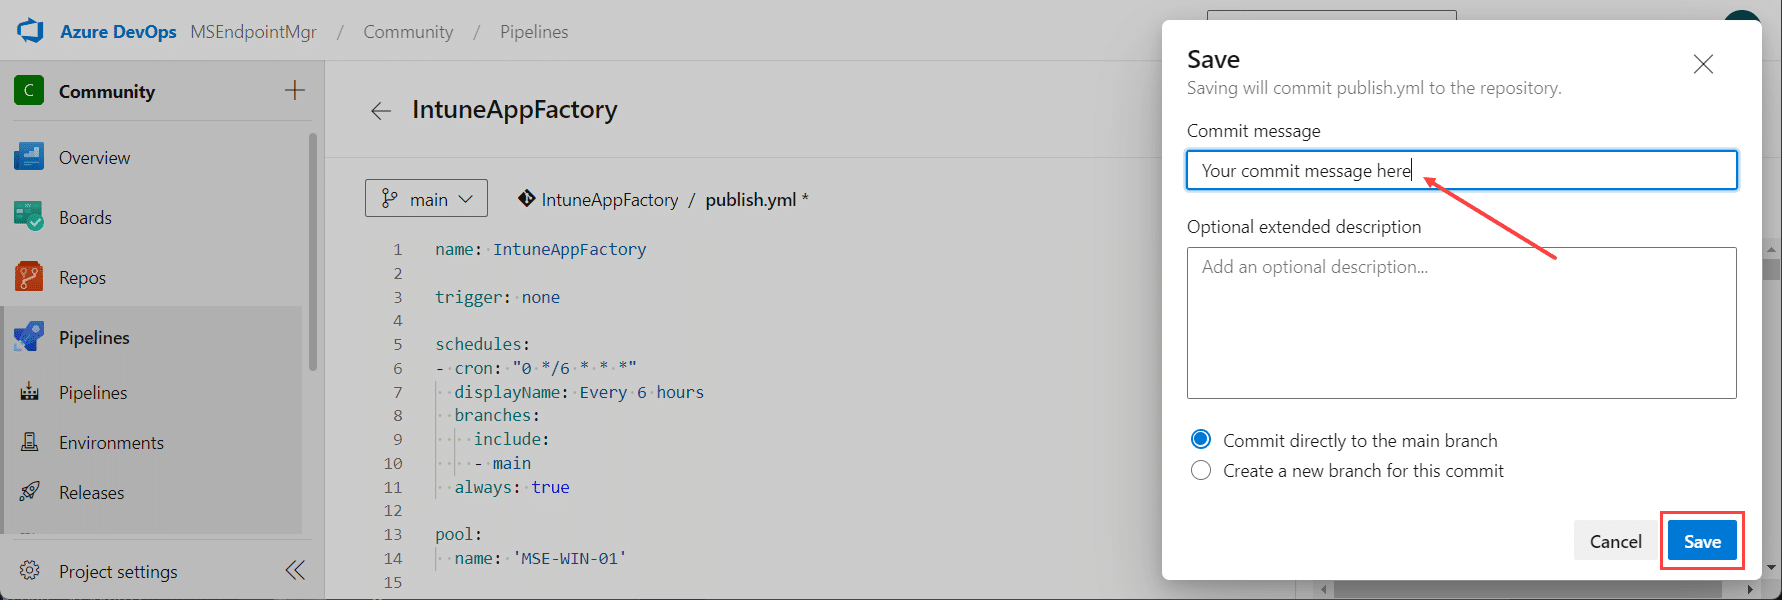
When all secret object item references (essentially the variables within the variable group), click Save.
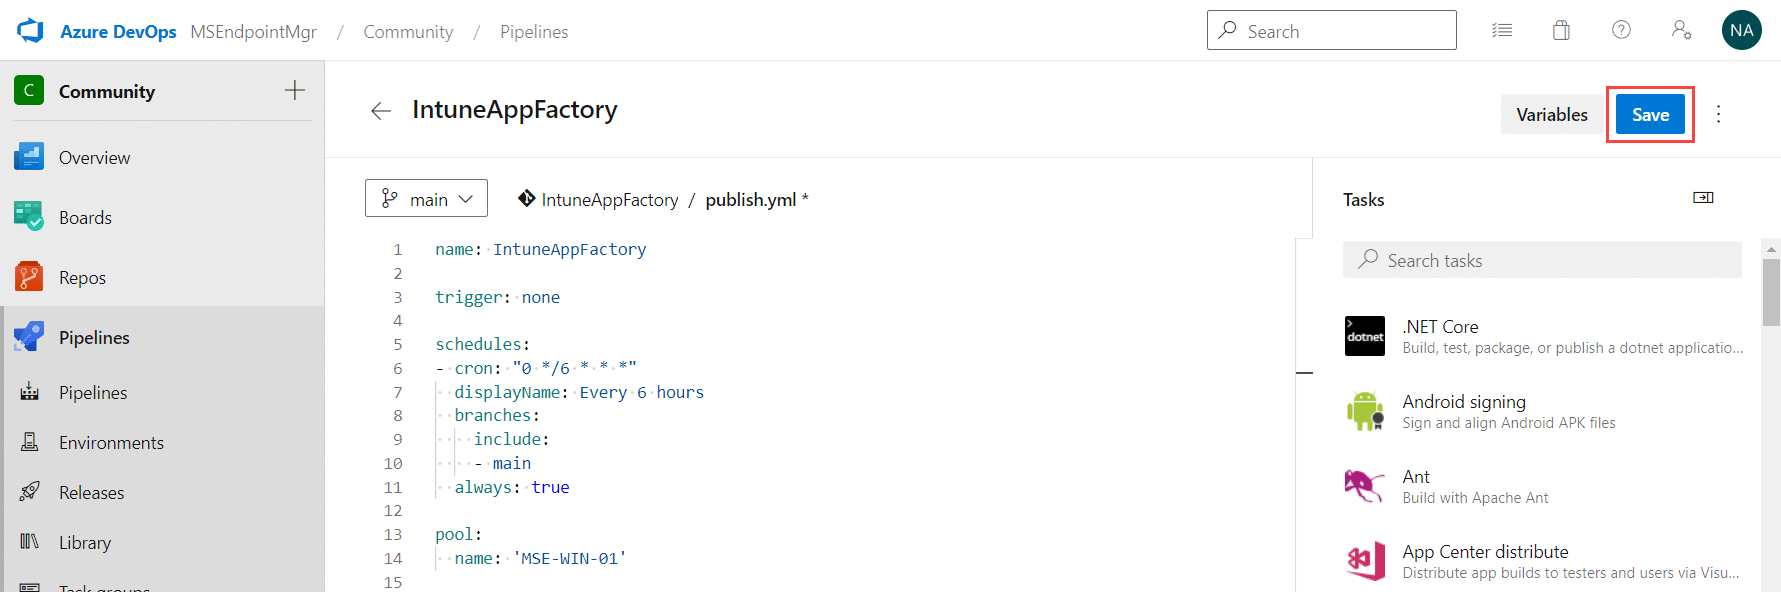
Type in a commit message and commit directly to the main branch. Click Save.
And with that, Intune App Factory has now been all setup and will from this point in execute every 6 hours.
Clone Intune App Factory repository locally
Now with Intune App Factory up and running, the final step of these setup instructions will cover how to clone the repository, that is the IntuneAppFactory repository, to your local device in order to be able to make changes to e.g. the pipeline configuration fil (publish.yml) or to onboard new applications.
This step requires that the two referenced software below to be installed prior to following these instructions:
- Visual Studio Code
- Git for Windows
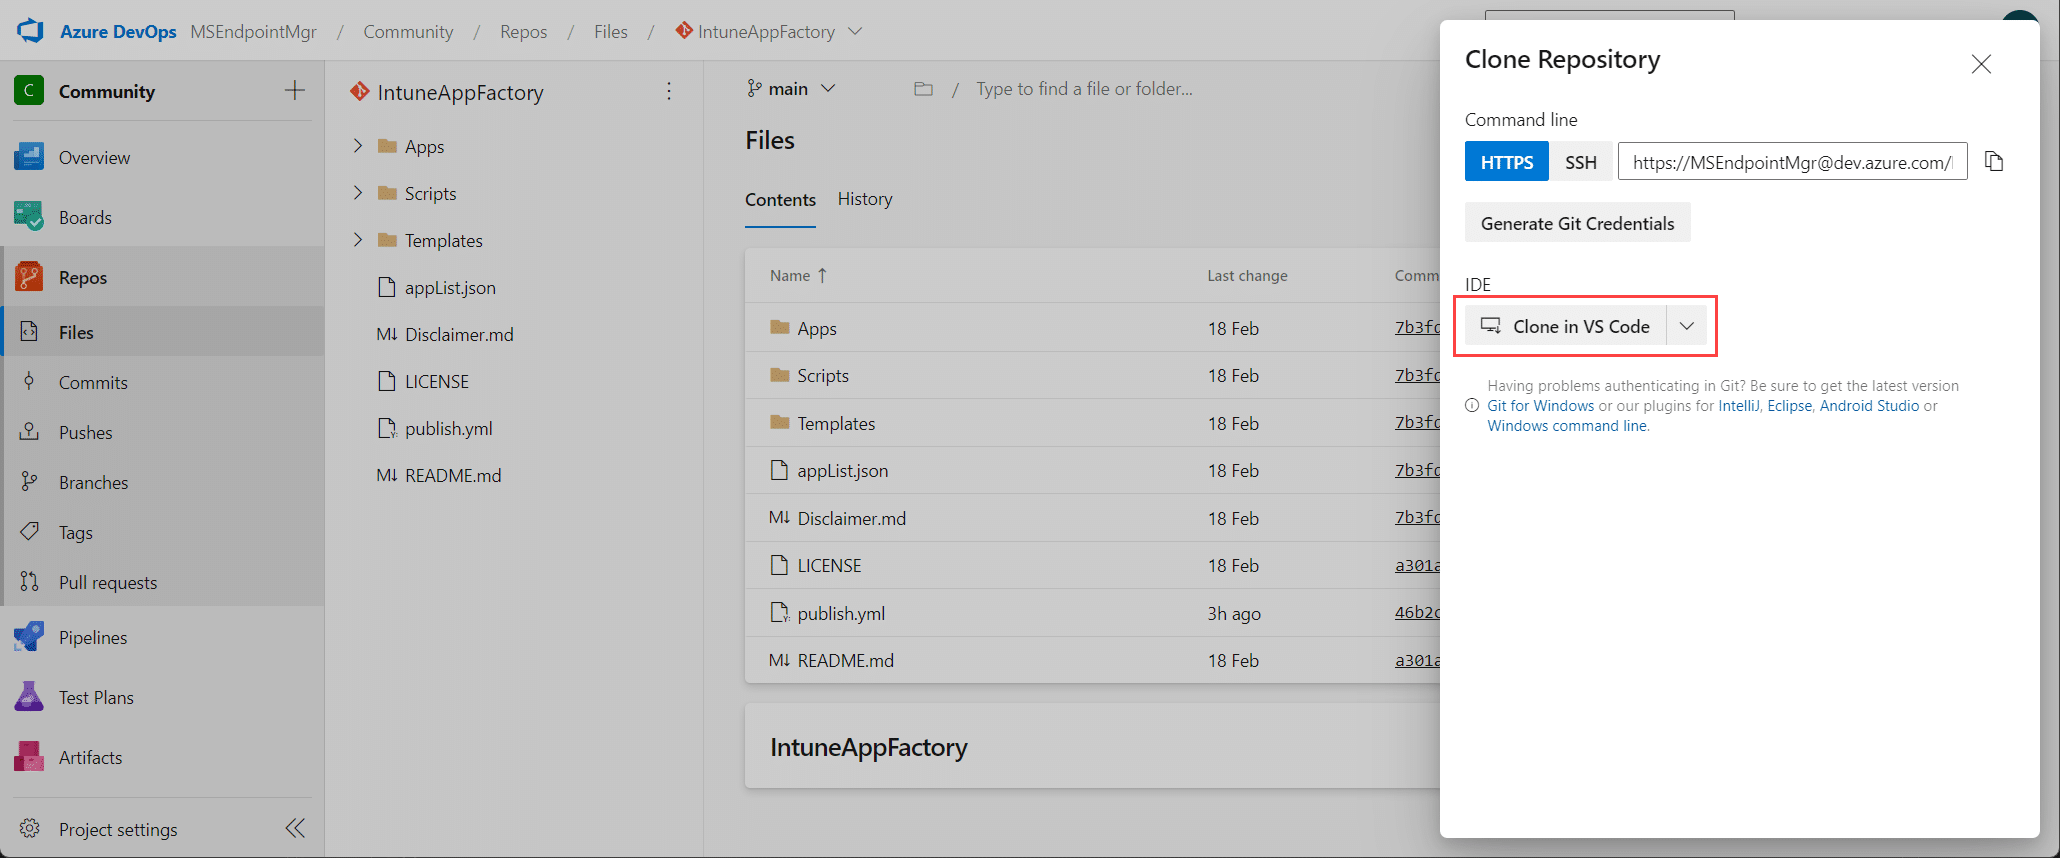
In the Azure DevOps portal, click Repos, in the breadcrumbs, make sure the IntuneAppFactory repository is selected.
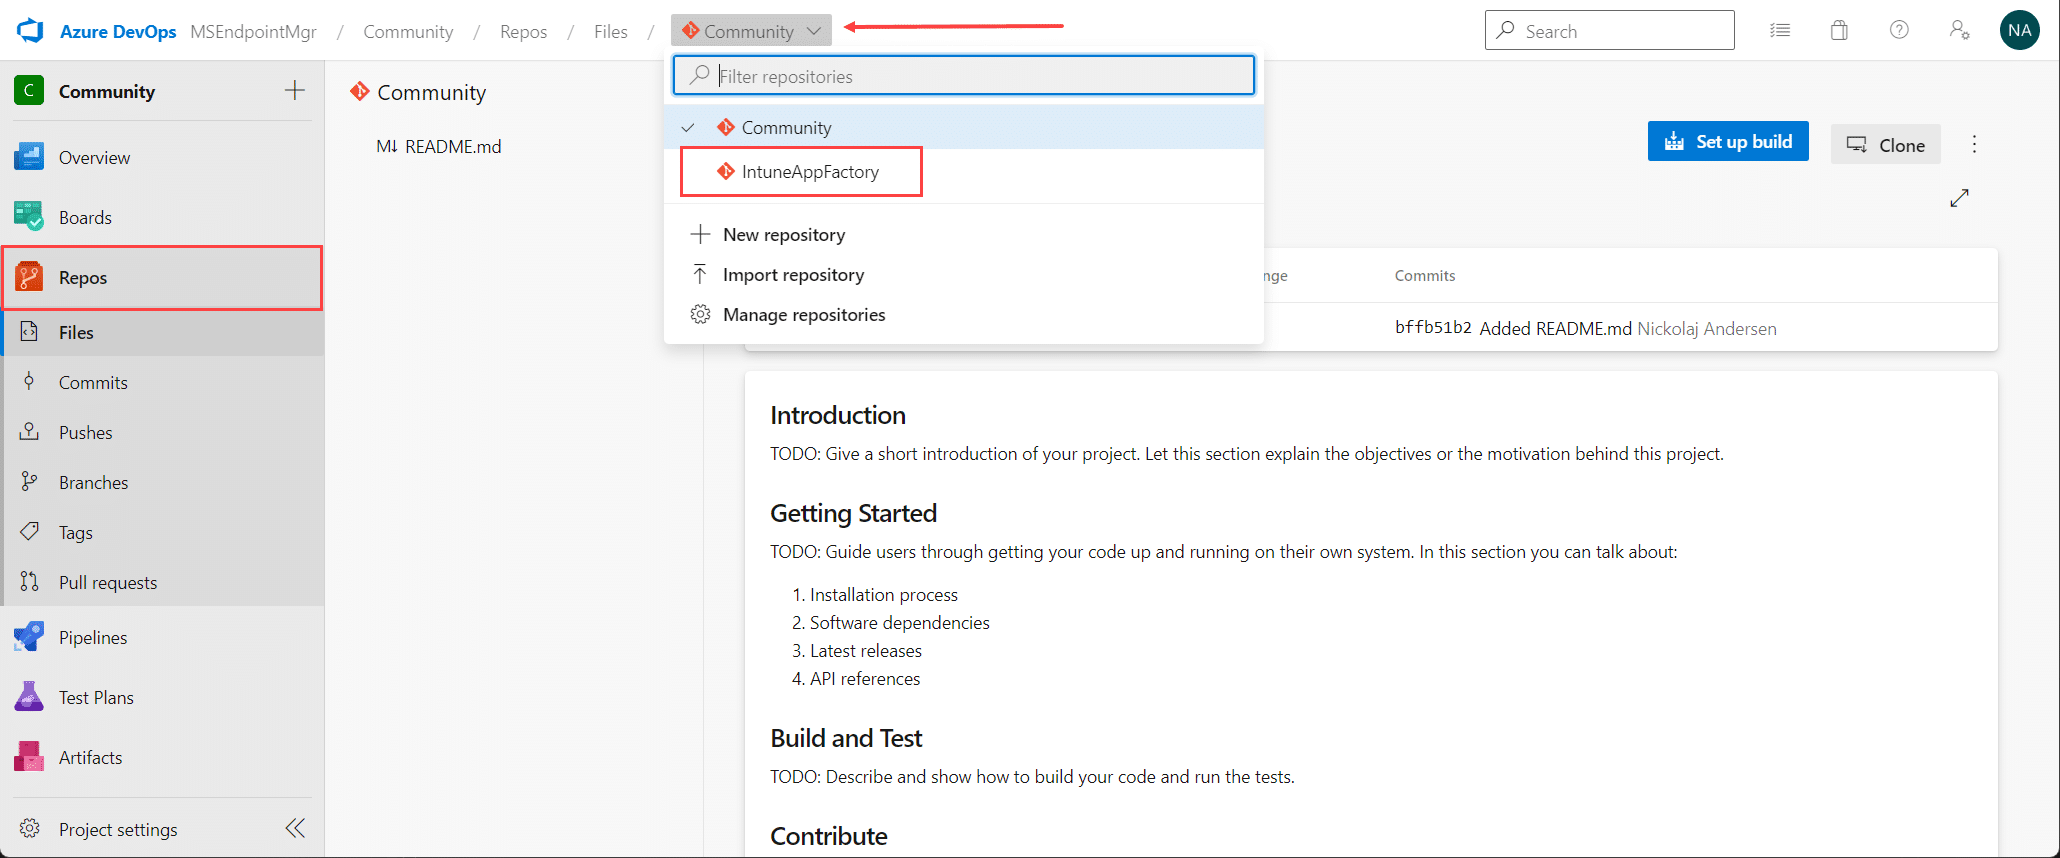
Click Clone.
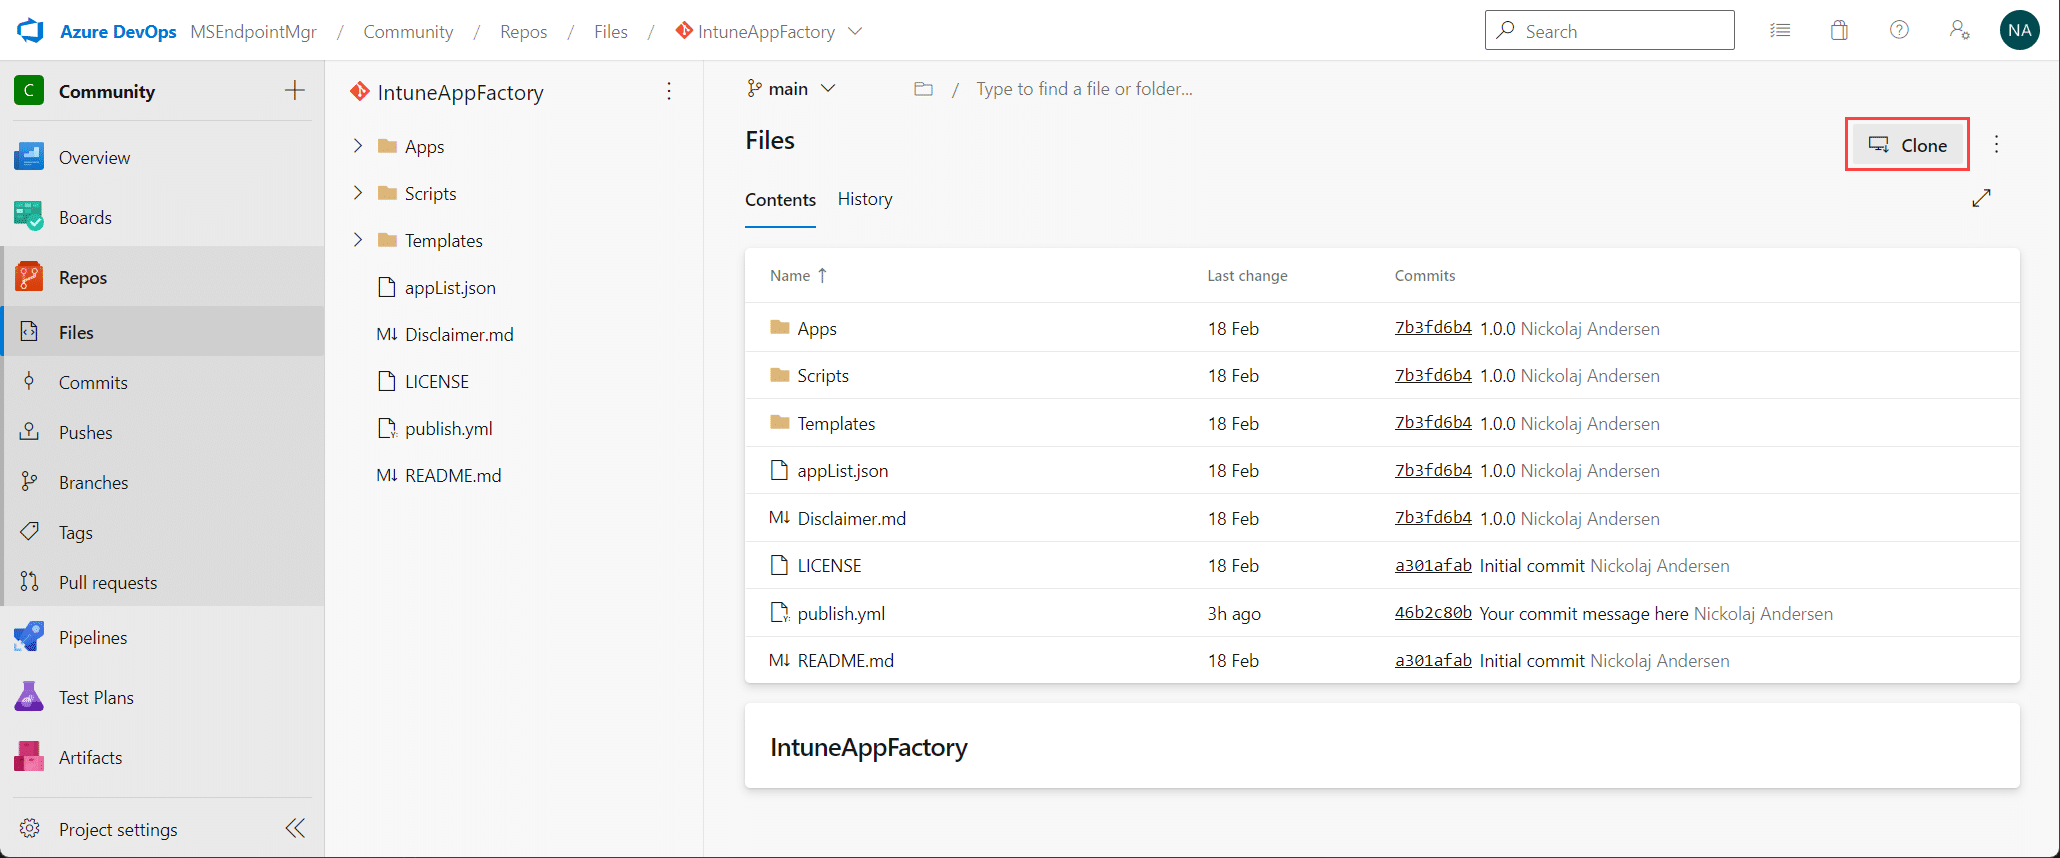
Click Clone in VS Code.
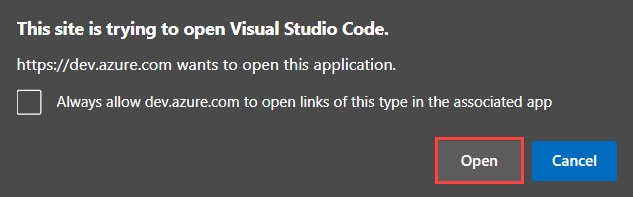
When prompted, click Open.
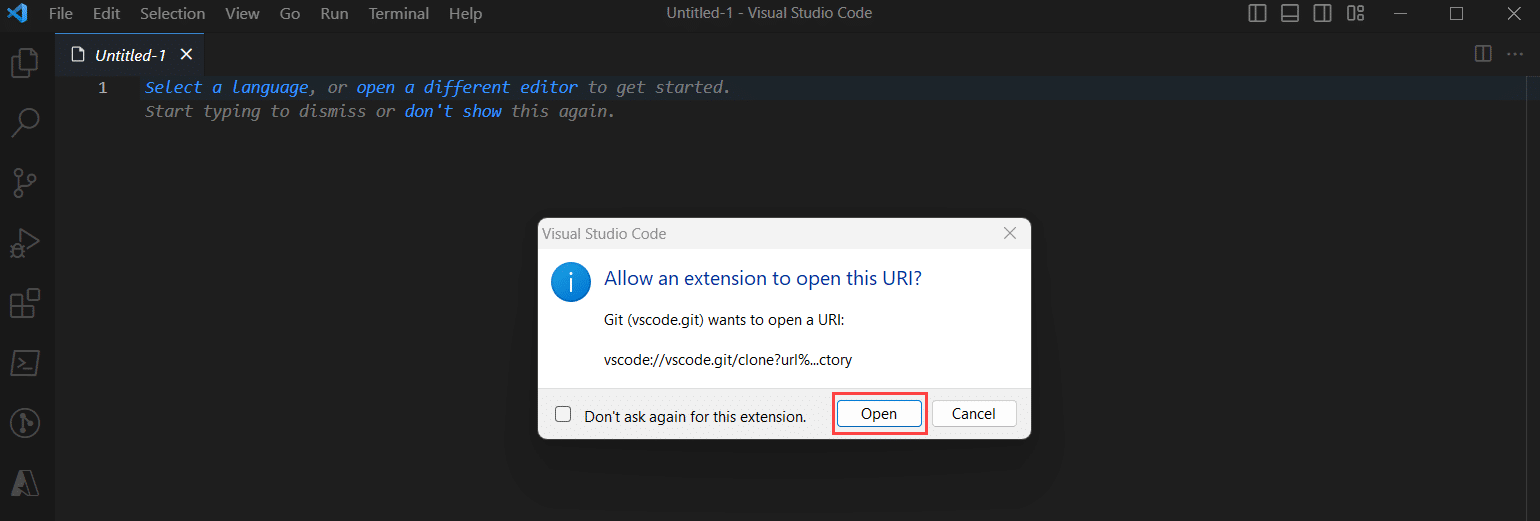
Click Open in the Visual Studio Code prompt.
When prompted to choose a folder where to locally clone the repository to, it’s recommended that you create a new folder somewhere on your device. A recommendation could be to create a folder in the root of the C: drive named Repositories. In that folder, you could create a new folder named e.g. AzureDevOps or simply ADO and select this for where the IntuneAppFactory repository will be cloned. Below is the full recommended path:
C:\Repositories\AzureDevOps
Once the desired folder is selected, click the Select as Repository Destination button in the explorer dialog window.
A notification is shown in the lower right corner of the Visual Studio Code application window, that the repository is being cloned.

Right after the cloning notification appears, another window will prompt for your credentials to login to Azure DevOps using the same identity used through out these setup instructions.
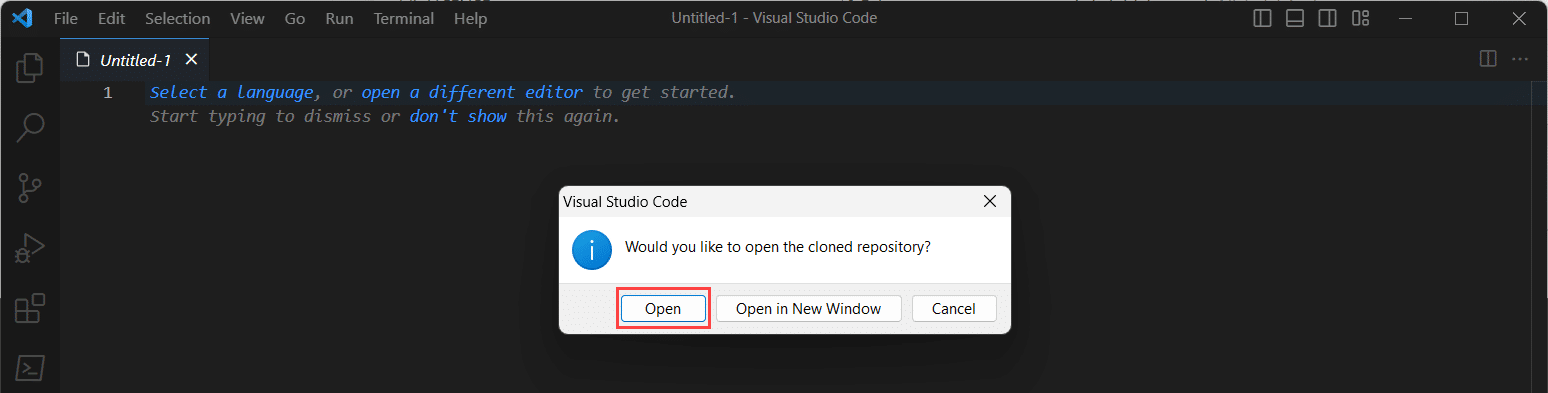
Once the cloning of the repository has completed, another prompt appears asking whether to open the cloned repository in the same window, or in a new one. Click Open.
The IntuneAppFactory repository has now successfully been cloned, and changes to the pipeline configuration file and onboarding of new applications can be committed.
For demonstration purposes and to get you a bit more familiar with committing changes, let’s assume you’d want to amend schedule for when the pipeline is executed.
In Visual Studio Code, select the publish.yml file in the file explorer section of the cloned repository, locate the schedules section and make the desired adjustments. In the left menu, click the Source Control section and click the + button next to the changes in files it has detected.
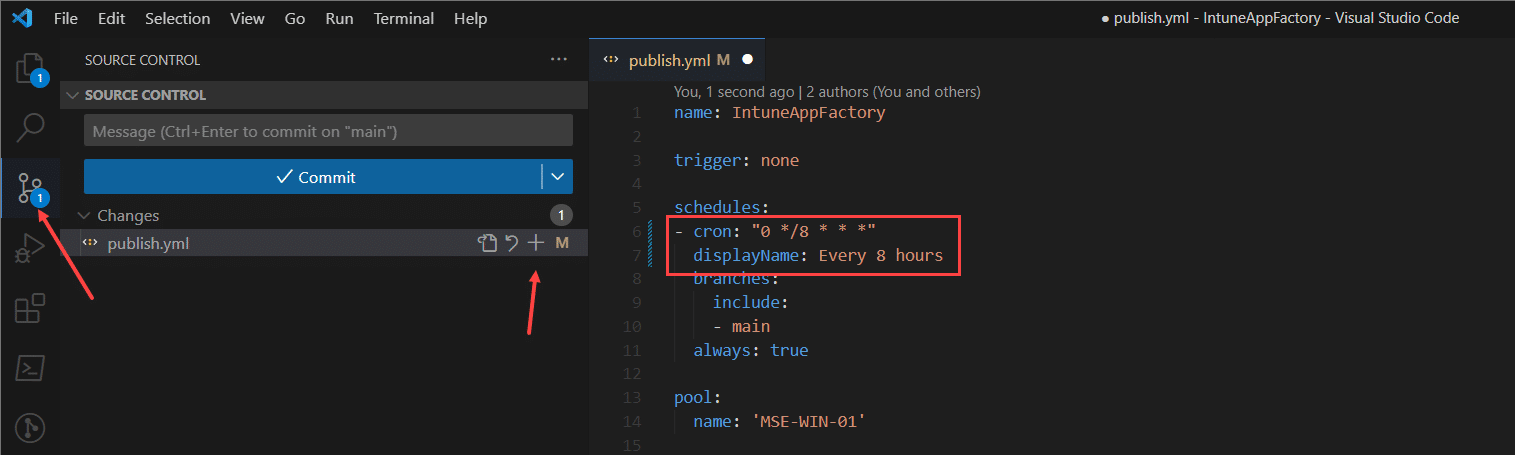
Provide a commit message and click the Commit button.

Then click Sync Changes.
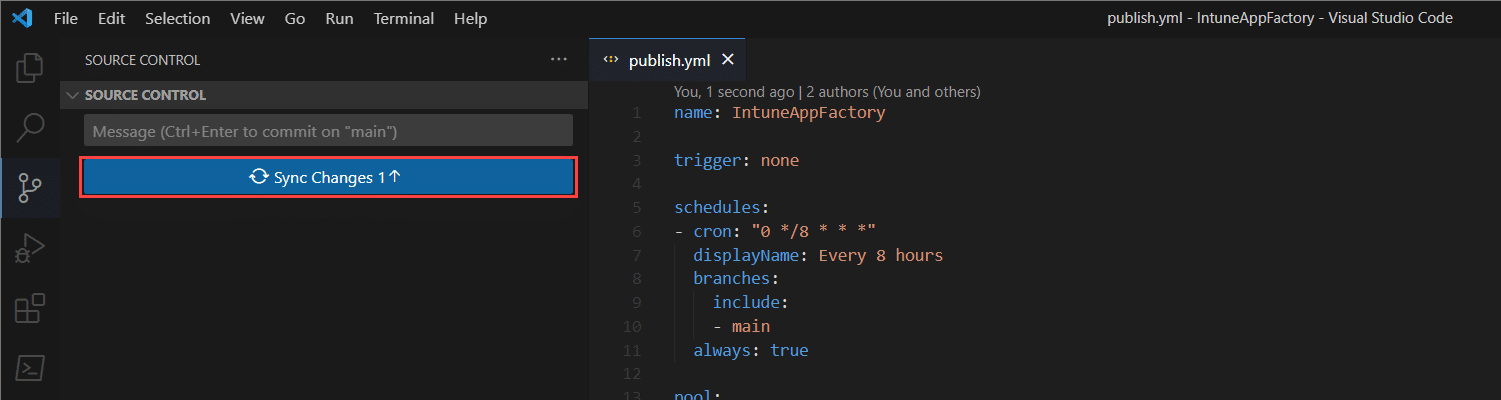
Within the Azure DevOps portal, the changes committed should once synchronized, appear here as well.

For more information about the different stages within the pipeline and on how to onboard applications, refer to the Docs section in the tabs above these setup instructions.
Table of content
Repository files and folder
Intune App Factory consists of a set of folders and files, all located in the public repository of the solution. This is also the repository that will be imported during the setup and configuration of Intune App Factory.

Below follows an explanation of the different files and folders and what they are used for within the solution:
- Apps
- This folder contains a list of subfolders that is the application specific root folder and contains the required files per onboarded application.
- An onboarded application must have a subfolder within the Apps folder named exactly as specified in the AppFolderName attribute in the appList.json file.
- By default, Intune App Factory comes with two pre-existing onboarded applications, 7-Zip and Notepad++.
- The contents of the application specific subfolder must consist of the following files, modified to support the publishing to Intune and installing of the application
- App.json
- Deploy-Application.ps1
- Icon.png
- Scripts
- This folder contains all the scripts the Intune App Factory solution is made up of. Do not make any changes to this folder, unless you absolutely know what you’re doing in terms of editing the scripts on your own to extend the functionality of the solution.
- Templates
- Application
- App.json
- This file is required for each onboarded app, and should be copied to the application specific subfolder within the Apps top folder.
- This file is used to define how the application should be created and presented in Intune.
- Entries within this file that contains <replaced_by_pipeline> are automatically modified during the package preparation stage when the pipeline executes.
- Entries within the Information segment of this file that contains <<ENTER_VALUE:[ ]>> must be configured with a string value, e.g. Description should be replaced with the desired description text.
- For entries within the Program, RequirementRule and DetectionRule segments of this file that contain <<SELECT_VALUE:[ ]>>, a selection must be made of any of the possible values provided within the [ ] characters.
- More information of how to configure this file is provided in the application onboarding documentation.
- Deploy-Application.json
- This file is required for each onboarded app, and should be copied to the application specific subfolder within the Apps top folder.
- This is the main PS App Deployment Toolkit installation script file used to perform the installation of the application, but could also be configured to uninstall the application including uninstalling previous versions of an application.
- Sections within this file that contains ###<text### should not be left out or changed, as they are automatically replaced by the pipeline when executing. Specifically, the ###SETUPFILENAME### is required to be maintained within this file, or the application will never be able to install successfully.
- Detection.ps1
- This is a sample PowerShell script file that demonstrates how to use a script file as a detection rule, instead of the other options available.
- latest.json
- This file is only required and used for an onboarded application when the Storage Account source method is used.
- Place this file within the defined Storage Account and container name given in the appList.json file for an onboarded application, alongside the setup installation file.
- Define the setup installation file name and version within the latest.json file for each onboarded application.
- App.json
- Framework
- In this folder, a subfolder named Source exist and contains the necessary PS App Deployment Toolkit files required for each onboarded application to successfully be packaged and later installed on the device.
- When updating the PS App Deployment Toolkit files, it’s important that the Source subfolder is kept in place, and the PS App Deployment Toolkit associated files within the Source subfolder are the ones that are updated.
- In addition to the PS App Deployment Toolkit files, a general Icon.png file is also present, which could be used if wanted. It’s highly recommended that this general Icon.png file is replaced with a company branded logo that represent your organization.
- Application
- appList.json
- This file is the main manifest file of the Intune App Factory solution. Each onboarded application is represented with an item in the Apps array of the JSON structure. See onboarding application documentation for more information on how this file should be drafted.
- publish.yml
- This is the Azure DevOps pipeline YAML configuration file. In here, the logic of PowerShell Scripts within the Scripts folder is orchestrated in sequence depending what operational mode and archive mode the pipeline is set to execute. Do not make any changes to this file, as it should not be required unless updated in a newer version made available in the public GitHub repository.
Pipeline operational mode and stages
The Intune App Factory pipeline consists of various stages, and has a control mechanism to define what stages should be executed by provided a value to a parameter named operationalMode. By default this parameter is set to execute on all stages, where applicable by the logic contained within each stage if the next should be allowed to execute or not.
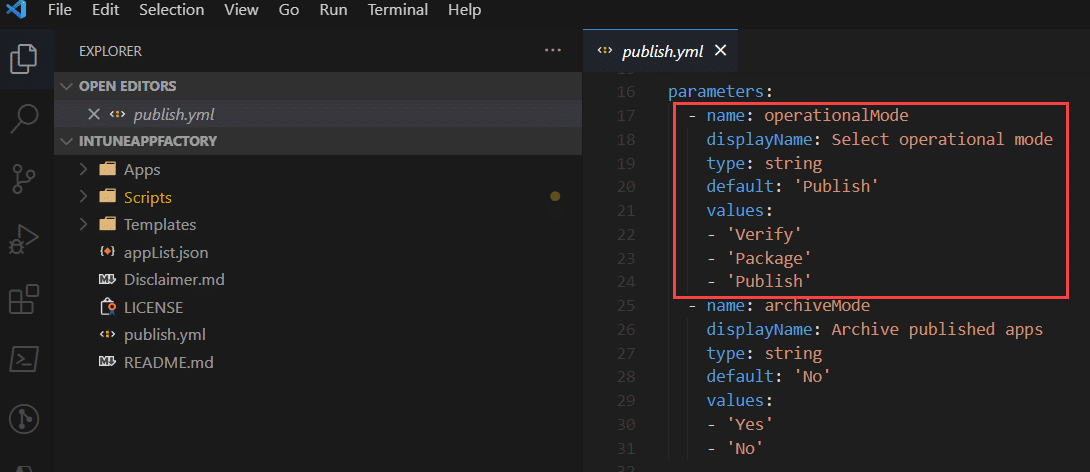
In the publish.yml file, the parameter can be configured otherwise, if the default value is not desired. When executing the pipeline manually, the options for the operationalMode parameter is also visible.

Each stage below provides information for what operationalMode a given stage is allowed to execute in.
Stage 1 – Test environment
This stage outputs a few key variables to reference what folders are to be used throughout the pipeline execution. In addition, the Templates folder of the repository where the pipeline resides, is validated that it contains all required files, as explained in the previous documentation section.
Executes during the following operational modes:
- Verify
- Package
- Publish
Stage 2 – Prepare environment
This stage ensures that the required PowerShell modules are installed and updated. Additionally, files and folder from previous execution are cleaned up before the pipeline stages that created the temporary files are invoked again.
Executes during the following operational modes:
- Verify
- Package
- Publish
Stage 3 – Check app files
This stage goes through each defined application in the appList.json main manifest file and validates the specific sub-folder in the Apps folder, to see if the application have been onboarded correctly and have the required files available for the pipeline to execute properly. If any file is missing, e.g. there’s no Icon.png file for a given onboarded application, that application will not be added for processing in the next stage.
Applications that are allowed to be continued to be processed throughout the pipeline, are added to a file named AppsProcessList.json.
Executes during the following operational modes:
- Verify
- Package
- Publish
Stage 4 – Check new app version
This stage goes through all the applications that has been added to the AppsProcessList.json processing file. For each application, the provided source, e.g. winget or Evergreen, will be checked for the latest version. The latest version of the application is later checked if it’s published in Intune or not. If the latest version of an application is not published, the application is marked for download in the next stage.
Applications that are allowed to be continued to be processed throughout the pipeline, are added to a file named AppsDownloadList.json.
Executes during the following operational modes:
- Package
- Publish
Stage 5 – Download new apps
This stage goes through all the applications that has been added to the AppsDownloadList.json processing file. For each application, the setup installer is downloaded by using the detected download URL from the previous stage.
Applications that are allowed to be continued to be processed throughout the pipeline, are added to a file named AppsPrepareList.json.
Executes during the following operational modes:
- Package
- Publish
Stage 6 – Prepare app files
This stage goes through all the applications that has been added to the AppsPrepareList.json processing file. For each application, a specific packaging folder named after the application is created in what’s called the publishing root folder, where all the intended files, such as the App.json, Deploy-Application.ps1 and Icon.png files are copied to, including the PS App Deployment Toolkit files from the Templates folder. The setup installer file from it’s previously downloaded temporary location is also copied into this packaging folder.
This stage performs other activities as well, such as modifying the App.json to contain all the correct parameters that the pipeline is capable of updating, such as the latest application version, the display name to be used in Intune, publisher etc. The detection rule section in the App.json file is also updated to ensure the proper detection logic is provided when the application is published to Intune. The Deploy-Application.ps1 script is also updated to reflect the proper application version and what setup installer file name to use.
Applications that are allowed to be continued to be processed throughout the pipeline, are added to a file named AppsPublishList.json.
Executes during the following operational modes:
- Package
- Publish
Stage 7 – Archive apps
This stage is optional, but when set to execute, it goes through all the applications that has been added to the AppsPublishList.json processing file. For each application, the packaging folder is compressed into an archive file and uploaded to the specified storage account for archiving purposes.
Executes during the following operational modes:
- Package
- Publish
Executes only if the archiveMode parameter is set to Yes.
Stage 8 – Publish apps
This stage goes through all the applications that has been added to the AppsPublishList.json processing file. For each application specific package folder in the publishing root folder, an .intunewin file is created. Then based on what was originally defined, when onboarding the application, and what has been amended during stage 6 in the App.json file, those details are then using to construct the required objects for publishing the application to Intune.
Executes during the following operational modes:
- Publish
Stage 9 – Assign apps
This stage goes through all the applications that has been added to the AppsAssignList.json processing file. For each application specific package folder in the publishing root folder, the assignment configuration defined in the app specific App.json file is processed to create the assignments for each newly published applications during pipeline execution.
Executes during the following operational modes:
- Publish
Application onboarding
Onboarding an application into the Intune App Factory solution involves several steps at current. The general approach is all the same, however each application has it’s own preferences, such as a method to install the application silently and also to detect the presence of the application after it has been installed. These preferences can’t be documented, and require outside skills from person onboarding the application. Application packaging have never been an easy task, and it involves steps that this documentation will not be able to to cover, such as:
- Determining the unattended installation and uninstallation parameters
- Determining the detection rules logic required for a Win32 app in Intune
This documentation won’t go into any detail regarding what processes could be used to determine the above items, and therefor a general understanding of application packaging and installations in Windows is required for onboarding an application. View it as the onboarding process is a one-time packaging effort of the application, where the Intune App Factory takes over for each new version of the application.
It’s always recommended though to make use of MSI-based setup installers, as that make the unattended and detection rule logic much more easy to work with, and can essentially be determined by Intune App Factory automatically.
As a prerequisite to follow these instructions outlined below on how to onboard an application, requires one to have cloned the Intune App Factory repository locally to the device. If this has not been completed, please finalize that before attempting to continue.
When first setting up Intune App Factory, two applications are already onboarded:
- 7-Zip
- Notepad++
Refer to these onboarded applications and their configuration as templates, if you have any doubts about the outlined process in this documentation.
Intune App Factory leverages PS App Deployment Toolkit, how to make use if all of it’s capabilities won’t be covered here, please refer to the official documentation for full feature set and capabilities:
Step 1 – appList.json onboarding
The appList.json file is considered as the first place to begin the application onboarding. This is also referred to as the main manifest file of the Intune App Factory solution.
Below is the required JSON construct of what’s the minimum required properties each onboarded application must contain.
{
    "IntuneAppName": "<<Display name of the application to be used in Intune>>",
    "IntuneAppNamingConvention": "<<SELECT[AppName, AppNameAppVersion, PublisherAppName, PublisherAppNameAppVersion]>>"
    "AppPublisher": "<<Publisher>>",
    "AppSource": "<<SELECT[Winget, Evergreen, StorageAccount]>>",
    "AppID": "<<ID of the app in the source repo>>",
    "AppFolderName": "<<Must match the name of the sub-folder in the Apps folder>>",
}
NOTE: Yes, there’s a comma at the end of the last property, which is to be expected since the JSON construct must be extended with AppSource specific properties depending on if Winget, Evergreen or StorageAccount is used. Always ensure the JSON construct is correctly formatted, for instance that any last item doesn’t contain a comma separator character. It’s recommended to use a tool to validate the JSON construct, such as an online validator similar to:
JSON Schema Validator – Newtonsoft
NOTE: Since version 1.1.0 of Intune App Factory, AppSetupFileName is no longer used and can be omitted from the JSON construct.
Depending on what’s selected as the AppSource, either Winget, Evergreen or StorageAccount, additional properties are required, but dynamic to the selected source. Refer to the following sections below for the specific additional configuration is required per selected AppSource.
For each new application to be onboarded into Intune App Factory, begin with adding a new section starting with the above JSON construct and amend it to suite the application and where to source the content from. Below follows a more detailed explanation of the usage of each property.
- IntuneAppName
- Self-explanatory, the name that will be used for the application within Intune, or more specifically the name of the Win32 application in Intune.
- AppPublisher
- Name of the publisher or vendor of the application.
- AppSource
- Select from the following possible values: Winget, Evergreen or StorageAccount.
- AppID
- Unique identifier string for the selected app source, for Intune App Factory to be able to search for the application.
- The Evergreen community project provides a great list of supported applications and the respective unique identifiers, refer to the following list for more details:
https://stealthpuppy.com/evergreen/apps - As for finding the unique identifier for applications available through Winget, simply use the winget command line utility using the following command:
winget search <appName>
- AppFolderName
- Must match the name of the application specific sub-folder in the Apps folder inside the Intune App Factory repository.
- AppSetupFileName
- Provide a name that the downloaded setup installer file will be renamed to.
Windows Package Manager (winget)
When the AppSource is set to Winget, no additional properties are required to be added to the JSON construct for the application being onboarded.
The important part for Intune App Factory to be able to detect the latest application version of the application being onboarded, the AppID must be configured properly, with what’s set in the Winget community respository.
On a device with Winget available, execute the following command to search for the value to be entered for the AppSource property:
winget search 7zip
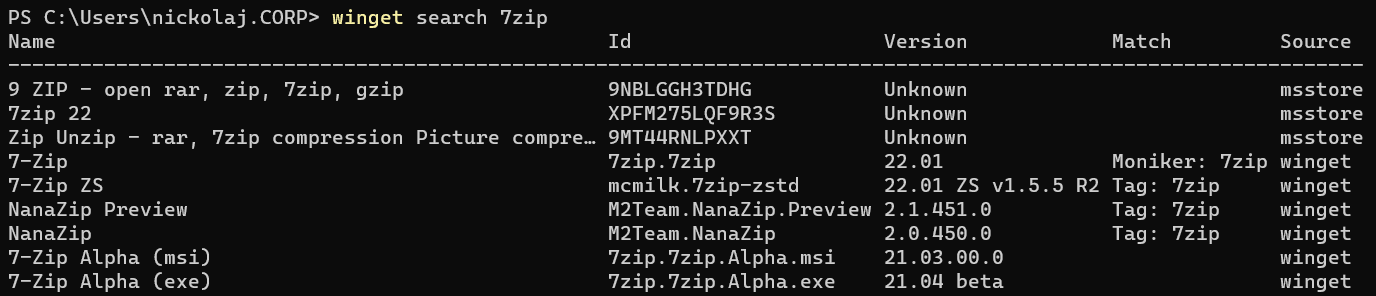
In the Id column from the search results, locate the value to be used for the application in question. For instance, if 7-Zip is the application being onboarded, from the above search results, 7zip.7zip is the value to be set for the AppID property.
Below is a full example for when onboarding the 7-Zip application using the Winget AppSource method:
{
    "IntuneAppName": "7-Zip",
    "IntuneAppNamingConvention": "AppName",
    "AppPublisher": "Igor Pavlov",
    "AppSource": "Winget",
    "AppID": "7zip.7zip",
    "AppFolderName": "7zip",
}
With the above template, that completes the appList.json part of the onboarding, for an Winget application.
Evergreen
When Evergreen is selected as the AppSource type for the application being onboarded, additional properties must be added for the JSON construct of the application representation.
An additional property named FilterOptions must added as an array definition. This property itself supports up to 4 different property types with values. The values for each property of the FilterOptions property, vary depending on what’s available for the application item in the Evergreen module.
{
    ...
    "FilterOptions": [
    	{
        	"name": "value"
    	}
	]
}
Above is the JSON construct in a template format that must be added in additional to the main minimum required properties, such as IntuneAppName and the rest.
Possible values for the supported properties of the FilterOptions property are:
- Architecture
- Channel
- Platform
- Type
Use the Get-EvergreenApp function in the Evergreen module to explore the search results for the application being onboarded.
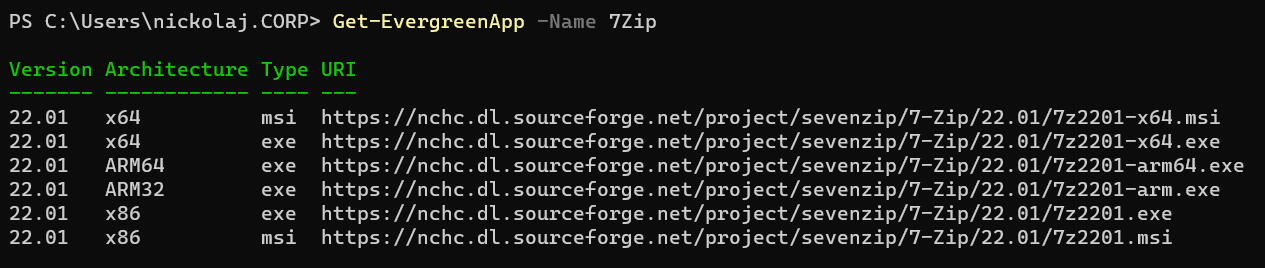
It’s important to narrow down the results from the Get-EvergreenApp when onboarding an application, 7-Zip in this instance, to a single search result. Otherwise, Intune App Factory will not be able to directly download the latest application version, if multiple results are returned.

Translate the above example of how to you can narrow down to a single search result, into the respective FilterOptions properties. FilterOptions must contain at least one property, e.g. Type or Architecture and not more than 4 in total.
Below is a full example for when onboarding the 7-Zip application, where the FilterOptions properties have been discovered making use of the Get-EvergreenApp function of the Evergreen PowerShell module.
{
    "IntuneAppName": "7-Zip",
    "IntuneAppNamingConvention": "AppName",
    "AppPublisher": "Igor Pavlov",
    "AppSource": "Evergreen",
    "AppID": "7zip",
    "AppFolderName": "7zip",
    "FilterOptions": [
        {
            "Architecture": "x64",
            "Type": "msi"
        }
    ]
}
With the above template, that completes the appList.json part of the onboarding, for an Evergreen application.
Azure Storage Account
The Storage Account AppSource method is meant for when there’s a need and desire to make use of Intune App Factory to assist in automating the packaging and publishing of an application, when it’s not available in either of the other supported sources.
This method makes use of a Storage Account in Azure, where Intune App Factory reaches out to find the relevant information of the latest application version and content stored in separate containers inside the Storage Account.
It’s required that the same Storage Account that was setup for the archiving functionality in Intune App Factory must be used, where applications are separated in different containers as already mentioned. This is because Intune App Factory currently, by design, doesn’t have a method to differentiate between the access keys for different Storage Accounts meant for archiving and application source, specified in the Azure DevOps Pipeline Library variable group IntuneAppFactory.
As for the JSON construct in the appList.json file, two additional properties must be added:
- StorageAccountName
- StorageAccount
{
    ...
    "StorageAccountName": "<<Name of the Storage Account>>",
    "StorageAccountContainerName": "<<Name of the container inside the Storage Account>>"
}
Above is the JSON construct in a template format that must be added in additional to the main minimum required properties, such as IntuneAppName and the rest.
Inside the container in the Storage Account, the latest application setup installer file must be placed, together with a latest.json file.
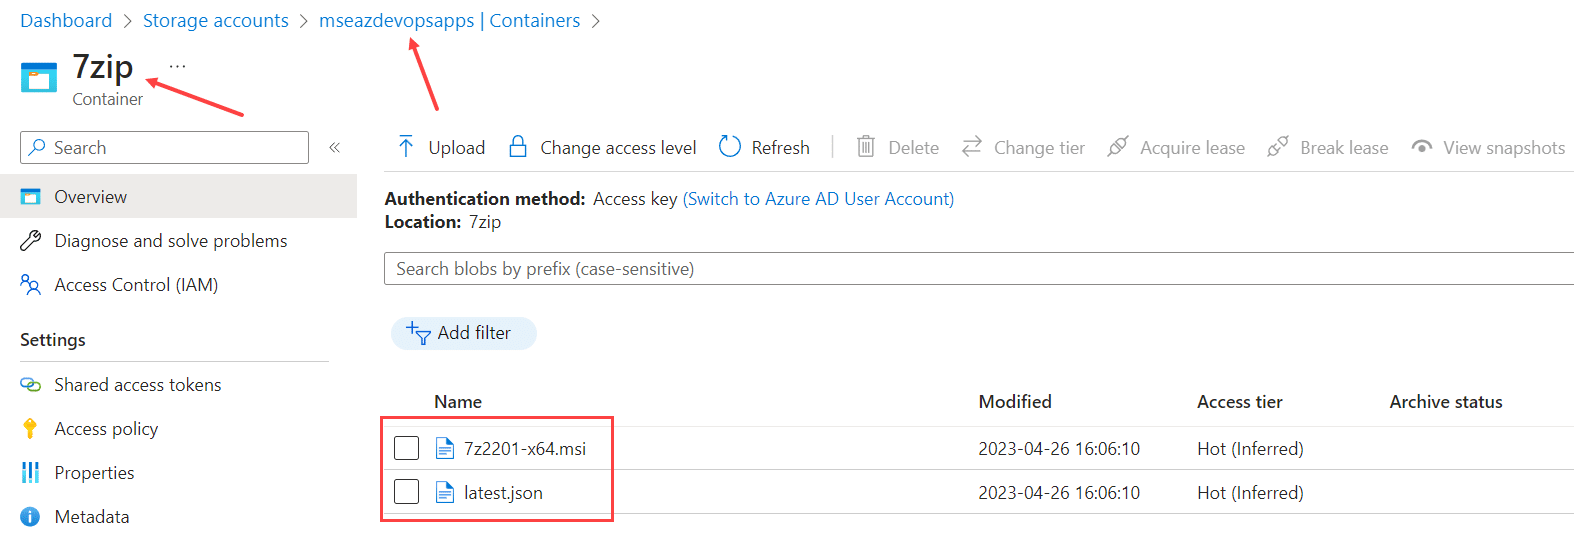
In the above example, a container named 7Zip is created where the two required files are uploaded. The 7z2201-x64.msi is the actual setup installer that Intune App Factory will download. Latest.json is used to determine the file that should be downloaded from the Storage Account and what version it is of the application, in case there’s a need to support multiple setup installers for recovery scenarios.
The latest.json file must contain the following details, in the example of onboarding the 7-Zip application:
{
    "SetupName": "7z2201-x64.msi",
    "SetupVersion": "22.01"
}
SetupName property should reflect the name of the file uploaded into the container of the Storage Account and the SetupVersion must reflect the actual version of the application.
Below is a full example for when onboarding the 7-Zip application, where the StorageAccountName and StorageAccountContainerName properties have been added to the application specific JSON construct in the appList.json main manifest file.
{
    "IntuneAppName": "7-Zip",
    "IntuneAppNamingConvention": "AppName",
    "AppPublisher": "Igor Pavlov",
    "AppSource": "StorageAccount",
    "AppID": "",
    "AppFolderName": "7zip",
    "StorageAccountName": "mseazdevopsapps",
    "StorageAccountContainerName": "7Zip"
}
Make a note of that the AppID property for this source method is not used, and is therefor set as an empty string, but it could also be removed all together.
With the above template, that completes the appList.json part of the onboarding, for an StorageAccount application.
Step 2 – App folder and files
Each onboarded application must have a sub-folder in the Apps root folder of the Intune App Factory repository. Application specific configuration files for how to create the Intune Win32 application object and how to handle unattended installation using PS App Deployment Toolkit, must be placed within this sub-folder.
It’s important to highlight that some of the information required for this step of the onboarding process, can only be retrieved by installing the application manually on a device. For instance, how to define the detection logic to be used, and the best approach for that. It’s recommended to use the MSI based detection rule whenever possible, as it provides the most effective and dynamic means for Intune App Factory to fully automate the whole process.
Modify the App.json file
As for the application specific App.json file, the template file that’s exists within the Templates > Application folder of the Intune App Factory repository, it contains a fixed set of required sections that must exist within this file. Each section also provides guidance on how to configure it’s required properties, by using a sort of schema that instructs when to provide any given value or to select from a list of supported values.
The schema defined within the App.json file can be explained as the following:
- <replaced_by_pipeline>
- Any property that has this value set, will automatically be fully replaced by the pipeline. It’s safe to leave this existing value or enter anything else.
- <<ENTER_VALUE:[custom_text]>>
- Any property that has this value set, must be updated with a custom text matching the expected data of the property.
- <<SELECT_VALUE:[value, value]>>
- Any property that has this value set, must be updated with any of the provided values from the list that’s defined.
- ###TEXT###
- For any property that contains this syntax in it’s value, the value will partially be replaced by the pipeline when it executes.
Below follows a description of each section and what they’re used for:
- PackageInformation
- This section of the file contains a set of static properties with values that should not be amended, unless you absolutely know what you’re doing.
- Information
- This section of the file contains a set of static properties with values. Only amend any value where instructed in accordance to the schema explanation above.
- Program
- This section of the file contains a set of static properties with values. Do not amend the InstallCommand and UninstallCommand properties. Only amend any value where instructed in accordance to the schema explanation above.
- RequirementRule
- This section of the file contains a set of static properties with values to create the requirement rule. Edit the values here for all properties and select amongst the available values provided.
- CustomRequirementRule
- This section is by default left empty, but can be utilized if additional File, Registry, or Script based requirement rules is needed. This section will be further documented in the future.
- DetectionRule
- This section of the file contains a set of pre-defined examples of how to construct the necessary detection rule, in order for the Win32 application to be detected. It’s important that the App.json file placed in the sub-folder of the application to be onboarded, only contains one of the provided examples.
- Assignment
- This section of the file contains a set of both mandatory and optional static properties to construct the assignment configuration. Multiple items can be specified.
Below is a full example for when onboarding the 7-Zip application and how the App.json specific file should be constructed.
{
    "PackageInformation": {
        "SetupType": "EXE",
        "SetupFile": "Deploy-Application.exe",
        "SourceFolder": "Source",
        "OutputFolder": "Package",
        "IconFile": "Icon.png",
        "IconURL": ""
    },
    "Information": {
        "DisplayName": "<replaced_by_pipeline>",
        "AppVersion": "<replaced_by_pipeline>",
        "Description": "Install 7-Zip",
        "Publisher": "<replaced_by_pipeline>",
        "Notes": "",
        "Owner": ""
    },
    "Program": {
        "InstallCommand": "Deploy-Application.exe Install",
        "UninstallCommand": "Deploy-Application.exe Uninstall",
        "InstallExperience": "system",
        "DeviceRestartBehavior": "suppress"
    },
    "RequirementRule": {
        "MinimumSupportedWindowsRelease": "W11_22H2",
        "Architecture": "x64"
    },
    "CustomRequirementRule": [
    ],
    "DetectionRule": [
        {
            "Type": "Registry",
            "DetectionMethod": "VersionComparison",
            "KeyPath": "HKEY_LOCAL_MACHINE\\SOFTWARE\\Microsoft\\Windows\\CurrentVersion\\Uninstall\\###PRODUCTCODE###",
            "ValueName": "DisplayVersion",
            "Operator": "greaterThanOrEqual",
            "Value": "<replaced_by_pipeline>",
            "Check32BitOn64System": "false"
        }
    ],
    "Assignment": [
    	{
            "Type": "VirtualGroup",
            "GroupName": "AllDevices",
            "Intent": "available",
            "Notification": "showAll",
            "UseLocalTime": true,
            "FilterName": "",
            "FilterMode": "",
            "AvailableTime": "",
            "DeadlineTime": "",
            "DeliveryOptimizationPriority": "",
            "EnableRestartGracePeriod": "",
            "RestartGracePeriodInMinutes": "",
            "RestartCountDownDisplayInMinutes": "",
            "RestartNotificationSnoozeInMinutes": ""
        }
    ]
}
With the above template, that completes the App.json part of the onboarding.
Modify the Deploy-Application.ps1 file
Each onboarded application also needs the Deploy-Application.ps1 specific file. This file is used as the installation and uninstallation engine, as it’s a part of the PS App Deployment Toolkit.
The Deploy-Application.ps1 file in the Templates > Application folder of the Intune App Factory repository should be considered a template file, and needs to be configured properly for the application to install and uninstall successfully. This part is very much up to the person to write the correct logic and make use of the PS App Deployment Toolkit’s features correctly to accomplish the desired behavior.
Just like the App.json file, Intune App Factory is able to update and replace values defined in the Deploy-Application.ps1 file using the similar schema functionality.
The schema in the Deploy-Application.ps1 file can be explained as the following:
- ###TEXT###
- For any string that contains this syntax, the syntax will be replaced by the pipeline when it executes.
Below is an example of what Intune App Factory will replace within the Deploy-Application.ps1 file automatically:
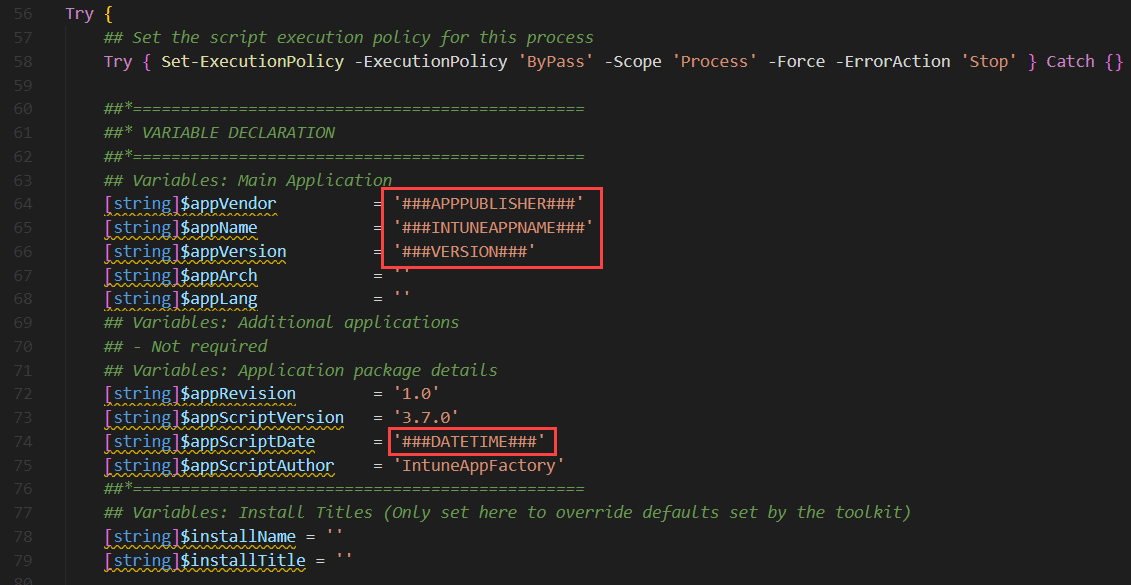
In addition to this, the setup installation file name will also automatically be populated wherever the ###SETUPFILENAME### syntax is entered.
In the Pre-Installation phase of the Deploy-Application.ps1 script, most of the original functionality of how the script normally functions has been commented out. It’s up to you to specify and control what features are to be enabled in this phase. There’s also pre-defined commented out segments of how to for instance remove any detected instances of the application that’s going to be installed, prior to installing the application. All of these examples are defined with ##SAMPLE: and could be utilized if required.

In the Installation phase of the Deploy-Application.ps1 script, a number of pre-defined methods for various installation scenarios are provided but by default commented out. Either write your own code for handling the application installation, or uncomment the desired example and make use of that. Remember that Intune App Factory can automatically reference the downloaded setup installer file and will replace that file name anywhere in the Deploy-Application.ps1 script where ###SETUPFILENAME### is defined.

In the Post-Installation phase of the Deploy-Application.ps1 script, nothing is specified in the template file. Make use of this section if required.
In the Pre-Uninstallation phase of the Deploy-Application.ps1, nothing is specified in the template file. Make use of this section if required.
In the Uninstallation phase of the Deploy-Application.ps1, examples are provided on how to handle uninstallation of the application.
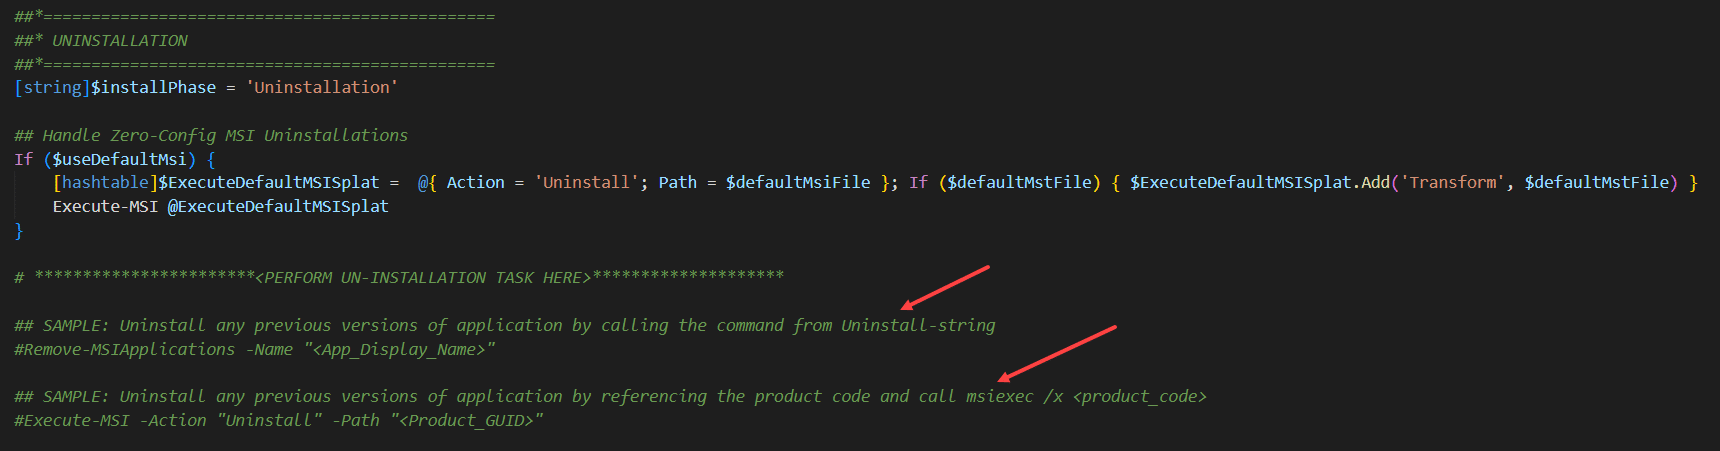
In the Post-Uninstallation phase of the Deploy-Application.ps1, nothing is specified in the template file. Make use of this section if required.
Refer to the two existing onboarded application that comes out of the box when setting up Intune App Factory for more details and examples. And with that, the configuration of the Deploy-Application.ps1 file is completed.
Add Icon file
Either make use of the default MSEndpointMgr provided icon, which is essentially not recommended, or find an official icon on the internet that you are legally allowed to use. Ensure the file is named as Icon.png, or else Intune App Factory will not be able to detect its presence and the application won’t be considered fully onboarded.
Step 3 – Commit and test
Once all of the required files are in place in the application specific sub-folder underneath the Apps folder, the changes should be staged and commit to the Azure DevOps repository.
Commit changes to repository
In Visual Studio Code, in the Source Control tab, click to stage all changes.
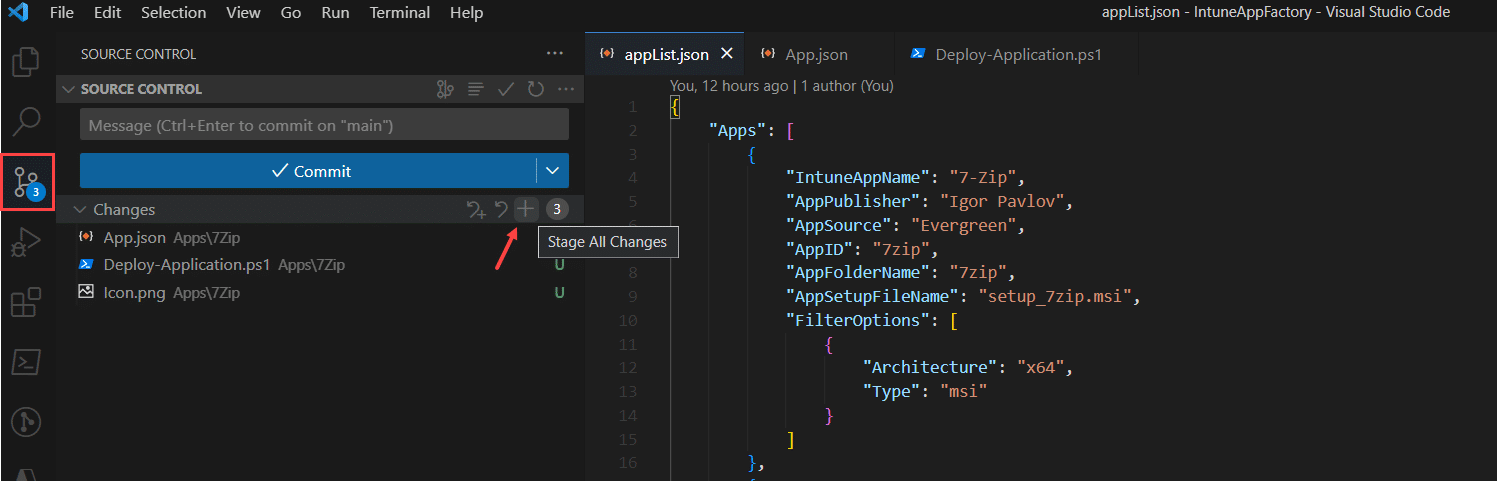
Provide a commit message and click Commit.

Click Sync Changes.

The application onboarding process has now been completed.
Test run pipeline
If desired, trigger the Intune App Factory pipeline manually and test the newly onboarded application. This can be done from within the Azure DevOps portal under the Pipelines section.
Click on the IntuneAppFactory pipeline.
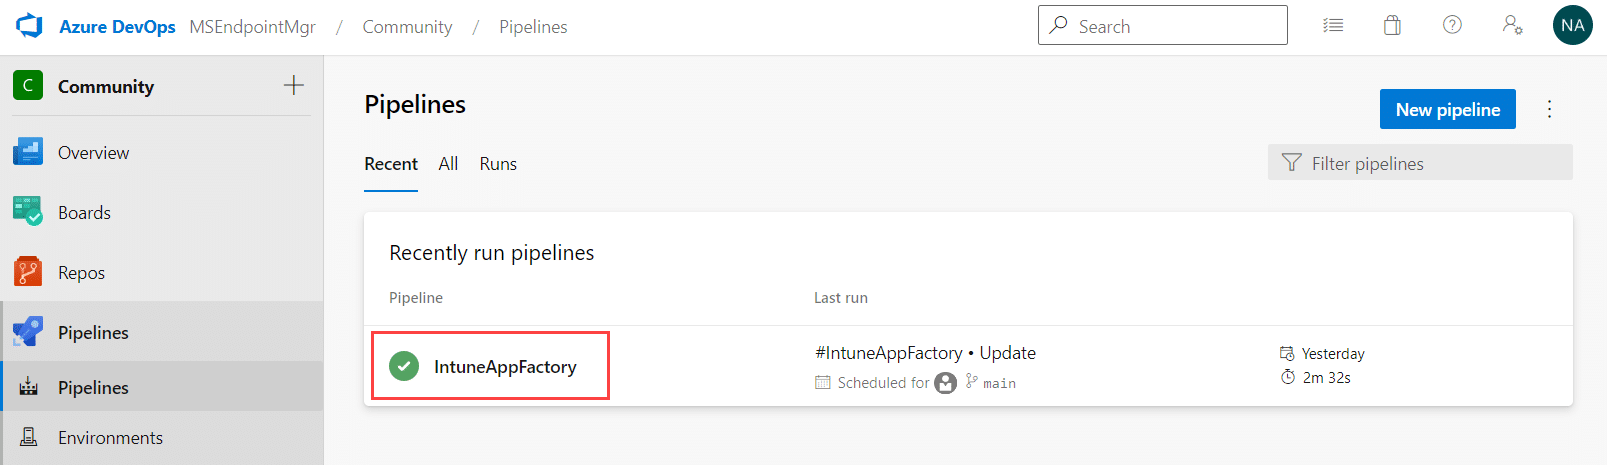
Click on Run pipeline.
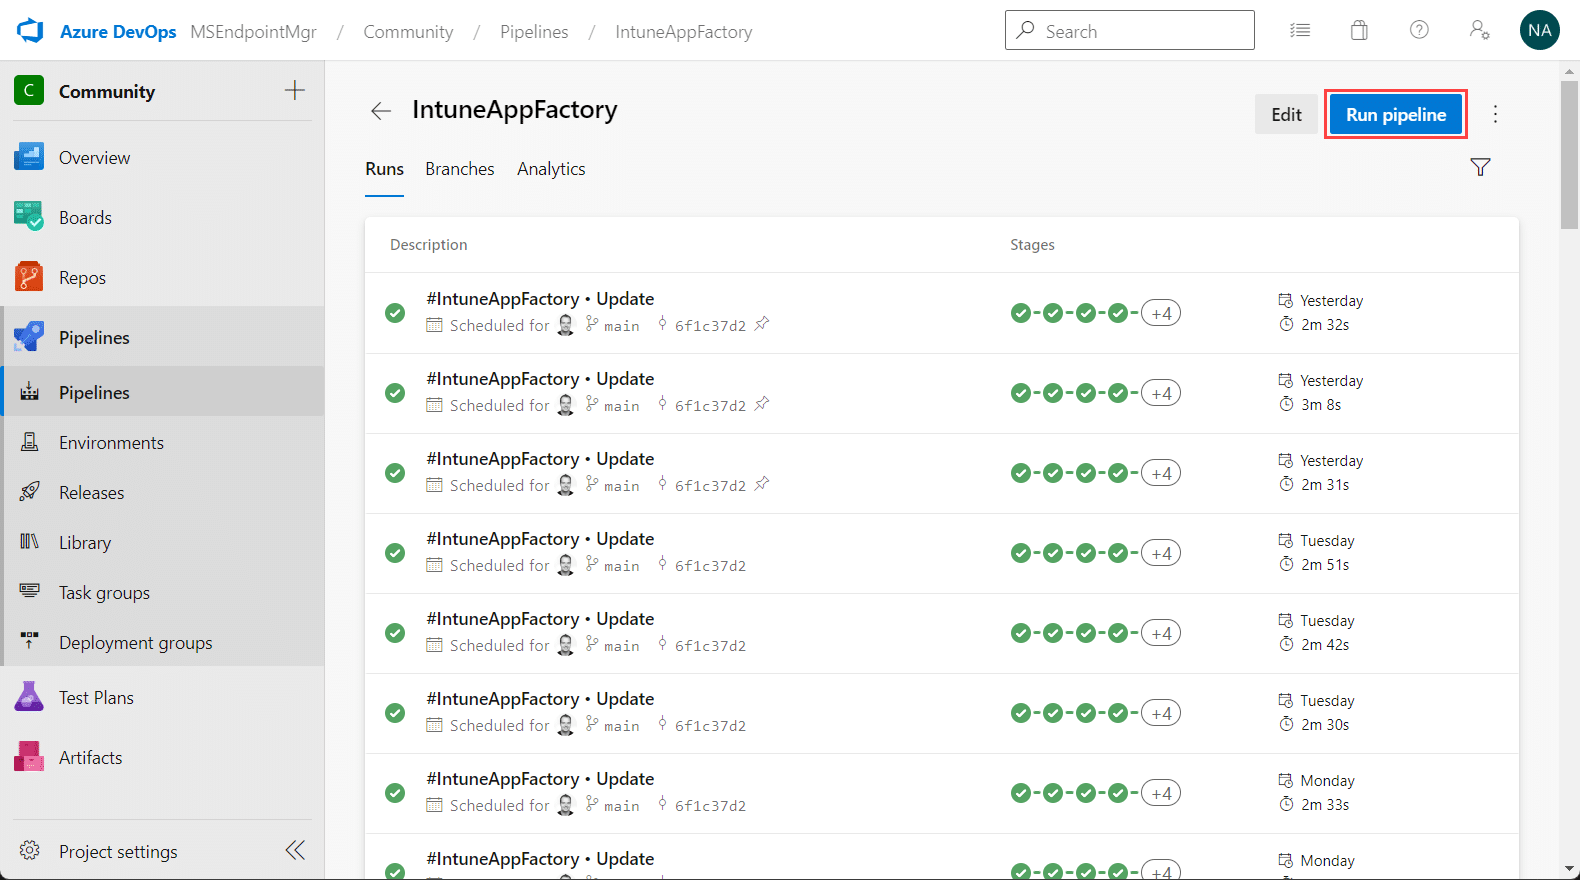
Select the desired operational mode of the pipeline and select Run.
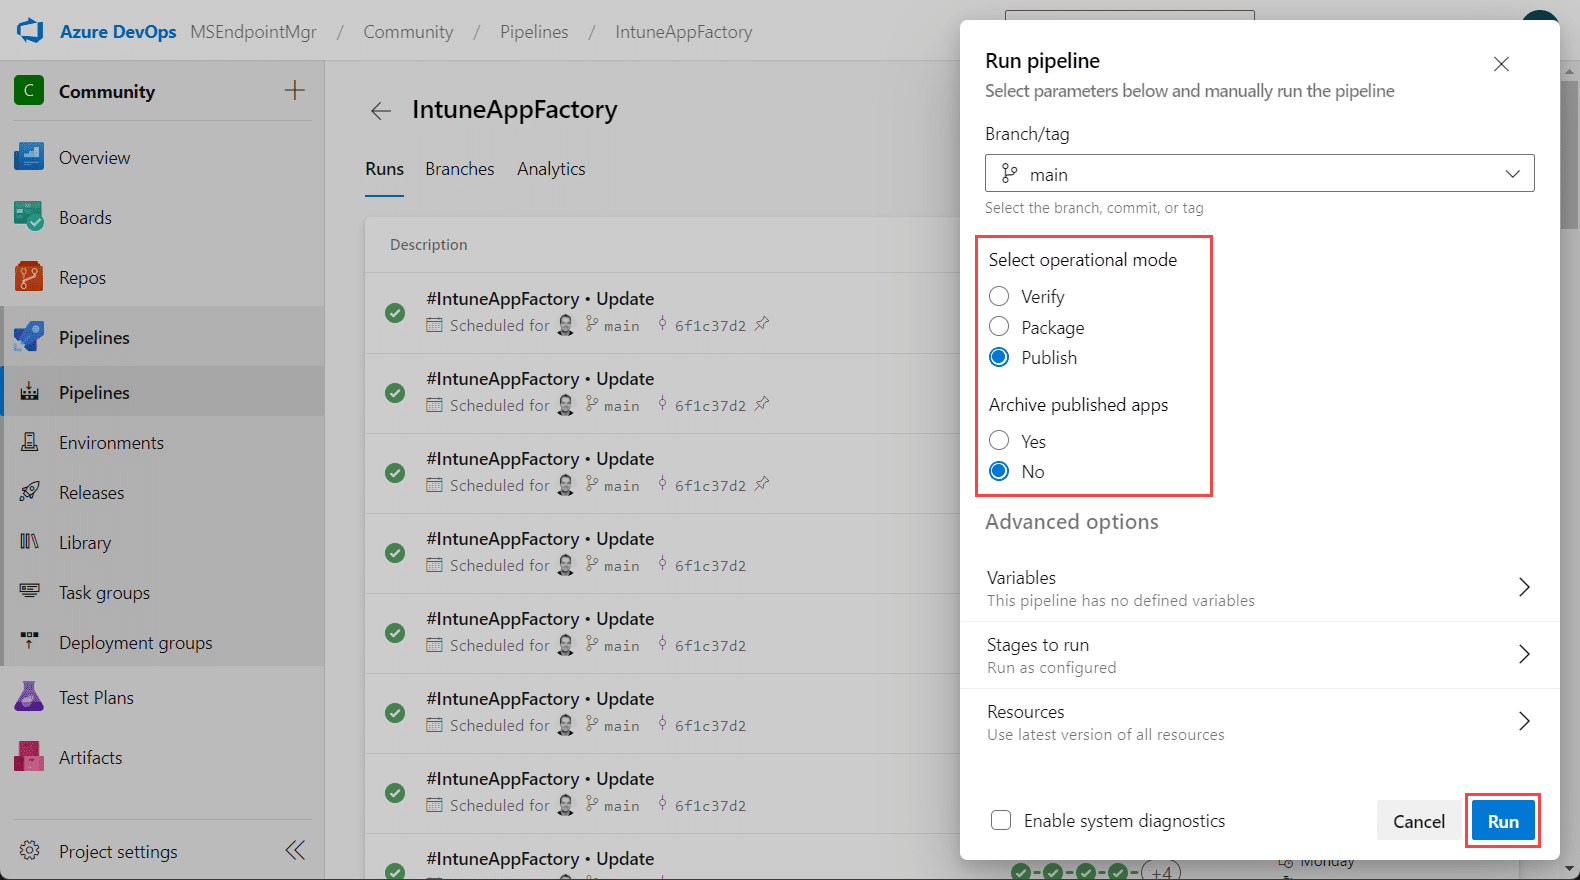
The pipeline will now execute and you can follow it’s progress by clicking on the current stage.
Source code repositories
Intune App Factory source code can be found at the following location:
https://github.com/MSEndpointMgr/IntuneAppFactory
Community resources
For contributing to the community repository available for onboarded application templates to be used with Intune App Factory, make a pull request in the following repository:
- Is Intune App Factory free?
- Intune App Factory as a community solution is licensed under the MIT license. However, since Intune App Factory is built around Azure DevOps, there’s a certain license requirement that needs to be fulfilled. There’s also a free option for Azure DevOps, however Intune App Factory has not been tested with that free subscription level.
- Will there be updates made available in the future?
- Whenever a bug is found or new features are added, a new release will be added under the Releases tab containing a link to the release specific update instructions.
- Is there any support for Intune App Factory provided by the developer?
- Intune App Factory is a community driven solution an no support is provided. However, if a bug is reported the developer intends to address it as soon as time permits.
- How do I report a bug in Intune App Factory?
- Open a new issue in the official repository. Links are provided in the Source section.