


WIM Witch is a utility that can be used to update and modify WIM files for Windows deployment scenarios. She currently supports the following:
- Integration into Configuration Manager
- Apply Software Updates
- Apply Drivers
- Apply Autopilot Profiles
- Apply Registry Keys
- Apply Default App Association
- Apply Start Menu Layout
- Apply Language Packs, Local Experience Packs, and Features on Demand
- Apply .Net 3.5
- Remove in-box provisioned apps apps
- Create content for ConfigMgr Upgrade Package
- Create updated bootable ISO
- Pause build process for manual customization
- Run custom PowerShell scripts for additional functionality
- Command line support for automation tasks
WIM Witch supports servicing Windows 10, Windows Server 2016 and 2019 images. For more information, please read the documentation listed in the Documentation Tab.
To Install WIM Witch, open PowerShell and run the following command:
Save-Script -Name WIMWitch -Path [folder to save file in ex: "c:\temp"]
Then run the downloaded WIMWitch.PS1 as an admin and follow the prompts.
Articles
v3.0.0 – Configuration Manager Console Extension
v2.3.0 – ISO Creation, Upgrade Package, Dynamic and Optional Updates
v2.2.0 – Default App Association, Start Menu Layout, and Reg Keys
v2.1.0 – Updated ConfigMgr Integration
v2.0.0 – ConfigMgr Integration
Deploying Autopilot with MDT on USB – A WIM Witch Use Case
v1.3.0 – Server Support, Improved CLI, OneDrive client update
- When switching from Update Existing Image to New Image on the ConfigMgr tab, the list box for DP’s is not cleared. The entries can be removed with the remove button, but it may be advisable to close WIM Witch and reload if the list box does not clear as desired.
- The path field on the Make It So tab does not allow the user to browse for a UNC path. I’ll be working on this as the current workaround is a little hokey.
- Source path for Features On Demand contain an extra “”. This does not cause a problem, and will be cleaned up in the future
Found a bug? Tweet or DM me! @TheNotoriousDRR
Prerequisites
WIM Witch can be installed on Windows 10, 2012 R2. Server 2016, and Server 2019.
PowerShell v5.1 is required.
The script will need to be run “As Administrator”
Internet access
Windows 10 ADK / Deployment Tools – Only required if building ISO’s
Running WIM Witch on Server 2012 R2
If using Server 2012 R2, PowerShell may need to be upgraded. This can be done by installing version 5.1 of the Windows Management Framework.
https://docs.microsoft.com/en-us/powershell/scripting/windows-powershell/wmf/setup/install-configure
If using Server 2012 R2, PowerShell may have trouble connecting to the PowerShell Gallery due ended support for TLS 1.0/1.1. Please see the following article to resolve the issue.
https://devblogs.microsoft.com/powershell/powershell-gallery-tls-support/
Installing WIM Witch
WIM Witch can now be installed from the PowerShell gallery. Use the following command to get it:
save-script -name wimwitch -path [your download folder] -force
To get started, simply run the script with Administrative rights. WIM Witch will start a pre-flight check to see if its folders exist in the folder that the script was run. If it doesn’t detect any of its folders, it will start the installation routine.
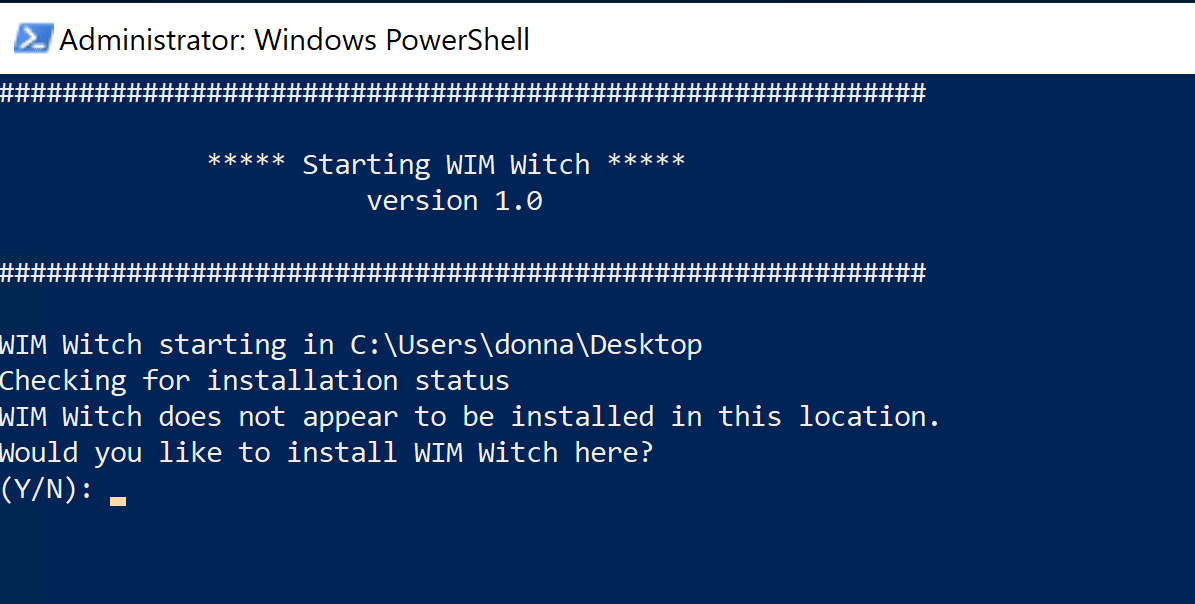
At the prompt, select “Y” for “yes” or “N” for “no”. If “N” is selected, WIM Witch will then ask for the folder that it should install to.
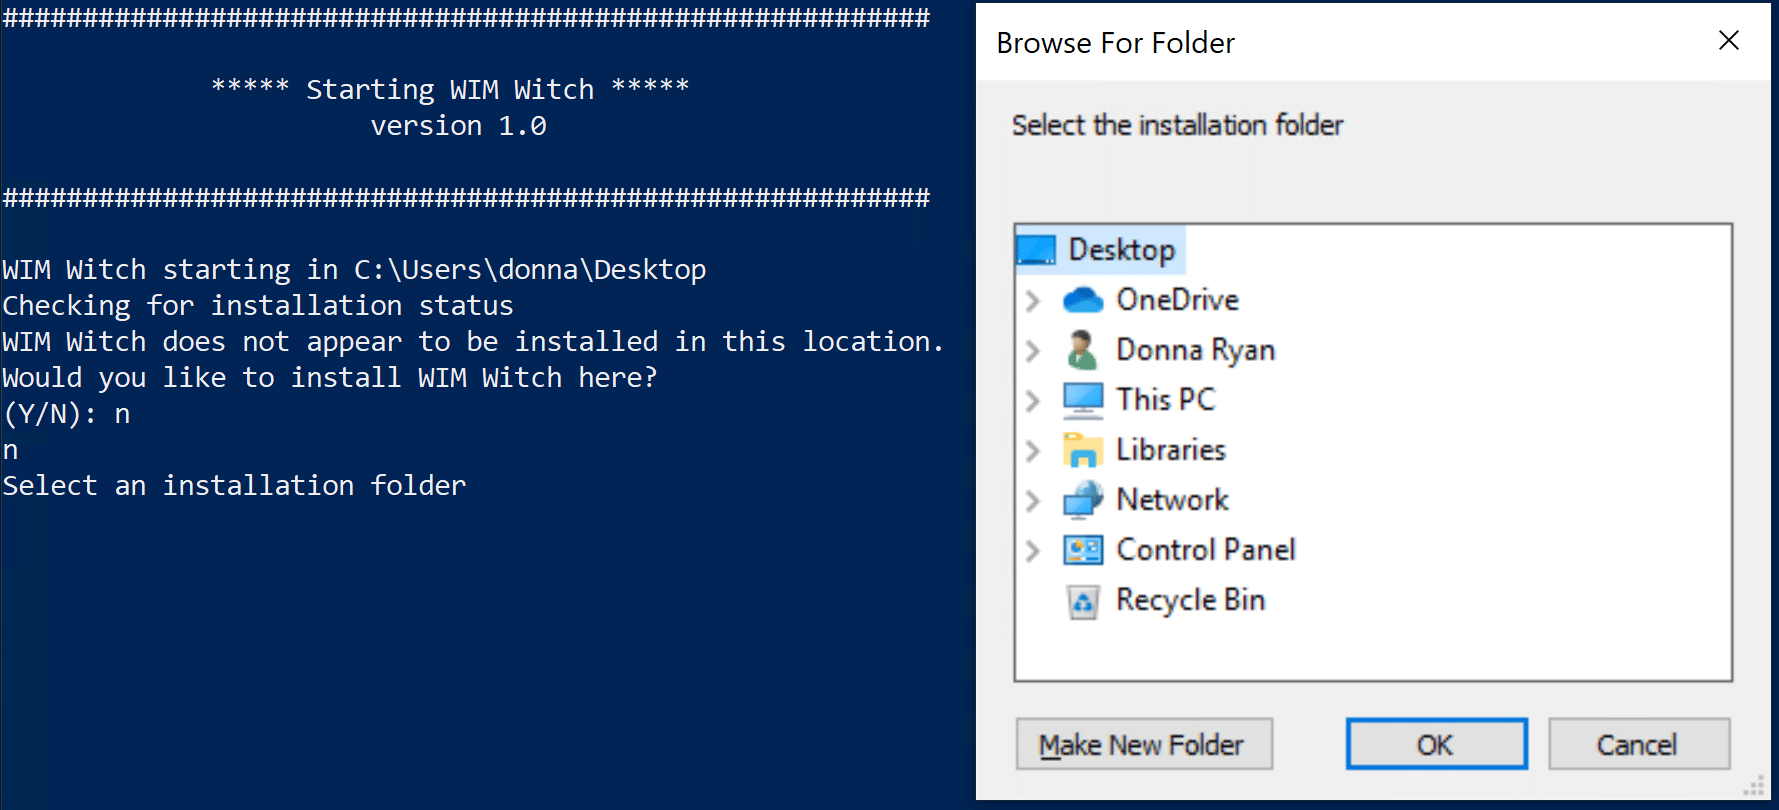
Sometimes the browse window loses the focus and becomes “hidden” behind active screens. If the window doesn’t spawn, minimize all windows to find it.
WIM Witch will create several folders and will copy itself to the path specified. Once this operation is complete, WIM Witch will exit. Please then run WIM Witch from the newly installed location.
Upon starting, WIM Witch will always check to see if its folder structure is present and will replace any folder that is missing.
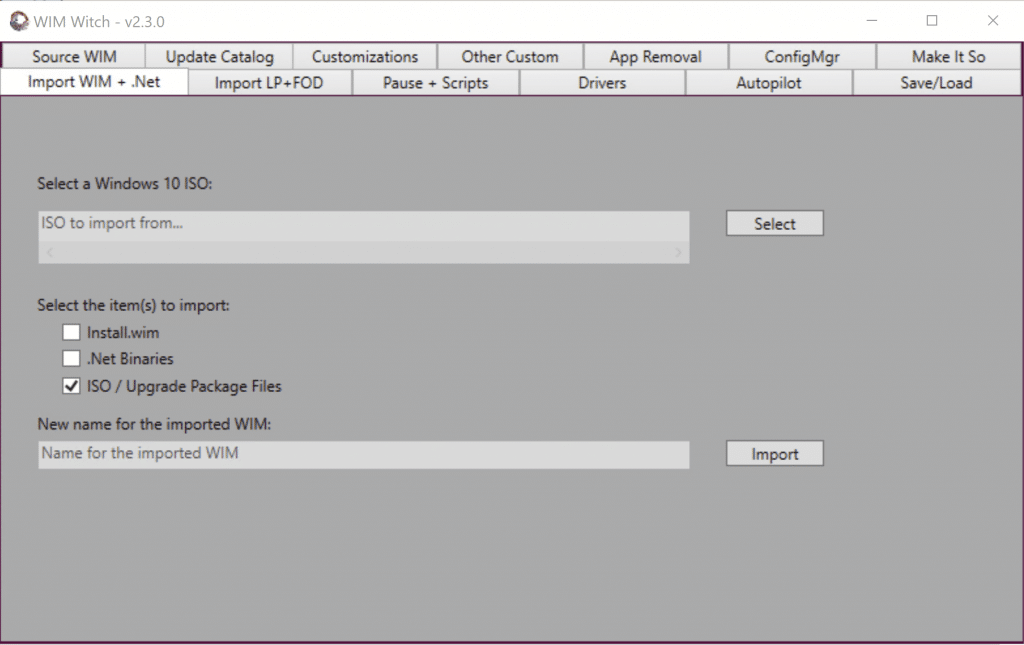
Importing WIM and .Net 3.5 Files
WIM Witch provides a mechanism to import Install.wim and .Net 3.5 files into its folder structure. When applying .Net 3.5 to an image, prior importation will be required as WIM Witch cannot download the .Net files Microsoft directly. Importing Install.wim files is optional, but may be beneficial.
To import, start on the “Import Tab”
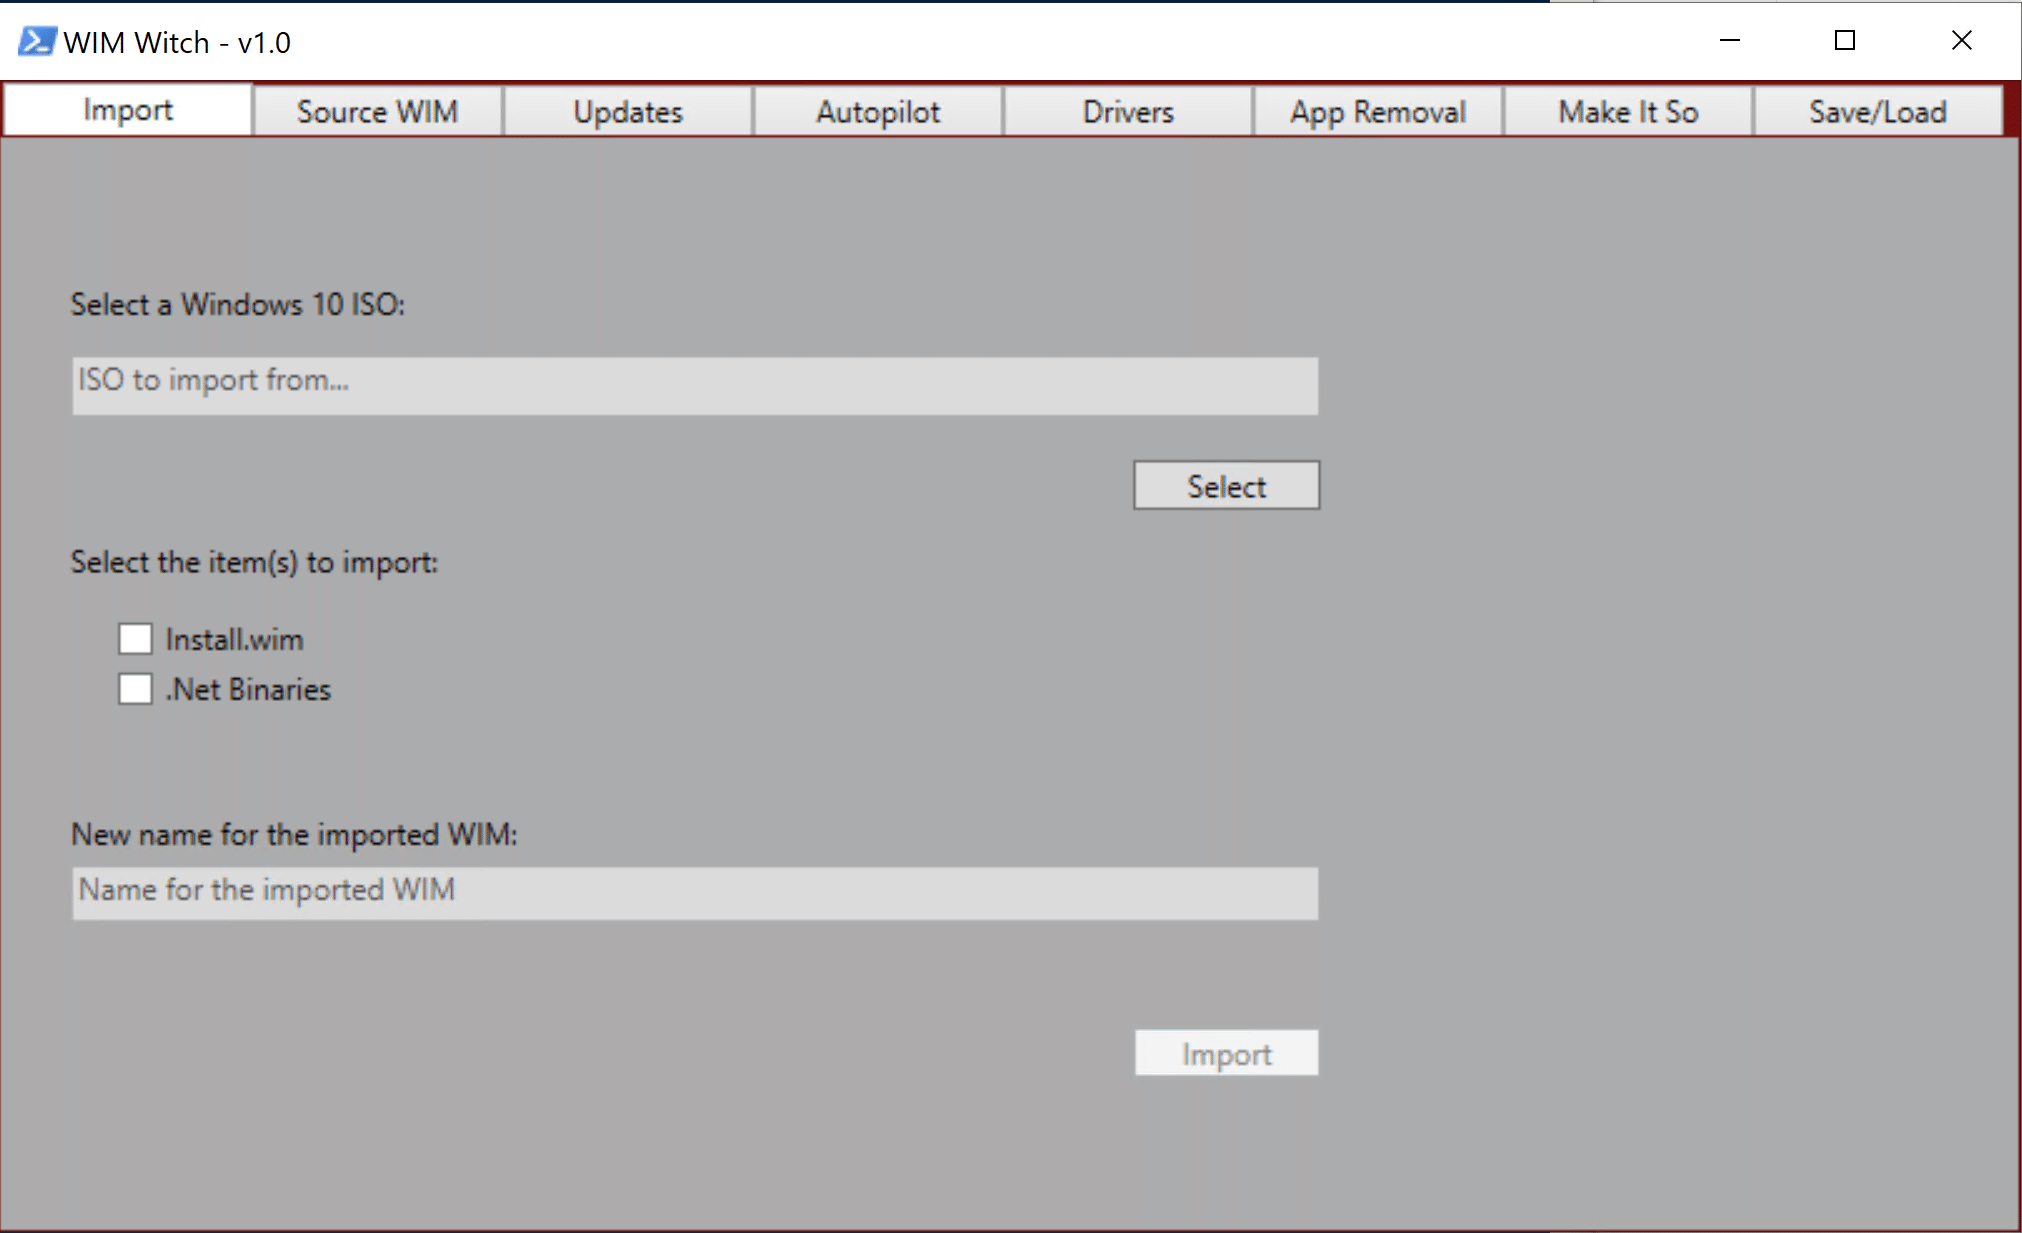
Press the “Select” button and browse to the ISO file that contains the files that should be imported. It should be noted that WIM Witch cannot import from an already mounted image; only ISOs. Once the ISO file is selected, check the box for the items that should be imported. If “Install.wim” is checked, the field to supply the name for the imported “Install.wim” file will now be accessible. Provide a unique name for the file. .Net 3.5 Binaries do not require any additional configuration.
Once the proper check boxes and fields have been completed, click “Import” to start the process.
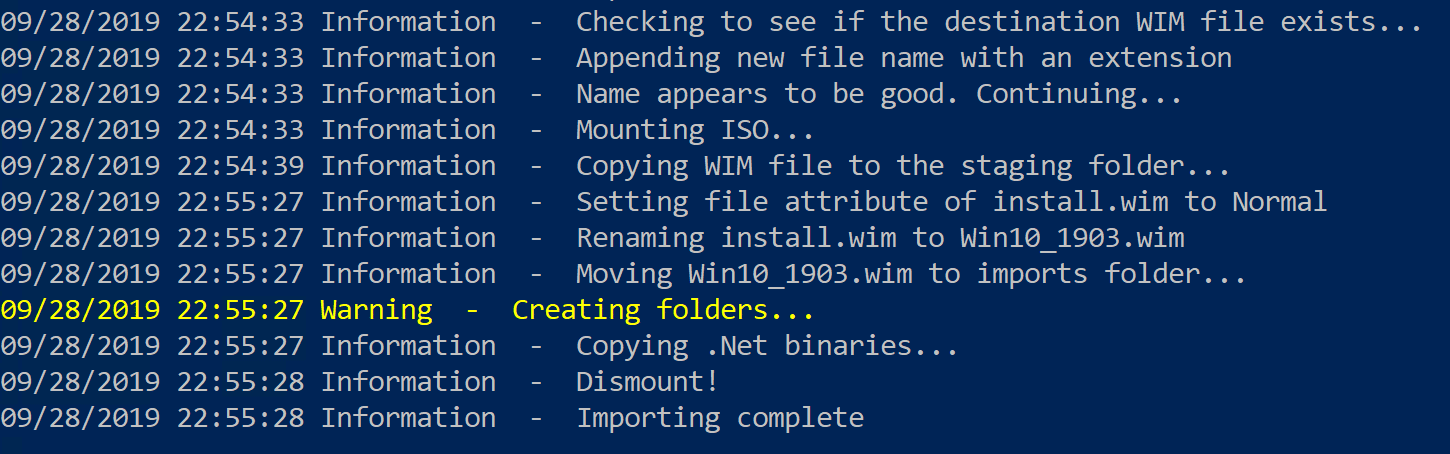
During the importation of the .Net binaries, if the required subfolders do not exist, WIM Witch will create them automatically.
Import ISO Binaries
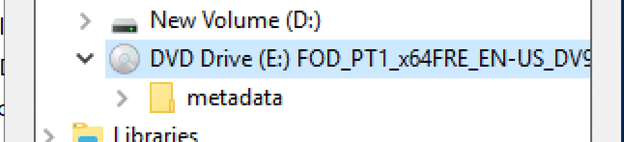
To get started, the binaries for the ISO will need to be imported. On the Import WIM tab, simply put a check mark in the ISO/Upgrade Packaged check box, select a source ISO, and then click import. This will copy all the files in the ISO, except the WIM file which should be imported with the Import WIM function. WIM Witch will determine if the ISO is Windows 10 or Server, and which version.
Start WIM Witch and select the “Import LP+FOD” tab. Select the type of import (Language Pack, Local Experience Pack, or Features On Demand), the Windows OS, and the corresponding version that you wish to import. At this time, WIM Witch is unable to determine the corresponding version of Windows from these binaries alone, so an accurate selection of the intended version is required.
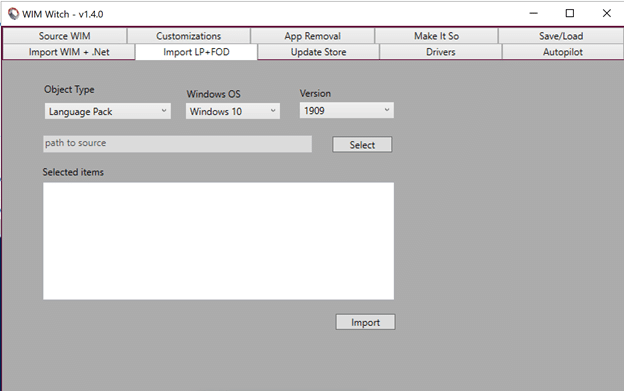
Once the required data points have been entered, click the “Select” button to browse to the source.
LP,LXP, and FOD importation does not import directly from a ISO file like the WIM importation process does. The ISO file will need to be mounted or extracted for WIM Witch to import.
Importing Language Packs
Select Language Packs in the Object Type drop down, then select the version of Windows. Then, click the “Select” button.
Browse to the \x64\langpacks folder in the Language Pack media and select this path. WIM Witch does not support x86 images, so ensure x64 is selected.
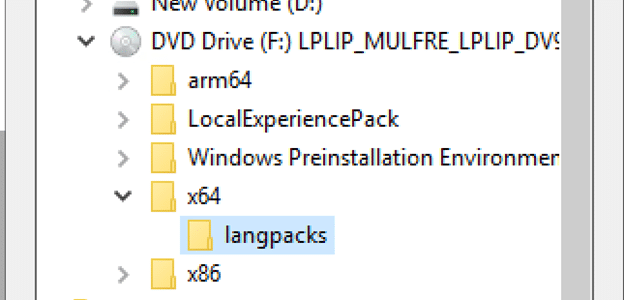
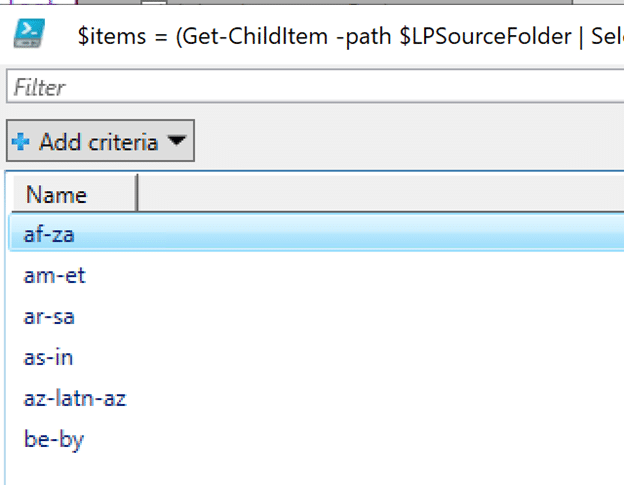
Once the folder has been selected, the path will be queried for content and the result will be displayed in a Grid View window.

Select the Language Packs that will be needed for image creation, then click OK.
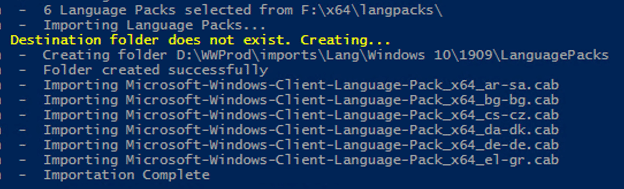
The selected files will be displayed in the “Selected Items” window on the “Import LP+FOD” tab. Ensure the files have a CAB file extension. Click the Import button to begin the importation process.
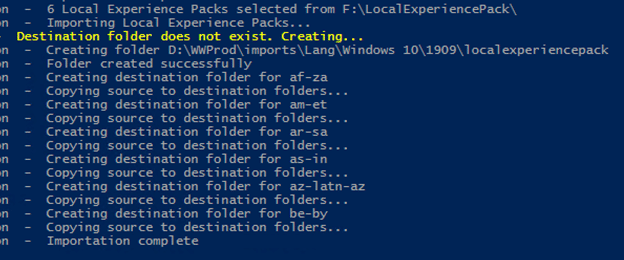
Importing Local Experience Packs
To import Local Experience Packs, select Local Experience Pack in the Object Type drop-down, along with the corresponding OS and Version number. Once configured, click the “Select” button and browse to the LocalExperiencePack source folder. Ensure the LocalExpereincePack folder is selected and not one of its many subfolders.

Once the source path has been selected, a Grid View will be displays a list of the Local Experience Packs that can be imported from the source. Select the needed packs and click OK. The LXP’s will be displayed in the Selected Items window in the Import “LP+FOD” tab.
Click the “Import” button to start the importation process.
Importing Features On Demand
To import Features on Demand, change the Object Type to Features on Demand and select the corresponding OS and Version. Click the “Select” button to select the import source folder.
Select the root of the mounted ISO or source folder.
Unlike the Language Packs and Local Experience Pack, WIM Witch does not provide the user with an option to select packages. Instead it copies the entire contents of the Features On Demand source to its import folder.

Click Import to start the importation process. There are a lot of files that will be copied, so this process will take longer than the other types.

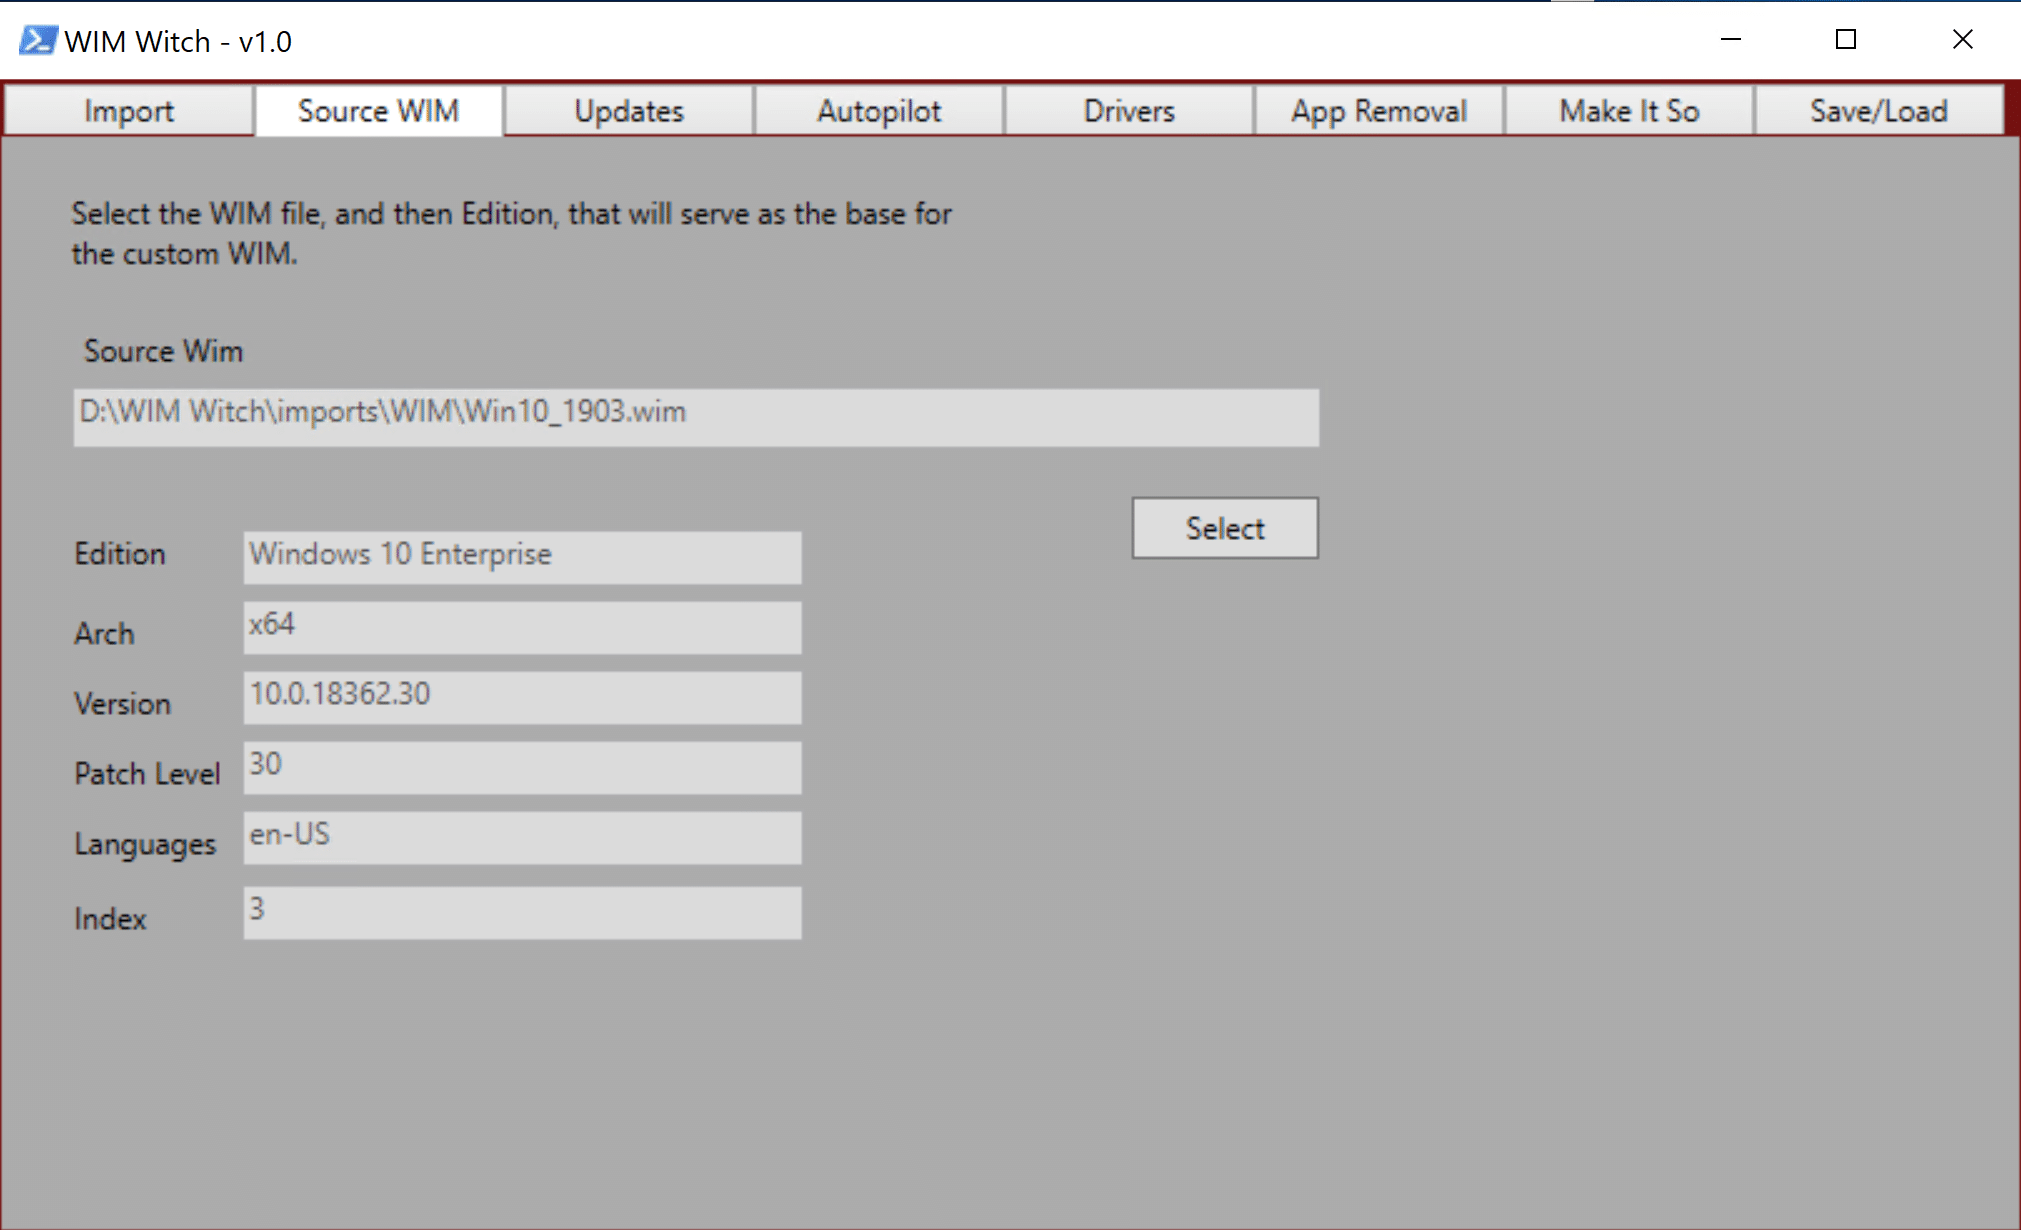
Starting at the “Source WIM” tab, click the “Select” button. Browse to the WIM file that will serve as the base for the image build.
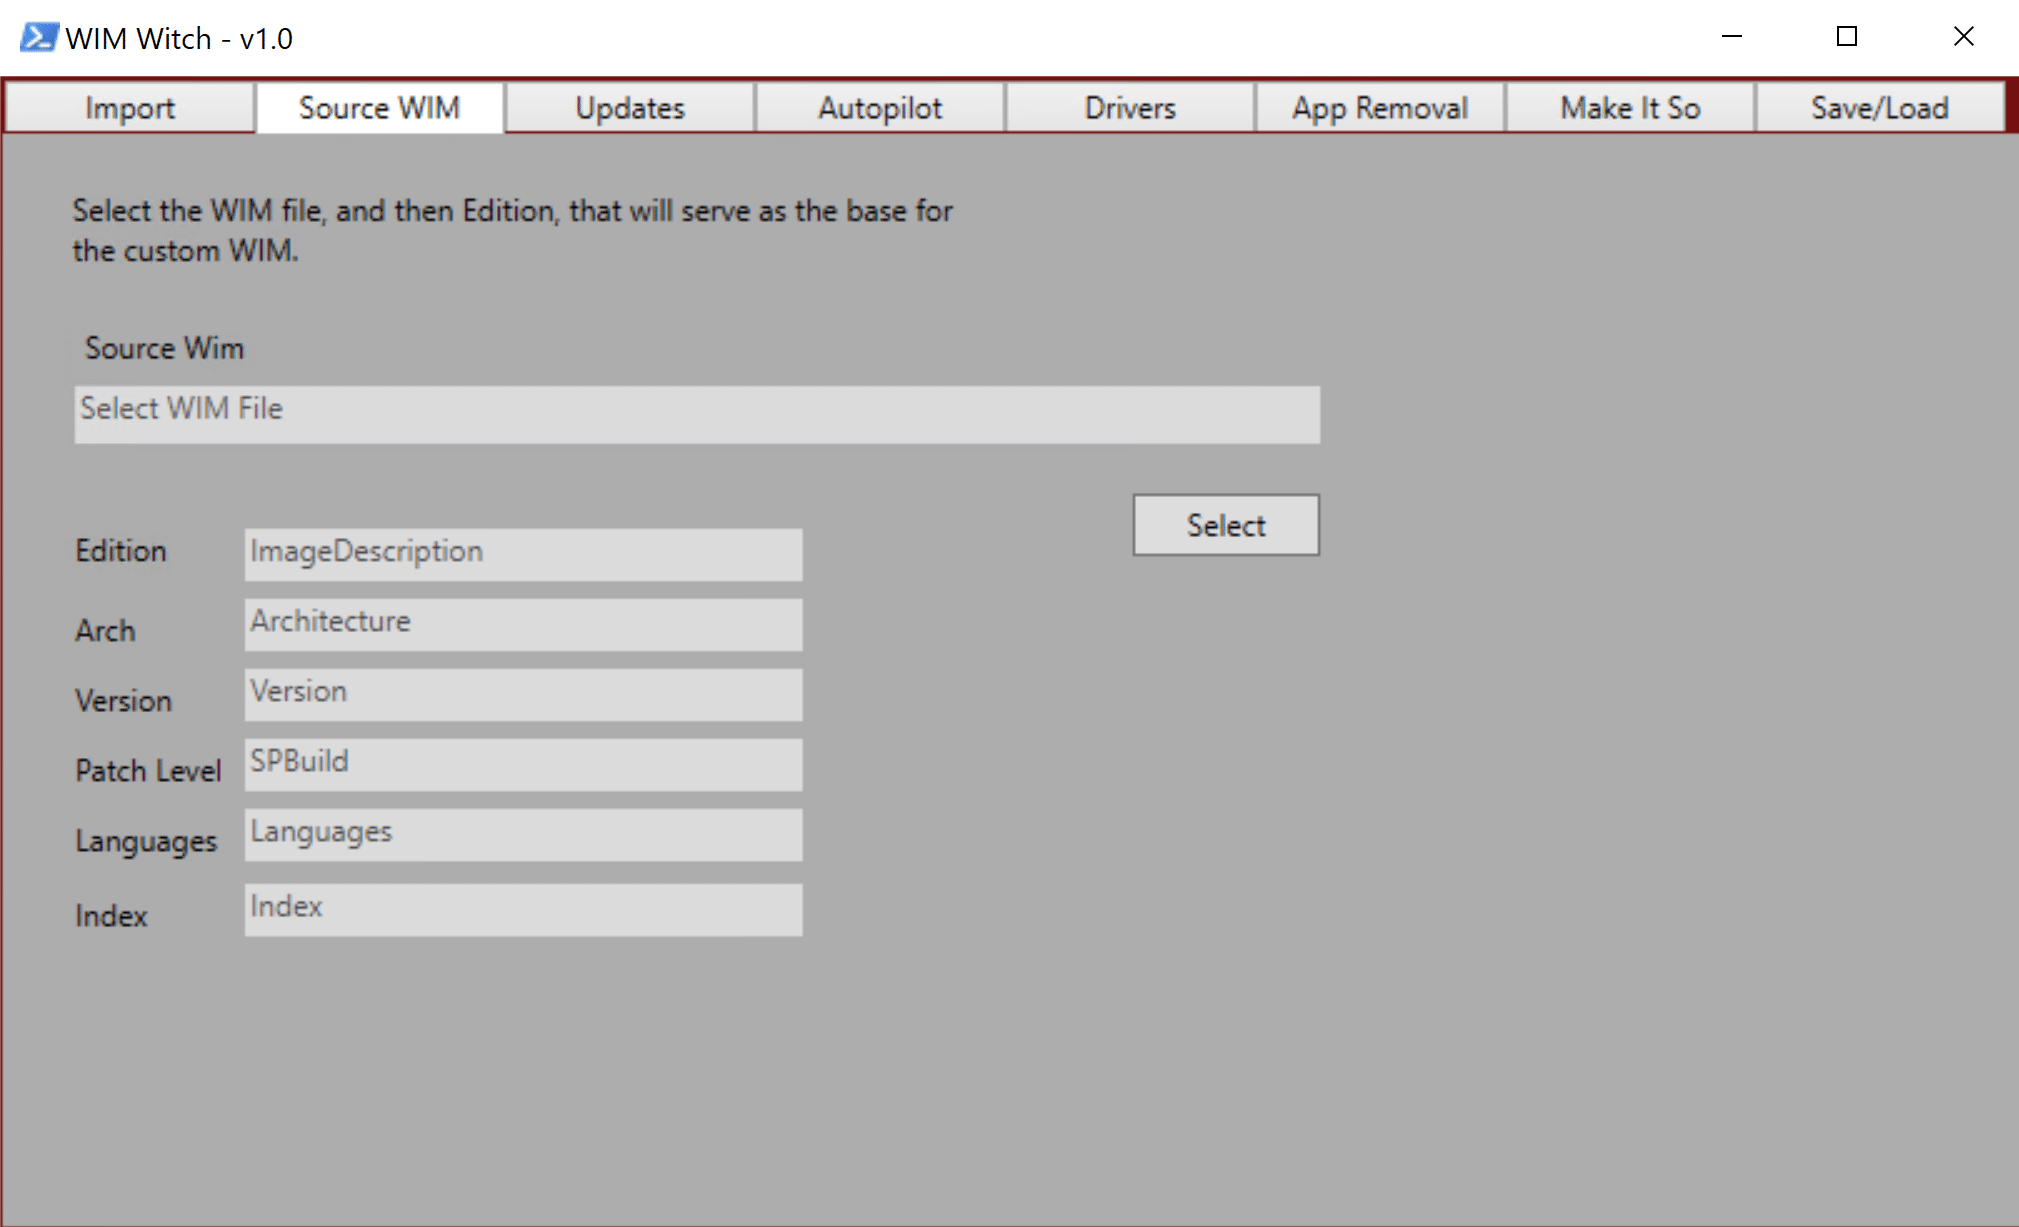
After selecting the WIM file, a Grid View window should appear:
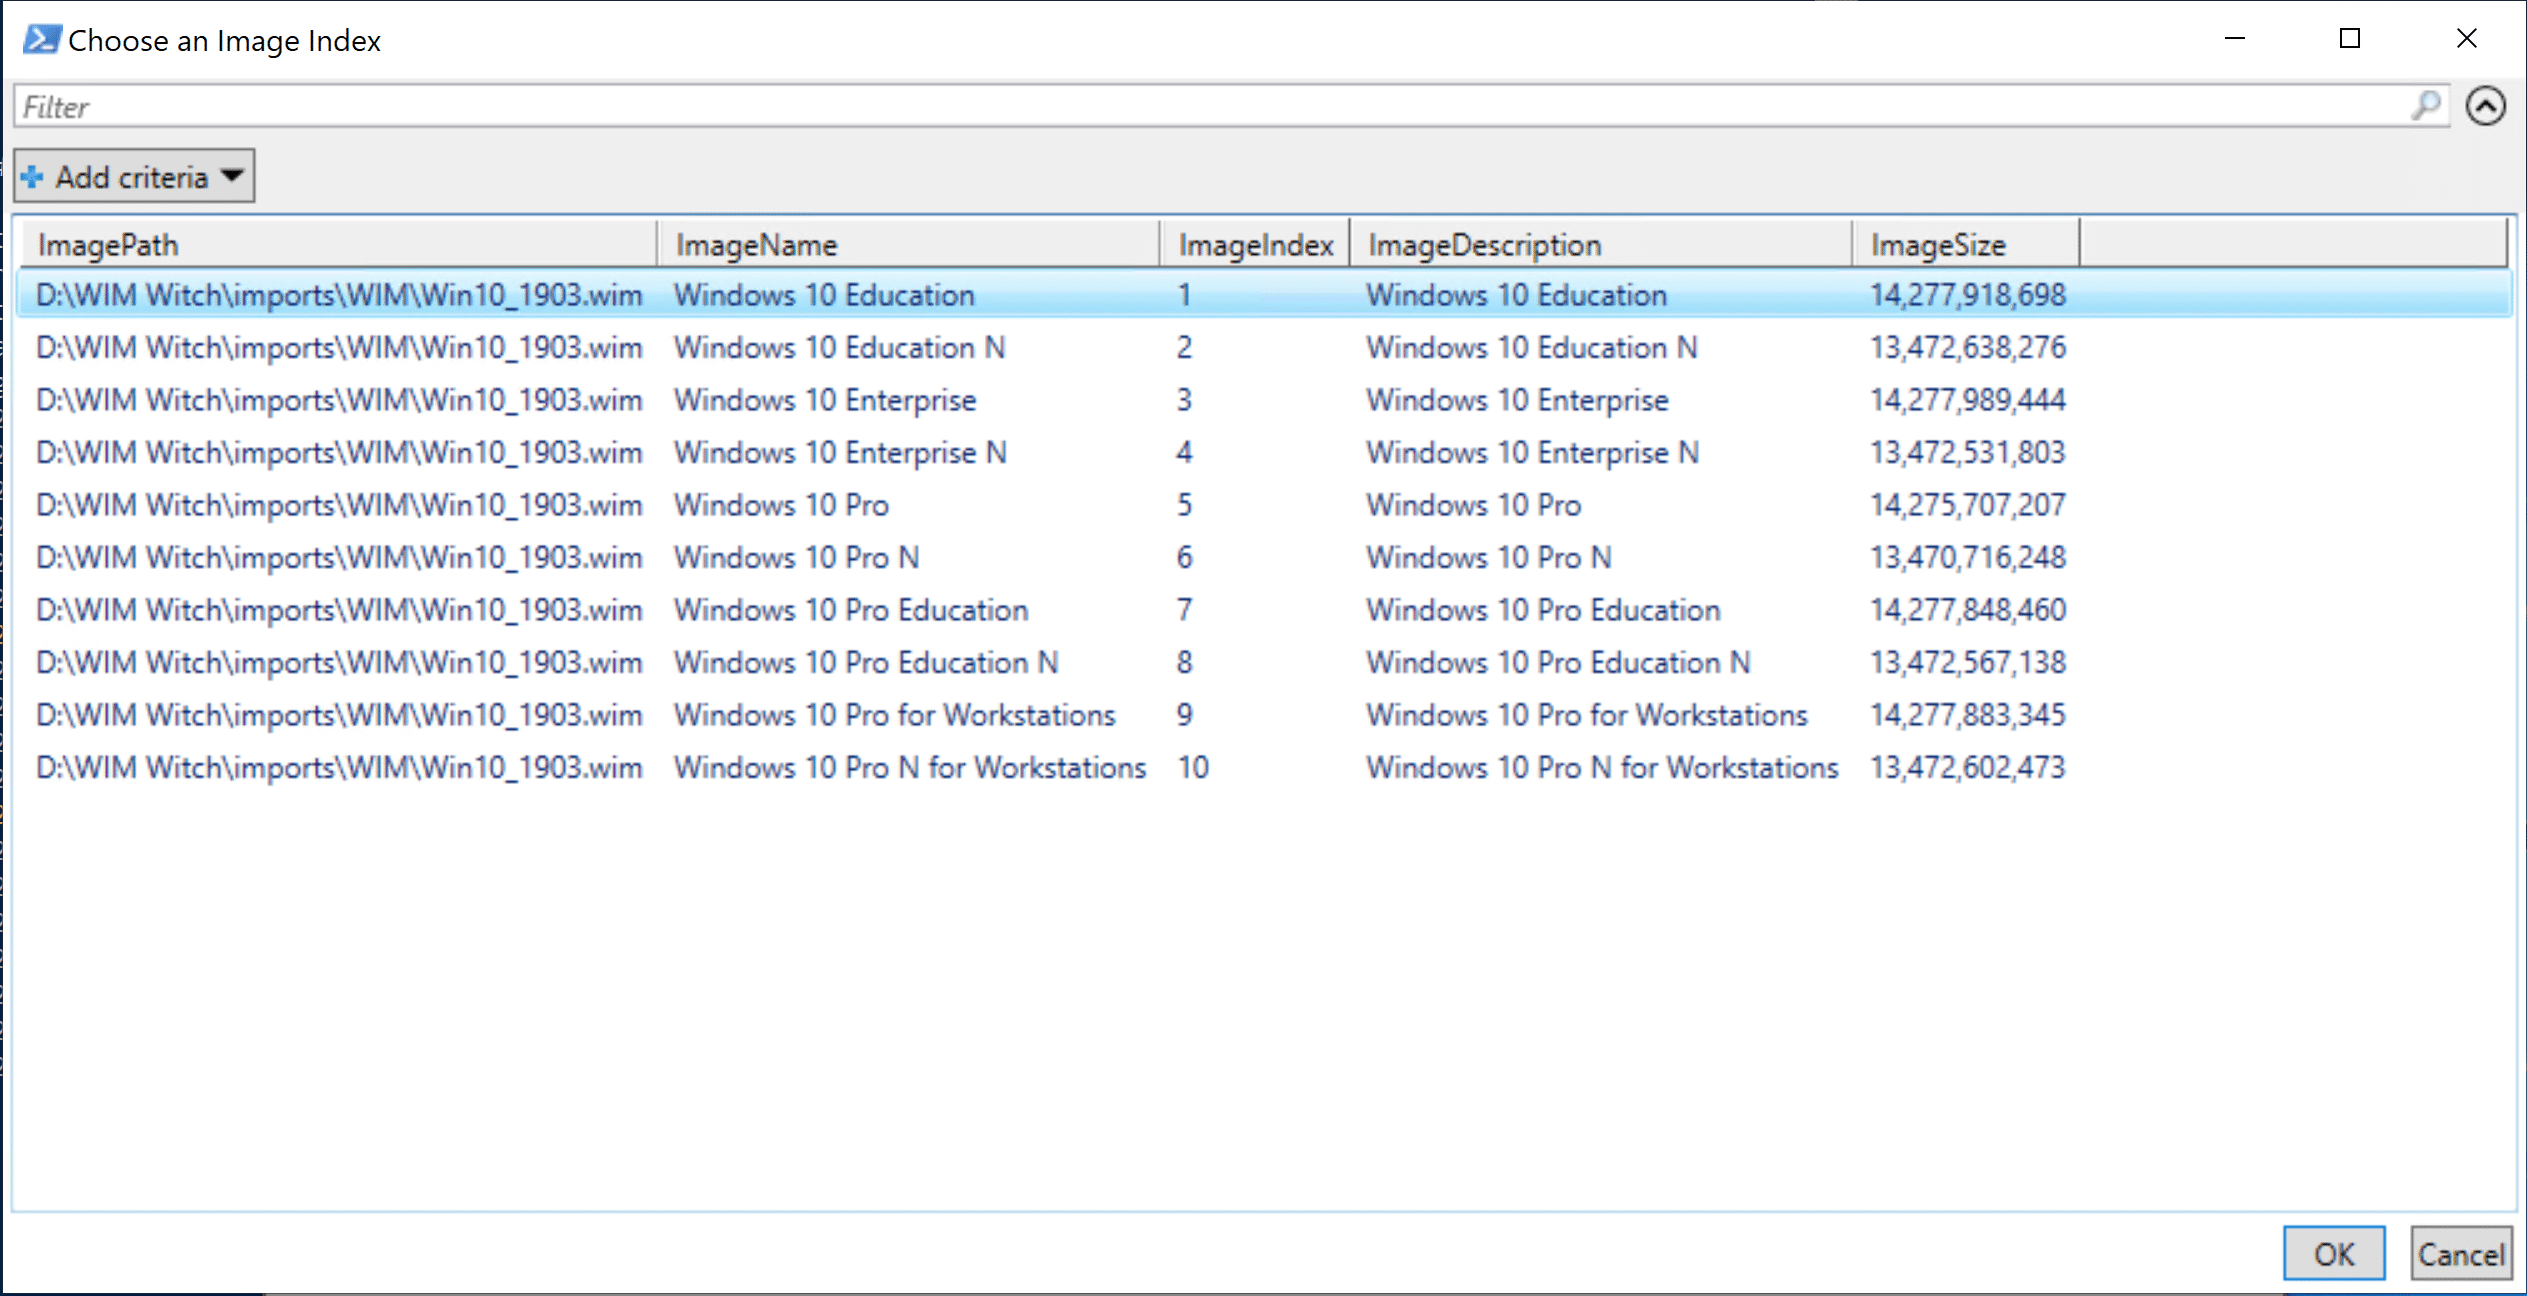
Select the edition / index of Windows 10 that will be used. Click “OK”.
WIM Witch will take a small amount of time to analyze the selection and extract relevant information. When the processing is complete, the fields will be populated.
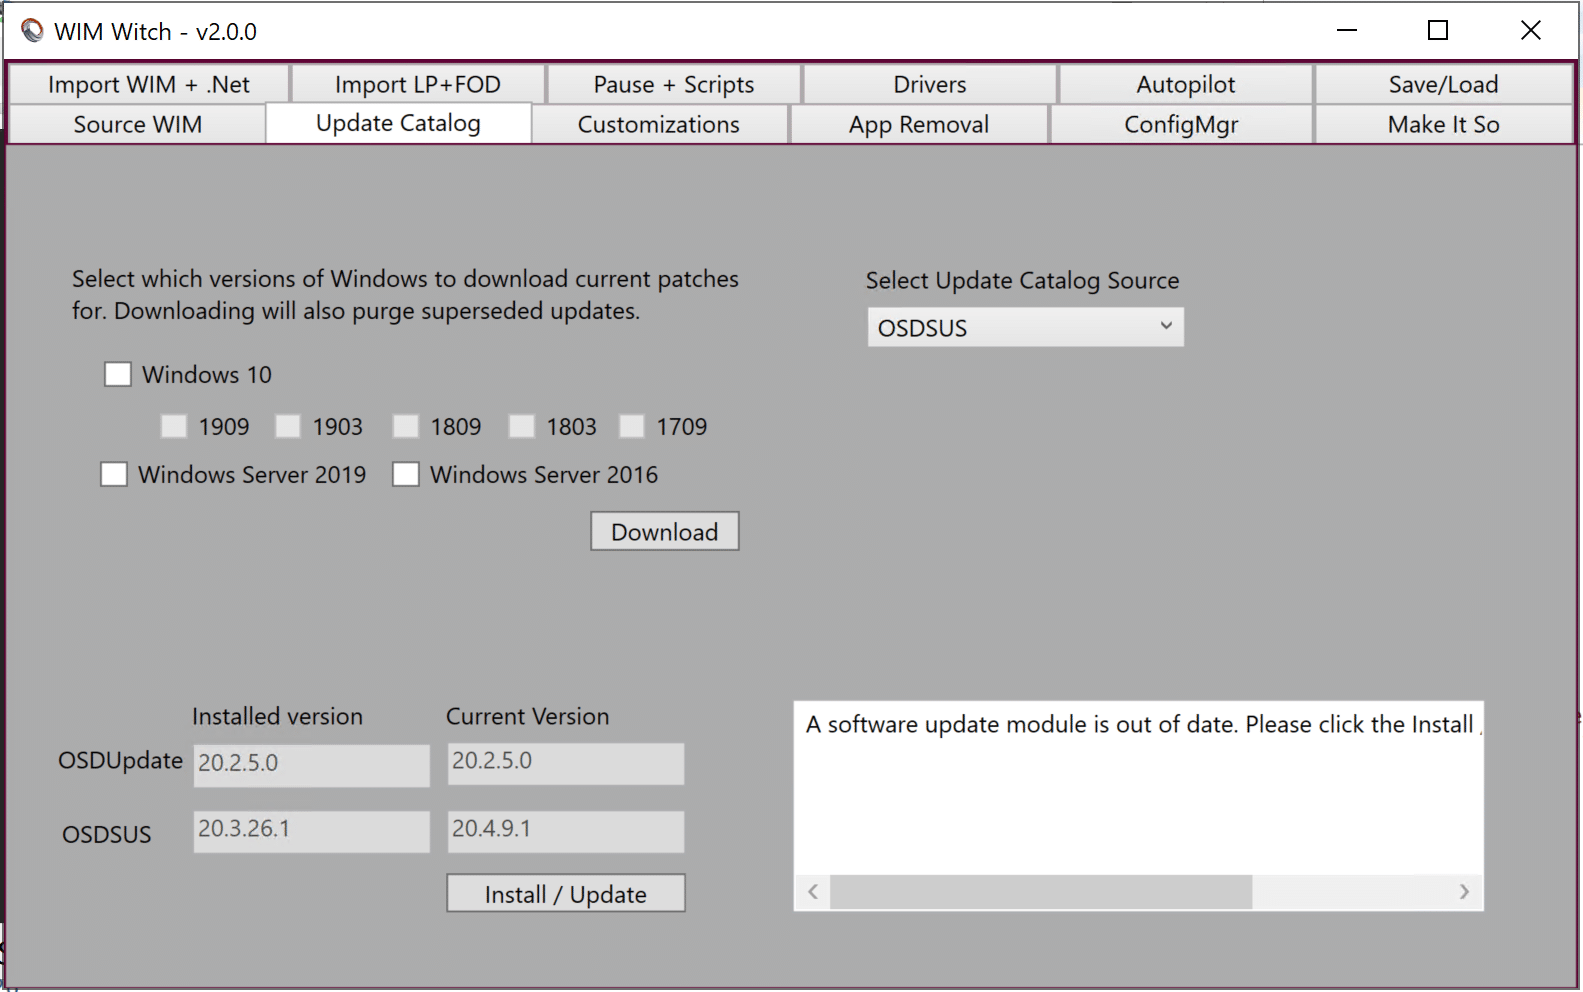
Update Catalog
The Update Catalog is where one can change the preferred update catalog source to either OSDSUS or ConfigMgr. If using ConfigMgr integration, downloading new updates prior to building an image is now optional. There isn’t much to do on this tab if ConfigMgr is the update catalog.

When using ConfigMgr as the Update Catalog, certain updates will be flagged as “Optional” and will not be downloaded or applied unless selected to do so. These “Optional” updates are ones that are not Servicing Stack, Cumulative, .Net, or Adobe related updates. This behavior is equivalent to OSDSUS as these updates are not intended for installation on every system.

- If there is sufficient demand to allow these updates to be managed with WIM Witch, this behavior can be modified in later releases. Just let me know.
If OSDSUS has been selected as the update catalog, and the modules are out of date or if PowerShell must be closed, WIM Witch will display the information in the box at the lower right of the window. This replaces the big, ugly text that was displayed in prior versions. The requirement of pre-downloading updates has not changed and will need to be performed.
Download Dynamic and Optional Updates
Prior to this release, WIM Witch would only download “Required” updates. These included Servicing Stack, Latest Cumulative, Adobe, and .Net updates. This release now supports Optional and Dynamic updates. Note that in order to download these updates, these check boxes must be checked. This is applicable both to the “Download” button on the Update Catalog tab, as well as the “Check for Updates” option on the Make It So tab.
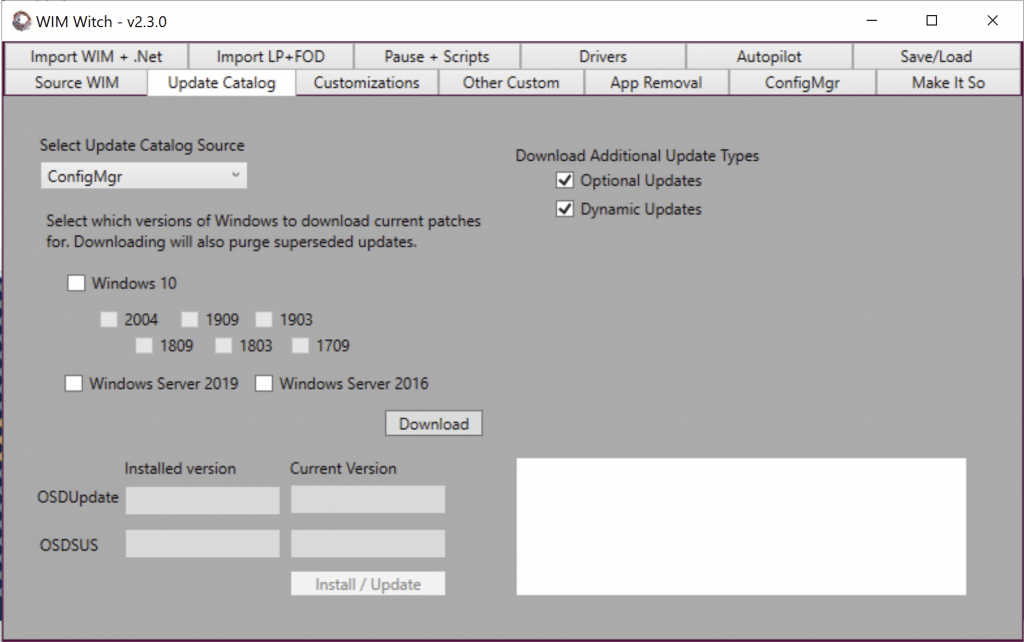
Optional Updates
Optional Updates are not needed on every Windows system and it is up to the admin to determine if the optional update should be applied. To download, select the option in the Update Catalog tab window.
Dynamic Updates
Dynamic Updates are intended to update the setup files of the Windows installation media, and these updates are not applied to a WIM. To download these updates, select the option in the Update Catalog tab.
Downloading Updates
If using OSDSUS as the update source, you will need do download the updates prior to Making It So. To do this, simply check the Operating System type and the corresponding version (if applicable). This process will also check for, and purge, superseded updates
If using ConfigMgr as the update source, you can have WIM Witch check for new updates by selecting the appropriate check box on the Make It So tab. If it is not desirable to check for updates at run time, the updates can be downloaded prior to Making It So
Applying LPs, LXPs, and FODs
To determine the correctly corresponding version of these objects, WIM Witch requires a WIM file to have been already selected on the Source WIM tab. This allows WIM Witch to autodetect which version and operating system to use, and modifies the options presented accordingly.
Click on the Customizations tab. This pane contains the LP, LXP, and FOD controls, and is now the home for the .Net 3.5 package option, OneDrive Client update, as well as Updates enablement.

Check the box next to the item type to be included. The Language Packs and the Local Experience Packs will prompt with the familiar Grid View windows, allowing the user to select which of the previously imported packages will be used.
The Features On Demand selection button provides a list of the Windows Capabilities for the given Window Version. Select the Demanded Features needed.

With all of the options selected for, it should look something like this:
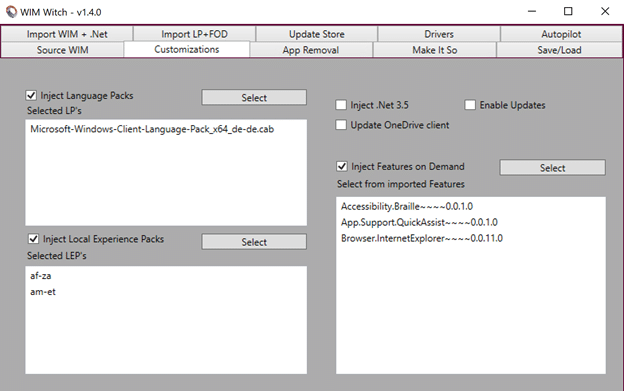
From this point, the selected LPs, LXPs, and FODs are ready and will be injected during the build process. They are now the first packages to be processed by WIM Witch, with Software Updates coming later in the process.
The .Net, OneDrive, and Updates check boxes on the Customization tabs provide the same functionality as they did when the resided in their previous locations.
These settings can be found under the “Other Custom” tab.
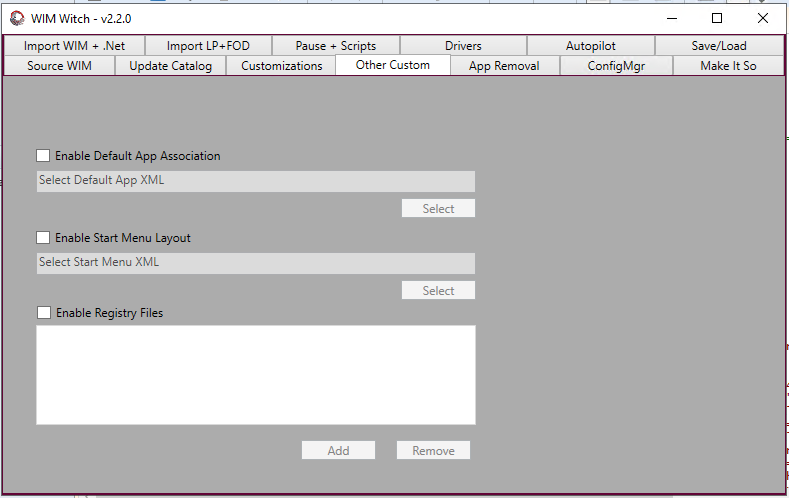
Default Application Association
To leverage this feature, one must already have a XML file exported from a Windows reference machine in order to import the configuration into the offline image.
For information on how to export the file from a reference machine, see this link
Click the check box to enable the Default App Association feature. Then click select and browse to the XML file and click OK. The path and file name will be displayed.
Start Menu Layout
To leverage this feature one must have already exported a Start Menu layout xml file from a Windows reference machine.
For information on configuring and exporting the Start Menu layout template, see this link
Click the check box to enable the Start Menu layout feature, then click the select button. From there, simply select the XML file. If the name of the file is not “Layout Modification.XML”, WIM Witch can apply the layout, but will rename the file during the build process. This behavior will be noted in the log and console output.
Registry Keys
WIM Witch can now import registry keys from exported REG files. As with the other new features, the required files will need to have already been exported from a reference machine. Click the check box to enable the feature, then click select. The UI allows for multiple files to be added from a single folder.
The current support for the exported registry settings are for:
- HKLM\Software
- HKLM\System
- HKCU
- HKU\Default
Make It So
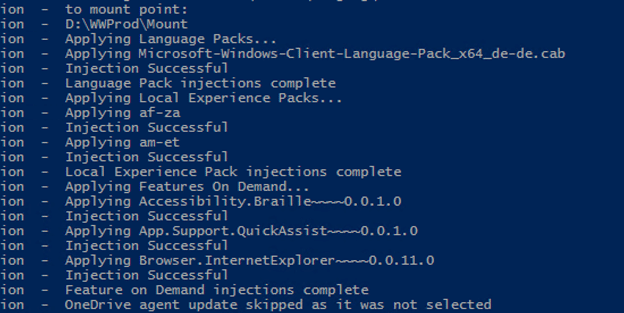
Once the required files have been selected, the options are ready to Make It So.

Below is a screen grab of the output regarding the new features during the build process.
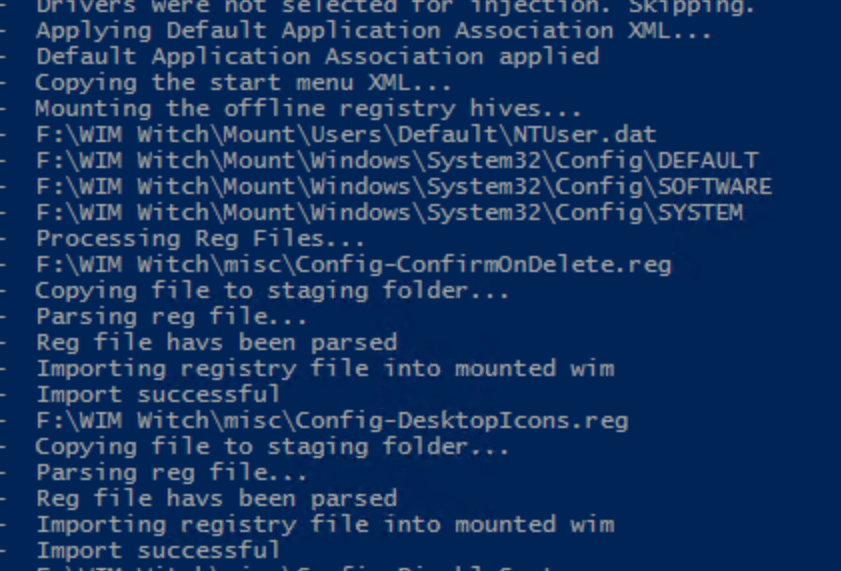
The relevant bits from Making It So
Driver Injection
To select drivers for injection, check the box “Enable Driver Injection”.
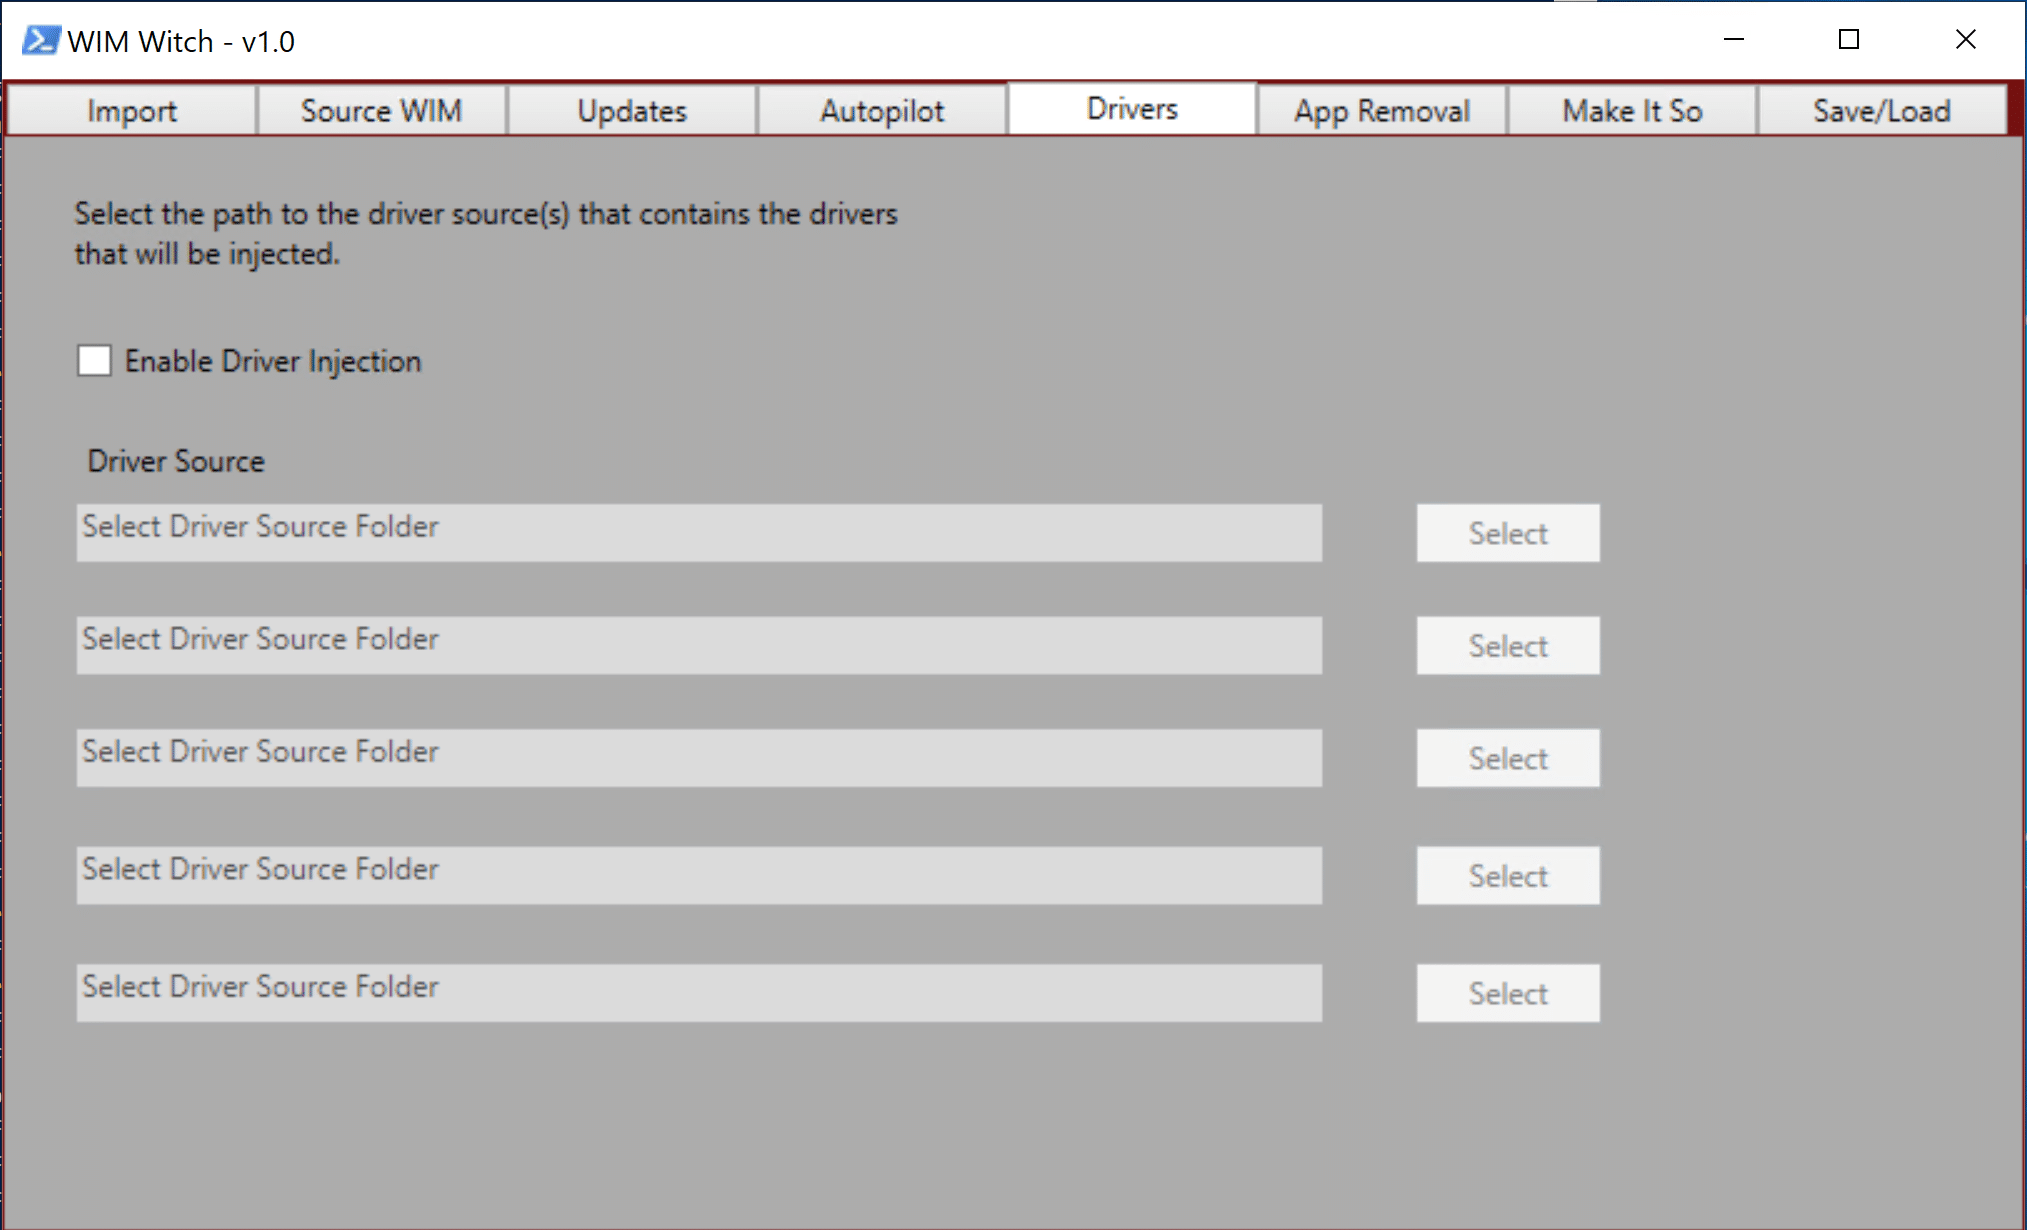
WIM Witch provides five paths that can be searched recursively for drivers. Not all fields are required to be populated as this just provides the ability to supply multiple folders if needed. Simply click the “Select” button at the end of each line and browse to the required folder.
Removing In-Box (Pre-Provisioned) Apps
To enable removing the pre-provisioned apps (store apps) from the WIM, on the App Removal tab, check the box “Enable app removal”.
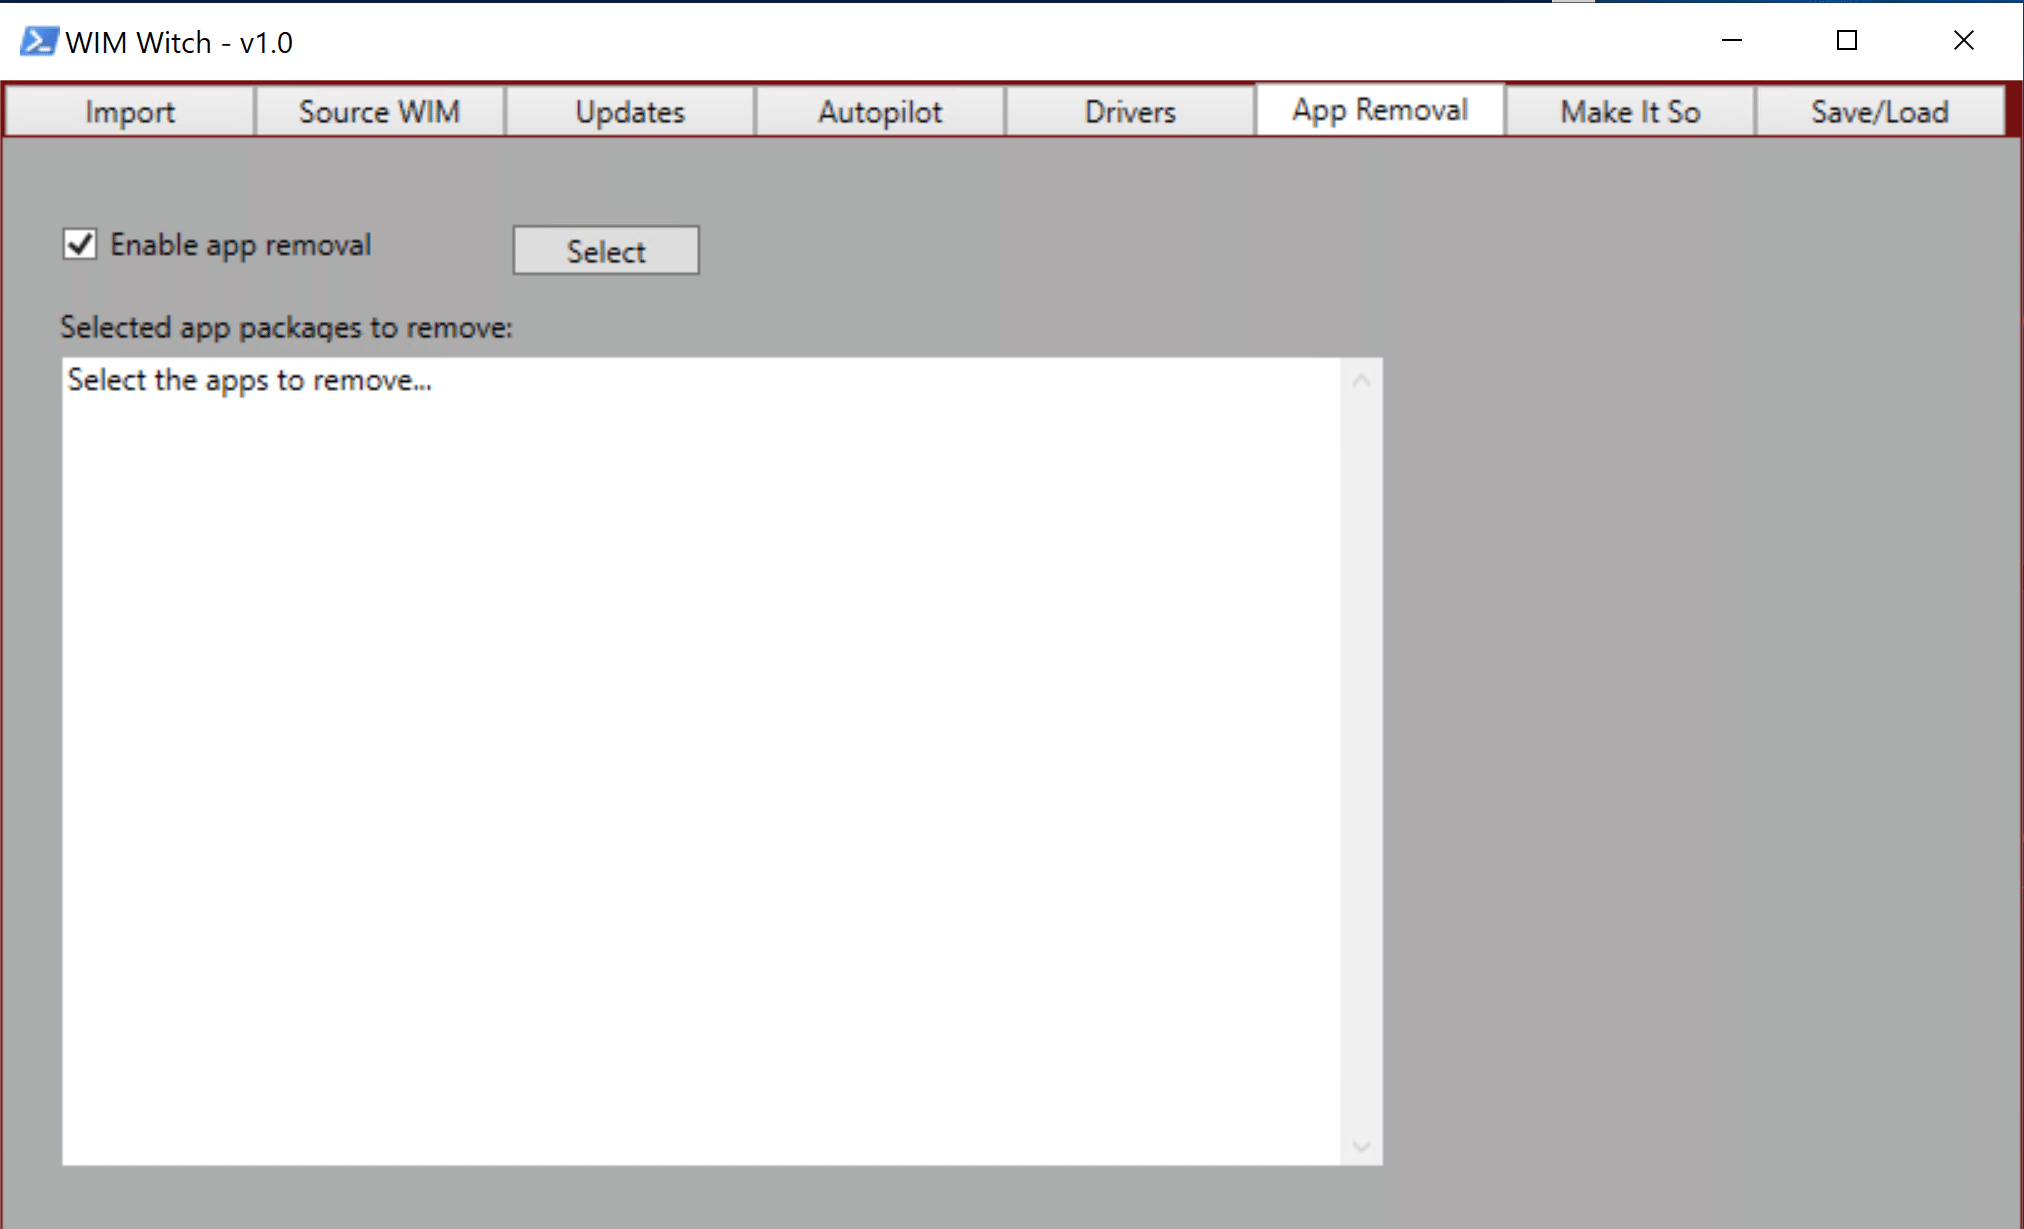
Next, click the Select button. Ensure that a WIM file has been selected in the Source WIM tab or this function will not work. WIM Witch requires a WIM to be selected as each version of Windows 10 has different apps and it needs to know which version is being modified so it can display the proper app list.
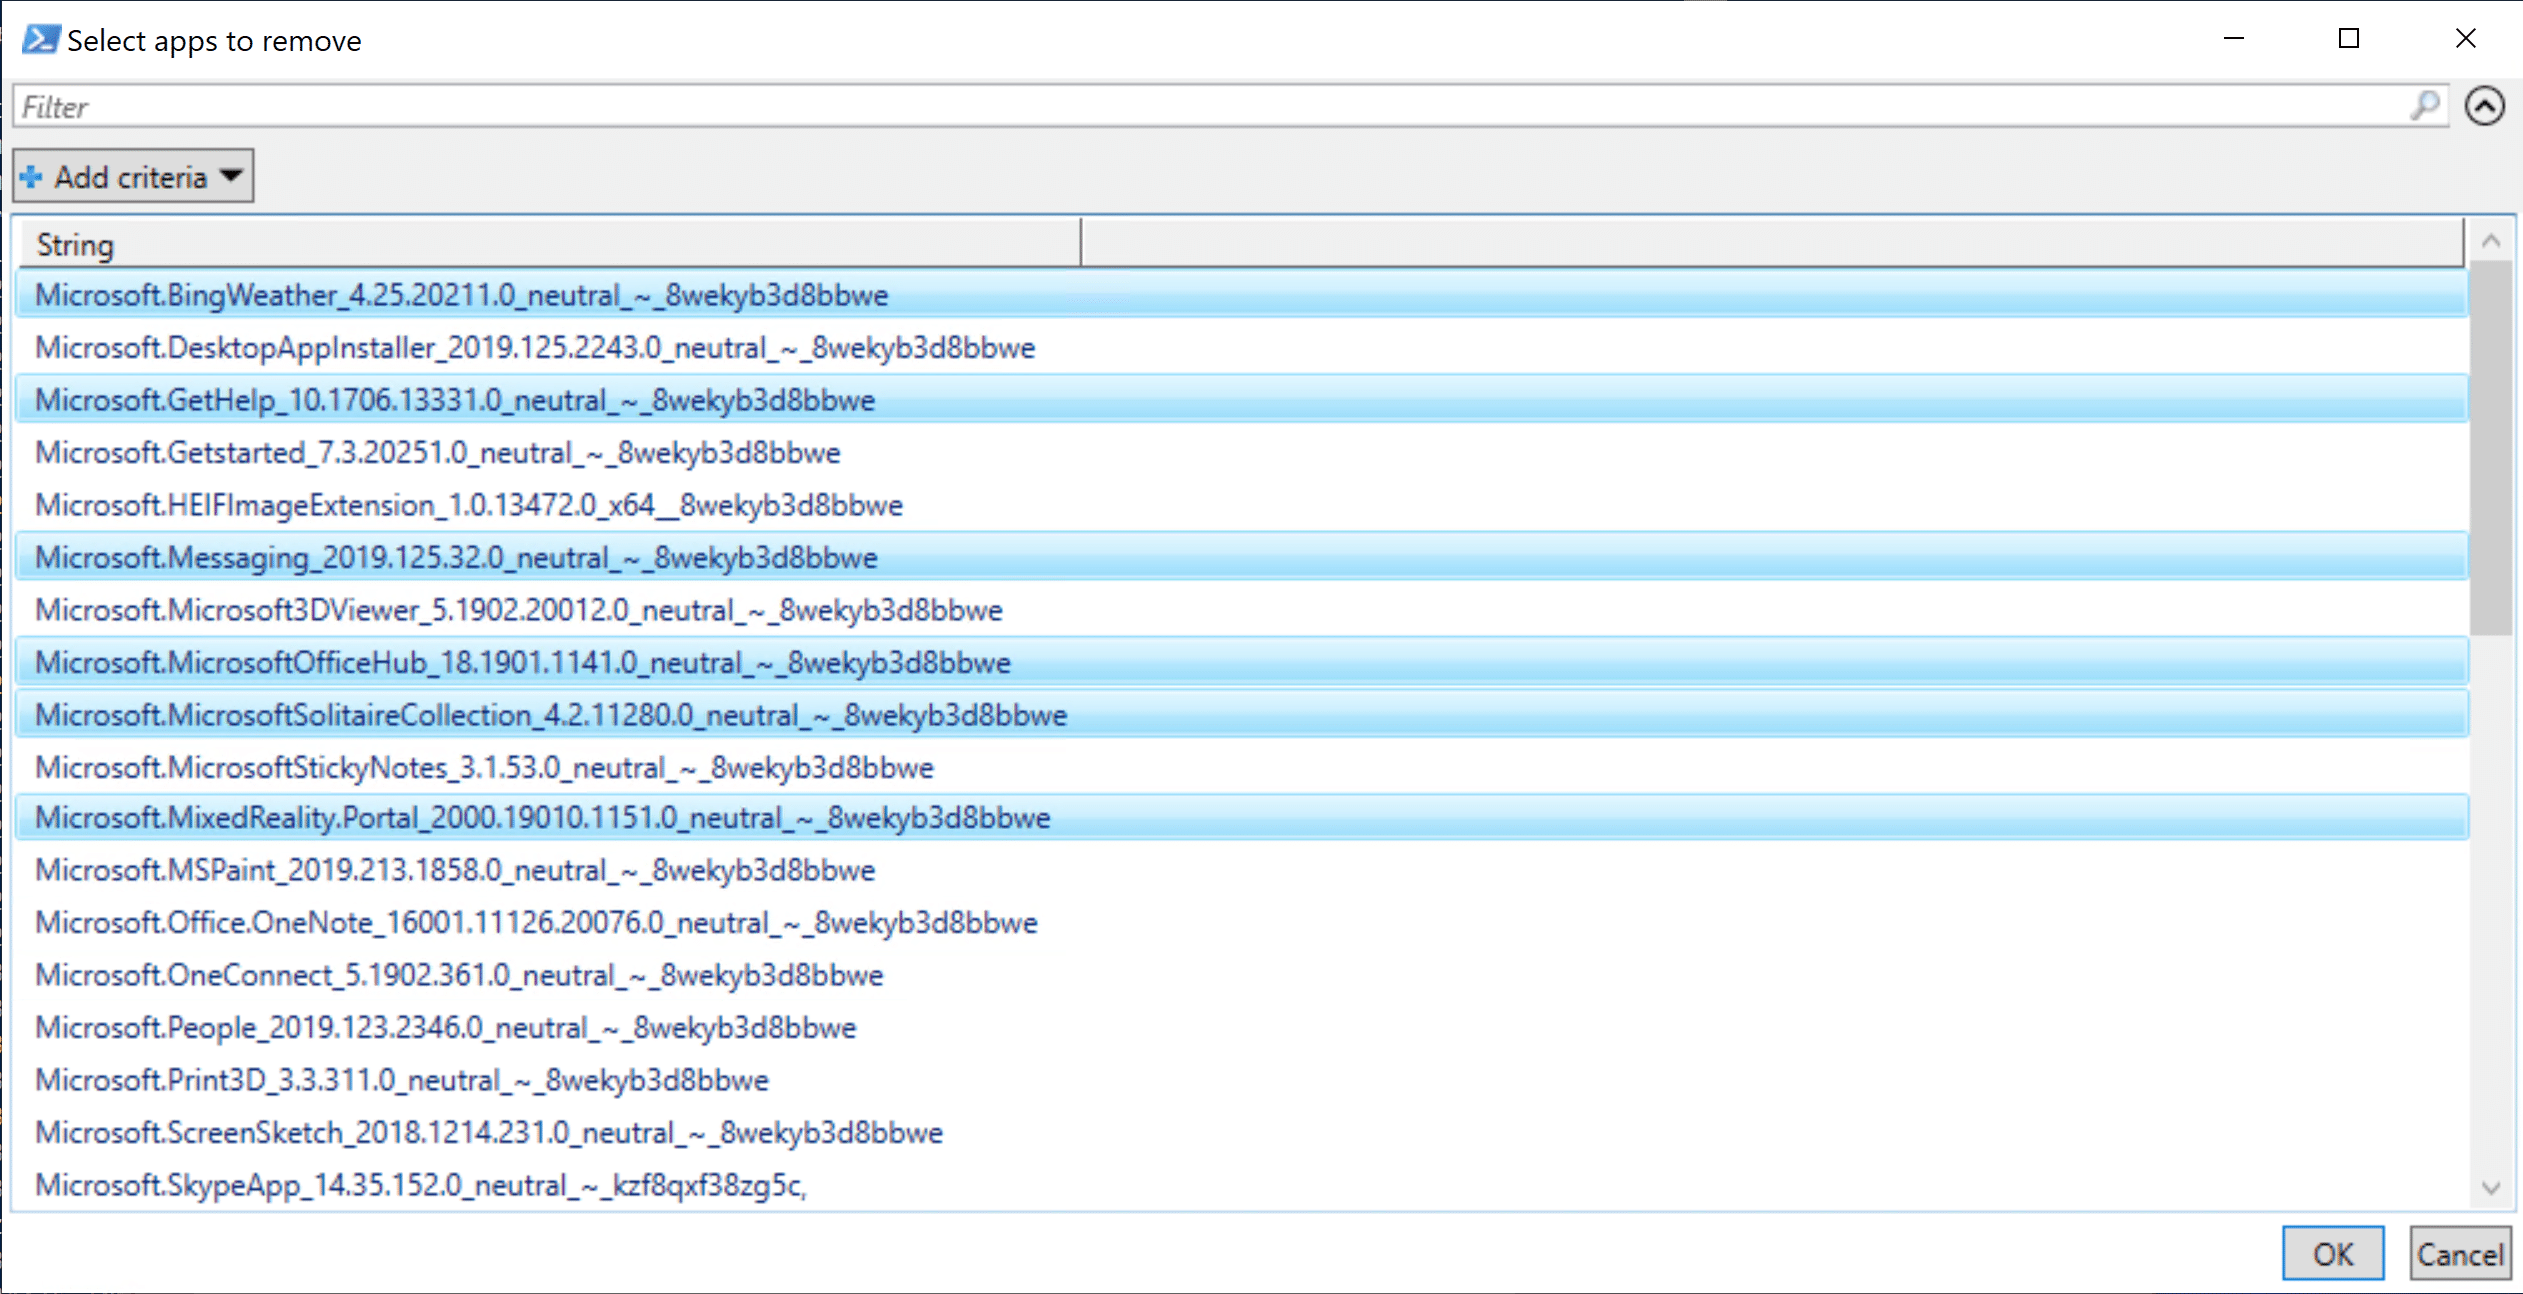
Select the apps that will be removed, then click “OK”.
Upon completion, the pane in the App Removal tab should display the apps that were selected.
Applying Autopilot Profile
To apply an Autopilot configuration file for use in an “Autopilot for Existing Devices” deployment, check the checkbox “Enable Autopilot”
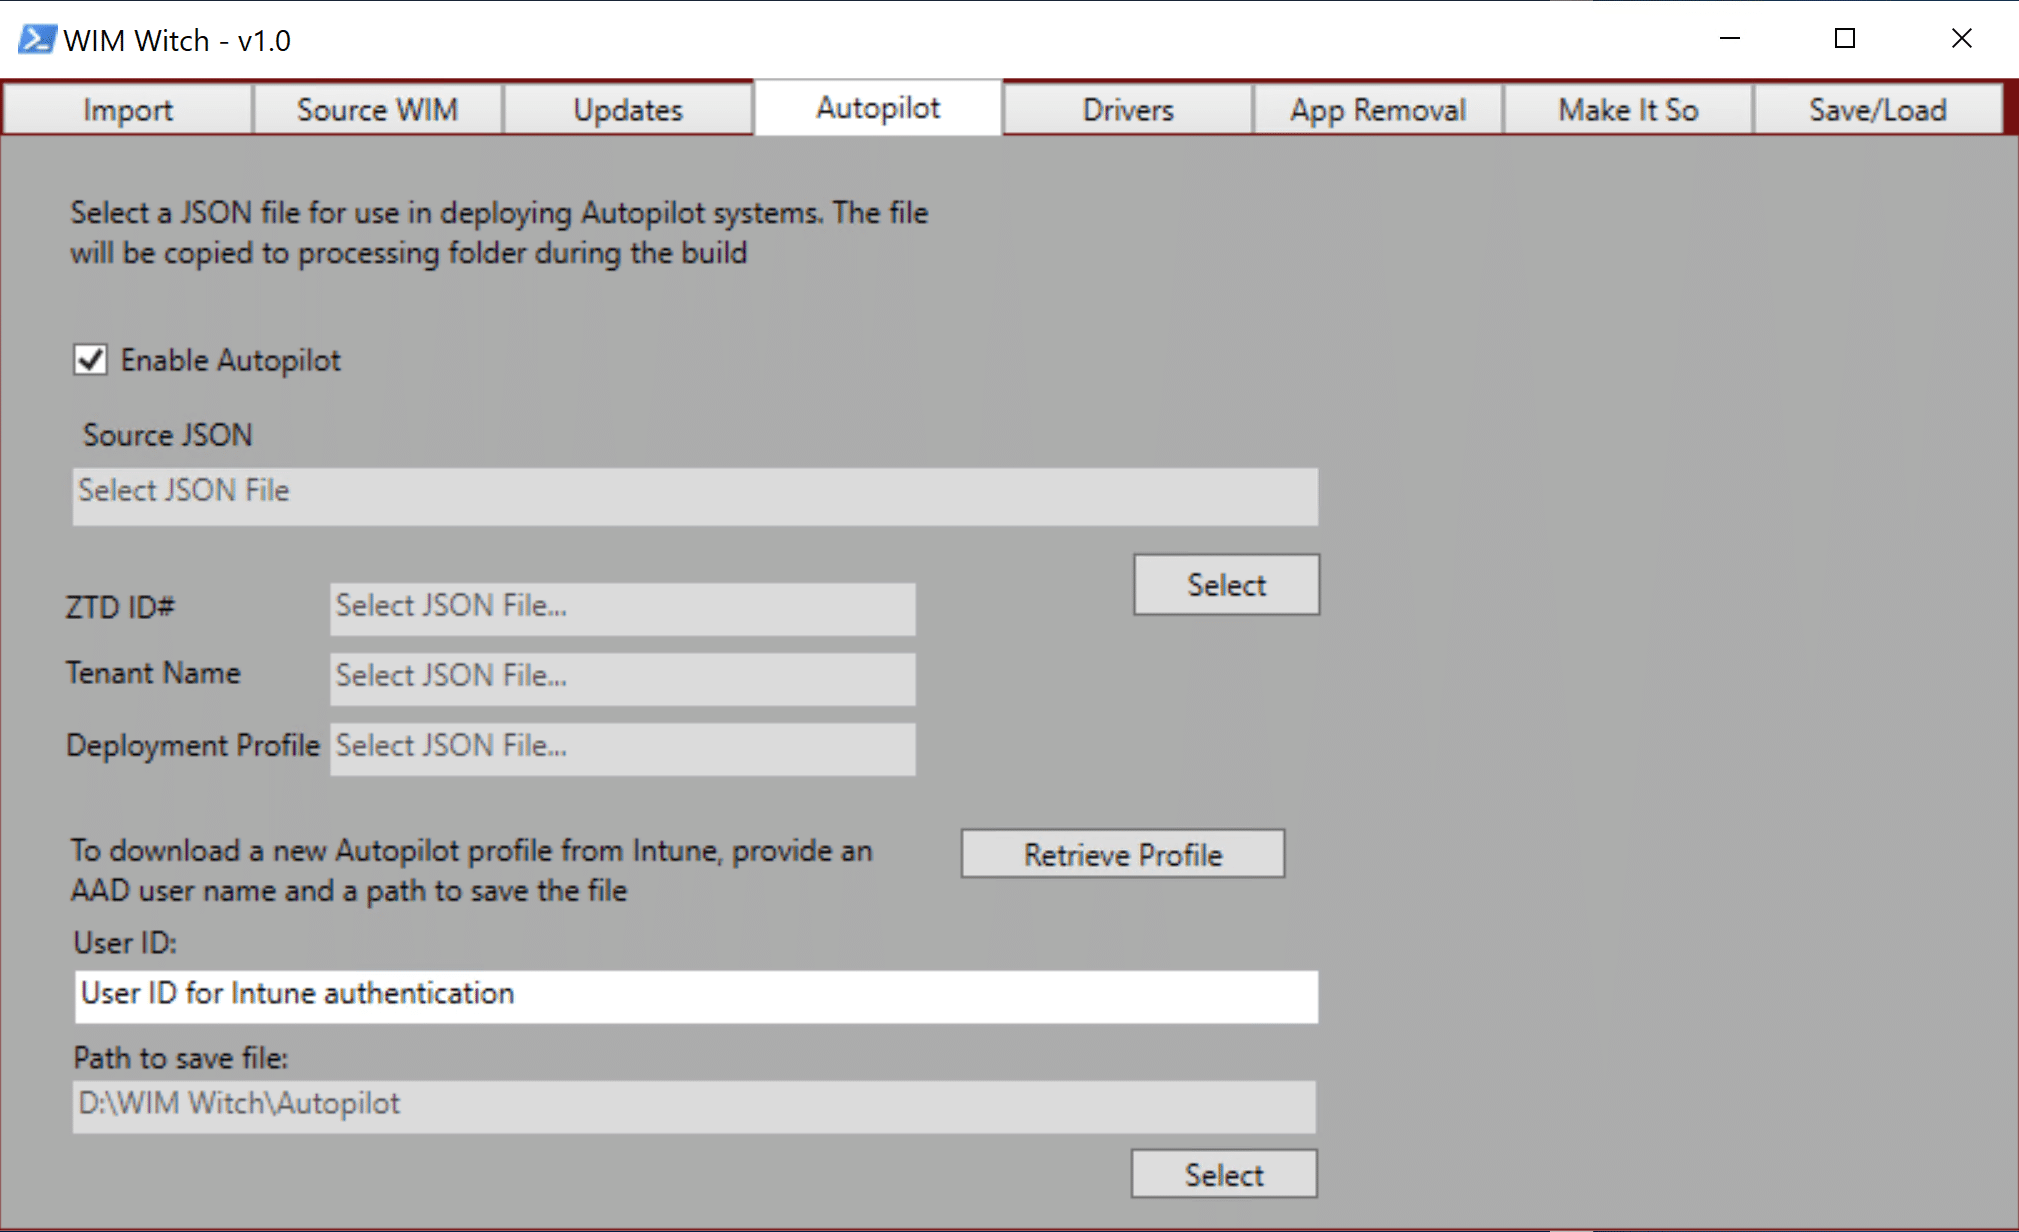
Once selected, click the “Select Button” under “Source JSON” file. This will allow the desired configuration file to be browsed to and selected. Once the process has been completed, the ZTD ID#, Tenant Name, and Deployment Profile fields will be populated.
If a new file needs to be downloaded from the cloud, simply enter the Azure AD User ID name into the User ID field, and then select a path to save the file to. Once completed, click the “Retrieve Profile” button.

WIM Witch will check to see if the required PowerShell modules are installed in order to connect to Intune and will install them if they are missing. Once all of the prerequisites have been installed, you will be prompted to provide a password.

Once authentication is complete, a screen will display a list of Autopilot deployment profiles. Select the one that is required. Click OK. The file will be created in the folder specified.
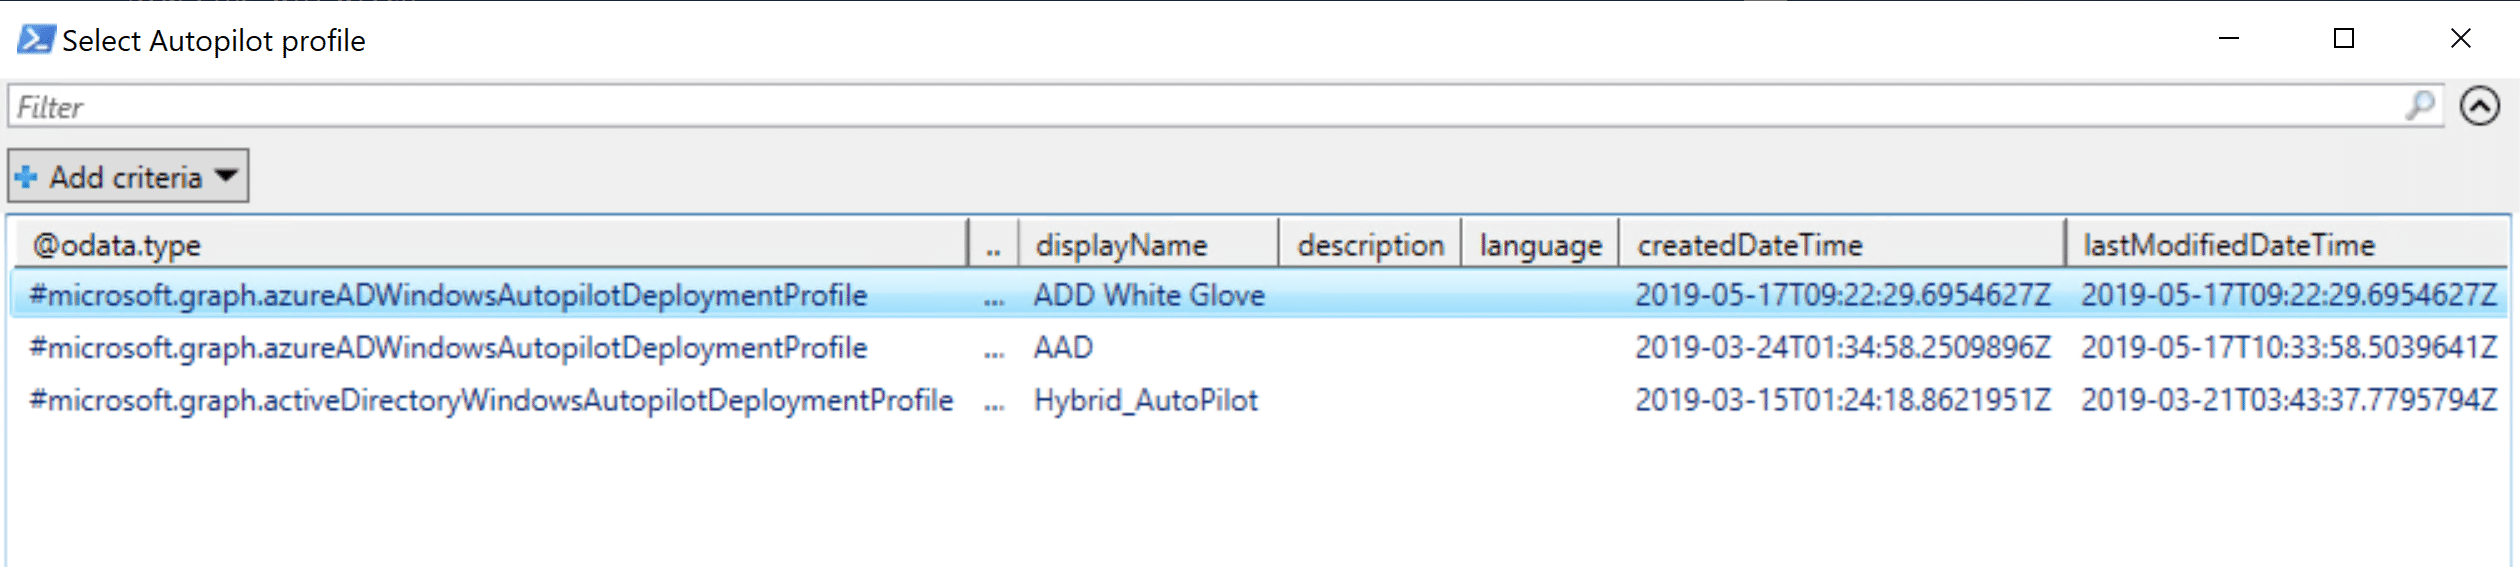
The file will be created in the folder specified and now can be selected in WIM Witch for injection.
Saving configurations
To save a configuration that can be loaded later, configure the WIM Witch build with the required source WIM and configurations. Do not click “Make It So”. Once complete, select the “Save/Load” tab and enter a name in the “Saved Configuration” field. Then click “Save”.

This will place a file in the “Configs” folder in the WIM Witch installation path.
Loading configurations – GUI
To load a configuration, select the “Save/Load” tab, then click “Load” under Load configurations. This will bring up a window to find the config file to be loaded.
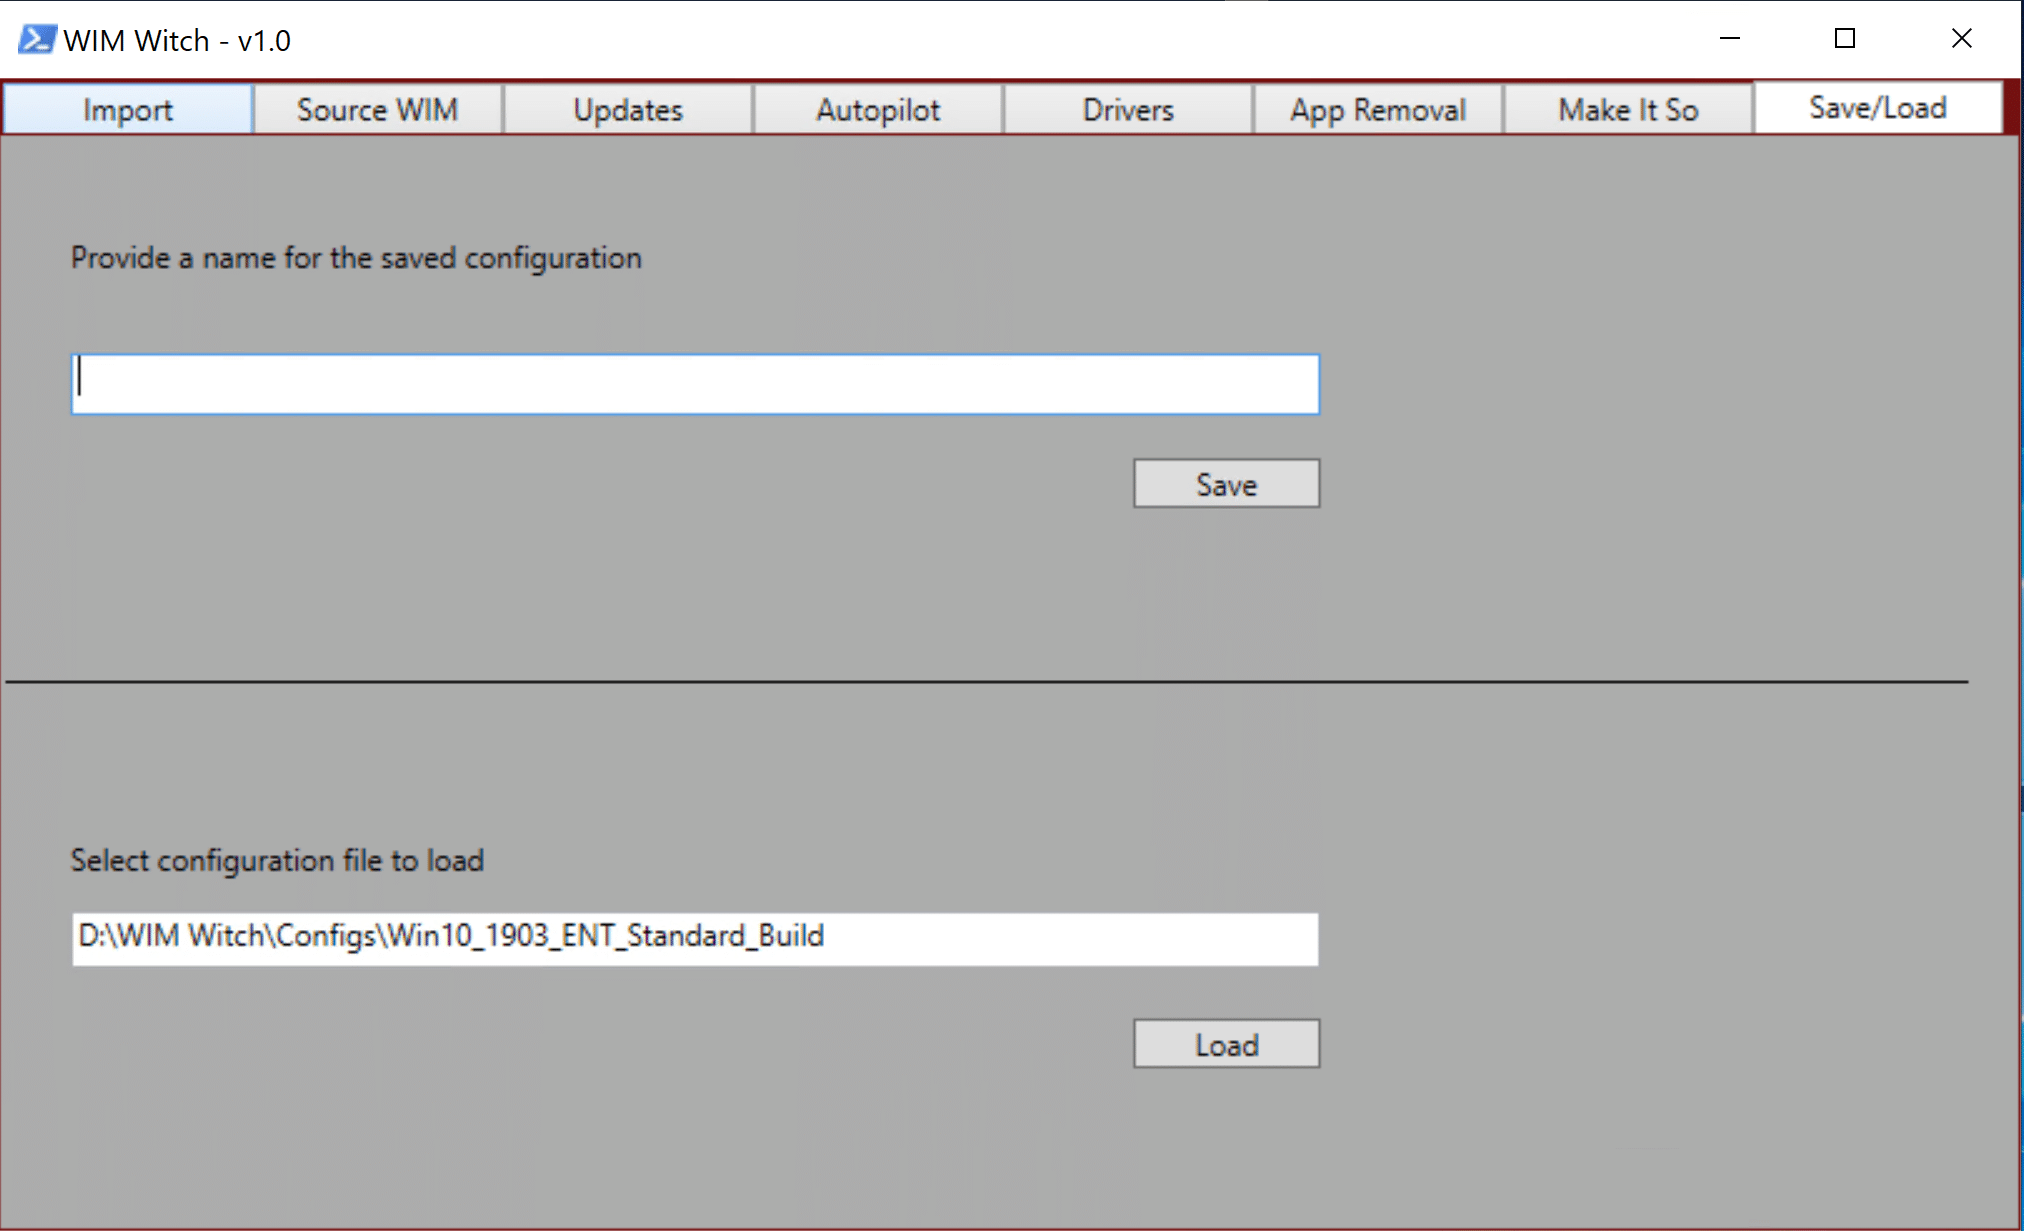
Once selected, WIM Witch will process the config file.

Once the Config file has been loaded successfully, select the “Make It So” tab, then click the “Make It So” button to start building the WIM file.


