The new Start screen that came with Windows 8 gives users a fast way to access their applications and to search for anything they’d like. The way that Microsoft has pinned applications on the Start screen for the Default User may not suit all organizations, and you may want to change the applications being pinned by default. There are several ways to accomplish that task. In this post I’ll cover one of them where you’d on a Windows 8.1 system start of with modifying the Start screen as you wish and then copy the appsFolderLayout.bin (a file containing the layout) file to your Content Library. We’ll then apply this file during OSD with ConfigMgr 2012 R2.
Overview
- Create the Start screen layout
- Create a Package with the appsFolderLayout.bin
- Modify your OSD task sequence
Create the Start screen layout
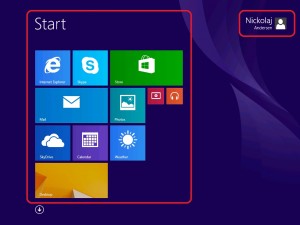
If you havn’t got a Windows 8.1 system up and running, I suggest that you install a virtual machine in your lab environment to begin with. We’ll use this virtual machine to modify the Start screen layout and to grab the appsFolderLayout.bin file. Make sure that the virtual machine has network connectivity so you’re able to copy the file to a network share. Here’s how I’ve modified it for this post:
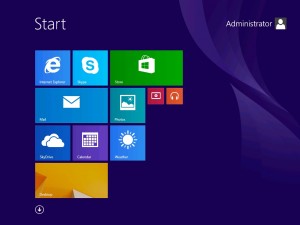
You now have two options on how to get your hands on the file containing the Start screen layout:
- Using sysprep
- Using PowerShell
Choose one the these methods. Both are supported on Windows 8.1.
Using PowerShell
1. On the virtual machine that you have modified the Start screen layout on, open an elevated PowerShell console.
2. Run the following command (change the path if necessary):
Export-StartLayout -As Bin -Path C:\Temp\appsFolderLayout.bin
3. You should now have a file called appsFolderLayout.bin in C:\Temp.
4. Copy the appsFolderLayout.bin to your Content Library folder.
Using Sysprep
1. Open an elevated command prompt on the virtual machine and browse to C:\Windows\System32\Sysprep.
2. Run the following command:
sysprep.exe /audit /reboot
The system will now reboot. Log in (if necessary) when it’s back up.
3. Open Windows Explorer and browse to:
C:\Users\<username>\AppData\Local\Microsoft\Windows (replace <username> with the logged on user name).
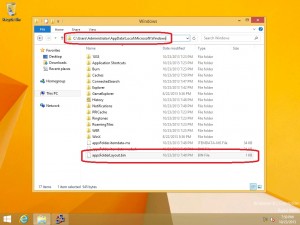
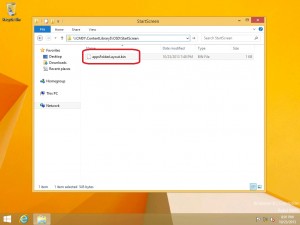
4. You should now see the appsFolderLayout.bin file. Copy this file to your a folder in your Content Library, e.g. \\CM01\ContentLibrary$\OSD\StartScreen.
Create a Package with the appsFolderLayout.bin
1. On your Primary Site server, open the ConfigMgr console and create a new Package.
2. Call the new package something like Start Screen Layout – Windows 8.1 Enterprise x64.
3. Enter the path to the folder where the appsFolderLayout.bin file is stored in the Source folder field. See the picture below how I’ve configured it:
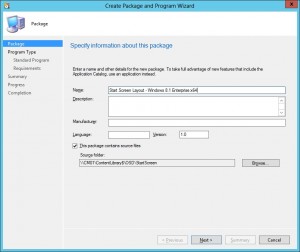
4. Do not create a program for the package.
5. Finish the wizard and then distribute the package to your Distributions Points.
Modify your OSD task sequence
1. Edit your task sequence used for deploying Windows 8.1.
2. Add a Run Command Line step somewhere after the Setup Windows and Configuration step.
3. Call it something like Start Screen Layout modification.
4. As the Command line, enter the following:
xcopy appsFolderLayout.bin "%SystemDrive%\Users\Default\AppData\Local\Microsoft\Windows" /Q /Y
5. Put a check mark in the Package box and browse for the package that you created earlier containing the appsFolderLayout.bin file.
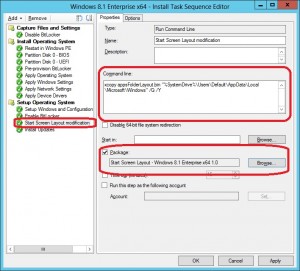
6. Apply the changes in your task sequence.
7. Start a new deployment of a system and let it complete.
8. Log on with a user account in your domain. The Start screen should now look like your modifications from the virtual machine used earlier.






Hi. I`ve done everything as you say, but my layout still the same. I have seen that my appsfolderlayout.bin it is only 1KB. Is it that ok?
Any help?
Hey man – great guide!
I build the reference image with no issues at all.
I was used to deploying Win 8.1, building customizations, and then using SCCM 2012 capture media to create a .wim file however i kept running into problems.
If you want to customize your reference image using your process, what do you think is the best method?
-Amir
Hi Amir,
Thanks! Although I’m not really sure what you’re asking here. Could you be a bit more specific?
Regards,
Nickolaj
Great post! If you need to pin customised shortcuts to your Start Screen make sure they also exist in the Start Menu, otherwise they won’t appear!
Great tip Sam, thanks for sharing!
Regards,
Nickolaj
Any thoughts for why this isn’t working for me?
I used powershell to export the appsFolderLayout.bin file on my Reference Machine.
It successfully copes to “C:\Users\Default\AppData\Local\Microsoft\Windows” during OSD and I’ve verified it is there after I log into an imaged machine. But the start menu is still the default cluttered mess.
Hi Gary,
Sorry for not getting back to you until now. Your comment got stuck in the spam filter of Akismet. Could you try and logon with another user and run the Import-StartLayout command with your exported layout? Does the Start screen change for that user then?
Regards,
Nickolaj
Will this work with windows 8.1 pro ? I cant get it to work…..
Doesn’t seem to work..
Created Start Menu Tiles how I wanted under the local Administrator account.
Used PowerShell to create the appsFolderLayout.bin file
Created Package, and added the command to the TS
When I login, I get the default Startmenu.
I confirm the file has been copied to “%SystemDrive%\Users\Default\AppData\Local\Microsoft\Windows”
Sysprep for generating the .bin file is way too complicated when using Windows 8.1 (it’s required when using Windows 8 though). You can use Powershell (Export-Startlayout) instead.
Hi Torsten,
True, I just learned about that a few hours after I created the post. But I still think it’s a valid option for creating the appsFolderLayout.bin file. I’ll amend the post soon to cover the PowerShell steps aswell for those who’d like to use that instead. Thanks for pointing it out!
Regards,
Nickolaj