Proactive Remediations is a part of the new Microsoft Endpoint Manager feature Endpoint Analytics. Proactive Remediations allows you to detect and fix common support issues on a user’s device. This also allows you to schedule scripts to run on all your devices at a certain time (hourly or daily) or do a run once. Did I say schedule script runs on Windows? Yes I did.
Proactive Remediations is truly a great new feature in the Modern Management space. It allows us to be inventive and proactive on maintaining our clients. If you currently have your support scripts or configuration items in Configuration Manager, this is the feature that allows you to move this functionality to the cloud.
Each package should have a detection script and a remediation script. The remediation script is not required, but it defeats the purpose unless you are just looking for some reports on a specific setting or configuration of your devices. Proactive remediations uses the Intune Management extension to run the scripts on the device like you already can do today using powershell script assignments in Intune. The difference is that now we have scheduling and also reporting on the specific case we want to fix.
Requirements (Intune)
- Devices must be enrolled into Endpoint Analytics (See her for Intune)
- Devices must be Azure AD joined or Hybrid AD Joined
- Windows 10 Enterprise or Education device that is managed by Intune
“Microsoft Docs says Pro is OK, but right now Windows 10 Pro devices can’t be enrolled into endpoint analytics. “
- Windows 10 Enterprise or Education device that is managed by Intune
- Proactive remediations also requires the licensing for Endpoint Analytics and one of these licenses for enrolled devices:
- Windows 10 Enterprise E3 or E5 (included in Microsoft 365 F3, E3, or E5)
- Windows 10 Education A3 or A5 (included in Microsoft 365 A3 or A5)
- Windows Virtual Desktop Access E3 or E5
- The Powershell execution policy can’t be set to Restricted or AllSigned.
Proactive Remediations
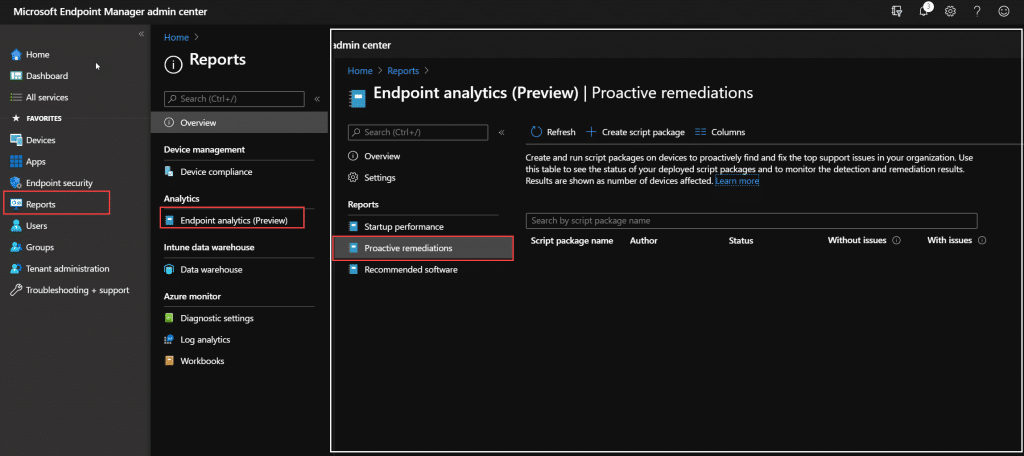
To find proactive remediations go to https://endpoint.microsoft.com -> Reports -> Endpoint Analytics (Preview) -> Proactive Remediations

There are 2 built in script packages for you to get started, but lets go through how we can create a simple script package our self. I have created a proactive remediation package that will check for computer uptime and tell the user to reboot if the device has not rebooted in 7 days. Lets start with the detection script:
Detection Script
$Uptime= get-computerinfo | Select-Object OSUptime
if ($Uptime.OsUptime.Days -ge 7){
    Write-Output "Device has not rebootet on $($Uptime.OsUptime.Days) days, notify user to reboot"
    Exit 1
}else {
    Write-Output "Device has rebootet $($Uptime.OsUptime.Days) days ago, all good"
    Exit 0
}
When the detection script returns exit code 1, it will tell Proactive Remediations to run the remediation script. If the exit code is 0, the status is OK and the remediation script will not run. If you just want to run a remediation to go on all machine regardless of detection, you can just create a script the returns Exit 1 and the remediation script will run and you will have the status in the console. Also the Write-Output here is something you should always have as this will show up in the Intune Console.
Remediation Script
In the remediation script we will call a Toast Notification to notify the user that a reboot is needed. This notification are deeply inspired by Martin Bengtson’s Toast notification solution. Also here mind your exit codes and Write-Output to get a nice report in Endpoint Manager portal. If you want to add an actual reboot to an action button on the Toast look into Martin’s blogs about this and install his Protocol extension solution.
function Display-ToastNotification() {
    $Load = [Windows.UI.Notifications.ToastNotificationManager, Windows.UI.Notifications, ContentType = WindowsRuntime]
    $Load = [Windows.Data.Xml.Dom.XmlDocument, Windows.Data.Xml.Dom.XmlDocument, ContentType = WindowsRuntime]
    # Load the notification into the required format
    $ToastXML = New-Object -TypeName Windows.Data.Xml.Dom.XmlDocument
    $ToastXML.LoadXml($Toast.OuterXml)

    # Display the toast notification
    try {
        [Windows.UI.Notifications.ToastNotificationManager]::CreateToastNotifier($App).Show($ToastXml)
    }
    catch {
        Write-Output -Message 'Something went wrong when displaying the toast notification' -Level Warn
        Write-Output -Message 'Make sure the script is running as the logged on user' -Level Warn
    }
}
# Setting image variables
$LogoImageUri = "https://azurefilesnorway.blob.core.windows.net/brandingpictures/Notifications/SCConfigMgr_Symbol_512.png"
$HeroImageUri = "https://azurefilesnorway.blob.core.windows.net/brandingpictures/Notifications/MSEndpoingMgrHeroImage.png"
$LogoImage = "$env:TEMP\ToastLogoImage.png"
$HeroImage = "$env:TEMP\ToastHeroImage.png"
$Uptime= get-computerinfo | Select-Object OSUptime

#Fetching images from uri
Invoke-WebRequest -Uri $LogoImageUri -OutFile $LogoImage
Invoke-WebRequest -Uri $HeroImageUri -OutFile $HeroImage

#Defining the Toast notification settings
#ToastNotification Settings
$Scenario = 'reminder' # <!-- Possible values are: reminder | short | long -->

# Load Toast Notification text
$AttributionText = "MSEndpointMgr"
$HeaderText = "Computer Restart is needed!"
$TitleText = "Your device has not performed a reboot the last $($Uptime.OsUptime.Days) days"
$BodyText1 = "For performance and stability reasons we suggest a reboot at least once a week."
$BodyText2 = "Please save your work and restart your device today. Thank you in advance."


# Check for required entries in registry for when using Powershell as application for the toast
# Register the AppID in the registry for use with the Action Center, if required
$RegPath = 'HKCU:\SOFTWARE\Microsoft\Windows\CurrentVersion\Notifications\Settings'
$App =  '{1AC14E77-02E7-4E5D-B744-2EB1AE5198B7}\WindowsPowerShell\v1.0\powershell.exe'

# Creating registry entries if they don't exists
if (-NOT(Test-Path -Path "$RegPath\$App")) {
    New-Item -Path "$RegPath\$App" -Force
    New-ItemProperty -Path "$RegPath\$App" -Name 'ShowInActionCenter' -Value 1 -PropertyType 'DWORD'
}

# Make sure the app used with the action center is enabled
if ((Get-ItemProperty -Path "$RegPath\$App" -Name 'ShowInActionCenter' -ErrorAction SilentlyContinue).ShowInActionCenter -ne '1') {
    New-ItemProperty -Path "$RegPath\$App" -Name 'ShowInActionCenter' -Value 1 -PropertyType 'DWORD' -Force
}


# Formatting the toast notification XML
[xml]$Toast = @"
<toast scenario="$Scenario">
    <visual>
    <binding template="ToastGeneric">
        <image placement="hero" src="$HeroImage"/>
        <image id="1" placement="appLogoOverride" hint-crop="circle" src="$LogoImage"/>
        <text placement="attribution">$AttributionText</text>
        <text>$HeaderText</text>
        <group>
            <subgroup>
                <text hint-style="title" hint-wrap="true" >$TitleText</text>
            </subgroup>
        </group>
        <group>
            <subgroup>
                <text hint-style="body" hint-wrap="true" >$BodyText1</text>
            </subgroup>
        </group>
        <group>
            <subgroup>
                <text hint-style="body" hint-wrap="true" >$BodyText2</text>
            </subgroup>
        </group>
    </binding>
    </visual>
    <actions>
        <action activationType="system" arguments="dismiss" content="$DismissButtonContent"/>
    </actions>
</toast>
"@

#Send the notification
Display-ToastNotification
Exit 0
The result of the script should look like this:
So how do we set this up? Let go into the configuration side of this:
Configuration our Proactive Remediation
To get started implementing this proactive remediation package go to Endpoint Analytics and click on Create Script Package.
In the Basics page, give your custom script package a fitting name, add a description and maybe change the Publisher if you want.
Under settings we add our PowerShell code from earlier, decide whether this should run as System or using logged on credentials and choose between 64bit/32bit PowerShell. The notifications we are using here in the remediation part requires the script to run under logged-on user credentials.
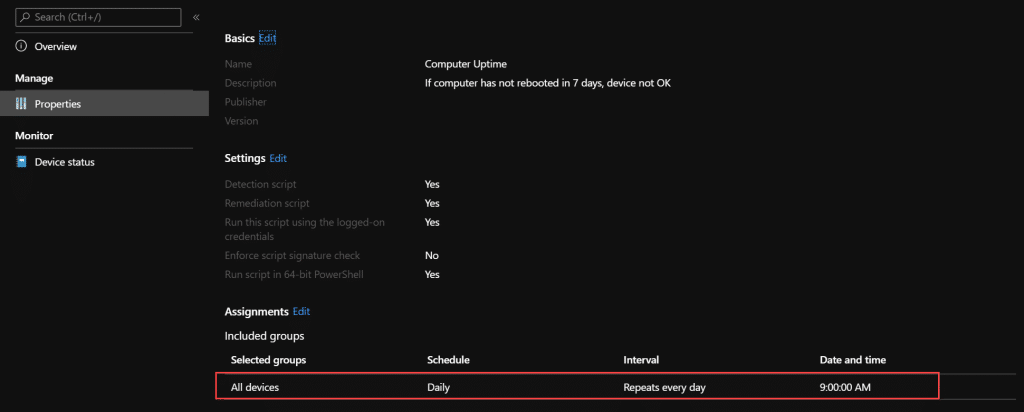
In the assignment page we choose our assignment option and scheduling. I am choosing this one to go to All Users with a schedule to run Daily at 9AM in the Morning. First when you select All Users it will default to a Daily schedule. To change the time schedule you need to click on edit on the assignment.
The sceduling options are time of day, and repeat every X day, or every X hour or run once. At the time of writing it does not seem like there is any issues with selecting any number of days in here. So potentially you could have a remediation run once every 365 days if you want. But lets go with once per 1 day for now.
Now we have assigned the package and the properties will show us what we have assigned:
If you need to change the script you can easily click edit on the Settings parts here from properties. Yes, you read correctly. We can now edit PowerShell scripts directly from the Endpoint Manager portal.
Insight and reporting
After this has run for some time, you can move over to the Overview to see a nice overview on how your environment looks regarding this remediation. As we do not force the reboot in any way, that would not be very nice to your users, you can see in the report how many of your devices that is not following your recommended reboot notification.
If we want to go even deeper. Go to device status. That will give you a list of all devices, their status and the last sync time. The default view looks like this. Detction status here is based on your exit code in the Detection Script. Remediation status is based on output from remediation script and also the detection status after remediation has been done.
To get all information, choose coloumns and select them all.
We can filter and show what we want. This filter is on remediation occured. And this also tells me why the status has not changed to Without issues. as it also shows me that after remediation, the device is still not rebooted.
This is just a small example of how to use proactive remediations in Endpoint Analytics. Watch for more in this space from us with better examples and use cases for this feature.


Firstly thanks for posting this article, fantastic resource.
My question is regarding this statement you made under the detection script statement:
Also the Write-Output here is something you should always have as this will show up in the Intune Console.
I have not been able to find these outputs anywhere on the console nor anywhere else. Can you point me in the right direction.
thanks
Choose to add more columns in the Device Status blade. There you will be able to find the output. Also you can find the outputs using graph api
Great article. The toast / balloon notification looks clean and native to Windows, What are the image dimension of $LogoImageUri and $HeroImageUri.
If anyone would want to target All Users without using the built in all user group, you can create a dynamic group and use rule based on user license plan and just use the serviceplan for mobility. This allows you to target that group which is essentially all users.
Great Article! I am just enabled this in our environment!
Looking forward for more of your blogs!
Great new feature and article! I’m aware that this is just an example and demonstration but isn’t the case that “All users” option shouldn’t be used when targeting something with Intune?
That really depends on your use case, if you want to do a proactive remediation on all your end users devices, there is no problem using All Users in this case. All Users in Intune actually means all licensed users. If you look in graph, it will look like this: “#microsoft.graph.allLicensedUsersAssignmentTarget