


In my second post of a series of posts on how we can utilise Log Analytics for automation and reporting, focusing on managing AppLocker in a more holistic manner.
What Is AppLocker?
AppLocker is a feature of Windows which allows administrators to control which applications can be launched on a device. The purpose of this primarily is a security concern, where a primary focus is those applications which can be run / installed under normal user context.
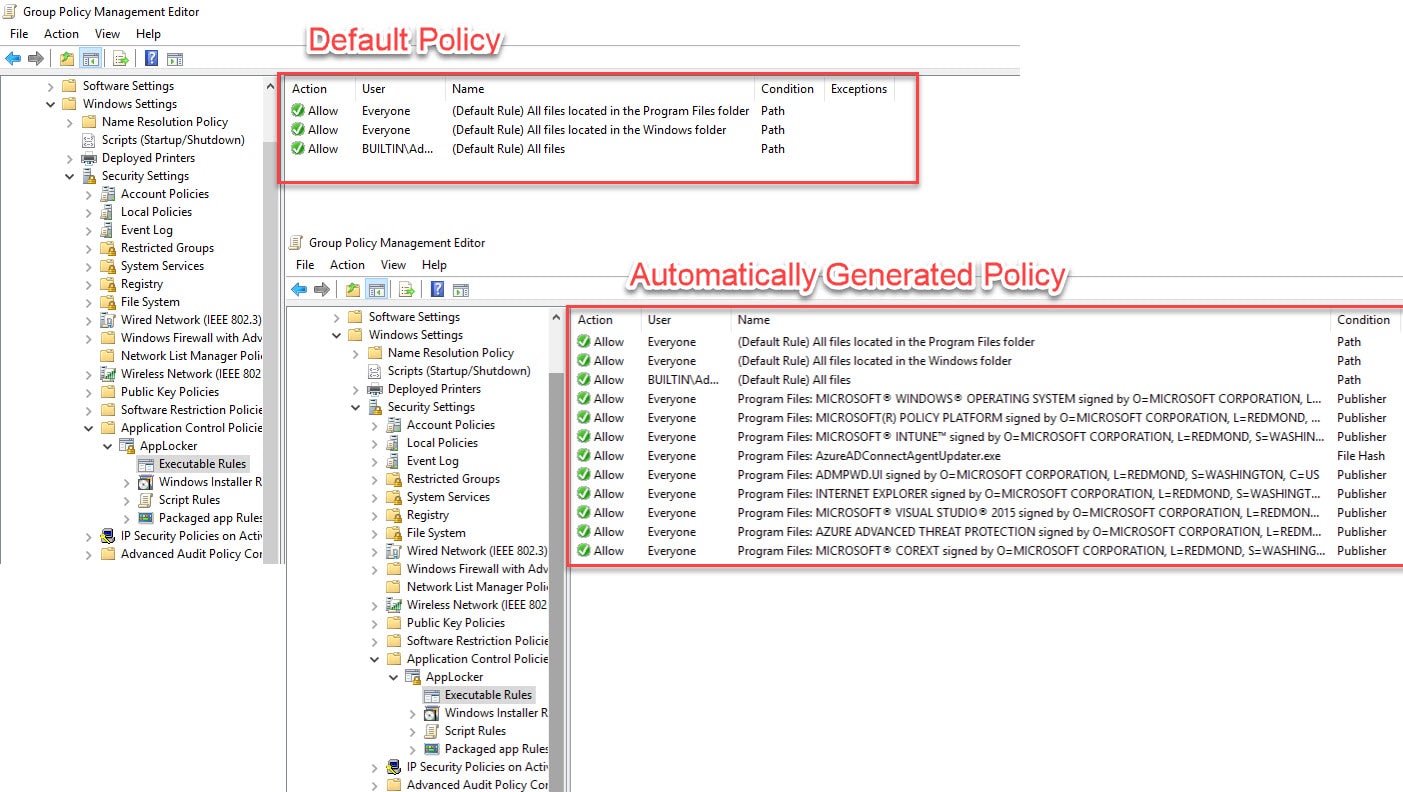
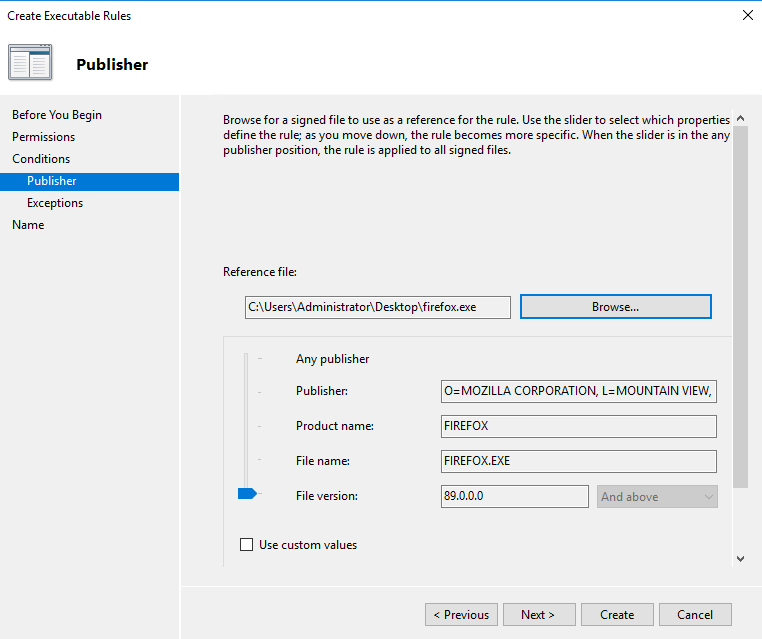
Administrators usually thus start with a policy which whitelists default applications or they capture rules from a client device which contains all of the common applications An example of both is pictured below;
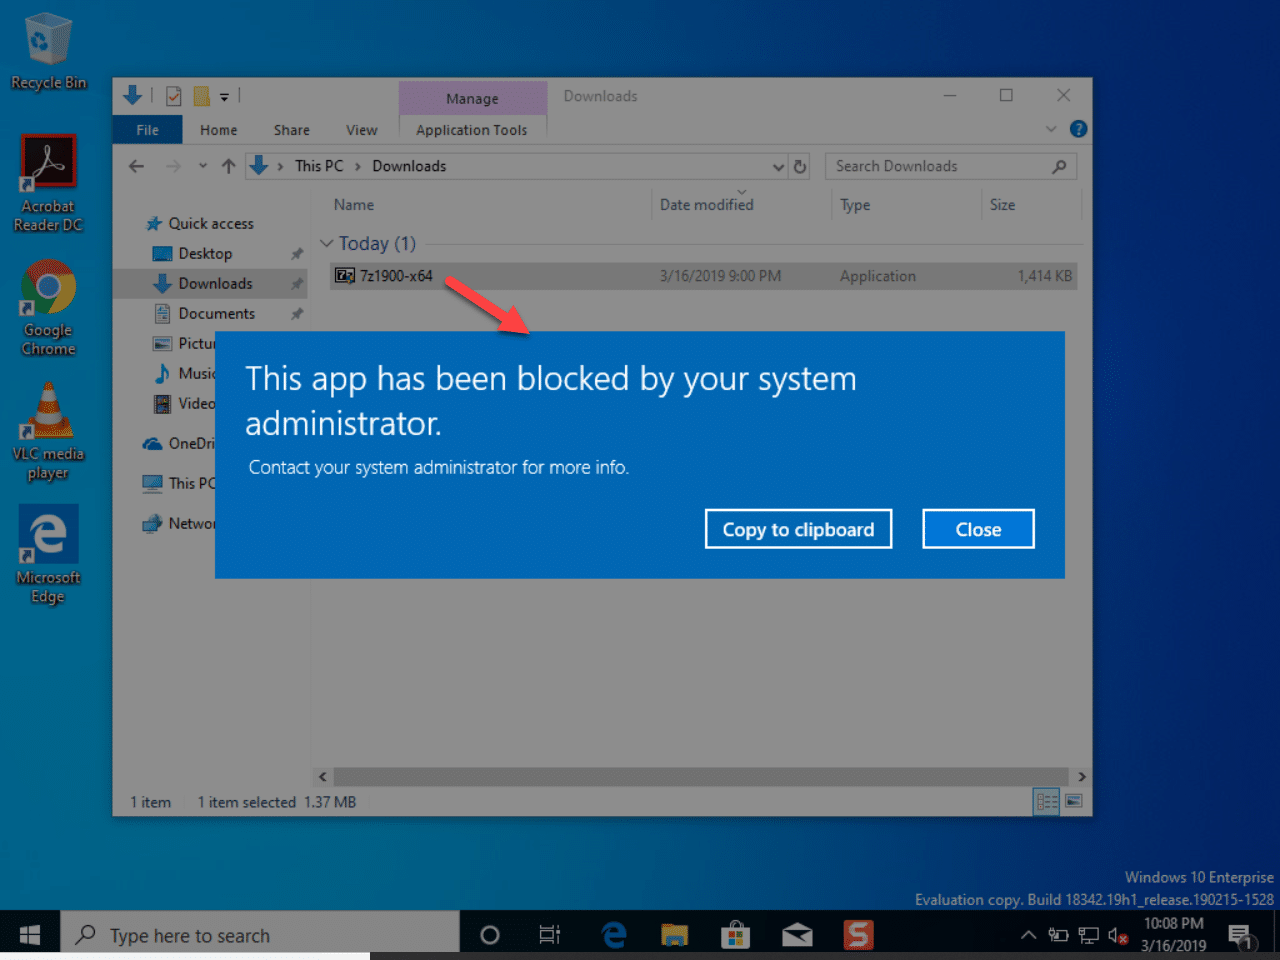
With the policy assigned, when an end user attempts to launch a non-approved application, they receive a blocked file dialogue box similar to this;
Implementing AppLocker
The major issue for a lot of companies which want to push out AppLocker, is how to I determine that all of my clients are not going to be impacted by enforcing policies? If you don’t do this correctly you could end up in large numbers of users being unable to launch applications, so you need to proceed with caution.
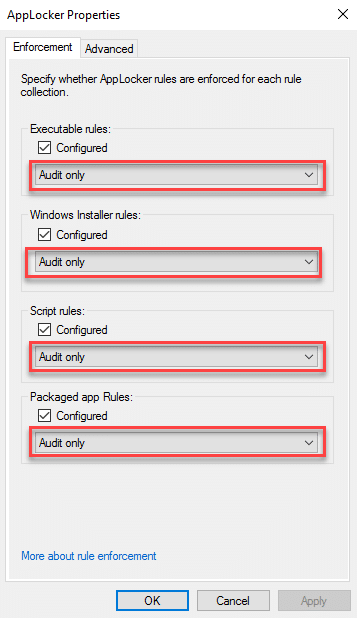
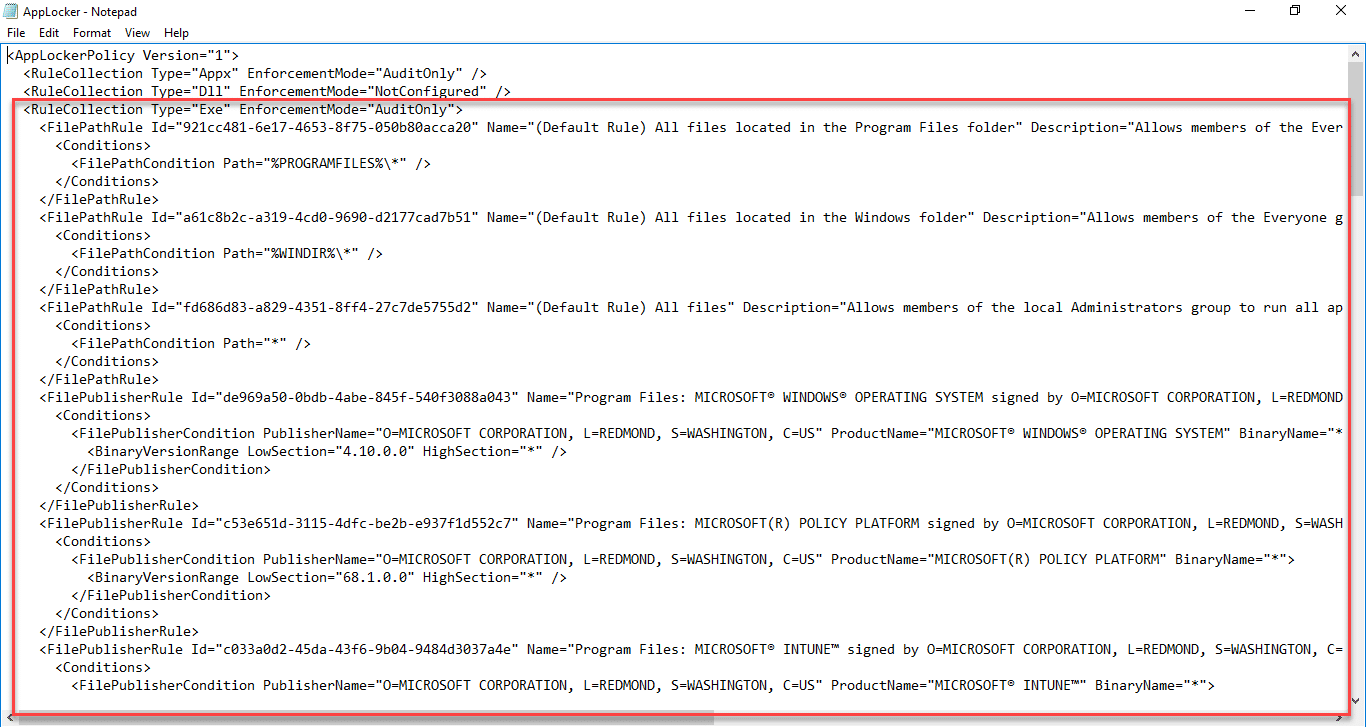
This is where I typically recommend that you run AppLocker rules in “Audit” mode for a period of 30 days, defining the enforcement mode as “Audit only” in each of the four policies;
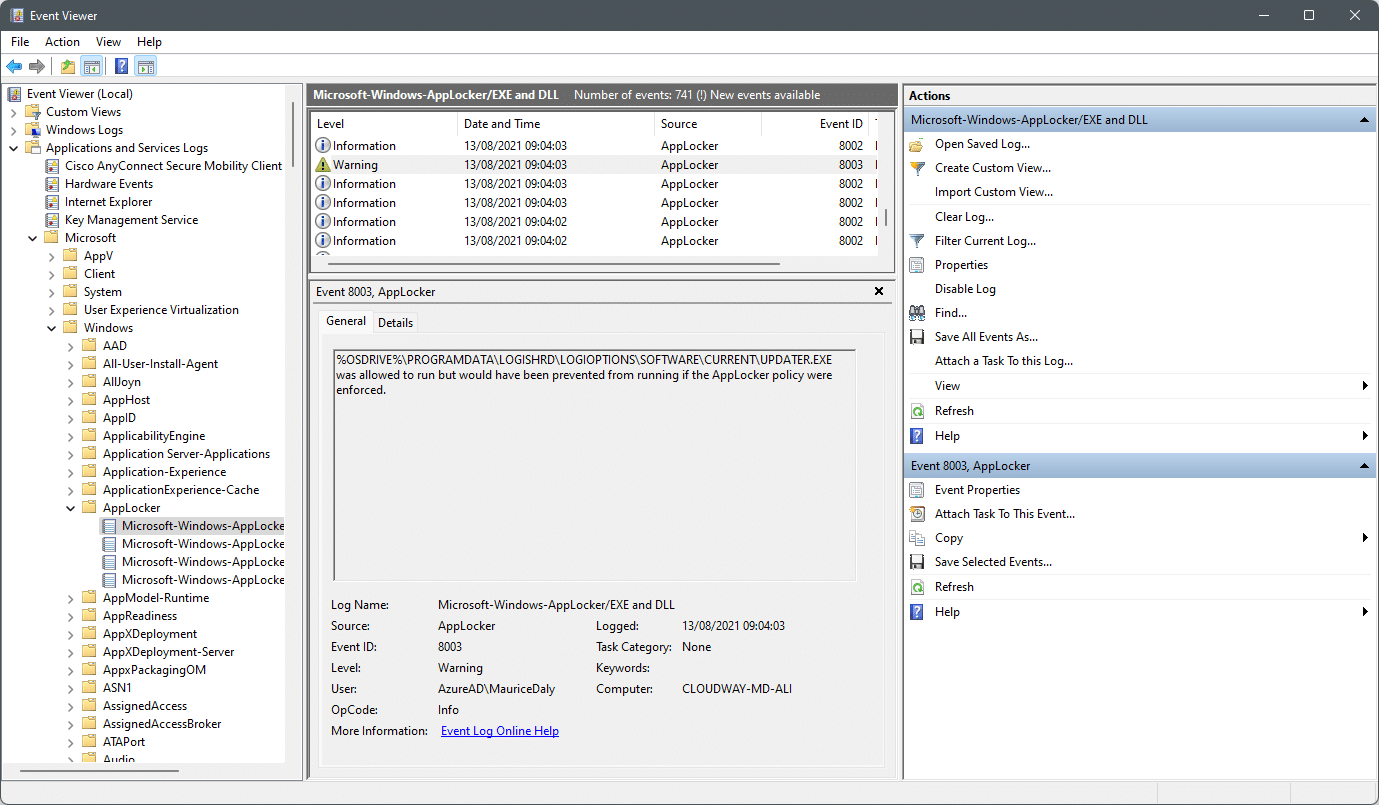
During the auditing phase time event logs are created with detailed information on the files being run and most important of all, whether they would have been blocked by enforcement of the policy. These can be viewed in the following location;
Application s and Service Logs\Microsoft\Windows\AppLocker
Here you can see a screenshot showing the EXE log where event 8003 indicates that a file would have been blocked;
More information on AppLocker can be found on an earlier blog post here – Managing Windows 10 with Microsoft Intune – Part 2 – MSEndpointMgr
CSV Exports – The Collection Issue
Collecting these logs can pose a challenge, and historically I have relied on PowerShell scripts and CSV exports in order to demonstrate the results to clients. Through PowerShell we can query AppLocker events, using the following command;
Get-AppLockerFileInformation -EventType Audited -EventLog -Statistics
Running the above command results in something like the following on your client;

The main issue with exporting all of this valuable detail to CSV files, either shared, or local, is the fact we need a schedule to run and a harvesting mechanism which is consistent. This means catering for machines that are offsite for instance, in which case if we were using a centralised CSV and appending details to it, we need the machine to be connected to the VPN, and this isn’t always the case.
This report append process is vital in the success for your AppLocker rollout, as with so many applications being audited, the event log can rollover quicker than is required to export the details. For instance, if a user is offsite for several days, and we use a centralised CSV to collect the information, when they connect we are only going to get the values from the log at that time, potentially missing an issue that impacted them.
Data Collection – Log Analytics & Endpoint Analytics
In order to modernise the log collection process, I turned to Log Analytics as a target. The reason for this of course is that we have a target which is always available to a device with an internet connection, and secondly that we can then build workbooks in order to visualise the data.
So I started with a goal of being able to report on the following;
- Blocked application count over time
- Details on the applications being blocked
Writing a PowerShell script, I started by collecting the following values;
- All AppLocker Events
- For each application gather the following
- File Publisher Information
- File Version
- File Path
- Product Name
- File Hash
- For each application gather the following
This was achieved by using a combination of the Get-AppLockerFileInformation, Get-FileHash and Get-ItemProperty cmdlets; below is an example of this
	#Obtain AppLocker Events
	$AppLockerEvents = Get-AppLockerFileInformation -EventLog -EventType Audited -Statistics

	$AppLockerArray = @()
	foreach ($App in $AppLockerEvents) {

		#Write-Output "Runnign for $App"

		# Sanitise file path
		$AppPath = ($([string]$App.FilePath).Replace('%OSDRIVE%', "$env:SystemDrive"))

		# Check if file still is present and obtain info
		if (Test-Path -Path $AppPath) {
			# Obtain file and audit log properties
			$AppProperties = Get-ItemProperty -Path $AppPath | Select-Object -ExpandProperty VersionInfo
			$AppEventProperties = Get-AppLockerFileInformation -Path $AppPath

			# Obtain file hash
			$AppFileHash = Get-FileHash -Path $AppPath -Algorithm SHA256

			# Set file properties formatting
			$AppPublisher = $AppEventProperties.Publisher.PublisherName
			if ([string]::IsNullOrEmpty($AppPublisher)) {
				$AppPublisher = "Unsigned"
				$AppFullPublisherDetails = "N/A"
			} elseif ($AppPublisher -match "O=") {
				$AppPublisher = $AppEventProperties.Publisher.PublisherName.Split(",")[0]
				$AppPublisher = $AppPublisher.TrimStart("O=")
				$AppFullPublisherDetails = $AppEventProperties.Publisher
			}

			$AppFileDescription = $($AppProperties.FileDescription)
			if ([string]::IsNullOrEmpty($AppFileDescription)) {
				$AppFileDescription = ($AppPath | Split-Path -Leaf)
			}

			$AppProductName = $($AppProperties.ProductName)
			if ([string]::IsNullOrEmpty($AppProductName)) {
				$AppProductName = $AppFileDescription
			}

			$AppProductVersion = $($AppProperties.FileVersion)
			if ([string]::IsNullOrEmpty($AppProductVersion)) {
				$AppProductVersion = "Unavailable"
			}

			# Obtain file monitoring count from AppLocker events
			$AppUseStatistics = $AppLockerEvents | Where-Object { $_.FilePath -eq $($App.FilePath) } | Select-Object -ExpandProperty Counter

			$tempapp = New-Object -TypeName PSObject
			$tempapp | Add-Member -MemberType NoteProperty -Name "Computer" -Value $ComputerName -Force
			$tempapp | Add-Member -MemberType NoteProperty -Name "ManagedDeviceID" -Value $ManagedDeviceID -Force
			$tempapp | Add-Member -MemberType NoteProperty -Name "FileDescription" -Value $AppFileDescription -Force
			$tempapp | Add-Member -MemberType NoteProperty -Name "FileVersion" -Value $AppProductVersion -Force
			$tempapp | Add-Member -MemberType NoteProperty -Name "ProductName" -Value $AppProductName -Force
			$tempapp | Add-Member -MemberType NoteProperty -Name "FileHash" -Value $AppFileHash -Force
			$tempapp | Add-Member -MemberType NoteProperty -Name "Publisher" -Value $AppPublisher -Force
			$tempapp | Add-Member -MemberType NoteProperty -Name "FullPublisherName" -Value $AppFullPublisherDetails -Force
			$tempapp | Add-Member -MemberType NoteProperty -Name "FileUseCount" -Value $AppUseStatistics -Force
            $AppLockerArray += $tempapp
		}
	}
The next thing was to get the outputted array information into Log Analytics in the form of a custom log. Azure Monitor can be used to achieve this of course, and the below diagram represents the process used for this retrieval;
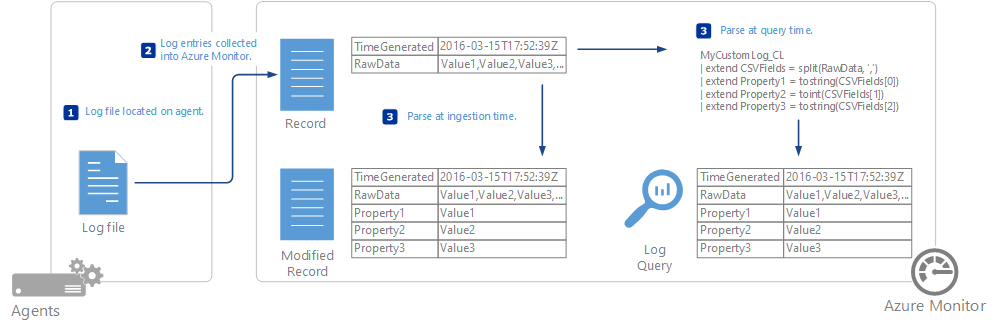
More information on Azure Monitor can be found here – https://docs.microsoft.com/en-us/azure/azure-monitor/agents/data-sources-custom-logs
For those who do not wish to push the Azure Monitor agent, it is also possible to create custom logs, and in my example I am not using the agent, but instead pushing direct to Log Analytics. This is achieved through Endpoint Analytics, in the form of a Proactive Remediation, running on the client device every 24 hours (although you could of course tweak this as required), where all of the required information is posted in JSON format to the Log Analytics workspace.
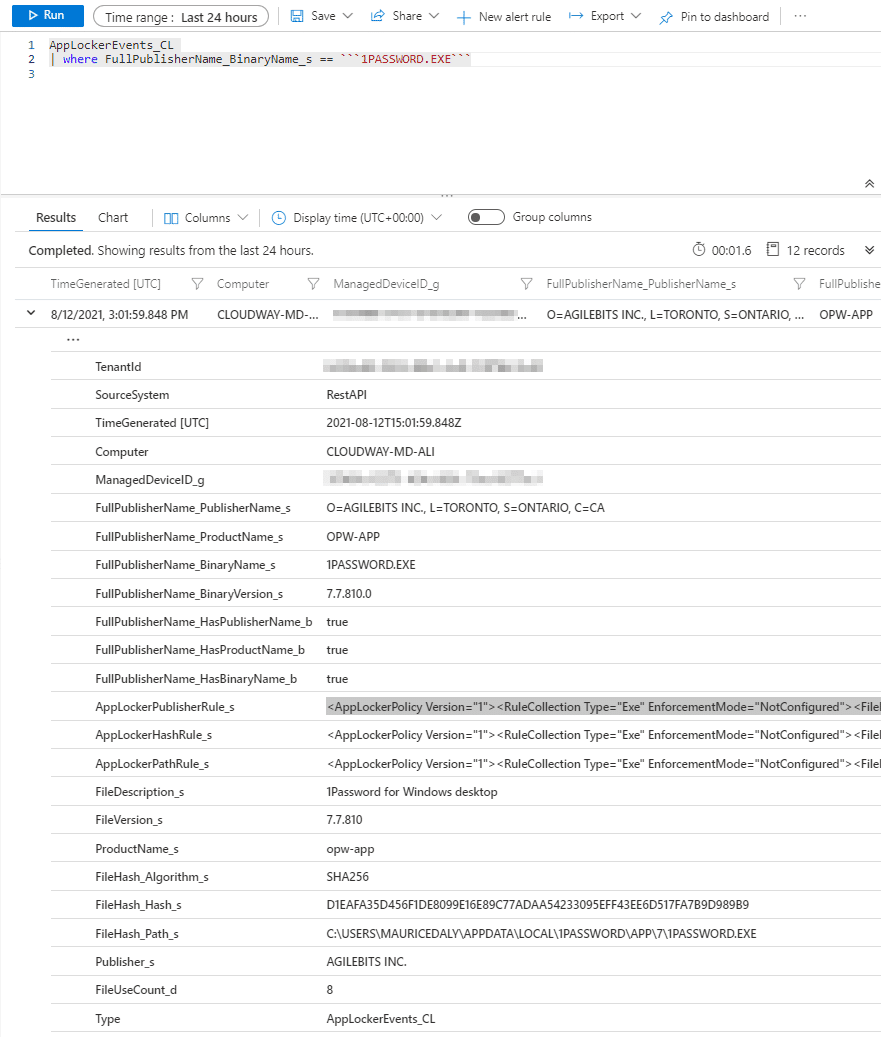
Looking at the newly created custom log (having also extended it to gather more information) we see something like this;
Data Analysis – Building A Workbook
With data flowing into Log Analytics, we can now start to parse the information.
Based on my initial goals, building a workbook results in what I had set out to achieve. As you can see from the below image, we can then monitor blocks over time, using the drop-down time parameter value;
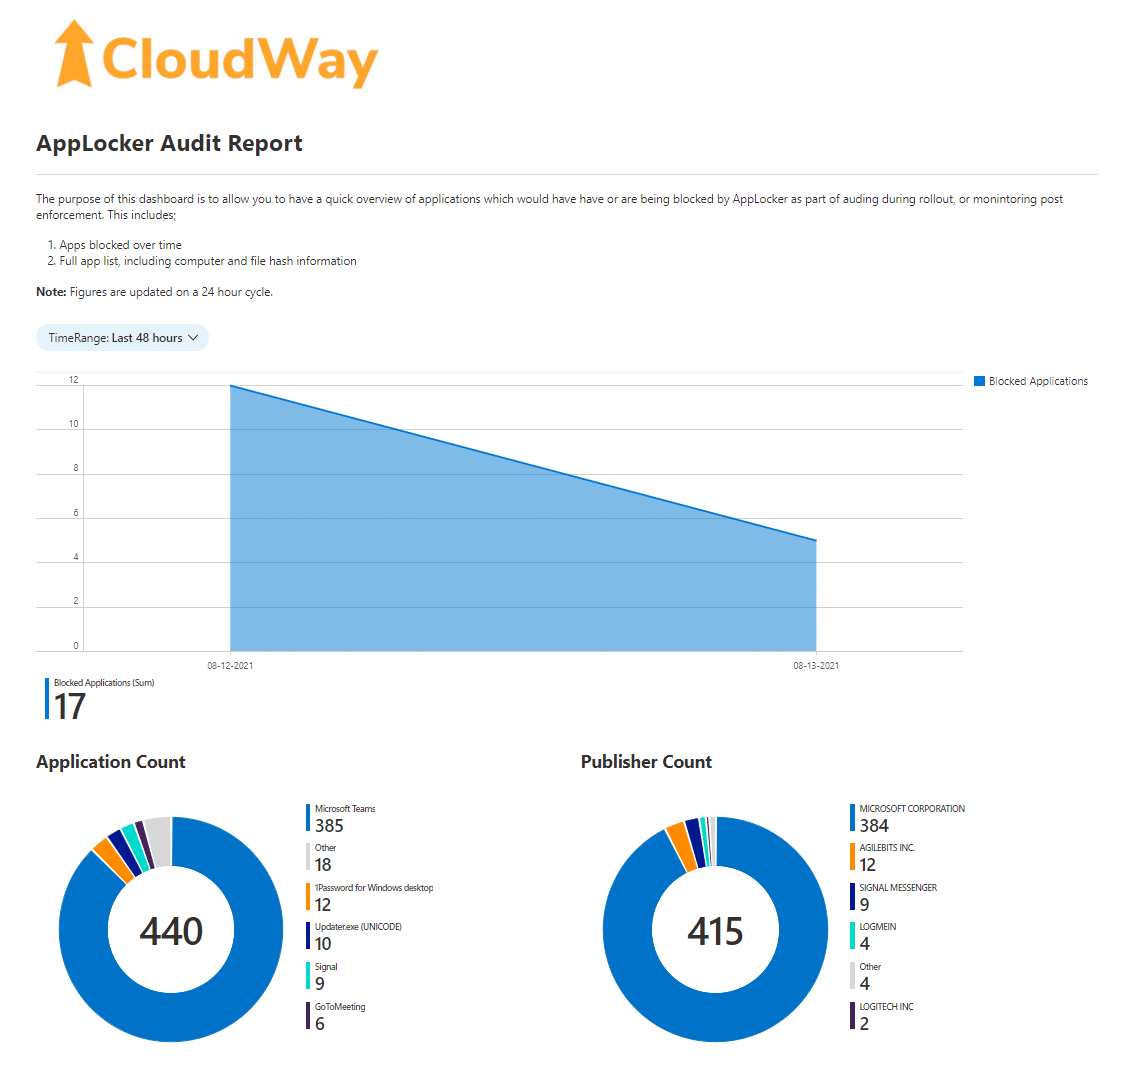
This is based on some simple KQL queries;
Apps Over Time
AppLockerEvents_CL
| extend File_Name = parse_path(FileHash_Path_s)
| extend Exe_Name = tostring(File_Name.Filename)
| summarize arg_max(TimeGenerated, *) by Exe_Name
| project TimeGenerated, Computer, Exe_Name
| summarize count(Exe_Name) by format_datetime(TimeGenerated, 'MM-dd-yyyy')
| order by count_Exe_Name
Application Count
AppLockerEvents_CL
| extend File_Name = parse_path(FileHash_Path_s)
| extend Exe_Name = tostring(File_Name.Filename)
| summarize arg_max(TimeGenerated, *) by Exe_Name
| project FileDescription_s, FileUseCount_d
Taking this a step further, based on all the information being sent through from the client machines, I then extended the workbook to display values such as;
- File Hash Information (SHA 256)
- File Paths
- File Publishers
- Blocked Counts
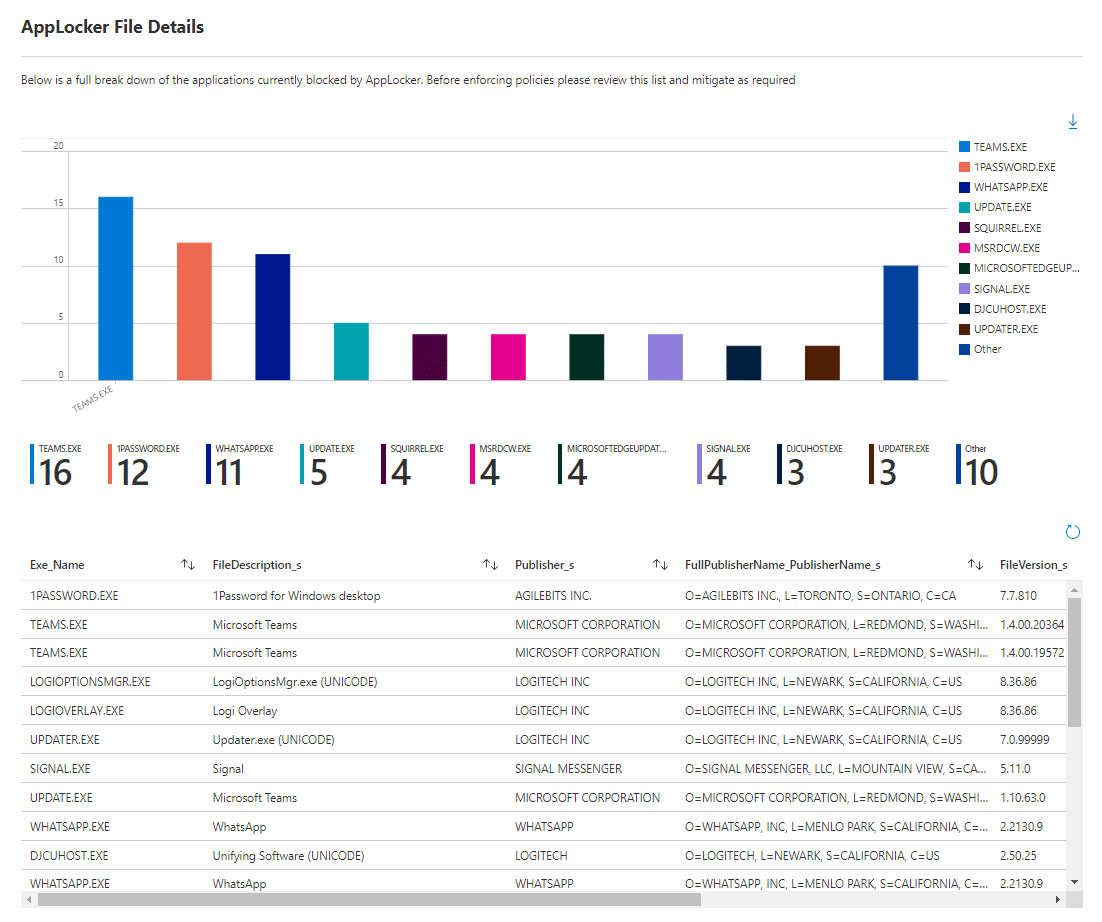
So at this stage we have some really useful information, that we can monitor over time, and with each whitelist addition we get nearer to the point of policy enforcement. The policy additions however are where I thought we could improve processes on.
AppLocker Policy Management
The issue with additions to AppLocker policies is the fact that if you are using group policy for administration, then you need to capture a copy of the file you wish to whitelist, and run it through the rule addition process.
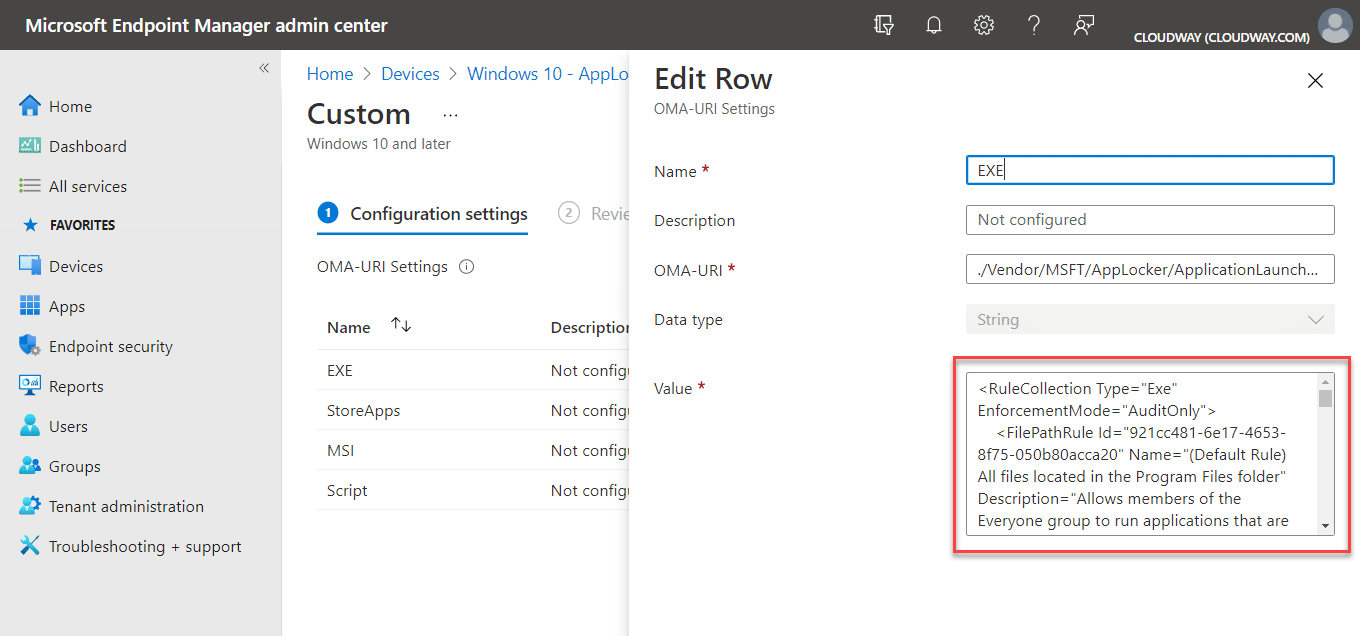
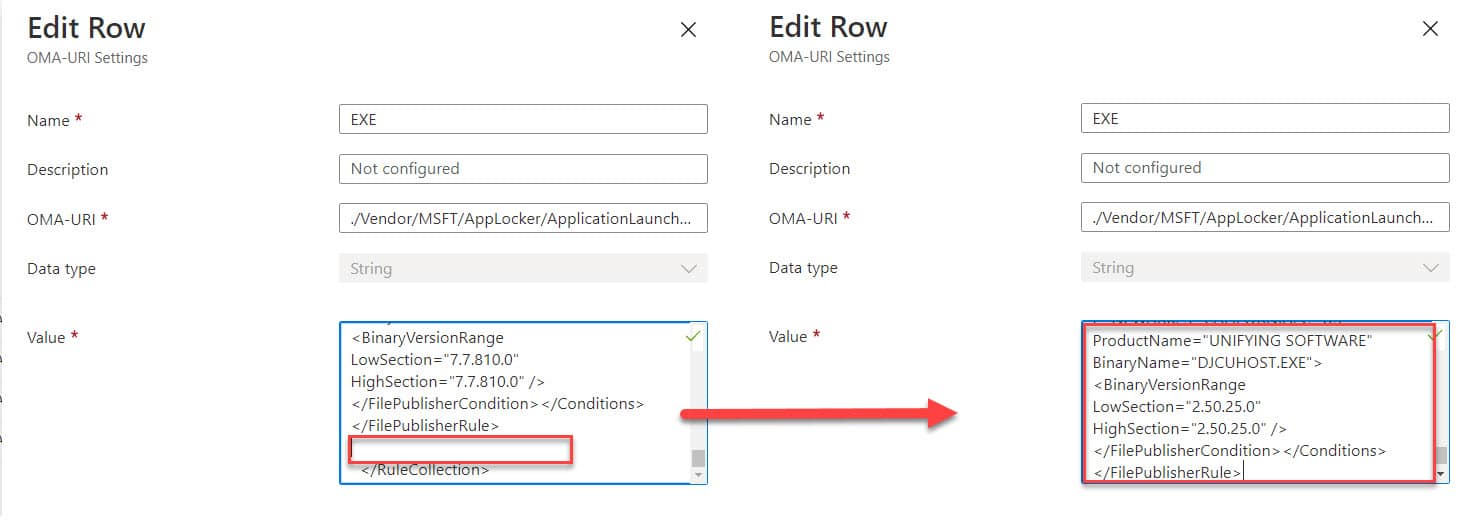
This is a time-consuming affair, and it gets further complicated if you are using Intune to push your AppLocker policies via CSP. In this case you usually then have to export the policy in XML, and replace or update the policy by removing the section you wish to use and applying it to your EXE policy for example;
Exported XML
Intune CSP OMA-URI Settings;
So this got me thinking wouldn’t it be great if you could potentially avoid having to do this long winded process over and over, and have drag and drop code generated by the client and uploaded to the custom log?
Using Log Analytics and the Get-AppLockerFileInformation and New-AppLockerPolicy cmdlet, I then started to push through the XML generated when creating a rule on the client, example;

Piping that through to create a new rule, using the following code;
Get-AppLockerFileInformation -Path $AppPath | New-AppLockerPolicy -RuleType Publisher -User Everyone -RuleNamePrefix "$AppProductName" -XML -ErrorAction SilentlyContinue
We then end up with the following XML;
<AppLockerPolicy Version="1">
	<RuleCollection Type="Exe" EnforcementMode="NotConfigured">
		<FilePublisherRule Id="305d05f4-ae45-4dd2-a7e1-3c95f93f4811" Name="opw-app: 1PASSWORD.EXE version 7.7.810.0 exactly in OPW-APP from O=AGILEBITS INC., L=TORONTO, S=ONTARIO, C=CA" Description="" UserOrGroupSid="S-1-1-0" Action="Allow">
			<Conditions>
				<FilePublisherCondition PublisherName="O=AGILEBITS INC., L=TORONTO, S=ONTARIO, C=CA" ProductName="OPW-APP" BinaryName="1PASSWORD.EXE">
				<BinaryVersionRange LowSection="7.7.810.0" HighSection="7.7.810.0" /></FilePublisherCondition>
			</Conditions>
		</FilePublisherRule>
	</RuleCollection>
</AppLockerPolicy>
At this point in order to add a rule, we simply need the data between the <RuleCollection> tags in the XML, so we then strip those out and we are left with a rule that we can add to the bottom of our AppLocker EXE policy in Intune.
Taking this a step further in the workbook, I then added a few queries and parameters to achieve the following;
- Select the EXE from the audited and stripped list of EXE’s returned in the AppLocker audit logs
- Select the EXE from the displayed list where different versions or file hashes are determined (required for the below)
- Automatically generate a PowerShell one liner that can be used to obtain file information on the client (for manual testing)
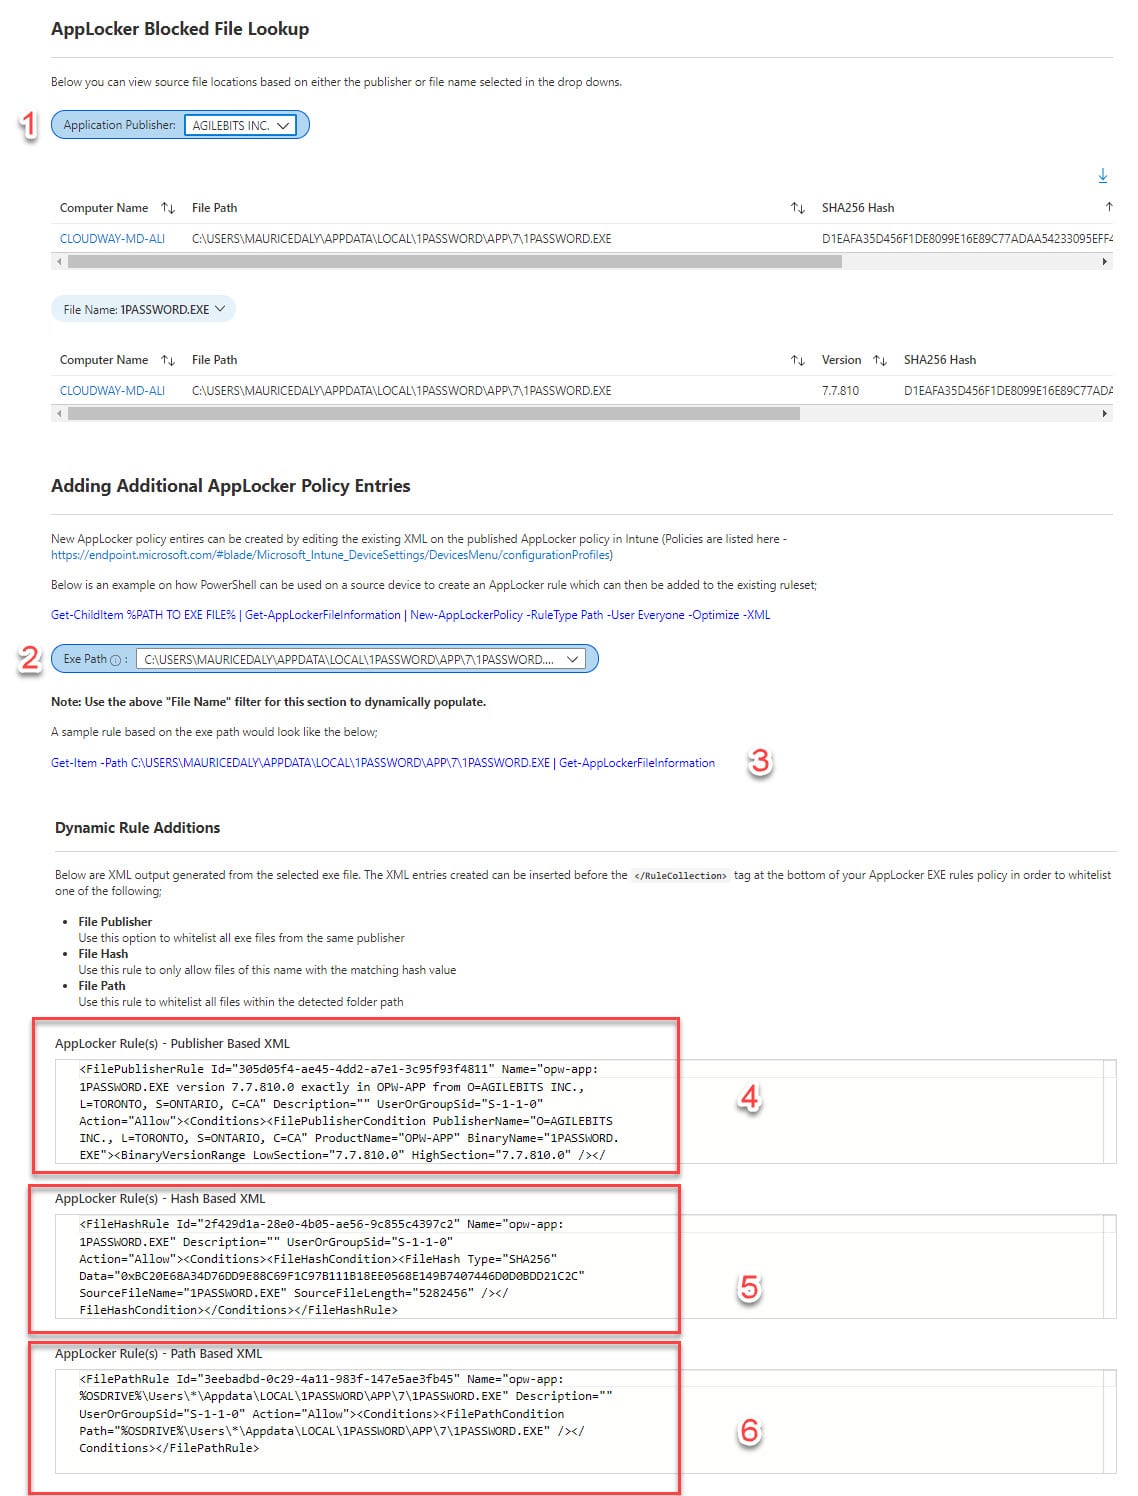
- Automatically generate app publisher based code that can be copy / pasted into an AppLocker EXE rule, with all non-required tags removed
- Automatically generate app hash based code that can be copy / pasted into an AppLocker EXE rule, with all non-required tags removed
- Automatically generate app file path based code that can be copy / pasted into an AppLocker EXE rule, with all non-required tags removed, and with the path sanitised as not to contain user information where the file is in the user profile path (replacing this with a wildcard)
This then allows the Intune admin to bypass using a GPO for maintaining the AppLocker policy, inserting the code (in this example its Agilebits as a publisher exception);
KQL Query
AppLockerEvents_CL
| where TimeGenerated {TimeRange:value}
| summarize arg_max(TimeGenerated, *) by FileHash_Hash_s
| extend File_Name = parse_path(FileHash_Path_s)
| extend Exe_Name = tostring(File_Name.Filename)
| where Exe_Name in ("{FileName}")
| extend Publisher_Rule = replace(@'<AppLockerPolicy Version="1"><RuleCollection Type="Exe" EnforcementMode="NotConfigured">',@"", AppLockerPublisherRule_s)
| extend Publisher_Rule = replace(@'</RuleCollection></AppLockerPolicy>',@"", Publisher_Rule)
| project Publisher_Rule
Output
<FilePublisherRule Id="305d05f4-ae45-4dd2-a7e1-3c95f93f4811" Name="opw-app: 1PASSWORD.EXE version 7.7.810.0 exactly in OPW-APP from O=AGILEBITS INC., L=TORONTO, S=ONTARIO, C=CA" Description="" UserOrGroupSid="S-1-1-0" Action="Allow"><Conditions><FilePublisherCondition PublisherName="O=AGILEBITS INC., L=TORONTO, S=ONTARIO, C=CA" ProductName="OPW-APP" BinaryName="1PASSWORD.EXE"><BinaryVersionRange LowSection="7.7.810.0" HighSection="7.7.810.0" /></FilePublisherCondition></Conditions></FilePublisherRule>
Intune Policy
Applying this policy, we then should see the whitelisted publisher start to disappear from the reports within the following hours / days.
What about file based rules with usernames? Well we can substitute * instead of the username, making these a copy and paste action too.
Workbook Running Example
Here we have a running example of the workbook in action, where the admin can report on every aspect of their AppLocker deployment, and also click on the Computer object names (bringing them to the Intune device) if required;
Conclusion
In this post we have looked at how we can use custom logs for sending data from clients, and reporting on them, but also extending that out so we can generate code to copy and paste into Intune policies for AppLocker. For those of you who are going to ask, the workbook is not being distributed as the IP in PowerShell and the workbook is for use with customers of CloudWay, but I hope this inspires you to go ahead and make your own!
Thanks to @sandy_tsang and @jankeskanke for help also!


Hey,
This is really interesting and something I’m looking to implement currently. Quick question regarding the PowerShell script, when does it run the capture. I’m looking at Intune deployment, so would this be a one time App Installation, or would you link it to a Scheduled Task? Slightly confused over this bit.
Really appreciate your feedback.
This is very helpful! Thank you!
Thanks for your work.
Is there any chance that the records include the execution of MSI files? I’m encountering a situation where the Get-AppLockerFileInformation does not show Audited, Allowed nor Denied executions of MSI files. The event is being recorded at the event viewer but does not appear in the Get-AppLockerFileInformation output.
Thanks.
Am I missing the Proactive Remediation to get the Event Log to Log Analytics? I’m trying to get Audit data to digest what’s going on?