Ever found your self in a messed up Hybrid Exchange environment, and some or all of your synced identities are missing onmicrosoft.com default domain?
It should be easy to fix, no?
Well it is… but if you google it, you will find suggestions like deleting the users or removing them from them from sync, then making the cloud only. And then hard or soft matching them again after they have received the domain.onmicrosoft.com alias back. That seems like a terrible waste of time if you ask me.
No, you can’t just add that domain on-premise to the proxyAddress field and be over with it – domain.onmicrosoft.com is not synced as an alias.
The quick(ish) fix
You don’t need to delete the user or anything fancy like that – here are the steps to fix it in production.
Add the UPN Suffix to your domain
In order for this fix to work, we need to add the tenant default domain as a UPN Suffix to our on-prem active directory. This is a simple one-time thing.
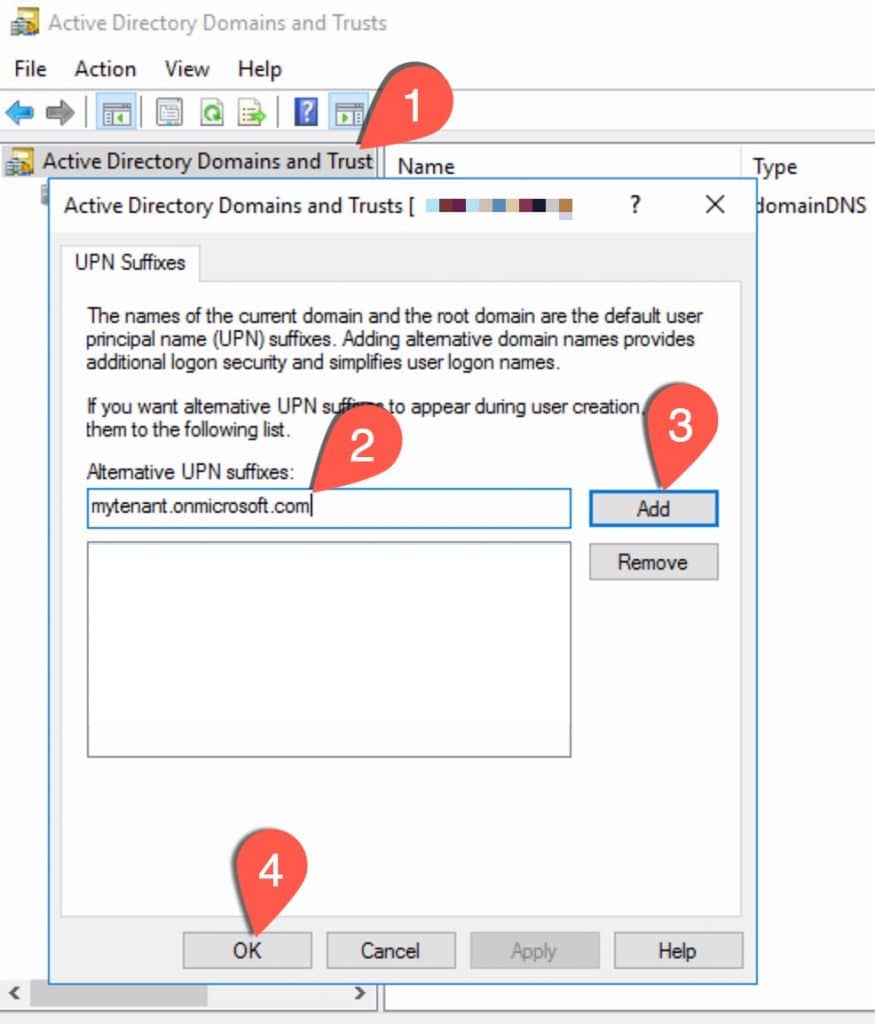
Open up “Active Directory Domains and Trusts” and follow the steps in the screenshot:

- Right-click and elect the properties of “Active directory domains and trusts” in the MMC
- Type in your default tenant domain (e.g. mytenant.onmicrosoft.com)
- Click “Add”
- Click “OK”
Now we can do some magic on the user-account…
Change the users UPN
Now the trick is to change the users logon name to match that of the default tenant domain, because unlike the e-mail alias (proxyAddress), the logon name will actually sync a change if using the default tenant domain.
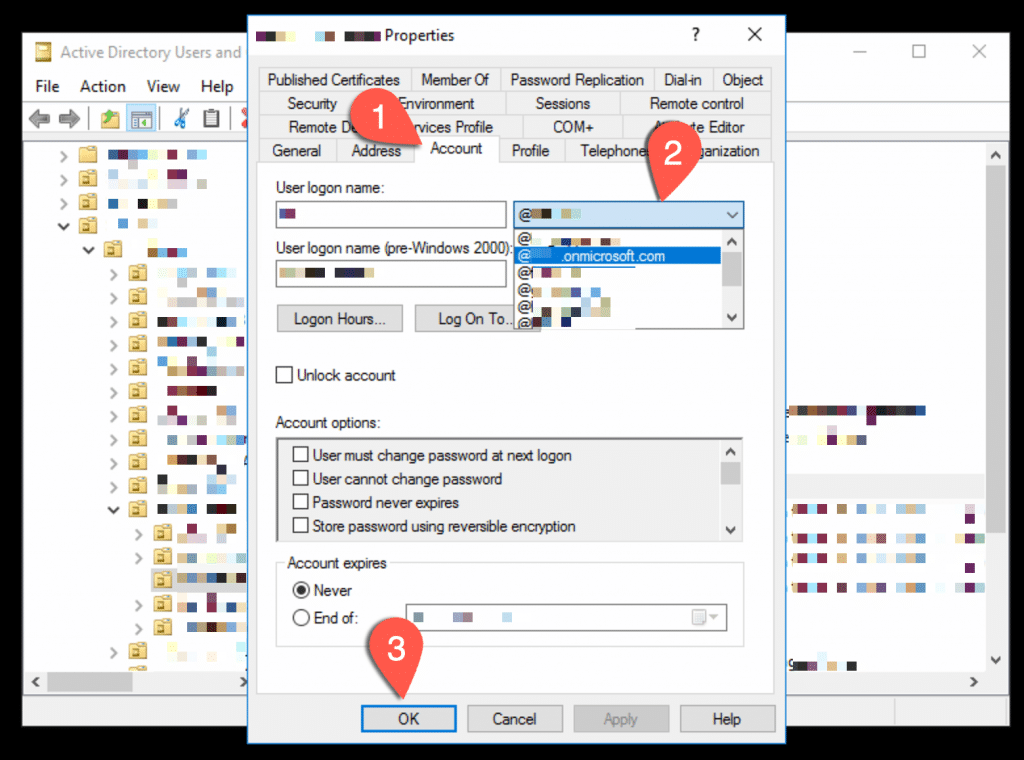
So crack open you “Active Directory Users and Computers” MMC, and lets follow login with the screenshot:

- Find the user with issues and go to the “Account” tab.
- From the User logon name domain name dropdown, note the current selection and then select the newly added UPN suffix (i.e. my tenant.onmicrosoft.com)
- Click “OK”
Now, that you have to do is either wait or force a sync with Azure AD Connect. Forcing it will obviously be faster.
After sync has completed, you should verify that the user login has actually chain in Azure AD or the M365 Admin portal. And at the same time, you can verify that the default domain e-mail alias is now in place as it should be.
Put it all back as it was
After you have confirmed that the cloud users has received the changes from on-prem, you simply need to put back the original domain from step 2 in the screenshot above. Then again wait for sync or force it.
If you wish to get rid of the UPN Suffix, you can do that at this point, it is no longer needed.
Final words
One could wish for a “fix it” button in Exchange online or the M365 portal to take care of this little bug, but I hope I have at least saved you some time by sharing this wacky workaround. Of course all of this can be scriptet if you have hundreds or thousands of users in this state.
And before you ask why even need this domain? Then think about the fact that it is default. And you never really know what 3rd party program or script is expecting to find that specific e-mail Alias on an account.
As always I hope you will add your comments below and follow on twitter to show your support.


Unfortunately, this did not seem to work for me. I added the UPN, updated the user logon name to be the @domain.onmicrosoft.com, and did an AD sync. However, it doesn’t seem like anything changed on the cloud side. I was really hoping this fix would work, but so far the only success I had was the delete on-prem and convert to cloud only account to fix it.
Many different things can influence that sync configuration. Sorry to hear it did not work for you.
Converting to cloud only by means of deleting the on-prem account will break the hybrid configuration and is not supported unfortunately.
But I hope you will write here if you find out what the blocker was for you doing this. as I have done it with multiple tenants, where I did not have access to the Azure AD Connect sync service.
Hey Michael,
why do we even add the suffix and then remove it?
“If you wish to get rid of the UPN Suffix, you can do that at this point, it is no longer needed.”
I saw a lot of confusion here and I would suggest a simple step: open Attribute editor and change UPN. One step.
Or Set-ADUser -UserPrincipalName $newUpn.
One step.
That’s the thing I always like to ask people, could I put @gmail.com UPN, will it works if I do not set it up in the UPN suffixes window? Lots of people get confused till they see the result.
Cheers, Dmitrii
Hi Dimitrii,
It can be done many ways, so thank you for adding your view.
When doing a blog on technical things, I must try and consider not to add too much information. So I chose this way with the GUI that is straightforward – but perhaps not the fastest method though.