Greetings, fellow IT admins! Repackaging setup files and editing your Win32 app again can be tedious and time-consuming. Thankfully, I bring you good news! There is a way to deploy a Win32 app and have it always install the latest version of the app on the computer.
To achieve this, we will deploy a PowerShell script as a Win32 app. This script will grab the latest version from the vendor’s site, download it, and then install it on the end computer. IT admins will not have to repackage the same app over and over again, edit their Win32 apps with every patch, and all your new devices/users will always get the latest version of the application.
PowerShell Script Logic Overview
The core logic of deploying Win32 applications via Intune with dynamic updates involves scripting the automated process of fetching the latest version of an application from the internet, downloading it, and executing the installation on the endpoint. The script can be summarized into several key steps:
- Define the Application’s Permalink: The script starts by specifying the permanent link (permalink) to the latest version of the application. This link is usually provided by the software vendor and points to an executable or MSI package that always downloads the most recent version available.
- Download the Latest Application Version: Utilizing PowerShell’s Invoke-WebRequest cmdlet, the script fetches the application package from the specified permalink.
- Execute the Installation: With the latest version downloaded, the script then executes the installer. For MSI packages, this might involve msiexec with appropriate switches; for executables, direct execution with parameters might suffice.
- Post-Installation Verification: Finally, the script can verify the successful installation by checking for the application’s presence, version number, or other success criteria.
How to Automatically Update Apps in Intune with Dynamic Win32
Finding the Permalink
The hardest and most important step is finding the permanent download link (aka permalink) for the target application, which will enable the download of the latest version of the application. Find the permalink by either exploring the vendor’s website, reading documentation and release notes, or simply reaching out to the vendor and asking them for it.
For this example, we will deploy Zoom. See the appendix section below to see a few common apps and their permalinks.
Building the Script
Once you find the permalink, it’s time to build the script. You can copy the full script from my GitHub here. I have added comments in the script to assist you in understanding it.
<#
.SYNOPSIS
Script to install or uninstall latest version of Zoom via PowerShell. This script can be packaged as win32 app and then deployed via intune.
.DESCRIPTION
This script allows you to install or uninstall Zoom on a Windows system.
.NOTES
Author: Lovepreet Singh (Recast Software)
Date: March 13, 2024
Version: 3.0
This script is provided as-is and without warranty. Use it at your own risk.
.Usage
Copy and paste the below commands in Command prompt (run as admin), Or in Intune install/unisntall command section.
For Install:> Powershell.exe -NoProfile -ExecutionPolicy ByPass -File .\Install_Zoom.ps1 --install
For Uninstall:> Powershell.exe -NoProfile -ExecutionPolicy ByPass -File .\Install_Zoom.ps1 --uninstall
#>
param (
[switch]$Install,
[switch]$Uninstall
)
#Give a app name and specify the permalink
$AppName = "Zoom"
$DownloadURL = "https://zoom.us/client/latest/ZoomInstallerFull.msi?archType=x64"
# Specify the full path to the MSI file. In my case i am storing this in the Temp folder.
$MSIFilePath = "$env:TEMP\$AppName.msi"
if ($Install) {
$InstallCommand = "msiexec /i '$MSIFilePath' /qn"
# Suppress progress reporting
#By suppressing the progress bar, the download speed increases 10x. This is a global variable used by powershell itself.
$ProgressPreference = 'SilentlyContinue'
# Download the MSI file
Invoke-WebRequest -Uri $DownloadURL -OutFile $MSIFilePath
# Install Zoom silently and enable Zoom auto updates
Start-Process -FilePath "msiexec" -ArgumentList "/i `"$MSIFilePath`" /qn /lex zoommsi.log ZoomAutoUpdate=1" -Wait
# Remove the downloaded MSI file
Remove-Item -Path $MSIFilePath -Force
}
#Below is the Uninstall parameter of this script. At first i wanted to copy the Install parameter and just replace the /i with /x to uninstall. But this is a bad idea. Why?
# Maybe the user will uninstall after 6 months, by then Zoom might have a new version with new MSI, with a differnt msi product code, so the uninstall can fail, instead we will below mentioned method
elseif ($Uninstall) {
$Query = "SELECT * FROM Win32_Product WHERE Name LIKE '%$AppName%'"
# Query for products that match the criteria
$Product = Get-WmiObject -Query $Query | Select-Object -ExpandProperty IdentifyingNumber
# Un-Install Zoom silently
Start-Process -FilePath "msiexec" -ArgumentList "/x $Product /qn" -Wait
}Packaging the Script
Now that you have the .ps1 script file downloaded and edited (if needed), it’s time to package it. We will use the Microsoft Win32 Content Prep Tool. Download it here.
For more information on this tool visit https://learn.microsoft.com/en-us/mem/intune/apps/apps-win32-prepare.
Using the Win32 Content Prep Tool
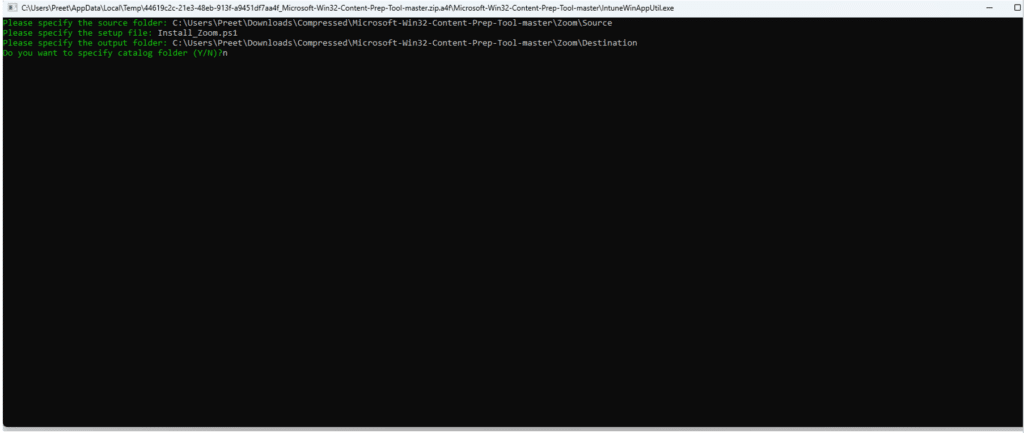
Refer to this article to learn how to package using the Win32 content prep tool. There are three major differences for us in this scenario compared to the article:
We will use “Install_Zoom.ps1” as the setup file instead of “Zoom.msi”.
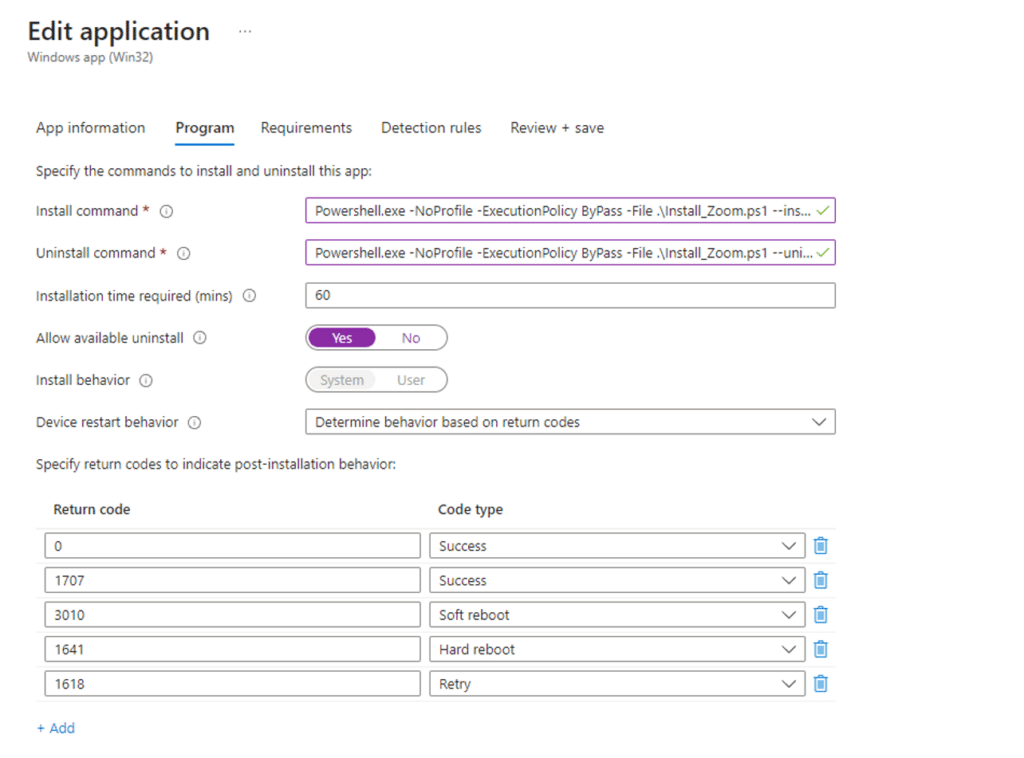
We will use our custom Install and Uninstall commands in Intune win32 application setup.
For Detection Rule, we will use the file version.
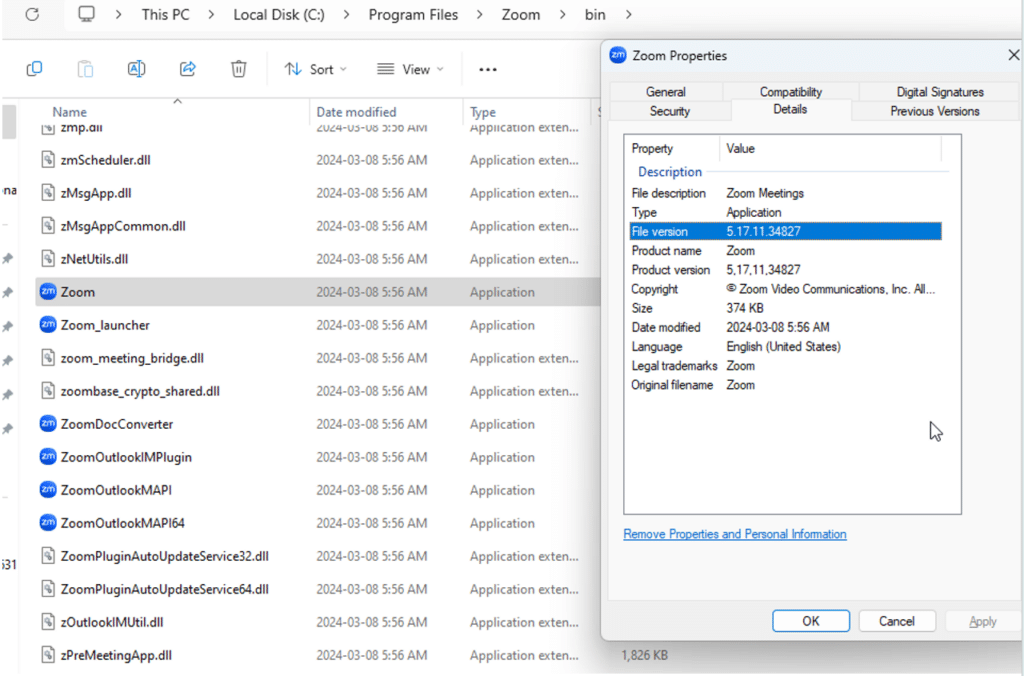
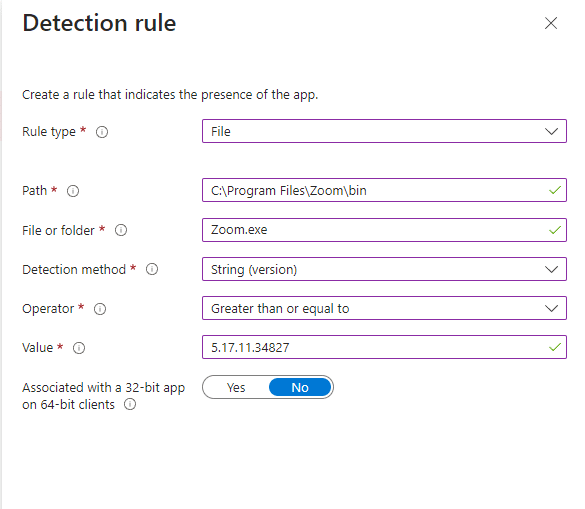
Note: while this method is great for ensuring that new users and devices will always get the latest version available, it is not perfect. For example, when a newer version of Zoom is released after 5.17.11.34827, the detection rule will read it as already installed because “Greater than or equal to 5.17.11.34827” will be true for all new versions.
Thankfully, Zoom has a prebuilt MSI switch (ZoomAutoUpdate=1) as shown in the script, which will always keep Zoom updated. However, this switch may not be available for other applications.
Customization Examples
Sysadmins can tailor the script to suit specific needs or environments. Below are examples of potential customizations:
Custom Installation Paths: By adding parameters to the installation command, you can specify custom installation directories, which is useful for managing disk space or adhering to organizational policies.
Start-Process 'msiexec' -ArgumentList '/i downloadedApp.msi TARGETDIR="C:\CustomPath" /qn' -Wait <br>
Version Check and Conditional Installation: Introduce logic to compare the currently installed version (if present) with the version available for download. Only proceed with the download and installation if the downloaded version is newer. This involves querying the installed applications using Get-WmiObject or Get-ItemProperty and parsing version numbers.
$installedVersion = (Get-ItemProperty 'HKLM:\Software\Microsoft\Windows\CurrentVersion\Uninstall\*').DisplayVersion
$latestVersion = "X.Y.Z" # This would be dynamically determined or fetched

if ($installedVersion -lt $latestVersion) {
    # Download and install logic here
}
Handling Special Installation Flags: Some applications require special flags for silent installations or additional configurations. Embedding these into the script ensures that installations are unattended and conform to required settings.
Start-Process 'downloadedApp.exe' -ArgumentList '/S /NoRestart' -Wait <br>
Logging and Notifications: Enhancing the script with logging functionality can help in troubleshooting and auditing. Additionally, integrating notification mechanisms, such as sending an email or posting to a web service when the installation process completes or fails, keeps relevant stakeholders informed.
Try {
    # Installation logic here
    Write-Output "Installation successful" | Out-File -FilePath "installation.log"
    # Optionally send a success notification
} Catch {
    Write-Output "Installation failed" | Out-File -FilePath "installation.log"
    # Optionally send a failure notification
}
Automatically Update All Apps
If you are looking for a more complete and comprehensive third-party application lifecycle management tool, which will create, deploy, update, retire, and delete your applications automatically, check out Application Manager by Recast Software.
This eBook also gives some good perspective on the challenges and risks of manually patching apps.
Appendix
- Slack Permalink: https://slack.com/ssb/download-win64-msi
- Chrome Permalink: https://dl.google.com/chrome/install/googlechromestandaloneenterprise64.msi
- Firefox Permalink: https://download.mozilla.org/?product=firefox-msi-latest-ssl&os=win64&lang=en-US






Add comment