


This summer Microsoft released what they’re calling the last version of Windows, naming it Windows 10. Organizations that are looking into deploying Windows 10 will have to evaluate what scenario they will use, e.g. In-Place Upgrade, Provisioning or the traditional way of deploying an image. In this blog post, I will go through the steps required to setup a functional build server for reference images. The goal with this blog post is for you to get up and running with a functioning build server that will create the Windows 10 Enterprise reference image for bare metal deployments.
Overview
- Prerequisites
- Build server configuration
- Install and configure WSUS
- Install Windows ADK 10
- Install MDT 2013 Update 1
- Create a MDT user account
- MDT 2013 Update 1 configuration
- Create a Deployment Share
- Delegate permissions on the Deployment Share
- Modify Rules and Bootstrap.ini
- Import Applications
- Import an Operating System
- Create a Task Sequence
- Modify the Task Sequence
- Update Deployment Share
- Start the reference image creation
Prerequisites
In this post I’ve installed a Windows Server 2012 R2 virtual machine named SRV001 and joined it to my domain. But before we start you need to grab some software that we’re going to install. Download the following software to C:\Downloads:
Through out this post you’ll see that I perform some of the tasks by using PowerShell, so I recommend that you get yourself familiar with PowerShell ISE if you’ve not used it before. Additionally, I will refer to my SRV001 as the build server, just to make that crystal clear.
Build server configuration
When you’ve downloaded the required software (MDT 2013 Update 1 and Windows ADK 10), we can start the configuration of the build server.
Install and configure WSUS
The first step is to install and configure WSUS on the build server.
NOTE! At the end of this section, you’ll find a script to automate the whole process.
1. Open an elevated PowerShell console and run the following command:
Add-WindowsFeature -Name "UpdateServices","UpdateServices-WidDB","UpdateServices-Services","UpdateServices-RSAT","UpdateServices-API","UpdateServices-UI"
2. Open the Windows Server Update Services console from the start menu.
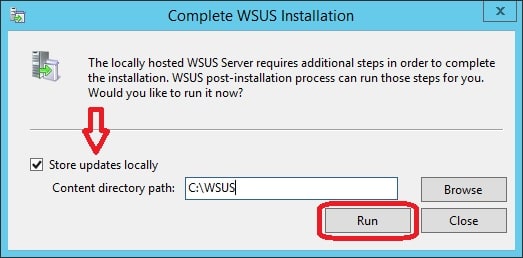
3. In the Complete WSUS Installation windows, select to store updates locally and enter a path e.g. C:\WSUS. Click Run when ready.
4. When the post configuration has completed, click Close.
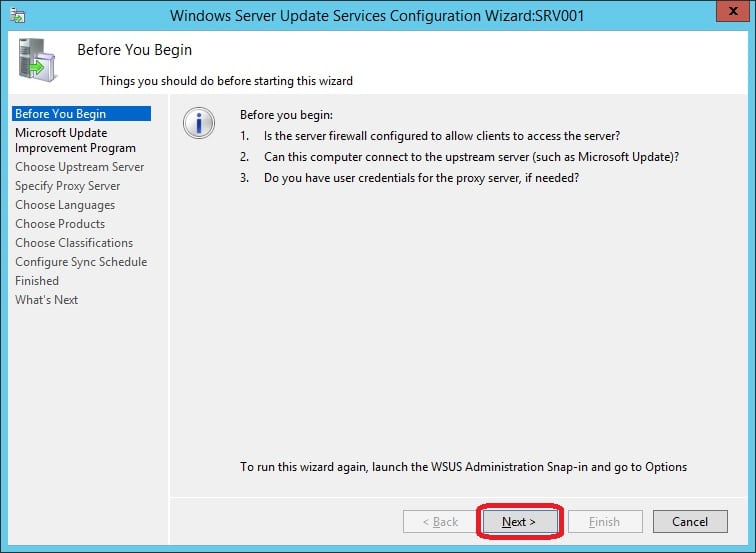
5. After a short while, the Windows Server Update Services Configuration Wizard appears. Click Next.
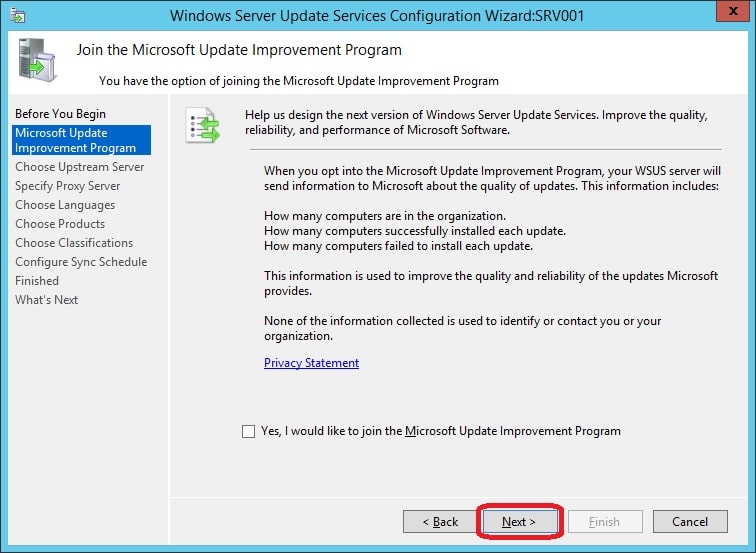
6. Decide whether you’d want to join the improvement program and click Next.
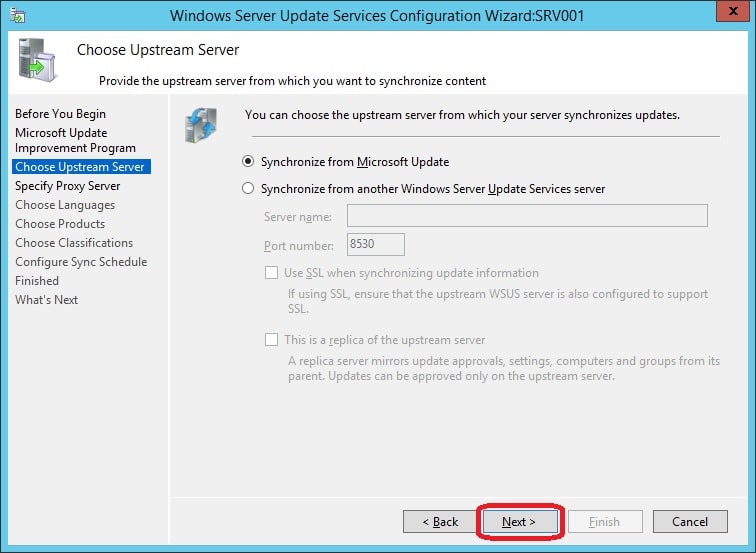
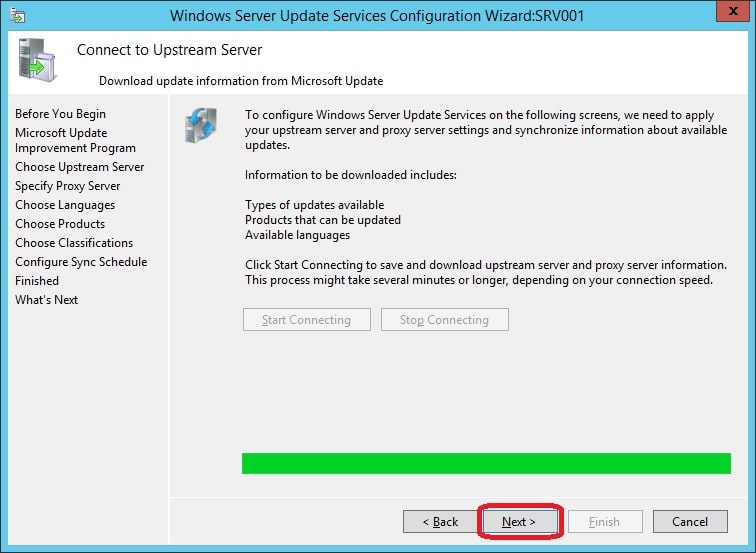
7. Make sure that Synchronize from Microsoft Update is selected on the Choose Upstream Server page and click Next.
8. On the Proxy page, configure the proxy settings if required in your environment in order to reach Microsoft Update. Click Next.
9. On the Specify Proxy Server page, click Start Connecting and wait for it to complete. Since this is the initial synchronization it may take a while, so be patient.

10. Once the synchronization has completed, click Next.
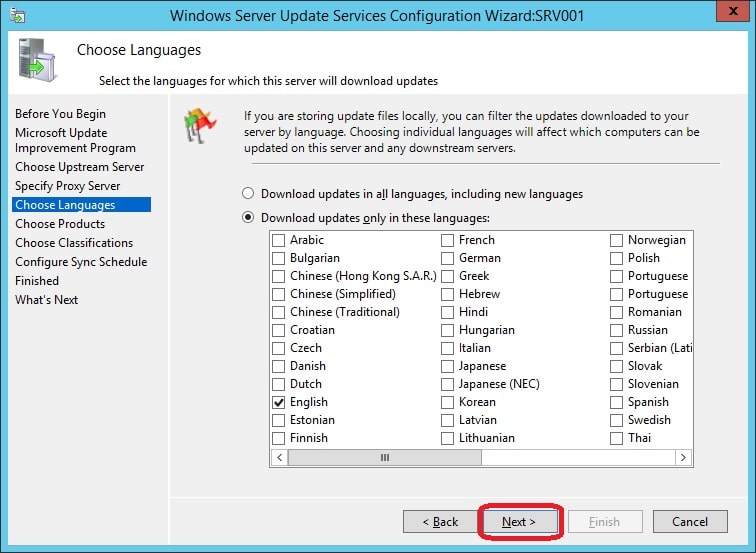
11. Select the languages you wish to sync updates for and click Next.
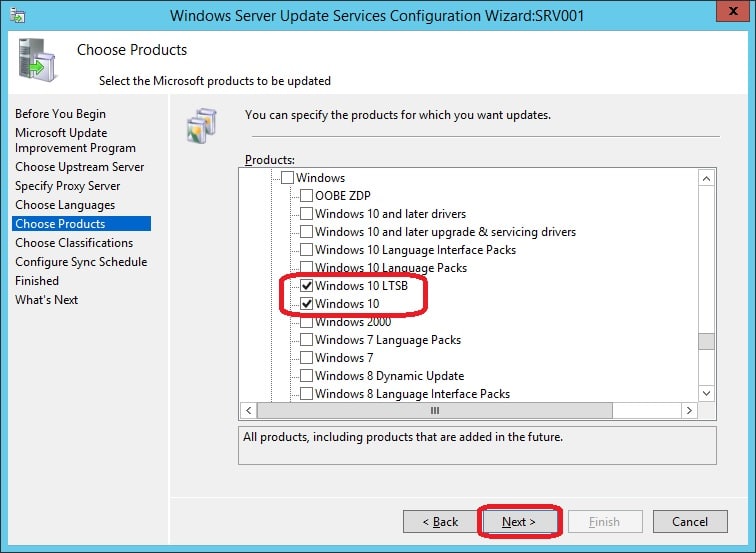
12.On the next page, we get to choose the Products that we want patches synced for. For this build server, we’ll select the following products:
- Windows 10
- Windows 10 LTSB
- Office 2016
You should of course choose the products that suits your need, and if you want to use the build server for creating reference images for other products, select those as well. I’ve also included Office 2016 for the sole purpose of allowing us to include Office 2016 in the reference image. Click Next when you’ve chosen the required products.
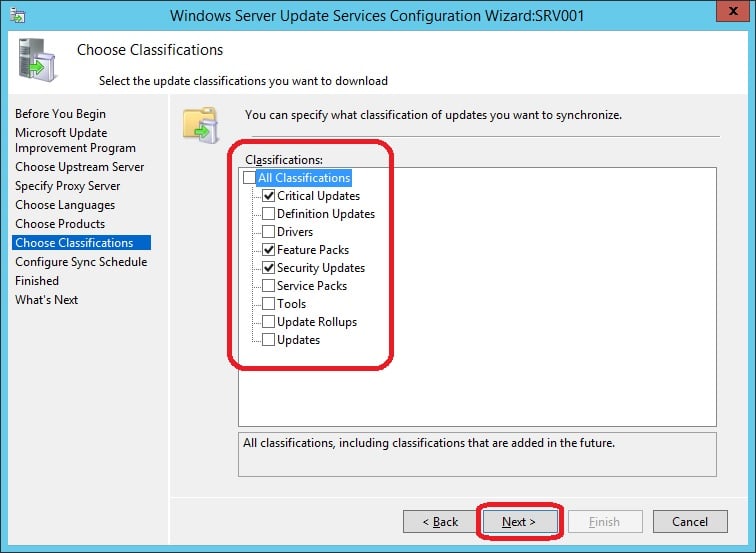
13. Make sure that you select at least the following Classifications:
- Critical Updates
- Security Updates
- Feature Packs (for .NET updates for Windows 10)
Click Next.
14. For the sync schedule, select Synchronize automatically and specify a time of the day that you’d like the sync to run. Note the 30 min random offset after the specified time. Click Next.

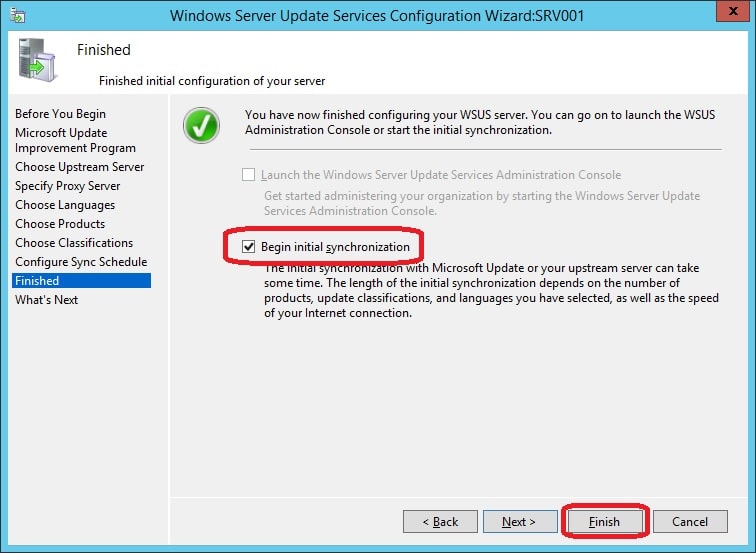
15. At the Finished page, select to Begin initial synchronization and click Finish.
16. The Update Services console now appears. Expand the server name in the left pane and select Synchronizations. Wait until the synchronization has completed until you continue.

17. Once the synchronization has completed, go to Options and click on Automatic Approvals.
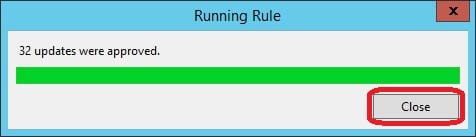
18. Put a check mark in the Default Automatic Approval Rule and click on Run Rule.

19. Click Yes to save the rule.
20. Click Close once the rule has completed approving the updates.
21. Click OK in the Automatic Approvals window.
WSUS has now been successfully installed and configured and is ready to service with updates for the reference image creation process.
If you’d rather want to perform the above steps, and may need to reproduce them in the future, run the following PowerShell script in ISE:
# Install WSUS and execute post install
Write-Output "Execute: Install WSUS and execute post install"
$WSUSContentFolder = "C:\WSUSContent"
if (-not(Test-Path -Path $WSUSContentFolder)) {
    New-Item -Path $WSUSContentFolder -ItemType Directory | Out-Null
}
Add-WindowsFeature -Name "UpdateServices","UpdateServices-WidDB","UpdateServices-Services","UpdateServices-RSAT","UpdateServices-API","UpdateServices-UI"
$WSUSUtil = "$($Env:ProgramFiles)\Update Services\Tools\WsusUtil.exe"
$WSUSUtilArgs = "POSTINSTALL CONTENT_DIR=$($WSUSContentFolder)"
Start-Process -FilePath $WSUSUtil -ArgumentList $WSUSUtilArgs -Wait
# Load WSUS assembly
Write-Output "Execute: Load WSUS assembly"
[System.Reflection.Assembly]::LoadWithPartialName("Microsoft.UpdateServices.Administration")
# Configure WSUS to synchronize from Microsoft Update
Write-Output "Execute: Configure WSUS to synchronize from Microsoft Update"
$WSUSServer = Get-WsusServer -Name localhost -Port 8530
Set-WsusServerSynchronization -UpdateServer $WSUSServer -SyncFromMU
# Disable all Update Classifications
Write-Output "Execute: Disable all Update Classifications"
$WSUSUpdateClassificationList = New-Object System.Collections.ArrayList
$WSUSUpdateClassificationList.AddRange(@("Critical Updates","Definition Updates","Drivers","Feature Packs","Security Updates","Service Packs","Tools","Update Rollups","Updates"))
foreach ($WSUSUpdateClassification in $WSUSUpdateClassificationList) {
    Get-WsusClassification | Where-Object { $_.Classification.Title -like "$($WSUSUpdateClassification)" } | Set-WsusClassification -Disable
}
# Enable required Update Classifications for Windows 10
Write-Output "Execute: Enable required Update Classifications for Windows 10"
$WSUSUpdateClassificationEnabledList = New-Object System.Collections.ArrayList
$WSUSUpdateClassificationEnabledList.AddRange(@("Critical Updates","Feature Packs","Security Updates"))
foreach ($WSUSUpdateClassification in $WSUSUpdateClassificationEnabledList) {
    Get-WsusClassification | Where-Object { $_.Classification.Title -eq $WSUSUpdateClassification } | Set-WsusClassification
}
# Configure Default Automatic Approval rule
Write-Output "Execute: Configure Default Automatic Approval rule"
$WSUSConnection = [Microsoft.UpdateServices.Administration.AdminProxy]::getUpdateServer("localhost", $false, "8530")
$WSUSRuleName = "Default Automatic Approval Rule"
$WSUSRule = $WSUSConnection.GetInstallApprovalRules() | Where-Object { $_.Name -like $WSUSRuleName }
$WSUSClassificationCollection = New-Object Microsoft.UpdateServices.Administration.UpdateClassificationCollection
foreach ($UpdateTitle in $WSUSUpdateClassificationEnabledList) {
    $RuleUpdateClassification = $WSUSConnection.GetUpdateClassifications() | Where-Object { $_.Title -like $UpdateTitle }
    $WSUSClassificationCollection.Add($RuleUpdateClassification) | Out-Null
}
$WSUSRule.SetUpdateClassifications($WSUSClassificationCollection)
$WSUSRule.Enabled = $true
$WSUSRule.Save()
# Create a WSUS automatic synchronization schedule
Write-Output "Execute: Create a WSUS automatic synchronization schedule"
$WSUSSubscription = $WSUSConnection.GetSubscription()
$WSUSSubscription.SynchronizeAutomatically = $true
$WSUSSubscription.SynchronizeAutomaticallyTimeOfDay = (New-TimeSpan -Hours 6)
$WSUSSubscription.Save()
# Configure WSUS update languages
Write-Output "Execute: Configure WSUS update languages"
$WSUSLanguages = @("en","sv")
$WSUSLanguageCollection = New-Object System.Collections.ArrayList
$WSUSConfiguration = $WSUSConnection.GetConfiguration()
$WSUSConfiguration.AllUpdateLanguagesEnabled = $false
foreach ($WSUSLanguage in $WSUSLanguages) {
    $WSUSLanguageCollection.Add($WSUSLanguage) | Out-Null
}
$WSUSConfiguration.SetEnabledUpdateLanguages($WSUSLanguageCollection)
$WSUSConfiguration.Save()
# Start WSUS initial synchronization
Write-Output "Execute: Start WSUS initial synchronization"
$WSUSSubscription.StartSynchronizationForCategoryOnly()
while ($WSUSSubscription.GetSynchronizationStatus() -ne "NotProcessing") {
    Write-Host "." -NoNewline
    Start-Sleep -Seconds 3
}
# Configure WSUS products
Write-Output "Execute: Configure WSUS products"
$WSUSSubscription = $WSUSConnection.GetSubscription()
$WSUSCategoryCollection = New-Object Microsoft.UpdateServices.Administration.UpdateCategoryCollection
$WSUSProduct = $WSUSConnection.GetUpdateCategories() | Where-Object { $_.Id -eq "a3c2375d-0c8a-42f9-bce0-28333e198407" }
$WSUSCategoryCollection.Add($WSUSProduct) | Out-Null
$WSUSSubscription.SetUpdateCategories($WSUSCategoryCollection)
$WSUSSubscription.Save()
# Start WSUS synchronization
Write-Output "Execute: Start WSUS synchronization"
$WSUSSubscription.StartSynchronization()
while ($WSUSSubscription.GetSynchronizationStatus() -ne "NotProcessing") {
    Write-Host "." -NoNewline
    Start-Sleep -Seconds 3
}
# Run Default Automatic Approval rule
Write-Output "Execute: Run Default Automatic Approval rule"
$WSUSConnection = [Microsoft.UpdateServices.Administration.AdminProxy]::getUpdateServer("localhost", $false, "8530")
$WSUSAutomaticRule = $WSUSConnection.GetInstallApprovalRules() | Where-Object { $_.Name -like "Default Automatic Approval Rule" }
$WSUSAutomaticRule.ApplyRule()
Install Windows ADK 10
Next up after installing and configuring WSUS is to install Windows ADK 10. In the following post I assume that you’ll be installing Windows ADK 10 online, by downloading the adksetup.exe from the URL mentioned earlier. I’ve downloaded the setup file to C:\Install\WADK10 on the build server and I suggest you do the same.
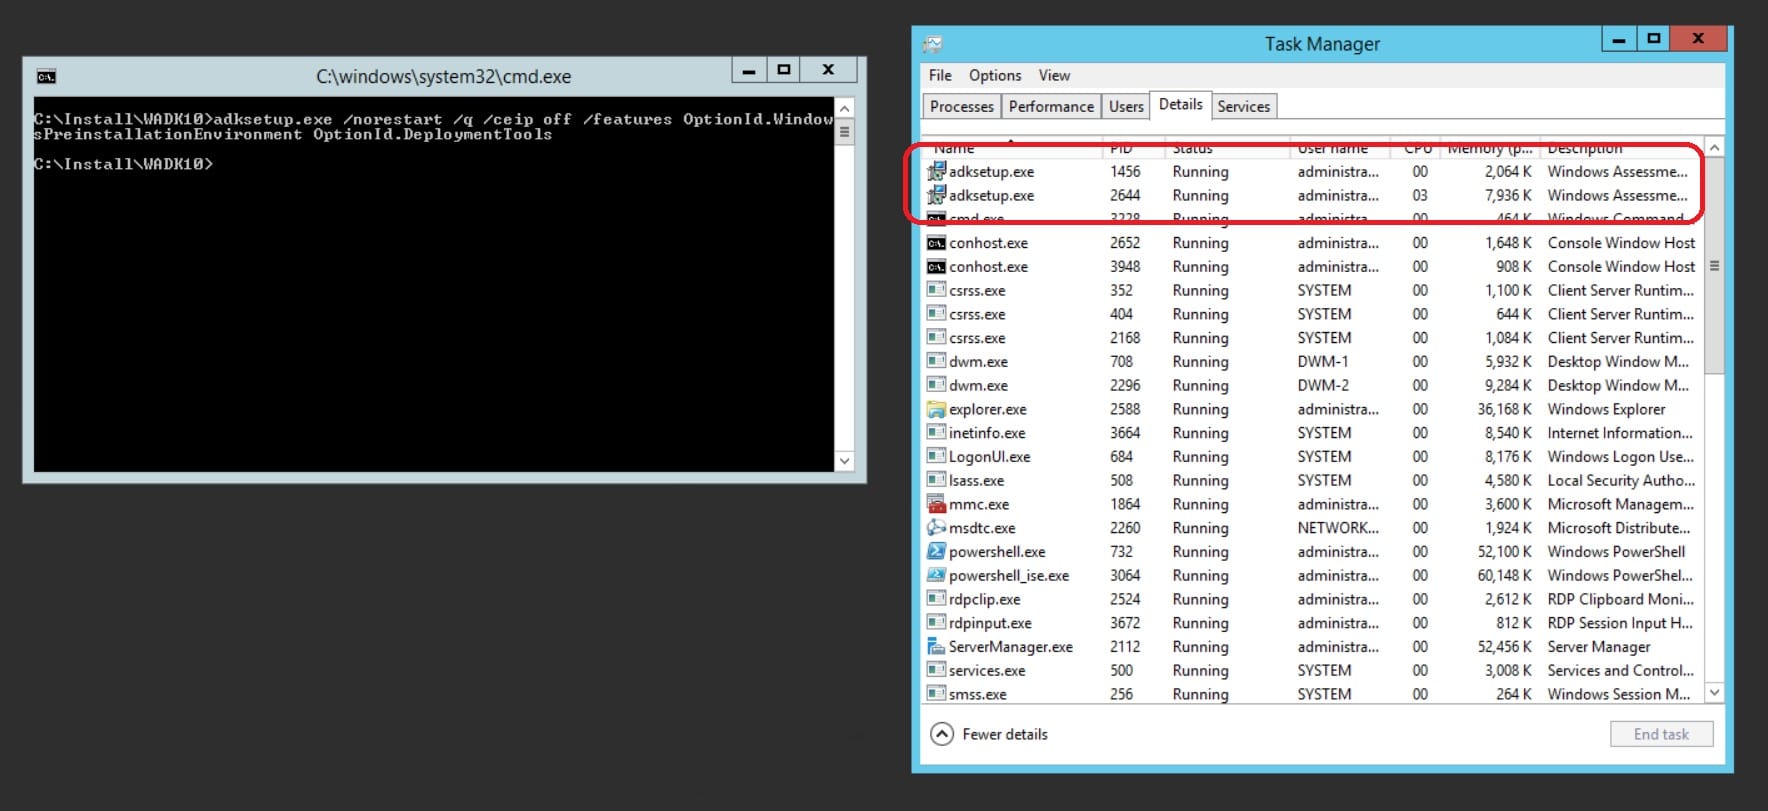
1. Open and elevated command prompt, browse to C:\Install\WADK10\ and run the following command to install Windows ADK 10 with the required features for MDT:
adksetup.exe /norestart /q /ceip off /features OptionId.WindowsPreinstallationEnvironment OptionId.DeploymentTools
2. Wait for the adksetup.exe process to disappear in the Task Manager.
Install MDT 2013 Update 1
It’s not time to install MDT 2013 Update 1. Make sure that you’ve downloaded the correct build, which should be 8298 (it includes a ton of bug fixes). The setup file for MDT should be downloaded to C:\Install\MDT2013U1 on the build server.
1. Open an elevated command prompt, browse to C:\Install\MDT2013U1 and run the following command to silently install MDT 2013 Update 1:
msiexec /i MicrosoftDeploymentToolkit2013_x64.msi /qn
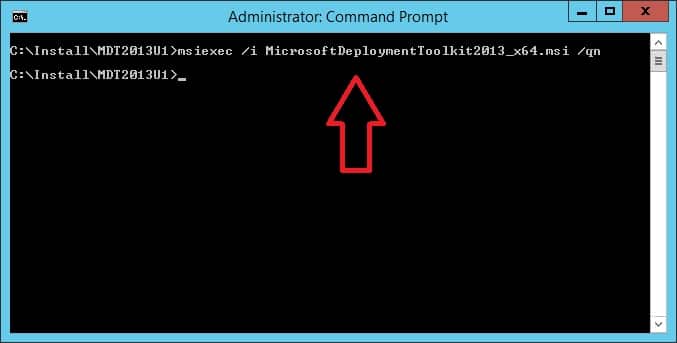
2. Wait for the installation to complete, which is rather quick.
Create a MDT user account
Before we go ahead on to the next step of configuring MDT, we need to create a user account that will be used to connect to the Deployment Share that we’ll create further on in this post. I’d recommend that you create a local user account, although it will also work with a regular domain user account. What’s important here is that we delegate the correct permissions for the user account on the Deployment Share. I’ll create the local user account by using a small PowerShell script where I specify the user name and password.
1. Open PowerShell ISE elevated and run the script below (modify the user name and password variables unless you want to use what I’ve specified):
$MDTUserName = "MDTUser"
$MDTPassword = "Passw0rd!"
$ComputerObject = [ADSI]"WinNT://localhost"
$UserObject = $ComputerObject.Create("User",$MDTUserName)
$UserObject.SetPassword($MDTPassword)
$UserObject.SetInfo() | Out-Null
[ADSI]"WinNT://localhost/$($MDTUserName)"
If the output looks like in the image below, the local user account was successfully created:

2. Verify that the user account was indeed created by opening the Computer Management console, expand Local Users and Groups – Users and verify that the account is available.
With all these steps, it sums up the build server configuration and we can move on to configuring MDT.
MDT 2013 Update 1 configuration
During this phase we will perform the required tasks in order to configure MDT so it can be used to successfully create reference images.
Create a Deployment Share
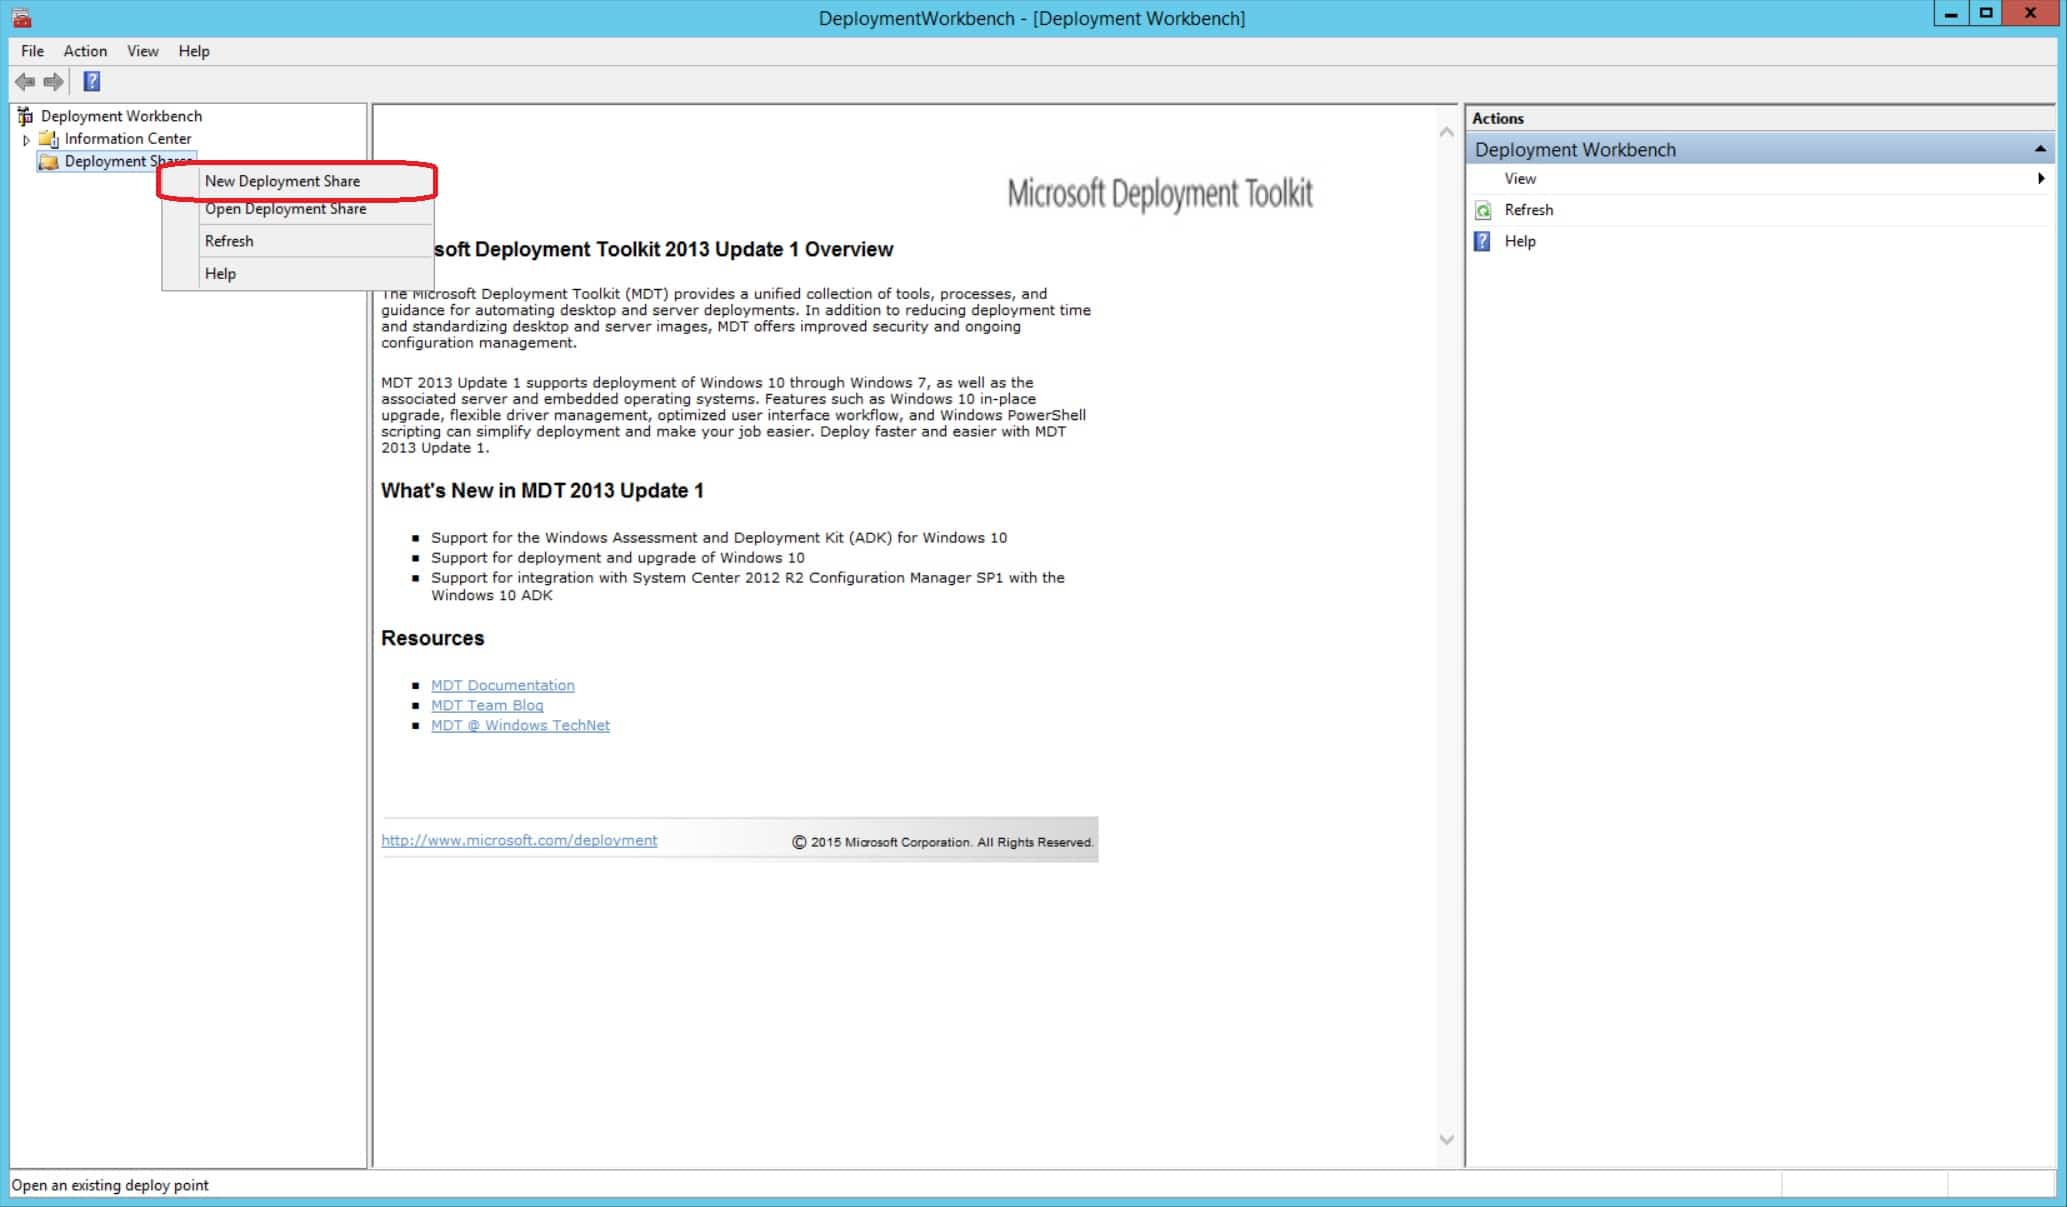
1. Open the Deployment WorkBench from the Start menu.
2. Right click on Deployment Shares and choose New Deployment Share
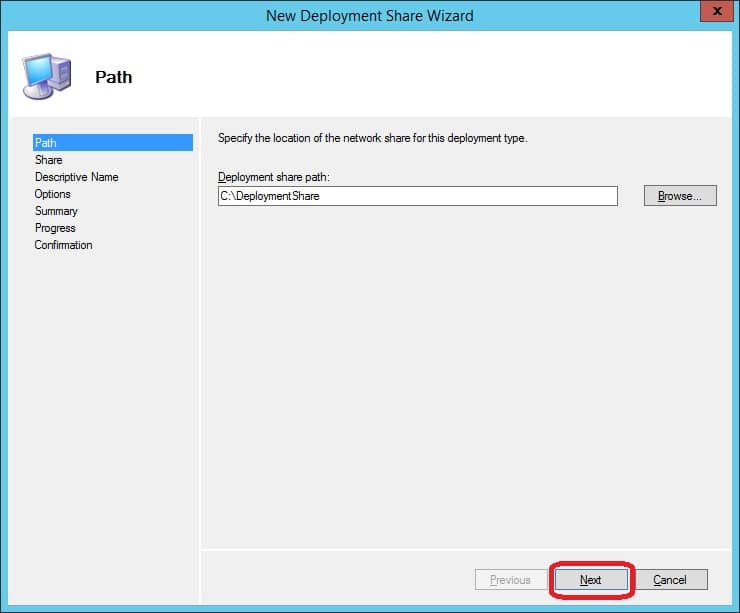
3. On the Path page, specify an alternative path or leave the default. Click Next.
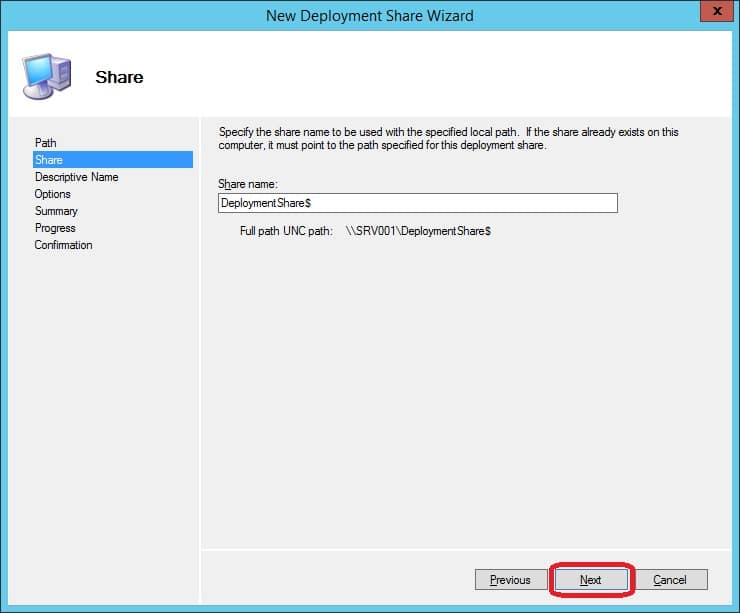
4. Use the default suggestion for the share name for the Deployment Share and click Next.
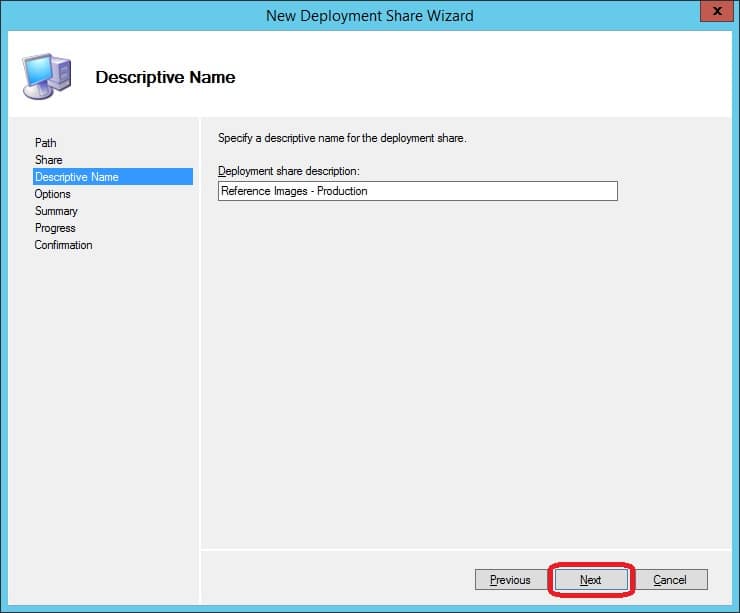
5. On the Descriptive page, name the Deployment Share e.g. Reference Images – Production and click Next.
6. As for the Options page, leave the default selections and click Next.
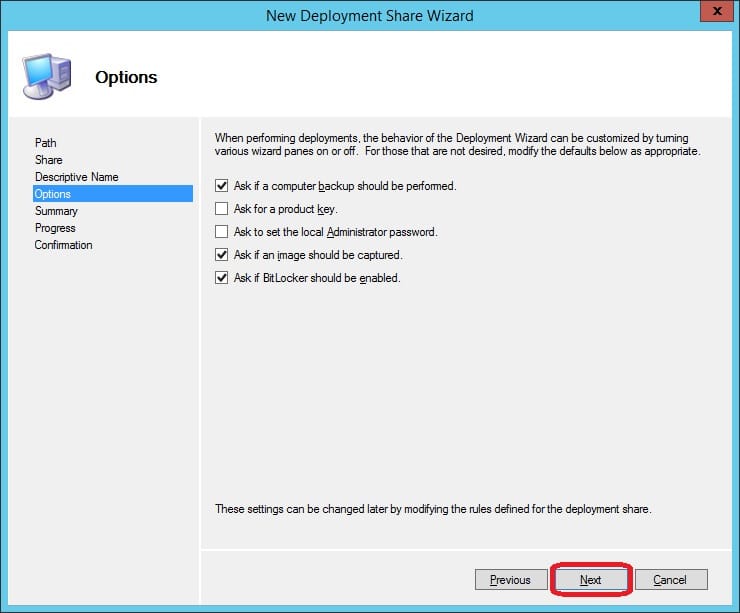
7. On the Summary page, click Next.

8. Once the operation has completed, click Finish.

Delegate permissions on the Deployment Share
In order for the MDT user account that we previously created to have access to the Deployment Share, we need to make some adjustments.
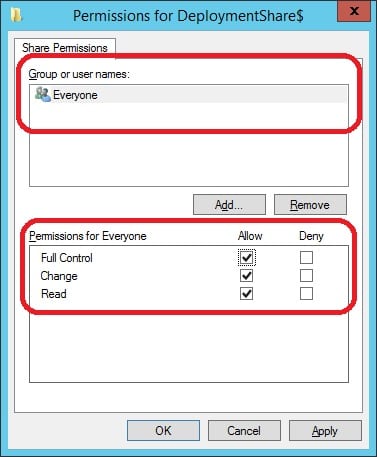
1. In Windows Explorer, browse to C:\, right click on DeploymentShare and choose Properties.
2. Go to the Sharing tab, click Advanced Sharing and then click Permissions
3. Remove the CREATOR OWNER entry and add Everyone with Full Control. Click OK and OK again in the Advanced Sharing window.
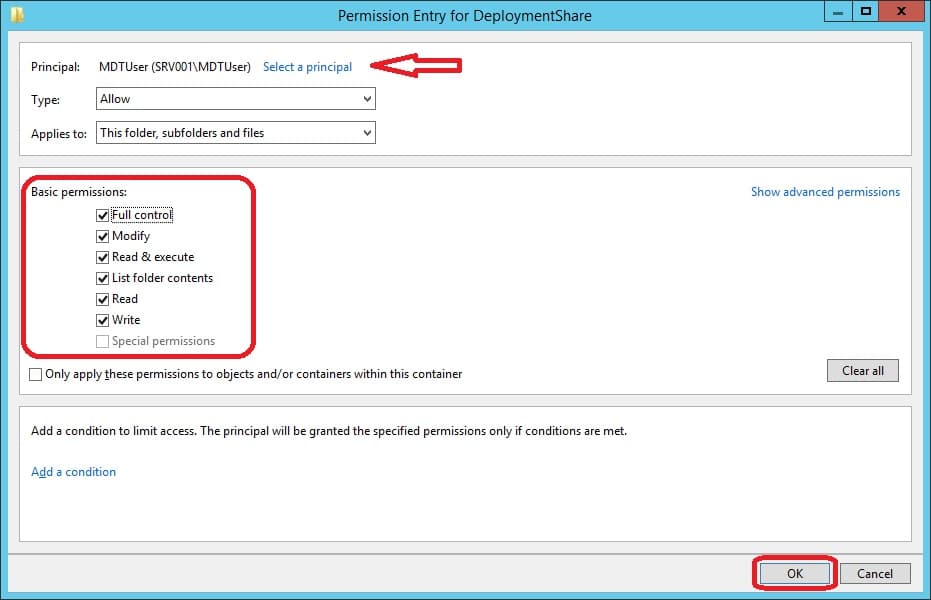
4. Go to the Security tab, click Advanced and click Add.

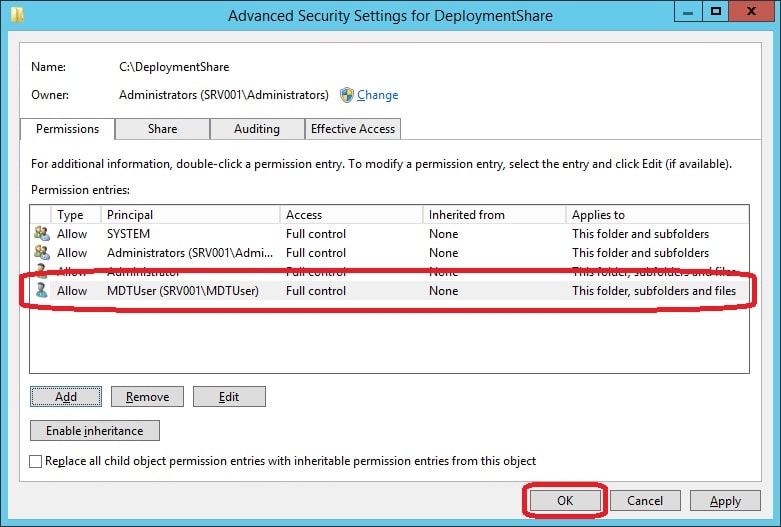
5. Click on Select a principal and browse for the MDT user account name that we created earlier (MDTUser if you used the same user name in this post). Remember to change location to the build server instead of your Active Directory if you created a local user account. Put a check mark in the Full Control box under Basic permissions and click OK.
6. In the Advanced Security Settings window, click OK.
7. Click Close in the DeploymentShare Properties window.
Modify Rules and Bootstrap.ini
Next we will have to configure a set of rules so that the deployment process will become automated, and no prompts will be shown.
1. Right-click on the Deployment Share and click on Properties.

2. Go to the Rules tab and amend the rules to something like this:
[Settings]
Priority=Default
Properties=MyCustomProperty
[Default]
OSInstall=Y
DeploymentType=NEWCOMPUTER
ComputerName=WIN10REF
DoNotCreateExtraPartition=YES
ApplyGPOPack=NO
UserDataLocation=NONE
HideShell=NO
JoinWorkgroup=WORKGROUP
AdminPassword=Passw0rd!
UILanguage=en-US
UserLocale=en-US
KeyboardLocale=en-US
TimeZoneName=Central Standard Time
WSUSServer=https://SRV001.contoso.com:8530
DoCapture=YES
ComputerBackupLocation=NETWORK
BackupShare=\\SRV001.contoso.com\DeploymentShare$
BackupDir=Captures
BackupFile=%TASKSEQUENCEID%-#year(date) & "-" & month(date) & "-" & day(date)#.wim
_SMSTSOrgName=Contoso - Reference Image Creation
TaskSequenceID=WIN10X64CBB
FinishAction=SHUTDOWN
SkipBDDWelcome=YES
SkipDeploymentType=YES
SkipDomainMembership=YES
SkipApplications=YES
SkipSummary=YES
SkipUserData=YES
SkipComputerName=YES
SkipTaskSequence=YES
SkipLocaleSelection=YES
SkipTimeZone=YES
SkipAppsOnUpgrade=YES
SkipAdminPassword=YES
SkipProductKey=YES
SkipComputerBackup=YES
SkipBitLocker=YES
SkipCapture=YES
SkipFinalSummary=YES
SkipRoles=YES
NOTE! You should amend the above rules to suite your environment, so make sure that you go through all of them.
3. Click on the Edit Bootstrap.ini button.
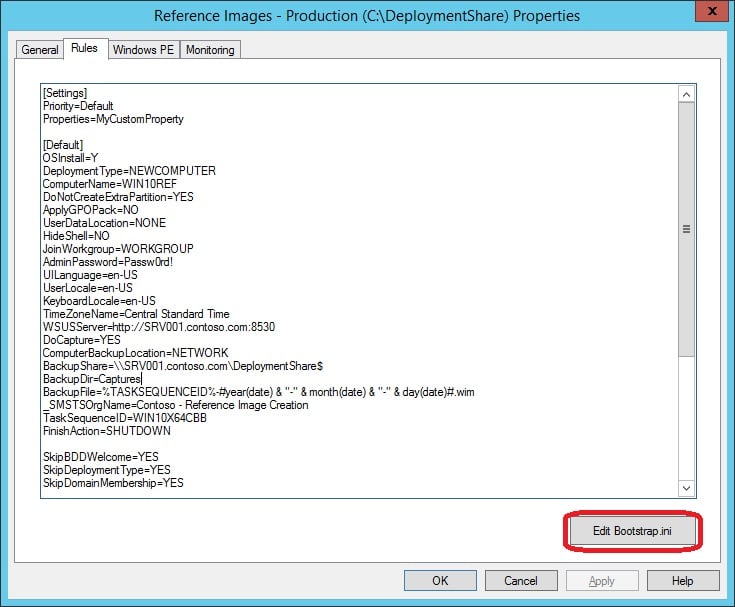
4. Amend the Bootstrap.ini file to the following:
[Settings]
Priority=Default
[Default]
DeployRoot=\\SRV001.contoso.com\DeploymentShare$
SkipBDDWelcome=Yes
UserID=MDTUser
UserDomain=SRV001
UserPassword=Passw0rd!
NOTE! You should amend the above rules to suite your environment, so make sure that you go through all of them.
5. In the Properties window of the Deployment Share, click Apply and then OK.
Import Applications
Applications can be really useful to incorporate in the reference image. Although, I’d advise you not to include everything. This is simply because you’d have to create a new reference image for every time a new version of any of the incorporated applications are updated. As per my recommendations, you should at least include the following applications in your reference image, to support various other applications:
- Visual C++ Redistributables
- .NET Framework 3.5 SP1 (can also be enabled with Roles and Feature step in the task sequence)
In addition to the above, you may also want to include Microsoft Office. But before you decide on just that, remember that the size of the reference image will increase quite significantly. What’s important though before you attempt to import any application into MDT, is that you’ve acquired the source (installation) files for your applications. In this post I will not go through all the required steps of manually importing applications, instead I’ll rely in PowerShell and a CSV file containing all of the applications that I want to import.
Download of source files
As shown in the picture below, I’ve downloaded the source files that I want to import into MDT and placed them in C:\SourceFiles\Apps:

CSV file with data for automated import of applications
This is the CSV file that I’ve created and will be using together with PowerShell to automatically import the applications:
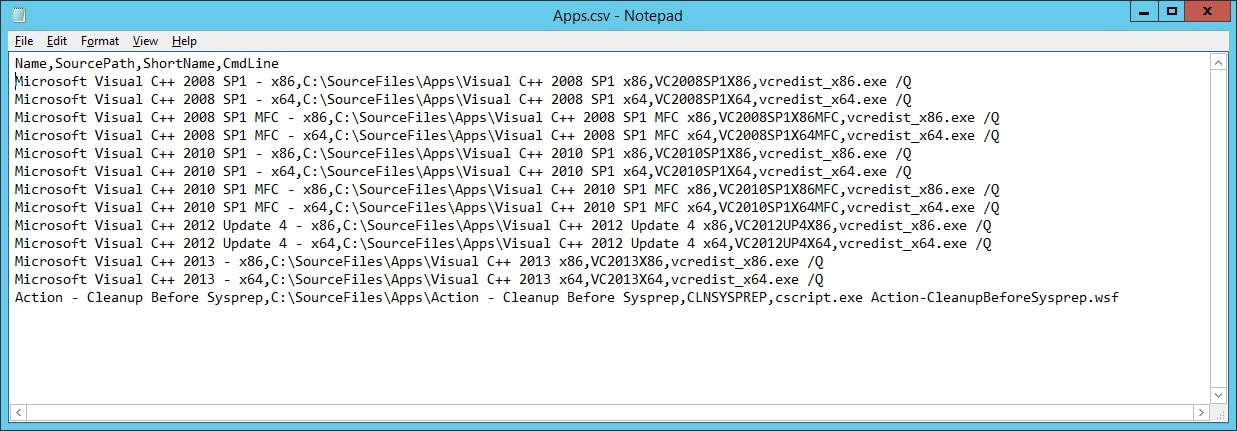
Here’s the above image in text form, for your convenience.
Name,SourcePath,ShortName,CmdLine
Microsoft Visual C++ 2008 SP1 - x86,C:\SourceFiles\Apps\Visual C++ 2008 SP1 x86,VC2008SP1X86,vcredist_x86.exe /Q
Microsoft Visual C++ 2008 SP1 - x64,C:\SourceFiles\Apps\Visual C++ 2008 SP1 x64,VC2008SP1X64,vcredist_x64.exe /Q
Microsoft Visual C++ 2008 SP1 MFC - x86,C:\SourceFiles\Apps\Visual C++ 2008 SP1 MFC x86,VC2008SP1X86MFC,vcredist_x86.exe /Q
Microsoft Visual C++ 2008 SP1 MFC - x64,C:\SourceFiles\Apps\Visual C++ 2008 SP1 MFC x64,VC2008SP1X64MFC,vcredist_x64.exe /Q
Microsoft Visual C++ 2010 SP1 - x86,C:\SourceFiles\Apps\Visual C++ 2010 SP1 x86,VC2010SP1X86,vcredist_x86.exe /Q
Microsoft Visual C++ 2010 SP1 - x64,C:\SourceFiles\Apps\Visual C++ 2010 SP1 x64,VC2010SP1X64,vcredist_x64.exe /Q
Microsoft Visual C++ 2010 SP1 MFC - x86,C:\SourceFiles\Apps\Visual C++ 2010 SP1 MFC x86,VC2010SP1X86MFC,vcredist_x86.exe /Q
Microsoft Visual C++ 2010 SP1 MFC - x64,C:\SourceFiles\Apps\Visual C++ 2010 SP1 MFC x64,VC2010SP1X64MFC,vcredist_x64.exe /Q
Microsoft Visual C++ 2012 Update 4 - x86,C:\SourceFiles\Apps\Visual C++ 2012 Update 4 x86,VC2012UP4X86,vcredist_x86.exe /Q
Microsoft Visual C++ 2012 Update 4 - x64,C:\SourceFiles\Apps\Visual C++ 2012 Update 4 x64,VC2012UP4X64,vcredist_x64.exe /Q
Microsoft Visual C++ 2013 - x86,C:\SourceFiles\Apps\Visual C++ 2013 x86,VC2013X86,vcredist_x86.exe /Q
Microsoft Visual C++ 2013 - x64,C:\SourceFiles\Apps\Visual C++ 2013 x64,VC2013X64,vcredist_x64.exe /Q
Action - Cleanup Before Sysprep,C:\SourceFiles\Apps\Action - Cleanup Before Sysprep,CLNSYSPREP,cscript.exe Action-CleanupBeforeSysprep.wsf
Import applications with PowerShell
With the source files downloaded and the CSV prepped, run the PowerShell script below in order to import your applications:
# Variables
$DeploymentShareRoot = "C:\DeploymentShare"
$AppCSVData = Import-Csv -Path "C:\SourceFiles\Apps.csv"
# Import MDT module
Add-PSSnapIn -Name Microsoft.BDD.PSSnapIn | Out-Null
if (-not(Get-PSDrive -Name "DS001" -ErrorAction SilentlyContinue)) {
    New-PSDrive -Name "DS001" -PSProvider MDTProvider -Root $DeploymentShareRoot | Out-Null
}
# Import Applications
foreach ($App in $AppCSVData) {
    Write-Output "Importing application: $($App.Name)"
    Import-MDTApplication -Path "DS001:\Applications" -Name "$($App.Name)" -ApplicationSourcePath "$($App.SourcePath)" -Shortname "$($App.ShortName)" -CommandLine "$($App.CmdLine)" -WorkingDirectory ".\Applications\$($App.Name)" -DestinationFolder "$($App.Name)" | Out-Null
}
NOTE! Remember to amend the variables section in the script above if you’ve for instance placed the CSV file at some other location than I’ve specified.
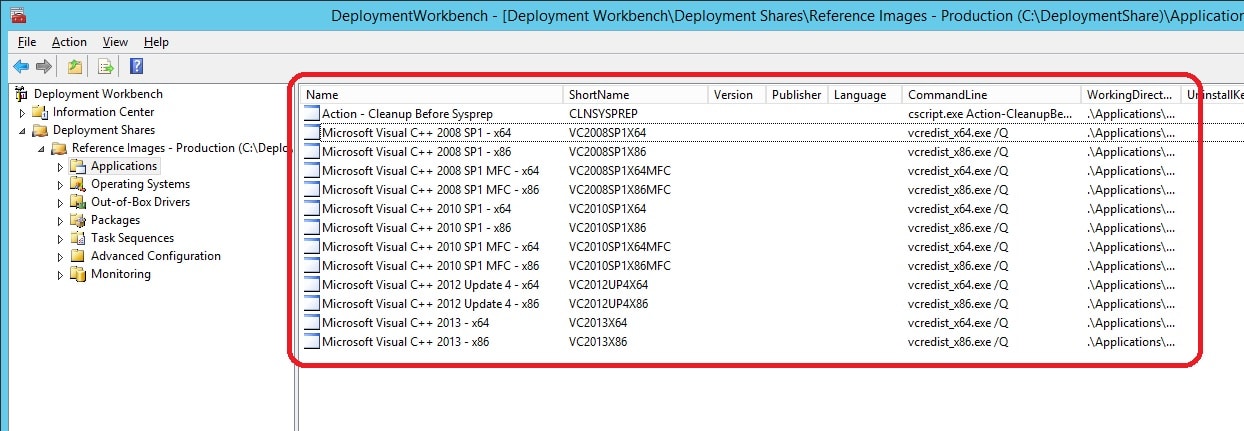
Once the script has successfully import all the applications, we can view them in the Deployment WorkBench under Deployment Share \ Applications.
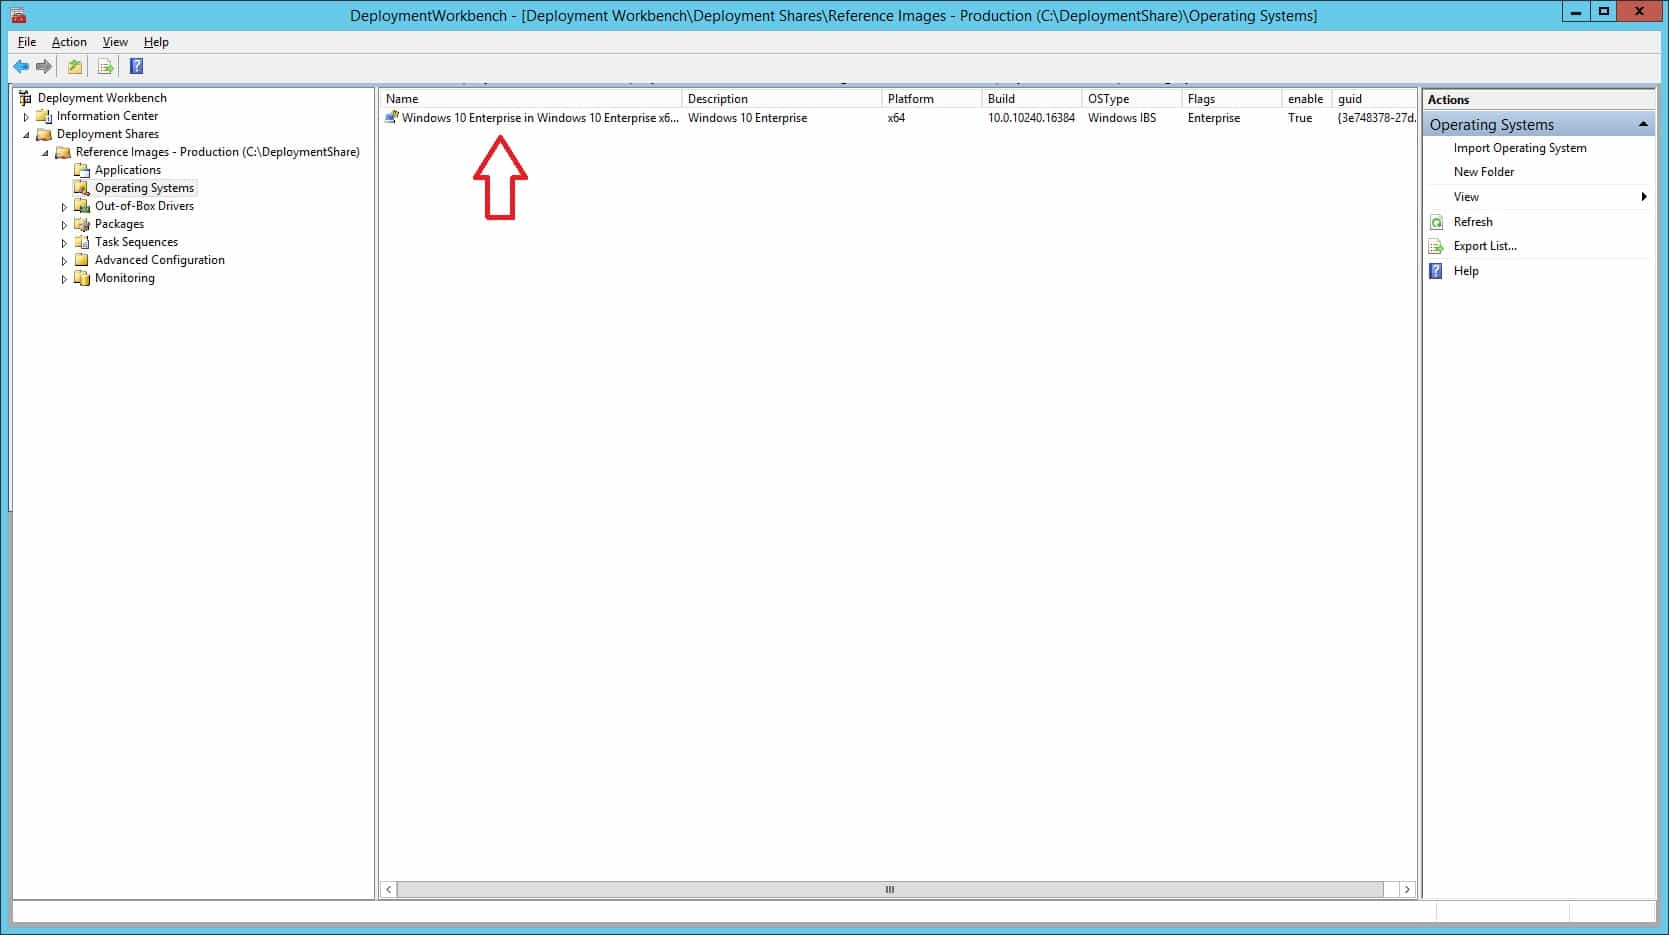
Import an Operating System
Before we go ahead and import Windows 10 as an Operating System in MDT, you need to acquire the ISO for Windows 10 Enterprise (remember there are 2 ISO media, one for CBB and one for LTSB).
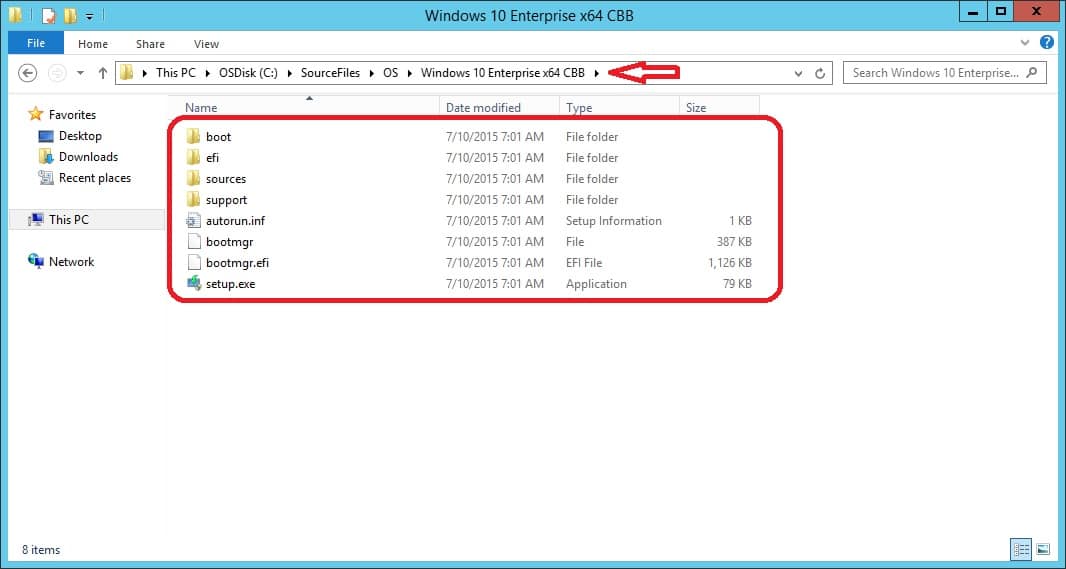
1. Download ISO media from MVLSC and mount it.
2. Copy the source media filer to e.g. C:\SourceFiles\OS\Windows 10 Enterprise x64 CBB.
3. In the Deployment WorkBench, right click on Operating Systems and select Import Operating System.
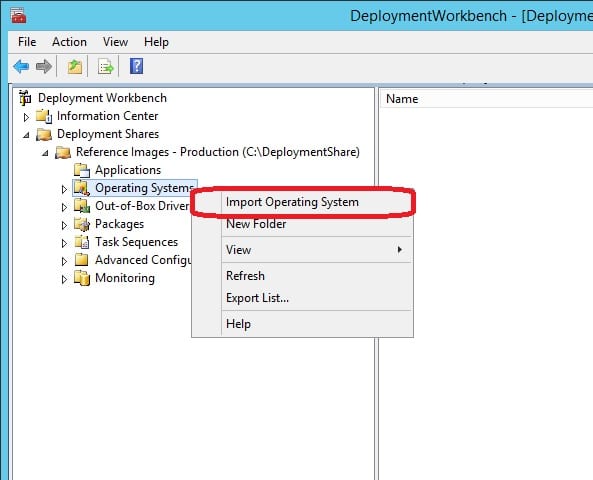
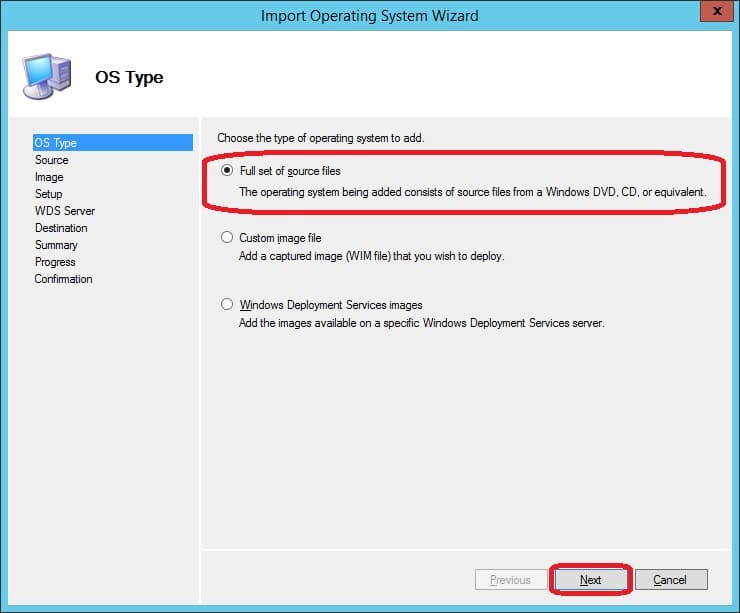
4. On the OS Type page, make sure that Full set of source files is selected and click Next.
5. Enter the path to where you copied the source media files for Windows 10 Enterprise and decide whether you’d wanna move the files from it’s current location to the Deployment Share. Click Next.

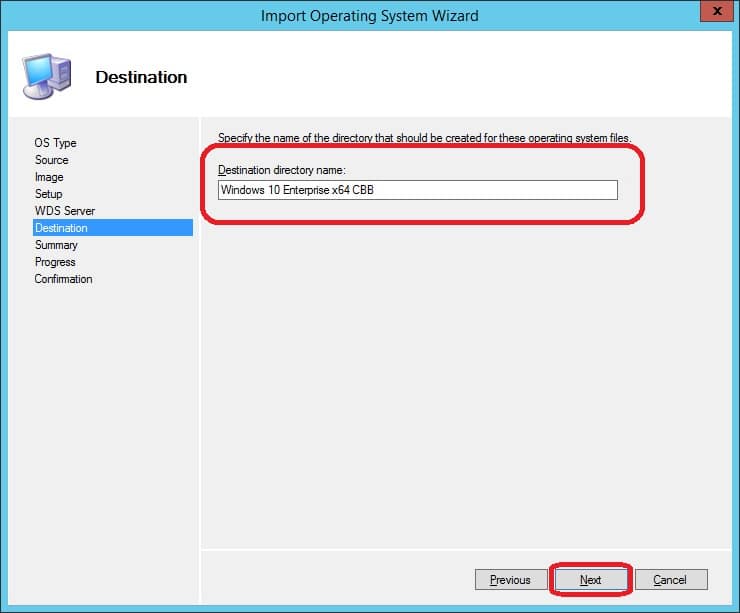
6. Enter the Destination directory name that will be created in the Deployment Share for this operating system and click Next.
7. On the Summary page, click Next.
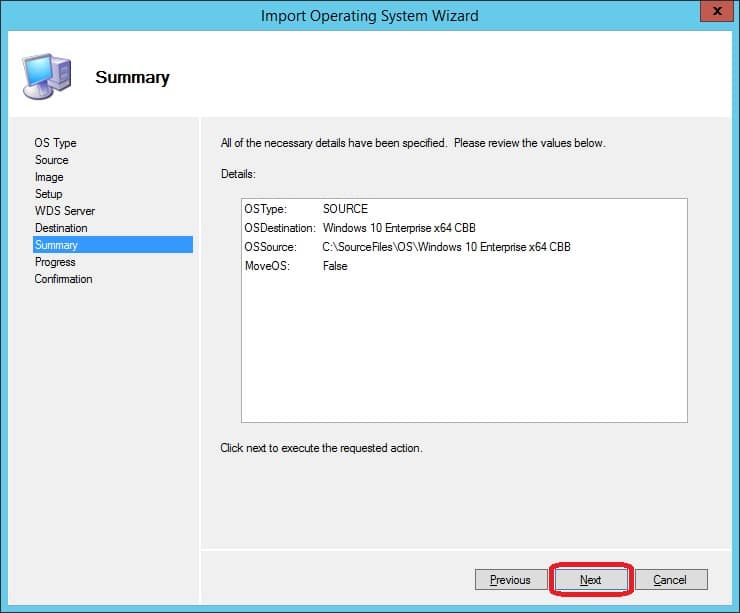
8. Wait for the import operation to complete, and click Finish when completed.
The Windows 10 Enterprise source files have now been imported as an Operating System in MDT.
Create a Task Sequence
Next step is to create a Task Sequence for Windows 10 Enterprise. During the creation of this task sequence, we’ll use the Operating System that we just imported. This task sequence will also have to be modified a bit to suite our automated requirements.
1. In the Deployment WorkBench, right click on Task Sequences and select New Task Sequence.

2. Specify the following and click Next:
Task sequence ID: WIN10X64CBB
Task sequence name: Windows 10 Enterprise x64 CBB
Description: This task sequence will deploy Windows 10 Enterprise x64 Current Business Branch
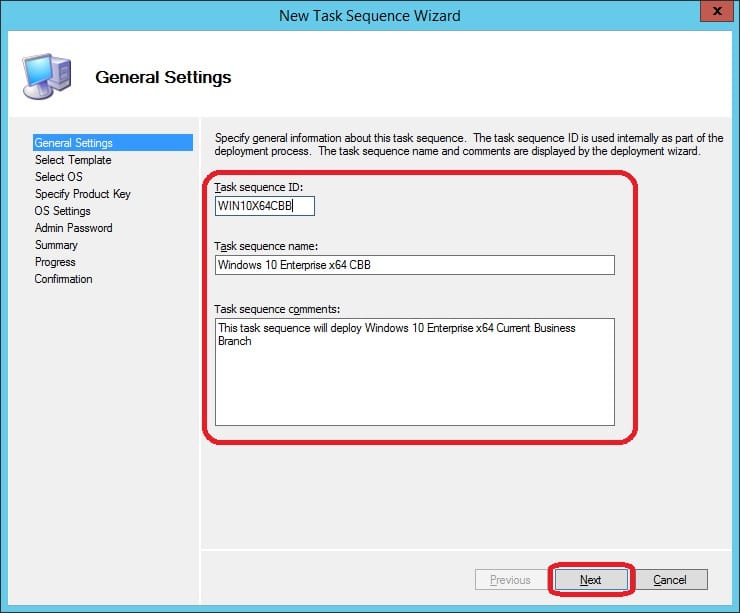
NOTE! If you choose to use another Task sequence ID than above, remember to change the TaskSequenceID property in the Rules section, since it’s crucial that you specify the correct ID of your task sequence in the Rules.
3. Make sure the Standard Client Task Sequence is selected and click Next.

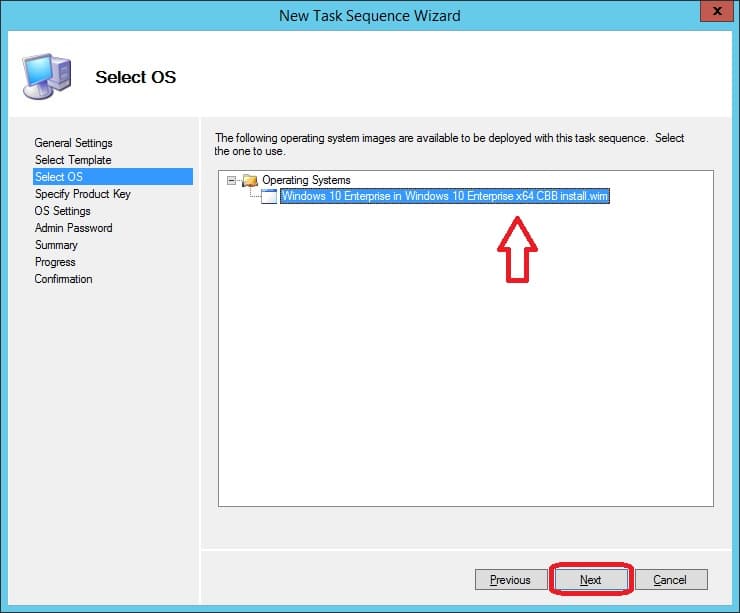
4. On the Select OS page, select the Operating System that we previously imported and click Next.
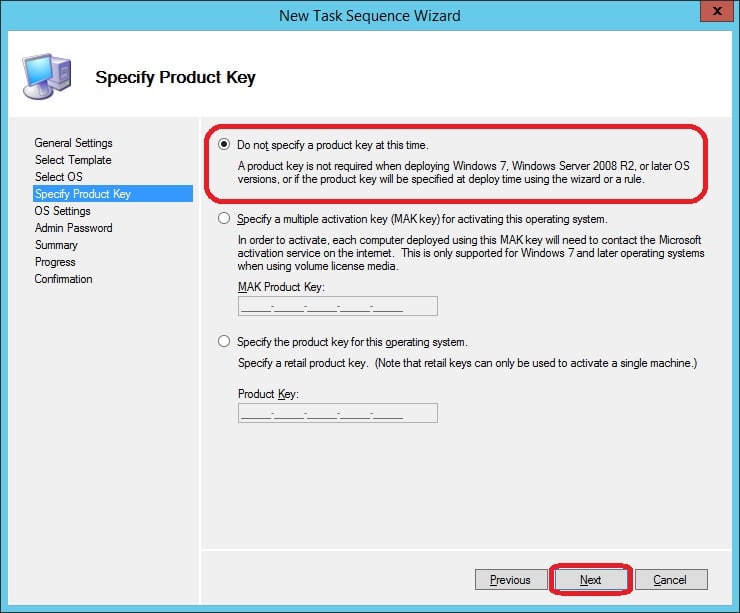
5. Do not specify a Product key and click Next.
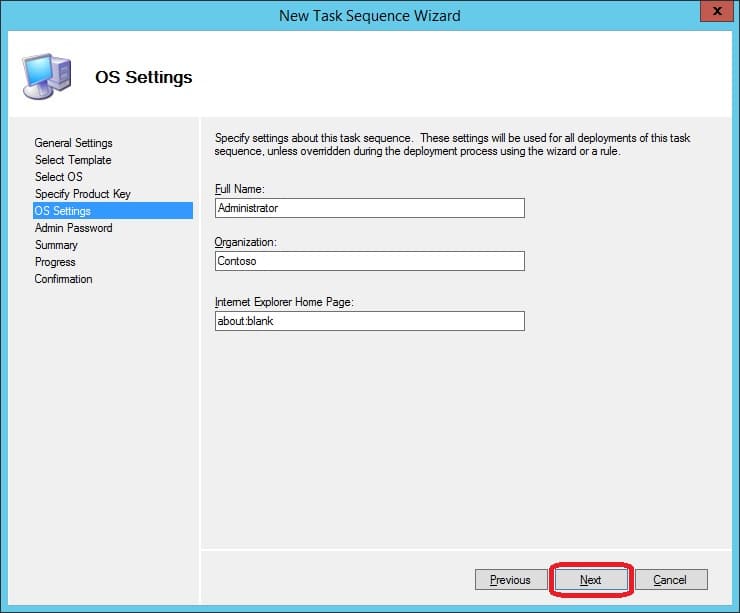
6. Leave the OS Settings with default values, or amend them if necessary, it’s up to you. Click Next.
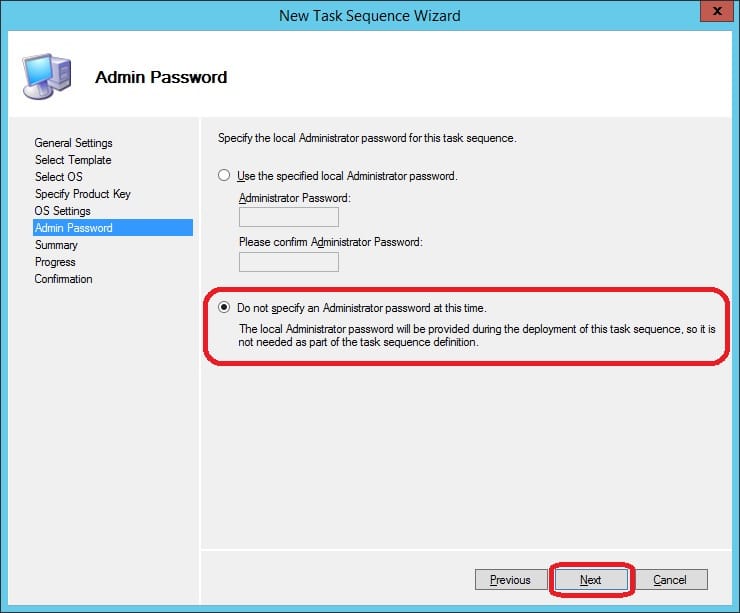
7. Select Do not specify an Administrator password at this time and click Next.
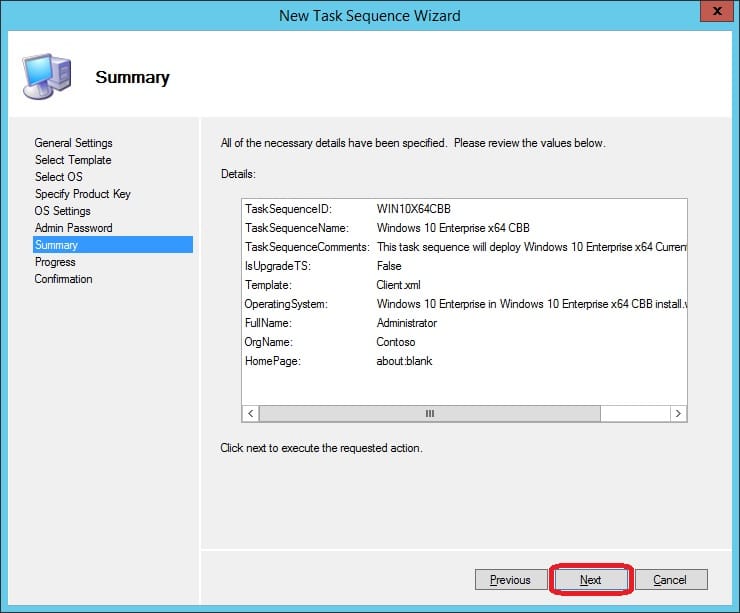
8. On the Summary page, click Next.
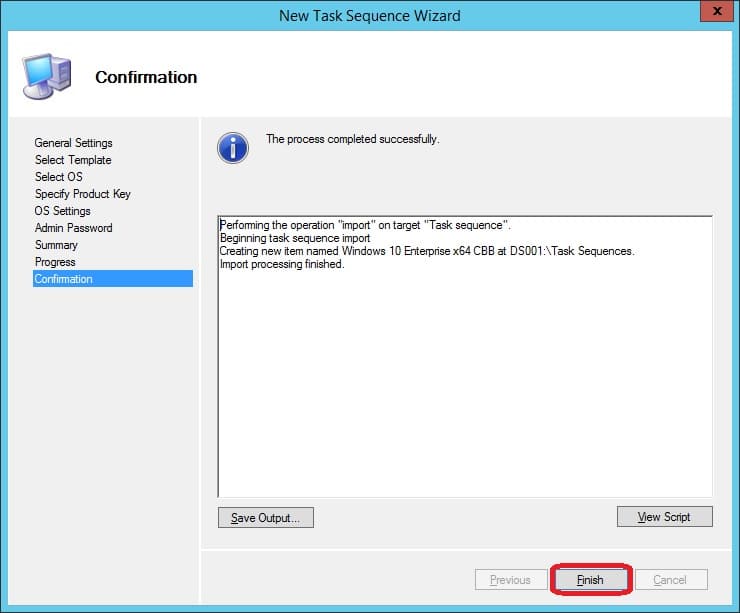
9. Once the task sequence has been created successfully, click Finish.
Modify the Task Sequence
If you’re still following along (I don’t blame you, it’s a huge post), we’re almost at the end and there are just a few more modifications we need to make to the task sequence we just created. In terms of selecting what applications that should be installed in the reference image, we have several options to choose by:
- Adding applications in the Rules section of the Deployment Share
- Choosing the applications during the creation of the reference image in the wizard
- Manually adding them to the Task Sequence
All of the methods above are totally viable for the purpose of selecting what applications should be installed, although one of the methods do not allow for a fully automated reference image creation process. This would be the method where you’d have the wizard asking you for what applications to install. In order to setup a fully automated build server, I’ll simply add the applications I want to the task sequence manually, as it gives me a better overview and control (and I do not have to memorize GUID’s, since that’s what you’d have to specify in the Rules section).
I’d also like to cover the topic of cleaning up your reference image at the end before we execute the capture step. I’ve previously written a VBScript that allows for this cleanup process to occur. You can read more about that topic in my post here. With all that covered, let’s get to it and modify the task sequence.
1. Go to the Task Sequence section in the Deployment WorkBench, right click on the Windows 10 Enterprise x64 CBB task sequence and select Properties.
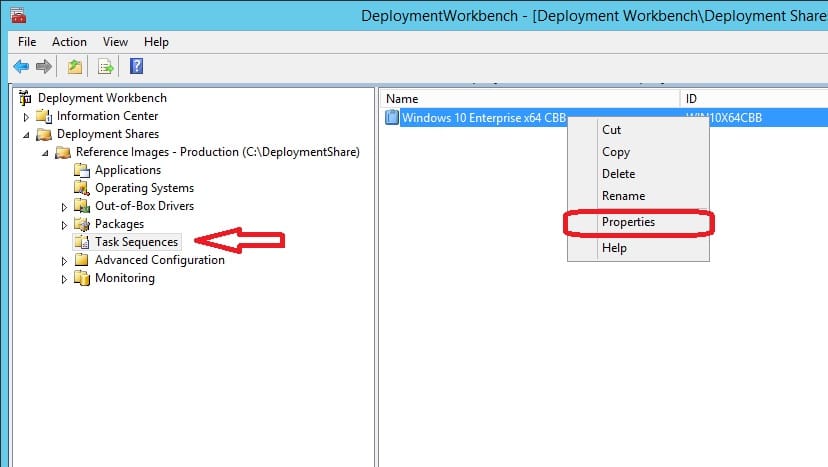
2. Click on the Task Sequence tab.
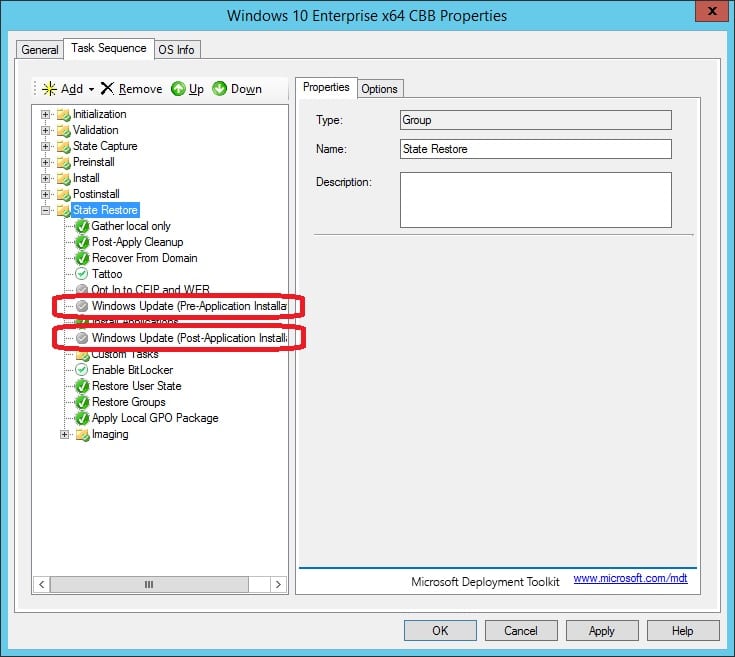
3. In the State Restore group, perform the same task for both the Windows Update (Pre-Application Installation) and Windows Update (Post-Application Installation) by going to the Options tab for each step, deselecting the Disable this step.
4. Select the Enable BitLocker step, go to the Options tab and select Disable this step.

5. Select the Install Applications step in between the two Windows Update steps, click on Add in the ribbon menu and select New Group.
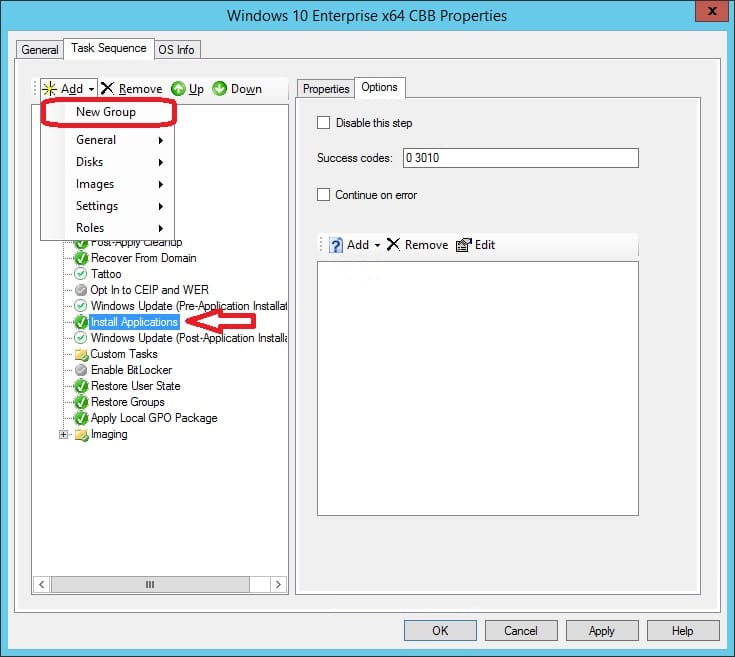
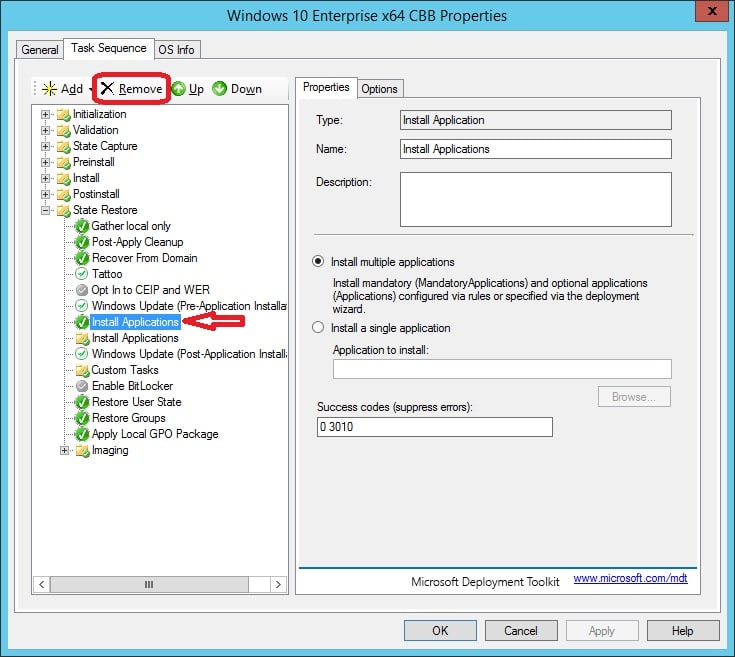
6. Give the new group a name like Install Applications, and remove the Install Applications step just above the group step by clicking Remove in the ribbon menu.
7. Select the Install Applications group, click on Add in the ribbon menu and select General – Install Application.

8. With the Install Application step in the Install Applications group select, choose Install a single application and click Browse.
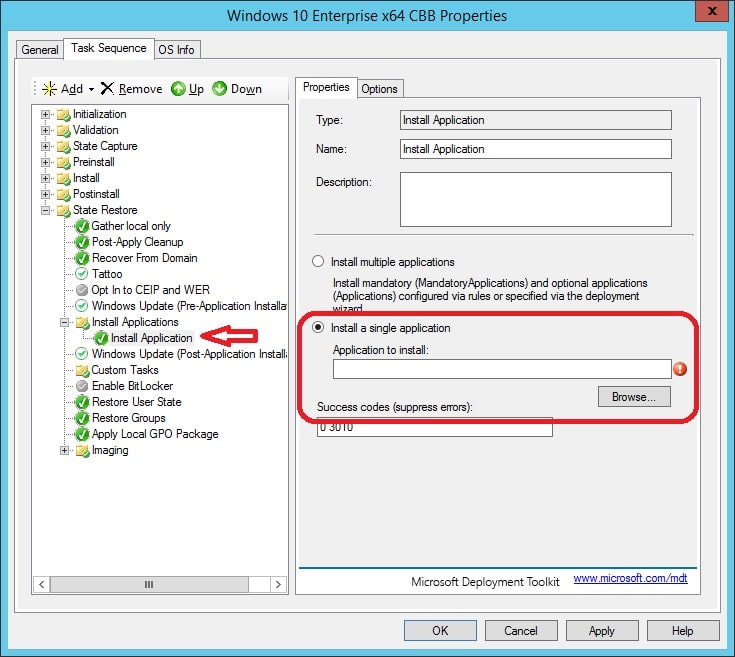
9. Select the application you want to have installed during this step and click OK.

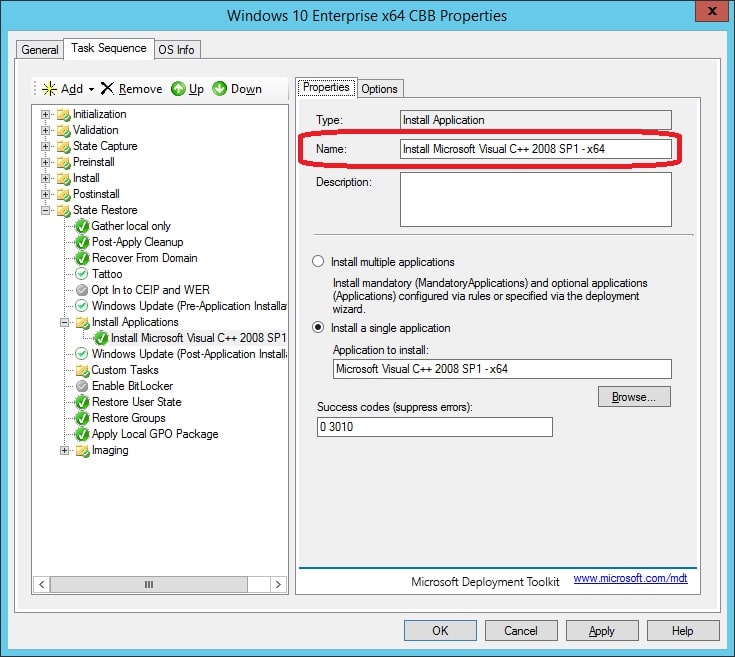
10. Rename the Install Application step so that it reflects the application that you’ve chosen to install.
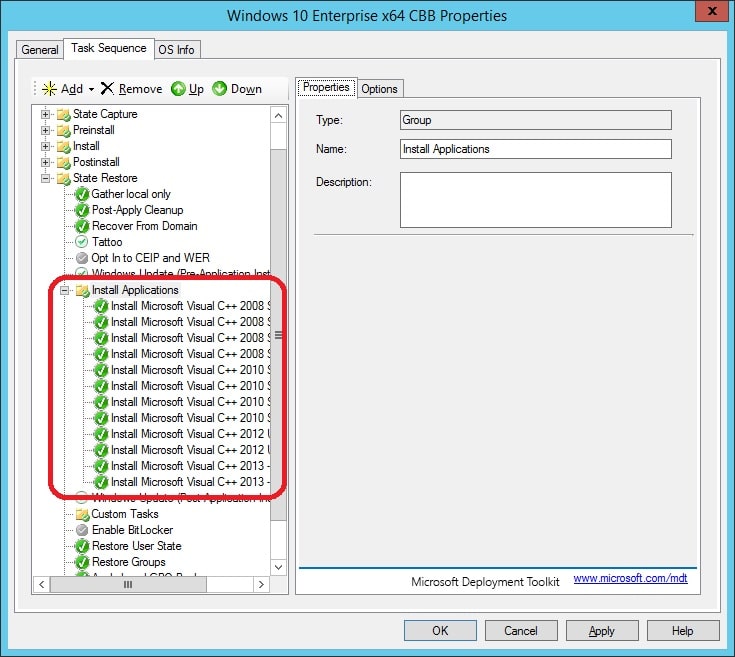
11. Perform step 7 – 10 for each application you’d like to have installed in your reference image. You could rearrange them by select the step you want to move up or down by using the Up and Down buttons in the ribbon menu.
12. Once you’ve added all the desired applications, it should look something like the following:
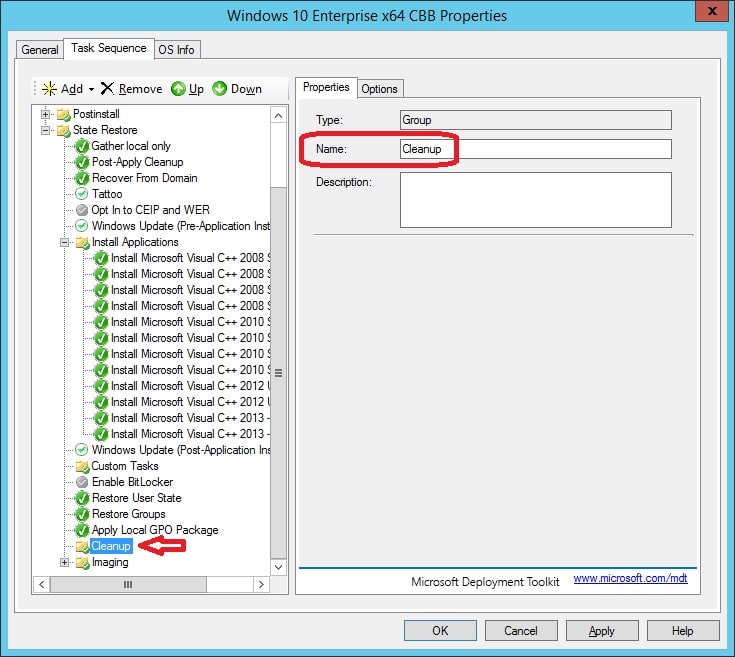
13. Select the Apply Local GPO Package step, click on Add in the ribbon menu and select New Group. Rename the group to Cleanup.
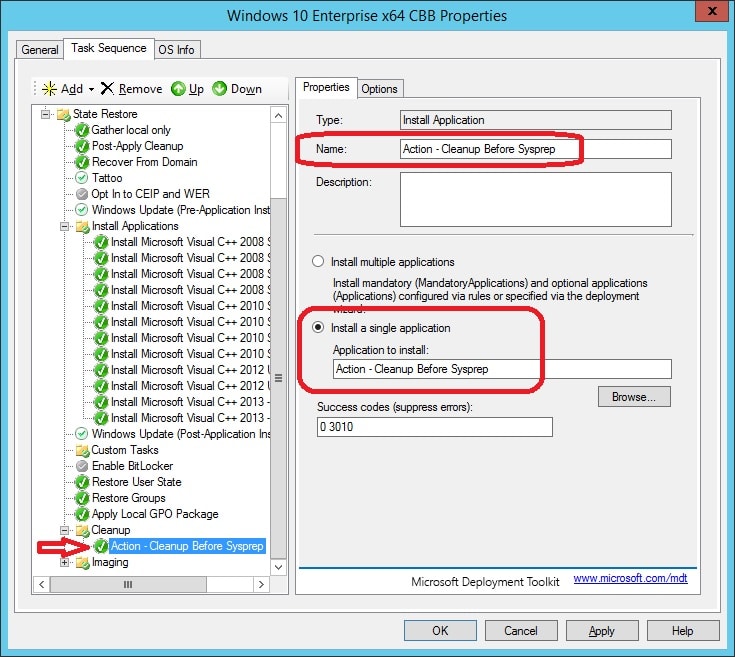
14. Select the Cleanup group, click on Add in the ribbon menu and select General – Install Application. Select to Install a single application and click Browse. Select the Action – Cleanup Before Sysprep application and click OK. Rename the step to reflect the name of the application.
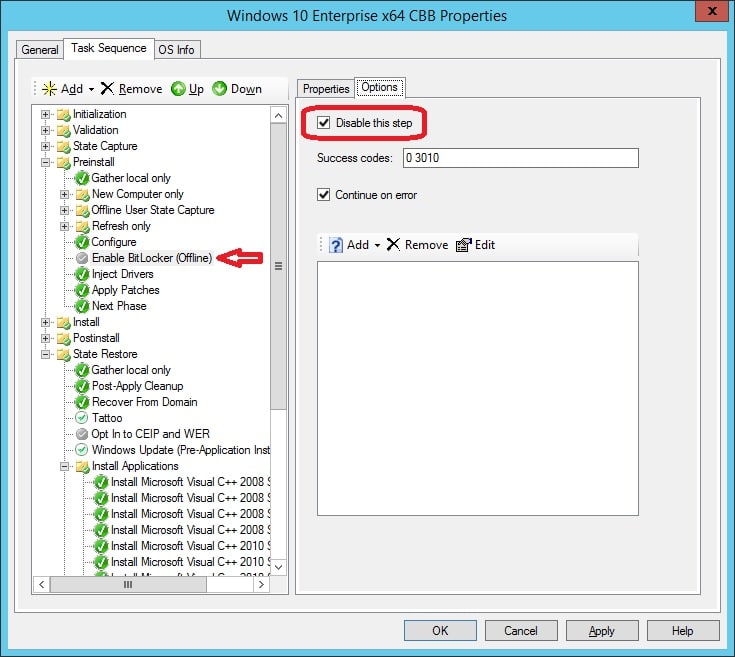
15. Scroll up in the task sequence and locate the Preinstall group. Select the Enable BitLocker (Offline) step, go to Options tab and select Disable this step.
16. Go back to State Restore group and disable the following steps right below Custom Tasks:
- Restore User State
- Restore Groups
- Apply Local GPO Package
17. Click Apply and then OK in the Properties window to save your modifications to the Windows 10 Enterprise x64 CBB task sequence.
Now that we have the task sequence prepared and ready, we can finalize the work in the Deployment Share by updating it.
Update Deployment Share
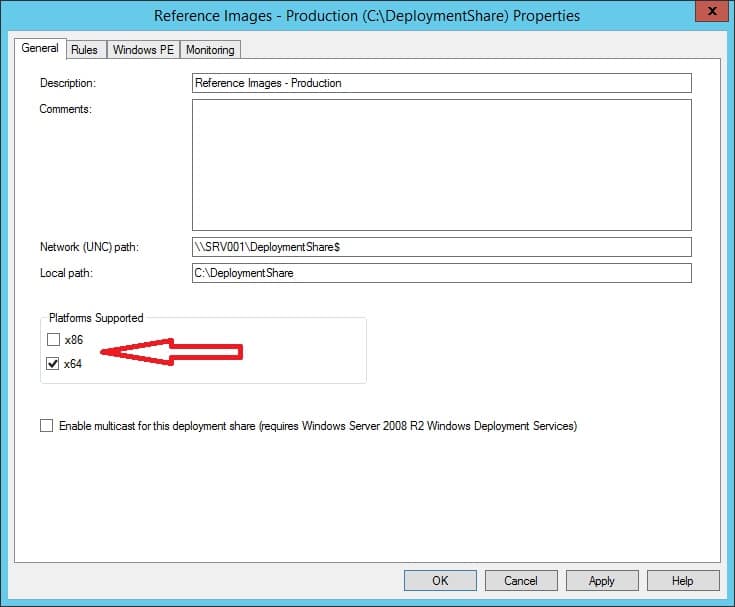
Updating the Deployment Share for the first time will start a chain of tasks where one of them is creating the ISO boot image that we’ll use later on in the next step to boot the VM that will be used to create and capture the reference image of Windows 10. In case that you’ll only support the x64 platform, there’s an option on the properties of the Deployment Share under the General tab where you can deselect the unwanted platforms. In this case I’ve removed the x86 since I don’t need it. See the picture below for reference:
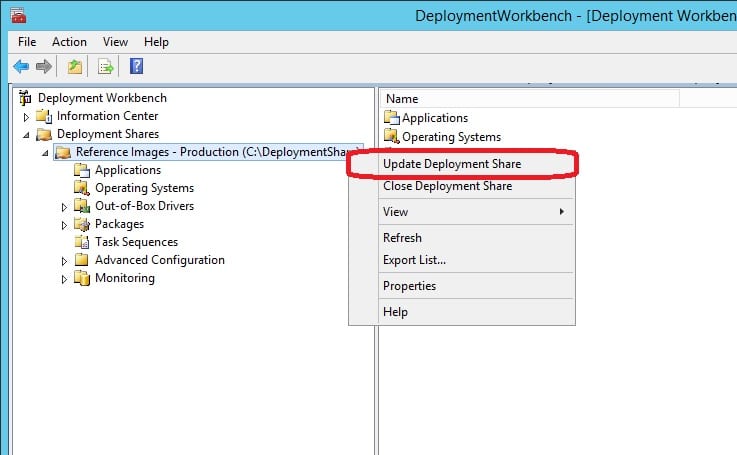
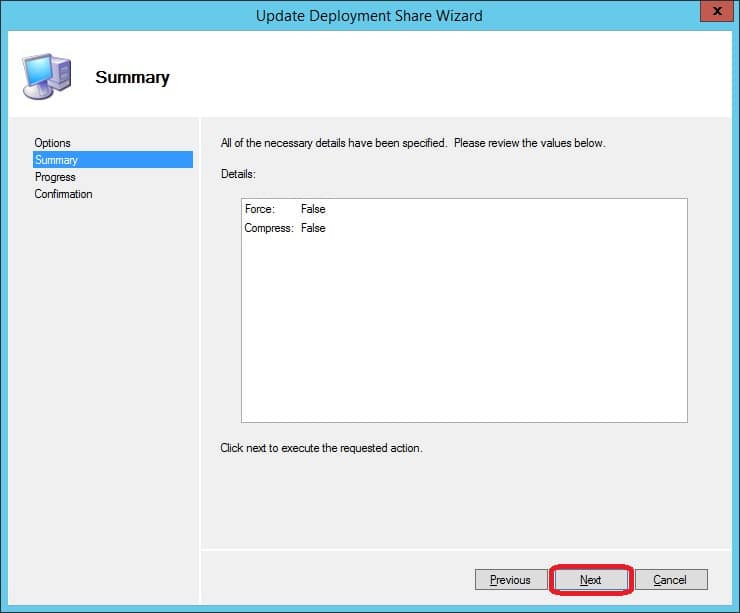
1. In the Deployment WorkBench, right click on the Reference Images – Production (C:\DeploymentShare) section (which represents the Deployment Share) and select Update Deployment Share.
2. On the Options page, click Next.

3. Click Next on the Summary page.
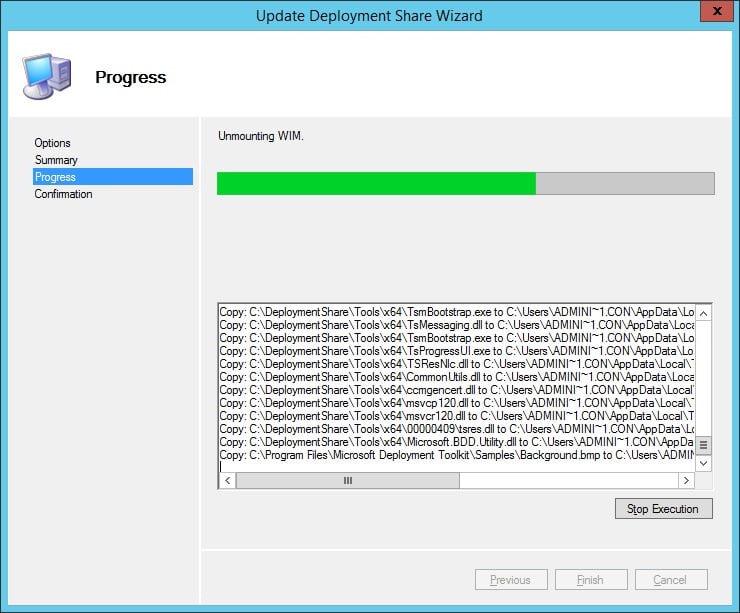
4. Wait while the Deployment Share is being updated, this process will take a while.
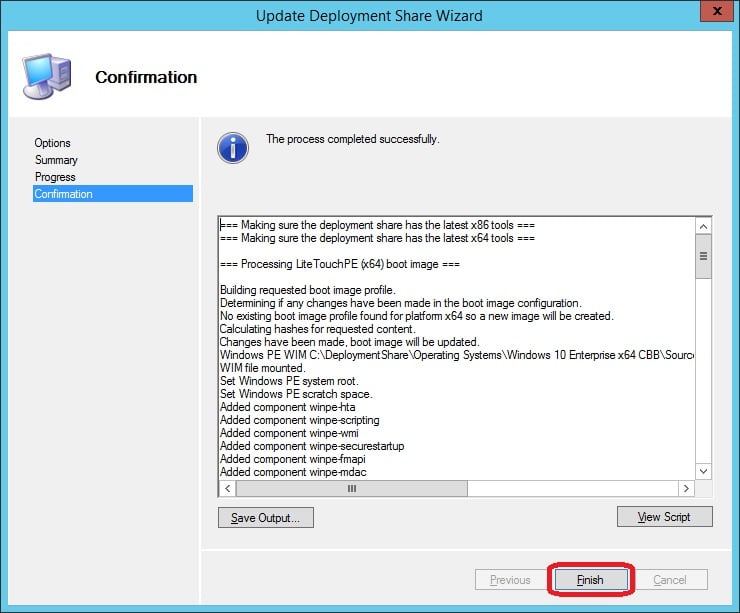
5. Once the Deployment Share has been successfully updated, click Finish.
Start reference image creation
Our build server is now ready for serving the purpose of creating reference images for Windows 10. In my lab environment I’ve created a VM called REF001 that I will be using for creating the reference image. The final step is to locate the ISO file that we’ll use to boot from on a VM machine that will be used for creating the Windows 10 reference image. Open up Windows Explorer and browse to the following location:
C:\DeploymentShare\Boot
In here there’s a few files that was created when we updated the Deployment Share. The one we’re after is called LiteTouchPE_x64.iso.

Copy this ISO file to a place where it’s accessible for being mounted to the VM. Mount the ISO and start the VM. You’ll see that everything that we’ve configured in this post have led up to the fact that the whole process of creating reference images is now automated, and all you have to do once it’s completed, is to locate the reference image WIM file in the following location:
C:\DeploymentShare\Captures
Once I start the VM, you can see that the reference image creation process starts of directly after it has processed the rules:
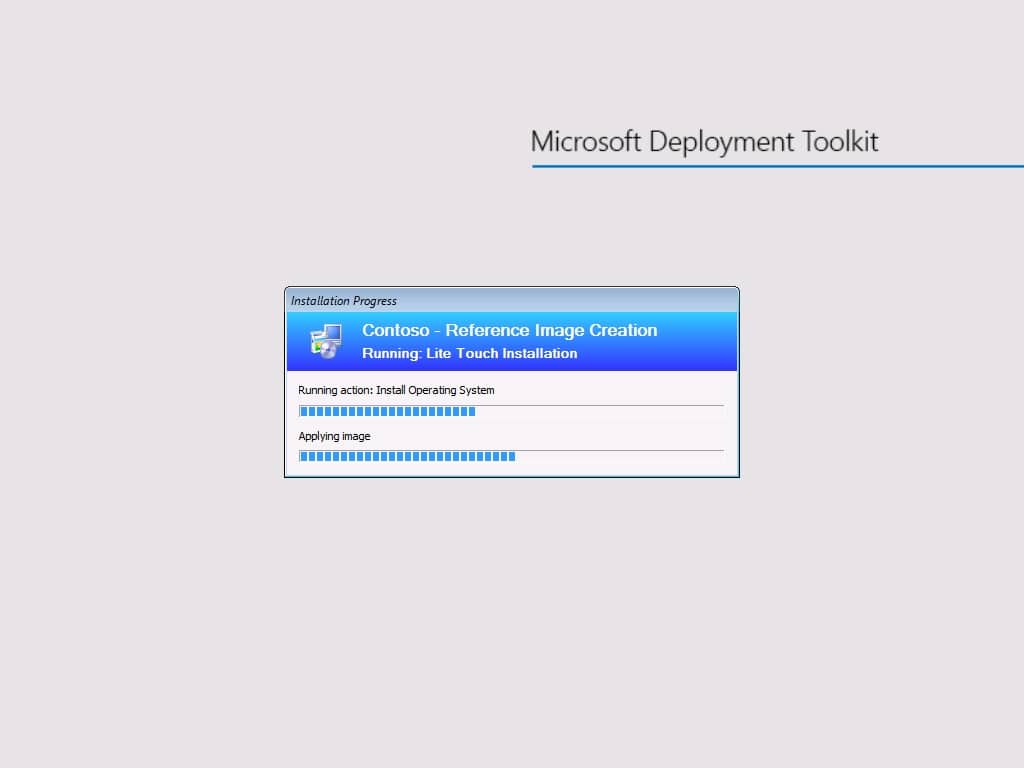


Once the reference image creation process has completed (after some time), you’ll have the captured Windows 10 WIM file in the Captures folder as stated earlier.
I hope this post has helped you with creating a reference image for Windows 10. If you have any questions, feel free to post a comment below.


Can you script all of this, like 1 step install of everything ?
script the downloads of all the needed parts…
script the installation & configuration of all the parts…
Thank you very much for the above instructions. Followed them to the letter and installed the iso on VMware VM, I also included the Cleanup script. I am getting the error “Windows could not parse or process unattend answer file [C:\windows\Panther\unattend.xml] for pass [Specialize]. The answer file is invalid.
Any assistant on the above error would be greatly appreciated.
Regards,
Mukesh
Thank you all in advance.
[…] Originally Posted by ITJS2015 I have not got time to install MDT and learn it. There's not much you need to learn if you follow a guide like this one… http://www.scconfigmgr.com/2015/10/24/create-a-windows-10-enterprise-reference-image-with-mdt-2013-update-1 […]
i’m kinda new to MDT…. can you verify if i am missing some step or something on the step you describe on “Action – Cleanup Before Sysprep”, i can’t find that .wsf file…. Do i need to create it? if so, can you please share the exact script?
Hi Achie,
Search this blog for Cleanup before sysprep and you’ll find the script.
Regards,
Nickolaj
Is the vm a blank vm or is windows 10 installed? i know its a silly question.
Had to ask because I’m having problems deploying windows 8.1.
LTIApply.wsf property or method not supported when deploying to a blank VM (HYPERV) I’ve tried everything even redone my MDT environment on 2012 R2
Thanks for the instructions. I did find that the step to remove the permissions for “creator owner” causes error “access denied” later when you try to run the script to import the applications or even generate a boot image.
Thanks
You’re welcome Sam.
Regards,
Nickolaj
Hi Nikolaj, thanks for a great blogpost.
Do you use any scripts for downloading all source files for VC++ or is it manually downloaded?
Hi Baatchus,
In this particular scenario I’ve downloaded them manually. But you could use a script like Mikael’s:
https://anothermike2.wordpress.com/2014/08/05/powershell-is-king-download-all-vc-runtimes-using-a-script/
Regards,
Nickolaj
[…] https://msendpointmgr.com/2015/10/24/create-a-windows-10-enterprise-reference-image-with-mdt-2013-u… […]
Great post!
Just found a small error in the WSUS-config scripting part.
On line 19 it probably should say:
“Set-WsusServerSynchronization -UpdateServer $WSUSServer -SyncFromMU” instead of et-WsusServerSynchronization -UpdateServer localhost -SyncFromMU
Hi Robin,
Thanks! Not sure if it’s not being rendered correctly on your end, but it says “Set-…” on row 19.
Regards,
Nickolaj
Oh, the missing “S” was just a typo.
What I was getting at was that “localhost” should say “$WSUSServer” on line 19.
You’re totally right, it has been corrected now. Thanks for pointing that out! 🙂
Regards,
Nickolaj
You should also add a “-Wait” on row 10. Now it tries to configure the WSUS server before the “WdsUtil.exe” process is completed, wich results in errors on every row after that.
Hi Matt,
Excellent feedback. It proves that my testing was not complete in any sense (I ran portions of it to test the code).
Regards,
Nickolaj