


- SSO to domain resources from Azure AD Joined Devices Overview
- Configure Active Directory and Certificates
- Configure the VPN Server (RRAS)
- Configure the Network Policy Server (NPS)
- Configure the Network Device Enrollment Service (NDES)
- Install Azure AD Application Proxy to publish the Device Enrollment Service (NDES)
- Configure Certificate Templates in Intune
- Create a Simple Certificate Enrollment Protocol (SCEP) Profile in Intune
- Creating the Always On VPN Profile in Intune
A great resource for anything VPN related is Richard Hicks blog which can be found at https://directaccess.richardhicks.com/
Introduction
Welcome to Part 4 of this 9 Part blog series. In Part 3 we looked at the requirements for the RRAS server to act as a RADIUS Client. In Part 4 we will step through how to configure the Network Policy Server (NPS) for RADIUS Client authorisation, accounting and authentication
Solution Overview
A reminder of the fundamental components we will use to setup a simple, Microsoft VPN solution
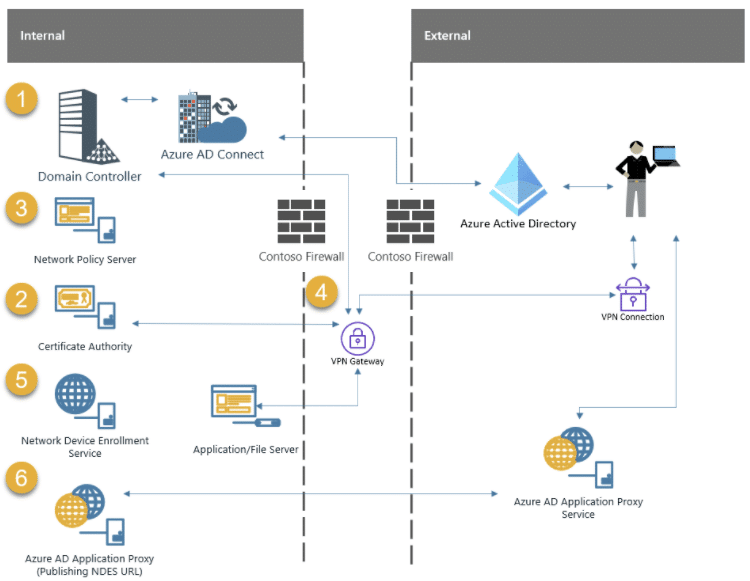
1 . Domain Controller – Microsoft Active Directory Domain Services (AD DS)
The Domain Controller is required to authenticate users and services
2 . Certificate Authority – Microsoft Active Directory Certificate Services (AD CS)
The Certificate Authority is required to issue certificates to users/devices and other VPN components like NDES/NPS and the VPN Server
3 . Microsoft Network Policy Server (NPS)
The Network Policy Server is required to authenticate requests from Radius clients
4 . VPN Gateway – Microsoft Routing and Remote Access Server (RRAS)
The VPN Gateway will terminate VPN connections for client devices
5 . Microsoft Network Device Enrollment Service (NDES)
The Network Device Enrollment Server is required to request certificates on behalf of users
6 . Microsoft Azure AD Application Proxy Connector
The Azure AD Application Proxy is required to publish the NDES Server URL to the internet – securely
Microsoft Network Policy Server (NPS)
The NPS is the RADIUS server and will authorise, authenticate and log (accounting) incoming connections from the Radius Client (RRAS Server). To provide fault tolerance for RADIUS-based authentication and accounting you should configure at least two NPS’s in a production environment.
The recommendation is to configure a primary RADIUS Server and a secondary for backup. The RRAS Server(s) are configured on both the primary and backup NPS’s. If the primary NPS becomes unavailable, the RRAS Server(s) would then fall over to the backup NPS.
More information on configuring NPS fault tolerance can be found here:-
https://docs.microsoft.com/en-us/windows-server/networking/technologies/nps/nps-plan-server
Build the Server
I am using Hyper-V in my lab and have built my NPS to the following specification:-
- Windows Server 2019 Datacentre Edition
- 2 vCPUs
- 8192MB Memory
- 60GB Disk1
- 1 Network Card
- Domain Joined
Server Name
In Part 3 of this blog series we configured a RADIUS Server and Accounting Provider when we were building the VPN Server (RRAS). We specified the name of the NPS during that configuration and the same name should be used for the server you are about to configure
The server name we used in the RRAS configuration for the NPS was bb-nps1.byteben.com
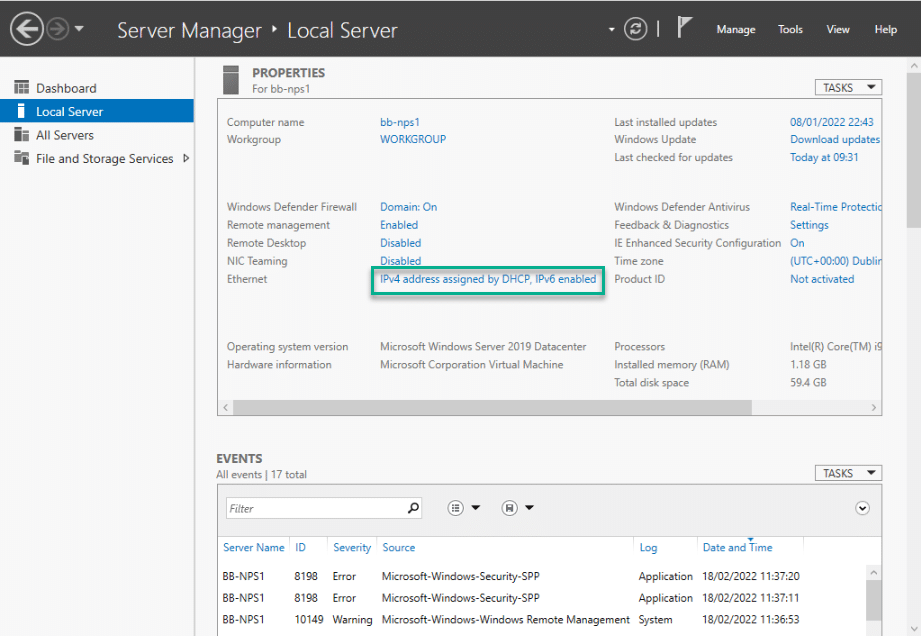
Network Adapter Configuration
At a high level, the ethernet adapter configuration should observe the following
- Static IP Address
- Subnet Mask
- Default Gateway
- DNS Servers configured
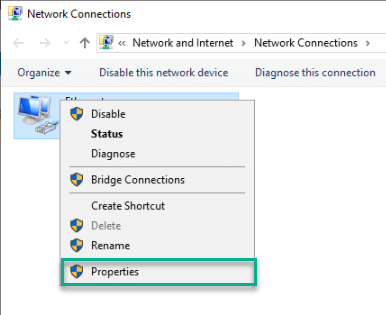
1 . Open Server Manager > Local Server and click on the network adapter to open the Network Connections control panel applet
2 . Right click the ethernet adapter and select Properties
3 . Select Internet Protocol Version 4 (TCP/IPv4) and click Properties
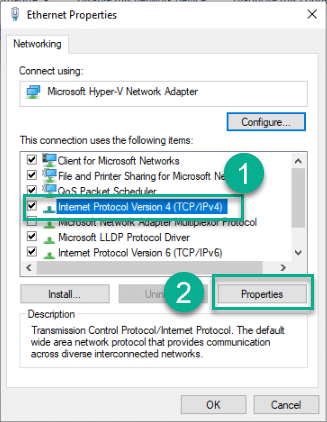
4 . Enter values for IP address, Subnet mask and DNS Servers and Press OK

Domain Join
We need to join the NPS Server to the domain
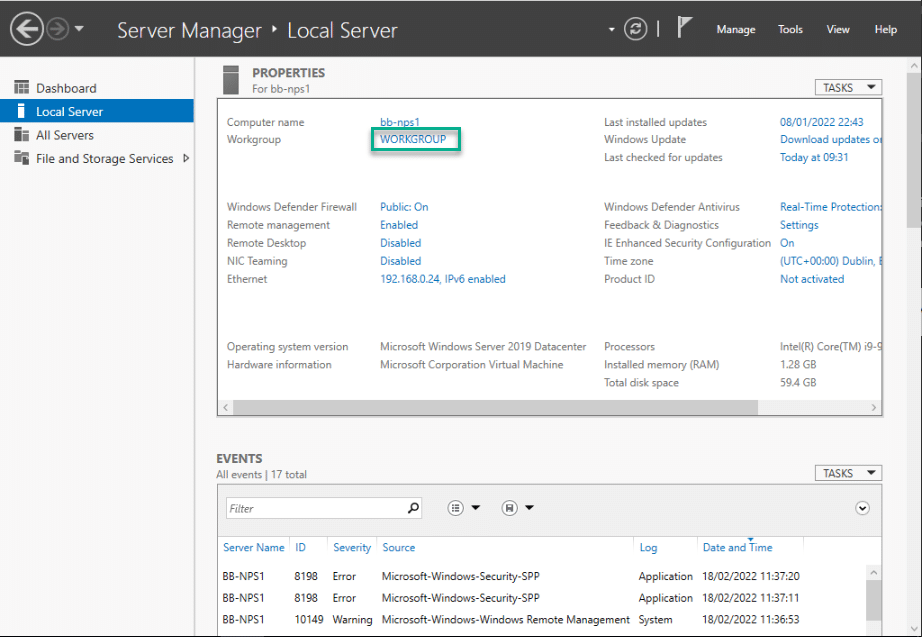
1 . Server Manager > Local Server and click on workgroup name
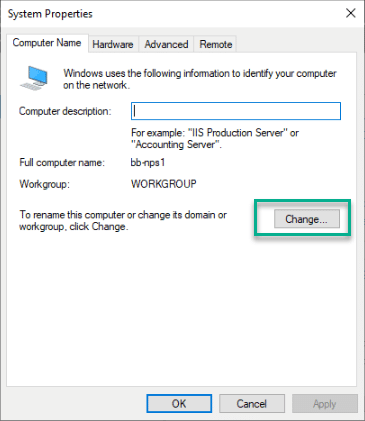
2 . In System Properties click Change
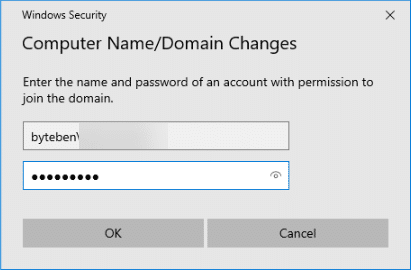
3 . Enter the domain to join and click OK

4 . Validate the Domain Join request and Accept subsequent prompts
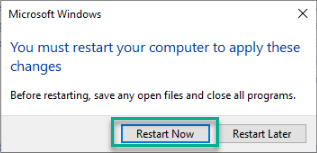
5 . Reboot when prompted
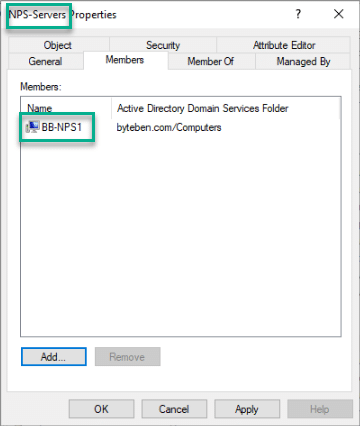
AD Group Membership
Add the NPS Server to the AD Group we created in part 2 called NPS-Servers
Reboot the NPS Server
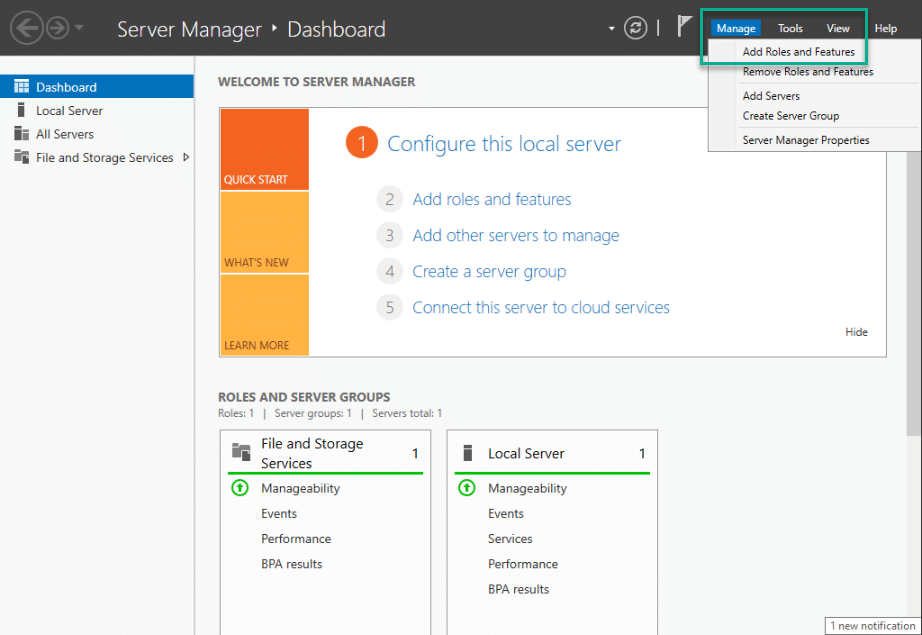
Install and Configure the NPS Server Role
Install NPS
1 . Open Server Manager and select Manage > Add Roles and Features
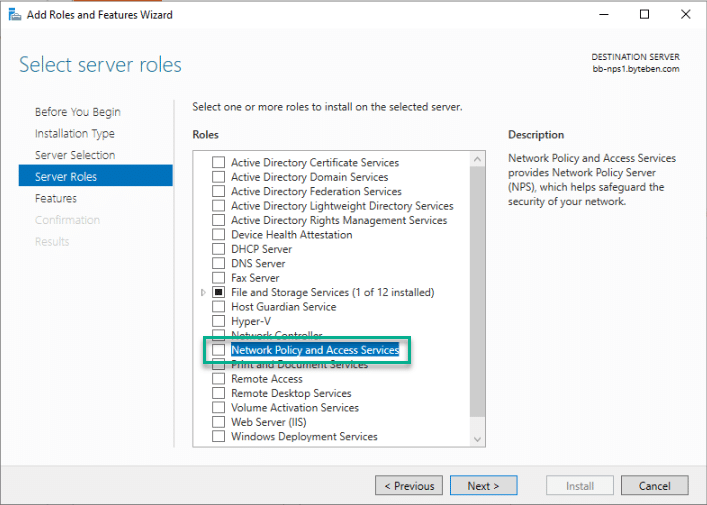
2 . Click Next 3 times and in the Roles selection menu tick Network Policy and Access Services
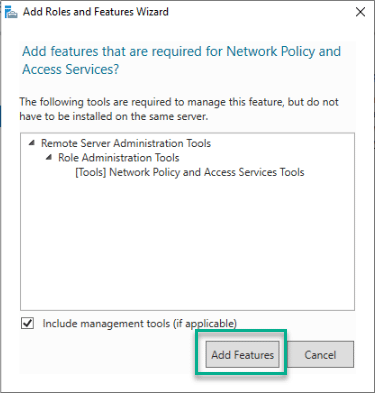
3 . When prompted to add additional features, click Add Features
4 . Click Next 3 times and on the Confirm installation selections screen click Install

5 . Wait for the installation to complete and reboot the server if prompted
Configure NPS
Firewall Consideration
We already looked at the Firewall requirements in Post 3 of this mega series. To recap, we need the following ports open from the RRAS server to the NPS
- UDP 1812
- UDP 1813
It should also be noted that there is an issue on Windows server 2019 where incoming traffic from the RRAS server is blocked unintentionally. To address that issue (for Windows Server 2019 only), type the following at a command (or PowerShell) prompt:-
sc.exe sidtype IAS unrestricted

This command resolves the issue in Windows Server 2019 where the firewall rule is bound specifically to the IAS service
Thanks to Richard Hicks for the blog on this issue:-
https://directaccess.richardhicks.com/2018/11/27/always-on-vpn-and-windows-server-2019-nps-bug/
Enroll the NPS Certificate
In Post 2 of this series we created the certificate template for the NPS server. We also set the NPS certificate to autoenroll for any computer in the NPS-Servers AD group
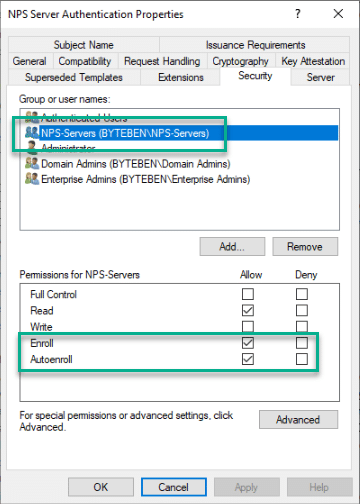
Remember, for auto update of the NPS Server certificate to work, you will also need to create a GPO to allow auto enrollment of certificates for the NPS Server(s). An example of how to configure auto enrollment can be found below:-
https://docs.microsoft.com/en-us/windows-server/networking/core-network-guide/cncg/server-certs/configure-server-certificate-autoenrollment#configure-server-certificate-auto-enrollment
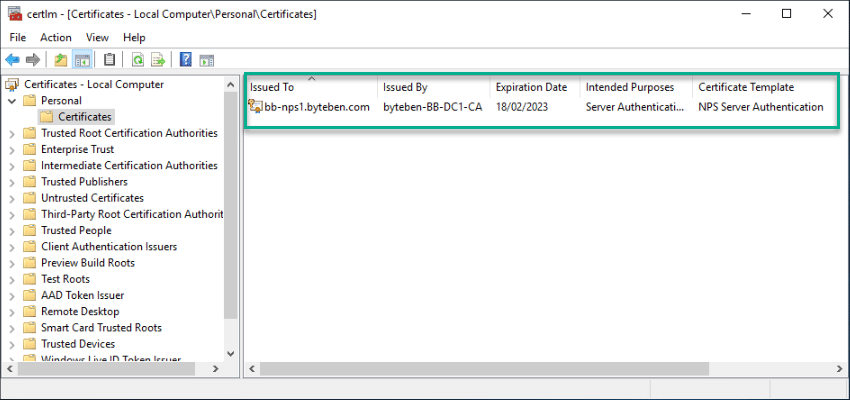
1 . Open the Certificate snap-in on the VPN Server by running certlm.msc
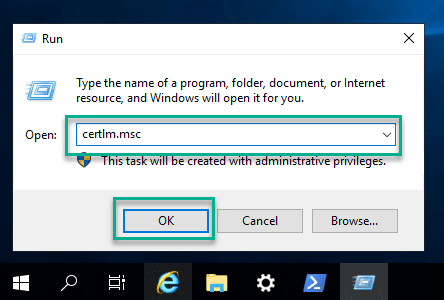
2 . Navigate to Certificates – Local Computer > Personal > Certificates and verify the NPS certificate is enrolled as expected

Enable Auditing
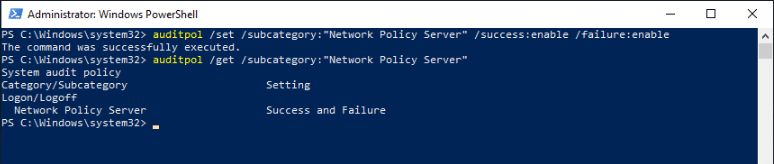
User access requests requests like Grant, Deny, Discard, Quarantine, Lock/Un-Lock can be audited. On the NPS, open command (or PowerShell) prompt and enable event auditing
auditpol /set /subcategory:"Network Policy Server" /success:enable /failure:enable
You can verify Audit events are enabled by running the following command
auditpol /get /subcategory:"Network Policy Server"
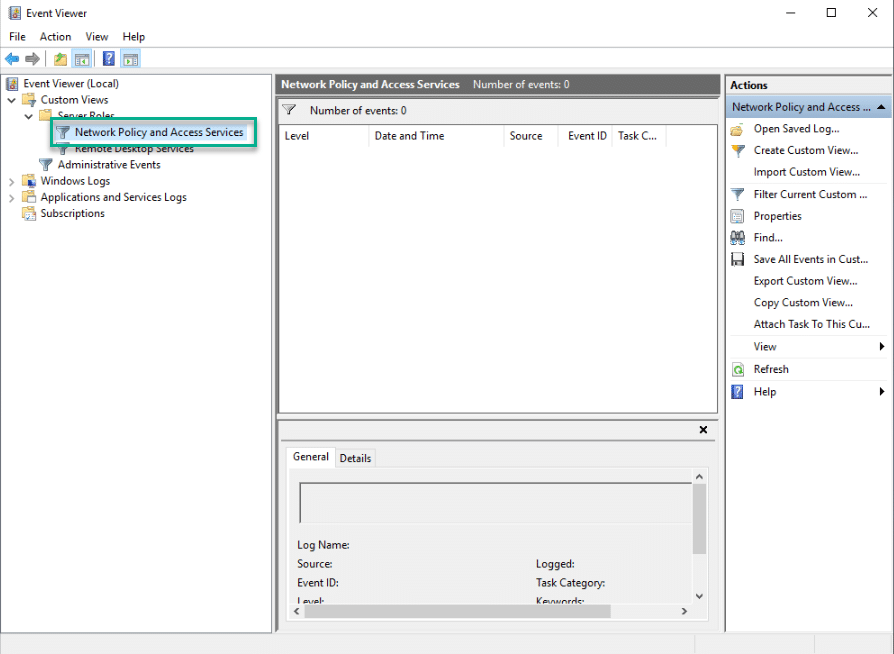
Success and Failure events can be monitored from the Windows Event Viewer
Read more on NPS Event Auditing here:-
https://docs.microsoft.com/en-us/windows/security/threat-protection/auditing/audit-network-policy-server
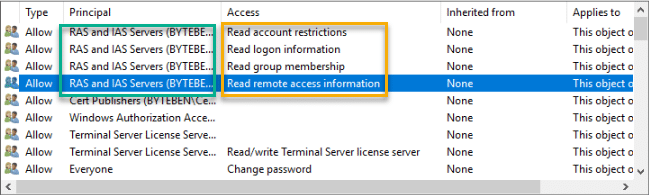
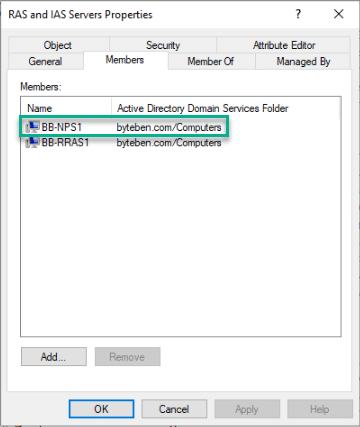
Register the NPS in Active Directory
We need to register the NPS in Active Directory to ensure the NPS can access user account details in order to process the incoming connection requests from the VPN Server. By registering the NPS in Active Directory we are effectively adding the computer object to the AD Group RRAS and IAS Servers
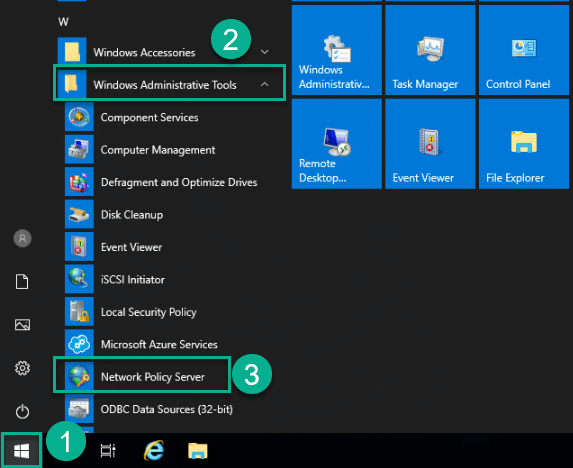
1 . Open the NPS Console from the Start Menu
You will need to run the console with an account that has sufficient privileges to update the group membership for the AD group RRAS and IAS Servers
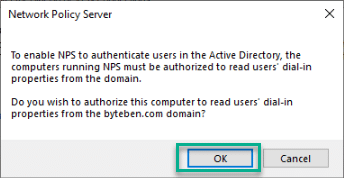
2 . Right click NPS (Local) and click Register server in Active Directory

3 . When prompted, click OK
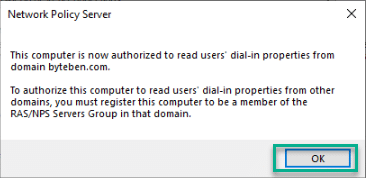
4 . Confirm the registration was succesful
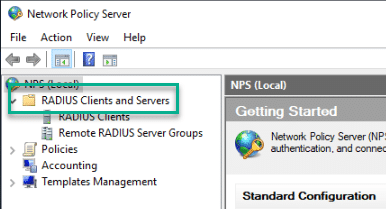
Add a RADIUS Client
In Part 3 of this blog series we configured a RADIUS Server and Accounting Provider when we were building the VPN Server (RRAS). For both the RADIUS Server and the Accounting Provider we configured a Shared Secret.
In the following steps we will configure a reciprocal connection using the same shared secret to authenticate and authorise communication between the RRAS and NPS servers
1 . From the NPS console, expand RADIUS Clients and Servers
2 . Right click RADIUS Clients and select New
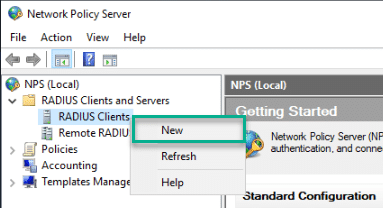
3 . Enter a Friendly name for the RRAS server we configured in the previous post
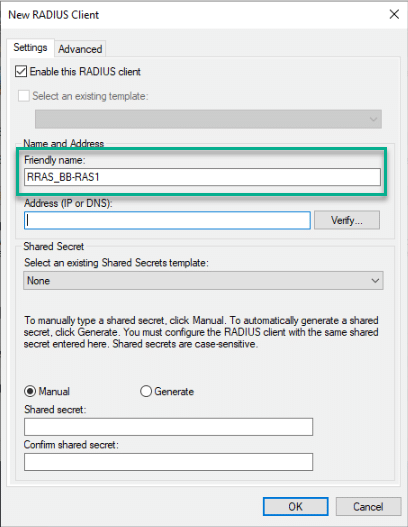
4 . Enter the FQDN of the RRAS Server (or the IP address of the Internal network adapter) and click Verify
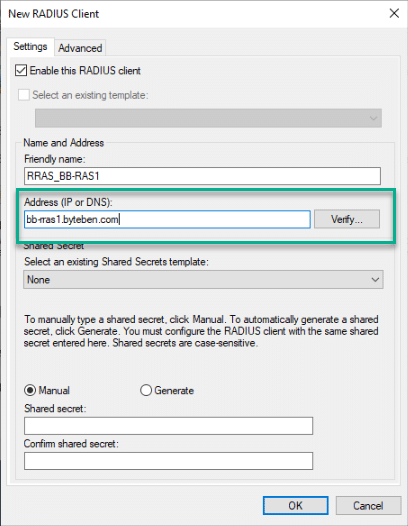
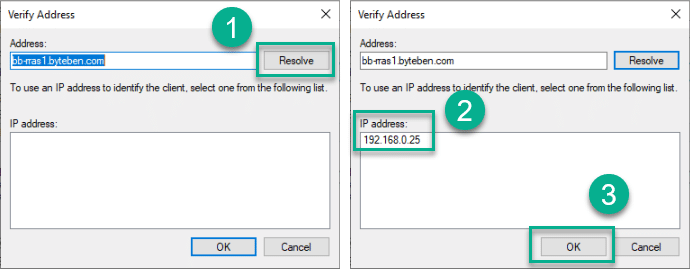
5 . Click Resolve, verify the IP address for the RRAS server is correct and click OK
6 . Enter the same Shared Secret that you used when configuring the RRAS Server. Confirm the shared secret and click OK

You can also configure Shared Secrets in the Network Policy Server which is useful when adding multiple RADIUS clients
Add a Network Policy
We can configure the Network Policy manually or walk through the built-in wizard to help with our choices. In this post we will create the policy manually
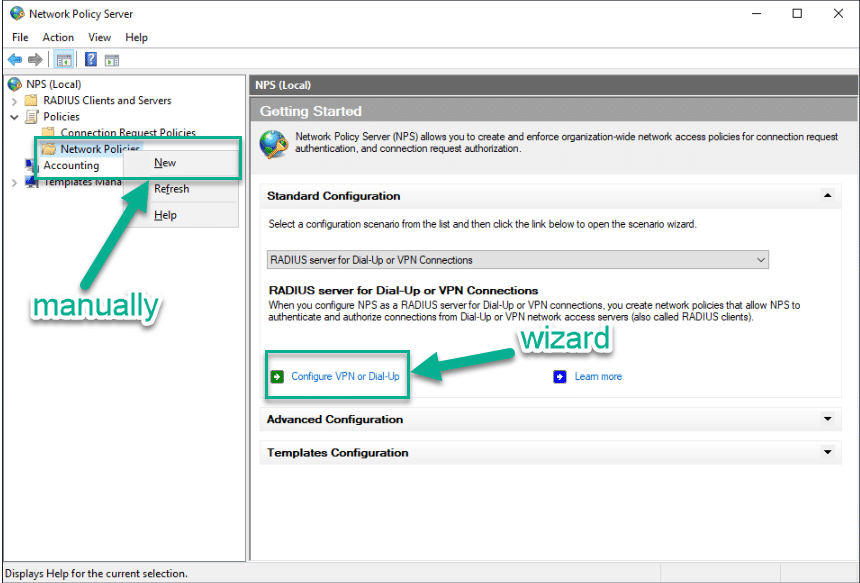
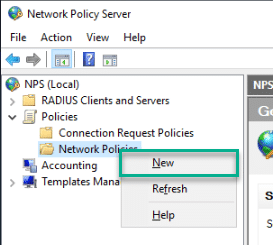
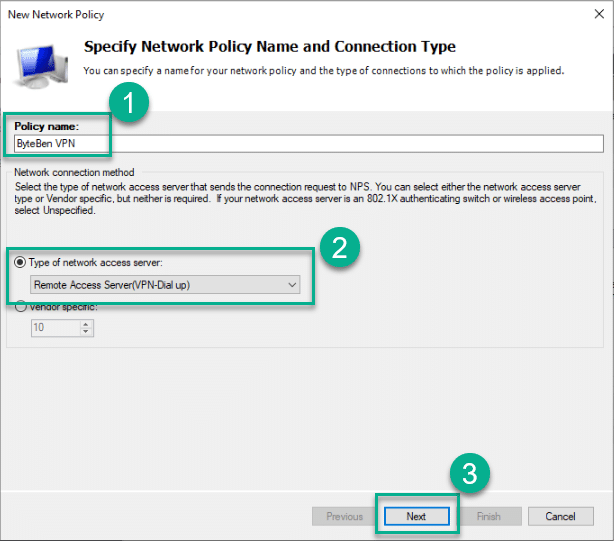
1 . Navigate to NPS (Local) > Policies > Network Policies. Right click Network Policies and select New
2 . Enter a suitable Name for the policy, select Remote Access Server(VPN-Dial up) from the drop down box and click Next
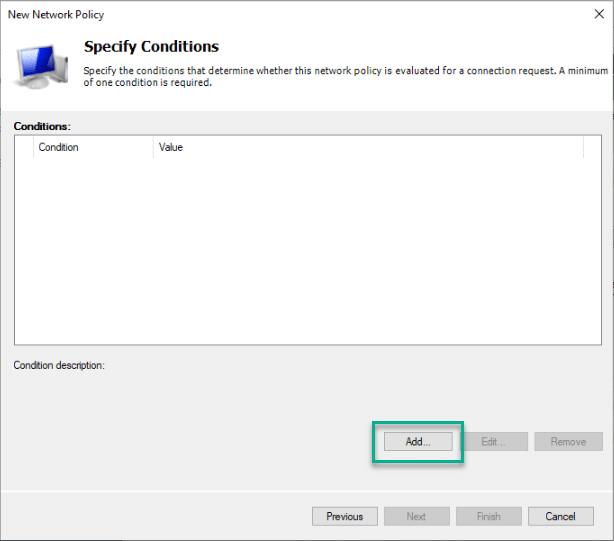
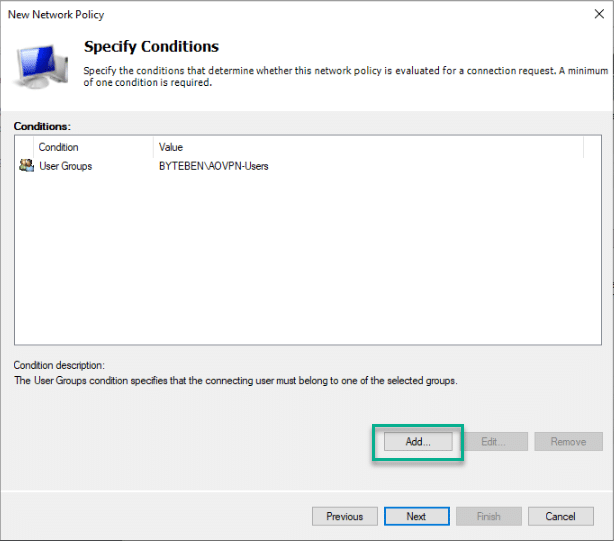
3 . In the Specify Conditions pane, click Add
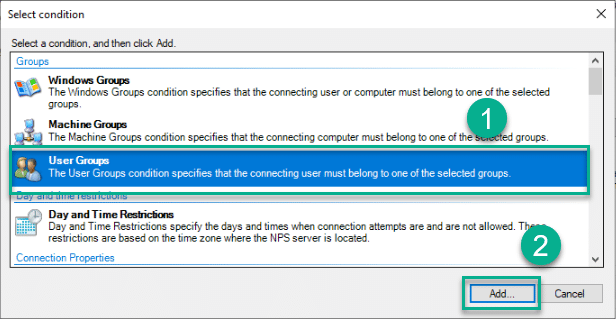
4 . In the Select Condition pane, select User Groups and click Add
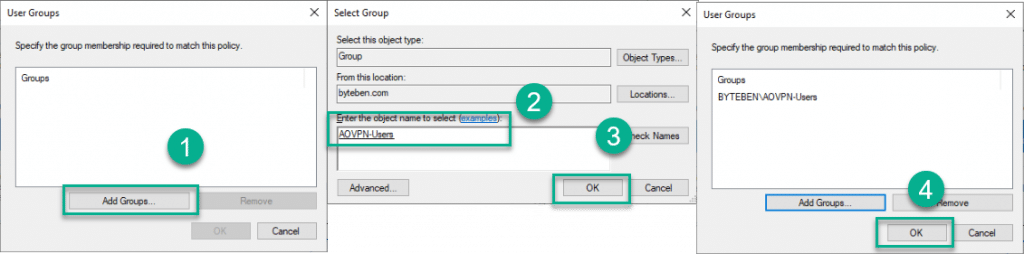
5 . Click Add Groups, search for the AOVPN-Users group we created in Post 2, and click OK twice
6 . In the Specify Conditions pane, click Add again
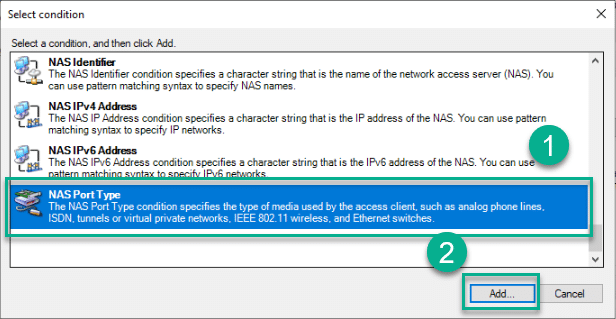
7 . Select NAS Port Type from the list and click Add
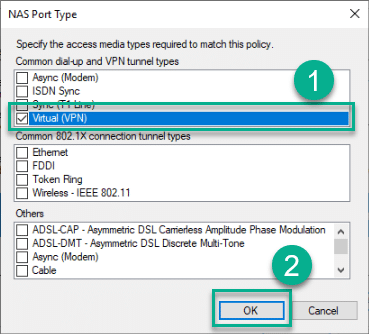
8 . Tick Virtual (VPN) and click OK
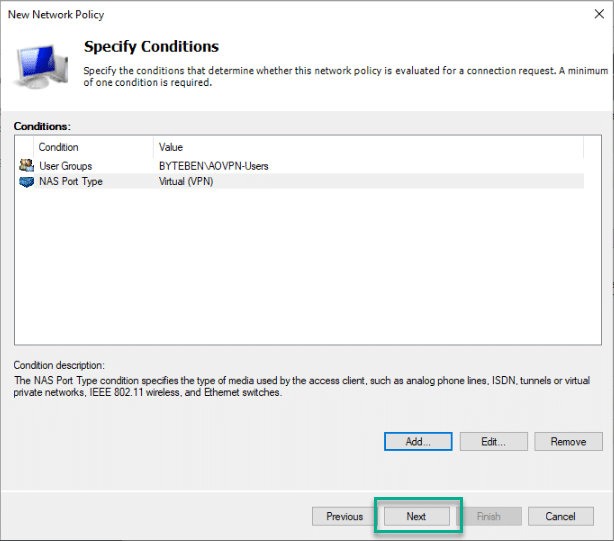
9 . Click Next
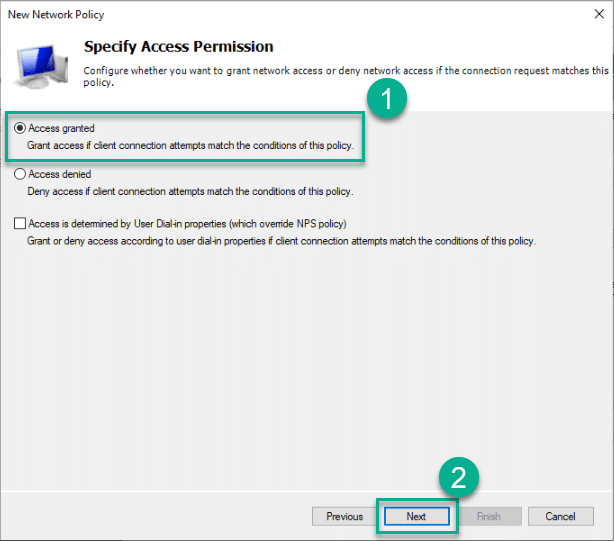
10 . On the Specify Access Permission pane, ensure Access granted is selected and click Next
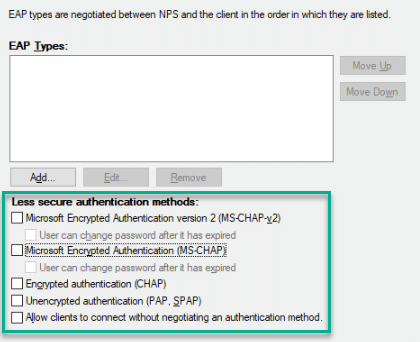
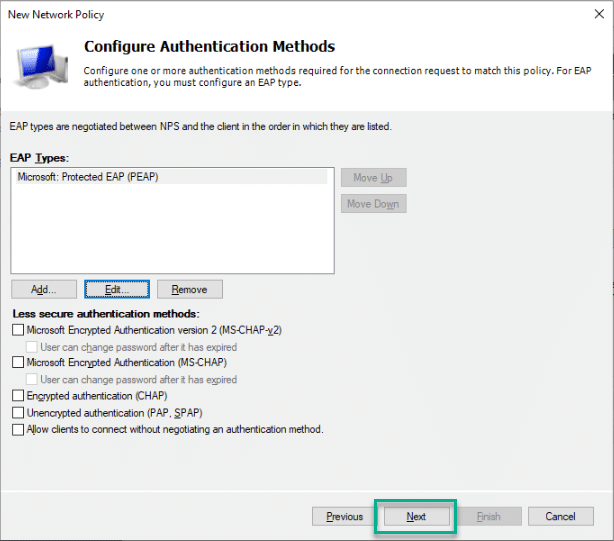
11 . In the Configure Authentication Methods pane, untick all the Less secure authentication methods
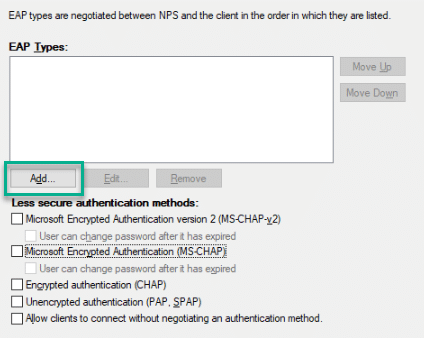
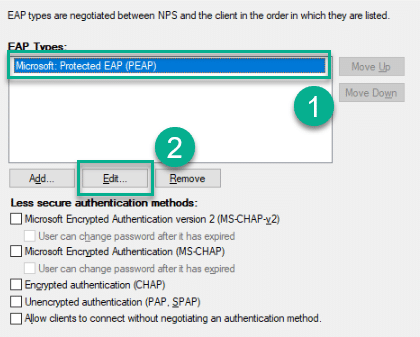
12 . Under the EAP Types list box, click Add
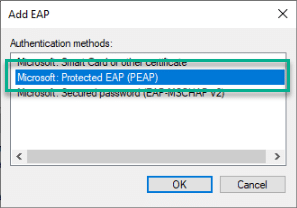
13 . Select Microsoft: Protected EAP (PEAP) from the list and click OK
14 . Select Microsoft: Protected EAP (PEAP) from the list and click Edit
15 . If this is a new server, the correct server certificate should already be selected. Ensure the certificate selected is the one we enrolled earlier on the NPS
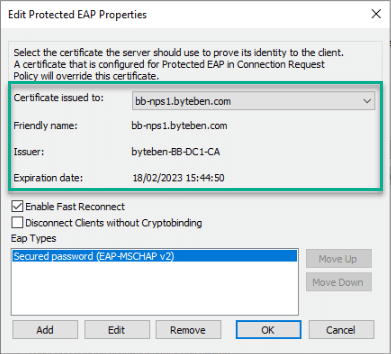
16 . If your are configuring the Network Policy for users who will travel between AP’s and you enable Fast Reconnect, you should consider ticking Enable Fast Reconnect. Be warned though, this setting is considered undesirable because a Fast Reconnect resumes the connection without full authentication. In this example, we won’t enable Fast Reconnect

More information can be found on MS-PEAP Fast Reconnect here:-
https://docs.microsoft.com/en-us/openspecs/windows_protocols/ms-peap/3b331dc6-8b68-4c2d-8b84-62d4fa593eda
17 . Cryptobinding is used to protect the negotiation from man-in-the-middle-attacks and is considered good practice. Tick Disconnect Clients without Cryptobinding
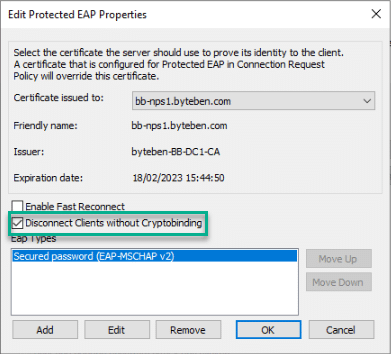
More information can be found on MS-PEAP Cryptobinding here:-
https://docs.microsoft.com/en-us/openspecs/windows_protocols/ms-peap/757a16c7-0826-4ba9-bb71-8c3f1339e937
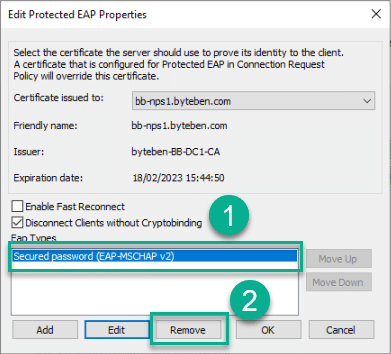
18 . Select Secure password (EAP-MSCHAP v2) from the Eap Types list and click Remove
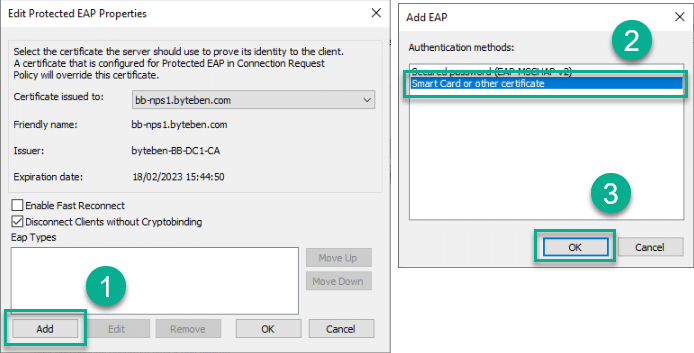
19 . Click Add, select Smart Card or other certificate from the list and click OK
20 . With the Smart card or other certificate Eap Type selected, click Edit
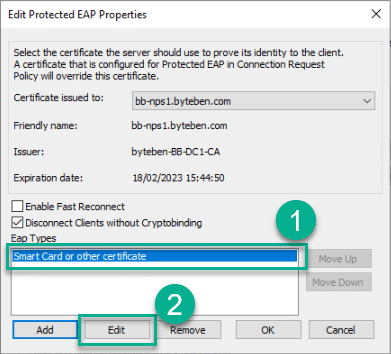
21 . As we observed in step 15, If this is a new server, the correct server certificate should already be selected. Ensure the certificate selected is the one we enrolled earlier on the NPS and click OK
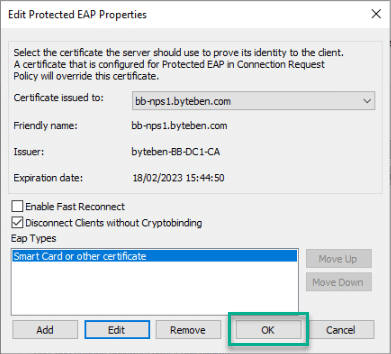
22 . Click OK to finish editing the new EAP Type
23 . Click Next
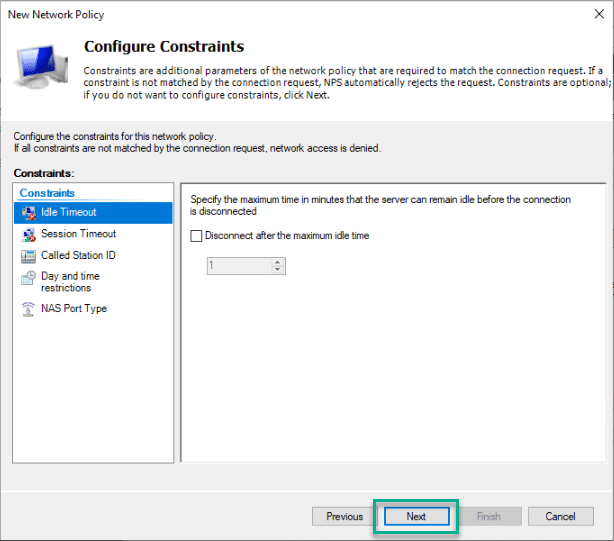
24 . In the Configure Constraints pane, click Next
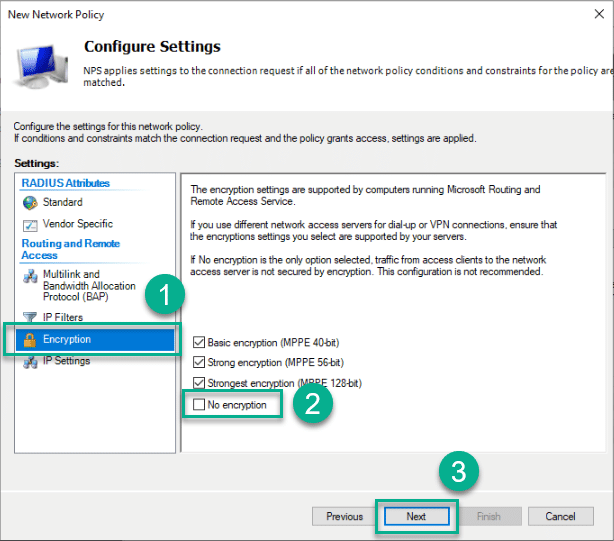
25 . In the Configure Settings pane, select Encryption, un-tick No encryption and click Next
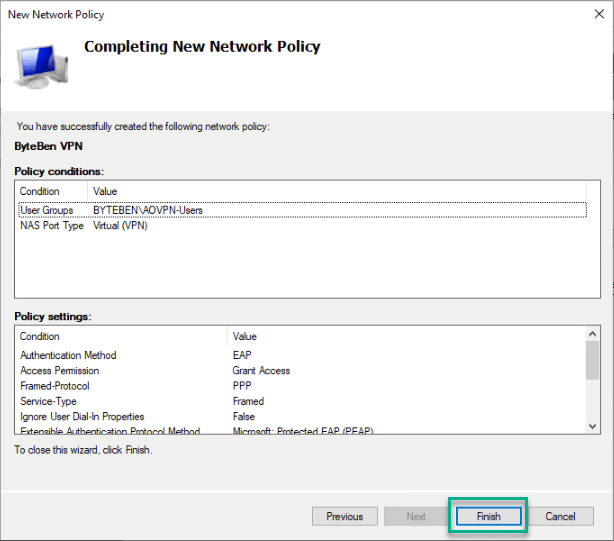
26 . Click Finish to complete adding the new Network Policy
Configure Accounting
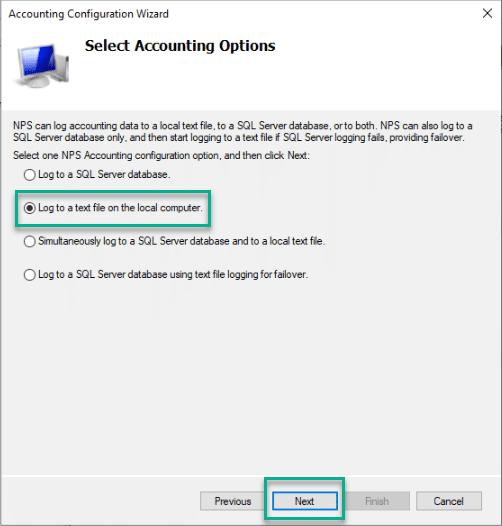
Previously, we configured our VPN server to use the NPS as the accounting provider. In the following example we will log accounting data to a text file on the NPS server but you can also choose to log this data to a SQL server or both a SQL server and text file. By default connection requests are logged to a text file at C:\Windows\system32\LogFiles\
To prevent the log files from filling the hard drive, it is strongly recommended that you keep them on a partition that is separate from the system partition
https://docs.microsoft.com/en-us/windows-server/networking/technologies/nps/nps-accounting-configure#configure-nps-log-file-properties
More information on the different Accounting options for the NPS server can be founde here:-
https://docs.microsoft.com/en-us/windows-server/networking/technologies/nps/nps-accounting-configure
1 . Open the NPS console and navigate to NPS (Local) > Accounting and click Configure Accounting
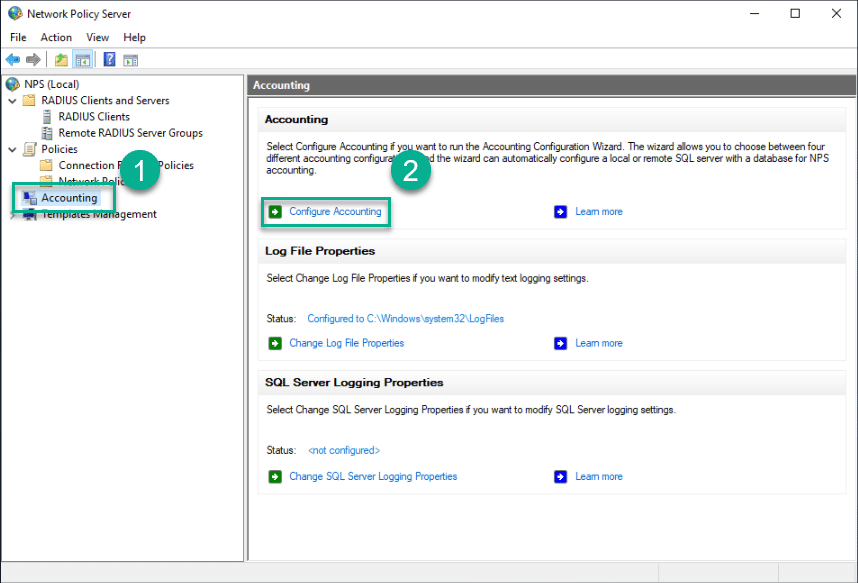
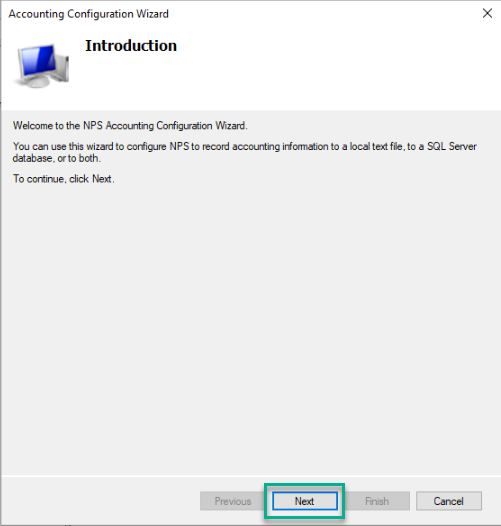
2 . When the Accounting Configuration Wizard opens, click Next
3 . Select Log to a text file on the local computer and click Next
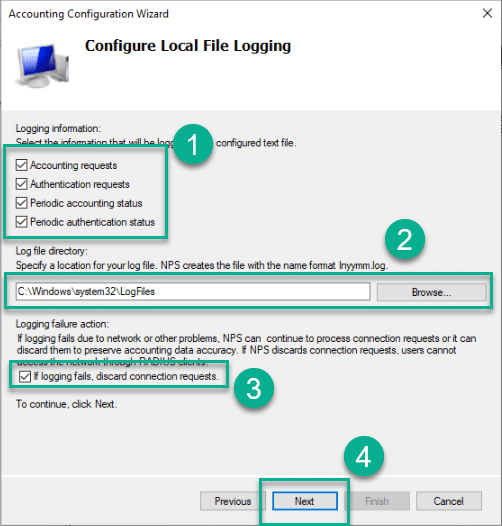
4 . Select:-
- Which audit and authentication information you want to log
- The location for the text file (Default is C:\Windows\system32\LogFiles
- Whether you want to continue processing connection requests if logging fails
and click Next
5 . Review the Accounting configuration and click Next
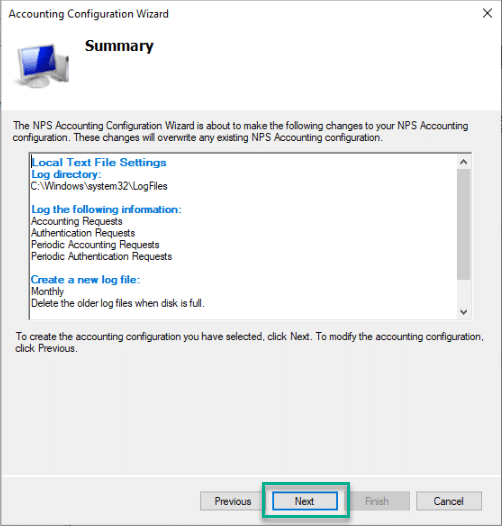
6 . Click Close to complete the configuration of the Accounting provider
Summary
In this post we configured the Network Policy Server (NPS) to authenticate connection requests from the RADIUS Client – the VPN Server
Because VPN connections will be coming from Azure AD Joined (AADJ) devices, we cannot use Conditions to identify the device – because Active Directory does not know about our AADJ devices. Instead we must rely on User Group membership (remember the user has to be synchronised to AAD using AD Connect as a prerequisite) and a valid User Certificate
In the next post in this Mega Series, we will look at how to configure the NDES Server


Add comment