


- SSO to domain resources from Azure AD Joined Devices Overview
- Configure Active Directory and Certificates
- Configure the VPN Server (RRAS)
- Configure the Network Policy Server (NPS)
- Configure the Network Device Enrollment Service (NDES)
- Install Azure AD Application Proxy to publish the Device Enrollment Service (NDES)
- Configure Certificate Templates in Intune
- Create a Simple Certificate Enrollment Protocol (SCEP) Profile in Intune
- Creating the Always On VPN Profile in Intune
A great resource for anything VPN related is Richard Hicks blog which can be found at https://directaccess.richardhicks.com/
Introduction
Welcome to Part 3 of this 9 Part blog series. In Part 2 we looked at the requirements for Active Directory and built the Certificate Templates we needed for the VPN solution. In Part 3 we will step through how to configure a RRAS server to facilitate VPN connectivity for our users from Azure AD Joined devices
Solution Overview
A reminder of the fundamental components we will use to setup a simple, Microsoft VPN solution
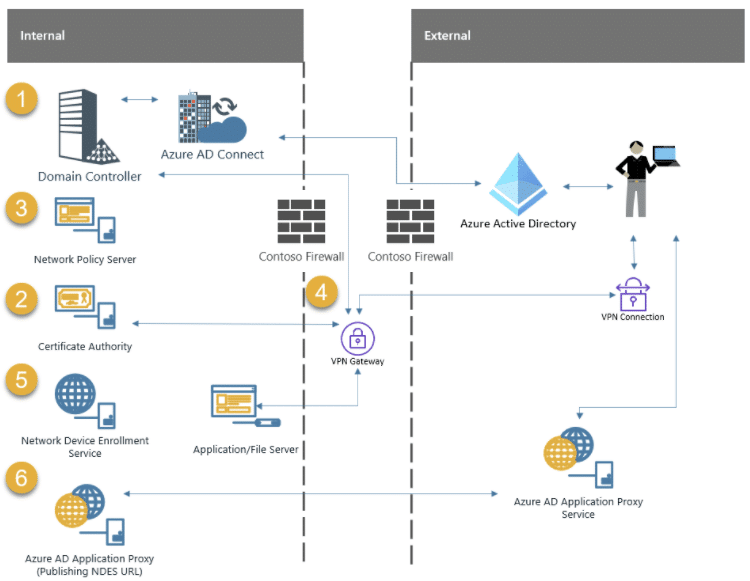
1 . Domain Controller – Microsoft Active Directory Domain Services (AD DS)
The Domain Controller is required to authenticate users and services
2 . Certificate Authority – Microsoft Active Directory Certificate Services (AD CS)
The Certificate Authority is required to issue certificates to users/devices and other VPN components like NDES/NPS and the VPN Server
3 . Microsoft Network Policy Server (NPS)
The Network Policy Server is required to authenticate requests from Radius clients
4 . VPN Gateway – Microsoft Routing and Remote Access Server (RRAS)
The VPN Gateway will terminate VPN connections for client devices
5 . Microsoft Network Device Enrollment Service (NDES)
The Network Device Enrollment Server is required to request certificates on behalf of users
6 . Microsoft Azure AD Application Proxy Connector
The Azure AD Application Proxy is required to publish the NDES Server URL to the internet – securely
Microsoft Routing and Remote Access Server (RRAS)
The RRAS Server / VPN Gateway will facilitate VPN connections for connecting devices. The VPN Gateway will also be configured as a Remote Authentication Dial-In User Service (RADIUS) Client. This RADIUS Client sends the connection request to the NPS server for connection request processing. The following configuration is not designed to be highly available. If you are reading this series to deploy a VPN solution in production I would strongly encourage that you examine each component and consider high availability
More information on configuring RRAS in a cluster for high availability can be found here:-
https://docs.microsoft.com/en-us/windows-server/remote/remote-access/ras/cluster/deploy-remote-access-in-cluster
Build the Server
I am using Hyper-V in my lab and have built my RRAS server to the following specification:-
- Windows Server 2019 Datacentre Edition
- 4 vCPUs
- 8192MB Memory
- 60GB Disk
- 2 Network Cards (1 Internal, 1 External)
- Domain Joined
If you are building the RRAS server in Hyper-V, you will need to configure 2 virtual switches. 1 will connect to your internal network where your Domain Controller, Issuing Certificate Authority and NPS Server etc are connected and the other will connect to the WAN
BB_LAB = Internal Adapter (Domain Controller, Issuing CA, NPS Server, NDES Server, AAD App Proxy)
WAN = External Adapter (Connected to External Firewall)

Network Adapter Configuration
It is important that each adapter, in a dual NIC configuration, is on a different network. In my lab the internal adapter will be configured on the 192.168.0.0/24 network. The external adapter will be on the 192.168.7.0/24 network. I will not be exposing the external adapter directly to the internet but instead using NAT on the firewall.
External Adapter
At a high level, the external adapter configuration should resemble the following
- Clearly named as the External Adapter
- Only the IPv4 and IPv6 Protocols enabled
- Static IP Address
- Subnet Mask
- Default Gateway
- NO DNS Servers configured
1 . Open Server Manager > Local Server and click on the external network adapter to open the Network Connections control panel applet

2 . Right click the external adapter and click Rename

3 . Enter the name External and press Enter

4 . Right click the external adapter and select Properties

5 . Untick all protocols except for Internet Protocol Version 4 (TCP/IPv4) and Internet Protocol Version 6 (TCP/IPv6)

6 . Select Internet Protocol Version 4 (TCP/IPv4) and click Properties
7 . Enter values for IP address, Subnet mask and Default gateway and Press OK

Internal Adapter
At a high level, the internal adapter configuration should observe the following
- Clearly named as the Internal Adapter
- Static IP Address
- Subnet Mask
- No Default Gateway
- DNS Servers configured
1 . Open Server Manager > Local Server and click on the external network adapter to open the Network Connections control panel applet
2 . Right click the internal adapter and click Rename

3 . Enter the name Internal and press Enter

4 . Right click the internal adapter and select Properties

5 . Select Internet Protocol Version 4 (TCP/IPv4) and click Properties
6 . Enter values for IP address, Subnet mask and DNS Servers and Press OK

Domain Join
Joining the RRAS Server to the domain allows auto-reenrolment of the VPN Server certificate (although initial enrolment must manual because the subject name wont match the RRAS Server name). This post won’t dig into the pro’s and con’s of joining a RRAS Server to the domain. If you decide not to join the RRAS Server to the domain, you must make appropriate consideration when following this series

AD Group Membership
Add the VPN Server to the AD Group we created in part 2 called AOVPN-Servers

Reboot the VPN Server
Firewall
The VPN design may make some network admins shudder. A double legged server configuration will effectively bridge two networks. One leg sits inside the internal perimeter network and the other sits inside the external perimeter network. I strongly recommended 1 firewall between your external perimeter (WAN/Internet) and external RRAS interface and a second firewall between your internal perimeter (LAN/DMZ) and the internal RRAS interface. This can be achieved through zoning on the same firewall but its better practice to use 2 separate firewalls – especially in production
The diagram below should help understand the basic flow for the VPN Server

Firewall Rules
The following Firewall recommendations do not take into account server management, AV, patching etc so further consideration of extra ports may be required in your environment
Internet (WAN) > External Interface of RRAS Server
- UDP 500
- UDP 4500
Internal Interface of RRAS Server > NPS Server
- UDP 1812
- UDP 1813
Internal Interface of RRAS Server > Domain Controller(s)
- TCP/UDP 53 (DNS)
- TCP/UDP 88 (Kerberos)
- TCP 135 (RPC)
- TCP 1024-65525 (RPC for LSA/SAM/NETLOGON)
- TCP/UDP 386 (LDAP)
- TCP 636 (LDAP SSL)
- TCP 3268 (LDAP GC)
- TCP 3269 (LDAP GC SSL)
- TCP 445 (SMB)
- TCP 49152-65535 (DFSR RPC)
- UDP 23 (NTP)
Internal Interface of RRAS Server > Issuing CA
- TCP 135 (RPC)
- TCP 49152-65535 (High Dynamic Range)
Internal Interface of RRAS Server > Internal Applications
- There will need to be consideration to allow connectivity from the RRAS Internal interface to the internal applications e.g. Print Servers, HR Systems, Fileservers etc
Certificate Enrollment
We need to enroll a Certificate for the VPN Server using the VPN Server Certificate Template we created in part 2 of this series. Enrollment will be quite straight forward because the VPN Server is Domain Joined
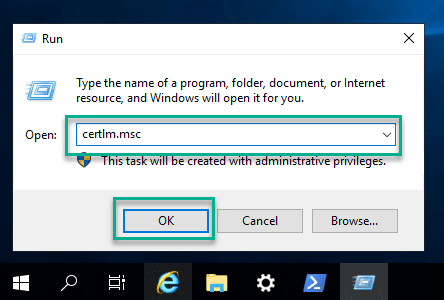
1 . Open the Certificate snap-in on the VPN Server by running certlm.msc
2 . Right click the Personal store and select All Tasks > Request New Certificate

3 . Click Next
4 . Ensure Active Directory Enrollment Policy is highlighted and click Next

5 . Click on the Configure Settings link for the VPN Server Authentication template

6 . In the Subject name area on the Subject tab, choose Common Name from the drop down list and enter the public DNS name that your VPN client will connect to. In my lab I am using aovpn.byteben.com. Click Add

7 . In the Alternative name area, choose DNS from the drop down list and enter the public DNS name that your VPN client will connect to. In my lab I am using aovpn.byteben.com. Click Add

8 . Click OK
9 . Tick VPN Server Authentication and then click Enroll


If you get a Request Denied error you perhaps you didn’t reboot after adding the VPN Server to the AD Group AOVPN-Servers

Install and Configure the RRAS Server Role
Install RRAS
1 . Open Server Manager and select Manage > Add Roles and Features

2 . Click Next 3 times and in the Roles selection menu tick Remote Access and click Next

3 . Click Next 3 times and in the Role Service selection menu for Remote Access, tick DirectAccess and VPN (RAS)

4 . When prompted, click Add Features

5 . Click Next 3 times and on the Confirm installation selections screen click Install

6 . Wait for the installation to complete and reboot the server if prompted
Configure RRAS
1 . Open Server Manager, click on the Warning Triangle ⚠️and click Open the Getting Started Wizard

2 . Select Deploy VPN Only

3 . In the Routing and Remote Access MMC that opens, right click the VPN Server and select Configure and Enable Routing and Remote Access

4 . Click Next
5 . Select Custom configuration and click Next

6 . Tick VPN access and click Next

7 . Click Finish
8 . When prompted, click Start service

Start RRAS service
9 . Right click the VPN Server and click Properties

Configure the Authentication Provider
The Authentication Provider (NPS Server) is responsible for validating the credentials of the VPN clients
1 . Select the Security tab and from the Authentication provider drop down list, select RADIUS Authentication

2 . Click Authentication Methods and tick Extensible authentication protocol (EAP). Untick all other methods and click OK

3 . Click Configure to configure the Authentication provider

4 . Click Add
5 . In the Server name field, enter the FQDN of the Network Policy Server you have created / will create

6 . Click Change and enter a shared secret that will be shared between the NPS Server and the VPN Server. You will need the same shared secret when you configure the NPS server later in the series so keep it to hand. The shared secret allows the RADIUS Server (NPS) to communicate with the RADIUS client (VPN Server)

The Shared secret you choose must be strong and is case sensitive
7 . Click OK twice to return to the Security tab
Configure the Accounting Provider
The Accounting Provider (also the NPS Server) will record the incoming connection requests and session information
1 . Select the Security tab and from the Accounting provider drop down list, select RADIUS Accounting

2 . Click Configure to configure the Accounting provider

3 . Click Add
4 . In the Server name field, enter the FQDN of the Network Policy Server you have created / will create

5 . Click Change and enter a shared secret that will be shared between the NPS Server and the VPN Server. You will need the same shared secret when you configure the NPS server later in the series so keep it to hand. The shared secret allows the RADIUS Server (NPS) to communicate with the RADIUS client (VPN Server)
The Shared secret you choose must be strong and is case sensitive
6 . Click OK twice to return to the Security tab
Certificate Binding
While still on the Security tab, select the SSL certificate we create earlier

IPv4 Configuration
1 . Click the IPv4 tab

2 . Select Static address pool and click Add
3 . Enter a Start IP address and an End IP address. Avoid using the same subnet as the internal adapter of the VPN Server if possible. I am restricted with that capability in the lab so am using the same subnet, ensuring there is no overlap with existing DHCP ranges. The Number of addresses value is calculated automatically

4 . Click OK and from the Adapter drop down box, select Internal (or whatever you named it earlier)

5 . Click OK and then click Yes when prompted to restart the RRAS service

Port Configuration
The Ports property in the RRAS console gives access to specify the maximum number of simultaneous connections that you want to support per protocol. As we are only using IKEv2 for this simple VPN solution we can reduce the number of ports for the other protocols
1 . Right click Ports and click Properties (Notice the inactive and unneeded ports)

2 . Double click WAN Miniport (SSTP)

3 . Untick both Remote access connections (inbound only) and Demand-dial routing connections (inbound and outbound) and set the Maximum ports value to 0

4 . Click OK and click Yes on the warning about reducing ports that could be active

5 . Double click WAN Miniport (L2TP)

6 . Untick both Remote access connections (inbound only) and Demand-dial routing connections (inbound and outbound) and set the Maximum ports value to 0

7 . Click OK and click Yes on the warning about reducing ports that could be active
8 . Double click WAN Miniport (PPTP)

9 . Untick both Remote access connections (inbound only) and Demand-dial routing connections (inbound and outbound) and set the Maximum ports value to 1 (This value cannot be 0)

10 . Click OK and click Yes on the warning about reducing ports that could be active
11 . Double click WAN Miniport (PPPOE)

12 . Untick both Demand-dial routing connections (inbound only)

13 . Click OK
14 . Double click WAN Miniport (GRE)

15 . Untick both Demand-dial routing connections (inbound and outbound) and set the Maximum ports value to 0

16 . Click OK and click Yes on the warning about reducing ports that could be active
17 . Double click WAN Miniport (IKEv2)

18 . Set the desired value for Maximum number of ports

You can choose a maximum of 30000 ports. There should also be consideration for the number of IP addresses available for VPN clients based on our earlier configuration. Allow enough ports for the number of VPN clients you are expecting to connect to the VPN server

19 . Click OK and click Yes on the warning about reducing ports that could be active
20 . Review port configuration and click OK

This concludes Port configuration. If you restart the RRAS service you will see only the ports listed that you have configured

Configure RRAS (Advanced)
The following configurations are recommended for optimal performance and security for the IKEv2 protocol. Thanks, again, extends to Richard Hicks. I will post links Richards blog for the following configurations where you can read more detail on “why” these should be configured
IKEv2 Security
Richard calls out, quite rightly, in his blog that the “Out of the box” IKEv2 IP Security parameters leave something to be desired. A minimum of AES-128 encryption, SHA-2 authentications and 2048 bit RSA key size is recommended. You can read the recommendations in more detail here
https://directaccess.richardhicks.com/2018/12/10/always-on-vpn-ikev2-security-configuration/
Some recommendations have changed for Server 2019 and are included in the snippet below
To update the default IP security settings, perform the following steps:-
1 . On the VPN Server, open an elevated PowerShell prompt
2 . Copy the following snippet into the PowerShell windows and press Enter
Set-VpnServerConfiguration -CustomPolicy -AuthenticationTransformConstants GCMAES128 -CipherTransformConstants GCMAES128 -DHGroup Group14 -EncryptionMethod GCMAES128 -IntegrityCheckMethod SHA256 -PFSgroup ECP256 -SALifeTimeSeconds 28800 -SADataSizeForRenegotiationKilobytes 1024000
Set-VpnServerConfiguration -CustomPolicy -AuthenticationTransformConstants GCMAES128 -CipherTransformConstants GCMAES128 -DHGroup Group14 -EncryptionMethod GCMAES128 -IntegrityCheckMethod SHA256 -PFSgroup ECP256 -SALifeTimeSeconds 28800 -SADataSizeForRenegotiationKilobytes 1024000

3 . Restart the RRAS Service for the changes to take effect. This can be performed from the same PowerShell window by running
Restart-Service RemoteAccess

4 . Verify the new configuration by running
Get-VPNServerConfiguration

IKEv2 Fragmentation
While configuring AOVPN for a customer, I also read with interest, on Richards blog, that IKEv2 packets can often exceed the MTU and would be split into fragments. More can be read on Richards blog here
https://directaccess.richardhicks.com/2019/02/11/always-on-vpn-and-ikev2-fragmentation/
We need to enable IKEv2 fragmentation support on the VPN Server
1 . On the VPN Server, open an elevated PowerShell prompt
2 . Copy the following snippet into the PowerShell windows and press Enter
New-ItemProperty -Path "HKLM:\SYSTEM\CurrentControlSet\Services\RemoteAccess\Parameters\Ikev2\" -Name EnableServerFragmentation -PropertyType DWORD -Value 1 -Force
New-ItemProperty -Path “HKLM:\SYSTEM\CurrentControlSet\Services\RemoteAccess\Parameters\Ikev2\” -Name EnableServerFragmentation -PropertyType DWORD -Value 1 -Force

3 . Restart the RRAS Service for the changes to take effect. This can be performed from the same PowerShell window by running
Restart-Service RemoteAccess

Summary
That concludes part 3 of the SSO to Domain Resource from AzureAD Joined devices Mega series. In this post we configured the VPN Server and gave consideration to Firewall, security and protocol requirements
In this series we are only configuring the user tunnel and not the device tunnel. We do not need line of sight to a DC before the user logs in to – remember, these are AzureAD Joined devices!
In Part 4 we will look at configuring the Network Policy Server for RADIUS authentication
Special thanks goes to Richard Hicks


Dear “Community driven and passionate Senior Cloud Consultant at CloudWay with 20 years experience in driving adoption and technology change within the Enterprise.”,
thanksm but is the IPv6 configuration part???
I saw an almost identical comment on Twitter too about the omission of IPv6. Sorry if the post doesn’t meet your exact expectations. I am putting a lot of time and energy into this blog series and even doing that I am unable to account for every configuration nuance. If someone is managing IPv6 in their environment today, my hunch is they would be able to translate the configs to IPv6 with relative ease. Thank you for your comment.