


- SSO to domain resources from Azure AD Joined Devices Overview
- Configure Active Directory and Certificates
- Configure the VPN Server (RRAS)
- Configure the Network Policy Server (NPS)
- Configure the Network Device Enrollment Service (NDES)
- Install Azure AD Application Proxy to publish the Network Device Enrollment Service (NDES)
- Configure Certificate Templates in Intune
- Create a Simple Certificate Enrollment Protocol (SCEP) Profile in Intune
- Creating the Always On VPN Profile in Intune
A great resource for anything VPN related is Richard Hicks blog which can be found at https://directaccess.richardhicks.com/
Introduction
Welcome to Part 5 of this 9 Part blog series. In Part 4 we looked at the requirements for the Network Policy Server (NPS) for RADIUS Client authorisation, accounting and authentication. In Part 5 we will step through how to configure Network Device Enrollment Service (NDES) in preparation to enrol certificates on behalf of users on Azure AD Joined Devices
Solution Overview
A reminder of the fundamental components we will use to setup a simple, Microsoft VPN solution
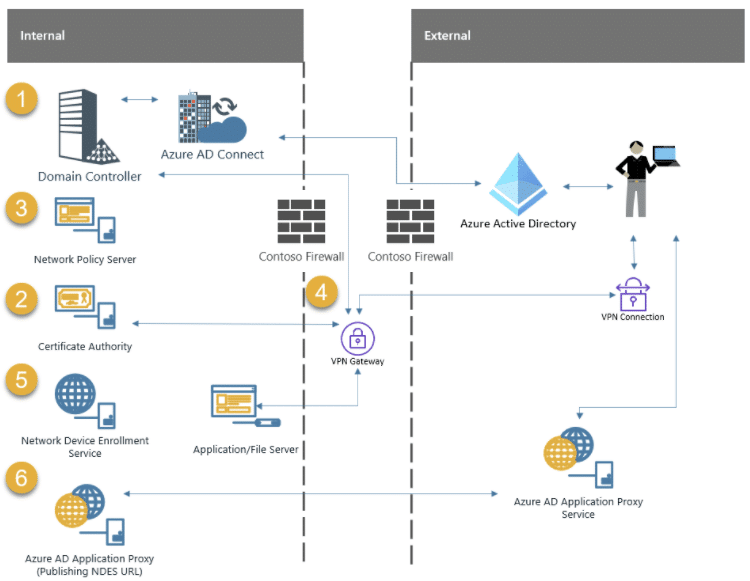
1 . Domain Controller – Microsoft Active Directory Domain Services (AD DS)
The Domain Controller is required to authenticate users and services
2 . Certificate Authority – Microsoft Active Directory Certificate Services (AD CS)
The Certificate Authority is required to issue certificates to users/devices and other VPN components like NDES/NPS and the VPN Server
3 . Microsoft Network Policy Server (NPS)
The Network Policy Server is required to authenticate requests from Radius clients
4 . VPN Gateway – Microsoft Routing and Remote Access Server (RRAS)
The VPN Gateway will terminate VPN connections for client devices
5 . Microsoft Network Device Enrollment Service (NDES)
The Network Device Enrollment Server is required to request certificates on behalf of users
6 . Microsoft Azure AD Application Proxy Connector
The Azure AD Application Proxy is required to publish the NDES Server URL to the internet – securely
Network Device Enrolment Service (NDES)
The NDES server is primarily used to obtain certificates, based on the Simple Certificate Enrollment Protocol (SCEP), from an internal PKI, for users/devices that do not always have domain credentials or line of sight to an issuing CA
More information on configuring NDES can be found here:-
https://docs.microsoft.com/en-us/previous-versions/windows/it-pro/windows-server-2012-r2-and-2012/hh831498(v=ws.11)
Choosing NDES/SCEP or PKCS
Is there an alternative to using NDES/SCEP?
NDES/SCEP is not the only way we can issue certificates to devices and users. When we use the Intune Certificate Connector later, you will see that we have the choice of either using NDES to publish certificates using SCEP or PKCS
PKCS is much simpler to setup. You simply publish certificates using the Intune Certificate Connector – there is no additional infrastructure. Issuing certificates with SCEP requires the additional overhead of an NDES server – so why are we using this method?
I heard that PKCS is not as secure as using SCEP?
When using PKCS, the certificate private key is generated on the server where the Intune Certificate Connector is installed. In order for the Intune Certificate Connector to be able to export the PFX certificate to the user/device the private key, on the certificate template, must be marked as exportable
Both the Certificate and Private key is then sent to Intune where the client will eventually check-in and pick it up. Some people consider this “insecure” because both the certificate and private key are sent across the internet (even though its over https and that communication is encrypted)
Even though the private key is marked as exportable on the template and sent to Intune along with the issued certificate, it is not marked as exportable once it is installed on the device
Is SCEP more secure then?
That is loaded question. If you think exporting private keys across the internet is a bad idea then the answer is yes…maybe, depends how paranoid you are about that kind of thing but don’t forget the private key is encrypted in transit
When using a SCEP profile, and the device reaches out to the NDES public URL, the Intune Certificate Connector verifies that the request has come from an Intune managed device. It does this by checking a challenge blob (Intune will generate a custom challenge blob that it encrypts and signs the request with) and the CSR. Once the request has been verified, the certificate is issued – there is no private key transfer across the internet
Only the certificate requests from an Intune enrolled device that passes the challenge blob validation are issued a certificate
https://docs.microsoft.com/en-us/mem/intune/protect/certificates-scep-configure#support-for-ndes-on-the-internet
More information on configuring SCEP can be found here:-
https://docs.microsoft.com/en-us/mem/intune/protect/certificates-scep-configure#support-for-ndes-on-the-internet
There are strong opinions on using PKCS vs SCEP. PKCS is simpler to implememnt – no question. If you also intened to deploy certificates to devices that have no user affinity, such as kiosk devices or iOS devices during ADE (DEP) enrollment then SCEP needs to be used
Build the Server
I am using Hyper-V in my lab and have built my NDES Server to the following specification:-
- Windows Server 2019 Datacentre Edition
- 2 vCPUs
- 8192MB Memory
- 60GB Disk1
- 1 Network Card
- Domain Joined
Administrators of Virtual Machines often have access to all VM disks (and data in memory). Consideration should be given if this is appropriate for a Tier-0 system as they could potentially get access to some Private Keys stored on the NDES server
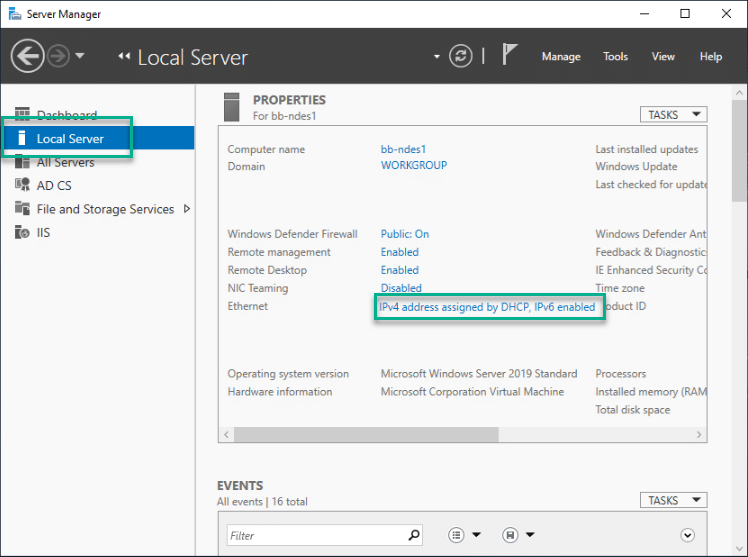
Network Adapter Configuration
At a high level, the ethernet adapter configuration should observe the following
- Static IP Address
- Subnet Mask
- Default Gateway
- DNS Servers configured
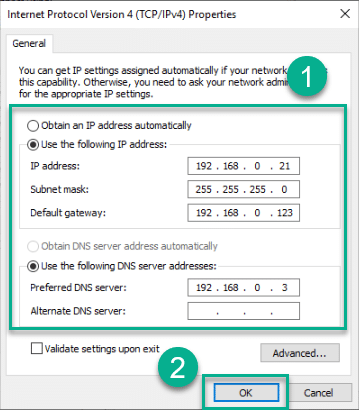
1 . Open Server Manager > Local Server and click on the network adapter to open the Network Connections control panel applet
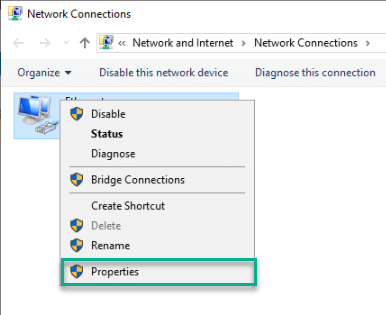
2 . Right click the ethernet adapter and select Properties
3 . Select Internet Protocol Version 4 (TCP/IPv4) and click Properties
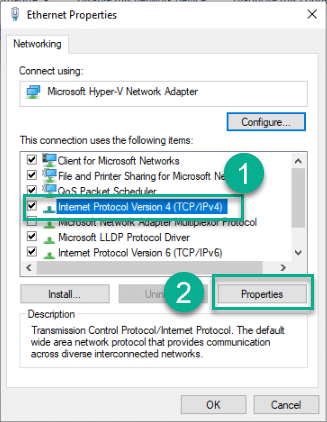
4 . Enter values for IP address, Subnet mask and DNS Servers and Press OK
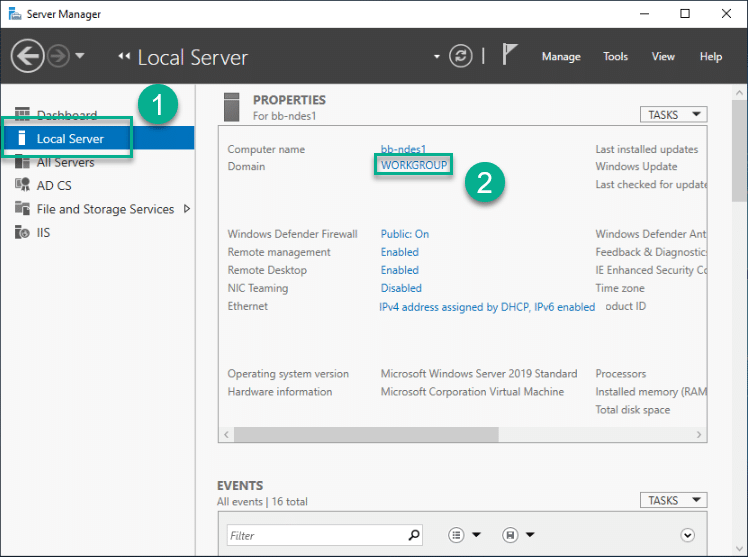
Domain Join
We need to join the NDES Server to the domain
1 . Server Manager > Local Server and click on workgroup name
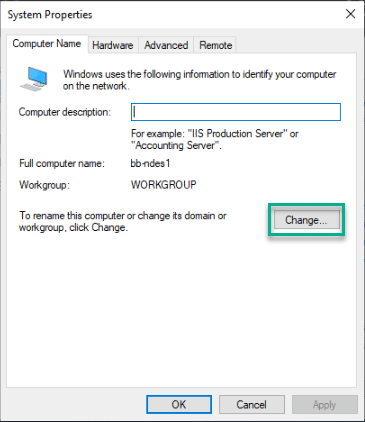
2 . In System Properties click Change
3 . Enter the domain to join and click OK
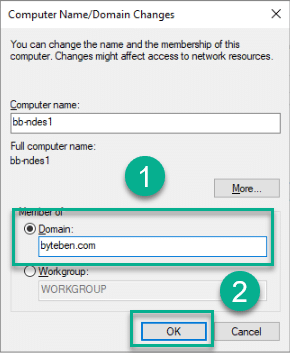
4 . Validate the Domain Join request and Accept subsequent prompts
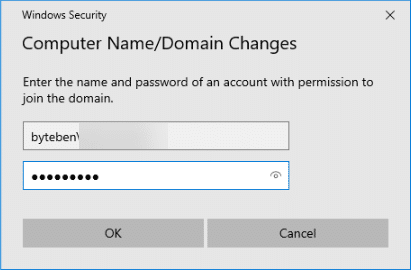
5 . Reboot when prompted
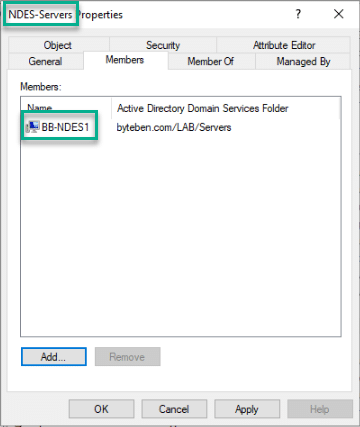
AD Group Membership
Add the NDES server to the AD Group we created in Part 2 called NDES-Servers
Reboot the NDES Server
Install and Configure the NDES Server Role
Create the SPN
Create the SPN for the NDES server using the service account we created in Part 2
setspn -s http/bb-ndes1.byteben.com byteben\ndes_svc_acc

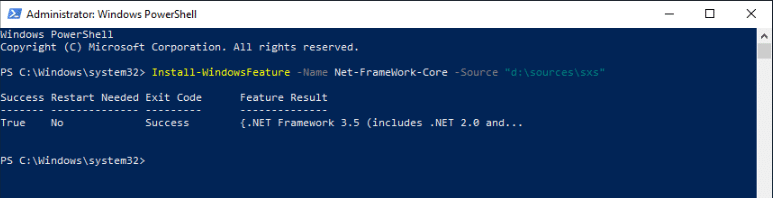
Install .Net Framework 3.5
I normally choose to install .Net Framework Core from the command line – it is much more relaible in my experience.
1 . Mount the OS installation Media
2 . Open a Command Line / PowerShell Prompt as Administrator and run:-
Install-WindowsFeature -Name Net-FrameWork-Core -Source "d:\sources\sxs"
Install NDES and IIS Roles
There are some observations to make before we install the NDES role
- The NDES server must be Domain Joined and in the same Forest as your Enterprise CA
- Never install the NDES role on the Enterprise CA
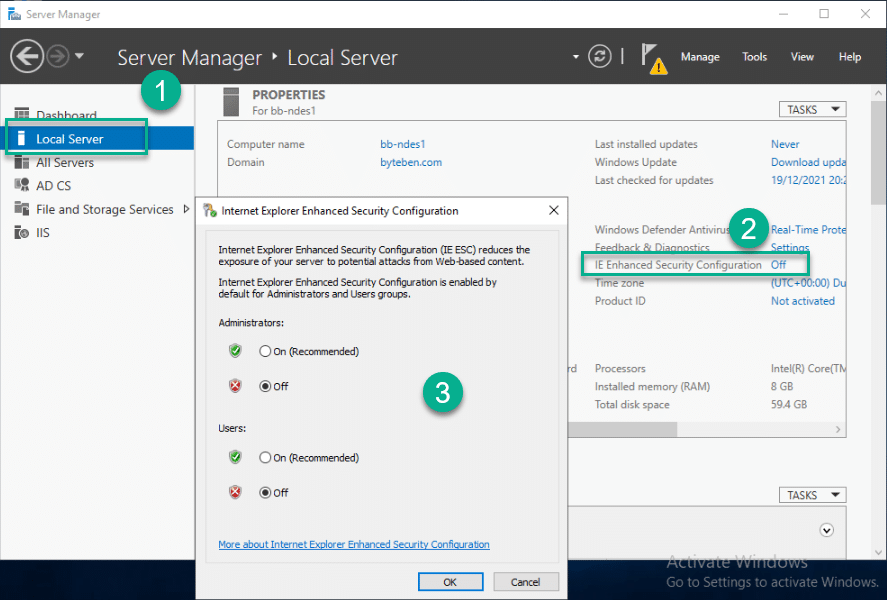
- Internet Explorer Enhanced Security Configuration should be disabled (requirement for the Microsoft Intune Certificate Connector)
Once you have met the prerequisites and built the server, it is time to install the required Roles and Features
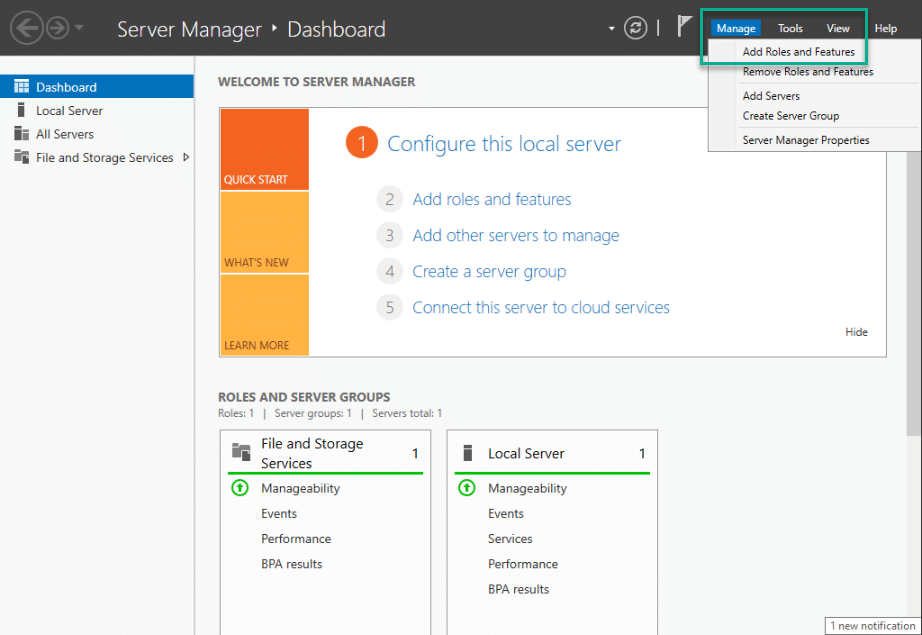
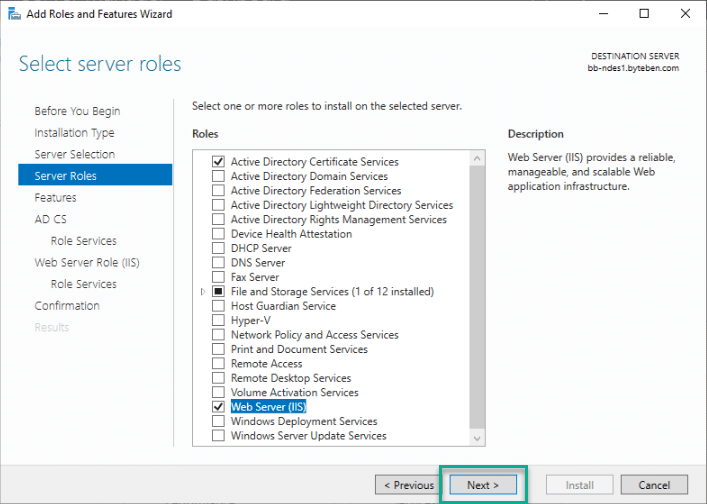
1 . Open Server Manager and select Manage > Add Roles and Features
2 . Click Next 3 times and in the Roles selection menu, tick Active Directory Certificate Services
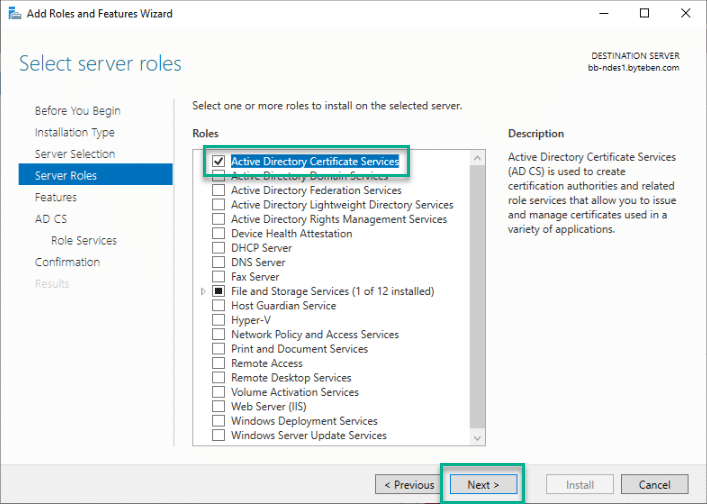
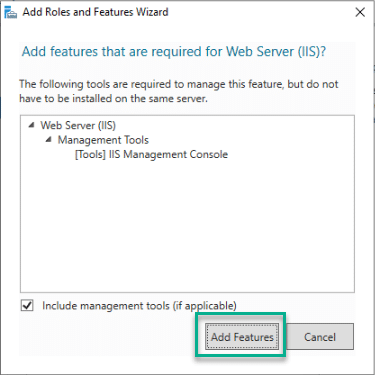
3 . On the same selection page, also tick Web Server (IIS) and click Add Features when prompted
4 . Click Next (Ensuring both Active Directory Certificate Services and Web Server (IIS) are ticked)
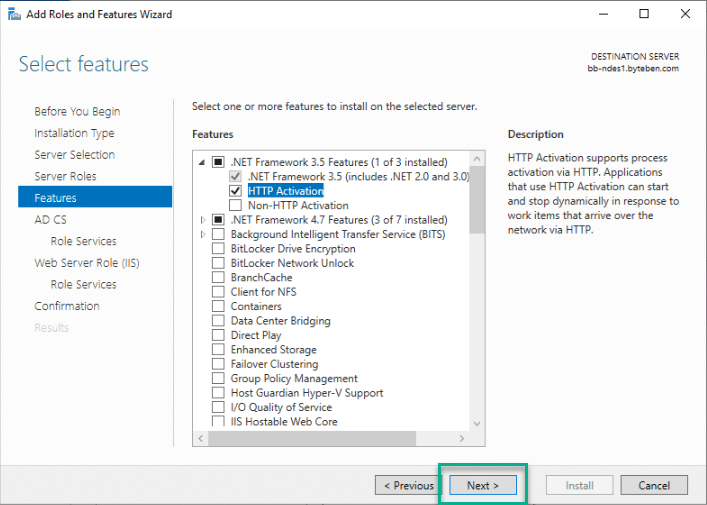
5 . On the Select Features page, tick .NET Framework 3.5 Features > HTTP Activation and click Add Features when prompted

6 . Click Next
7 . Click Next
8 . On the Active Directory Certificate Services page, un-tick Certificate Authority
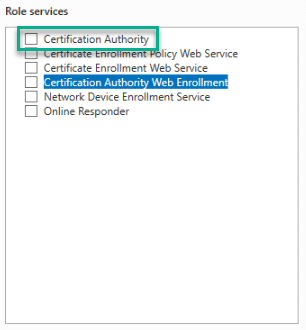
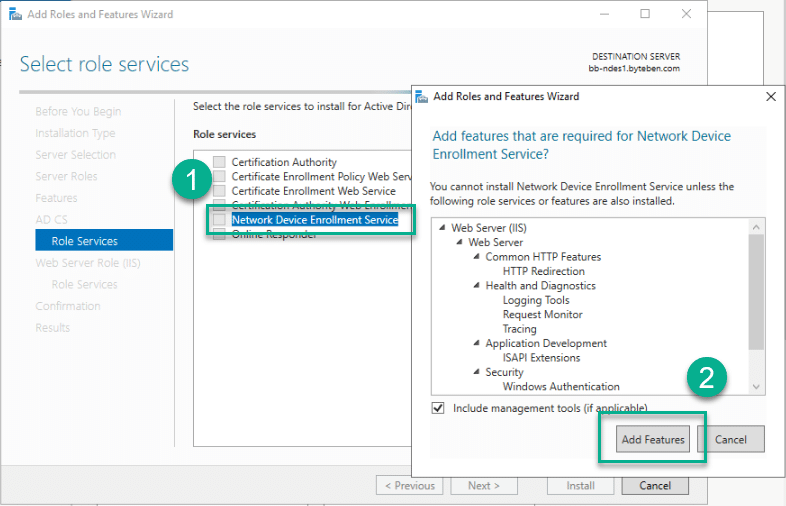
9 . Still on the Active Directory Certificate Services page, tick Network Device Enrollment Service and click Add Features when prompted
10 . Click Next twice
11 . On the Web Server Role (IIS) page, tick the following (if they are not already ticked)
- Web Server > Security > Request Filtering
- Web Server > Application Development > ASP.NET 3.5 (Click Add Features when prompted)
- Web Server > Application Development > ASP.NET 4.7.2 (Click Add Features when prompted)
- Management Tools > IIS 6 Management Compatibility > IIS 6 Metabase Compatibility
- Management Tools > IIS 6 Management Compatibility > IIS 6 WMI Compatibility
12 . Click Install
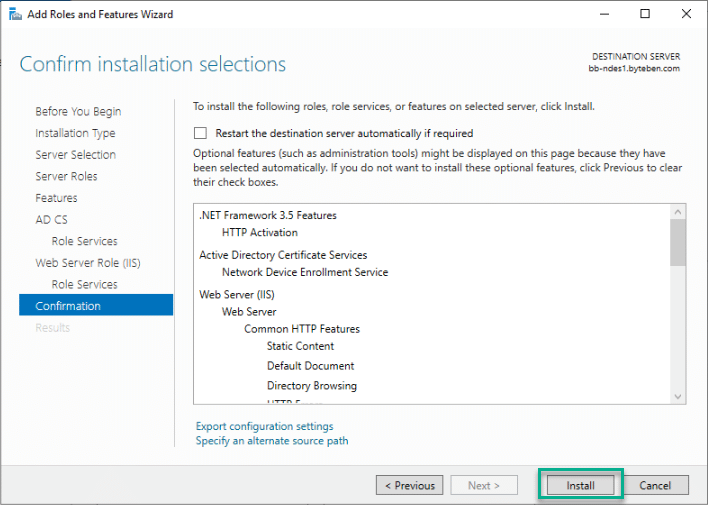
13 . Click Close once installation has completed
14 . Re-open Server Manager and select Manage > Add Roles and Features
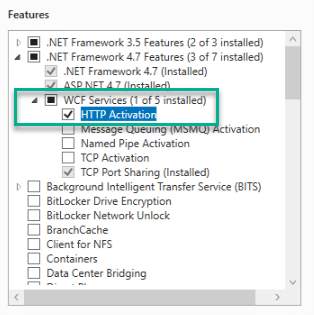
15 . Click Next 4 times and in the Roles selection menu and expand .NET Framework 4.7 Features
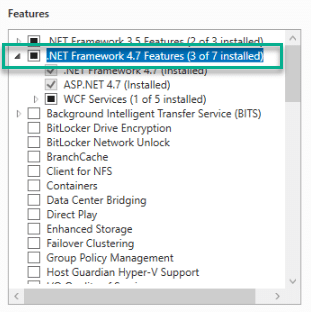
16 . Tick the following:-
- WCF Services > HTTP Activation
17 . Click Next and Install
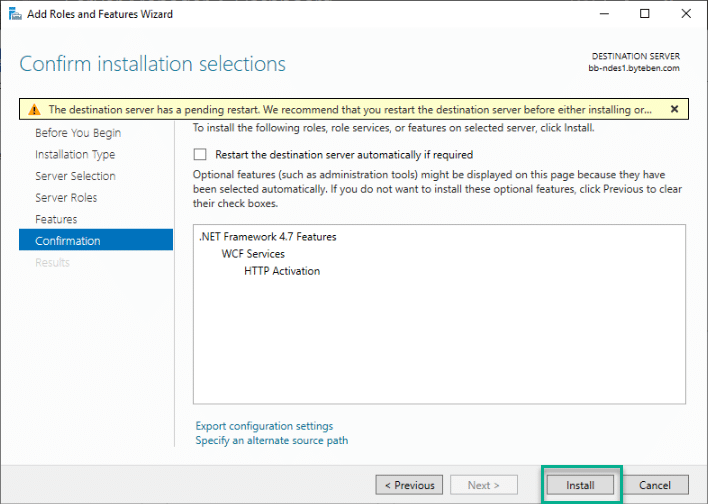
18 . Click Close and Restart the NDES Server
The full list of ROles and Features required for NDES are listed below for your convenience
- Server Roles:
- Active Directory Certificate Services
- Network Device Enrollment Service
- Web Server (IIS)
- Security
- Request Filtering
- Application Development
- .NET Extensibility 4.7
- ASP.NET 4.7
- Management Tools
- IIS Management Console
- IIS 6 Management Compatibility
- IIS 6 Metabase Compatibility
- IIS 6 WMI Compatibility
- Security
- Active Directory Certificate Services
- Features:
- .NET Framework 3.5 Features
- .NET Framework 3.5
- HTTP Activation
- .NET Framework 4.7 Features
- .NET Framework 4.7
- ASP.NET 4.7
- WCF Services
- HTTP Activation
- .NET Framework 3.5 Features
More information on role prerequisites for NDES can be found here:-
https://docs.microsoft.com/en-us/mem/intune/protect/certificate-connector-prerequisites#scep
Configure NDES
Now that the required Roles and Features are installed, it is time to configure NDES.
As you follow this guide, you should remember that the NDES server is considered a Tier-0 system. You should treat it with the same security and access controls as you would your Enterprise Identity and PKI servers
Advanced PKI Considerations
If you read the Microsoft documentation here you may be tempted to change a policy flag on your CA to support validity periods in Configuration Profiles from Intune
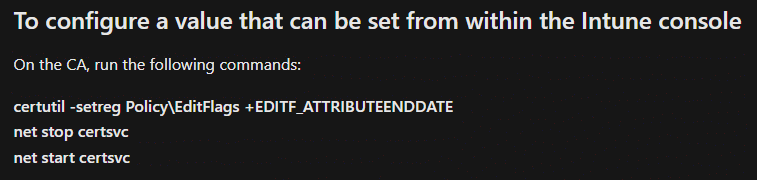
Changing this flag will allow the validity period, for ALL certificates issued by your CA, to be adjusted, to any value, by the requester. This means if your certificate template has a validity period of 1 year, the requester can change that to 3 years (for example). Validity periods for certificates issued by your CA will not be enforced

More information and insight into hardening NDES can be found in the tech community article here:-
https://techcommunity.microsoft.com/t5/core-infrastructure-and-security/ndes-security-best-practices/ba-p/2832619
Came looking for iOS SCEP advice in a Windows blog?
If, by chance, you happened upon this post and are looking to configure NDES/SCEP to issue certificates for iOS devices, you should note that Apple have stricter requirements for iOS13+
- Key size must be greater than or equal to 2048 bits
- SHA-1 signed certificates are no longer trusted for TLS. Use SHA-2 instead
- The validity period must be less than 825 days (about 2 years)
- The DNS name must be specified in the certificate SAN – CommonName is no longer supported
Read more here:-
https://support.apple.com/en-gb/HT210176
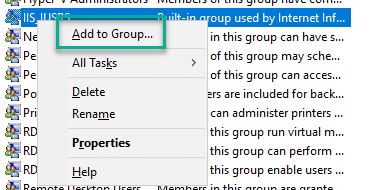
Add NDES Service account to IIS_USRS Group
1 . Open a PowerShell window (As Administrator)
2 . Type compmgmt.msc and press Enter
3 . Expand System Tools > Local Users and Groups > Groups
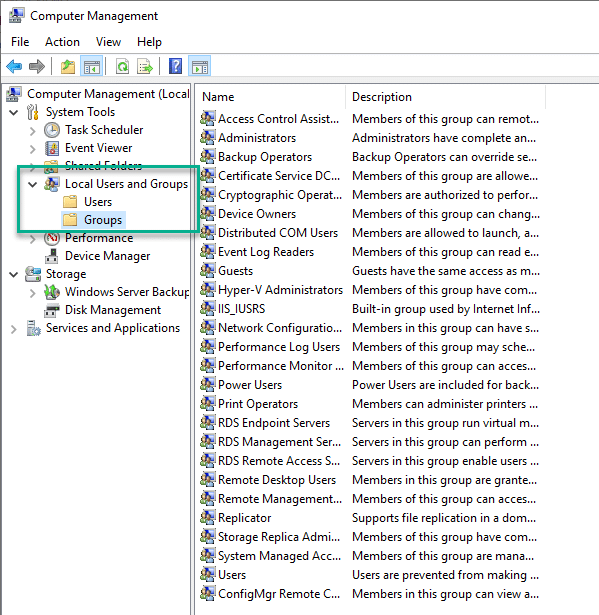
4 . Right click IIS_IUSRS and click Add to Group
5 . Enter the NDES service account and click OK

Configure the NDES Role
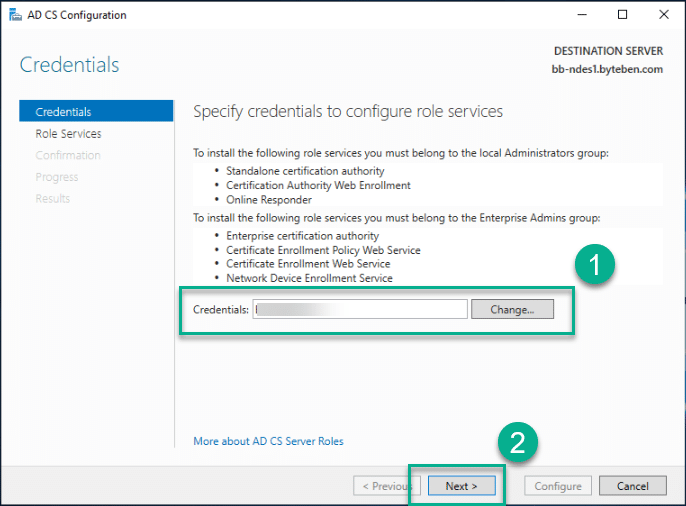
To configure the NDES role, you will need the credentials of an account that is a member of the Enterprise Admins group in Active Directory
1 . Open Server Manager, click on the Notifications icon ⚠️ and select Configure Active Directory Services on the destination server
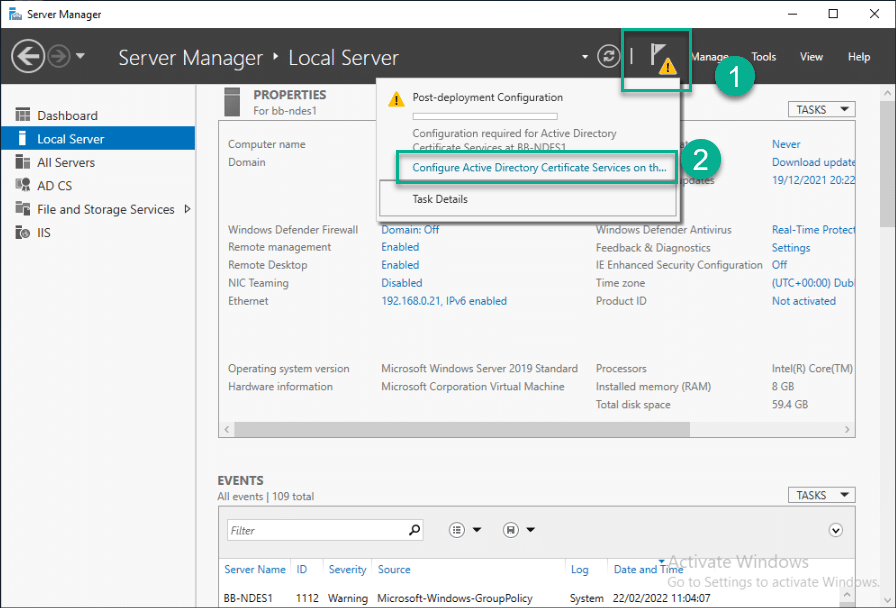
2 . Enter the Enterprise Admin credentials and click Next
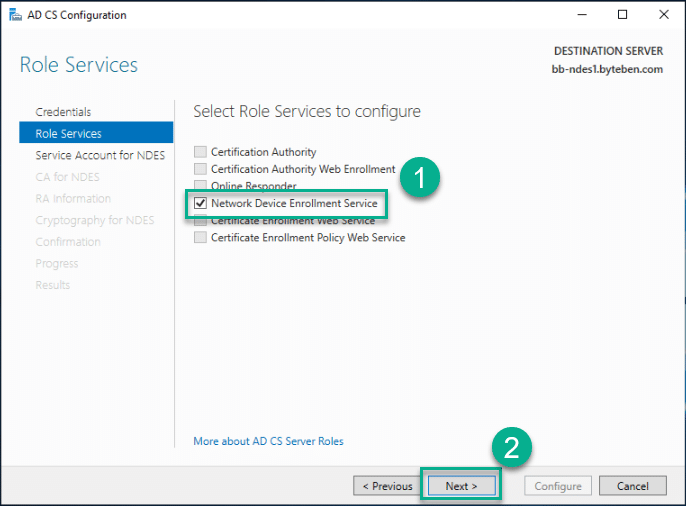
3 . Select the Network Device Enrollment Service role and click Next
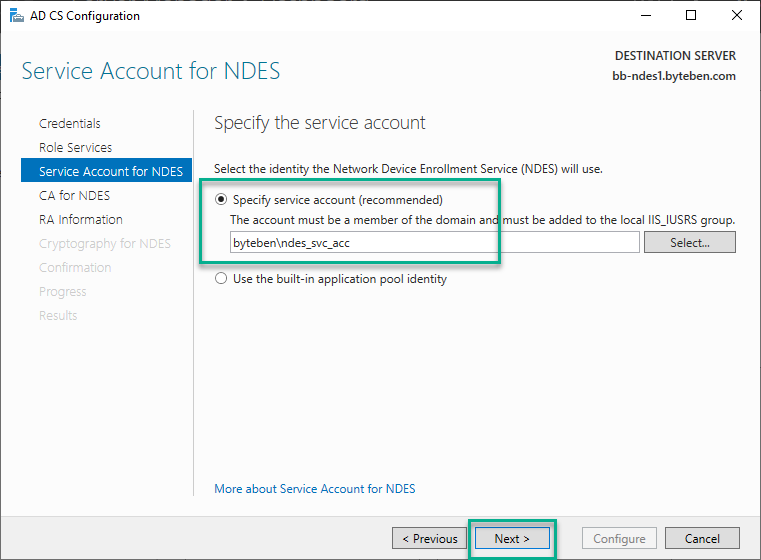
4 . In the Specify the service account step, specify the NDES service account
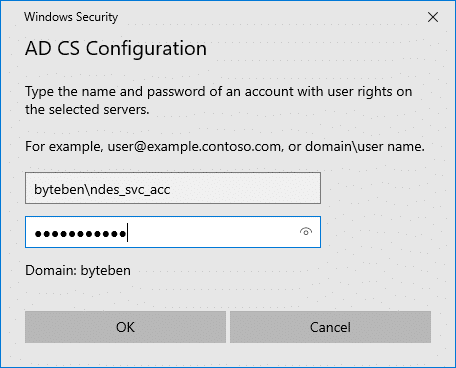
and click Next
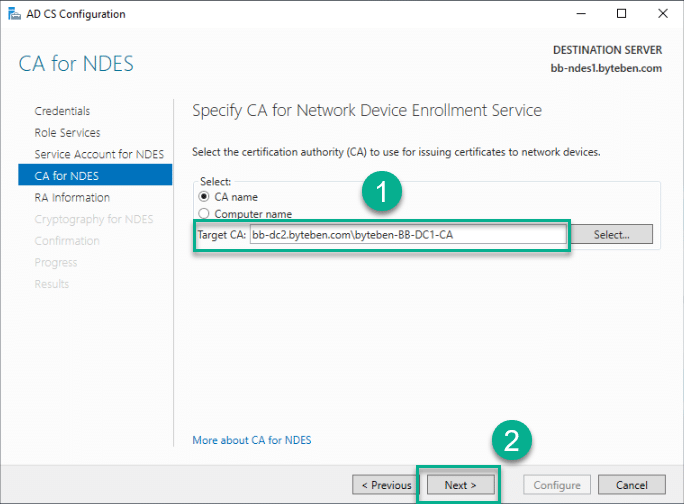
5 . Click Select, select your Enterprise CA and click OK

6 . Verify the target CA is correct and click Next
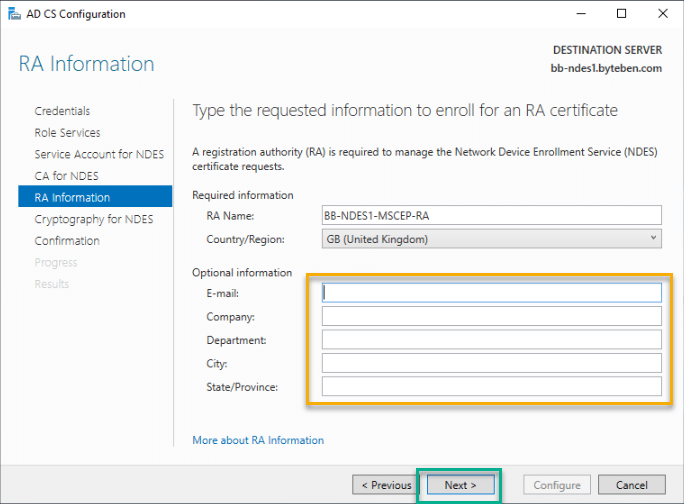
7 . Verify the RA Name and (optionally) configure additional information. This information will be used to create the signing certificate. Click Next
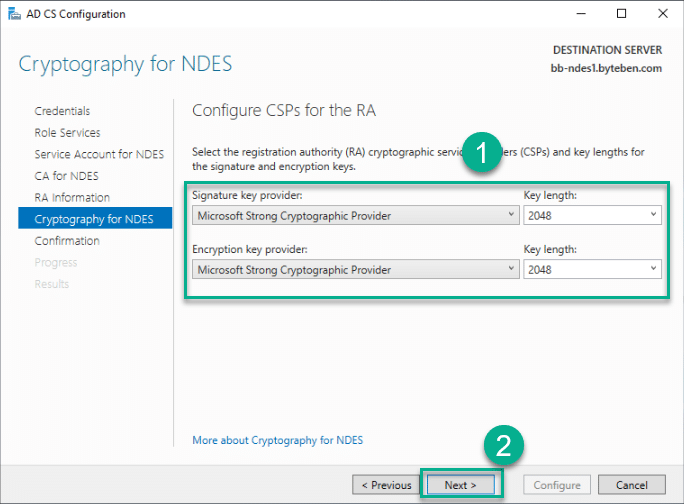
8 . Verify the CSPs and key lengths that will be used for the signature and encryption keys. Click Next
9 . Verify the configuration summary and click Configure
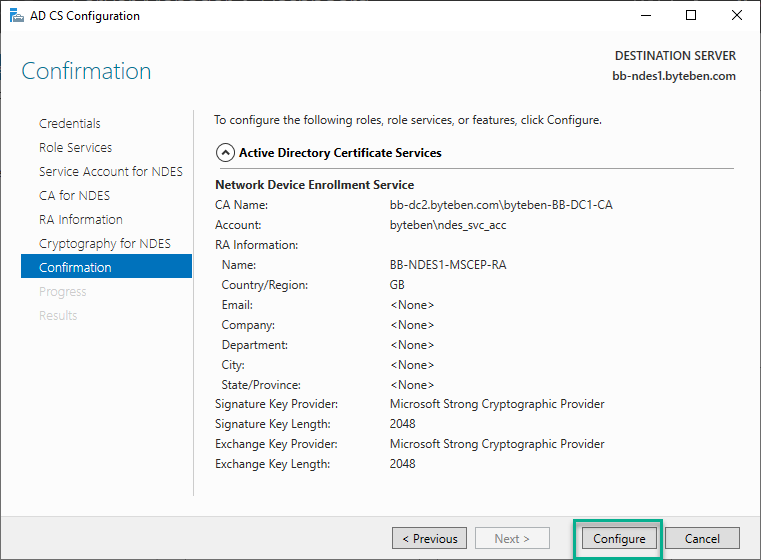
10 . Click Close once configuration has completed
Configure Long URL support
When a HTTP request is made to the NDES server with a URL longer than the maximum allowed by IIS, problems can occur. To avoid this, the maximum URL length should be increased
- From Server Manager, click Tools and select Internet Information Services (IIS) Manager
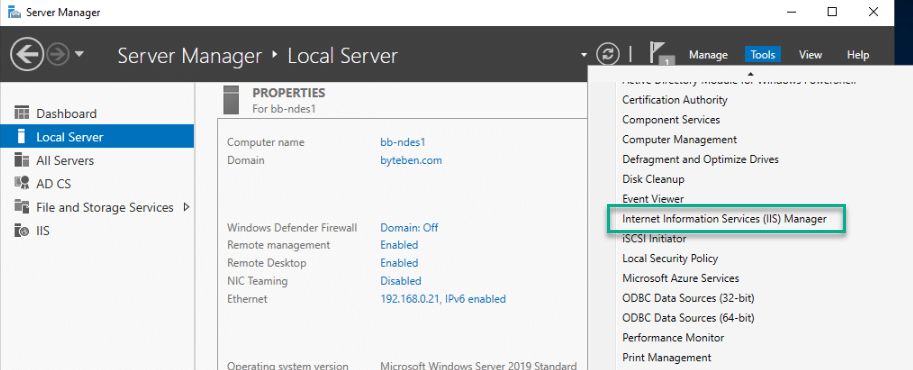
2 . Expand {{NDES Server}} > Sites > Default Web Site and double click Request Filtering
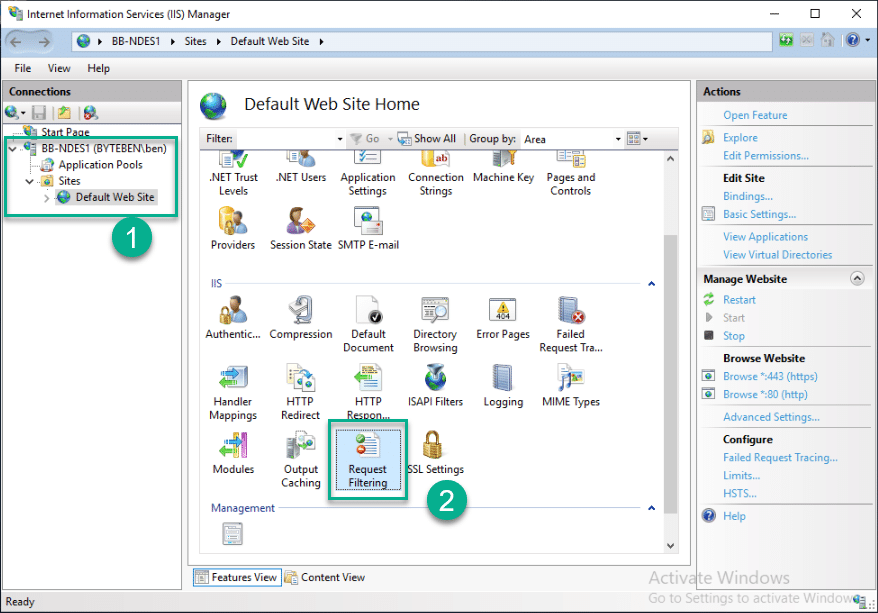
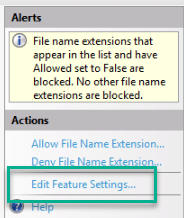
3 . Click Edit Feature Settings…
4 . Set Maximum URL Length and Maximum Query String to 65534
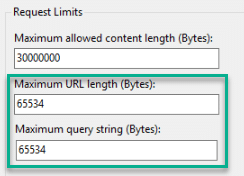
5 . Tick Allow double-escaping and click OK

Sometimes, clients are encounter issues looking up CRL’s. If a plus sign (+) is present in the URI of delta CRLs they must be allowed by IIS. Read more here:-
https://docs.microsoft.com/en-us/previous-versions/windows/it-pro/windows-server-2008-R2-and-2008/dd379478(v=ws.10)?redirectedfrom=MSDN
The maximum URL length also needs to be configured in the registry
1 . Open the Registry Editor as an Administrator
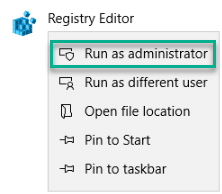
2 . Navigate to HKEY_LOCAL_MACHINE\SYSTEM\CurrentControlSet\Services\HTTP\Parameters and edit/add the REG_DWORD values for MaxRequestBytes and MaxFieldLength to 65534 (Decimal)

Enroll and Assign the NDES Server Certificate
If you previously configure the auto enroll GPO the Web Server certificate we created in Part 2 of this series we set the NDES certificate to autoenroll for any computer in the NDES-Servers AD group
Remember, for auto update of the NDES Server certificate to work, you will also need to create a GPO to allow auto enrollment of certificates for the NDES Server(s). An example of how to configure auto enrollment can be found below:-
https://docs.microsoft.com/en-us/windows-server/networking/core-network-guide/cncg/server-certs/configure-server-certificate-autoenrollment#configure-server-certificate-auto-enrollment
1 . Open the Certificate snap-in on the NDES Server by running certlm.msc
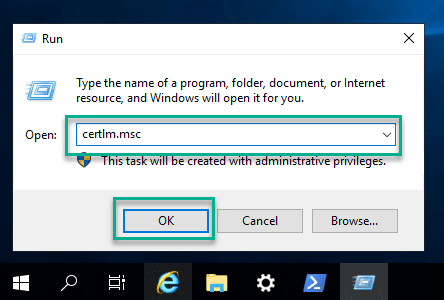
2 . Navigate to Certificates – Local Computer > Personal > Certificates and verify the NDES certificate is enrolled as expected

3 . From Server Manager, click Tools and select Internet Information Services (IIS) Manager
4 . Expand {{NDES Server}} > Sites > Default Web Site and click on Bindings
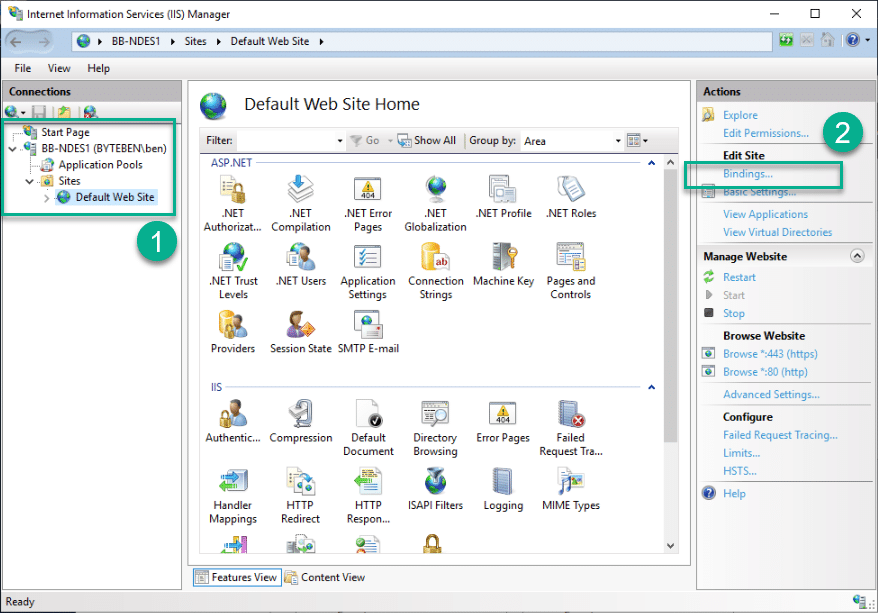
5 . Select the https binding and click Edit
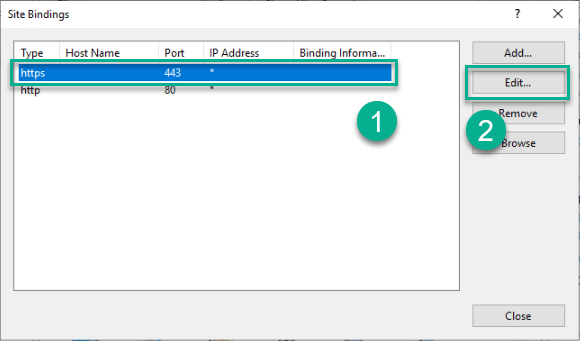
Select https binding
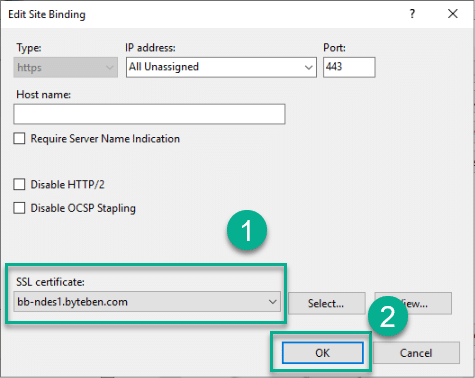
6 . Select the NDES Server certificate and click BOK
7 . Select the http binding and clickRemove
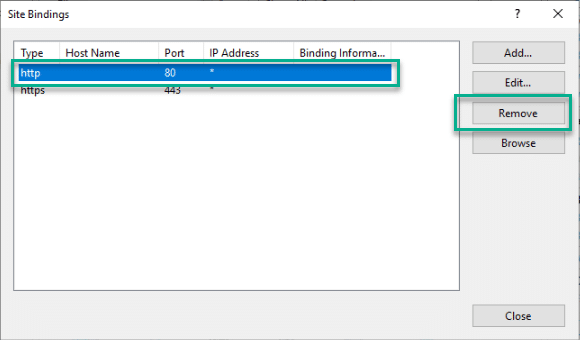
8 . Click Close to close the binding configuration page
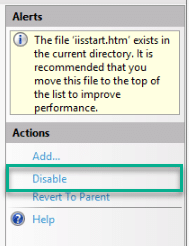
IIS Default Document
Disabling the Default Document is not a hard requirement for NDES but it is considered good practice
1 . From Server Manager, click Tools and select Internet Information Services (IIS) Manager
2 . Expand {{NDES Server}} > Sites > Default Web Site and double click on Default Document
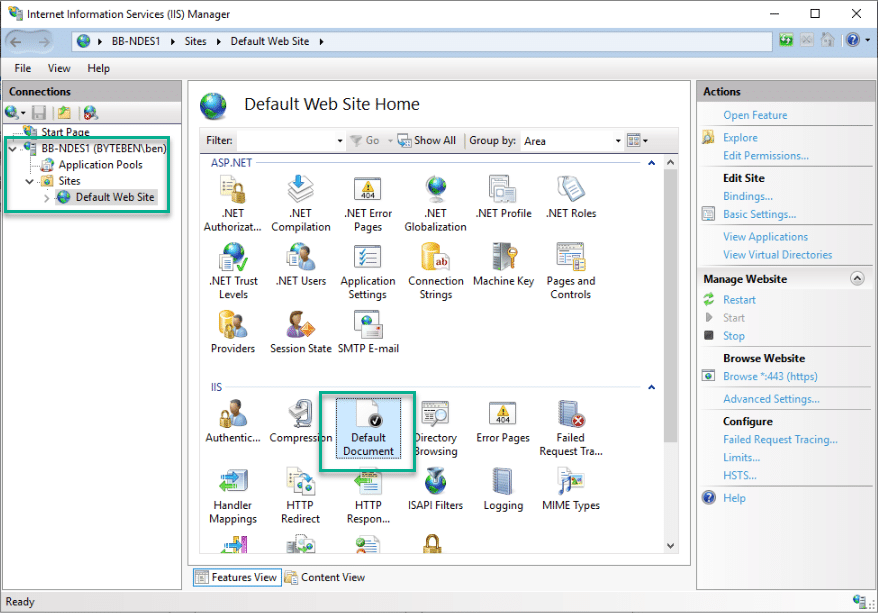
3 . In the Actions pane, click Disable
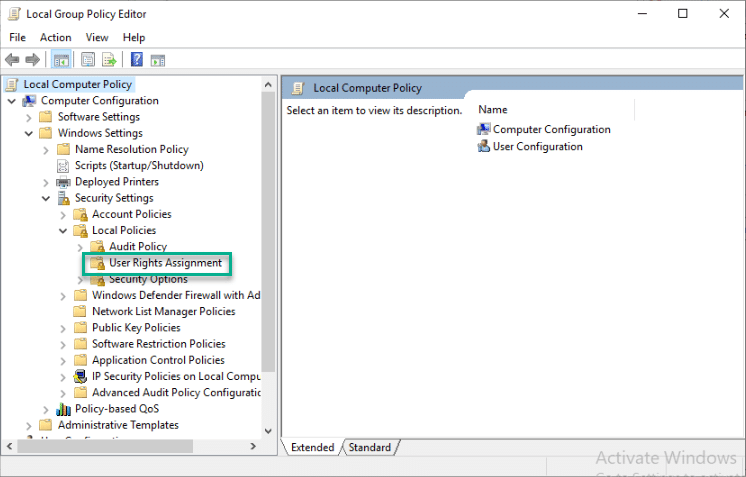
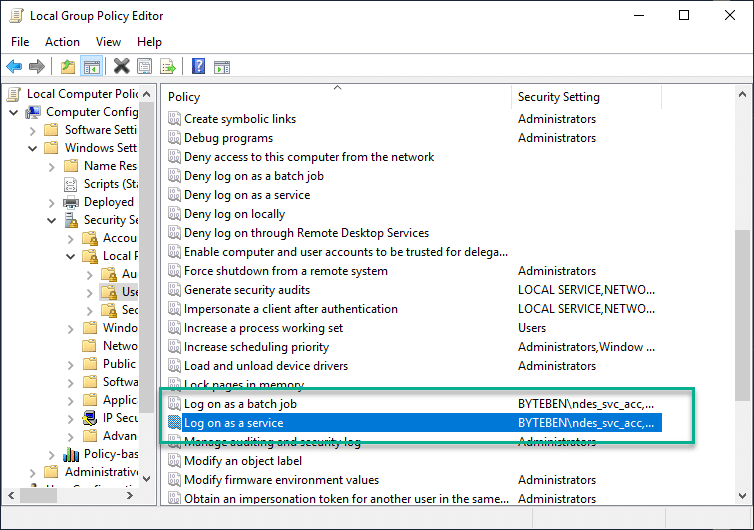
User Rights Assignment
The service account requires the following privileges on the NDES server:-
- Allow log on locally
- Log on as a batch job
- Log on as a service
You can do this via a Domain GPO or edit the security policy locally. As we only have a single NDES server we will config the policies locally
1 . Open gpedit.msc as an Administrator
2 . Navigate to Local Policy > Computer Configuration > Windows Settings > Security Settings > Local Policies > User Rights Assignment
3. In the policy list, double click Allow log on locally
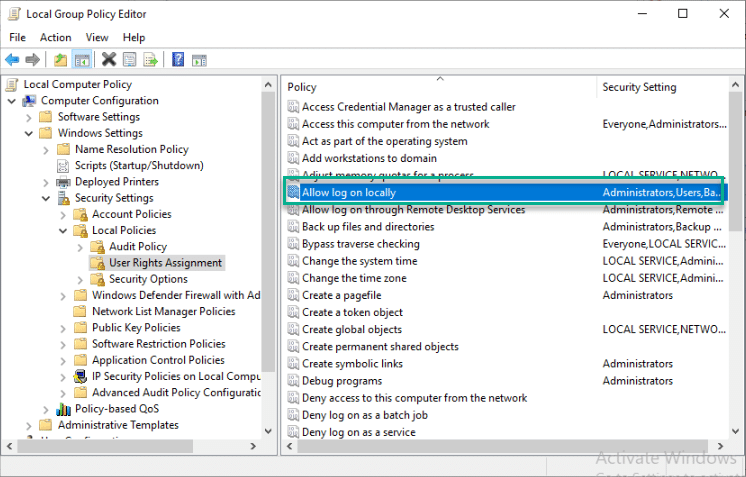
4 . Click Add User or Group and enter the ndes_svc_acc account. Click Check Name to verify the account and click OK
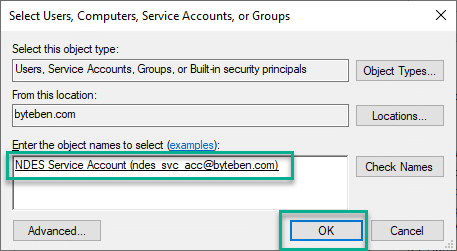
5 . Verify the account is listed and click OK
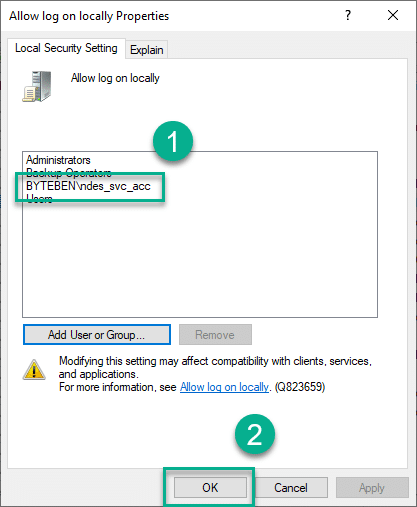
6 . Repeat steps 1 through 5 and add the service account to the policies Log on as a batch job and Log on as a service *
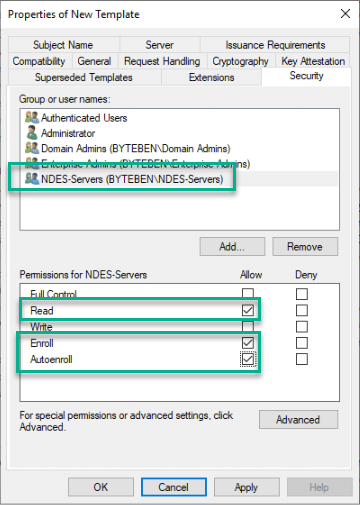
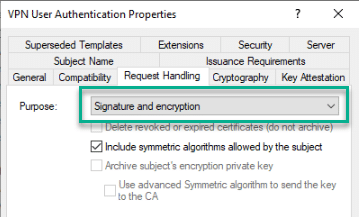
MSCEP Certificate Selection
We need to specify which template is selected when a certificate request is made. When we configured the VPN User certificate in Part 2 we specified the purpose of the certificate as Signature and Encryption
There are 3 different template values we can modify in the registry on the NDES server to determine which template will be chosen for a specific purpose
EncryptionTemplate = Used for Certificates with a purpose of Encryption only
SignatureTemplate = Used for Certificates with a purpose of Signature only
GeneralPurposeTemplate = Used for Certificates with a purpose of both Signature and Encryption
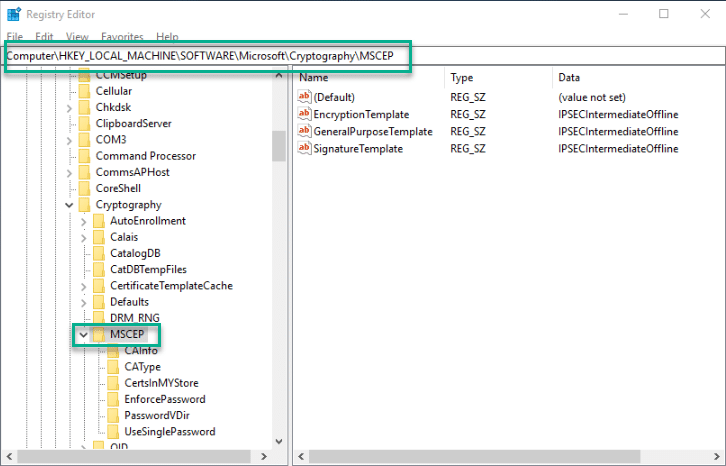
These values can be found in the following registry key
HKEY_LOCAL_MACHINE\SOFTWARE\Microsoft\Cryptography\MSCEP
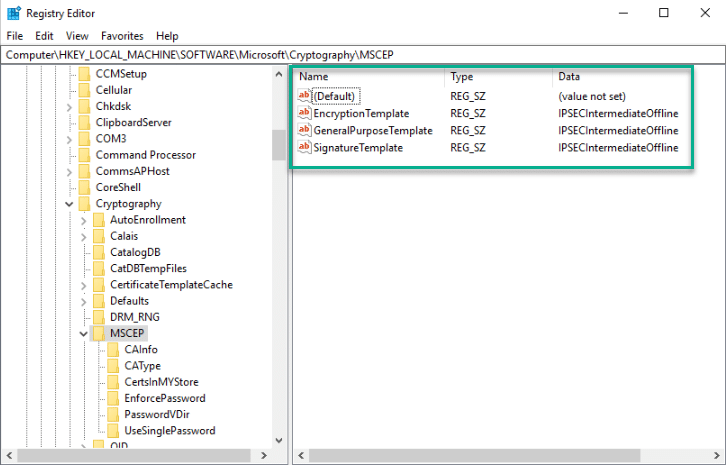
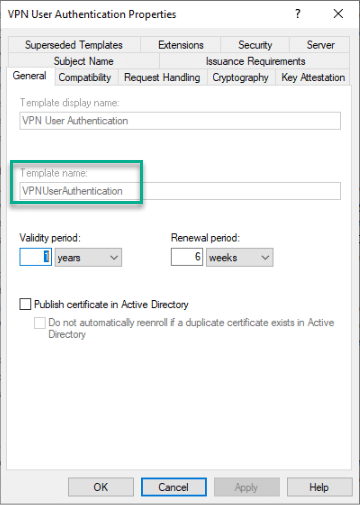
As our certificate purpose is for both Signature and Encryption purposes, we need to enter the template name value for GeneralPurposeTemplate
The template name for the VPN User Certificate that we created in Part 2 is VPNUserAuthentication
1 . Open the Registry Editor as an Administrator
2 . Navigate to HKEY_LOCAL_MACHINE\SOFTWARE\Microsoft\Cryptography\MSCEP
3 . Modify GeneralPurposeTemplate and enter VPNUserAuthentication
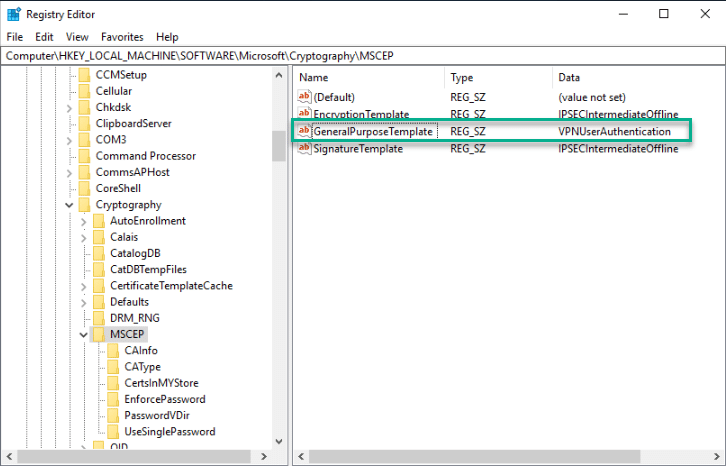
4 . Reboot the NDES Server
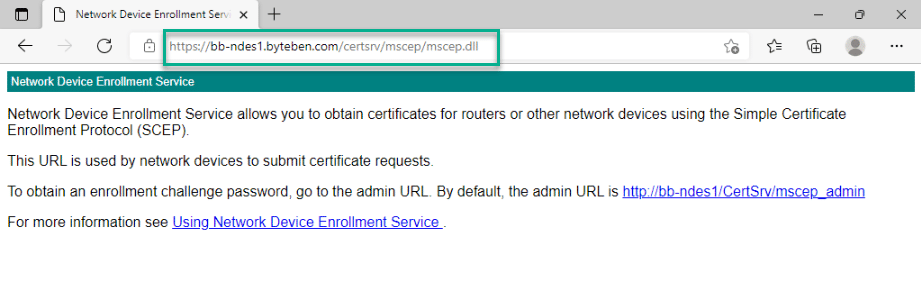
Verify NDES Configuration
Open a browser on the NDES server and browse to the following address:-
https://{{NDES Server FQDN}}/certsrv/mscep/mscep.dll
Microsoft Intune Certificate Connector
Now that NDES is configured, we can install the Microsoft Intune Connector on the NDES server to secure communication with the MSCEP endpoint
Prerequisites
Some of the prerequisites have already been installed on the NDES server as part of the NDES role configuration. A summary of the requirements are below:-
- Port 443 Outbound to the Endpoint autoupdate.msappproxy.net
- Access to the following Network Endpoints
https://docs.microsoft.com/en-us/mem/intune/fundamentals/intune-endpoints - .NET Framework 4.7.2
- IE Enhanced Security mode must be disabled
- An account with Global or Intune Administrator privileges (only required to setup the initial connection not permanently)
- An account with an Intune Licence
Installation
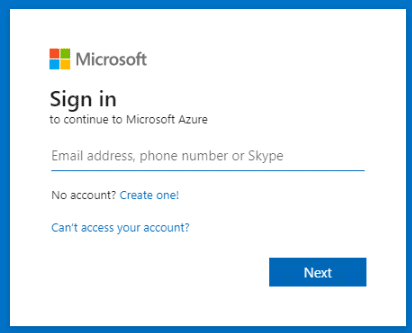
1 . From the NDES Server, open a modern browser and navigate to https://endpoint.microsoft.com
2 . When prompted, sign in with either Global Administrator or Intune Administrator credentials
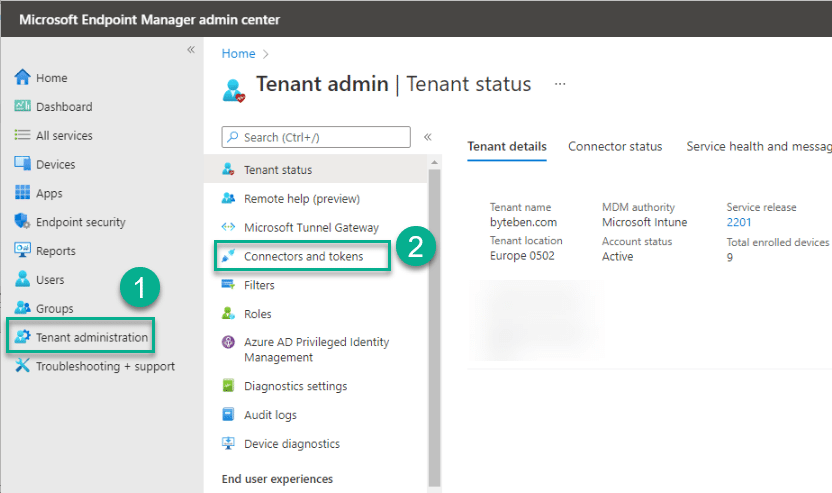
3 . Navigate to Tenant administration > Connectors and tokens
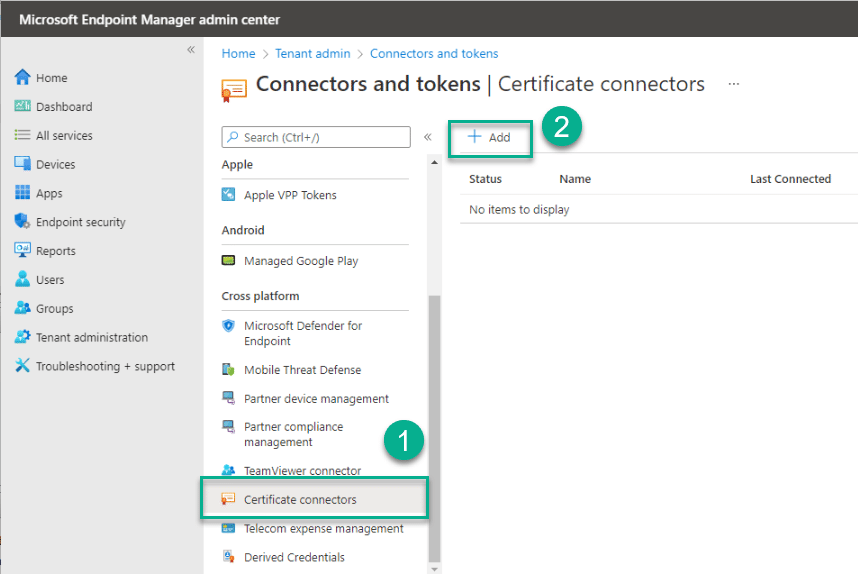
4 . Select Certificate connectors and click Add
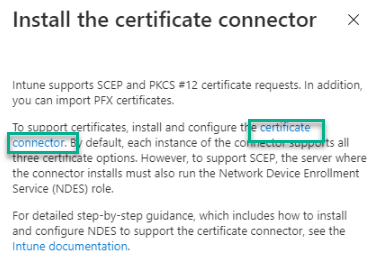
5 . Click the link to download the certificate connector to the NDES server

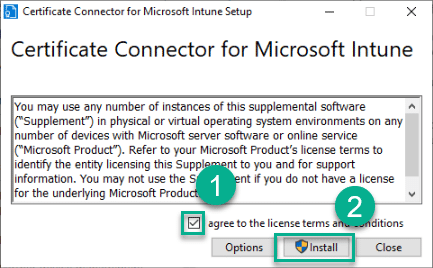
6 . Open the downloaded file. Tick I agree to the license terms and conditions and click Install
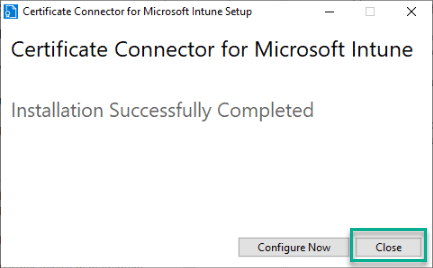
7 . Click Close
Configuration
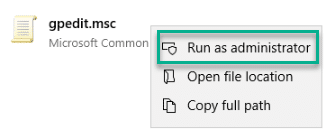
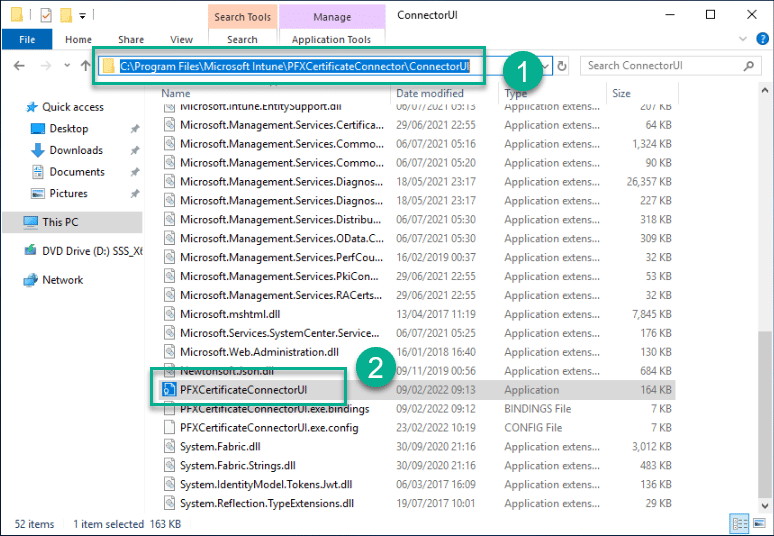
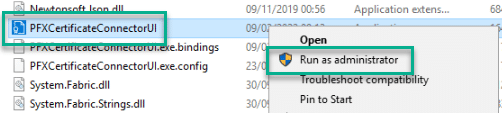
1 . Open Windows Explorer and navigate to C:\Program Files\Microsoft Intune\PFXCertificateConnector\ConnectorUI and right click PFXCertificateConnectorUI.exe and select Run As Administrator
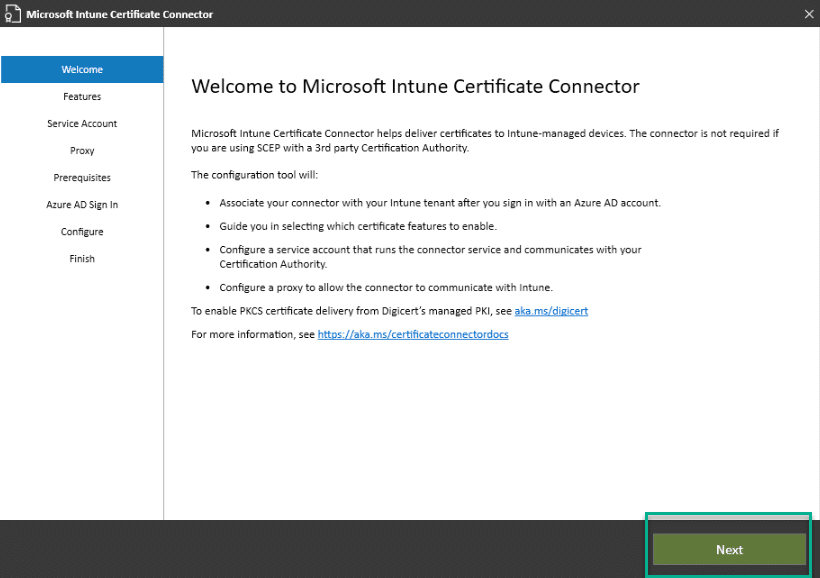
2 . Click Next at the Welcome screen
3 . Tick both SCEP and Certificate revocation and click Next
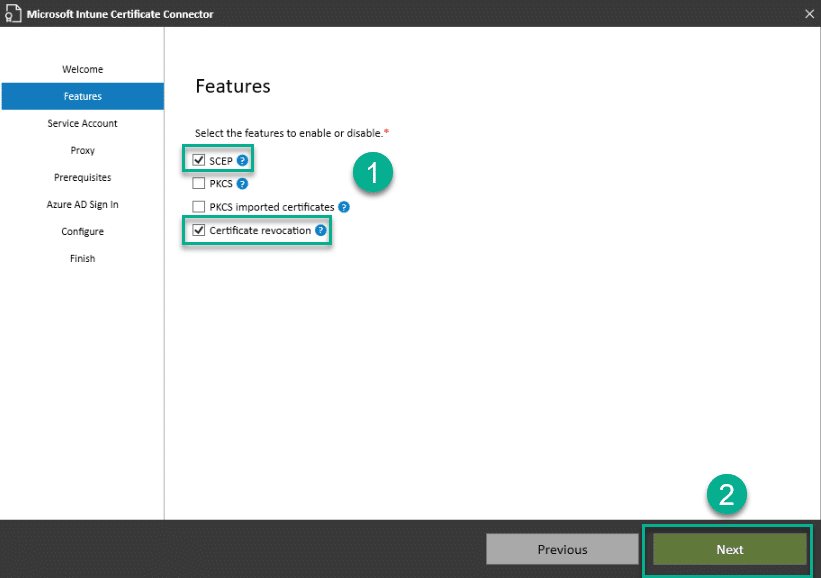
Select Features
4 . Select Domain account, enter the credentials for the NDES Service account that we created in Part 2 of the blog series and click Next
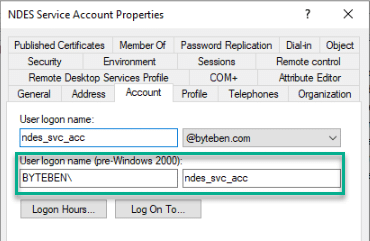
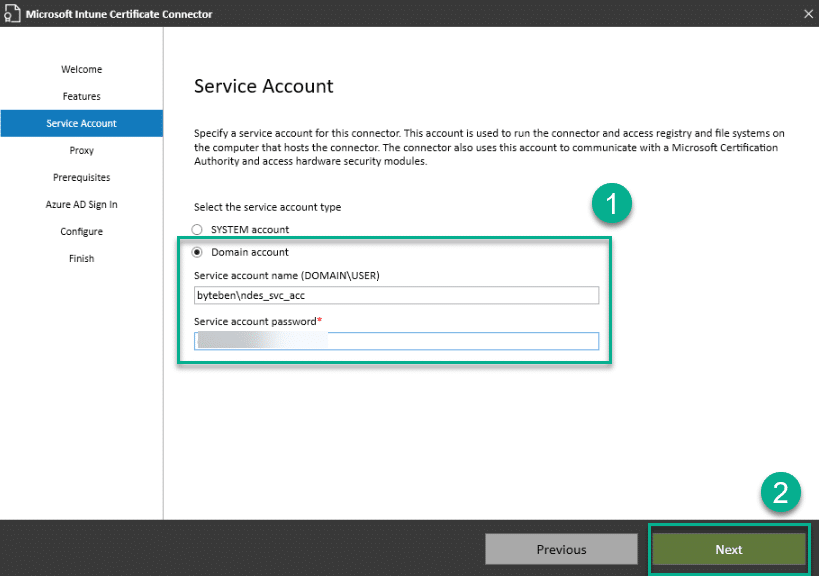
NDES Service Account credentials
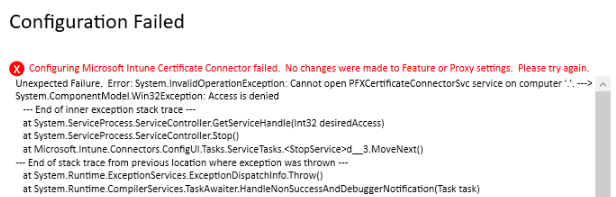
IMPORTANT Credentials are not validated at this stage. If you enter incorrect credentials or password combination you may see an error like this later during the wizard
This service account is used for certificate issuance and revocation
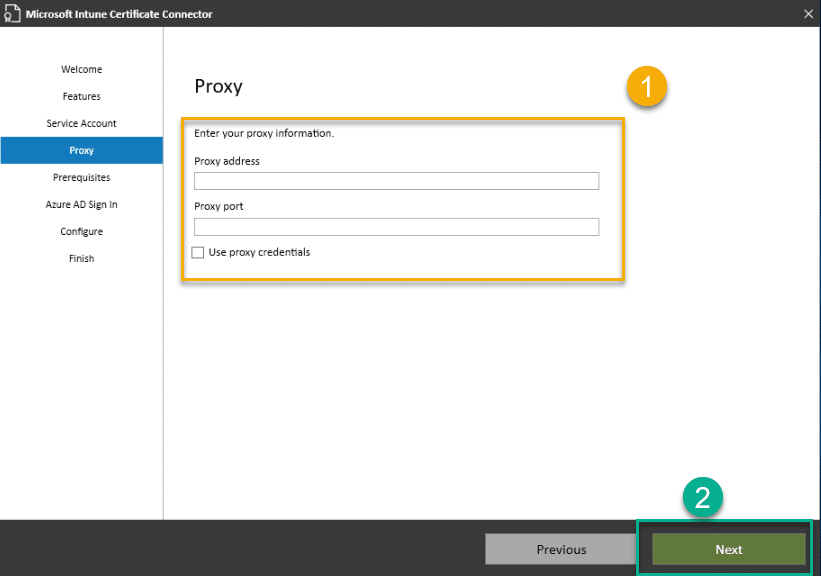
5 . If outbound connections from the NDES server require the use of a Proxy Server, enter that information here and click Next. Otherwise just click Next
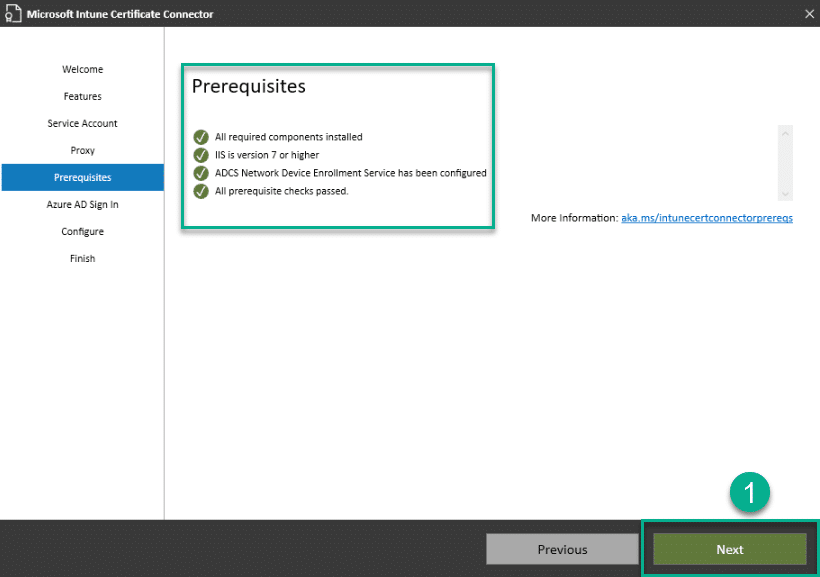
6 . Assuming you have followed this whole guide, the prerequisites should all have been configured. Click Next
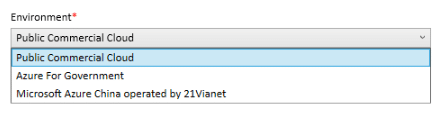
7 . Select the appropriate Azure environment for your organisation and click Sign In
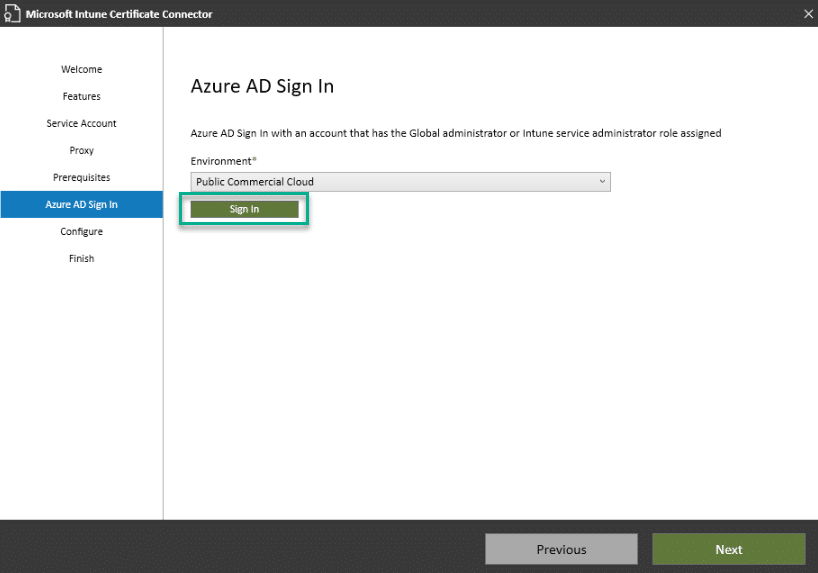
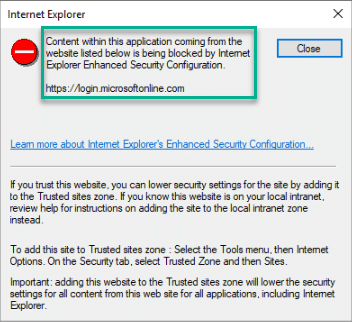
If you see the message below. Turn IE Enhanced Security Configuration On and then back Off again in Server Manager
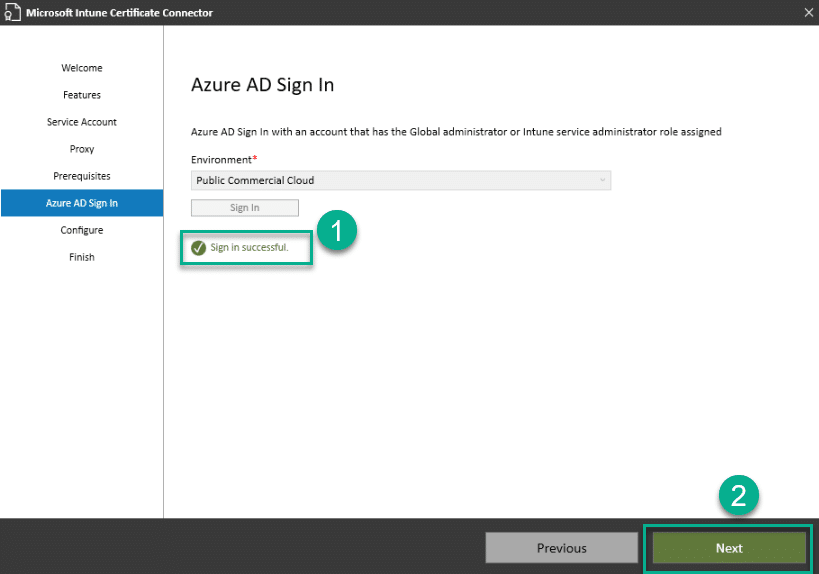
8 . Enter your Global Administrator or Intune Administrator credentials and click Next. Remember, this account also needs to be assigned an Intune License

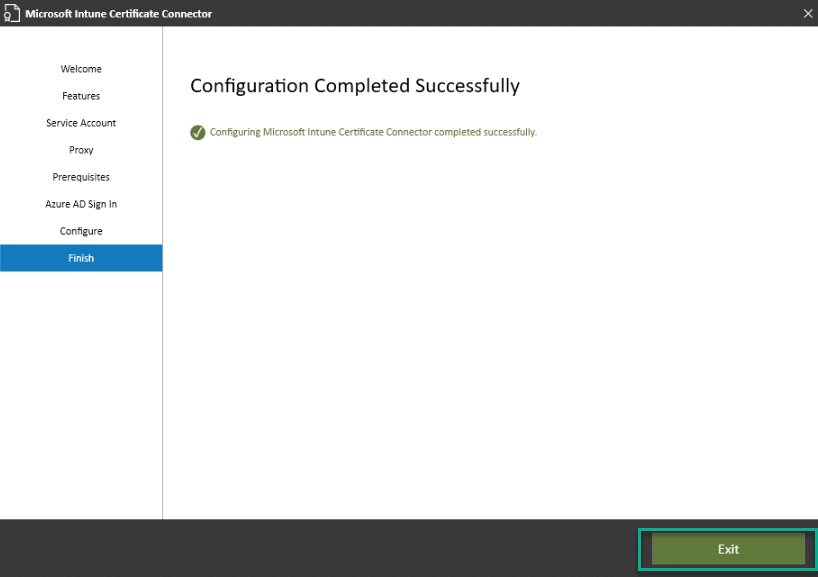
9 . Once configuration has completed, click Exit
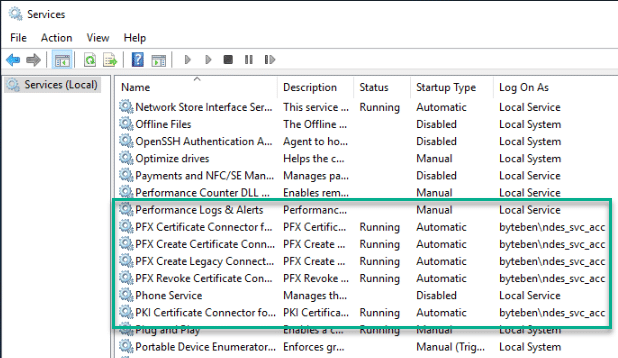
10 . Open services.msc and verify the Certificate Connector service is running with the correct NDES Service account
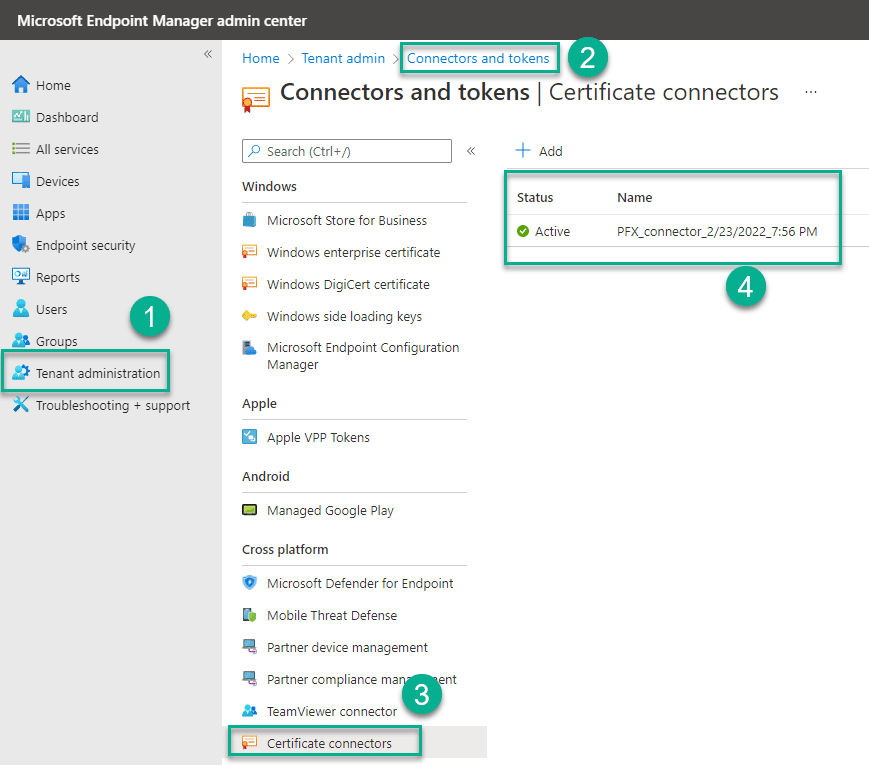
11 . Verify you can see the Certificate Connector has registered correct in the Microsoft Endpoint Manager admin center. Navigate to Tenant Administration > Connectors and Tokens > Certificate connectors
Certificate Revocation Permissions and Restrictions
At the time of writing this blog, the Microsoft Intune Certificate Connector does not support gMSA’s still which is why we had to use a Domain Account to run the connector service. The same domain account requires the necessary permissions to revoke certificates issued by NDES. We need to configure those permissions on the Enterprise CA
It is wise to restrict the NDES Service Account from issuing and revoking ALL certificates from ALL templates on the CA. We will add these restrictions in the following steps
1 . On the server hosting ADCS, open the Certificate Authority console certsrv
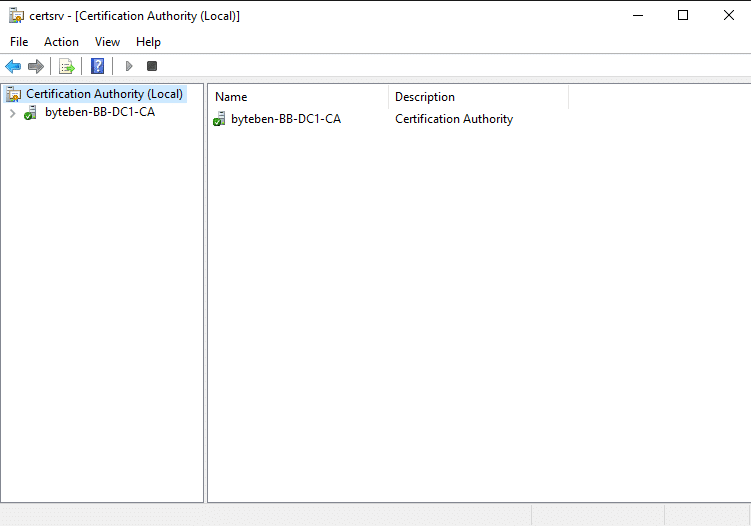
2 . Right click the CA and click Properties
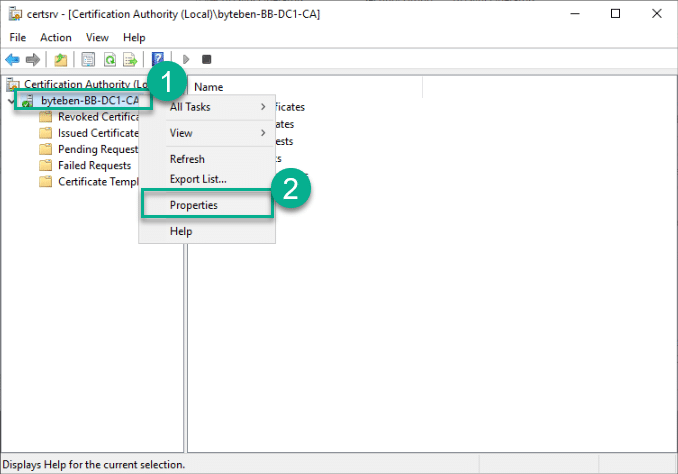
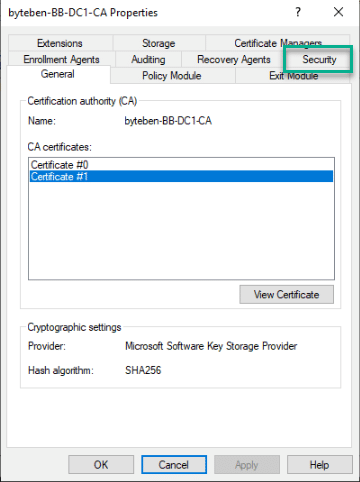
3 . Click the Security tab
4 . Click Add
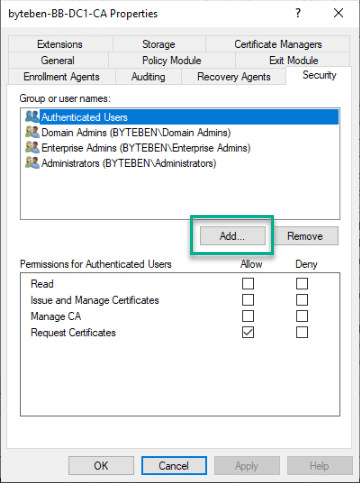
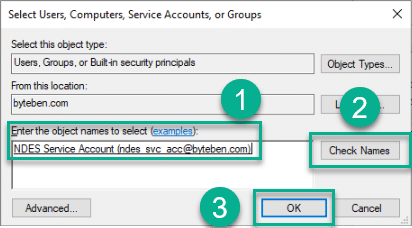
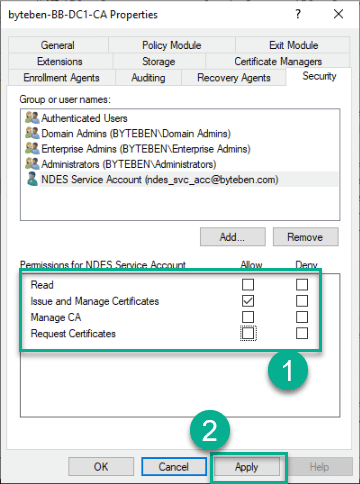
5 . Search for the NDES Service Account, click Check Names and click OK
6 . Untick Request Certificates, tick Issue and Manage Certificates and click Apply
7 . Select the Certificate Managers tab and then select Restrict certificate managers

8 . Select the NDES Service Account and in the Certificate Templates pane, click Add
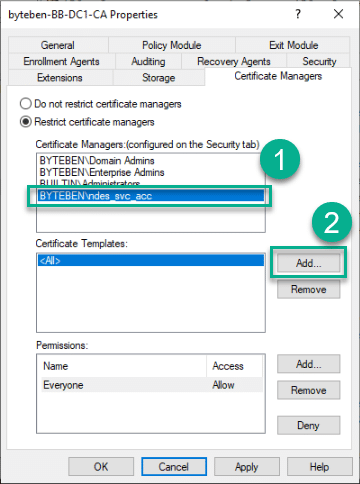
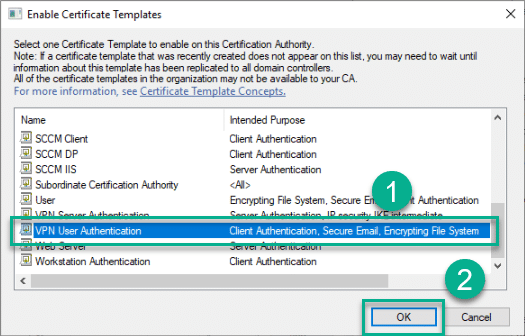
9 . Select the VPN User Authentication Certificate we created in Part 2 and click OK
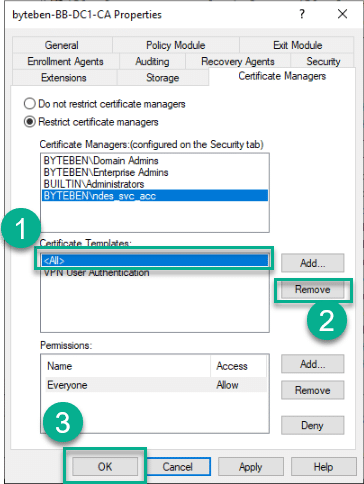
10 . In the Certificate Templates pane, select All, click Remove and click OK
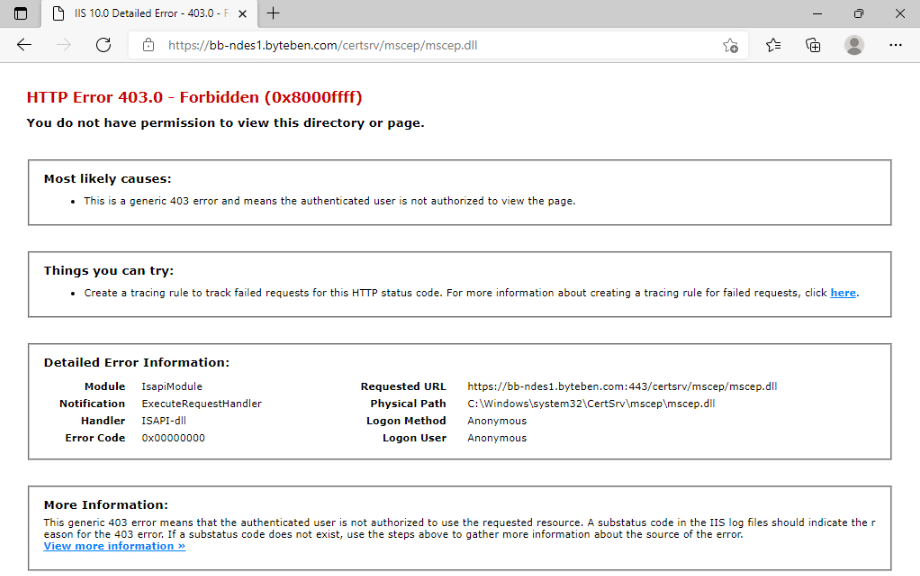
Verify MSCEP Hardening
Open a browser on the NDES server and browse to the following address:-
https://{{NDES Server FQDN}}/certsrv/mscep/mscep.dll
Before we installed the Microsoft Intune Connector, we saw the page below
After installing the Microsoft Intune Certificate Connector, we should see a 403 page when we try to browse to the same URL. This means configuration was succesful!
Summary
This was by far the longest part in the MEGA series so far. We looked at how to install, configure and verify an NDES installation. After NDES had been configured we installed the Microsoft Intune Certificate Connector to harden MSCEP to accept requests from Intune clients only
In Part 6 we will look at how to install and configure the Azure AD Application Proxy to publish our MSCEP Server URL to the internet


Add comment