

In this blog post I will be showing you how to get started with certificate based authentication for Azure Active Directory (AAD) applications.
The story so far
The world has gone cloud crazy. But this is a good thing! Thinking back to my old admin days, any script I wrote would be deployed using GPO’s, Scheduled Tasks, RMM tools, ConfigMgr, Login Scripts and more. As we now focus our automation efforts on cloud services, the good old days of “dropping a script somewhere and running it” are coming to an end. Whether you are running scripts interactively to get data from Graph API or using Azure Functions to automate that task for you – you would have to authenticate at some point to prove you have the permissions to make that API call.
Thinking back to the old days, I would typically authenticate myself against Active Directory to prove I had the necessary permissions to perform a task. In the modern world, its a similar model and I now authenticate against AAD to obtain the token I need to perform a particular function or call to the Graph API.
App Registrations
When I think about automation, I instinctively get drawn to Microsoft Graph. The API’s are rich and expose a wealth of information about my Microsoft Services. I can jump over to Graph Explorer aka.ms/ge and this is a great tool to familiarize yourself with queries to the Microsoft Graph but at some point you are going to want to use other programming logic to build your query that will get posted to the Microsoft Graph. To make calls to the Graph we need need to have an access token and to get that access token we need to authenticate to AAD.
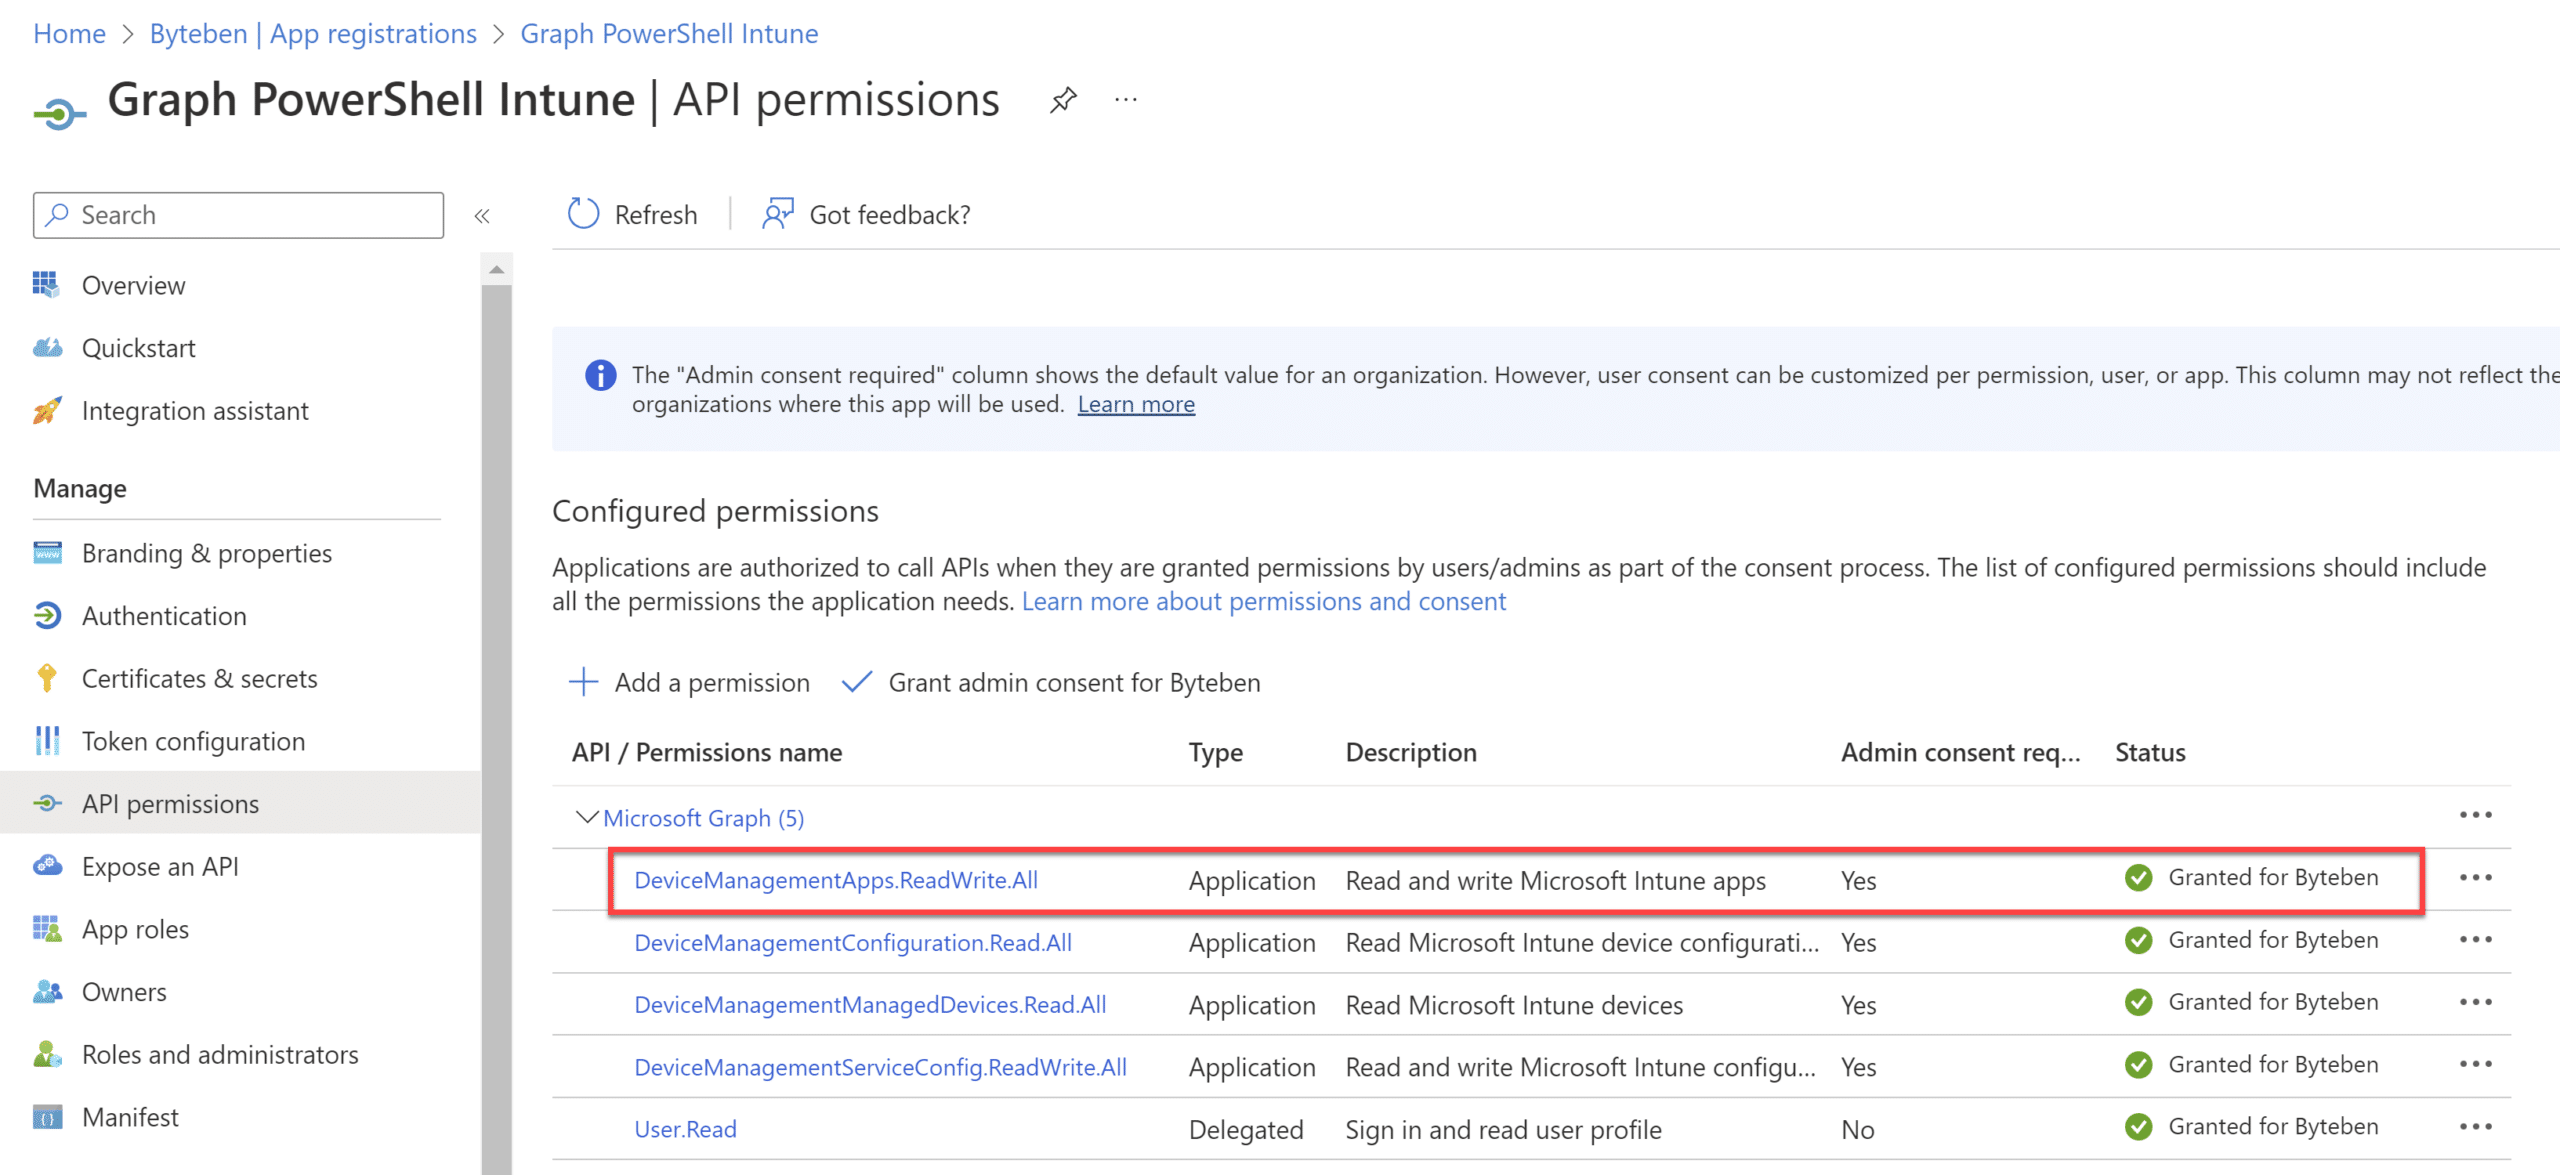
Now, typically you might be using an AAD App registration (a service principal) to get the token. The service principal is granted the necessary permissions it requires for your automation to do its thing. These permissions are explicitly granted on the service principal (see below) For example, if I wanted to read and write Win32apps in Intune, my app registration must be granted permission DeviceManagementApps.ReadWriteAll
Client Secrets

You will see A LOT of blogs and automation examples on the internet where the admin will use a very easy method to authenticate the Service Principal. A basic password – otherwise known as a Client Secret. Client secrets are quick and easy to use but they come at a price.
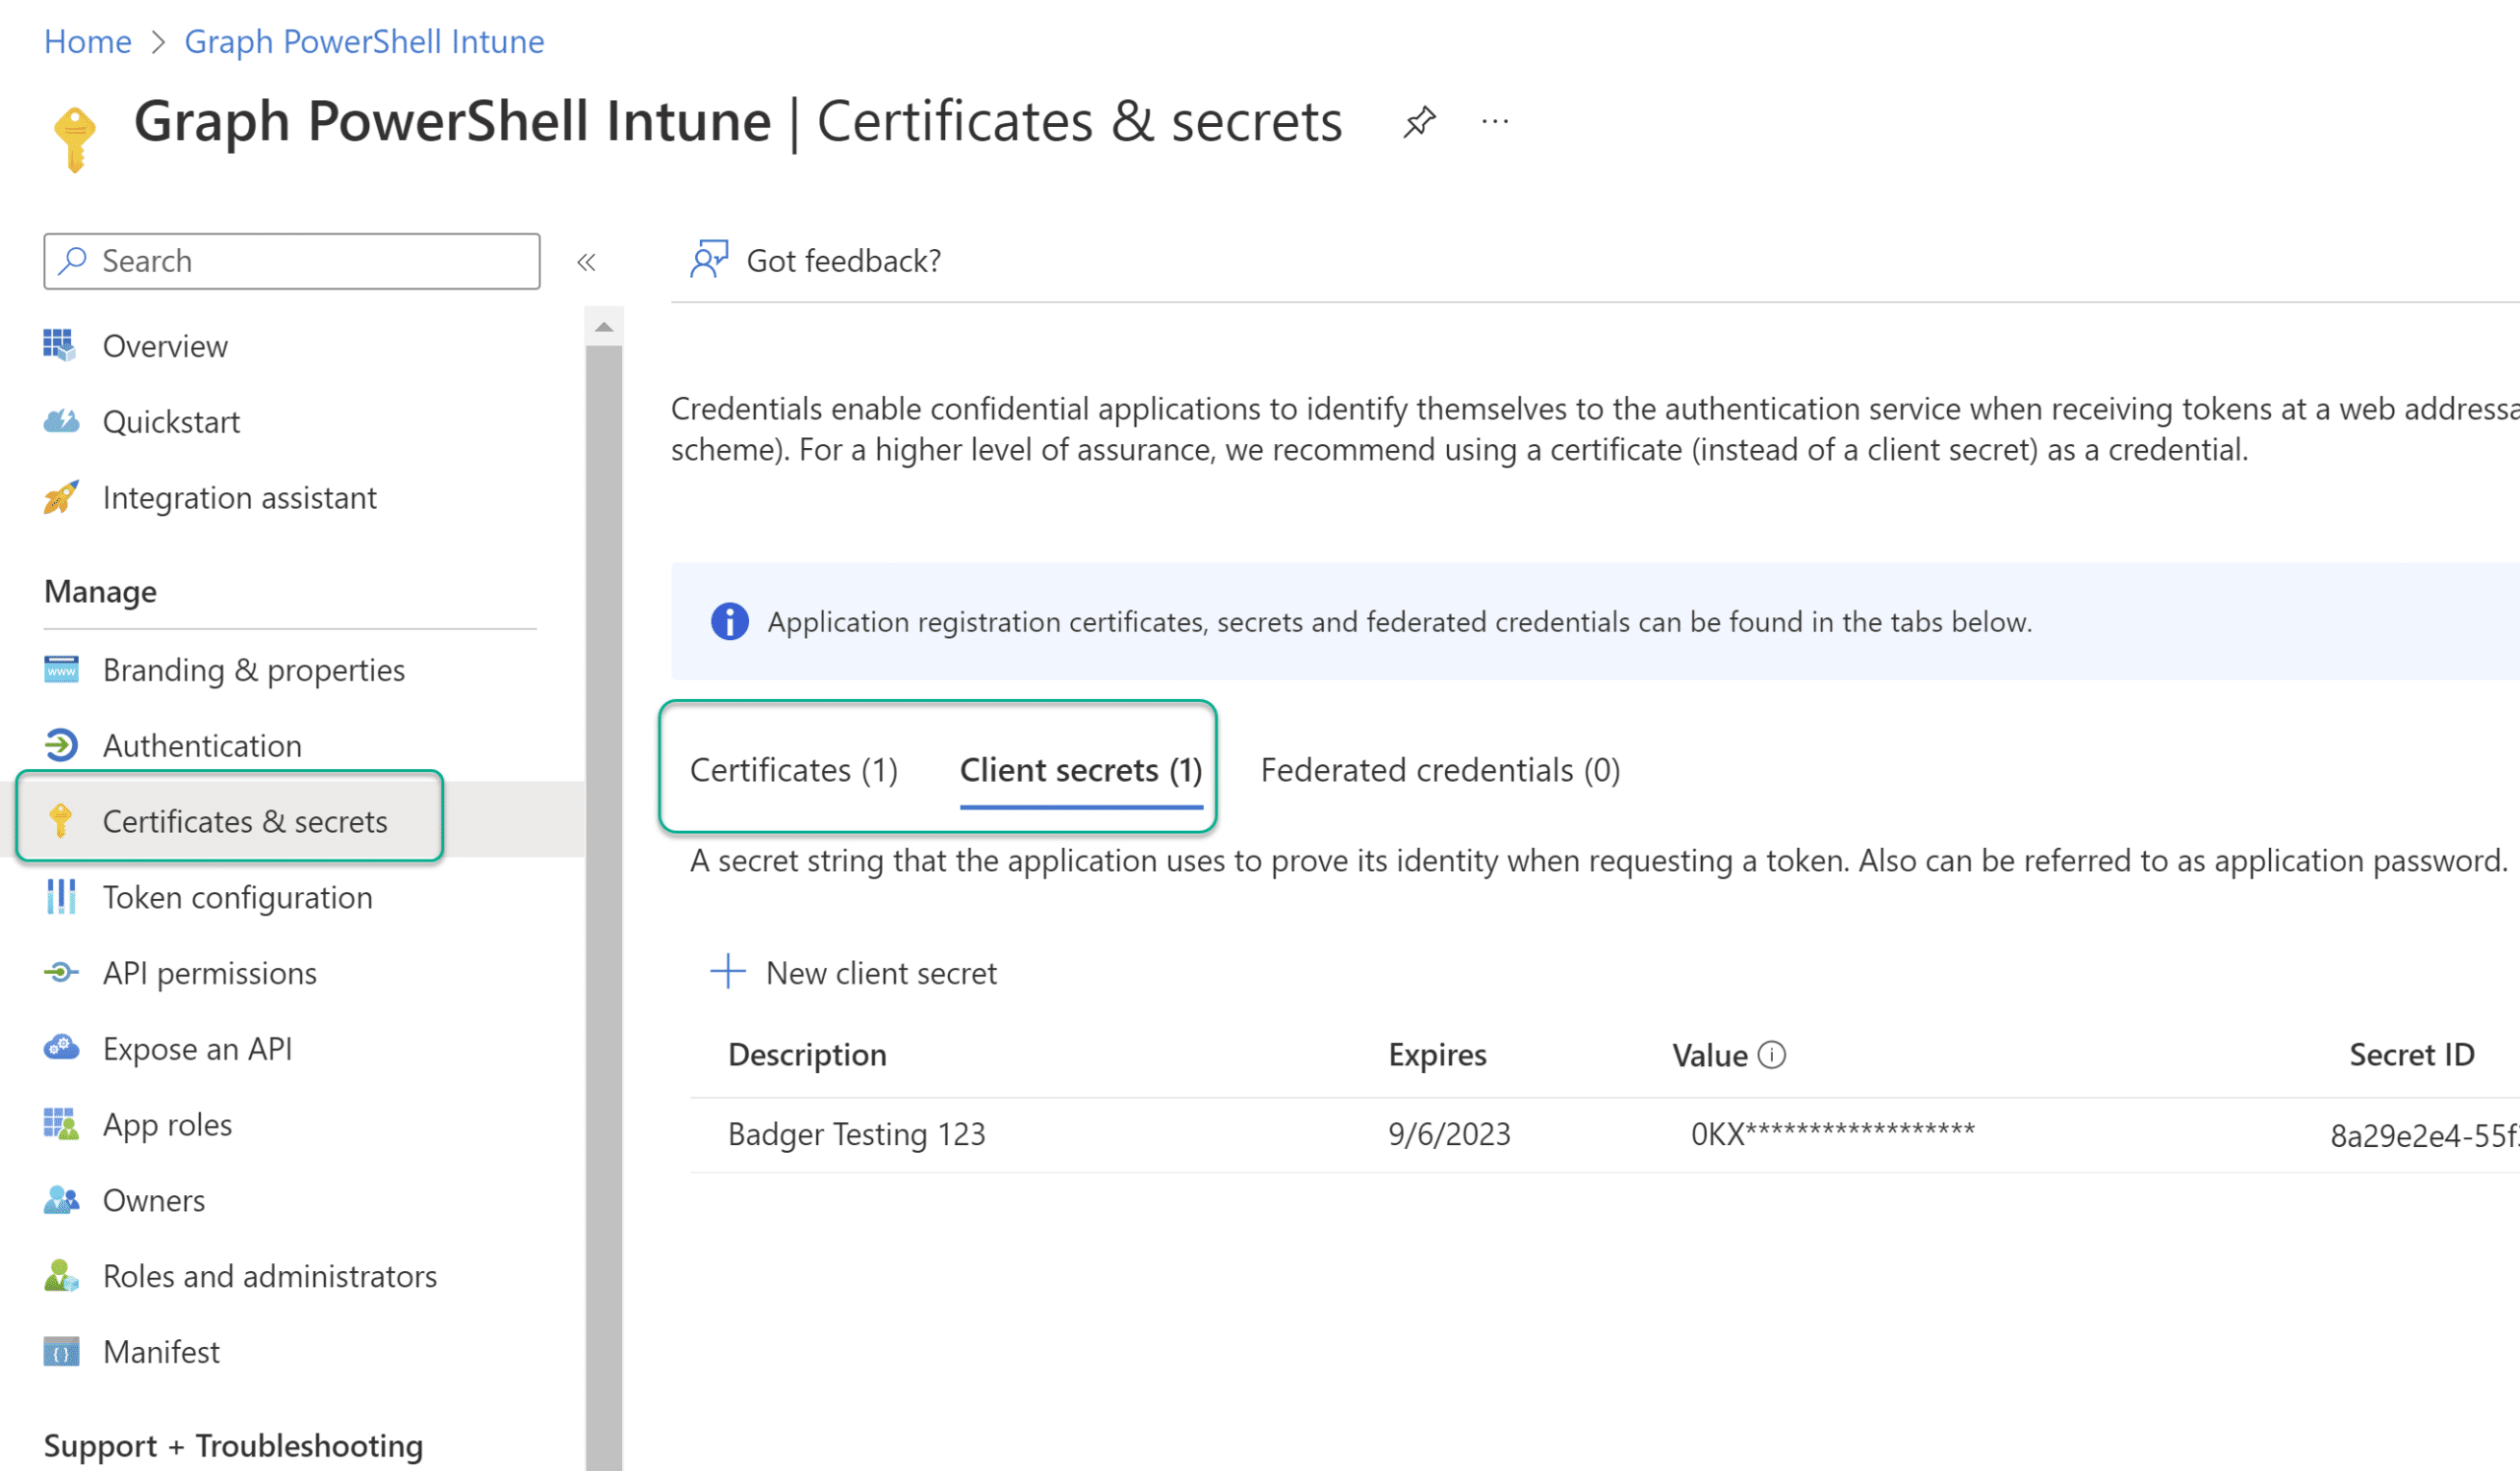
If we look at the Certificates and secrets blade on the app registration, you will see there are 3 ways to authenticate.
- Certificates
- Application Secrets
- Federated Credentials
The client secret is a short/long lived password. When we authenticate to the Microsoft Graph with our service principal, we need to present 3 pieces of information.
- Tenant ID (which tenant are we authenticating against)
- Application ID (same concept as a username)
- Client Secret (same concept as a password)
We don’t have the option of creating a secret that lasts forever, but a secret can be configured to be valid for up to 2 years

2 years is an incredibly long time for basic credential to be hanging around, especially when we don’t have any other protections around it like we do with normal user accounts, like MFA.
Once you create a client secret, it is only visible in the portal temporarily. When you navigate away from the blade the client secret is obfuscated
Authenticating with a client secret is considered basic authentication. Anyone with the Tenant Name/ID, Application ID and Client Secret can authenticate with the service principal in your tenant. Yeah its probably OK for testing with the minimum value of a client secret set to 90 days but will you go in and clear down your client secrets after performing your tests? The likelihood is no.

Where do I see Client secrets used badly? Hard coded in PowerShell scripts 🙁 Please, for the sake of all things great and small, do not do this! If you insist on using Client Secrets, at least store them in a key vault but never hard code them in your scripts.
Jan wrote a really good article on using Client Secrets in conjunction with Azure Key vault at Securing Intune Enhanced Inventory with Azure Function – MSEndpointMgr
The IntuneManagementExtension.log will display the script body of a script pushed from Intune. If you hard coded a client secret in your script it will be visible to anyone who opens that log file.
You could mitigate some malicious abuse of your app registration if these credentials are leaked, perhaps by using Conditional Access, but I would argue its better to use a stronger form of authentication if you can. Think about what this Service Principal is allowed to do – create Win32 apps in your tenant! A malicious actor would love to create and deploy a Win32 app that dropped malware on your devices if they got hold of those credentials.
Certificates
Remember back to your basic training around authentication. Passwords are bad, strong authentication methods are good. When we think about Multi Factor Authentication we have something that others do not. A Certificate is something that I have, it is not a credential that can be used by anyone, which effectively makes it a stronger form of authentication than a client secret.
When I authenticate my Service Principal to get a token, I can use a certificate – but how does this work? A high level view of certificate based authentication:-

- Create a certificate or obtain one from a trusted public authority
- Upload the public key to the AAD app registration
- The private key is used from the local device or uploaded and used from Azure automation
- Authentication is successful
- A token is returned which can be used to make calls to Graph
Create a Self Signed Certificate
Authentication with a certificate, from the perspective of automation at least, is quite simple. We often only need the private key on the local device performing the calls to Graph, normally the admin or developer, or it needs to be in Azure automation.
Certificate Requirements
There are many flavours of certificate that we can create. What should the cryptographic algorithm, validity period, key length be? Microsoft have a great article calling these out and I’ll list them below.
- A 2048-bit key length. While longer values are supported, the 2048-bit size is highly recommended for the best combination of security and performance.
- Uses the RSA cryptographic algorithm. Azure AD currently supports only RSA.
- The certificate is signed with the SHA256 hash algorithm. Azure AD also supports certificates signed with SHA384 and SHA512 hash algorithms.
- The certificate is valid for only one year.
- The certificate is supported for use for both client and server authentication
So that begs the question, “How do we create a self signed certificate”?
The “New-SelfSignedCertificate” PowerShell Cmdlet
The New-SelfSignedCertificate PowerShell cmdlet allows us to create a self signed certificate for the purpose of certificate based authentication to Azure AD.
If we just run the cmdlet and pass the Subject parameter, lets see what happens
New-SelfSignedCertificate -Subject "AzureCertIntuneTesting"

What happened then. It looks like a certificate was created somewhere. Let’s take a peek.
Get-ChildItem -Path "Cert:\LocalMachine\My" | Where-Object { $_.Thumbprint -eq "24994e6e4a404978ea05476d940f6f88dd43d13c" }
certlm.msc show us some magic.
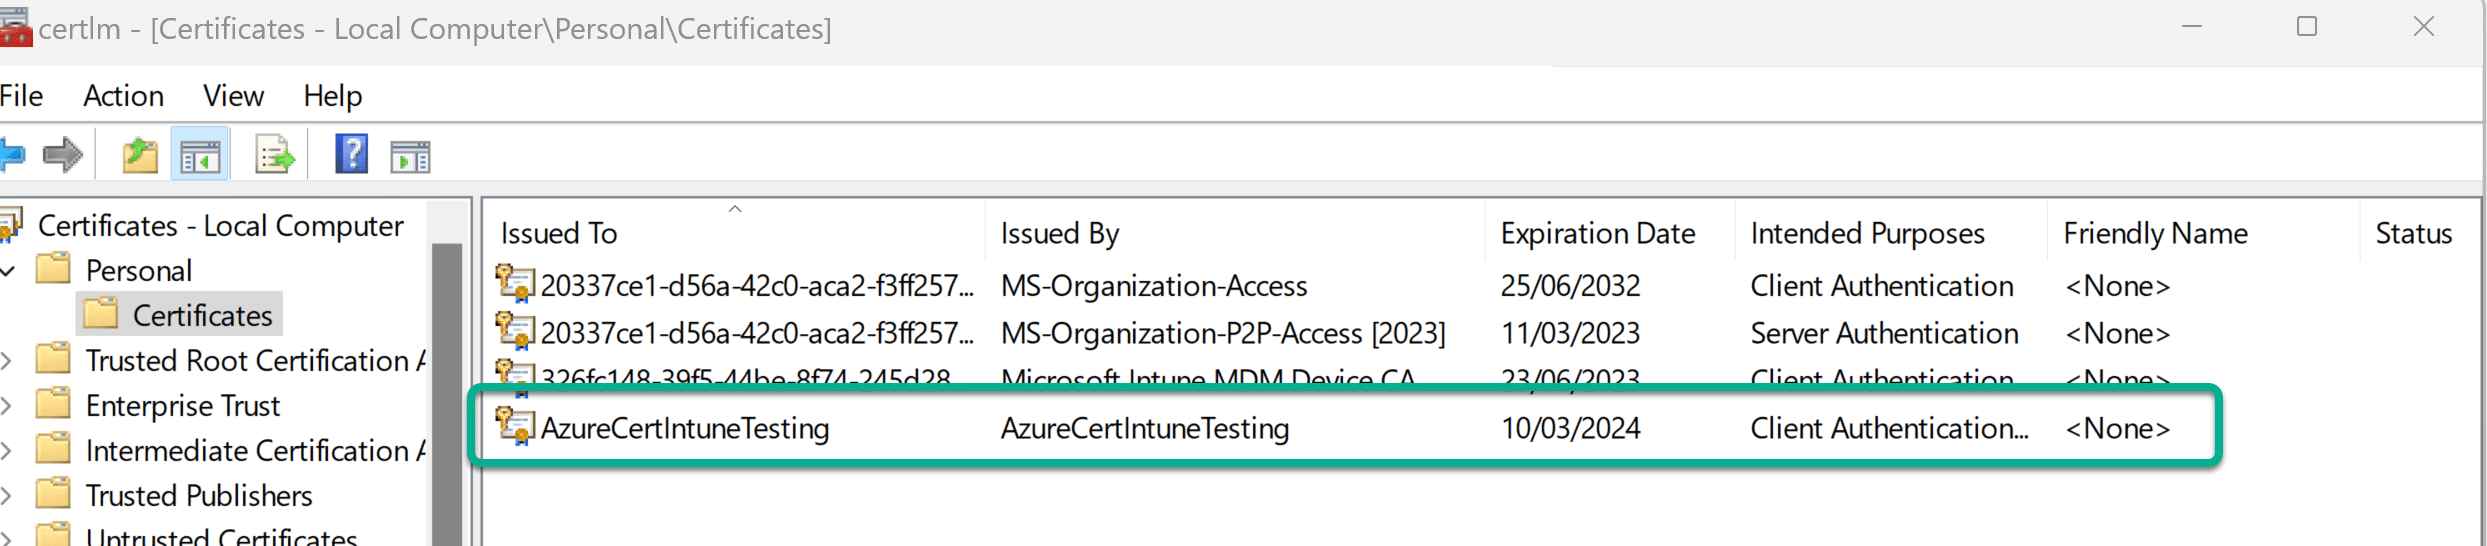
We can see the default properties of the certificate that was created. Information like the private key is exportable (useful if we need to export it for Azure Automation) and the default validity period is 12 months.

The default characteristics of the certificate, without passing any other parameters are:-
- A 2048-bit key length *
- Uses the RSA cryptographic algorithm (AAD currently supports only RSA)
- The certificate is signed with the SHA256 hash algorithm **
- The certificate is valid for only one year
- The certificate is supported for use for both client and server authentication
* While longer values are supported, the 2048-bit size is highly recommended for the best combination of security and performance.
** AAD also supports certificates signed with SHA384 and SHA512 hash algorithms.
Can we have a little more control? This snippet is useful to help you quickly create a self-signed certificate by splatting some params to the cmdlet.
$subjectName = "AzureCertIntuneTesting2"
$certStore = "LocalMachine"
$validityPeriod = 24

$newCert = @{
    Subject = "CN=$($subjectName)"
    CertStoreLocation = "Cert:\$($certStore)\My"
    KeyExportPolicy = "Exportable"
    KeySpec = "Signature"
    NotAfter = (Get-Date).AddMonths($($validityPeriod))
}
$Cert = New-SelfSignedCertificate @newCert
Important: This is just one example of the params you can use when creating a certificate. I mark the key as exportable because later on in this post I need it. If you intend to authenticate only using the certificate store on the device where you generated the certificate from or by calling the certificate resource in Azure Automation, you probably don’t want to mark the private key as exportable.
More information on creating a self signed certificate can be found at https://learn.microsoft.com/en-us/powershell/module/pki/new-selfsignedcertificate?view=windowsserver2022-ps
Export the Public Portion for use in Azure
Use the following snippet to export the public portion of the certificate as a .cer file which you can upload and use for your Service Principal (App Registration) authentication.
$certFolder = "C:\temp\certs"
$certExport = @{
Cert = $Cert
FilePath = "$($certFolder)\$($subjectName).cer"
}
Export-Certificate @certExport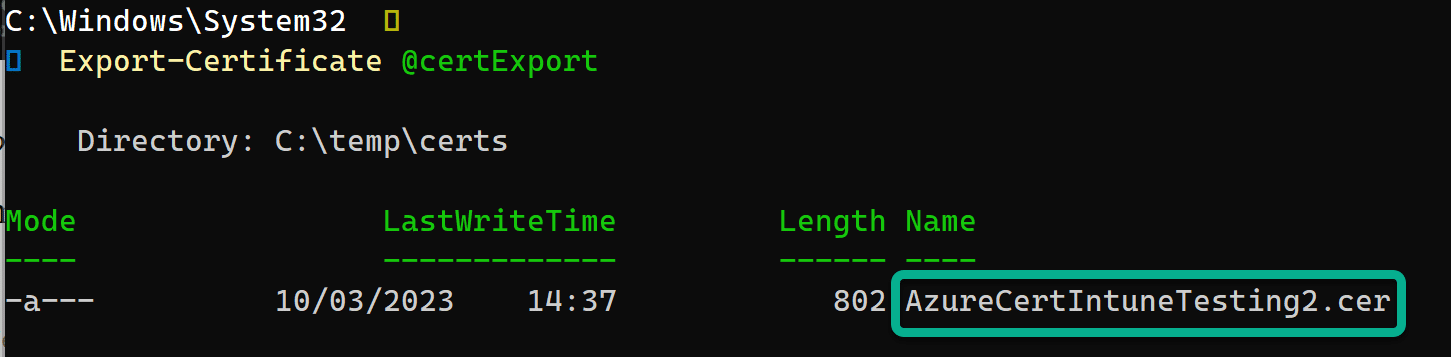
Export the Private Key
If you previously marked the private key as exportable when you created the certificate, and you have a valid reason to use the .pfx for authentication, you can use the following snippet to export the private portion of the certificate as a .pfx file which you can upload and use when authenticating with the Service Principal (App Registration).
$certFolder = "C:\temp\certs"
$certThumbprint = $Cert.Thumbprint
$certPassword = Read-Host -Prompt "Enter password for your certificate: " -AsSecureString
$pfxExport = @{
    Cert         = "Cert:\$($certStore)\My\$($certThumbprint)"
    FilePath     = "$($certFolder)\$($subjectName).pfx"
    ChainOption  = "EndEntityCertOnly"
    NoProperties = $null
    Password     = $certPassword
}
Export-PfxCertificate @pfxExport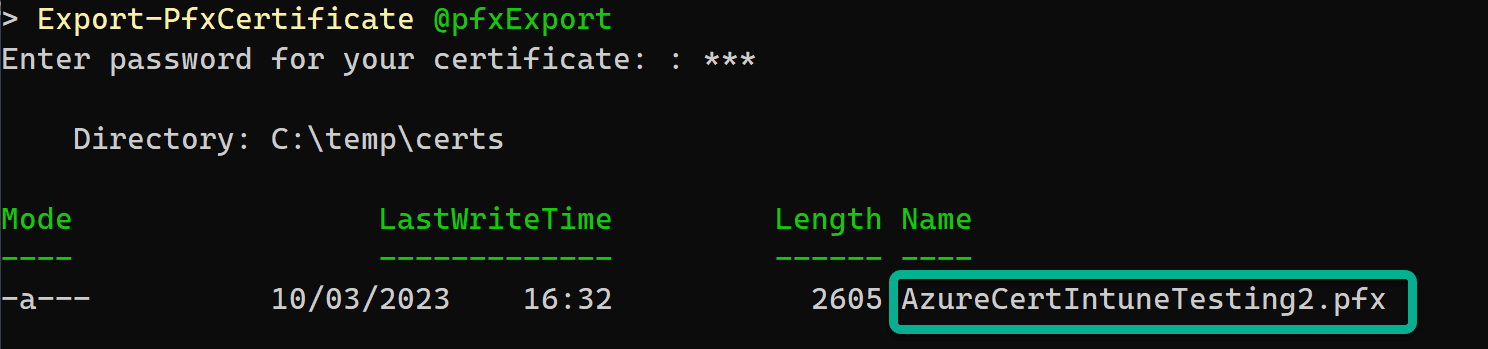
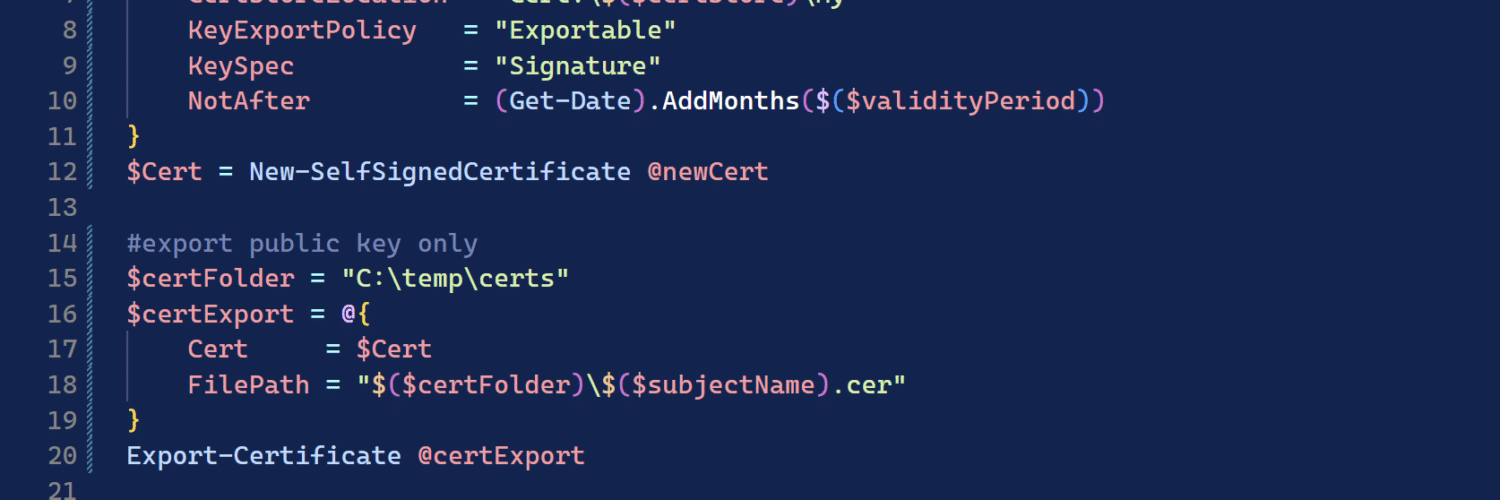
Create and Export the Public and Private Keys
We can take the examples above and run the following script block to generate a certificate and export the public and private keys.
$subjectName = "AzureCertIntuneTesting"
$certStore = "LocalMachine"
$validityPeriod = 24

$newCert = @{
    Subject           = "CN=$($subjectName)"
    CertStoreLocation = "Cert:\$($certStore)\My"
    KeyExportPolicy   = "Exportable"
    KeySpec           = "Signature"
    NotAfter          = (Get-Date).AddMonths($($validityPeriod))
}
$Cert = New-SelfSignedCertificate @newCert

#export public key only
$certFolder = "C:\temp\certs"
$certExport = @{
    Cert     = $Cert
    FilePath = "$($certFolder)\$($subjectName).cer"
}
Export-Certificate @certExport

#export with private key
$certFolder = "C:\temp\certs"
$certThumbprint = $Cert.Thumbprint
$certPassword = Read-Host -Prompt "Enter password for your certificate: " -AsSecureString
$pfxExport = @{
    Cert         = "Cert:\$($certStore)\My\$($certThumbprint)"
    FilePath     = "$($certFolder)\$($subjectName).pfx"
    ChainOption  = "EndEntityCertOnly"
    NoProperties = $null
    Password     = $certPassword
}
Export-PfxCertificate @pfxExport
We should end up with 2 files in our output directory as illustrated below.
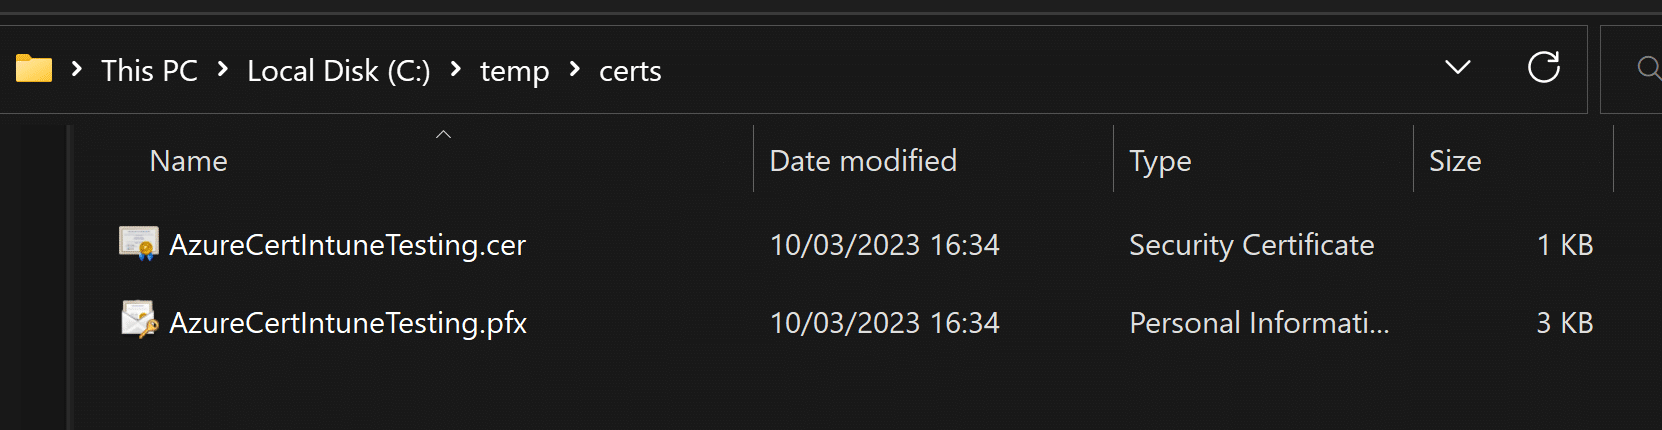
The certificate, including the private key, will also be in the certificate store of the local machine as we saw earlier.

Configure Certificate Authentication for an AAD App Registration
At the beginning of this post, we viewed the “Certificate & secret” blade on our app registrations. I will revisit that again now and show you how to add the certificate in readiness for certificate based authentication.
Navigate to Certificates & secrets blade and select Upload Certificate
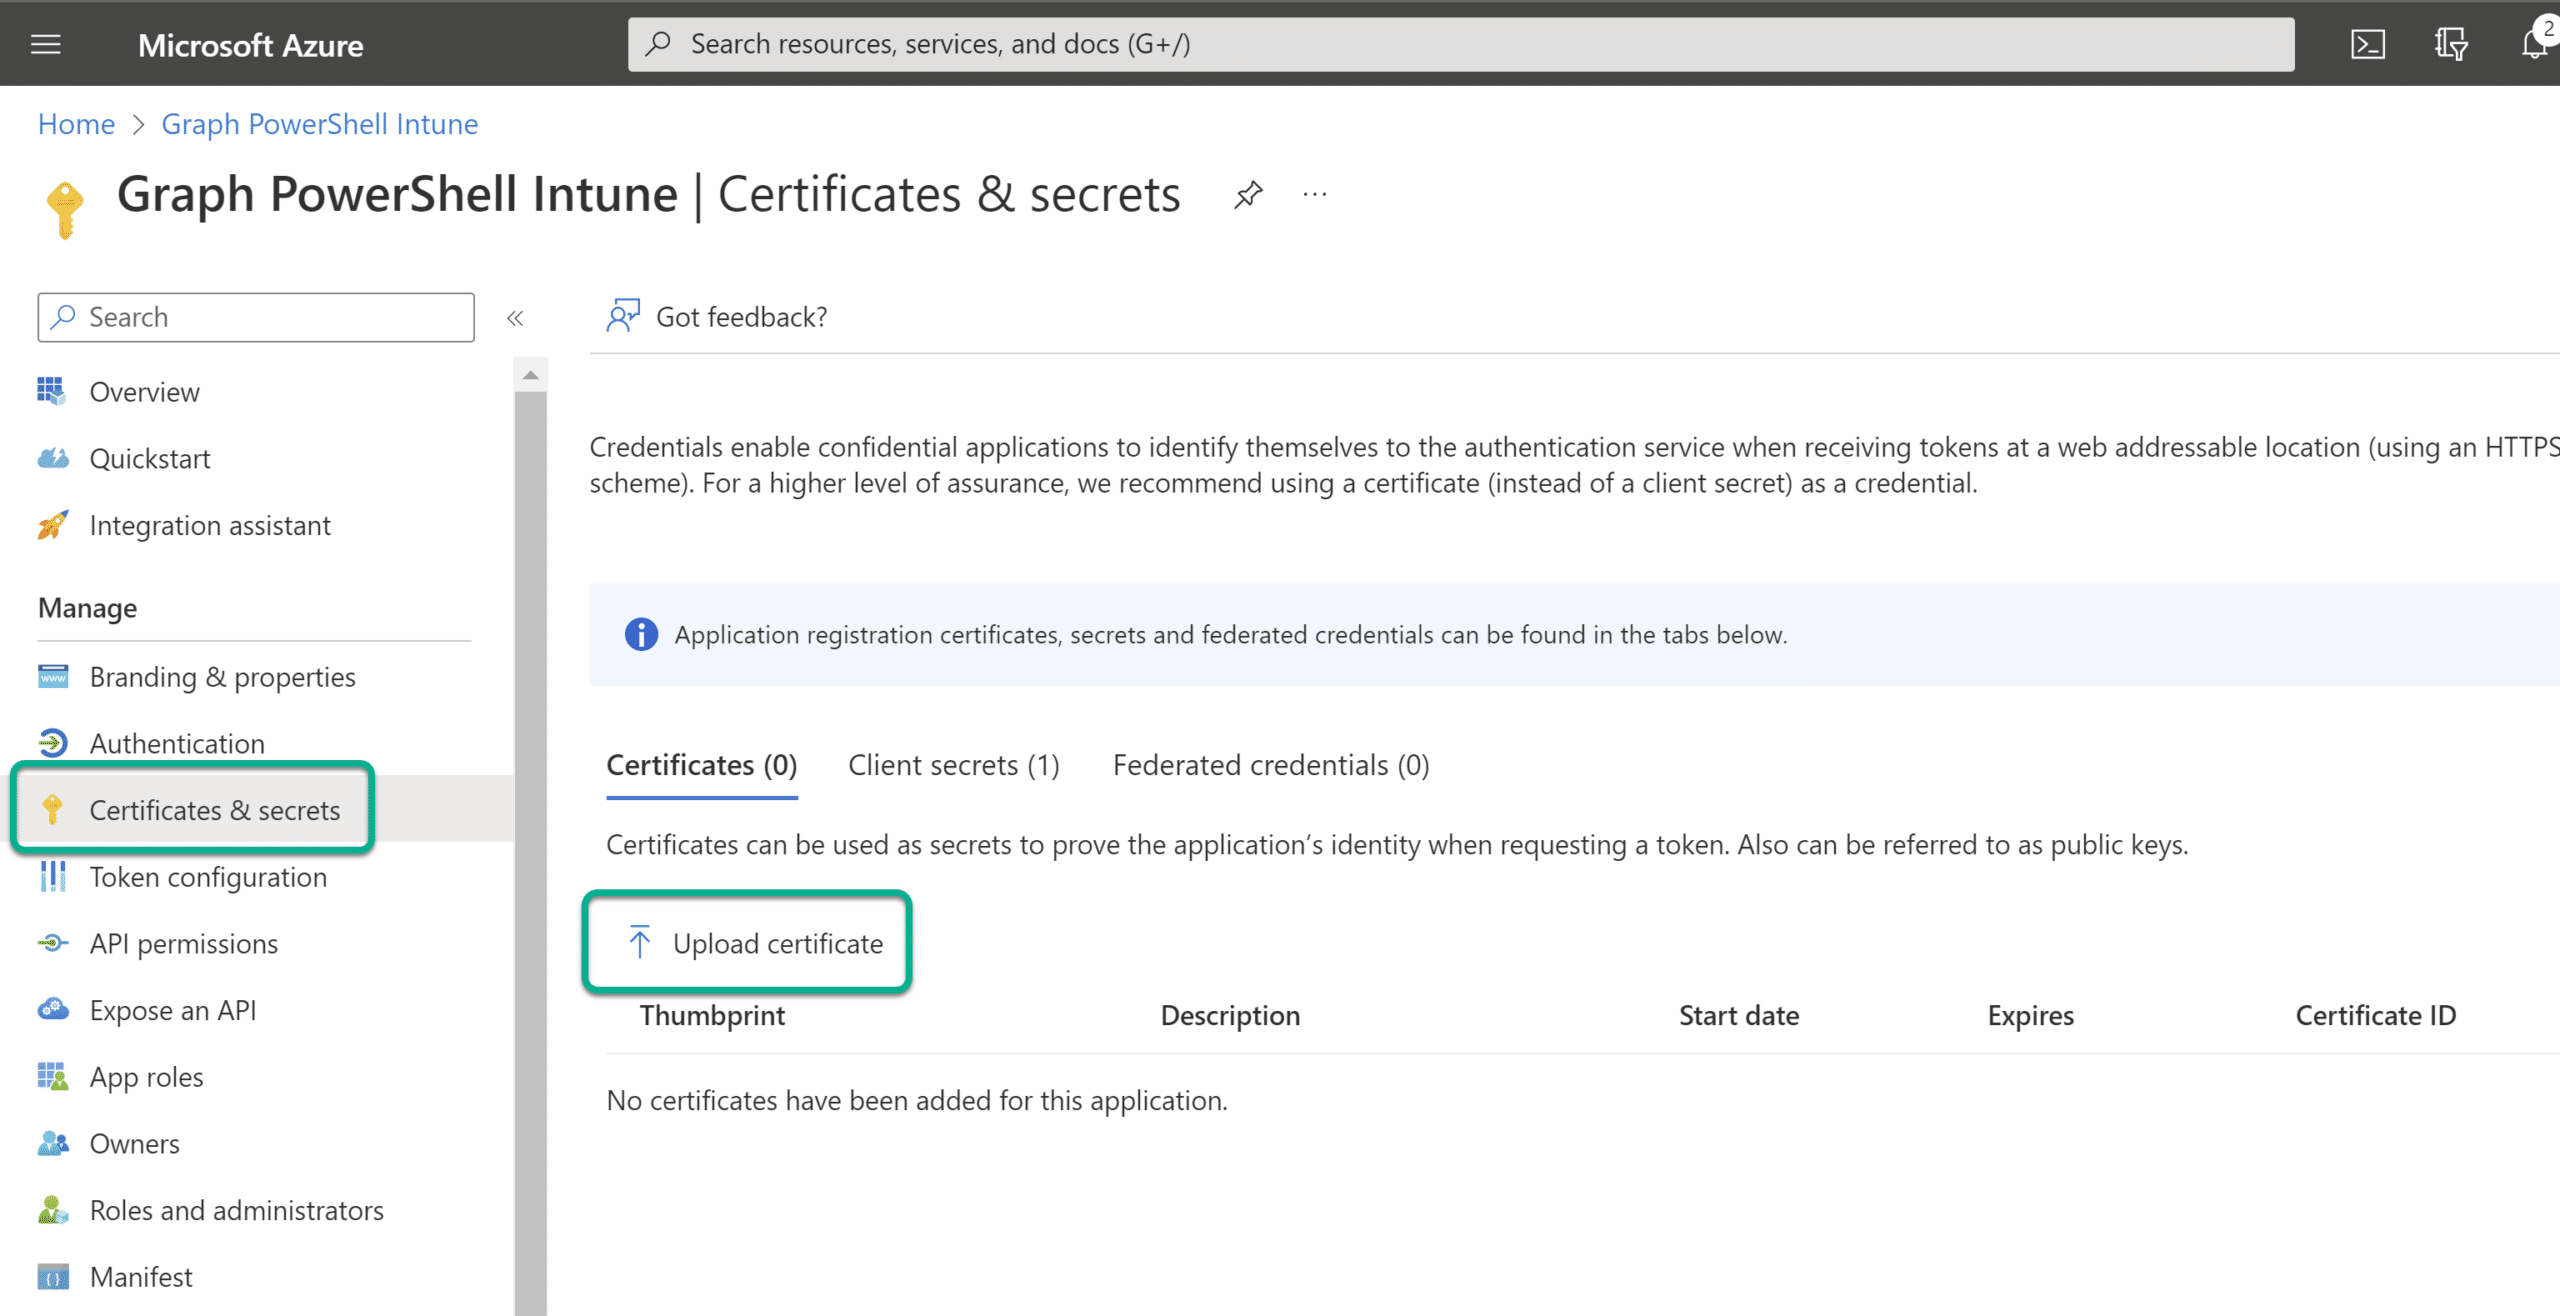
Browse the the .cer file we created earlier and click Add
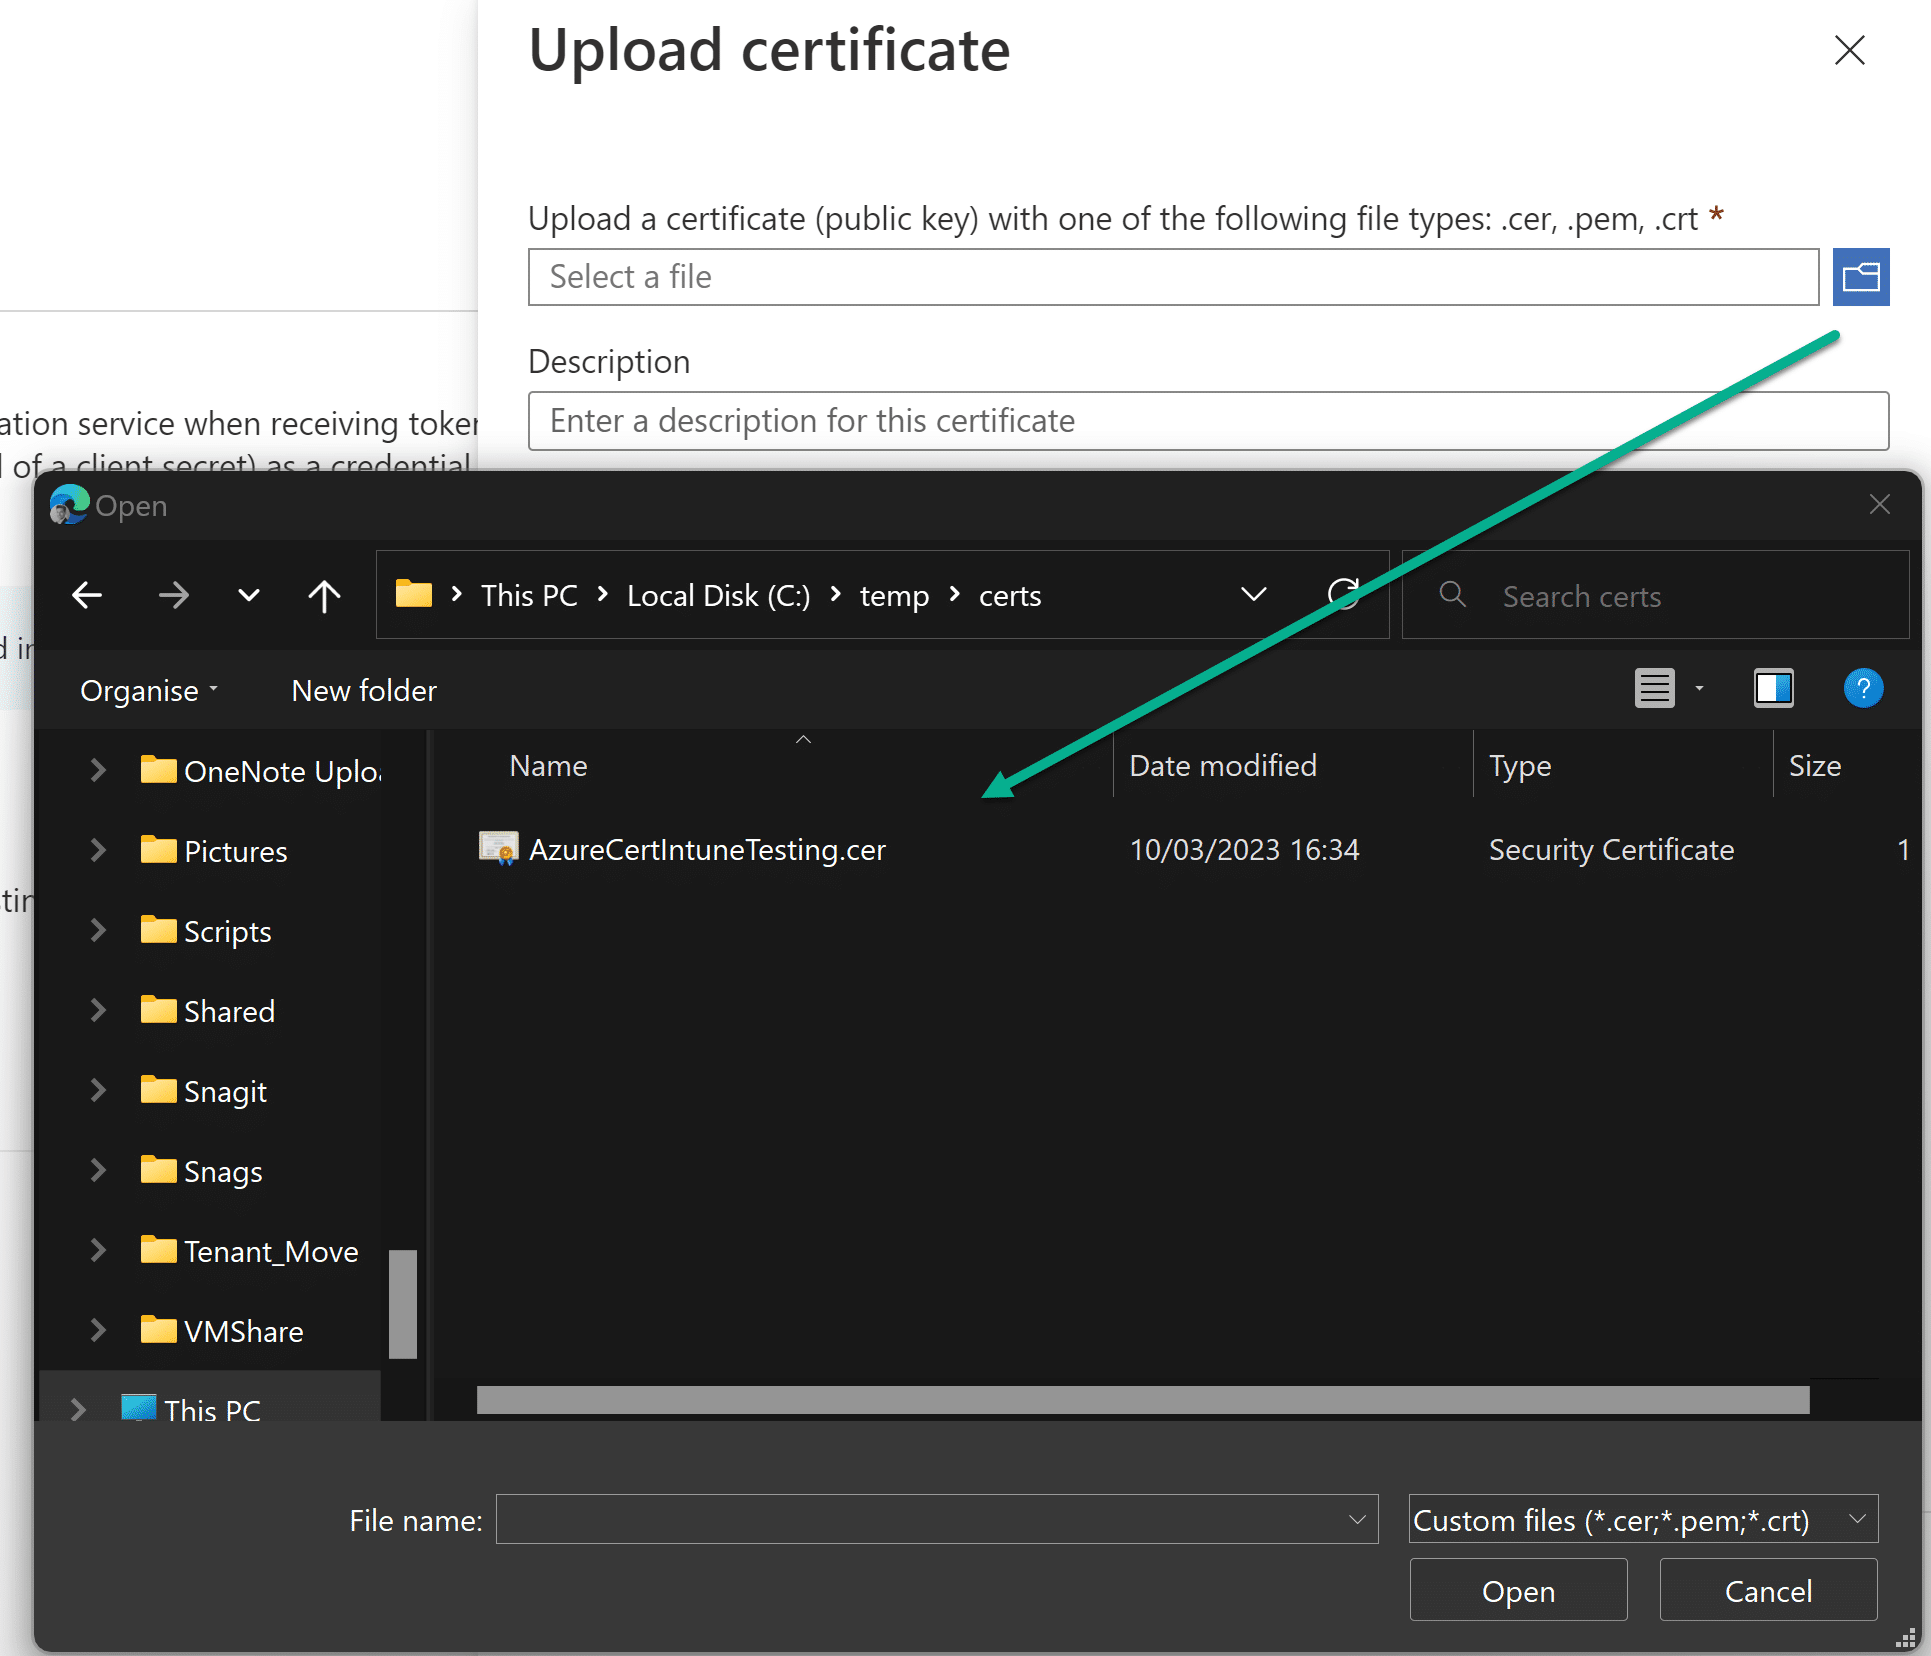
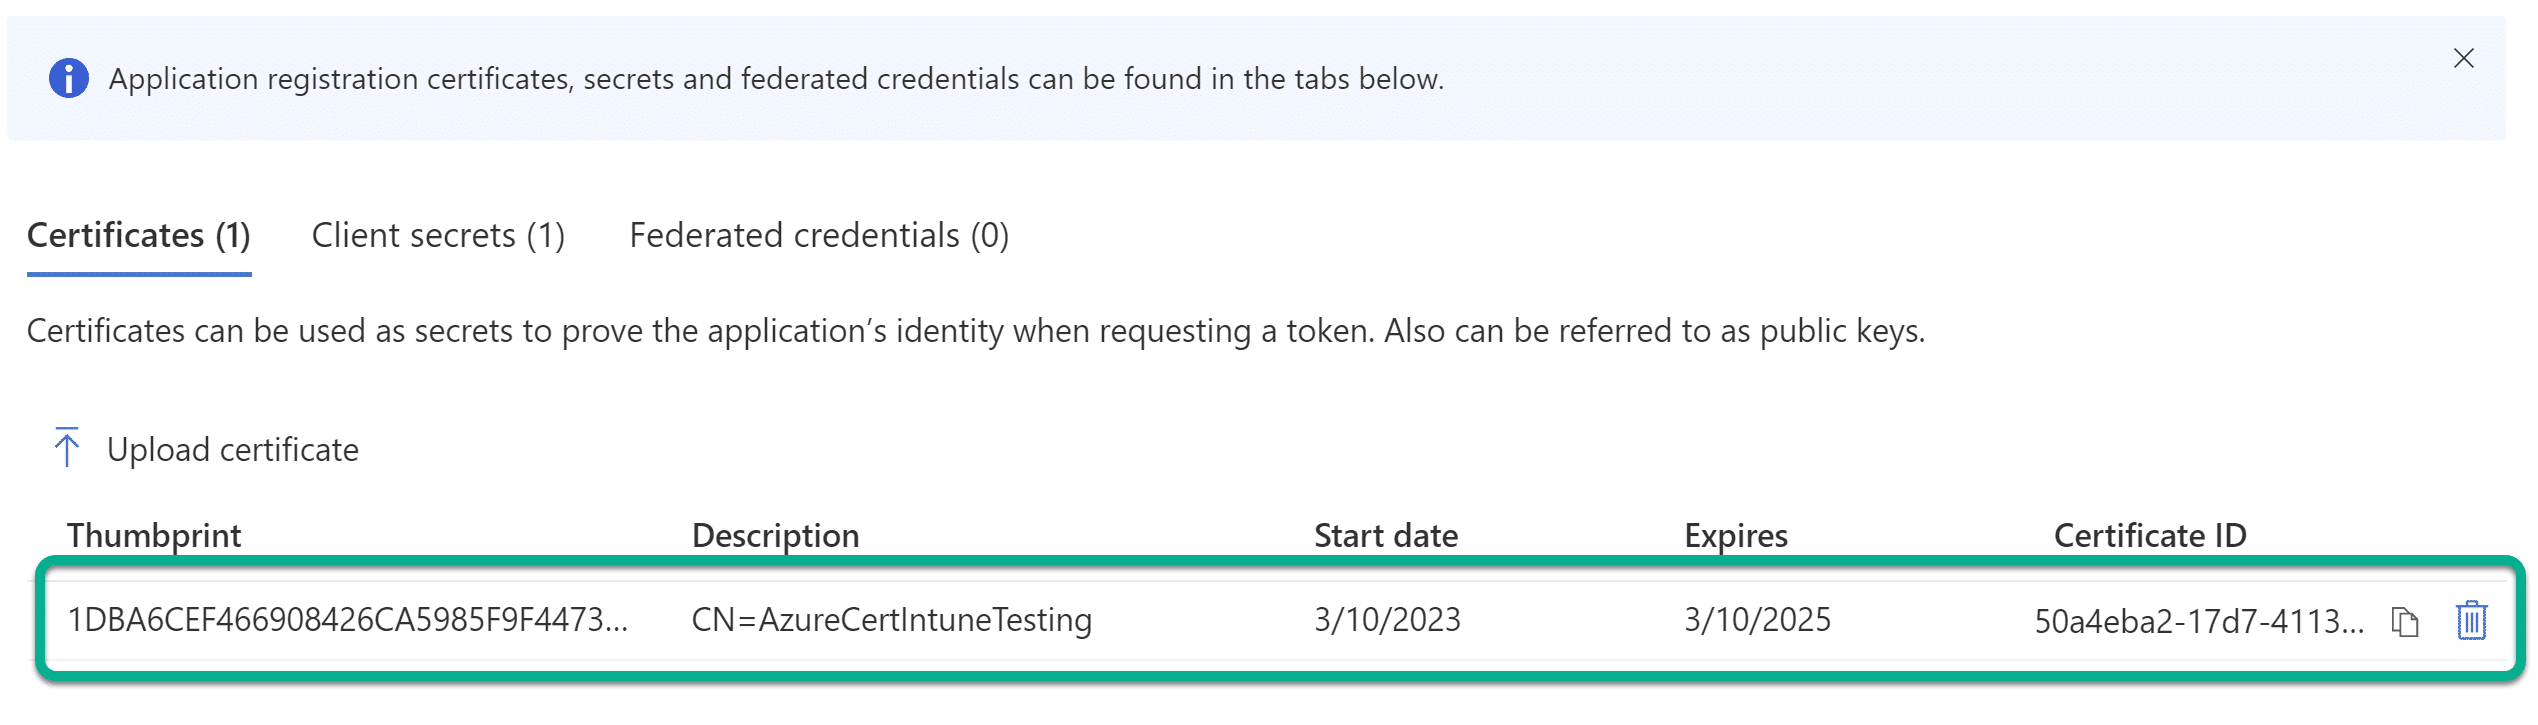
Great, the public portion of the certificate is right where we need it to be.
Easy: Authenticate to AAD when the certificate is in the local certificate store
If you didn’t previously mark the private key as exportable and/or it is in the local certificate store on the device where you generated the certificate, there is a really simple way to authenticate using the MSAL.PS module.
Lets try it out.
<#
.SYNOPSIS
    Authenicate using an AAD app registration and a certificate to obtain a token
.DESCRIPTION
    After generating a self signed certificate, use the MSAL.PS module to authenticate to AzureAD to obtain a token
.EXAMPLE
    .\Get-CBATokenMSAL.ps1 -tenantId "0cebf1f4-e0c4-46d4-8c5a-0fc80bed6b2c" -applicationId "47727b19-7b3f-472a-8057-704affed1815" -certStore "CurrentUser" -thumbprint "1dba6cef466908426ca5985f9f4473892b2d5cbb"
.NOTES
    Requires MSAL.PS module // Install-Module MSAL.PS -Scope CurrentUser
#>

[CmdletBinding()]
param (
    [Parameter(Mandatory = $true)]
    [ValidateSet('LocalMachine', 'CurrentUser')]
    [string]$certStore,
    [string]$thumbprint,
    [string]$tenantId,
    [string]$applicationId
)

Function Get-Token {
    #connect to graph and authenticate with the certificate
    Import-Module -Name MSAL.PS -Force

    $connectStringSplat = @{
        TenantId          = $tenantId
        ClientId          = $applicationId
        ClientCertificate = Get-Item -Path "Cert:\$($certStore)\My\$($thumbprint)"
    }

    $authToken = Get-MsalToken @connectStringSplat
    Return $authToken
}

#get token
Get-Token -tenantId "0cebf1f4-e0c4-46d4-8c5a-0fc80bed6b2c" -applicationId "47727b19-7b3f-472a-8057-704affed1815" -certStore "LocalMachine" -thumbprint "1dba6cef466908426ca5985f9f4473892b2d5cbb"
We have a token!
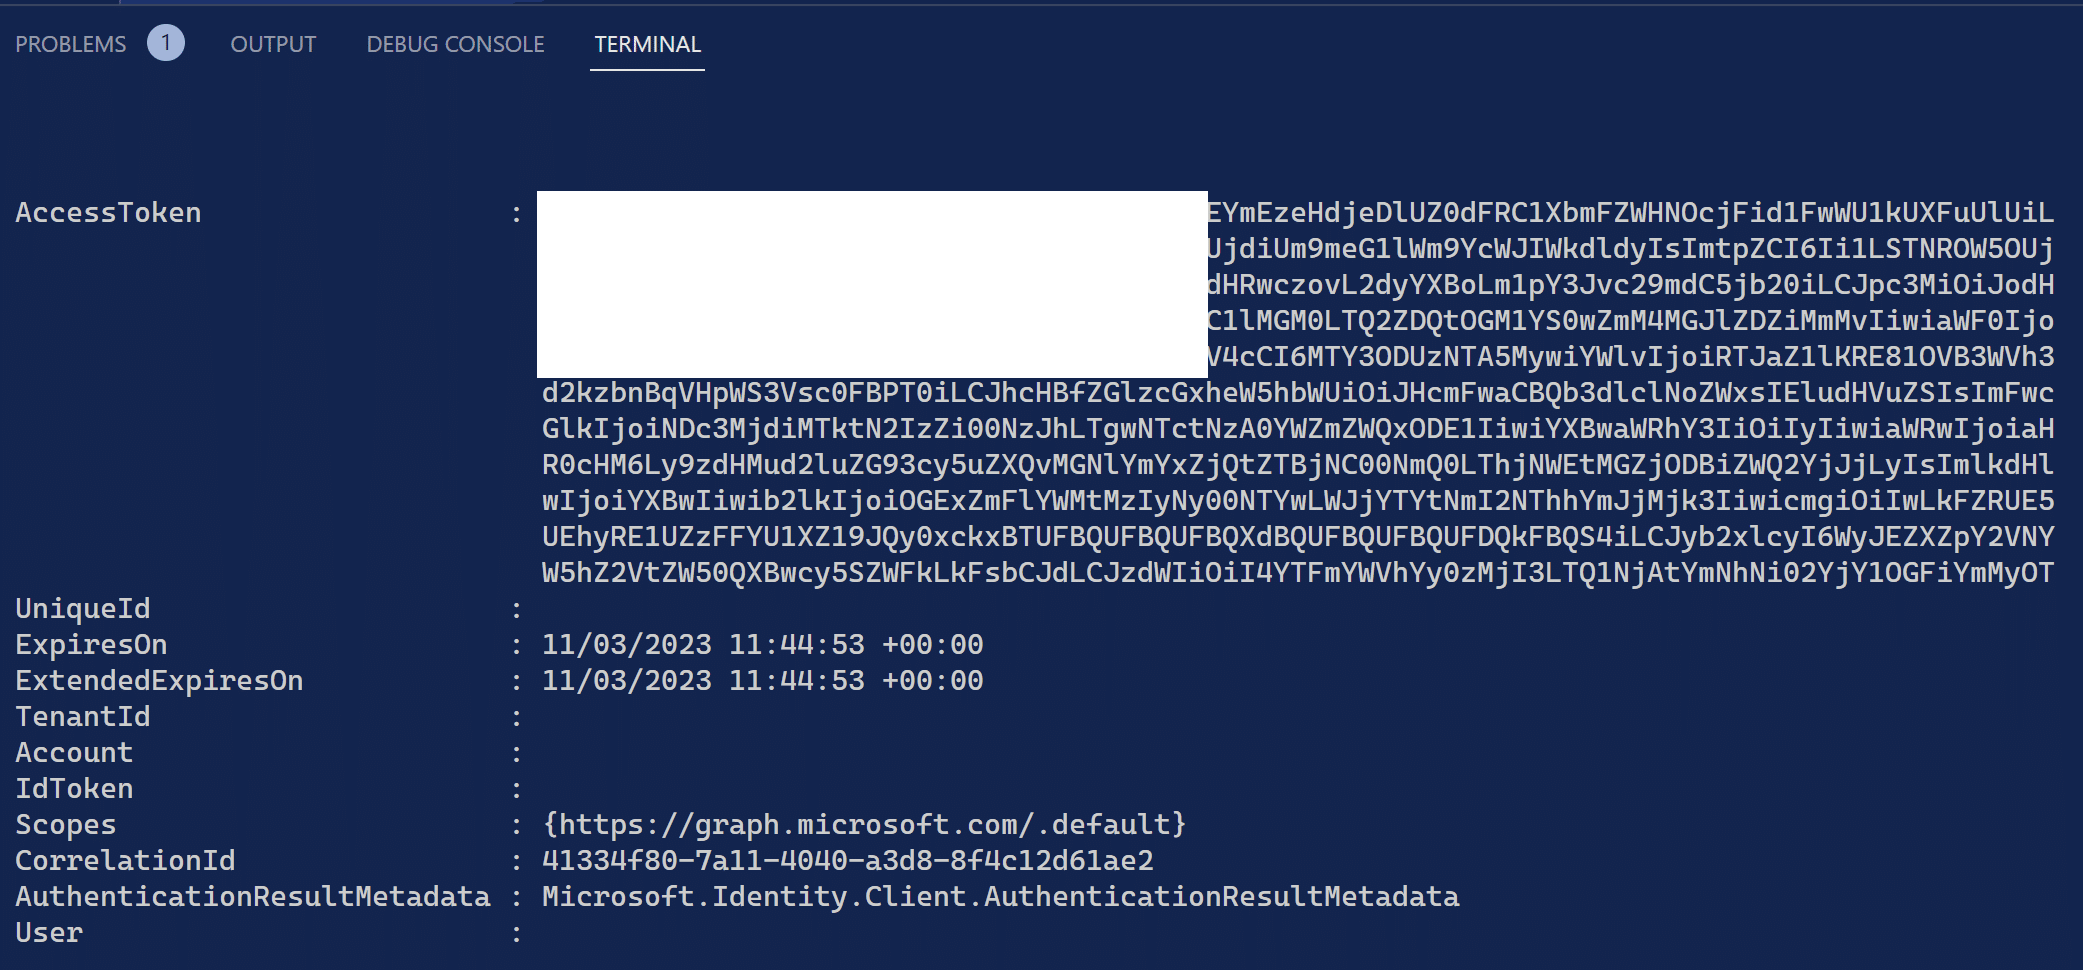
Sign-in used the certificate that we had selected.
Example: Authenticate with a certificate and make a Graph call to Intune
Lets use the access token to make a call to Microsoft Graph.
.\Get-CBATokenMSAL.ps1 -tenantId "0cebf1f4-e0c4-46d4-8c5a-0fc80bed6b2c" -applicationId "47727b19-7b3f-472a-8057-704affed1815" -certStore "LocalMachine" -thumbprint "1dba6cef466908426ca5985f9f4473892b2d5cbb"
Invoke-RestMethod -Headers @{"Authorization" = "$($AuthToken.AccessToken)"} -Method GET -Uri "https://graph.microsoft.com/beta/deviceAppManagement/mobileApps?$filter=(isof('microsoft.graph.win32LobApp'))"
Easy: Authenticate to AAD when the certificate is in Azure Automation
There are a couple of ways to use the certificate for authentication in Azure Automation. I am reserving one method for part 2 where we will store the certificate with the private key in Azure Key Vault. In the following example, we will simply upload the private key to the automation account.
From the Automation account, navigate to Certificates and upload the .pfx you generated previously when you created the self-signed certificate.
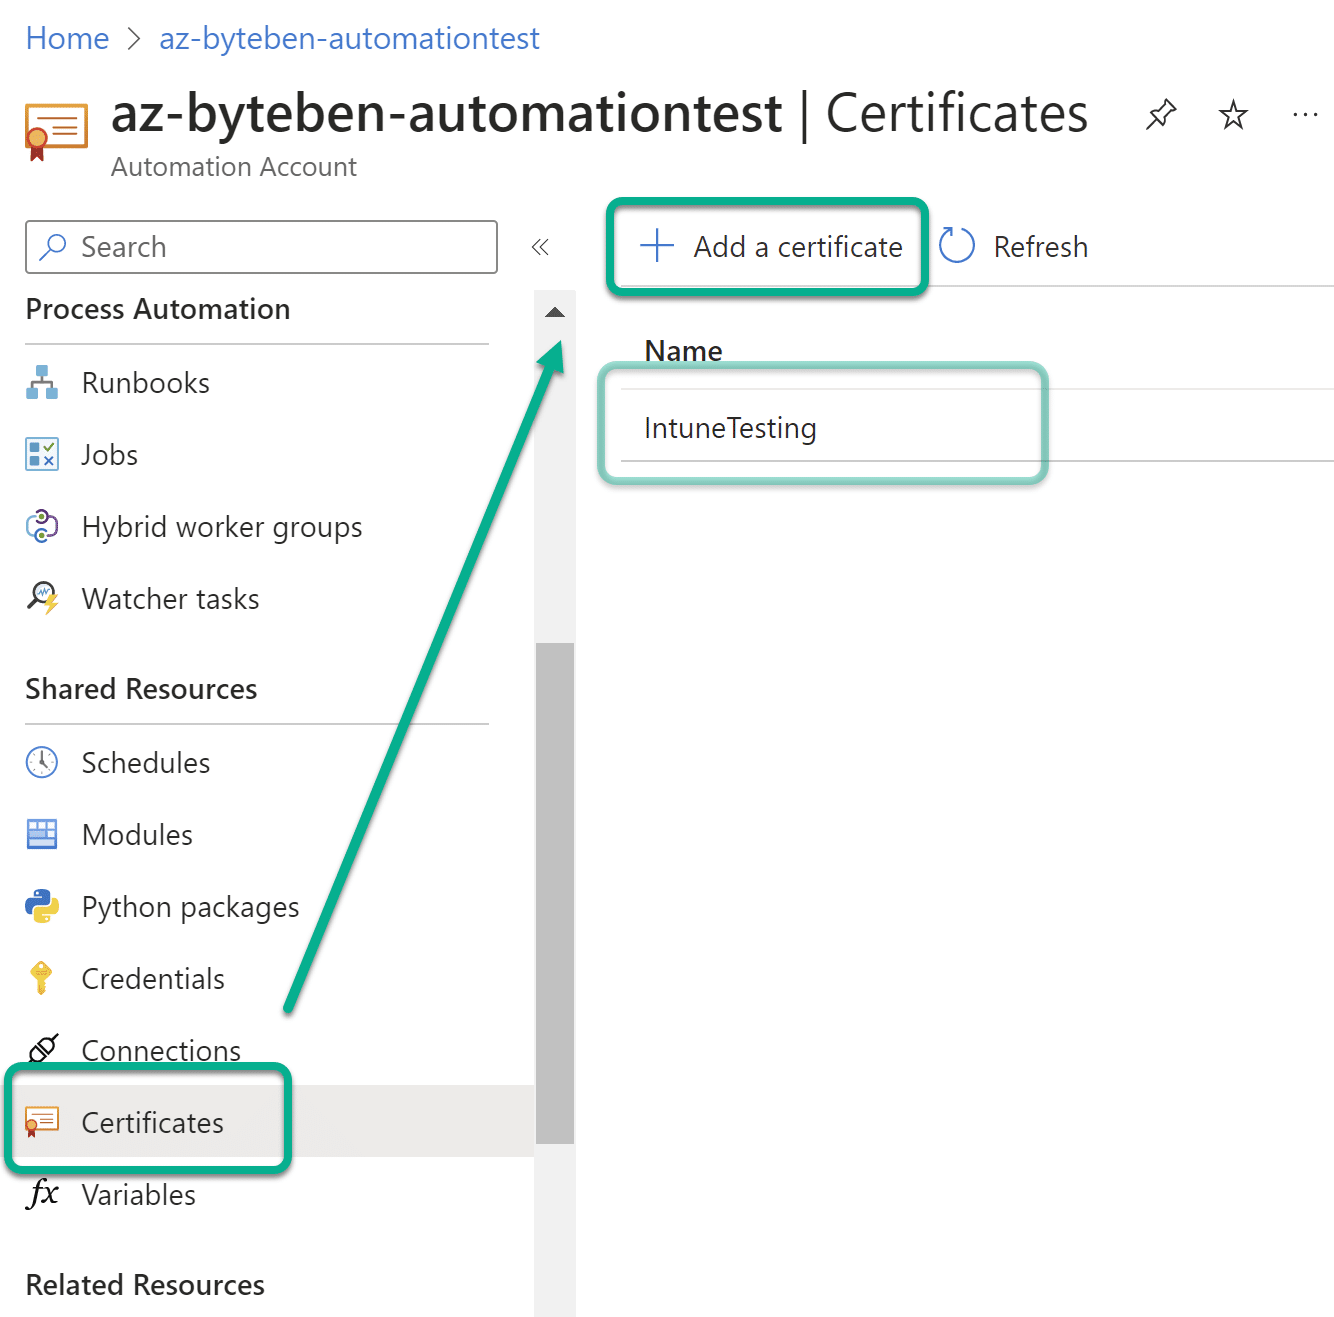
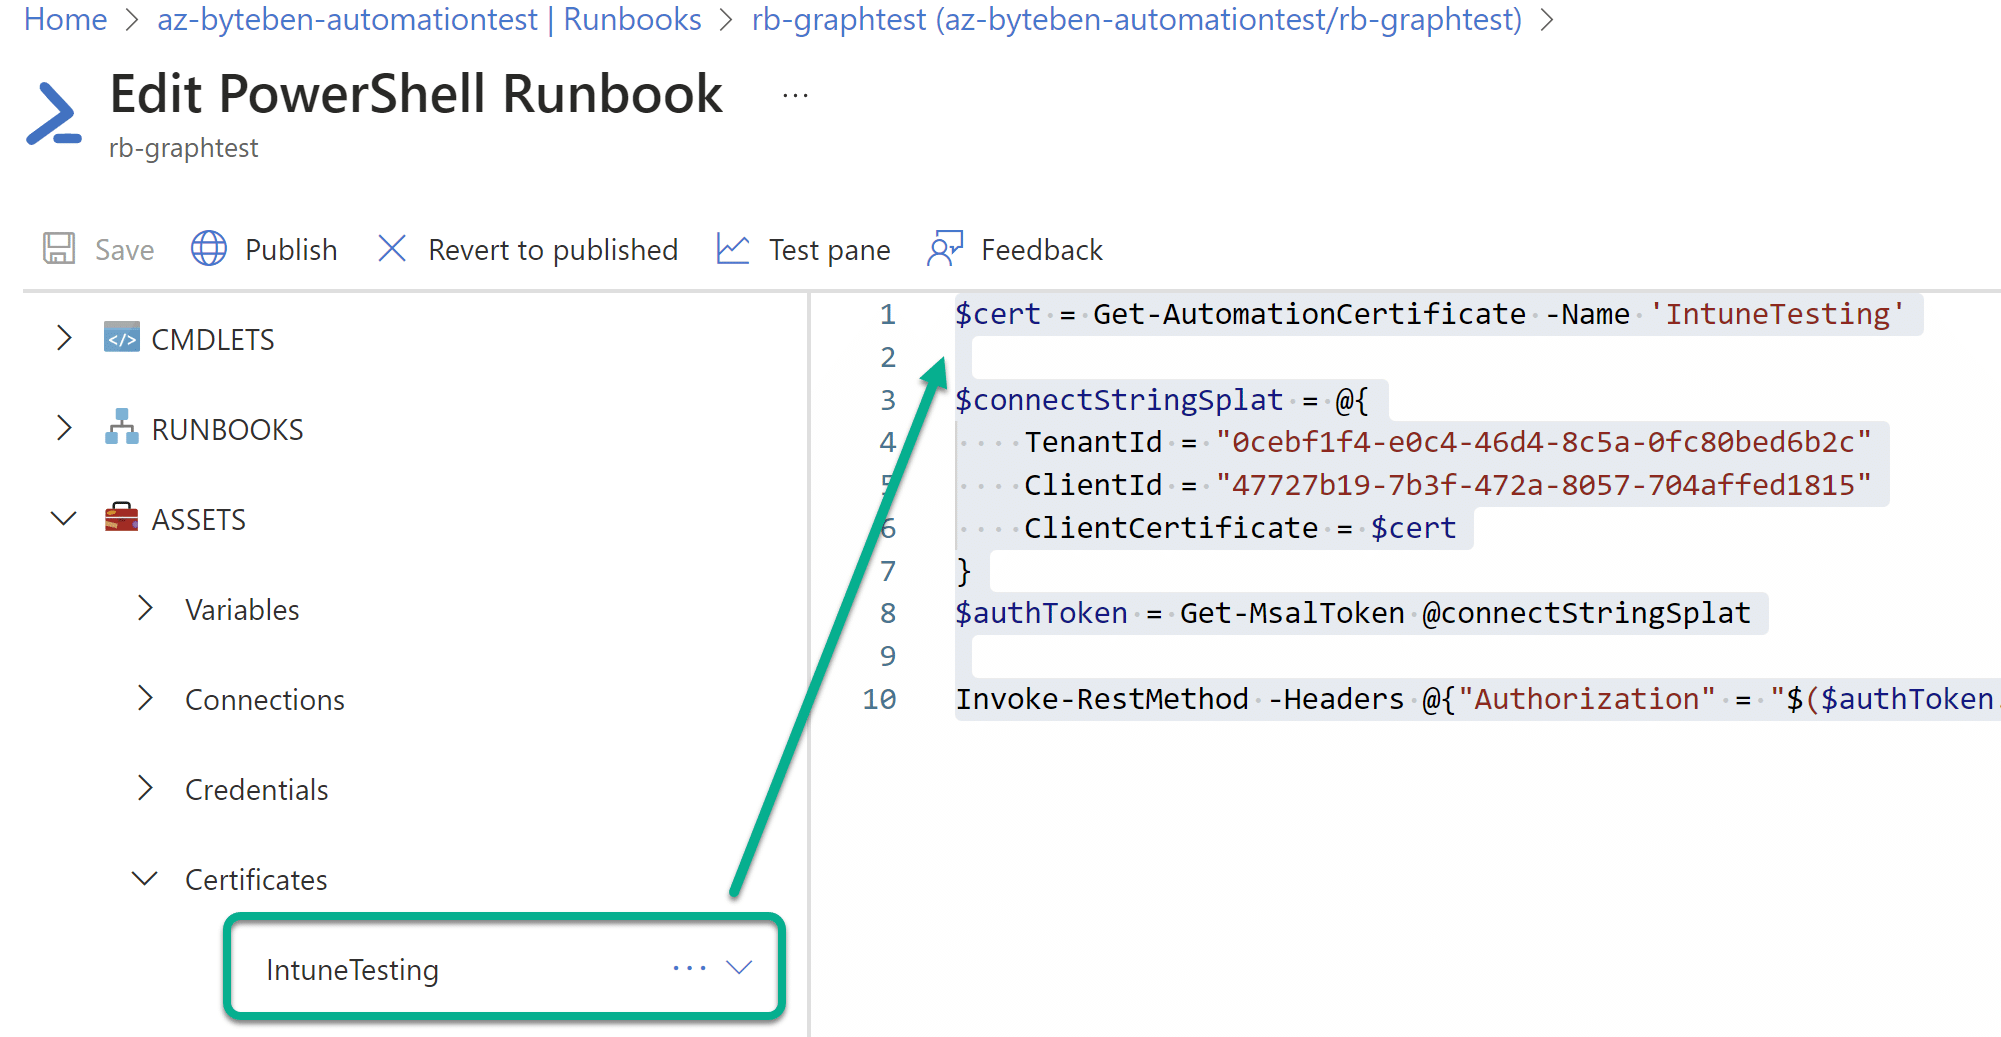
Add the certificate from the Runbook assets and assign it to a variable
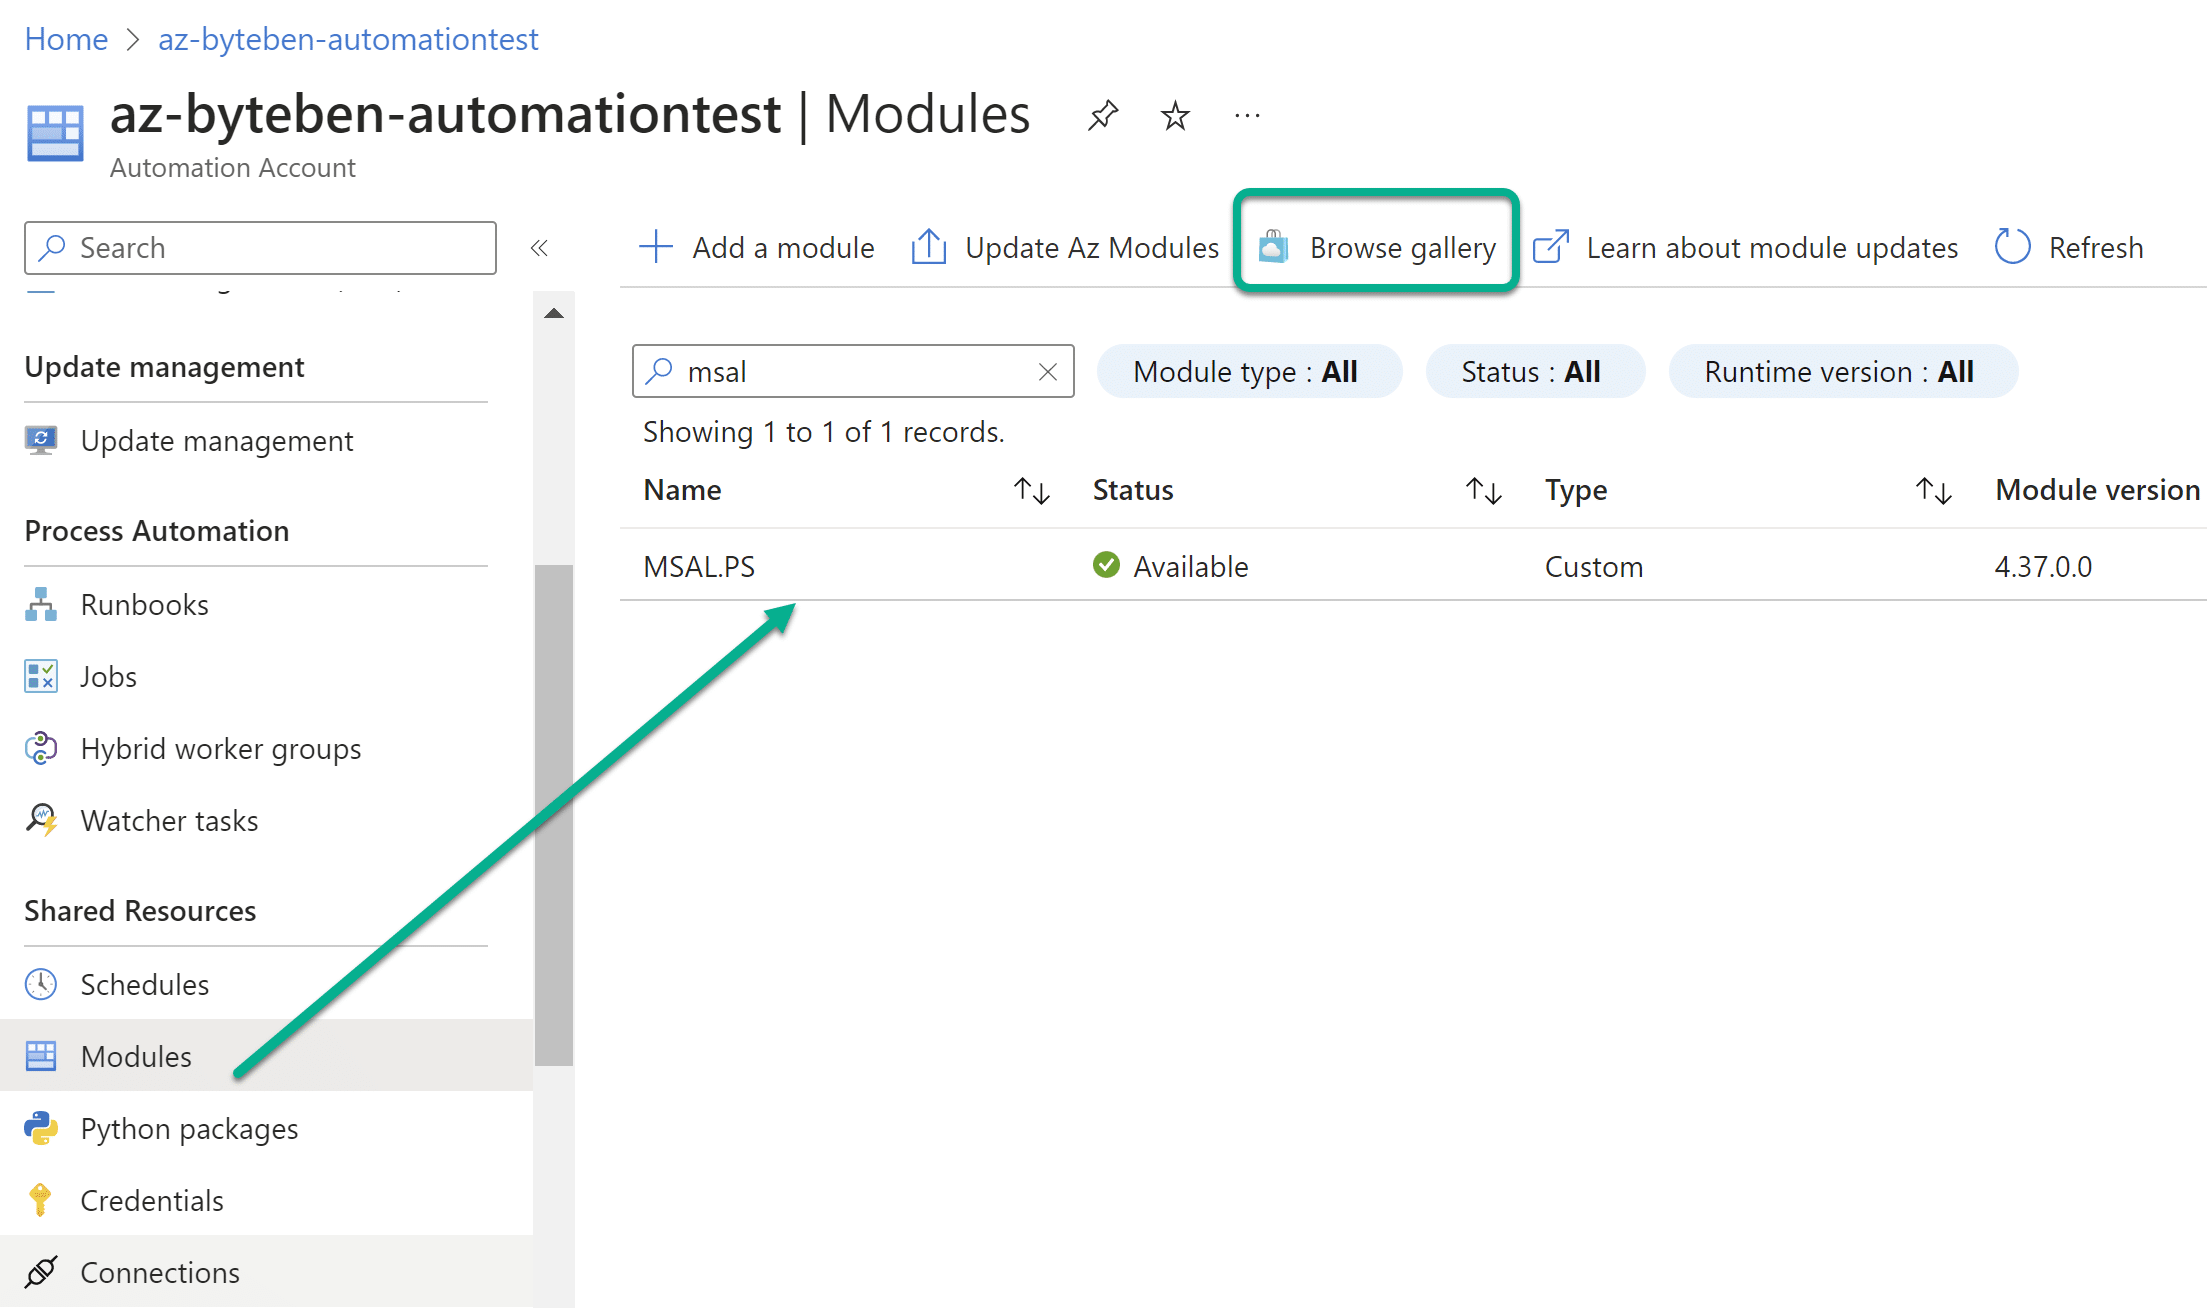
Once we have the certificate, we can use the MSAL.PS module to authenticate to Graph. Make sure you have also added the MSAL.PS module from the gallery to your Automation Account.
Example: Authenticate with a certificate and make a Graph call to Intune
Lets use the access token to make a call to Microsoft Graph.
#requires MSAL.PS module
$cert = Get-AutomationCertificate -Name 'IntuneTesting'

$connectStringSplat = @{
    TenantId = "0cebf1f4-e0c4-46d4-8c5a-0fc80bed6b2c"
    ClientId = "47727b19-7b3f-472a-8057-704affed1815"
    ClientCertificate = $cert
}
$authToken = Get-MsalToken @connectStringSplat

Invoke-RestMethod -Headers @{"Authorization" = "$($authToken.AccessToken)"}-Method GET -Uri "https://graph.microsoft.com/beta/deviceAppManagement/mobileApps?$filter=(isof('microsoft.graph.win32LobApp'))"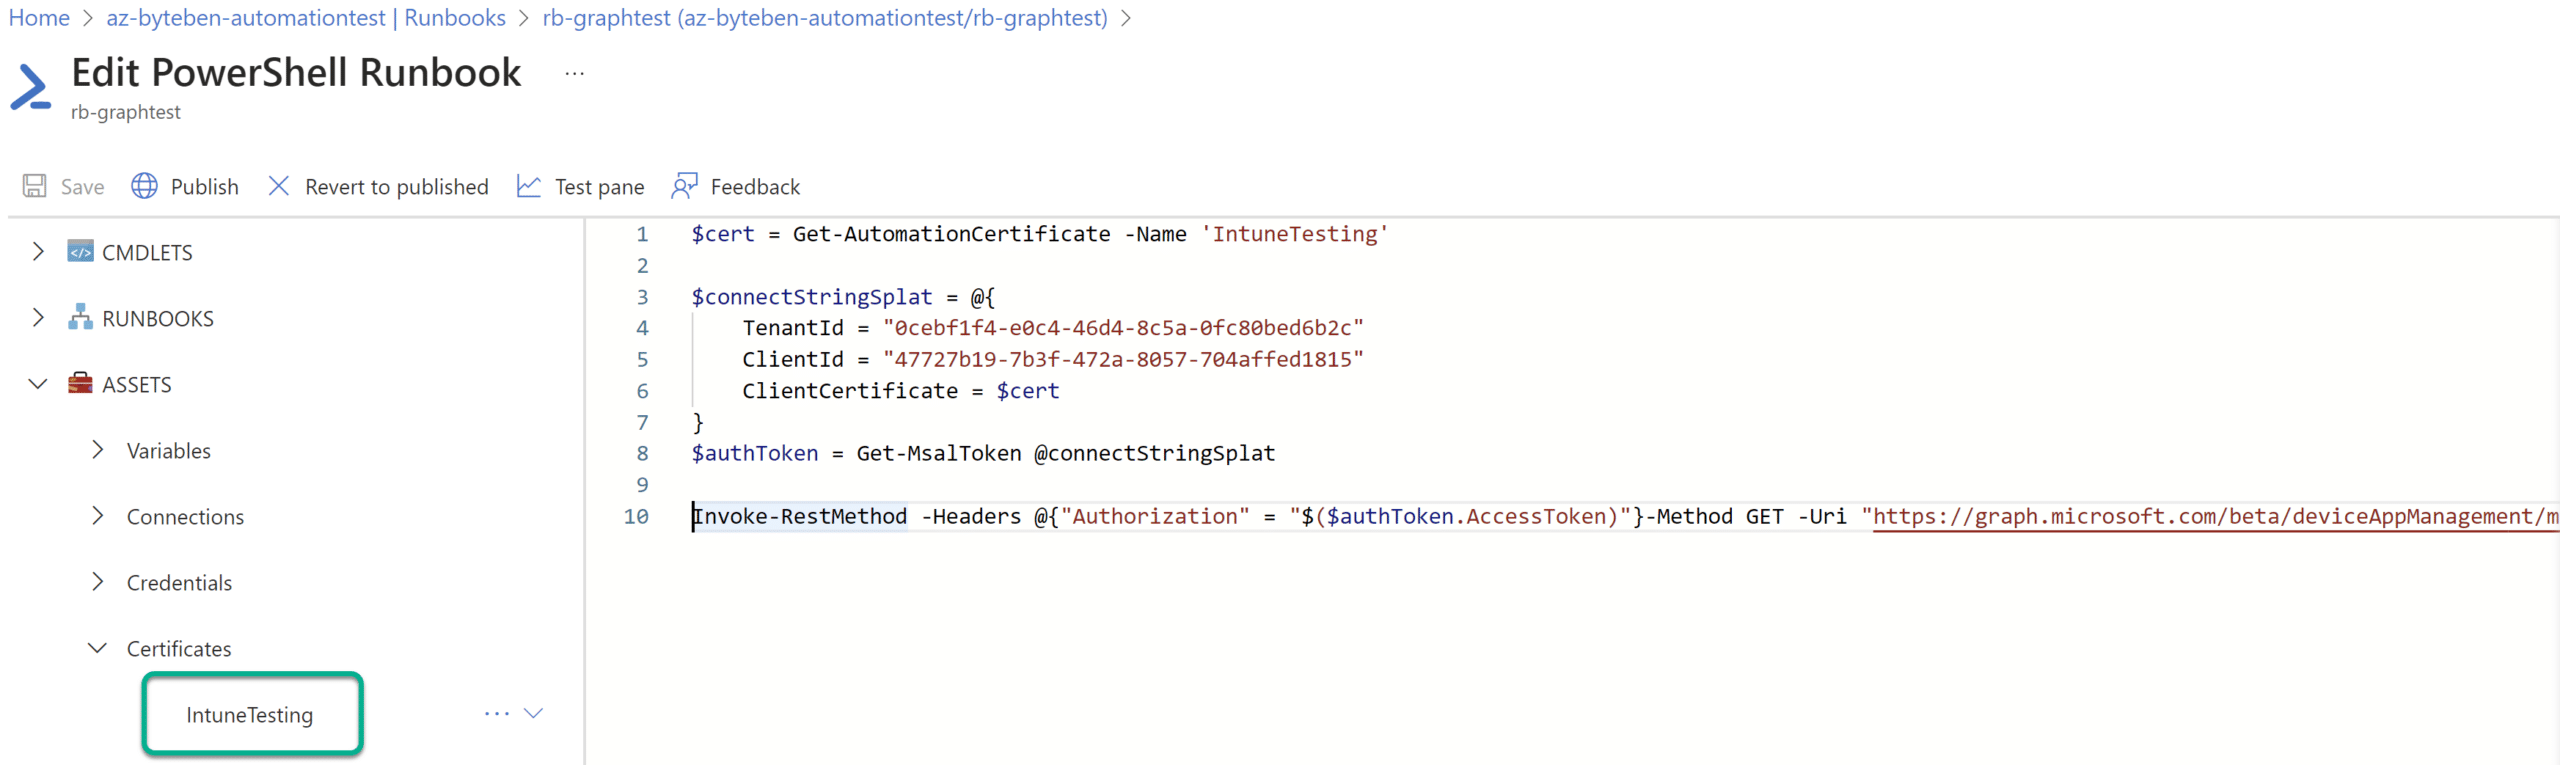
Advanced: Authenticate to AAD when the certificate is not in a certificate store
If you are connecting from a Windows device, you may already have the certificate in your certificate store if you generated the self signed certificate from the same computer. If the certificate is not in a certificate store or Azure Automation, you can still generate a JSON Web Token (JWT) for authorization. A great thread and code example can be found here.
Caution Using this method could significantly increase the risk of the private key being obtained maliciously. Ideally, the certificate with the private key should never leave the certificate store
<#
.SYNOPSIS
Authenicate using an AAD app registration and a certificate to obtain a token
.DESCRIPTION
After generating a self signed certificate, use the pfx to authenticate to AzureAD to obtain a token
.EXAMPLE
Get-CBAToken.ps1 -tenantId "0cebf1f4-e0c4-46d4-8c5a-0fc80bed6b2c" -applicationId "47727b19-7b3f-472a-8057-704affed1815" -pfxFile "C:\temp\certs\AzureCertIntuneTesting.pfx" -pfxPassword "123"
.NOTES
#>
[CmdletBinding()]
param (
[Parameter(Mandatory = $true)]
[string]$pfxFile,
[string]$tenantId,
[string]$applicationId,
[string]$pfxPassword
)
$Scope = "https://graph.microsoft.com/.default"
If (-not $pfxPassword) {
$pfxPassword = Read-Host -Prompt "Enter password for your certificate: " -AsSecureString
}
else {
$pfxPassword = ConvertTo-SecureString -String $pfxPassword -AsPlainText -Force
}
#get certificate hash and create base64 string
$cert = New-Object System.Security.Cryptography.X509Certificates.X509Certificate2
$cert.Import($pfxFile, $certPassword, 'DefaultKeySet')
$cert64Hash = [System.Convert]::ToBase64String($cert.GetCertHash())
function Get-Token {
#create JWT timestamp for expiration
$startDate = (Get-Date "1970-01-01T00:00:00Z" ).ToUniversalTime()
$jwtExpireTimeSpan = (New-TimeSpan -Start $startDate -End (Get-Date).ToUniversalTime().AddMinutes(2)).TotalSeconds
$jwtExpiration = [math]::Round($jwtExpireTimeSpan, 0)
#create JWT validity start timestamp
$notBeforeExpireTimeSpan = (New-TimeSpan -Start $StartDate -End ((Get-Date).ToUniversalTime())).TotalSeconds
$notBefore = [math]::Round($notBeforeExpireTimeSpan, 0)
#create JWT header
$jwtHeader = @{
alg = "RS256"
typ = "JWT"
x5t = $cert64Hash -replace '\+', '-' -replace '/', '_' -replace '='
}
#create JWT payload
$jwtPayLoad = @{
aud = "https://login.microsoftonline.com/$tenantId/oauth2/token"
exp = $jwtExpiration
iss = $applicationId
jti = [guid]::NewGuid()
nbf = $notBefore
sub = $applicationId
}
#convert header and payload to base64
$jwtHeaderToByte = [System.Text.Encoding]::UTF8.GetBytes(($jwtHeader | ConvertTo-Json))
$encodedHeader = [System.Convert]::ToBase64String($jwtHeaderToByte)
$jwtPayLoadToByte = [System.Text.Encoding]::UTF8.GetBytes(($jwtPayLoad | ConvertTo-Json))
$encodedPayload = [System.Convert]::ToBase64String($jwtPayLoadToByte)
#join header and Payload with "." to create a valid (unsigned) JWT
$jwt = $encodedHeader + "." + $encodedPayload
#get the private key object of your certificate
$privateKey = ([System.Security.Cryptography.X509Certificates.RSACertificateExtensions]::GetRSAprivateKey($cert))
#define RSA signature and hashing algorithm
$rsaPadding = [Security.Cryptography.RSASignaturePadding]::Pkcs1
$hashAlgorithm = [Security.Cryptography.HashAlgorithmName]::SHA256
#create a signature of the JWT
$signature = [Convert]::ToBase64String(
$privateKey.SignData([System.Text.Encoding]::UTF8.GetBytes($jwt), $hashAlgorithm, $rsaPadding)
) -replace '\+', '-' -replace '/', '_' -replace '='
#join the signature to the JWT with "."
$jwt = $jwt + "." + $signature
#create a hash with body parameters
$body = @{
client_id = $applicationId
client_assertion = $jwt
client_assertion_type = "urn:ietf:params:oauth:client-assertion-type:jwt-bearer"
scope = $scope
grant_type = "client_credentials"
}
$url = "https://login.microsoftonline.com/$tenantId/oauth2/v2.0/token"
#use the self-generated JWT as Authorization
$header = @{
Authorization = "Bearer $jwt"
}
#splat the parameters for Invoke-Restmethod for cleaner code
$postSplat = @{
ContentType = 'application/x-www-form-urlencoded'
Method = 'POST'
Body = $body
Uri = $url
Headers = $header
}
$request = Invoke-RestMethod @postSplat
#view access_token
$request
}
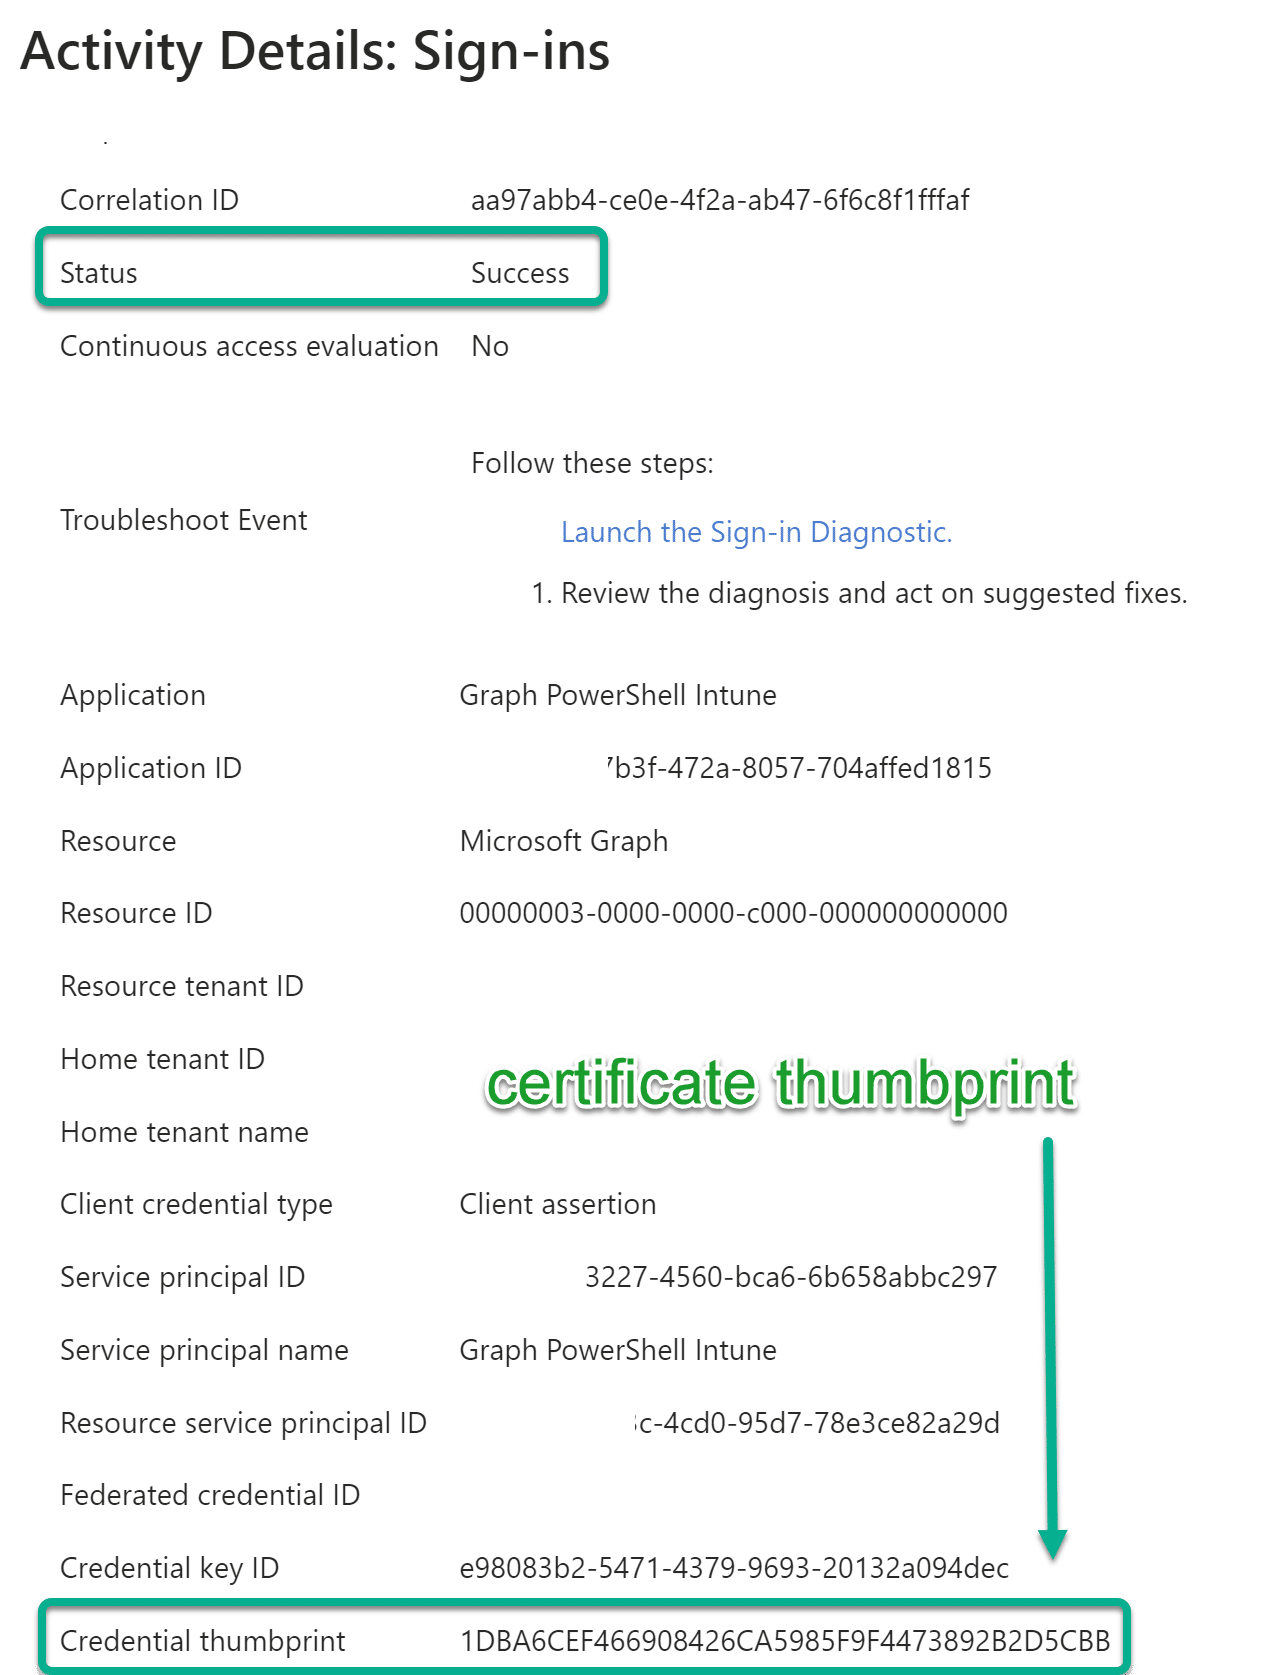
Get-Token -tenantId $tenantId -applicationId $applicationId -scope $scope -cert $cert -certBase64Hash $cert64HashWhen we execute the script, we get a token!

And the AAD sign-in log shows the success authorization
Example: Authenticate with a certificate and make a Graph call to Intune
We can simplify things now. Lets use the access token to make a call to Microsoft Graph
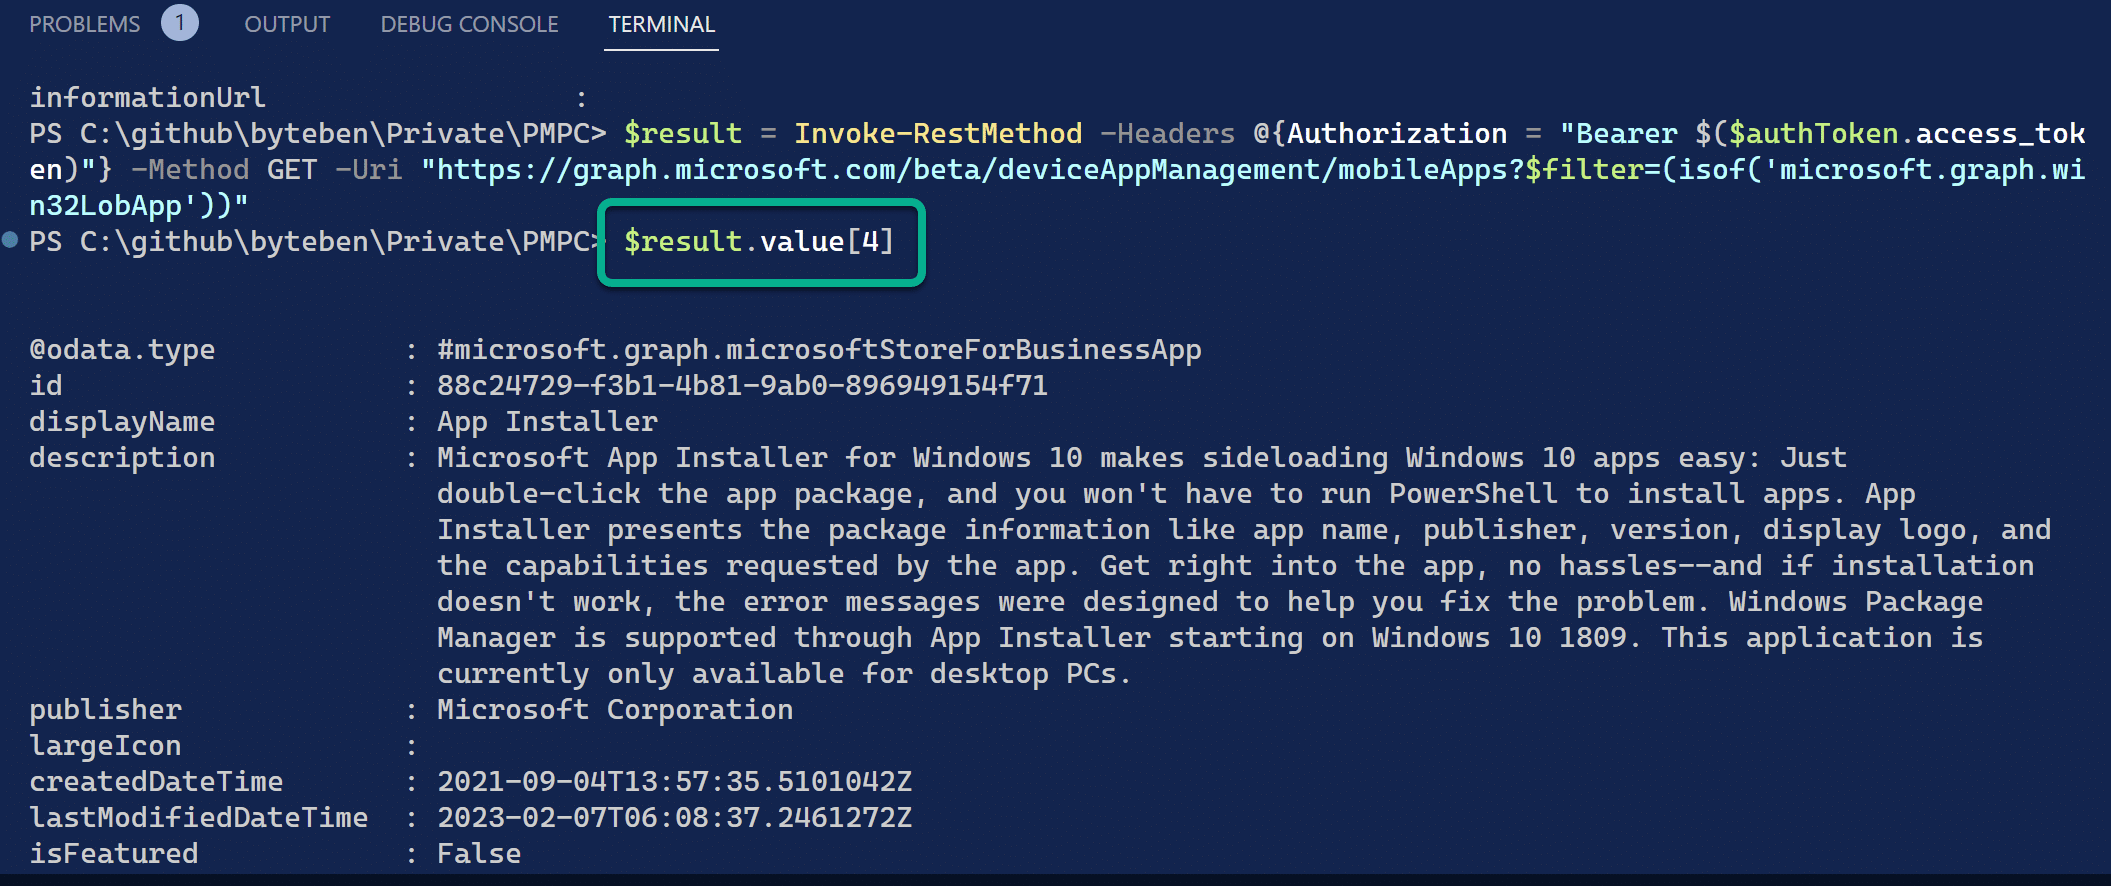
$authToken = .\Get-CBAToken.ps1 -pfxFile "C:\temp\certs\AzureCertIntuneTesting.pfx" -tenantId "0cebf1f4-e0c4-46d4-8c5a-0fc80bed6b2c" -applicationId "47727b19-7b3f-472a-8057-704affed1815" -pfxPassword "123"
Invoke-RestMethod -Headers @{Authorization = "Bearer $($authToken.access_token)"} -Method GET -Uri "https://graph.microsoft.com/beta/deviceAppManagement/mobileApps?$filter=(isof('microsoft.graph.win32LobApp'))"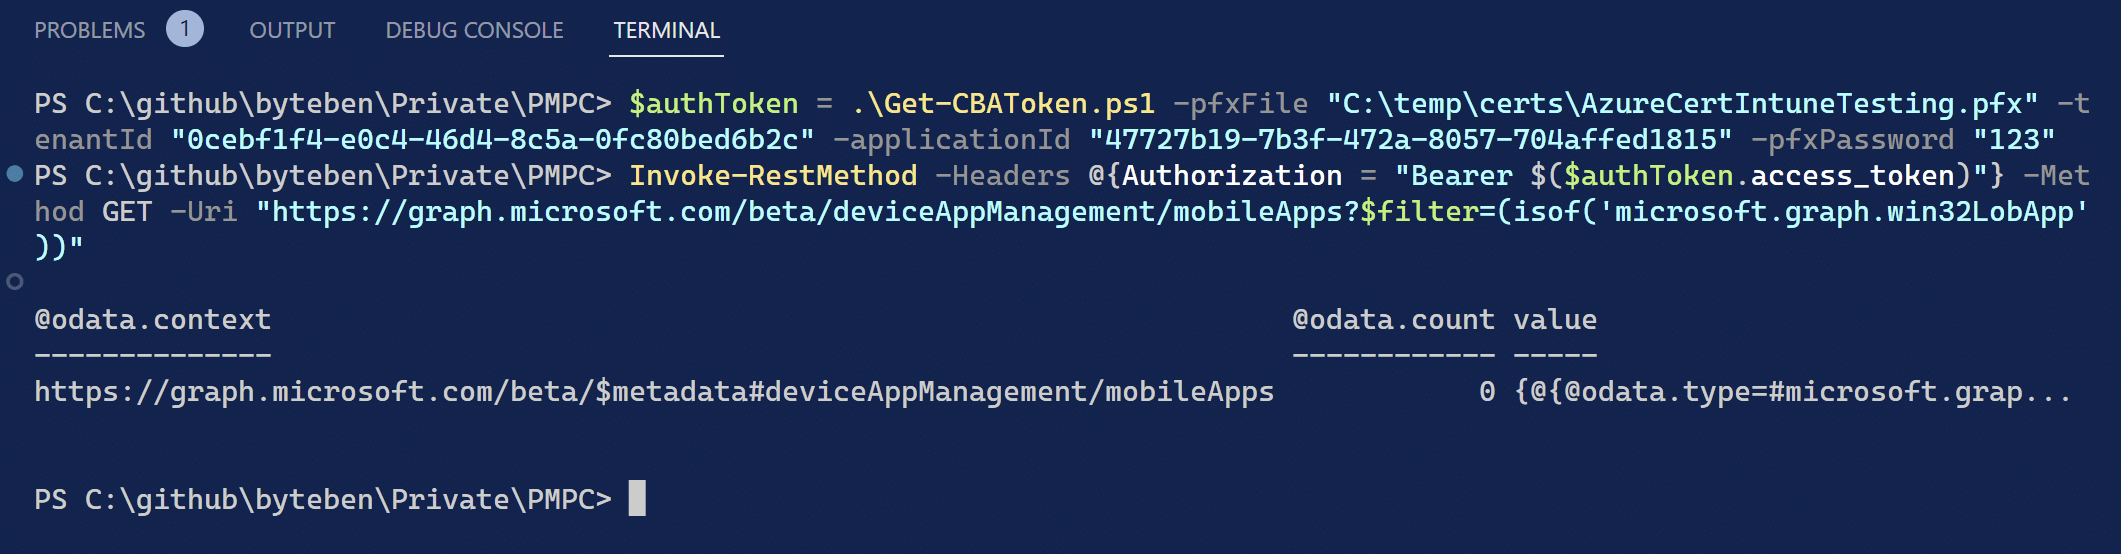
Summary
In this post we looked at creating a self signed certificate for the purpose of authentication to AAD using a Service Principal. Certificates are a much better way to authenticate than client secrets. You can use MSAL.PS module to very easily authenticate when the certificate is in the “LocalMachine” or “CurrentUser” certificate store or Azure Automation. If the certificate is not in a certificate store, we looked at how you could create a JWT for authentication using the private key and make a simple call to Graph to get the token (although we did caveat to proceed with caution if you start exporting private keys).
I feel part 2 might be in the works. We spoke about using Azure Automation with Certificate Based Authentication and I would like to give some examples of how that can be achieved using the Azure Key Vault too. We may also explore how to create the certificate directly in Azure so there is no need to export/import private keys (which always adds a degree of security concern). I think part 2 will also start to look at Managed Identities and why we should be using those as we look to improve our authentication methodology.


Excellent write-up, Ben!