This blog post is dedicated to Autopilot. As you read the opening line, you may think it’s just another piece about Microsoft’s much-discussed onboarding method. However, that’s not our angle. Our aim is to share the complete narrative. How do you begin troubleshooting when you encounter an error on the ‘preparing’ screen? Even if you’re well-versed in the subject, we believe our insights can still enlighten you. We could delve into complex details with elaborate Wireshark, Procmon, and IDA traces, but that’s not our intention. Instead, we strive to demystify the process and make it more understandable than ever before. While we know Autopilot device preparation is already out, it will take time for companies to adopt this as their primary onboarding process, so the old method of onboarding will stay for a while.

Let’s explore the magical black box and split it into bits and pieces
If you came so far, it means you are still curious what we are up to. Let’s begin!
Autopilot Intro
Autopilot has been widely adopted and is used by millions, indicating its status as a necessary technology, regardless of personal opinions. As for the requirements and other specifics, it is recommended to refer to the Microsoft documentation for detailed explanations.
So, what is Autopilot really?
Windows Autopilot is a cloud-based service that automates the deployment and configuration of new Windows 10 and 11 devices, enabling a ready-to-use state for end-users with minimal IT intervention.
But how?
That is exactly the question, HOW? We will demonstrate how Autopilot works and what Autopilot really is and what it is not.
Autopilot hash upload and registration
Initially, you must upload the device hash to the Autopilot database. You can collect the device hash and upload it yourself, but it is often more convenient to have a vendor handle this task, simplifying the process for you as an administrator.
Once this step is completed, and you need to distinguish between devices, you should also apply group tags. These tags facilitate the use of dynamic structures in Entra ID and automate autopilot profile assignments. Note that there may be some delay within the dynamic group, so it’s crucial to construct your rule as precisely as possible to expedite the group’s responsiveness. Another tip is to upload the hash at least a day prior to beginning the provisioning process.
Example of autopilot query that takes all autopilot registered devices:
(device.devicePhysicalIDs -any _ -contains “[ZTDId]”)
Example of autopilot query that takes autopilot registered devices with specific group tag:
(device.devicePhysicalIDs -any _ -eq “[OrderID]:EntraID”)

This seems straight forward and yeah the process is easy enough but you need to take into consideration of the timings as this needs a bit of time to sink in and be ready to work.
Out of box experience (OOBE)
The out-of-box experience refers to the initial setup process that a user or IT technician must complete. It should be straightforward and simple to navigate.
We know OOBE as this initial screen

The steps will be as described here:
Your friend here is a stable internet connection that you can rely on.
Authentication and autopilot profile
Once a device connects to the internet, numerous processes occur behind the scenes, even though they are not immediately visible.
The device initiates a request to login.live.com to execute a “device add request” for device authentication. It employs a randomly generated username and password, created by a local DLL named wlidsvc.dll, also known as the Microsoft Account Sign-In Assistant service.
After the above request is made, the service returns a hardware device ID.
An rsts2.srf file is generated and sent to login.live.com to obtain the final device token required for authenticating and validating the device with the autopilot service.
Live.com returns the device token, validating the device for Autopilot services access. This token is stored locally and can be located in the registry at HKCU:\SOFTWARE\Microsoft\IdentityCRL\Immersive\production\Token.
The device then send a request with the device token together with the Autopilot marker to the autopilot service: ztd.dds.microsoft.com and here it will ask for the autopilot profile: device boot strap policies / Autopilot profile. This URL ztd.dds.microsoft.com is not mentioned in the Microsoft fundamental documentation right here, so be aware that you can not use this list as a single source of truth. However it is mentioned here.
If all processes function correctly and the device is recognized (verified to have a record in the autopilot database), it will download the autopilot profile and save it as a JSON file in C:\Windows\servicestate\wmansvc on the local device.
The profile will be retrieved by the Windows management service and display company branding if it has been set up in the Intune portal. The end-user will then be presented with the login screen to enter their username and password.
Finally, this is the state you will find the device in now and here on the first screen we show you how it is not supposed to look like:

And next a working sample:

Autopilots work is done here. We got the json and it is up to windows and other processes to carry out the instructions from here.
Device Preparation Phase 1 – Entra ID join
This is the phase where the device start its journey to become managed starting with Entra joining phase.

The initial step involves securing the hardware, which is not necessary in a user-driven autopilot scenario where this step is completed swiftly, often unnoticed. In contrast, during pre-provisioning, this step may take longer and necessitates TPM attestation.
The device will reach out to login.microsoft.online.com and request a html based webapp.
The user encounters the familiar login prompt previously observed in the image accompanying the autopilot JSON delivery.
The user enters their username and password to authenticate and initiate the process. This action triggers the Entra ID join flow, which is the initial step in user provisioning with Autopilot.
The web application, known as Microsoft.Windows.CloudExperienceHost_cw5n1h2txyewy, will connect to login.microsoftonline.com/common/oauth2/token to request a token. Additionally, if the user possesses an Intune license, the application will simultaneously request the MDM token.
The application Microsoft.Windows.CloudExperienceHost_cw5n1h2txyewy locates the EntraID join URLs using the dsreg.dll file and, with that information, connects to enterprise.registration.net/yourdomain/discover?api-version=1.7.
It will recieve a response with the DeviceJoinService URL that would be https://enterpriseregistration.windows.net/EnrollmentServer/device/ and then with a JoinResourceID urn:ms-drs:enterpriseregistration.windows.net
With all that information the device will send a request to EntraID to ask for a certificate. It does that to the device join URL + the token it got.
The device join service validates the ID Token and once it has been validated it will create the corresponding device object in EntraID. When the object is created it will reply to the device with the ms-organization certificate. It will also respond with SID on user and user groups that should be added to the local administrator group.
Cloud domain join info is converted and written to registry keys that then can be used during this next provisioning phase to give the device a name and know what tenant it needs to reach for:


The second step involves joining the device to Entra ID. During this process, the device initiates AADDiscovery, reaching out to enterpriseregistration.windows.net.


After successfully joining Entra ID, it will receive the ms-organization-certificate and add the configured users and groups to the local administrators group:


The Entra ID join process is now complete, and the next step will be to enroll in MDM.
After that his happened the ClipRenew.exe will kick in which is a tool that will help the device acquire license. It will start its process with “C:\WINDOWS\system32\ClipRenew.exe” -e but nothing further happens for now.
Device Preparation Phase 2 – MDM enrollment
Once the device is done with entra joining, it will continue to discover the url’s needed to enroll to the MDM service.

While this step is running the RuntimeBroker.exe will make sure that OOBE is able to continue if the device should reboot. It does that by adding Autologon registry to HKCU\Software\Microsoft\Windows\CurrentVersion\UserOOBE\
AutologonSigninName
AutologonIsConnected
AutologonAuthenticationBuffer
AutologonPreserveOobeAutologonCredentials
The initial phase of mobile device enrollment indicates that inputting our username during the Entra ID Join resolves the service URI (enrollment.manage.microsoft.com), which is essential for discovering the actual enrollment URIs required for initiating the device enrollment process.
It will then contact the discovery service using the email address, which is actually utilizing your domain. It will respond with the correct enrollment URI required to carry out the enrollment.
Enrollment in the MDM service requires a security token. This token will contain information such as DeviceID, TenantID, IP Address, and the zero-touch device ID.
It contacts the MDM service to retrieve policies, utilizing the token from the previous step. The MDM service will then provide a blueprint for creating the x509 certificate required for the device to be considered trusted.
Once the device has the blueprint, it can begin to request a specific security token (using the aforementioned token). The MDM service will then provide a certificate and designate a storage location for it on the device.
The certificate is stored on the device and in the TPM. Now the enrollment is done and device + MDM (Intune) has trust.

Device Preparation Phase 3 – Preparing for MDM
In this phase the device will preparing everything needed for your device to work with Intune.

It will query the device for a specific version of nodecache
HKLM\SOFTWARE\Microsoft\Provisioning\NodeCache\CSP\Device\MS DM Server\CacheVersion
OmaDMClient.exe enumerates through registry to know what policies it has available from the Windows side
1st: HKLM\SOFTWARE\Microsoft\Provisioning\CSPs\.\Vendor\MSFT and index them
2nd: HKLM\SOFTWARE\Microsoft\Provisioning\CSPs\.\User\Vendor\MSFT
3rd: HKLM\SOFTWARE\Microsoft\Provisioning\CSPs\.\Device\Vendor\MSFT
4th: HKLM\SOFTWARE\Microsoft\Provisioning\CSPs\.\cimv2
and this goes on and on.
OmaDMClient.exe enumerates through providers and security and index all of them.
HKLM\SOFTWARE\Microsoft\PolicyManager\providers
HKLM\SOFTWARE\Microsoft\PolicyManager\default\Security
It will alter the service “Device Management Wireless Application Protocol” from a startup type Manual to Automatic delayed start.

Then it starts to write this exact policy on the device
HKLM\SOFTWARE\Microsoft\PolicyManager\providers\%Intune GUID%\default\Device\Security\RequireRetrieveHealthCertificateOnBoot
This is for attestation purpose. You can read more about it here

And then to here:
HKLM\SOFTWARE\Microsoft\PolicyManager\current\device\Security\RequireRetrieveHealthCertificateOnBoot

The TPM service must initiate contact to obtain a health certificate, starting with the entry of the Intune GUID.
HKLM\System\CurrentControlSet\Services\TPM\WMI\HealthCert\Store\EnrollmentID
Secondly by adding a force key for it to reach out
HKLM\System\CurrentControlSet\Services\TPM\WMI\HealthCert\Store\has.spserv.microsoft.com\ForceRetrieve

Earlier OmaDMClient.exe queried NodeCache and configured a version, next it will create a new key underneath.
HKLM\Software\Microsoft\Provisioning\NodeCache\CSP\Device\MS DM Server\Nodes
This marks the beginning as the nodecache is written to the device, serving as a cache that reflects the device’s current state. From the initial node to the last, it typically takes about two and a half minutes to complete on a standard fast computer. On my test device, it recorded 1308 settings.
So what is NodeCache?
The NodeCache configuration service provider is a tool designed to handle the client cache, which is a temporary storage area on the client side. This tool is intended exclusively for use by enterprise management servers, which are systems that oversee and control corporate networks. It offers a way to manage the list of network nodes independently of the actual storage solution used. This ensures that the client cache stays updated with the server cache, which is the equivalent storage on the server side. Additionally, it includes an API (Application Programming Interface) that allows for tracking any changes made to the cache on the devices themselves.

HKLM\SOFTWARE\Microsoft\Provisioning\NodeCache\CSP\Device\MS DM Server\CacheVersion
is updated with the latest information. Now NodeCache is up2date and ready to take on to the next step.
Intune Management Extension
Next step it construct the data to be able to deliver the Intune Management Extension (IME). That will be saved under
HKLM\SOFTWARE\Microsoft\EnterpriseDesktopAppManagement\S-0-0-00-0000000000-0000000000-000000000-000\MSI\%GUID%
The IME is installed, from an MSI, via the OMA-DM channel using the Enterprise Desktop App Management Configuration Service Provider (CSP).
This CSP is used to handle enterprise desktop application management tasks, such as querying installed enterprise applications, installing applications, or removing applications.
Using the SyncMLViwer from Oliver Kieselbach, we can track track the MSI coming down in the protocol stream.
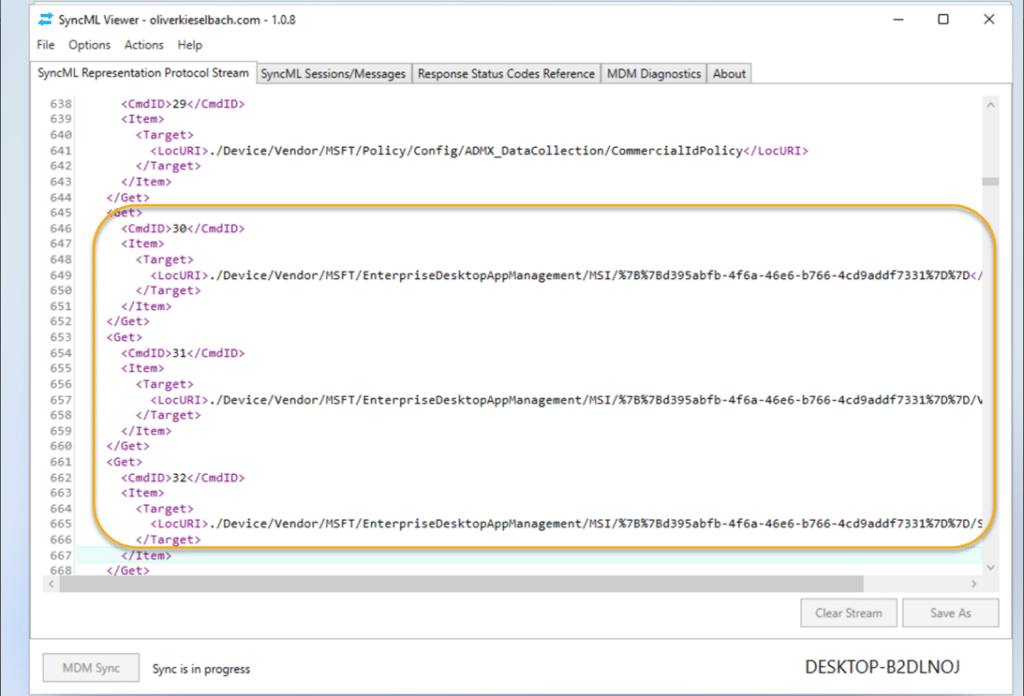
You will be able to download the current production IME installation from here if you like to see what it contains. https://euprodimedatahotfix.azureedge.net/IntuneWindowsAgent.msi

Once all the necessary data has been populated and we have the information required to understand IME, MDMAppInstaller.exe will retrieve the details from the registry path HKEY_LOCAL_MACHINE\SOFTWARE\Microsoft\EnterpriseDesktopAppManagement\
S-0-0-00-0000000000-0000000000-000000000-000\MSI and begin execution.
INFO:
It has been noticed from time to time that this step can fail. If so and you see error 0x800705B4, you can see more about what is happening here
Omadmclient.exe is configured to update the tracked registry with path1, allowing the ESP to monitor it and wait for the completion of the process.

During installation, a session will be created to monitor the installation progress. Once the installation is complete, this session will be removed, signaling to Intune that it is prepared to proceed with the necessary instructions for IME.

The same CSP, EnterpriseDesktopAppManagement, is utilized for two other mechanisms you may be familiar with. When using the new Endpoint Privilege Management (EPM) feature, this CSP is employed to install the EPM client on the device. Similarly, if you utilize the co-management authority feature, the same CSP is used to download CMsetup.exe, which serves as the starting point for downloading policies from your available configuration manager management point.
ADMX backed policies
Next omadmclient will make the device ready to consume certain ADMX backed policies. It will do that by first download the ADMX templates and then installing ADMX for us one by one.

While ingesting the ADMX it will start write the policies that becomes available for intune to put on your device. You will be able to see available ingested ADMX policies here:
HKLM\SOFTWARE\Microsoft\PolicyManager\AdmxDefault\%Intune MDM GUID%\

Once the ADMX is installed it will mark it in registry that it completed and when.
HKLM\Software\Microsoft\PolicyManager\AdmxDefault\%Intune MDM GUID%

The device has completed the preparing for MDM management.
Device Setup Phase 1 – Security policies, certificates and network connections
During this phase, the device will implement security policies, certificates, and network connections. The specifics of this chapter hinge on the policies you have assigned to groups containing devices or to “all devices.”
Important notice
It is very important to notice here, that your policies can differ from ours. But most of the configuration shown here will most likely apply to your environment too, we are sure.

1st Certificates (ESP Tracked)
First policy to come down is written as a REG_BINARY key called Blob. Inside this key it hold information how to retrieve certificates that has been assigned from Intune.
HKLM\SOFTWARE\Microsoft\SystemCertificates\ROOT\Certificates\AB3FD6E553CCFF3E34C164623B70F30CE1937A74\Blob
It will then proceed to write the preferred certificate tracking policy or policies, which will be applied as swiftly as possible. Additionally, the count will increment by one for each path it adds to the tracked policies.

2nd DeviceHealthMonitoring (Not Tracked)
One might assume that the firewall CSP or other security-related policies would be the first to apply to a device, but in reality, the initial policy to be enforced is the DeviceHealthMonitoring, assuming it has been assigned—and it’s advisable to do so.
HKLM\SOFTWARE\Microsoft\PolicyManager\providers\%Intune GUID%\default\Device\DeviceHealthMonitoring

and right after this it will write DeviceHealthMonitoring keys to
HKLM\SOFTWARE\Microsoft\PolicyManager\current\device\DeviceHealthMonitoring

Read more on the device health CSP and what it means to enable it right here
3rd Defender (Not Tracked)
Next policy to come down is 3 specific defender updates. More specifically the signature, engine and platform ring. I didn’t configure those, but anyhow they get configured on my devices.

4th Windows Updates (Not Tracked)
As the fourth policy is implemented, it’s crucial to configure Windows updates if you haven’t already. You’ll definitely want to manage this aspect. In particular, the AllowAutoUpdate policy should be the first one to consider.
HKLM\SOFTWARE\Microsoft\PolicyManager\providers\%Intune GUID%\default\Device\Update\AllowAutoUpdate

And last ends up in
HKLM\SOFTWARE\Microsoft\PolicyManager\current\device\Update

If you utilize the update ring policy, a preview build policy will also be among the configured policies. This particular policy is not stored in the same hive as the update registry but is located in the System instead.
HKLM\SOFTWARE\Microsoft\PolicyManager\providers\%Intune GUID%\default\Device\System

And lastly added here
HKLM\SOFTWARE\Microsoft\PolicyManager\current\device\System\AllowBuildPreview

5th Defender tagging (Not Tracked)
Because I scope my devices to groups in MDE I have added a policy to add that group ID to the device. This policy is applied as the 5th policy in the chain of policies coming down.

6th Microsoft Defender onboarding (Not Tracked)
It comes as no surprise that we need the onboarding of the device to happen as fast as possible. I wonder though why this is prioritized as the 6th policy and not the first, if a device has been targeted to onboard to this service.

Then the service Windows Defender Advanced Threat Protection (MsSense.exe) is kicking in to get the fresh policy and to get the process started. It uses the same registry entries to look up the tenant ID as in the process where it join the device to Entra.
Windows Defender Advanced Threat Protection service will go from Manual to Automatic and disable from tampering with the service.

7th Delivery Optimization (Not Tracked)
Operating the cloud where all bits and bytes comes from internet we of course should have our DO configured. This is the 6th policy that comes down to the device
HKLM\SOFTWARE\Microsoft\PolicyManager\providers\%Intune GUID%\default\Device\DeliveryOptimization more specifically the download mode.

and last in to
HKLM\SOFTWARE\Microsoft\PolicyManager\current\device\DeliveryOptimization

If you like to know more about Delivery Optimization we have other posts that can help you build some nice reports.
8th Firewall – (ESP Tracked)
Firewall is a policy that ESP will be able to track. First thing that the OmaDMClient will do is to ask the registry path beneath what it can track from the firewall CSP node. Tracking policies will be Global, DomainProfile, PublicProfile, PrivateProfile and FirewallRules.
HKLM\SOFTWARE\Microsoft\Windows\EnterpriseResourceManager\AllowedNodePaths\CSP\Firewall
First one will be the rules that needs to be applied. If you didn’t assign any, you would of course not see them.

9th Microsoft Edge Channel – (Not Tracked)
Either if you use autopatch or just manage Edge yourself, this is something that will come down fast to the device as well.
HKLM\SOFTWARE\Microsoft\PolicyManager\providers\BD9C1553-50EF-432B-A9EC-925DE282894B\default\Device\updatev95~Policy~Cat_EdgeUpdate~Cat_Applications~Cat_MicrosoftEdge\Pol_TargetChannelMicrosoftEdge

And moved on to
HKLM\SOFTWARE\Policies\Microsoft\EdgeUpdate\TargetChannel{56EB18F8-B008-4CBD-B6D2-8C97FE7E9062}

10th Bitlocker – (Not Tracked)
I believe that everyone with a windows device also run with some sort of encryption. If you run with the native bitlocker this is the 10th policy that will hit the device.
HKLM\SOFTWARE\Microsoft\PolicyManager\providers\BD9C1553-50EF-432B-A9EC-925DE282894B\default\Device\BitLocker

and next here
HKLM\SOFTWARE\Microsoft\PolicyManager\current\device\BitLocker

But this policy is not only applying to the MDM stack. It also had to put a certain setting in the old hive of policies.
HKLM\SOFTWARE\Policies\Microsoft\FVE\OSEncryptionType
HKLM\SOFTWARE\Policies\Microsoft\FVE\EncryptionMethodWithXtsOs
HKLM\SOFTWARE\Policies\Microsoft\FVE\EncryptionMethodWithXtsFdv
HKLM\SOFTWARE\Policies\Microsoft\FVE\EncryptionMethodWithXtsRdv

11th Knobs – (Not Tracked)
Knobs, what can we say about knobs? This is registry added by omadmclient that says something about power schemes. It seems to add a hole lot but at the same time a standard device has the same settings applied already. So why are Intune adding those to the registry portion of a windows device, is a really good question! We think this is not for a regular windows device but maybe for lighter versions that need certain settings to perform best possible while Intune manages the device.
First ~400 settings will get added to this path
HKEY_LOCAL_MACHINE\SOFTWARE\Microsoft\PolicyManager\current\device\knobs
12th LAPS – (Not Tracked)
Then it is time for LAPS to apply. Of course again if you applied it, but why wouldn’t you. LAPS configuration can be found here:
HKLM\SOFTWARE\Microsoft\Policies\LAPS\

13th Firewall settings – (ESP Tracked)
Then it will be time for some generel firewall configuration.
HKLM\SOFTWARE\Microsoft\Windows\EnterpriseResourceManager\AllowedNodePaths\CSP\Firewall

14th OneDrive – (Not Tracked)
Time for some OneDrive. Same applies this time, if you haven’t configured it, it might not be something you see, but why wouldn’t you right?!
First i goes to
HKLM\Software\Microsoft\PolicyManager\providers\%Intune GUID%\default\Device\
OneDriveNGSCv2~Policy~OneDriveNGSC
OneDriveNGSCv4~Policy~OneDriveNGSC
OneDriveNGSCv5~Policy~OneDriveNGSC

and then to the known path
HKLM\SOFTWARE\Microsoft\PolicyManager\current\device\
OneDriveNGSCv2~Policy~OneDriveNGSC
OneDriveNGSCv4~Policy~OneDriveNGSC
OneDriveNGSCv5~Policy~OneDriveNGSC

15th Windows Hello for Business – (ESP Tracked)
Last but not least the last tracked policy in our environment. As stated in the beginning, there can be plenty more. One of my customer has 127 tracking policies as we speak. Especially firewall rules if you have a lot of those, will be filling up the tracked policy space.
If you enable this policy setting, Windows Hello for Business will use a Microsoft Entra Kerberos ticket to authenticate to on-premises resources. The Microsoft Entra Kerberos ticket is returned to the client after a successful authentication to Microsoft Entra ID if Microsoft Entra Kerberos is enabled for the tenant and domain.
You can see more about the CSP right here
HKLM\SOFTWARE\Microsoft\EnterpriseResourceManager\Tracked\BD9C1553-50EF-432B-A9EC-925DE282894B\device\default\Path12

This will result in a policy that will located here:
HKLM\SOFTWARE\Microsoft\Policies\PassportForWork\%tenant GUID%\Device\Policies\UseCloudTrustForOnPremAuth

That concludes it for now on the tracked policies. It doesn’t mean if it is tracked that it will be prioritized before everything else, just that ESP will track it to make sure it applies.
Device Setup Phase 2 – Apps
The device has now reached the stage where it begins to search for and install applications.

First thing that will happen is that IME is instructed to configure 2 registries
HKLM\SOFTWARE\Microsoft\IntuneManagementExtension\Notification\
EnableChannelUriFeature = True
EnableDeviceActionFeature = True
These keys are related to a new feature we know as device query. If you are using or have used device query you maybe know by know that it uses the IME engine to grab the information queried from the Intune portal on the device and send it back again. If you like to deep dive the subject, you can do so here.

Here are some intriguing observations. Initially, we have the ChannelAddress, which indicates the WNS push address utilized by the device for receiving specific information via IME when necessary.
Another noteworthy detail is the FullSyncFrequencyInHours set at 168. Dividing this by 24 hours yields 7, signifying that the device performs a complete synchronization every seven days.
PowerShell scripts
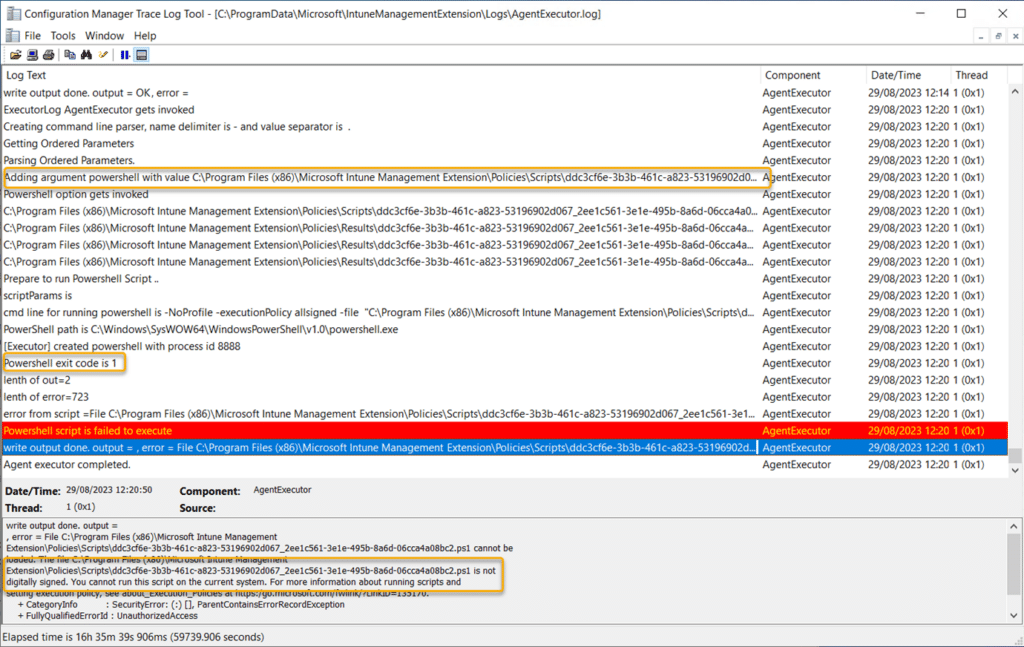
Before apps are installed, IME will start executing PowerShell scripts, also called “platform scripts” in the Intune console. AgentExecuter will be responsible for carring out this task and it can be viewed in the log “C:\ProgramData\Microsoft\IntuneManagementExtension\Logs\AgentExecutor.log” what happens.
Within our setup, there are four scripts designated for the device. Consequently, the process will initiate by executing these scripts. The agentExecutor log provides a straightforward way to monitor the script’s status and the outcome of its execution.
Scripts are download to here:
C:\Program Files (x86)\Microsoft Intune Management Extension\Policies\Scripts
and will create 4 files for every script it executes (the GUID will represent your script from Intune.)
4cce5d56-a9c4-42d9-b822-0e99acdcba91.ps1
4cce5d56-a9c4-42d9-b822-0e99acdcba91.error
4cce5d56-a9c4-42d9-b822-0e99acdcba91.output
4cce5d56-a9c4-42d9-b822-0e99acdcba91.timeout
And if we have a look at the AgentExecuter.log

Note: It is common to see the following error if you have an All-Signed PowerShell policy in place and the script being processed is not digitally signed.
IME Policies
Now is the time to get policies down from Intune so the device knows what it needs to apply.
It will start by populating the system part to the registry here:
HKLM\SOFTWARE\Microsoft\IntuneManagementExtension\Policies\00000000-0000-0000-0000-000000000000

It is also worth mentioning that everytime IME does add a registry key or value it is reflecting the status in the IME log

The log “C:\ProgramData\Microsoft\IntuneManagementExtension\Logs\AppActionProcessor.log” is created and starts to process all the logic that needs to happen with Win32 apps like
- Are the app required
- Is there any uninstall before the installation
- Is the app detected
- Is is applicable

ESP tracking app
IME agent continues to write to the registry and the first thing that that comes down is the EspTrackingWin32App.
HKLM\SOFTWARE\Microsoft\IntuneManagementExtension\EspTrackingWin32Apps\00000000-0000-0000-0000-000000000000

If you are interested in knowing what these apps that the device added to the tracking list, you can easily do that by grabbing the GUID, navigate to a random win32 app in Intune and then paste the GUID into the address bar.

Win32 apps
You cannot specify the application installation order, even when Win32 apps are tracked. The exact order in which the IME will process each Win32 app policy is:-
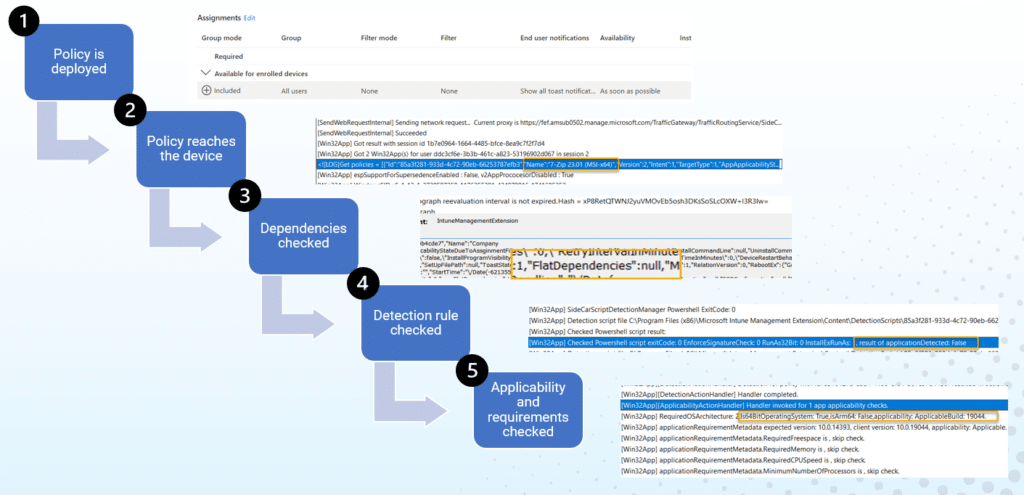
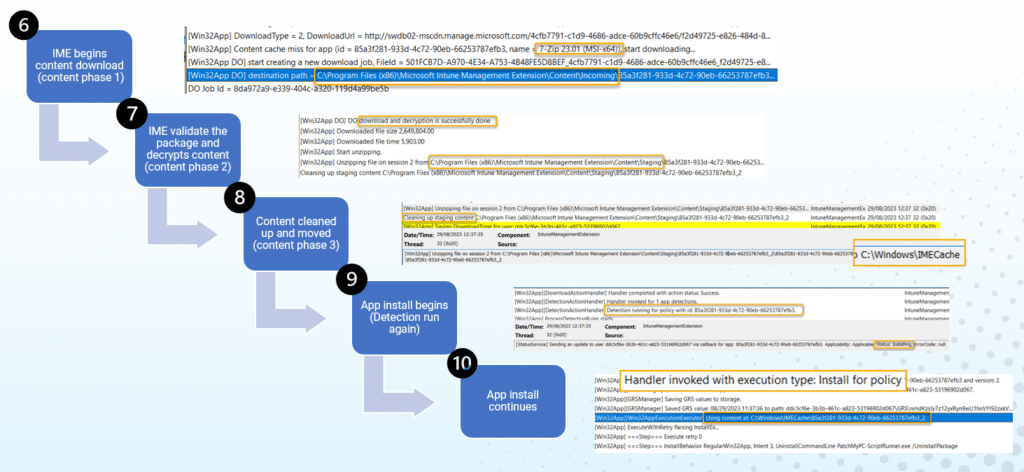
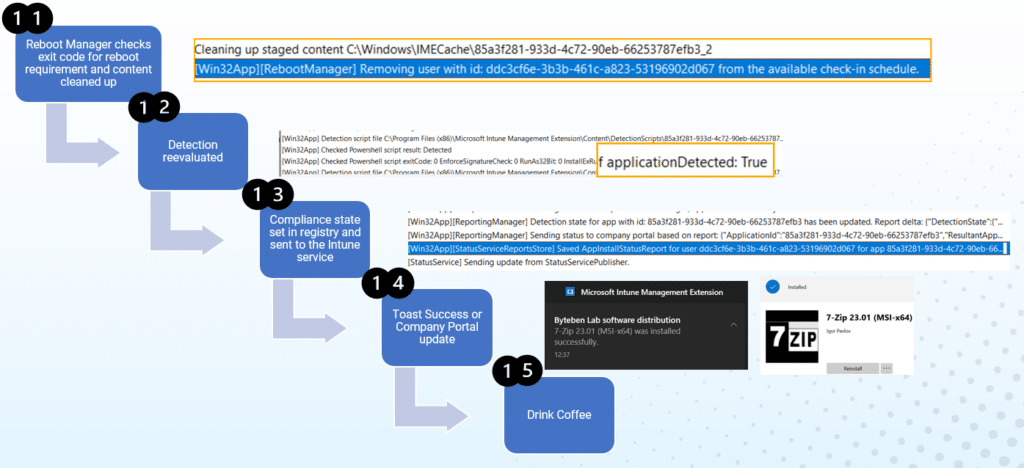
Next up the IME agent will start adding reporting information to the registry. This will be some sort of help to track the process.

And then it moved onto AppAuthority where it publish all apps that has a assignment for the device

While everything starts coming together it continues to write into the SideCarPolicies space. SideCar? Where did that come from?
It’s a component that facilitates the installation and management of Win32 apps and PowerShell scripts on Windows devices. During the Enrollment Status Page (ESP) process, Sidecar tracks the installation state of Win32 apps (but not PowerShell scripts). The installation state can have the following values:
- 1 (NotInstalled)
- 2 (NotRequired)
- 3 (Completed)
- 4 (Error)
During the process the status here in the next picture will start saying: Installing…

It then goes back to reporting HKLM\SOFTWARE\Microsoft\IntuneManagementExtension\Win32Apps\Reporting\00000000-0000-0000-0000-000000000000\ to make sure it is updated with latest status.
Next up its Compliance State Reporting. A compliance report is generated and sent back to the Intune service. These reports are saved as a JSON body in a key under \Win32apps\<deviceGUID\UserGUID>\<AppId>\ComplianceStateMessage
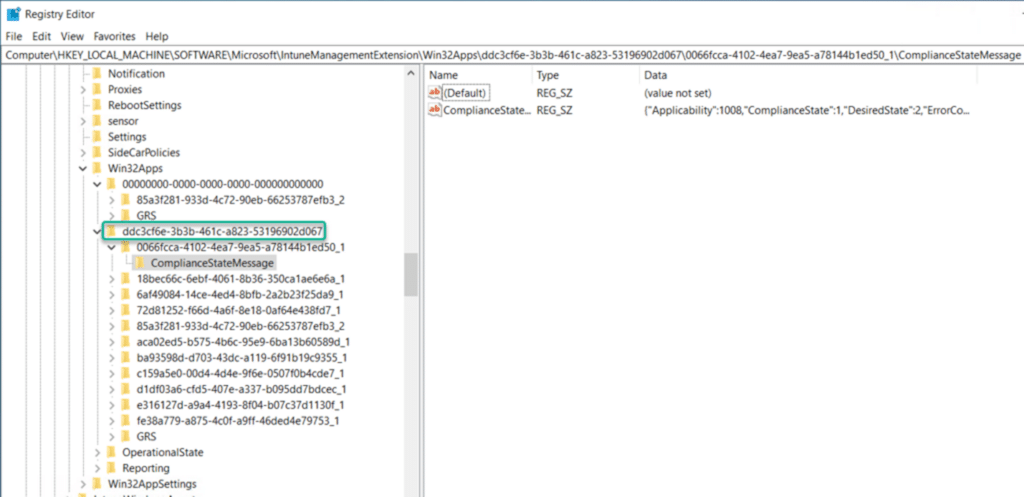

The IME can be decompiled to reveal what the numerical values represent. Here are some of the common state message values you might come across.

We deep dive into Compliance State Messages at Win32 app State Messages Demystified – PowerShell FTW (msendpointmgr.com)
Next GRS get’s written, one record at a time. I needs to go through above flow for each app. GRS stands for Global ReEvaluation Scheduler and is a mechanism within IME that comes into play when a Win32 app deployment fails. After 3 consecutive failed attempts to install an app, the GRS prevents the IME from trying to install the app again for the next 24 hours.
The IME will only retry the app 3 times if the return code is known
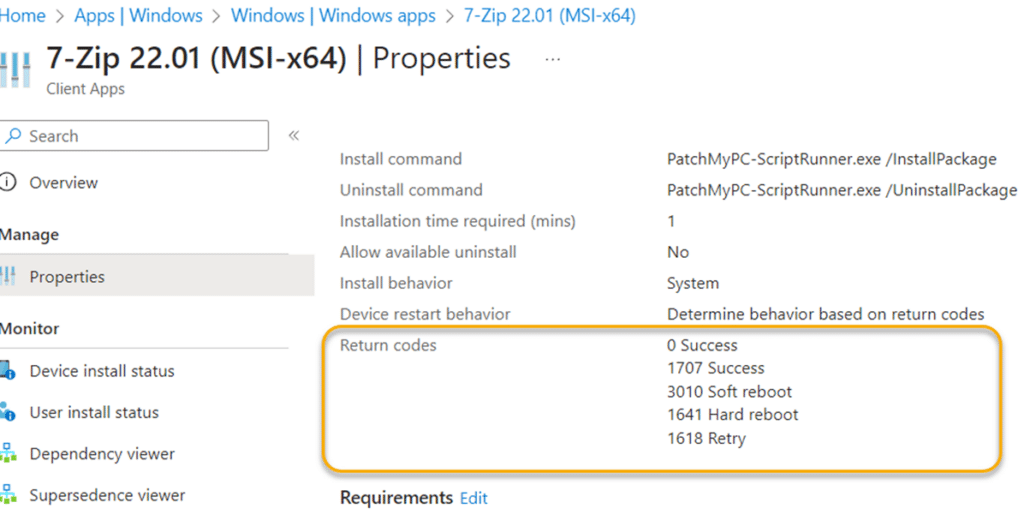
Great preventative action not having a device repeatedly attempting to install an app that has known issues, which will allow admins to troubleshoot and resolve the problem before the system reattempts.
In this example the app has 2 things it needs to keep tack of.
If you like to troubleshoot this area, you can see more here.

Let us explain. The first GUID is CDBurnerXP, which has a supersedence to another app. Can you guess which? Correct the other GUID mentioned above. That is why we will see 2 GUIDs under this GRS data. If you had only 1 installation without any relationship, there would be one GUID.
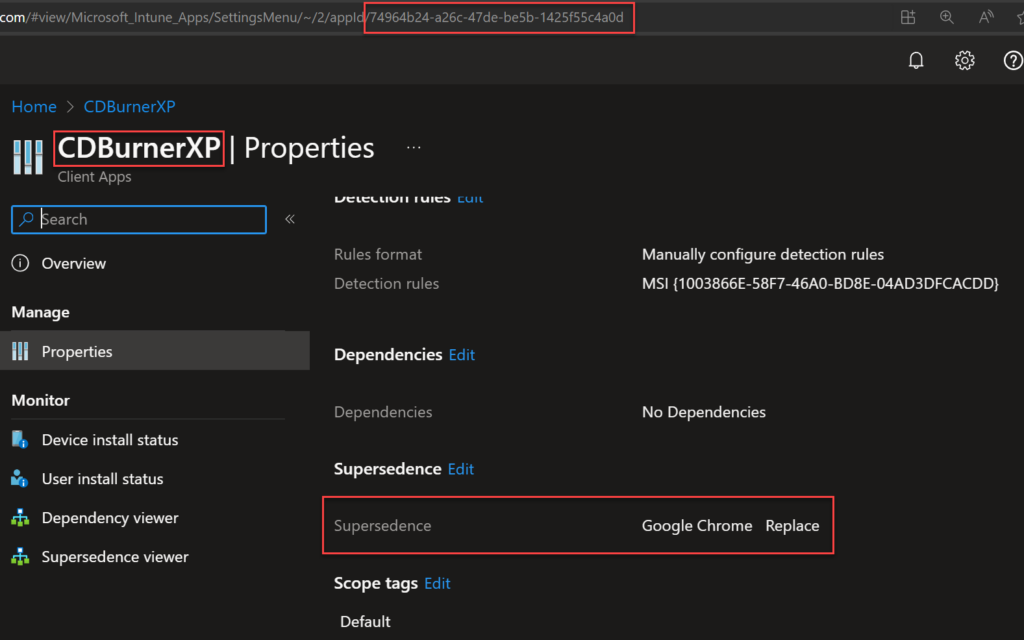
This process then happens over and over again until there are no more apps that needs to be installed during ESP.
An overview of how GRS handles policy retries can be found below:-
- Policy is evaluated and installation begins.
- If installer fails, does the exit code indicate “Retry”? If so, retry 3 more times every 5 minutes.
- If installer is failed (still), add the app to the GRS.
- Evaluate a sub graph every 8 hours to check when 24 hours have passed since the app was added to GRS.
- After 24 hours, retry the installation.
- Repeat forever.
Because the sub-graph is evaluated every 8 hours, and depending if the machine has been off during a scheduled re-evaluation, it can take anywhere between 24 and 32 hours to re-evaluate a policy
Remediation
Next, we have remediation scripts. These scripts are typically located in C:\Windows\IMECache\HealthScripts\ and are associated with a GUID that can be resolved in the Intune console to identify what is executing on the device.
First, we encounter the detection script, followed by the remediation script. Occasionally, not both scripts are added to your remediation package, yet both will still be downloaded. The script without any code will remain at 0kb.

The AgentExecutor.log file reveals the process flow for remediation.

This procedure is repeated for each remediation script assigned to the device or user.
The process writes to ClientHealth.log to verify the device’s IME health, MDM certificate, download location, and the sending of sidecar requests back to Intune. It also checks the Intune Management Extension service and sends back a health report.
Account Setup
Account setup is very similar to Device setup. If you’ve adopted a strategy of assigning most of your policies to user groups, it’s advisable to maintain this approach in your provisioning strategy. Additionally, if you utilize pre-provisioning, the account setup stage becomes a valuable asset, ensuring the latest configuration / apps is applied before users access their devices.
Should the above not apply, we recommend disabling this phase. It tends to decelerate the provisioning process and offers little benefit if your policies and app stack are already assigned to groups containing your devices.
Summary
We have reached the conclusion. The device provisioning flow has been thoroughly documented, providing you with comprehensive knowledge of the process from start to finish.
Autopilot plays a minor role in provisioning, supplying a JSON with initial data, which triggers the entire sequence from enterprise joining, through MDM enrollment, to device preparation for management, including configuration settings, app installations, and scripts.
Despite the apparent simplicity, the process is complex. We sincerely hope that this insight into the world of modern provisioning will be advantageous to you in the future.






Nice deep dive, thanks
Great Documentation! Hopefully the flow will stay 🙂
thank you!!!
What about hybrid entra id join type record formed from ADS side.
For example if i have issue in 20 out of 100 devices, those are not forming hybrid join type records in entra id.
I am doubting on certificate those can be corrupted but I don’t know what they are and actually it’s from when hybrid come into entra id via azure ad connect tool.
As we have user-driven hybrid autopolit profile…..so affected deviecs are in intune as azure ad join type record and they are not forming hybrid azure ad join type in entra id.
There is no issue from our infra side as I mentioned I am doubting on certificate might be they corrupted so hybrid join type record is not forming in entra id while it’s coming from azure ad connect tool and if i send wipe both records form properly.
Fantastic article! Very granular, I’m curious how were you able to identify the registry changes through the process? Special tool?
Hey Mike. Thanks. This was mostly done with Procmon. But for some of it also SyncML tool part of the Intune debug toolkit you can find on this site, and also IDA to look into DLL’s and lastly wireshark to sniff network connections and communications.
Great explanation