

What is Microsoft Connected Cache (or MCC)?
Microsoft Connected Cache, or DOINC (Delivery Optimization In-Network Cache) was first released with Configuration Manager Technical Preview 1903 and was created with the intent of replacing distribution points for cloud native devices (aka Entra joined aka AADJ). The solution went through various iterations for the last 5 years, but its General Availability is finally here. MCC acts as a centralized cache node for Delivery Optimization on a network segment. When an Intune managed device is checking for Windows, Updates, Win32Apps and many other download types (for a complete list check Types of download content supported by Delivery Optimization) you can configure it to look or a cache node, and if one is available and does not have the contents you are looking for, it will download it, service to your device and keep it in cache for when other devices need it, reducing internet bandwidth and improving efficiency since content is always available. Peer to Peer Delivery Optimization is great, but if the first computer to download an update on the network goes offline, the next one will have to download it again. When you use MCC the server is most likely always available to service requests.
This guide intention is to automatically deploy an MCC node on Windows 11 25H2 using the local user account option. This implementation will leverage Intune Autopilot with Self-Deployment mode to create a Zero Touch deployment. This idea came from a requirment that many organisations have, where remote offices, which might benefit hugely from a caching solution not always have a dedicated IT team onsite, making it harder to troubleshoot or re-deploy this solution otherwise.
How to create an MCC instance and a node
To get started with MCC, you need an Azure subscription and access to create resources in it.
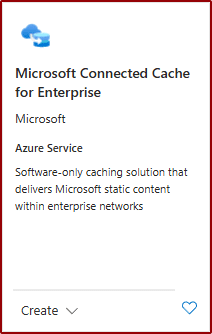
Once you have that you can navigate to Create a resource, choose Microsoft Connected Cache for Enterprise and then click Create
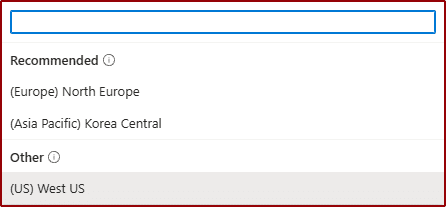
Choose a Subscription, Resource group, a Location and name.
These are the currently supported locations:
Once the resource is created, you can navigate to it and start creating nodes in the Cache Nodes blade.
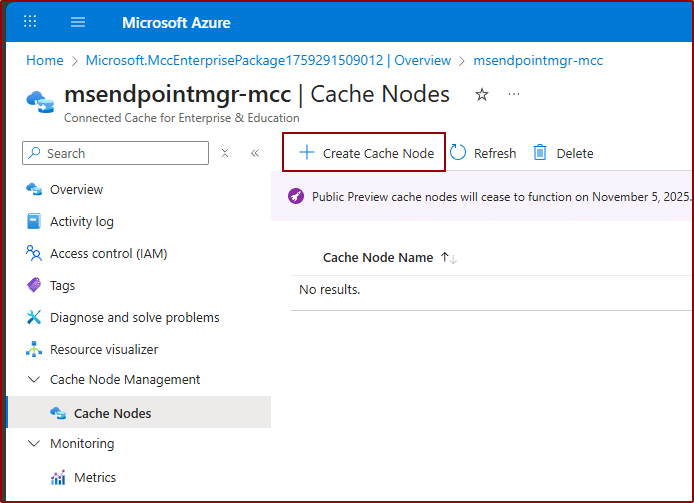
You’ll notice you can create nodes on Windows and Linux operating systems.
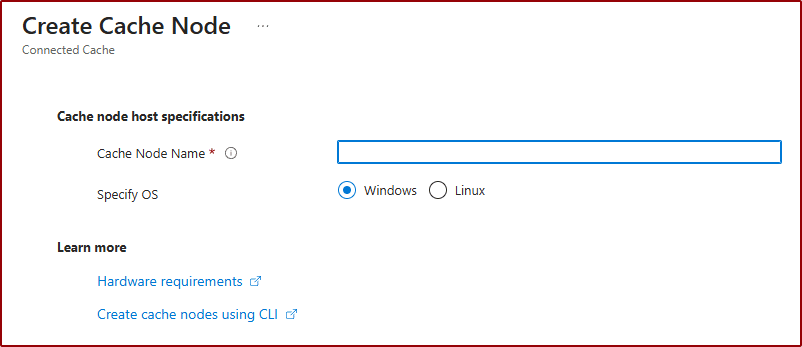
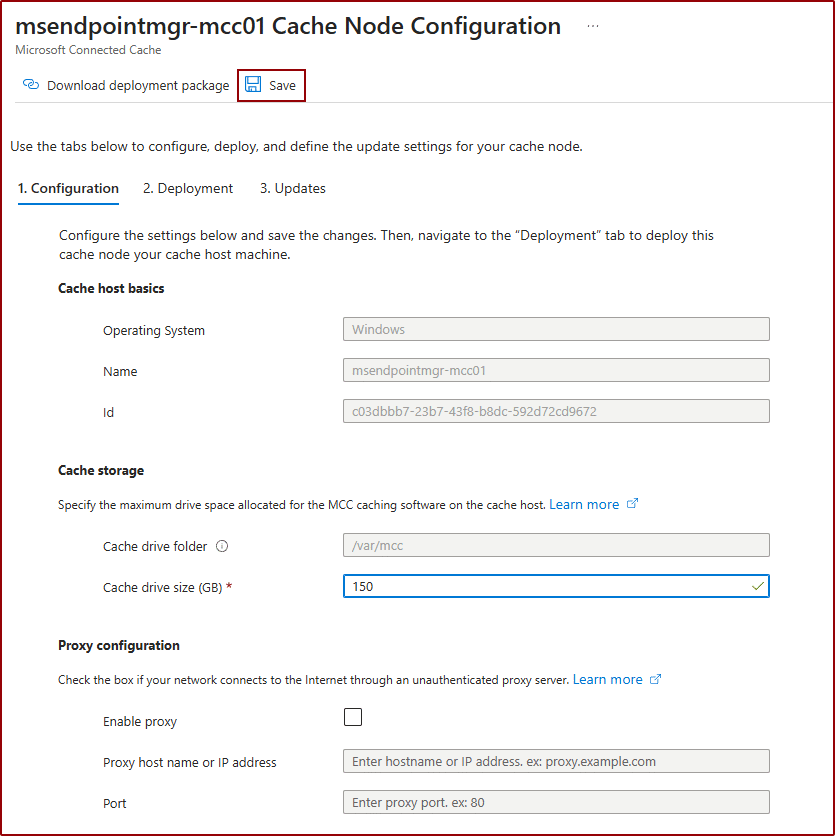
This guide will cover only Windows deployments. Once you created a new node, go to Configuration and define a size for the cache drive (for this guide 150 will be the value set) and click save.
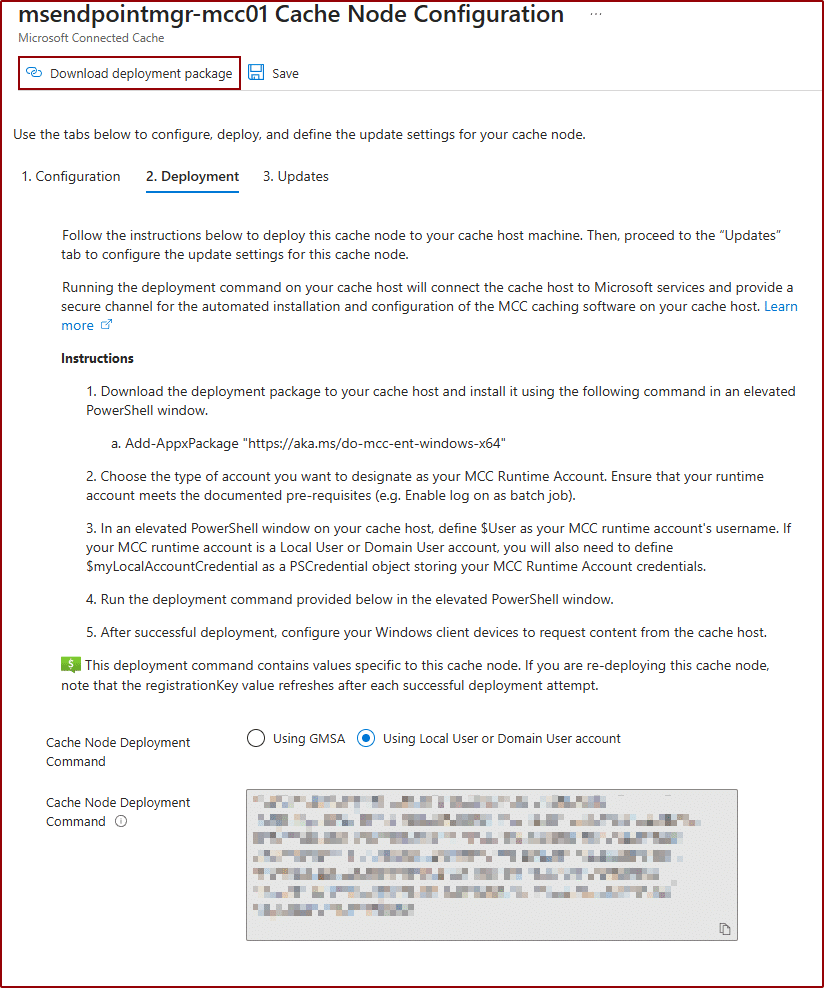
After that navigate to Deployment, choose Using Local User account and copy all the information for the cache node provisioning (this will be utilised later with the MCC Bootstrap App) and click Download deployment package
Prerequisites of MCC node
Entra Groups
To be able to target our apps, configuration profiles, autopilot and enrollment status page we will need a dynamic group plus one group per physical connected cache node.
Dynamic Group
This group is based on a query for Autopilot Tags and will add any devices imported to Autopilot with the Group tag of MCC. This group will be assigned to the Autopilot Profile, the Enrollment Status Page Profile and the Configuration Profiles
This is the dynamic query for the group.
(device.devicePhysicalIds -any (_ -eq "[OrderId]:MCC"))Assigned Group(s)
This group(s) will be used to assign each MCC Bootstrap App. In case you have more than one cache node, you will require a unique copy of this app pointing to each node ID and Registration key. Each node corresponding device entra object should be statically assigned to each group. Those should then be assigned to its corresponding Win32App. To illustrate that example below is two Win32apps with their assignments
Win32Apps
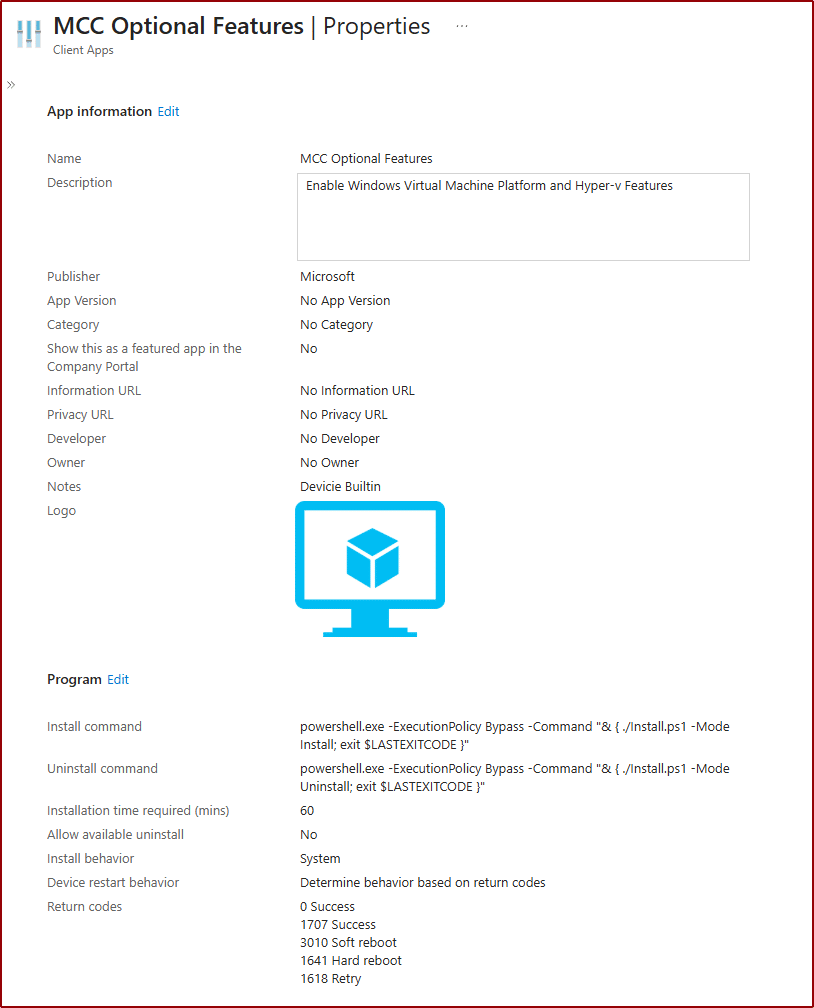
1 Enable Windows optional features
‘VirtualMachinePlatform‘ and ‘Microsoft-Hyper-V-All‘ Windows optional features are required to install and enable MCC. We are going to create a Win32App to deploy those features as per below.
Installation script (Install.ps1)
Param (
    [Parameter(Mandatory = $true)]
    [ValidateSet("Install", "Uninstall")]
    [String]$Mode
)

#region Config
$Features = @("VirtualMachinePlatform", "Microsoft-Hyper-V-All")
$Client = "MCC"
$LogPath = "$env:ProgramData\$Client\logs"
$LogFile = "$LogPath\FeatureManagement.log"
#endregion

# Ensure log directory exists
if (!(Test-Path -Path $LogPath)) {
    New-Item -Path $LogPath -ItemType Directory -Force | Out-Null
}

$RestartNeeded = $false

foreach ($Feature in $Features) {
    switch ($Mode) {
        "Install" {
            Write-Output "Installing $Feature..." | Tee-Object -FilePath $LogFile -Append
            $result = Enable-WindowsOptionalFeature -Online -FeatureName $Feature -All -NoRestart -ErrorAction SilentlyContinue
        }
        "Uninstall" {
            Write-Output "Uninstalling $Feature..." | Tee-Object -FilePath $LogFile -Append
            $result = Disable-WindowsOptionalFeature -Online -FeatureName $Feature -NoRestart -ErrorAction SilentlyContinue
        }
    }

    if ($result.RestartNeeded) {
        $RestartNeeded = $true
    }

    Write-Output "$Feature - RestartNeeded: $($result.RestartNeeded)" | Tee-Object -FilePath $LogFile -Append
}

Write-Output "Overall RestartNeeded: $RestartNeeded" | Tee-Object -FilePath $LogFile -Append
# Exit code 1641 indicates restart required
if ($RestartNeeded) {
    [System.Environment]::Exit(1641)
} else {
    [System.Environment]::Exit(0)
}
Detection script (detect.ps1 )
$vmPlatform = Get-WmiObject -Class Win32_OptionalFeature | Where-Object { $_.Name -eq "VirtualMachinePlatform" -and $_.InstallState -eq 1 }
$hyperV = Get-WmiObject -Class Win32_OptionalFeature | Where-Object { $_.Name -eq "Microsoft-Hyper-V-All" -and $_.InstallState -eq 1 }
if ($vmPlatform -and $hyperV) {$True}
Intune App
Install command: powershell.exe -ExecutionPolicy Bypass -Command “& { ./Install.ps1 -Mode Install; exit $LASTEXITCODE }”
Uninstall command: powershell.exe -ExecutionPolicy Bypass -Command “& { ./Install.ps1 -Mode Uninstall; exit $LASTEXITCODE }”
2 WSL
Windows Subsystem for Linux can also be enabled as a Windows optional feature, but we will be using the latest release from Microsoft available on GitHub. This will also be packaged as a Win32App
Intune App
Install command: msiexec /i wsl.2.6.1.0.x64.msi /qn /l*v C:\ProgramData\MCC\Logs\wsl_2_6_1_0_Install.log
Uninstall command: msiexec /x “{8705254B-3AE0-4CFA-93D5-F71DCDE9ED2B}” /qn
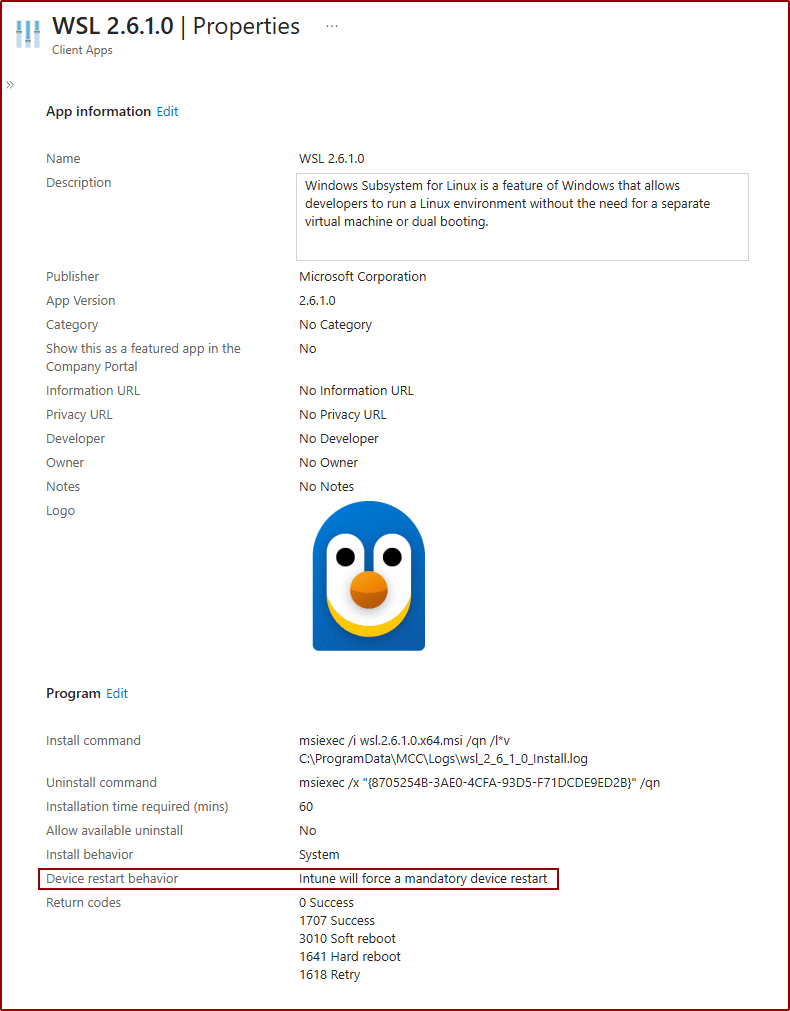
- Note that the Device restart behavior is set to “Intune will force a mandatory device restart”
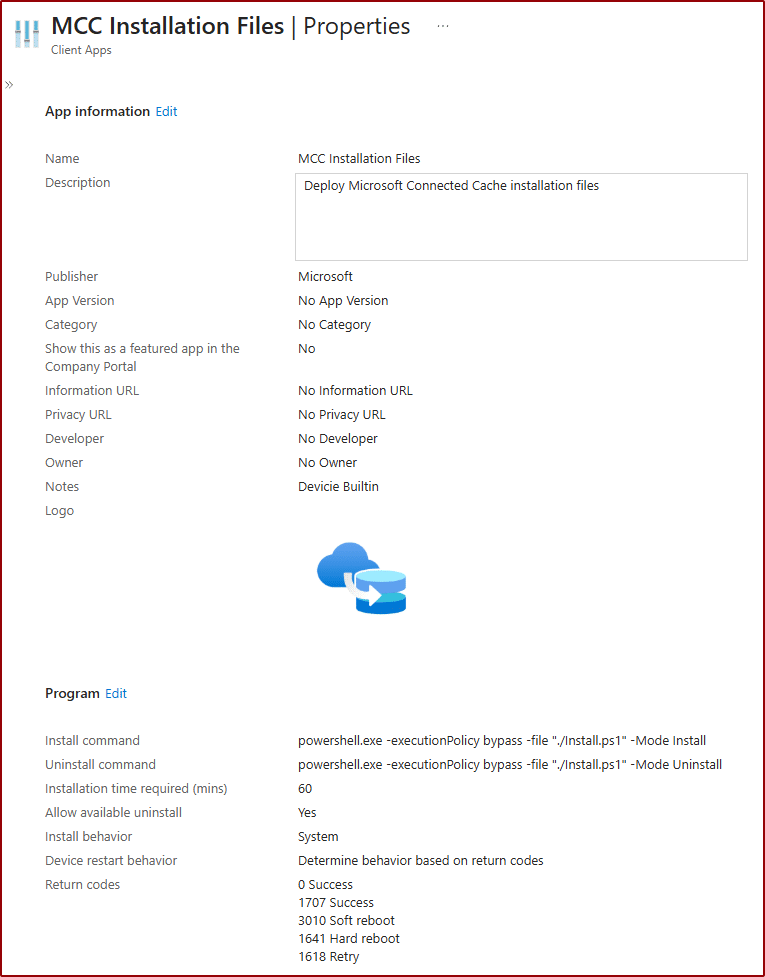
3 MCC Deployment Package
The deployment package is a Msixbundle app and as we need to create a dependency chain between our apps, it needs to be re-packaged as a Win32App.
These are the instructions for the current version:
Download the deployment package (msixbundle) and add the following script to a source folder (to later create the .intunewin file
Installation script (Install.ps1)
Param (
    [Parameter(Mandatory = $true)]
    [ValidateSet("Install", "Uninstall")]
    [String[]]$Mode
)

# ----------------------------------------
# Read file info: locate the MSIX bundle
# ----------------------------------------
$MSIX = (Get-ChildItem -Recurse -Path ".\*.msixbundle").FullName

# ----------------------------------------
# Retrieve MSIX properties
# ----------------------------------------

# Load .NET assembly to work with ZIP files
Add-Type -AssemblyName System.IO.Compression.FileSystem

# Open the .msixbundle as a ZIP archive
$zip = [System.IO.Compression.ZipFile]::OpenRead($MSIX)

# Create an empty array to store package info
$packageInfoList = @()

# Find all embedded .msix or .appx packages inside the bundle
$packages = $zip.Entries | Where-Object { $_.FullName -like "*.msix" -or $_.FullName -like "*.appx" }

# Loop through each embedded package
foreach ($pkg in $packages) {
    # Open the embedded package stream
    $pkgStream = $pkg.Open()

    # Treat the embedded package as a ZIP archive
    $pkgZip = New-Object System.IO.Compression.ZipArchive($pkgStream, [System.IO.Compression.ZipArchiveMode]::Read)

    # Locate the AppxManifest.xml file inside the embedded package
    $manifestEntry = $pkgZip.Entries | Where-Object { $_.FullName -eq "AppxManifest.xml" }

    if ($manifestEntry) {
        # Read and parse the manifest XML
        $reader = New-Object System.IO.StreamReader($manifestEntry.Open())
        [xml]$manifest = $reader.ReadToEnd()
        $reader.Close()

        # Create a custom object with Name, Version, and Publisher
        $packageInfo = [PSCustomObject]@{
            Name      = $manifest.Package.Identity.Name
            Version   = $manifest.Package.Identity.Version
            Publisher = $manifest.Package.Identity.Publisher
        }

        # Add the object to the array
        $packageInfoList += $packageInfo
    }

    # Dispose of the embedded package ZIP archive
    $pkgZip.Dispose()
}

# Dispose of the main .msixbundle ZIP archive
$zip.Dispose()

# ----------------------------------------
# Initialize ExitCode
# ----------------------------------------
$ExitCode = 0

# ----------------------------------------
# Main logic based on mode
# ----------------------------------------
switch ($Mode) {
    "Install" {
		if ($MSIX)
			{
				# Install MSIX from local source
				Add-AppProvisionedPackage -Online -PackagePath $MSIX -SkipLicense
			}
		else
			{
				# Install MSIX from online binaries
				Add-AppProvisionedPackage -Online -PackagePath "https://aka.ms/do-mcc-ent-windows-x64" -SkipLicense
			}
    }

    "Uninstall" {
        # Uninstall MSIX
        Get-AppxPackage -AllUsers -Name $packageInfoList.name | Remove-AppPackage -AllUsers
    }
}

# ----------------------------------------
# Exit with appropriate code
# ----------------------------------------
[System.Environment]::Exit($ExitCode)
Detection script (detect.ps1 )
IF (Get-AppxPackage -AllUsers | Where-Object { $_.Name -eq "microsoft.deliveryoptimization"})
{$True}
Intune App
Install command: powershell.exe -executionPolicy bypass -file “./Install.ps1” -Mode Install
Uninstall command: powershell.exe -executionPolicy bypass -file “./Install.ps1” -Mode Uninstall
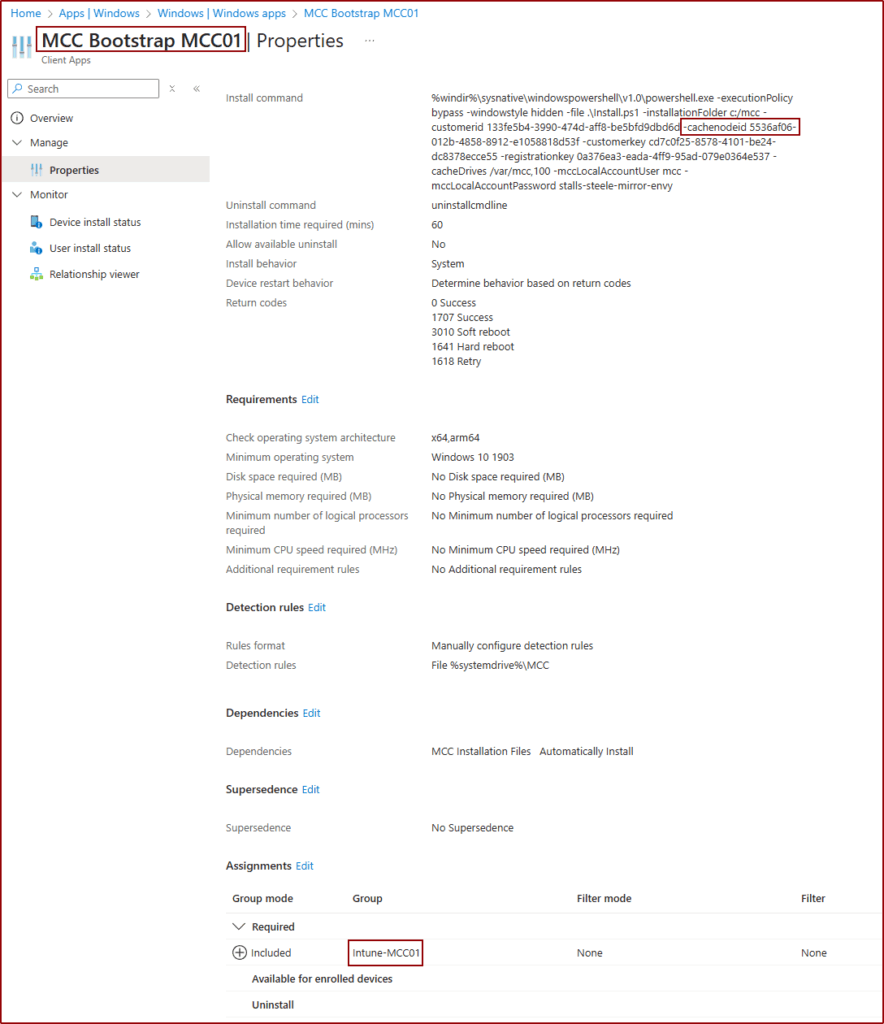
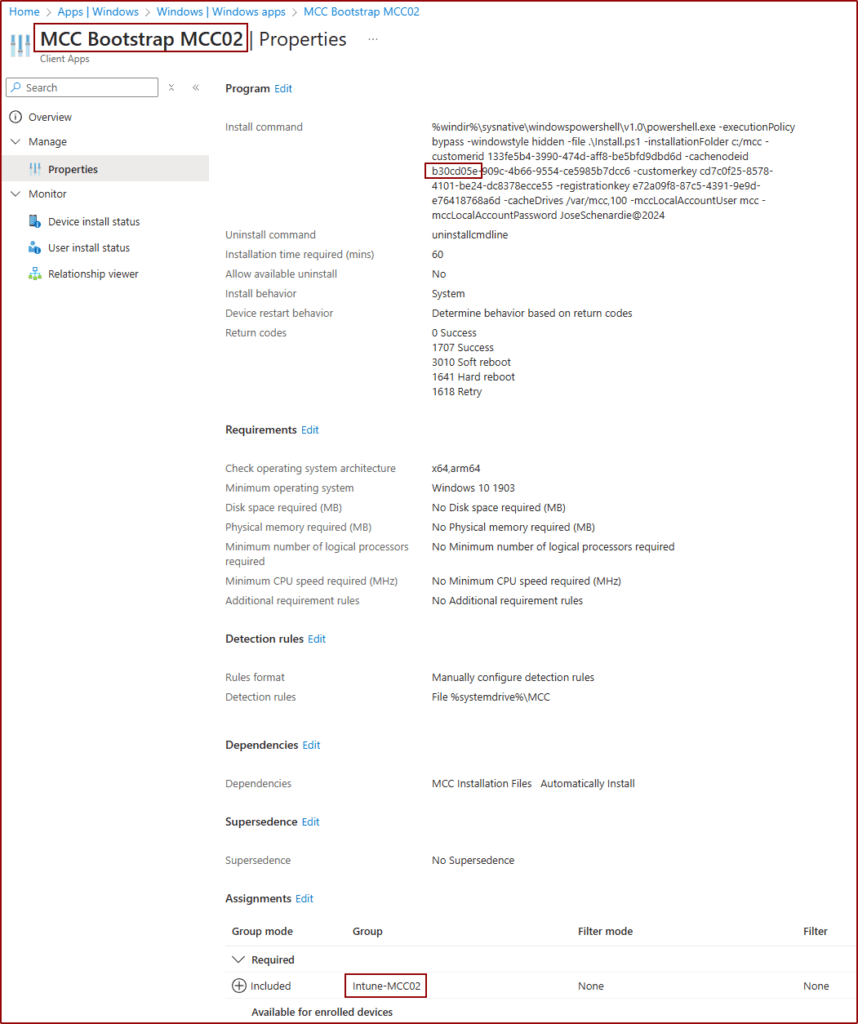
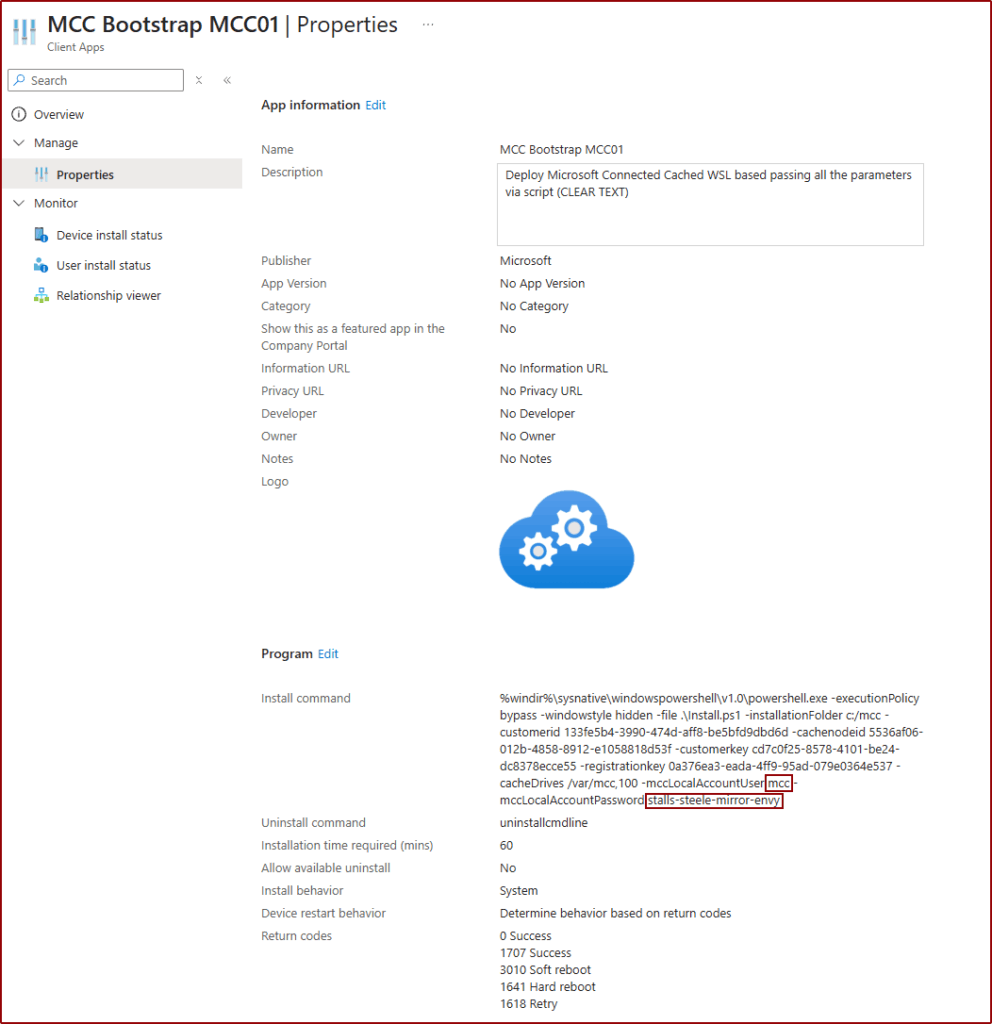
4 MCC Bootstrap
This is the app that will hold all the logic to install the Connected Cache server adjusting all the requisites that would otherwise fail if trying to deploy by only calling the original mcc installer (deploymcconwsl.ps1) directly. Keep in mind, that while the prerequisites (apps 1-3) can be re-used across all connected cache nodes, the MCC Bootstrap app needs to have a separate instance to each node (due to unique parameters to the cache node bring present in the install command).
Installation script (Install.ps1)
<#
.SYNOPSIS
    Script that initiates MCC Self Deployng on Intune

.NOTES
    Author: Jose Schenardie
    Contact: @schenardie
    Website: https://www.msendpointmgr.com
#>


param(
	[Parameter(Mandatory = $true)][string]$installationFolder,
	[Parameter(Mandatory = $true)][string]$cacheDrives,
	[Parameter(Mandatory = $true)][string]$customerId,
	[Parameter(Mandatory = $true)][string]$cacheNodeId,
	[Parameter(Mandatory = $true)][string]$customerKey,
	[Parameter(Mandatory = $true)][string]$registrationKey,
	[Parameter(Mandatory = $false)][pscredential]$mccLocalAccountCredential,
	[Parameter(Mandatory = $false)][int]$mccPublicPort = 80,
	[Parameter(Mandatory = $false)][string]$mccLocalAccountUser,
	[Parameter(Mandatory = $false)][string]$mccLocalAccountPassword
)

# Helper function for timestamped logging
function Log-Message {
	param([string]$Message)
	$timestamp = Get-Date -Format "yyyy-MM-dd HH:mm:ss"
	Write-Host "[$timestamp] $Message"
}

#Logging Function
    $Pname = "MicrosoftConnectedCacheBootstrap"
    $Pversion = "1.0"
    $client = "MCC"
    $logPath = "$env:ProgramData\$client\logs"
    $logFile = "$logPath\$PName" + "_" + "$Pversion" + "_Install.log"
#endregion
    if (!(Test-Path -Path $logPath)) {
        New-Item -Path $logPath -ItemType Directory -Force | Out-Null
    }

    Start-Transcript -Path $logFile -Force
#Create credential object for local account
$User = "$env:COMPUTERNAME\$mccLocalAccountUser"

#Add account to local administrators group if not yet
if (-not (net localgroup Administrators | Select-String -Pattern $mccLocalAccountUser)) {
	Log-Message "Adding $($mccLocalAccountUser) to local admins"
	net localgroup Administrators $mccLocalAccountUser /add
}
else {
	Log-Message "$($mccLocalAccountUser) is already member of local admins"
}

#Define Working directory for scheduled Task
$WorkingDir = (Get-ChildItem "C:\program files\WindowsApps" -directory | Where-Object {$_.Name -like "Microsoft.DeliveryOptimization*"} | select-Object -First 1).Fullname + "\deliveryoptimization-cli\"

# Create action for scheduled Task
$Action = New-ScheduledTaskAction -Execute "powershell.exe" -Argument "-ExecutionPolicy Bypass -NoProfile -Command `" & '.\deploymcconwsl.ps1' -installationFolder $installationFolder -customerid $customerId -cachenodeid $cacheNodeId -customerkey $customerKey -registrationkey $registrationKey -cacheDrives '$($cacheDrives)' -mccRunTimeAccount $User -mccLocalAccountCredential (New-Object System.Management.Automation.PSCredential('$($User)', (ConvertTo-SecureString '$($mccLocalAccountPassword)' -AsPlainText -Force)))`"" -WorkingDirectory $WorkingDir

# Create principal for scheduled Task
$Principal = New-ScheduledTaskPrincipal -userID $User -LogonType Password -RunLevel Highest

# Create task for scheduled Task
$Task = New-ScheduledTask -Action $Action -Principal $Principal

# Create a task name for the scheduled Task
$DeployWSLTaskName = "MCC_DeployWSL"

# Register scheduled task
Log-Message "Registering scheduled task $DeployWSLTaskName"
Register-ScheduledTask -TaskName $DeployWSLTaskName -InputObject $Task -User $User -Password $mccLocalAccountPassword -Force

# Start scheduled Task
Log-Message "Starting scheduled task $DeployWSLTaskName"
schtasks /run /tn $DeployWSLTaskName /i

# Add 5 seconds wait
Log-Message "Waiting 5 seconds for task to initialize"
Start-Sleep 5

$timeoutMinutes = 15
$startTime = Get-Date
Log-Message "Monitoring $DeployWSLTaskName for completion (timeout: $timeoutMinutes minutes)..."
do {
	$taskInstance = Get-ScheduledTaskInfo -TaskName $DeployWSLTaskName
	Start-Sleep -Seconds 30

	$elapsed = (Get-Date) - $startTime
	Log-Message "$([math]::Floor($elapsed.TotalMinutes)) minutes elapsed, still waiting for $DeployWSLTaskName to complete..."
	if ($elapsed.TotalMinutes -ge $timeoutMinutes) {
		Log-Message "Timeout reached for $DeployWSLTaskName. Exiting with code 1."
		exit 1
	}
} while ($taskInstance.LastTaskResult -eq 267009 -or $taskInstance.LastTaskResult -eq 0)

Log-Message "$DeployWSLTaskName completed with result: $($taskInstance.LastTaskResult)"

#Update Install task to fix broken paths
$taskName = "MCC_Install_Task"
Log-Message "Updating paths for $taskName"

# Get original task
$task = Get-ScheduledTask -TaskName $taskName
$action = $task.Actions[0]
$trigger = $task.Triggers[0]
$principal = $task.Principal

# Extract the StartIn path
$startInPath = "'" + ($task.Actions | Where-Object { $_.Execute -like "*powershell*" }).WorkingDirectory + "'"
$WorkingDirectory = ($task.Actions | Where-Object { $_.Execute -like "*powershell*" }).WorkingDirectory

# Build updated command with StartIn path substitution
$originalArguments = $action.Arguments
$updatedArguments = $originalArguments -replace '"\."', "$startInPath"

# Also update relative paths like .\filename to full path
$updatedArguments = $updatedArguments -replace '\.\\', "$WorkingDirectory\"

# Build new action
$newAction = New-ScheduledTaskAction -Execute $action.Execute -Argument $updatedArguments -WorkingDirectory $WorkingDirectory

# Re-register the task using its original components
Log-Message "Re-registering $taskName with updated paths"
Register-ScheduledTask -TaskName $taskName -Action $newAction -Trigger $trigger -User $User -Password $mccLocalAccountPassword -Force

#Update Monitor task to fix broken paths
$taskName = "MCC_Monitor_Task"
Log-Message "Updating paths for $taskName"

# Get original task
$task = Get-ScheduledTask -TaskName $taskName
$action = $task.Actions[0]
$trigger = $task.Triggers[0]
$principal = $task.Principal

# Extract the StartIn path
$startInPath = "'" + ($task.Actions | Where-Object { $_.Execute -like "*powershell*" }).WorkingDirectory + "'"
$WorkingDirectory = ($task.Actions | Where-Object { $_.Execute -like "*powershell*" }).WorkingDirectory

# Build updated command with StartIn path substitution
$originalArguments = $action.Arguments
$updatedArguments = $originalArguments -replace '"\."', "$startInPath"

# Also update relative paths like .\filename to full path
$updatedArguments = $updatedArguments -replace '\.\\', "$WorkingDirectory\"

# Build new action
$newAction = New-ScheduledTaskAction -Execute $action.Execute -Argument $updatedArguments -WorkingDirectory $WorkingDirectory

# Re-register the task using its original components
Log-Message "Re-registering $taskName with updated paths"
Register-ScheduledTask -TaskName $taskName -Action $newAction -Trigger $trigger -User $User -Password $mccLocalAccountPassword -Force

# Check for MCC_Install_Task and start it if queued
$MCCInstallTaskName = "MCC_Install_Task"
try {
	$MCCInstallTaskStatus = (Get-ScheduledTask -TaskName $MCCInstallTaskName -ErrorAction Stop).State
	if ($MCCInstallTaskStatus -eq 'Ready' -or $MCCInstallTaskStatus -eq 'Queued') {
		Log-Message "Starting $MCCInstallTaskName task..."
		$maxRetries = 5
		$retryCount = 0
		$taskStatus = (Get-ScheduledTask -TaskName $MCCInstallTaskName).State

		while ($taskStatus -ne 'Running' -and $retryCount -lt $maxRetries) {
			Log-Message "Task $MCCInstallTaskName is not running, retrying in 30 seconds... (Attempt $($retryCount + 1) of $maxRetries)"
			Start-Sleep -Seconds 30
			schtasks /run /tn $MCCInstallTaskName /i
			$taskStatus = (Get-ScheduledTask -TaskName $MCCInstallTaskName).State
			$retryCount++
		}

		# Monitor MCC_Install_Task for 45 minutes
		$timeoutMinutes = 45
		$startTime = Get-Date
		Log-Message "Monitoring $MCCInstallTaskName for completion (timeout: $timeoutMinutes minutes)..."
		do {
			$taskStatus = (Get-ScheduledTask -TaskName $MCCInstallTaskName).State
			$installTaskInstance = Get-ScheduledTaskInfo -TaskName $MCCInstallTaskName
			Start-Sleep -Seconds 60

			$elapsed = (Get-Date) - $startTime
			Log-Message "$([math]::Floor($elapsed.TotalMinutes)) minutes elapsed, task state: $taskStatus, result: $($installTaskInstance.LastTaskResult)"

			if ($taskStatus -ne "Running") {
			Log-Message "$MCCInstallTaskName is no longer running (state: $taskStatus). Exiting monitoring loop."
			break
			}

			if ($elapsed.TotalMinutes -ge $timeoutMinutes) {
			Log-Message "Timeout reached for $MCCInstallTaskName. Continuing..."
			break
			}
		} while ($true)

		Log-Message "$MCCInstallTaskName completed with result: $($installTaskInstance.LastTaskResult)"
	}
	else {
		Log-Message "$MCCInstallTaskName is in state: $MCCInstallTaskStatus. Not starting."
	}
} catch {
	Log-Message "$MCCInstallTaskName task not found or not accessible."
}

# Check for MCC_Monitor_Task and start it if queued
$MCCMonitorTaskName = "MCC_Monitor_Task"
try {
	$MCCMonitorTaskStatus = (Get-ScheduledTask -TaskName $MCCMonitorTaskName -ErrorAction Stop).State
	if ($MCCMonitorTaskStatus -eq 'Ready' -or $MCCMonitorTaskStatus -eq 'Queued') {
		Log-Message "Starting $MCCMonitorTaskName task..."
		schtasks /run /tn $MCCMonitorTaskName /i
	}
	else {
		Log-Message "$MCCMonitorTaskName is in state: $MCCMonitorTaskStatus. Not starting."
	}
} catch {
	Log-Message "$MCCMonitorTaskName task not found or not accessible."
}

# De-register the task
Log-Message "Removing $DeployWSLTaskName scheduled task..."
Unregister-ScheduledTask -TaskName $DeployWSLTaskName -Confirm:$false

# Remove account from local admins
Log-Message "Removing $mccLocalAccountUser from local administrators group"
net localgroup Administrators $mccLocalAccountUser /delete

# Add port forwarding if missing
if (!(netsh interface portproxy show v4tov4))
{
	Log-Message "Port forwarding not found, adding required port mappings"
	$ipFilePath = Join-Path ([System.Environment]::GetEnvironmentVariable("MCC_INSTALLATION_FOLDER", "Machine")) "wslIp.txt"

	$ipAddress = (Get-Content $ipFilePath | Select-Object -First 1).Trim()
	Log-Message "Using WSL IP address: $ipAddress"

	Log-Message "Adding port forwarding for port 80"
	netsh interface portproxy add v4tov4 listenport=80 listenaddress=0.0.0.0 connectport=80 connectaddress=$ipAddress

	Log-Message "Adding port forwarding for port 5000"
	netsh interface portproxy add v4tov4 listenport=5000 listenaddress=0.0.0.0 connectport=5000 connectaddress=$ipAddress
}
else {
	Log-Message "Port forwarding already configured"
}

# Add firewall rules if missing
if (-not (Get-NetFirewallRule -DisplayName "WSL2 Port Bridge (MCC SUMMARY)" -ErrorAction SilentlyContinue)) {
	Log-Message "Adding firewall rule for port 5000 (Terse Summary page)"
	New-NetFirewallRule -DisplayName "WSL2 Port Bridge (MCC SUMMARY)" -Direction Inbound -Action Allow -Protocol TCP -LocalPort 5000
	Log-Message "Firewall rule added successfully"
}
else {
	Log-Message "Firewall rule already exists for Terse Summary page"
}

Log-Message "Script completed successfully..."
Stop-Transcript
File Detection logic
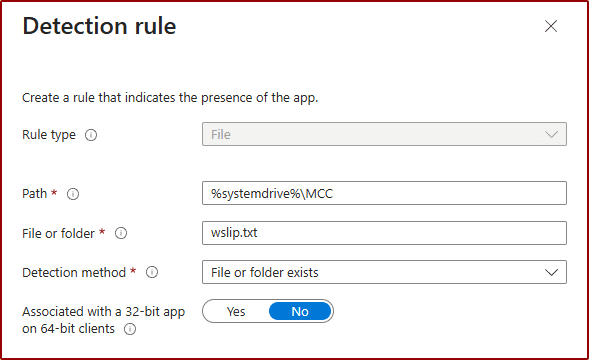
The install commnad for this app will require a username and password which will be used to deploy the connected cache server with. That account can be created using a configuration profile as specified below. In this example, the account created was mcc and the password was stalls-steele-mirror-envy. Since this is a local standard account that can only be used on the connected cache node, we are passing the credentials in clear text (which is a requirement for this solution to work). If security deems this action too risky, optional settings on a configuration profile can be deployed to block interactive logons on that device with this account, just keep in mind that troubleshooting eventual problems with the connected cache node will be harder.
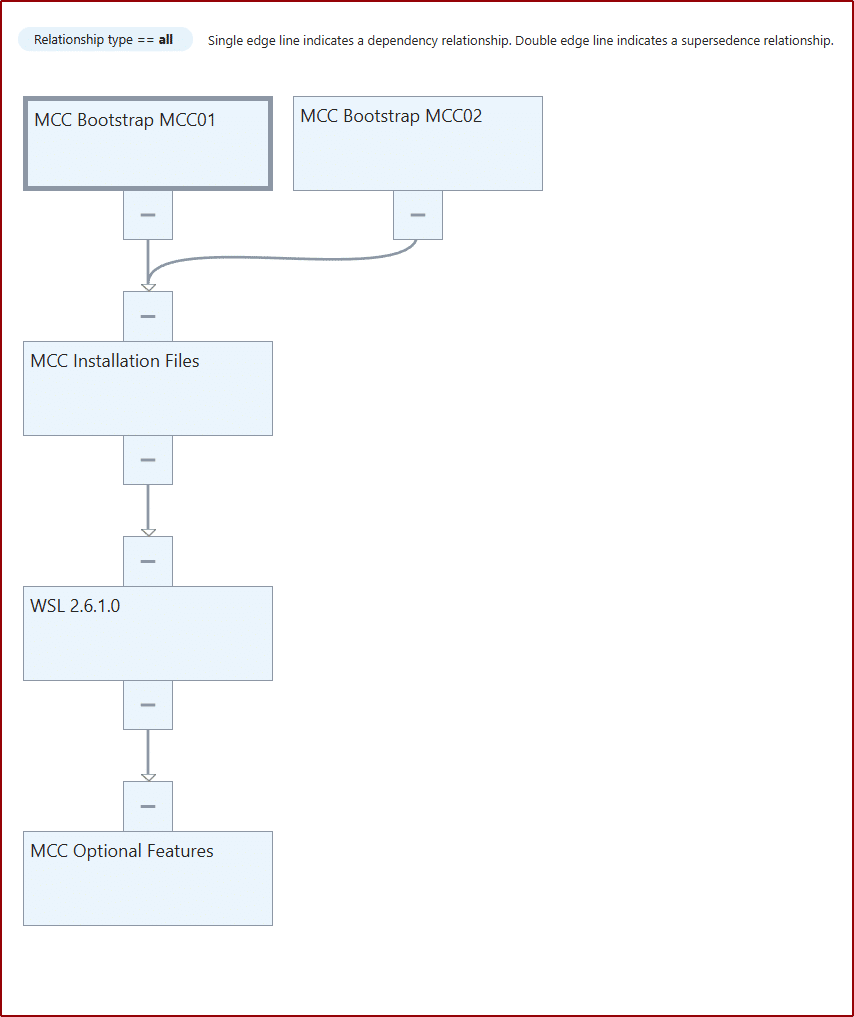
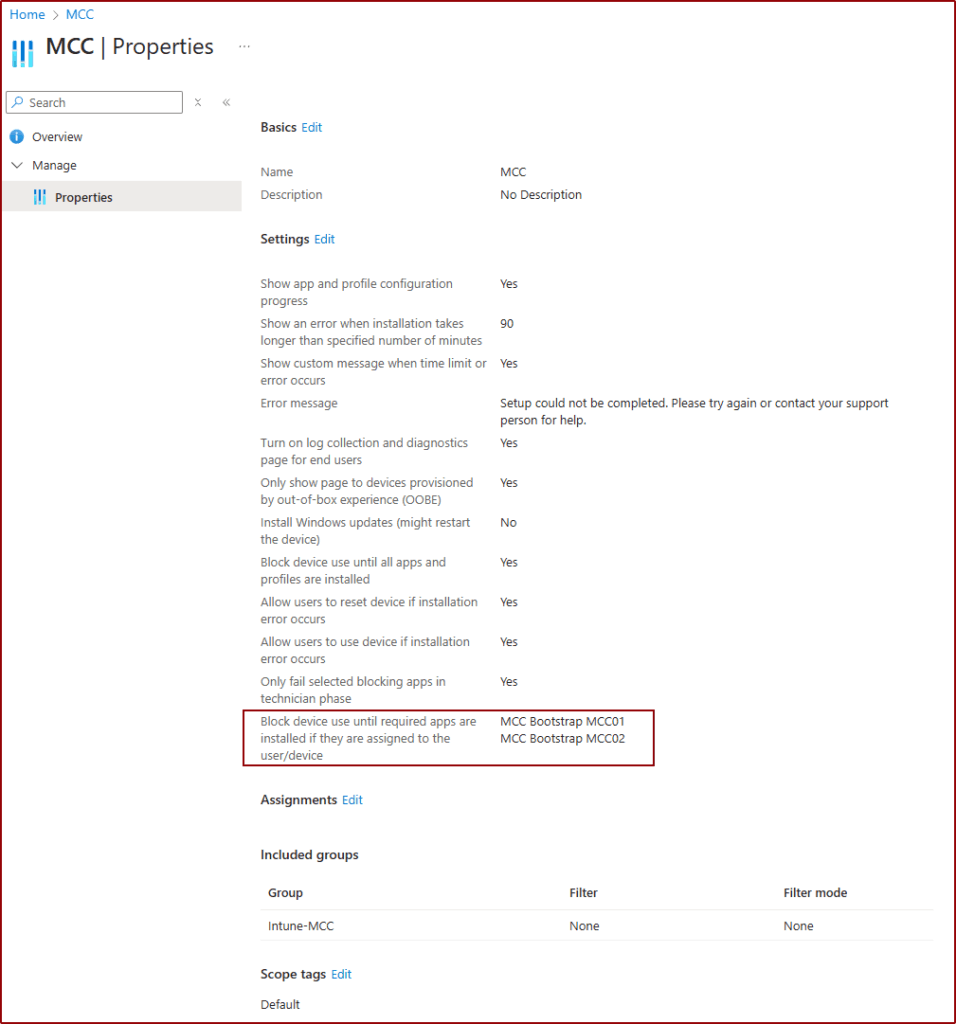
Dependency chain
Once we have the four apps created, we need to configure dependency between them so during our Autopilot they will install on the correct order and respect required reboots. Our apps (for this example) are named MCC Optional Features, WSL 2.6.1.0, MCC Installation Files and MCC Bootstrap MCC01 (MCC01 being designation for the cache name). If you have more than one cache, they should follow the dependency (below we have 2 distinct caches to depict that). Then, the Bootstrap apps should be assigned to its corresponding assigned group.
Configuration Profiles
As the MCC node is running with a local account and that account does not need to be an administrator on the device (after installation), we will be required to create an entire new account and a password and allow said account to start scheduled tasks (Log On As Batch Job). But as this account and password are going to be exposed through Intune, we will also use some other User Rights (optionally) to block it from login into the device interactively and via the network. Fo such we will create two profiles.
MCC Account Creation
Can only be done using a Custom type policy and should have the following information
| Name | MCC Account Creation |
| OMA-URI | ./Device/Vendor/MSFT/Accounts/Users/REPLACEWITHACCOUNTNAME/Password |
| Data type | String |
| Value | REPLACEWITHDESIREDPASSWORD |
MCC User Rights Policy
This will be a settings catalog profile containing the account created above
| Policy Name | Policy Value |
| (OPTIONAL) Deny Access From Network | REPLACEWITHACCOUNTNAME |
| (OPTIONAL) Deny Local Log On | REPLACEWITHACCOUNTNAME |
| Log On As Batch Job | REPLACEWITHACCOUNTNAME |
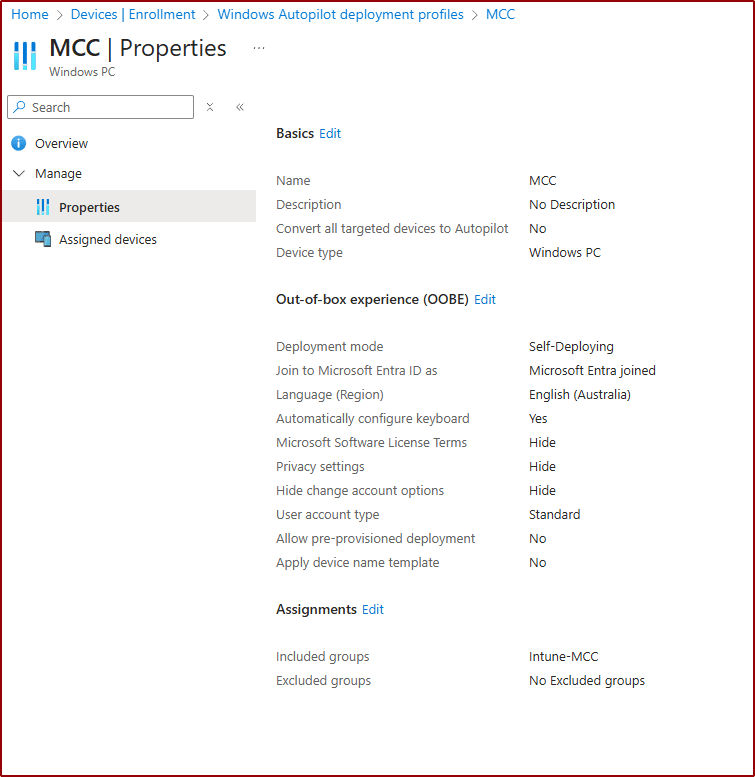
Autopilot Profile
This is where we will configure self-deploying mode for our cache servers. This will be assigned to the dynamic group.
Enrollment Status Page Profile
The enrollment status page can also be assigned to the dynamic group, just make sure to add all your connected cache Bootstrap apps, othewise the self-deploying won’t install all necessary resources.
LAPS Profile (Optional)
A LAPS profile, while not mandatory is hihgly advised since this deployment does not require an entra id account but might require having physical access to the box to perform troubleshooting, and since the MCC account might be blocked from logging in, having anothert account which is a local adminstrator might come in handy. This is our example

Conclusion
Once these resources are all created and assigned all that is left to do is to boot the designated device and connect to the internet (wifi or wired). and at the end of the Autopilot Self-Deploying task, you will have your Connected Cache up and running.
In case you need to re-deploy an existing device, all you need to do is navigate to Azure, find the connected cache node, open it and navigate to the Deployment tab. Once there, copy the new registrationkey (they change after each successfull deployment) and update your Bootstrap App Win32 App with the bew registration key under Install Command and send a Wipe to your connected cache. All the rest should happen automatically, once the device goes through Autopilot Self Deploying again.


Wow. Wow. Wow. I am fascinated by this idea. I was going to create poor man nodes out of targeted Win11 boxes. This makes it repeatable and automated. I owe you all the beers. I need to lab it, but this looks very promising to help me solve an issue at my organization.
Happy to help Mark. I created that solution out of the same need of deploying and managing multiple nodes.