During the development phase of my new tool that I will be releasing very soon, I had to find ways to amend and modify various settings in MDT. For instance if you’d like to add a line to the CustomSettings.ini by using PowerShell, combining Get-Content with Select-String is a great idea. In this post I will go through the various settings modifications that I used during the development of my new tool. As you may know from previous experience with MDT, everything can be changed and configured from the Deployment WorkBench. But in order to script these changes, we need to deep into various methods. I’ve divided this post into three main sections:
- Retrieve data from a XML file
- Modify a XML file
- Modify CustomSettings.ini
Retrieve data from a XML file
Lets start with retrieving data from a XML file. Most of the configuration available in the Deployment WorkBench are exposed as XML files. If you take a look in the <Deployment Share path>\Control folder, you’ll see files like this:
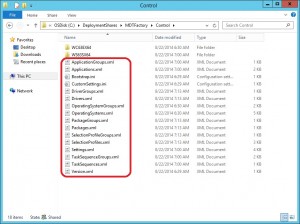
Let’s take the Applications.xml as our first example. Here we would like to get the GUID for all of the imported applications in MDT. Easy you say? Well, sure you could go ahead and open up the properties of all the applications and copy the GUID into a text file. But in my opinion, we can do it a lot faster and easier by using PowerShell. First of we need to store the path to Applications.xml, and we do that by using the following method:
# Store the path to Applications.xml in a variable
$AppsXMLFile = "C:\DeploymentShares\MDTFactory\Control\Applications.xml"
We now have an variable called $AppsXMLFile containing the path to our Applications.xml. Next up is to create a XML object where we use Get-Content to load whole XML into a variable, by doing the following:
# Use Get-Content to load the Applications.xml file as a XML object
[xml][/xml]
$AppsXML = Get-Content $AppsXMLFile
Before we go ahead and explore the XML object with PowerShell, lets open up Applications.xml with XMLNotepad 2007.
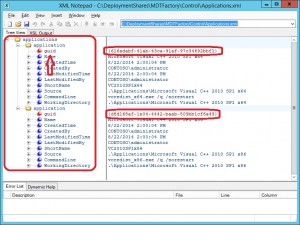
It appears that my Applications.xml consists of two applications. On the right I’ve highlighted the GUID data that we’d like to retrieve. On the left, we can see that the XML is contructed with 2 tags, the first named Applications (how convenient) and then for each imported application there’s a tag called Application. If we’d like to retrieve these tags from our $AppsXML object, we’d simply just do the following:
# Get all Applications in the XML object
$AppsXML.Applications.Application
This would give us the following output:
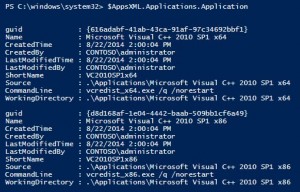
Let’s say that we don’t have access to XMLNotepad 2007, and would like to figure out what tags are available in the XML object by using PowerShell. Here’s how we can do that. First we run the following command:
# Get properties for the XML object
$AppsXML | Get-Member -MemberType Property
This will show us that we have a tag (in PowerShell we refer to it as a property of the XML object that we’re working with):

If we use the same method of getting the properties of the property called applications, we’d get the following:
# Get the properties of Applications
$AppsXML.Applications | Get-Member -MemberType Property

We can now go ahead and get the properties of the application property, as we did just a bit earlier:
# Get all Applications in the XML object
$AppsXML.Applications.Application
And there we have it, the GUID. In order to only show all GUID in the XML object, we can use the following code:
# Get all GUIDs in the XML object
$AppsXML.Applications.Application | Select-Object -ExpandProperty Guid | ForEach-Object {
    $_
}
![]()
That’s how you can create an XML object and retrieve any of the properties it consists of. We could now use these properties for another purpose that is out of the scope for this post.
Here’s the complete script:
# Store the path to Applications.xml in a variable
$AppsXMLFile = "C:\DeploymentShares\MDTFactory\Control\Applications.xml"
# Use Get-Content to load the Applications.xml file as a XML object
[xml][/xml]
$AppsXML = Get-Content $AppsXMLFile
# Get all GUIDs in the XML object
$AppsXML.Applications.Application | Select-Object -ExpandProperty Guid | ForEach-Object {
$_
}
Modify a XML file
In the case where you might want to modify a XML file by using PowerShell, a good example would be to enable to disable steps in a task sequence. In MDT the task sequences are stored as XML files, which is convenient for us since we’ve just learned how to retrieve data from a XML file. As for this example, we’re going to locate all the steps in a task sequence that has Windows Update in the name. For this we need to know the path to where the ts.xml file is located. The file can be found in the following path <Deployment Share path>\Control\<Task Sequence ID>\ts.xml.
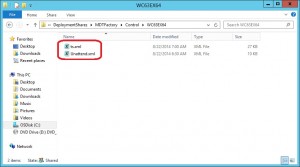
We begin by using the same method as earlier by retrieving the properties:
# Store the path to ts.xml in a variable
$TSXMLFile = "C:\DeploymentShares\MDTFactory\Control\WC63EX64\ts.xml"
# Use Get-Content to load the ts.xml file as a XML object
[xml][/xml]
$TSXML = Get-Content $TSXMLFile
# Get the tags from the XML object
$TSXML | Get-Member -MemberType Property
$TSXML.Sequence | Get-Member -MemberType Property
$TSXML.Sequence.Group | Get-Member -MemberType Property
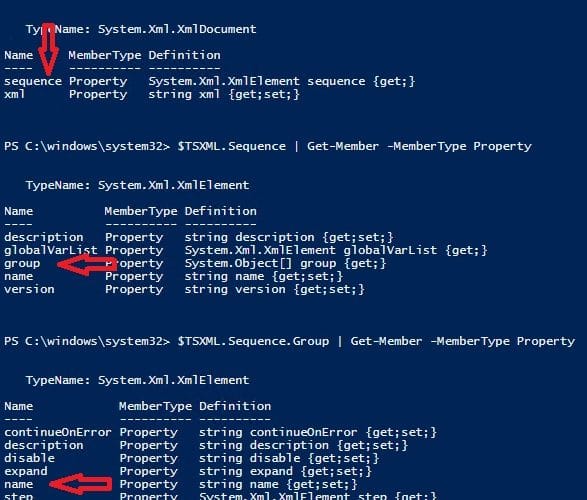
By running the last three rows of the code seperately, we’ll get the following output:
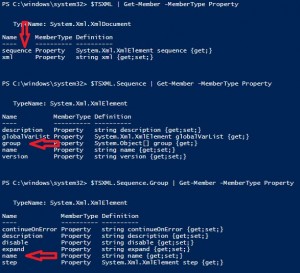
And as shown in the last highlight (arrow), there’s a property called Name. This is the one that we’re looking for. Now can loop through all the steps that contains Windows Update in the name. For that we’ll use Where-Object and then pipe the objects to ForEach-Object where we change the Disable property of each object to False:
# Enable all the steps with a name consisting of Windows Update
$TSXML.Sequence.Group.Step | Where-Object {$_.Name -like "*Windows Update*"} | ForEach-Object {
    $_.Disable = "false"
}
The $TSXML object now contains the changes that we’ve made, and we need to save that back to the ts.xml file. In order to do so, we simply use the Save() method of the XML object:
# Save the changes back to the ts.xml file
$TSXML.Save($TSXMLFile)
The steps that we’ve modified are now changed in the actual ts.xml. Here’s the whole script for your convenience:
# Store the path to ts.xml in a variable
$TSXMLFile = "C:\DeploymentShares\MDTFactory\Control\WC63EX64\ts.xml"
# Use Get-Content to load the ts.xml file as a XML object
[xml][/xml]
$TSXML = Get-Content $TSXMLFile
# Enable all the steps with a name consisting of Windows Update
$TSXML.Sequence.Group.Step | Where-Object {$_.Name -like “*Windows Update*”} | ForEach-Object {
$_.Disable = “false”
}
# Save the changes back to the ts.xml file
$TSXML.Save($TSXMLFile)
Modify CustomSettings.ini
In the previous two sections we’ve been working with XML files. But the CustomSettings.ini is not a XML file, instead it’s (you guessed it right) an INI file. Since it’s basically a plain text file, we could read it line by line until we get to what we’re looking for. Here we’ll leverage Select-String together with Get-Content. In this example we’ll be changing SkipTaskSequence=YES to SkipTaskSequence=NO. Our pattern to look for will be SkipTaskSequence.
We begin as we’ve done in the other parts of this post, by storing the path to our file (in this case CustomSettings.ini) in a variable:
# Store the path to CustomSettings.ini in a variable
$CSPath = "C:\DeploymentShares\MDTFactory\Control\CustomSettings.ini"
From here we continue to use Get-Content to load the contents of the file:
# Use Get-Content to load the CustomSettings.ini file as a XML object
$CSFile = Get-Content -Path $CSPath
If you’ve played around with Select-String previously, you’re probably familiar with one of the properties called LineNumber. LineNumber represent the row on which the pattern used with Select-String is found. Now since the data is stored in an array, which always begins at 0, we will run into a problem when pointing to a specific LineNumber. To solve this we have to go back one item in the array. Let me illustrate this a bit more clearly. If the pattern that we’re looking for is at row 18 (determined by Select-String’s property LineNumber), we’d have to use the 18th item in the array, which is 17 (since the first item is number 0). So the code will look like this:
# Use Select-String to get the desired patterns LineNumber
$LineNumber = ($CSFile | Select-String -Pattern "SkipTaskSequence").LineNumber-1
Now that we have the number of the item where our pattern is in the array, we can go ahead and amend that row:
# Change the pattern of the LineNumber
$CSFile[$LineNumber] = "SkipTaskSequence=NO"
Finally, we have to put the amended row back to the CustomSettings.ini, and we do that with the following code:
# Set the content of CustomSettings.ini
$CSFile | Set-Content -Path $CSPath
That’s how you’d modify a row in CustomSettings.ini. Here’s the whole script again:
# Store the path to CustomSettings.ini in a variable
$CSPath = "C:\DeploymentShares\MDTFactory\Control\CustomSettings.ini"
# Use Get-Content to load the CustomSettings.ini file as a XML object
$CSFile = Get-Content -Path $CSPath
# Use Select-String to get the desired patterns LineNumber
$LineNumber = ($CSFile | Select-String -Pattern "SkipTaskSequence").LineNumber-1
# Change the pattern of the LineNumber
$CSFile[$LineNumber] = "SkipTaskSequence=NO"
# Set the content of CustomSettings.ini
$CSFile | Set-Content -Path $CSPath
Last famous words
As I’ve shown you in this blog post, PowerShell can be used to not only retrieve settings in MDT, but also change them. I hope this helps!




Hello Nickolaj,
Great post I must say.
Is it possible to add additional applications to MDT via Powershell?
Let say that I generate multiple versions with my source control and build machine, and I don’t want to add each version manually.
I’m looking for a way to add these new versions automatically.
Thanks in advance,
David.
Nice post, the customsettings.ini was just what i wa looking for, so thanks you.
May i suggest you to have a look at my Powershell test environment for MDT, you could maybe take benefits of it to finish your project.
https://www.osd-couture.com/2014/07/mdt-2013-create-simulation-environment.html
Hi Diagg,
Sorry for the late reply.
I’m glad that you found the article useful. I did have a look at your scripts and they look great 🙂
Regards,
Nickolaj