

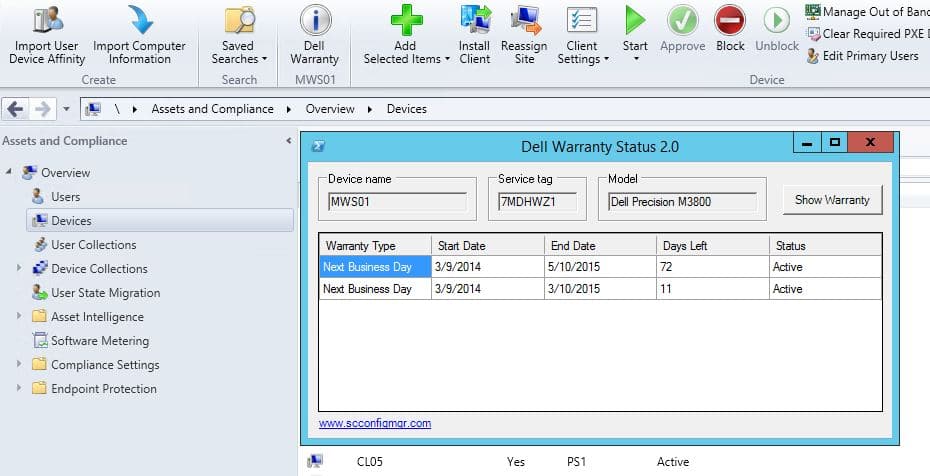
Over the past year I’ve evolved my PowerShell skills and revisited some of the scripts and tools that I’ve previously created. When I looked at the Dell Warranty Console Extension Tool 1.0 that I created, I felt that something had to be done about how it was written. So I set out to rewrite the whole code base for the tool, and can proudly present a new version of the brand new and renamed Dell Warranty Status 2.0 tool!
The new version of this tool does not remotely query any information from WMI on the clients, as the previous would. Instead it’s now relying on the hardware inventory collected by ConfigMgr. If you’ve not turned on hardware inventory in your Client Settings, the tool will not work as expected and give you a warning that there’s no hardware inventory data found. In addition to that, if you try to execute it against a device where hardware inventory has been collected, but it’s not a Dell device, it will warn you about that as well.
I’d like to thank Dustin Hedges and Sean O’Mahony for their contributions and testing of this tool during it’s development phase, thank you guys.
Download the tool
I’ve uploaded the tool to the TechNet Gallery for your convenience. Download from here.
Installation instructions
For the previous version of this tool I created a Nullsoft installer package. I’ve decided not to take that approach with this version. Instead I’ve chosen to go with a PowerShell scripted installation, and for those that want to do it manually I’ll also provide instructions for that. For this tool to work, you need to have the ConfigMgr console installed on the server you’re going to run the installation on, or manually install it on. The automated approach is relying on the SMS_ADMIN_UI_PATH system environment, so if that’s not present the tool won’t be installed.
Automated installation
1. Download the zip-file from the TechNet Gallery and unpack it to e.g. C:\Temp\DWST. You should now have the following files in C:\Temp\DWST:
- DellWarranty.xml
- Invoke-ToolInstallation.ps1
- Get-DellWarrantyStatus_2.0.ps1
2. Close the ConfigMgr console, open an elevated PowerShell console and run the following command to install the tool (Path parameter should point to a location where the script file will be stored):
Invoke-ToolInstallation -Method Install -Path C:\Scripts -Verbose
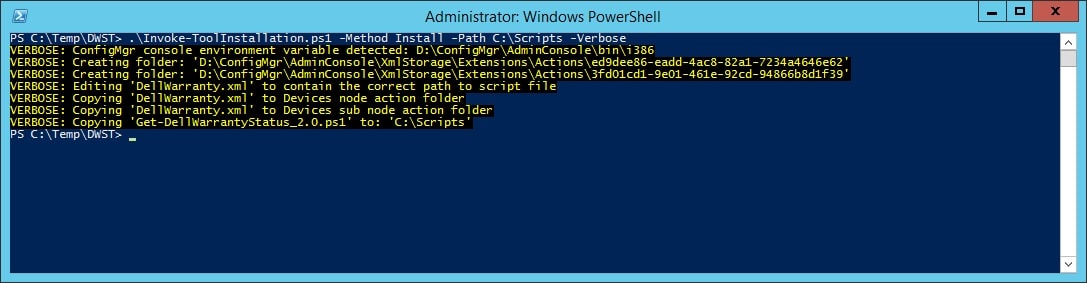
3. Re-launch the ConfigMgr console.
Manual installation
1. Download the zip-file from the TechNet Gallery and unpack it to e.g. C:\Temp\DWST. You should now have the following files in C:\Temp\DWST:
- DellWarranty.xml
- Invoke-ToolInstallation.ps1
- Get-DellWarrantyStatus_2.0.ps1
2. Close the ConfigMgr console and copy Get-DellWarrantyStatus_2.0.ps1 from C:\Temp\DWST to e.g. C:\Scripts (it’s important that you place it in a non-temporary location, since the DellWarranty.xml file will point to this location for referencing the script).
3. Edit the DellWarranty.xml file on the line that starts with <Parameters>, amend the part after -File to the path where you copied the Get-DellWarrantyStatus_2.0.ps1 file, e.g.:
-WindowStyle Hidden -ExecutionPolicy ByPass -File "C:\Scripts\Get-DellWarrantyStatus_2.0.ps1" -SiteServer ##SUB:__Server## -DeviceName ##SUB:Name## -ResourceID ##SUB:ResourceID##
4. Go to <ConfigMgr console root directory>\XmlStorage\Extensions\Actions. You can get the path by running a PowerShell console and typing:
$env:SMS_ADMIN_UI_PATH
5. Create the following two directories in the Actions folder:
- 3fd01cd1-9e01-461e-92cd-94866b8d1f39
- ed9dee86-eadd-4ac8-82a1-7234a4646e62
6. Copy the DellWarranty.xml file from C:\Temp\DWST to both of the directories recently created.
7. Re-launch the ConfigMgr console.
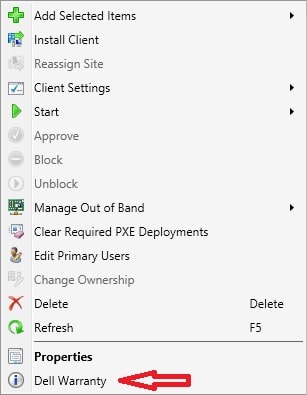
Using the console extension
One you have successfully installed the console extension by using any of the installation methods, open the ConfigMgr console, go to Assets and Compliance – Devices and right click on any device.


Hi Nikolaj
Thanks for the post. I’m trying to dial everything back to baseline and need to uninstall it. Any chance you could provide a few instructions on that? Thanks!
According to Dell-Brad G
“As of now, the backend service that the tool connects to has been decommissioned. A new tool is supposedly in the works but there is no ETA.”
Source: https://en.community.dell.com/techcenter/enterprise-client/w/wiki/7533.dell-command-integration-suite-for-system-center#pi40900=3
Appears that the DELL Web Services are Down…
I Have tested and get no response.
I’m having the same issue.
Yeah, it seems that Dell broke their web service, or took it down.
Program runs and shows me the Computer name, clicking on the Show Warranty button gives me the Asset Tag and Model but no warranty information.
I’ve checked using the Dell site and the info is available but I get prompted with a Captcha when I use the Dell site.
Anyone else having the same issues?
Cheers.
Small issue… If you search for a user under the Users snap-in, then click the “Primary Device” hyperlink, you will end up under the “Device Collections” snap-in. However, this will be a user collection, there is a user icon instead of a machine. The result is no right-click menu entry for Dell Warranty Data. The fix, is to add this additional action folder: 0770186d-ea57-4276-a46b-7344ae081b58
In the code I called it $PrimaryDeviceNode.
# Define node folders
$DevicesNode = “ed9dee86-eadd-4ac8-82a1-7234a4646e62”
$DevicesSubNode = “3fd01cd1-9e01-461e-92cd-94866b8d1f39”
$PrimaryDeviceNode = “0770186d-ea57-4276-a46b-7344ae081b58”
Then added:
Write-Verbose -Message “Copying ‘$($XMLFile)’ to Primary Device node action folder”
$XMLStorageDevicesPrimaryDeviceArgs = @{
Path = Join-Path -Path $ScriptRoot -ChildPath $XMLFile
Destination = (Join-Path -Path $AdminConsoleRoot -ChildPath “XmlStorage\Extensions\Actions\$($PrimaryDeviceNode)\$($XMLFile)”)
Force = $true
}
Copy-Item @XMLStorageDevicesPrimaryDeviceArgs
I also added this to the uninstall area:
# Remove XML file from Primary Device node
Write-Verbose -Message “Removing ‘$($XMLFile)’ from Primary Device node action folder”
$XMLStorageDevicesPrimaryDeviceArgs = @{
Path = Join-Path -Path $AdminConsoleRoot -ChildPath “XmlStorage\Extensions\Actions\$($PrimaryDeviceNode)\$($XMLFile)”
Force = $true
ErrorAction = “SilentlyContinue”
}
Remove-Item @XMLStorageDevicesPrimaryDeviceArgs
I could really use this tool as we are a Dell shop. Having an issue installing. PowerShell gives the following error. “Invoke-ToolInstallation.ps1 The term “Invoke-ToolInstallation.ps1 is not recognized as cmdlet
You have to use a “.\” before the Invoke-ToolInstallation to the load the cmdlet into PowerShell.
Any way to use this tool to generate reports using the reporting feature of SCCM? Thanks for this tool, it is a great asset to have to quickly identify out of warranty workstations!
Hi Mike,
At this point, there’s no option to generate a report since the data is not stored anywhere. If you build that yourself, I’d like to see how you accomplished that 🙂
Regards,
Nickolaj
Tool looks awesome! I ran through the instructions and it appears to install just fine, however when I try to use it a powershell box pops up and closes without giving me any information. Thoughts?
Great tool here! This helped me finished up the left over stragglers of Dell servers that are needing warranty attention. One question though: is it possible for this to target a collection of Dell servers and return a list of warranty status? Also have the ability in the gui to export to an excel file? That would be uber-AWESOME!
Thanks,
Dean
Hi Dean,
I’ve not built a version of the tool yet so that it can be done for a collection. It might come in the future 🙂
Regards,
Nickolaj
hi Nickolaj
Thank for this tool. Work great with my Dell Desktop fleet in SCCM2012
Hello,
I got the same issue as Jason and Tolik.
We also use zscaler. Did you already find a workaround for it?
The IE proxy settings are correctly filled in.
Thanks,
Thomas
hi Thomas,
sadly no as we use zscaler to get out to the internet bypassing it cant happen ( offsite head office traffic shaping) so while I can point it at a old proxy server via internet explorer and it should be able to get out I cant leave it set like that for the next guy to log in and start wildly browsing the internet on a server
Regards
Jason
Hi great work ! the dell integration tool kit is total rubbish so to find your tool that fits exactly what i need was a life saver ! slight issue where it wont populate the details. looks to be the same as Tolik interesting tho that i also use zscaler but given that it can cause issues we do have a proxy we can use that’s non zscaler is there anywhere i can manually set the proxy details ?
Hi Jason,
The tool itself doesn’t have any built in support for connecting through a proxy. I’d assume that you could simply enter your proxy details into Internet Explorer under LAN Settings in Options. Could you give that a try and see if it works?
Regards,
Nickolaj
Having some issues with tool. Everything seems to install okay.
When right click on a system and pick “Dell Warranty” the tool launches with the computer name filled in. BUT then when I click the “Show Warranty button”, the Service tag ad Model fill in, but no Warranty status shows.
I launched the tool from an both a standard and an elevated powershell window and ran the Get-DellWarrantyStatus_2.0.ps1 cmdlts filled in the SiteServer, DeviceName and ResourceID.
When clicking the “Show Warranty button” I see the same results as running it via the console (Device name, Service tag, and Model show, but no Warranty info), but in the background this is the error that comes up.
Exception calling “GetAssetInformation” with “3” argument(s): “The request failed with an empty response.”
At C:\Scripts\Get-DellWarrantyStatus_2.0.ps1:66 char:9
+ $AssetInformation = $WebService.GetAssetInformation(([GUID]::NewGuid()). …
+ ~~~~~~~~~~~~~~~~~~~~~~~~~~~~~~~~~~~~~~~~~~~~~~~~~~~~~~~~~~~~~~~~~~~~~~~~~~~~~~~~
+ CategoryInfo : NotSpecified: (:) [], MethodInvocationException
+ FullyQualifiedErrorId : WebException
Any help would be appreciated.
Hi Tolik,
That’s strange, are you behind a proxy or something like that? The tool collects the computer name and service tag from WMI on the Primary Site server, so that behavior is expected. First when you click on the Show Warranty button, it will try to grab the warranty status from Dell’s web service.
Regards,
Nickolaj
Hi Nickolaj,
Thank you for your response. We are using zscaler for our web filtering. No dell domain website seems to be blocked though.
Whats the direct website that the info is pulled from?
Thank you.
As well as the port the program is using to access the site (if not 80)?
Hi Tolik,
This is the adress that the script connects to:
https://xserv.dell.com/services/AssetService.asmx?WSDL
Could you check to see if the zscaler is filtering out the traffic against this adress?
Also, since it’s HTTP the port would be 80.
Regards,
Nickolaj
Let me know if you need some help testing the Lenovo version.
Great work! If you could find the time to add HP I’d very much appreciate it.
Hi CypherBit,
I’ll do my best to get around and create one for HP as well.
Regards,
Nickolaj
I works great on my site server but it doesn’t show up when I install it on my workstation. Should I be able to access it from both locations?
I fixed it. I had re-create the folders and then it worked. Thanks again.
Works great! Looking forward to the Lenovo extension
Great work. Awesome.
Great idea! Maybe console extension for Lenovo?
Thanks! I’m working on a tool for Lenovo as well. Will be available in the next coming weeks.
Regards,
Nickolaj