With the release of Windows 10 version 1607, you have the option to install Ubuntu for Windows which gives you a Linux subsystem running in your Windows operating system. At a first glance, you might ask why you should bother with this new capability. However, there are plenty of companies and organizations out there running virtual machines with various distributions of Linux in use by their work force to accomplish daily tasks. As with Windows 10 version 1607, some (or even all) of those tasks could now be performed directly from the Windows operating system, without the need of a virtual machine with a Linux distribution.
Requirements for Ubuntu for Windows
Enabling Ubuntu for Windows, or more specifically, Bash for Windows, are well covered in many blog posts on the internet already, and therefor I’ll not go through those steps in this blog post. I will however show you how to prepare your Windows 10 deployments with the required configuration that let’s your end users install and use Ubuntu for Windows without the need of installing any Windows Features or other operating system configuration.
Before we get started though, there’s a couple of things that you need to be aware of. Enabling Ubuntu for Windows is only supported if your system fulfills the following requirements:
- Running Windows 10 version 1607 build 14393 or above
- Using a 64-bit architecture of Windows
Enable Ubuntu for Windows
Enabling Ubuntu for Windows is not rocket science really, it comes down to two things that we need to configure:
- Enable Developer Mode in Windows
- Add a Windows Feature called Microsoft-Windows-Subsystem-Linux
For everyones convenience, I’ve combined these two requirements into a single script that you’ll find below.
<#
.SYNOPSIS
    Enable Windows Subsystem for Linux (Ubuntu) on Windows 10 version 1607 or later.
.DESCRIPTION
    This script will configure Developer Mode in order to enable Windows Subsystem for Linux (Ubuntu) on Windows 10 version 1607 or later.
.EXAMPLE
    Prepare Windows 10 for Windows Subsystem for linux and install required features:
    .\Enable-UbuntuForWindows.ps1
.NOTES
    FileName:    Enable-UbuntuForWindows.ps1
    Author:      Nickolaj Andersen
    Contact:     @NickolajA
    Created:     2016-09-08
    Updated:     2016-09-08
    Version history:
    1.0.0 - (2016-09-08) Script created
#>
Begin {
    # Validate Windows 10 version 1607 build
    if ([int](Get-WmiObject -Class Win32_OperatingSystem).BuildNumber -lt 14393) {
        Write-Warning -Message "Unsupported build of Windows 10 detected, exiting" ; exit 1
    }
    # Construct TSEnvironment object
    try {
        $TSEnvironment = New-Object -ComObject Microsoft.SMS.TSEnvironment -ErrorAction Stop
    }
    catch [System.Exception] {
        Write-Warning -Message "Unable to construct Microsoft.SMS.TSEnvironment object" ; exit 1
    }
}
Process {
    # Functions
    function Write-CMLogEntry {
	    param(
[parameter(Mandatory=$true, HelpMessage=”Value added to the smsts.log file.”)]
[ValidateNotNullOrEmpty()] [string]$Value,
[parameter(Mandatory=$true, HelpMessage=”Severity for the log entry. 1 for Informational, 2 for Warning and 3 for Error.”)]
[ValidateNotNullOrEmpty()] [ValidateSet(“1”, “2”, “3”)] [string]$Severity,
[parameter(Mandatory=$false, HelpMessage=”Name of the log file that the entry will written to.”)]
[ValidateNotNullOrEmpty()] [string]$FileName = “EnableUbuntuforWindows.log” ) # Determine log file location $LogFilePath = Join-Path -Path $Script:TSEnvironment.Value(“_SMSTSLogPath”) -ChildPath $FileName # Construct time stamp for log entry $Time = -join @((Get-Date -Format “HH:mm:ss.fff”), “+”, (Get-WmiObject -Class Win32_TimeZone | Select-Object -ExpandProperty Bias)) # Construct date for log entry $Date = (Get-Date -Format “MM-dd-yyyy”) # Construct context for log entry $Context = $([System.Security.Principal.WindowsIdentity]::GetCurrent().Name) # Construct final log entry $LogText = “<![LOG[$($Value)]LOG]!><time=””$($Time)”” date=””$($Date)”” component=””EnableUbuntuForWindows”” context=””$($Context)”” type=””$($Severity)”” thread=””$($PID)”” file=””””>” # Add value to log file try { Add-Content -Value $LogText -LiteralPath $LogFilePath -ErrorAction Stop } catch [System.Exception] { Write-Warning -Message “Unable to append log entry to EnableUbuntuforWindows.log file” } } # Write beginning of log file Write-CMLogEntry -Value “Starting configuration for Windows Subsystem for Linux” -Severity 1 # Create AppModelUnlock if it doesn’t exist, required for enabling Developer Mode $RegistryKeyPath = “HKLM:\SOFTWARE\Microsoft\Windows\CurrentVersion\AppModelUnlock” if (-not(Test-Path -Path $RegistryKeyPath)) { Write-CMLogEntry -Value “Creating HKEY_LOCAL_MACHINE\SOFTWARE\Microsoft\Windows\CurrentVersion\AppModelUnlock registry key” -Severity 1 New-Item -Path $RegistryKeyPath -ItemType Directory -Force } # Add registry value to enable Developer Mode Write-CMLogEntry -Value “Adding HKEY_LOCAL_MACHINE\SOFTWARE\Microsoft\Windows\CurrentVersion\AppModelUnlock\AllowDevelopmentWithoutDevLicense value as DWORD with data 1” -Severity 1 New-ItemProperty -Path $RegistryKeyPath -Name AllowDevelopmentWithoutDevLicense -PropertyType DWORD -Value 1 # Enable required Windows Features for Linux Subsystem try { Enable-WindowsOptionalFeature -FeatureName Microsoft-Windows-Subsystem-Linux -Online -All -LimitAccess -NoRestart -ErrorAction Stop Write-CMLogEntry -Value “Successfully enabled Microsoft-Windows-Subsystem-Linux feature” -Severity 1 } catch [System.Exception] { Write-CMLogEntry -Value “An error occured when enabling Microsoft-Windows-Subsystem-Linux feature, see DISM log for more information” -Severity 3 } }
Using the script
Save the above script as e.g. Enable-UbuntuForWindows.ps1 and place it in your Content Library (source location).
I’d suggest that you simply just create a legacy Package, or include it in any package of your choosing. In regards to placement of the step in your task sequence, there’s a few things to keep in mind. Enabling the Microsoft-Windows-Subsystem-Linux feature requires a restart. It won’t perform a dual restart, like the Microsoft-Hyper-V-HyperVisor feature, however if you’re using my script for enabling Credential Guard and were thinking of adding a simple Restart Computer right after the step that calls the script above to enable Ubuntu for Windows, go ahead, but make sure that you’re placing it before the Credential Guard script, otherwise the Restart Computer will pick up the required restart from the Credential Guard script and break the task sequence.
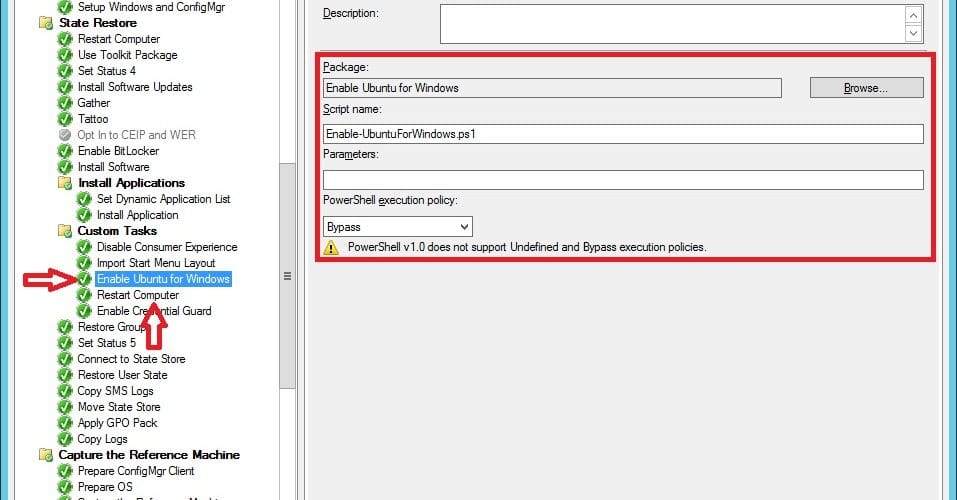
In my task sequence, I’ve placed the Enable Ubuntu for Windows step as shown in the picture below:

Remember, the Restart Computer step is optional. Now when the step is executed, the script will log in the default task sequence log location to a file called EnableUbuntuforWindows.log. Below is a sample log file showing a successful attempt to configure Windows Developer Mode and add the Microsoft-Windows-Subsystem-Linux feature:

Per-User configuration after deployment
Simply just implementing the script from above into your deployment process, only enables Ubuntu for Windows. However, on a per-user basis, it has to be downloaded from the Windows Store and installed, before it can be used. Each user simply just have to open a command prompt and enter Bash followed by an Enter key stroke, and a couple of questions including a license term will have to be answered and accepted. A default user and password would then be created (also asked by the Bash installation).
The process described above is what I’d recommend any organization thinking of incorporating Ubuntu for Windows into their Windows 10 deployment process. There’s is a way if you’d want to include the download and install of Bash during the deployment process, but this will create the default user named root with an empty password. This could potentially be a security risk, and therefor not something that I’d recommend. But for those of you that want to know how it could be accomplished, simply put a Run Command Line step after the Restart Computer step (shown in the picture above), which for this scenario becomes required instead of optional, with the following command:
lxrun.exe /install /y


Hi! nice script!
I would add this, pseudocode:
$answer = New-Item (all-your-orders)
if $answer “” then
Write-CMLogEntry (all-your-data)
end if
Best regards from Venezuela, thanks for all!
Unable to construct Microsoft.SMS.TSEnvironment object
does this work with windows 10 home edition?
Thank know you for posting this. Very nice!