Late last year the Microsoft Configuration Manager team worked with the PowerBI team to release a business template for reporting on information in Configuration Manager. When this report first came out I chuckled a little bit at it because the amount of data they were working with was absolutely ginormous. However the report slowly picked up steam while not always for the whole report absolutely it picked up steam for certain components in particular patching.
If you’ve been following along on Twitter there was a short period of time where the solution template went ‘missing’. This was because of an internal decision at Microsoft so shut down the solution template market place. As a result the solution was moved to a GitHub repository and made open source. However there were never any instructions on how to compile the solution template into a .EXE that could be installed. As of last week, the compiled template was finally made available again on GitHub. You can now find the installer here:
With the re-release of the template and it’s move to open source I think it’s safe to say we can now within the scope of ‘support’ make changes to how the template is implemented in environments, so while the report itself is cool wouldn’t it be awesome if we could extend the report to add our own custom information that we cared about? The idea for this came to me when I was talking with Justin Chalfant at PatchMyPC who had an interest in adding the ‘vendor’ column to the patching section of the report. It seems like it should be pretty simple to add right? Well if it was using the Configuration Manager SQL database – absolutely it would be REALLY easy to add in. However if you know anything about the Configuration Manager PowerBI template you know that it actually uses a dedicated reporting database (of your choice) to store information that it then pulls into the PowerBI report. So let’s go over the logic flow of how the heck this solution template works. For details on how to install the template you can find them here:
When you first install this template you’ll notice that it asks you to specify a few things. It asks you to specify your configuration manager database and a destination database. – Either in Azure or a something local on premises.
NOTE: I do not know if the Microsoft Configuration Manager SQL license allow you to install/add a database for the PowerBI report on the SCCM Server – I’ve asked around but I do not have an official statement saying it is or is not OK.
For the purposes of this I have already installed the PowerBI solution template and I am using a database that is attached to my labs ConfigMgr SQL instance. That means for any referenced images/screenshots below the SOURCE database is CM_PR1 and the destination database where the solution template data is stored is in ReportServerPBI – Please ignore the name of this database this was originally an on-premises PowerBI server demo. Now lets make sure we understand the logic of how data is populated into the PowerBI template.
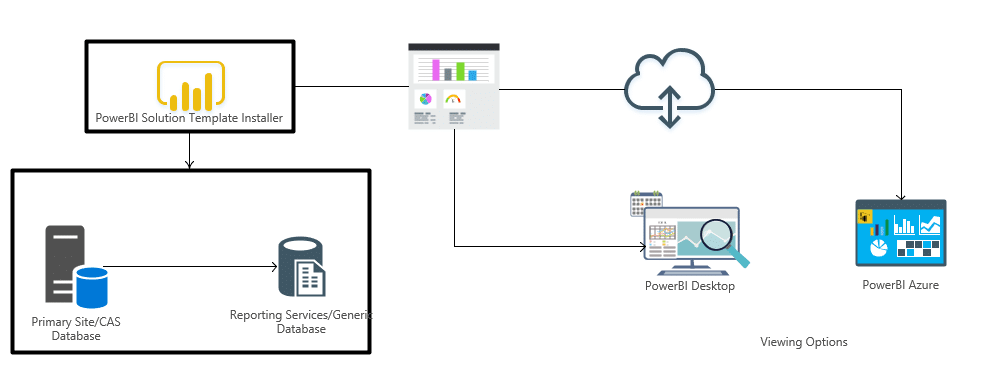
When you install the PowerBI Solution template the following things happen, first it creates a connection (Explained more later) between the data source (your SCCM database) and a reporting database (Azure DB, report server DB some other generic DB) and then generates a PowerBI template using the hardcoded information of the location of the database. This template can then be opened either with PowerBI desktop directly, or uploaded to the PowerBI service and updated using the PowerBI gateway as depicted above. OK but once the ‘connection’ is established how is the data for the report updated? The answer is a scheduled task, some PowerShell and a SQL stored procedure.
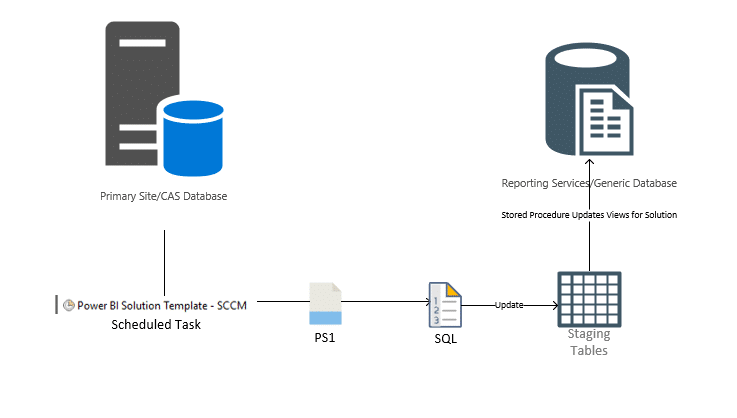
Just to make sure we understand this:
A scheduled task starts a PowerShell script, this script executes a set of .SQL files which pre-loads information into the ‘Staging Tables’ in the report server, upon successful completion the PowerShell Script then requests the SQL database to execute a set of Stored Procedures that then moves the data from the ‘Staging Tables’ to the normal data tables.
Essentially the PowerBI solution template creates the above process by doing the following to your server when run.
- Creates a Scheduled task
- Creates a PowerShell script in C:\ProgramData\Business Platform Solution Templates\Microsoft-SCCMTemplate\” called “DataLoad.PS1” – this script is run based on your refresh schedule
- It has parameters of Source Database, Destination Server, DestinationDatbase
- Creates the associated SQL command files in C:\ProgramData\Business Platform Solution Templates\Microsoft-SCCMTemplate\”
- Creates Stored Procedures on the Destination Datbase:
- sp_populatecomputer
- sp_populatecomputermalware
- sp_populatecomputerprogram
- sp_populatecomputerupdate
- sp_populatemalware
- sp_populateprogram
- sp_populatescanhistory
- sp_populatesite
- sp_populateupdate
- sp_populateuser
- sp_populateusercomputer
- sp_populatecollection
- sp_populatecomputercollection
Once all of this is created these stored procedures are called every time information in the destination database needs to be updated.
All in all that’s a LOT of stuff to get a report configured in an environment. So how do we make changes or customize the report? Obviously if we want to make changes to the PowerBI template/report itself that’s easy but what if we wanted to add something to the report like say vendor information so we could report on the patch status of all the PatchMyPC patches? Natively that information isn’t available to we have to make a few changes.
Note the changes we are going to make are ‘unsupported’ – but the project is also open source so and if you break it you can always re-move and re-install it to regenerate the the changes you made.
The following steps and logic can be applied to basically any other information we would like to add to the report we will ONLY be focusing on updating the vendor information in this example.
- Update the staging table ‘pbist_SCCM.update_Staging’ and production table ‘pbist_SCCM.update’ with a new column ‘Vendor’ nvarchar
- Update the stored procedure to include the newly created column when inserting the data.
- Update the SQL query that populates data into ‘pbist_SCCM.Update_Staging’ so that it populates the vendor data.
Adding the vendor column to staging and production
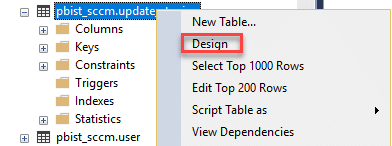
Open SQL Management studio, navigate to the destination database, in my case ReportServerPBI and expand Tables and find ‘PBIST_SCCM.Update_Staging’ table right click it and select ‘Design’ If you are having problems finding the table validate you installed the PowerBI solution template, and use the ‘filter’ option on the tables to ensure you find the table.
This will open up the design function in SQL – at the bottom type in ‘Vendor’ for the datatype select ‘nvarchar’ I have chosen 50 because I checked to confirm that none of the vendor patches have a company name longer than 50 characters. and select ‘Allow Nulls’
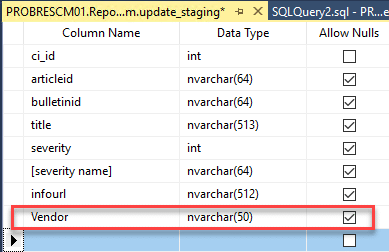
This will create the destinations we need for our data to go to once we modify the stored procedure and the script.
Update the stored procedure to move the data
Next we need to update the data ‘move’ from staging to production. We can do this by expanding the database where the report structure lives on, navigate to ‘program-ability’ -> ‘Stored Procedures’ and then scroll until we find the specific update procedure we would like to update in this case ‘pbist_SCCM.SP_populateUpdate’ right click it and select ‘Modify’
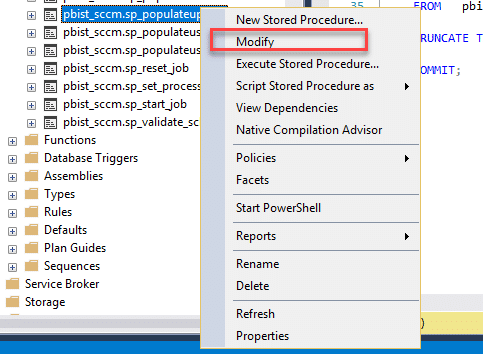
This will cause the stored procedure to be generated as a SQL command file in SQL management studio you should get an output that looks roughly like this:
USE [ReportServerPBI]
GO
/****** Object:  StoredProcedure [pbist_sccm].[sp_populateupdate]    Script Date: 4/1/2019 2:05:15 PM ******/
SET ANSI_NULLS ON
GO
SET QUOTED_IDENTIFIER ON
GO
-- =============================================
-- Description: Append the rows from  Site_staging to Site.
-- =============================================
ALTER PROCEDURE [pbist_sccm].[sp_populateupdate] AS
BEGIN
    SET NOCOUNT ON;

    BEGIN TRANSACTION;

    TRUNCATE TABLE pbist_sccm.[update];
    INSERT INTO [pbist_sccm].[update]
           (ci_id
           ,articleid
           ,bulletinid
           ,title
           ,severity
           ,severityname
           ,infoURL
       ,Vendor)
    SELECT ci_id,
            articleid,
            bulletinid,
            title,
            severity,
            [severity name],
            infourl,
    FROM   pbist_sccm.update_staging;

    TRUNCATE TABLE pbist_sccm.update_staging;

    COMMIT;
END;
You will need to update line 34 by adding another line to include the vendor information. You can either used the full name or just state ‘vendor’ I have a preference to use full structure names. This will cause your stored procedure to look like this:
USE [ReportServerPBI]
GO
/****** Object:  StoredProcedure [pbist_sccm].[sp_populateupdate]    Script Date: 4/1/2019 2:05:15 PM ******/
SET ANSI_NULLS ON
GO
SET QUOTED_IDENTIFIER ON
GO
-- =============================================
-- Description: Append the rows from  Site_staging to Site.
-- =============================================
ALTER PROCEDURE [pbist_sccm].[sp_populateupdate] AS
BEGIN
    SET NOCOUNT ON;

    BEGIN TRANSACTION;

    TRUNCATE TABLE pbist_sccm.[update];
    INSERT INTO [pbist_sccm].[update]
           (ci_id
           ,articleid
           ,bulletinid
           ,title
           ,severity
           ,severityname
           ,infoURL
       ,Vendor)
    SELECT ci_id,
            articleid,
            bulletinid,
            title,
            severity,
            [severity name],
            infourl,
      pbist_sccm.update_staging.vendor
    FROM   pbist_sccm.update_staging;

    TRUNCATE TABLE pbist_sccm.update_staging;

    COMMIT;
END;
Make sure you SAVE the stored procedure changes once you are done if you do not SAVE the changes it will not update properly.
Update the SQL script for storing data
Navigate to C:\ProgramData\Business Platform Solution Templates\Microsoft-SCCMTemplate\update.SQL and once you’ve made a backup copy update the SQL script to include the vendor or company information from the Configuration Manager database.
SET NOCOUNT ON;

SELECT su.ci_id,
       su.articleid,
       su.bulletinid,
       title,
       severity,
       customname [Severity Name],
       infourl,
       v_CICategoryInfo_All.CategoryInstanceName [Vendor]
FROM   v_updateinfo su
LEFT OUTER JOIN customseverityreference s ON su.severity=s.severityid
left outer join v_CICategoryInfo_All on su.CI_ID = v_CICategoryInfo_All.CI_ID
where v_CICategoryInfo_All.CategoryTypeName = 'Company';
You can just copy and past the above script to replace the Update.SQL file. This will link the appropriate information.
If you’re thinking man this is a long and convoluted process – congratulations you’re right! Don’t worry we are almost done we just need to run the scheduled task manually to confirm that the data is properly updating and then update our PBIX file. First we run the scheduled task with a simple right click run

Update the PowerBI report
Then once the script has completed successfully – we can open up the PowerBI file and make our final tweaks. First we need to refresh the data in general this should by default then include the new column we’ve added to the solution template and with a couple of quick clicks we can add a data slicer to organize things by vendor. We can do this by navigating to the ‘Update Compliance’ tab, expanding the ‘visualization’ option and selecting a slicer.
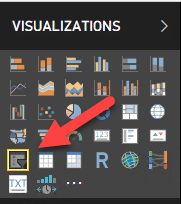
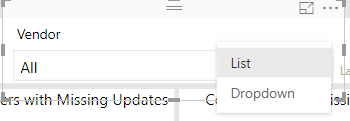
Then expand the ‘update’ table from the fields section choose ‘vendor’ this will add it as an option. On the selection for the field you’ll be able to select if you would like it to be a ‘list’ or a drop down. I personally prefer lists so
This was a really fun project to figure out how the PowerBI report was put together and how it updates the data and then to get some practical usage out of it as well! If there is something else you would like to see added to the Microsoft PowerBI template let me know in the comments and I’ll see what I can do.



I wish I had read your article earlier. I’ve been trying to figure out why my dashboard isn’t working with CM1902 and it’s because I didn’t run through the .EXE installer. I thought I could skip it because I’m working with an on-prem ConfigMgr SQL database and no Azure. I see now that the source database is supposed to have values like “pbist_sccm” which my report can’t find.
Is it possible to edit the scripts to add multiple databases onto the same template?
I don’t see why not. As long as you have parameters and an account hat has access.