


Installing applications, specifically Win32 applications, have for some time now been possible with Microsoft Intune managed devices, also sometimes referred to as cloud managed devices. Those devices, either being managed as Hybrid Azure AD joined devices or Azure AD joined devices, there’s no difference in how the Win32 applications are delivered from Microsoft Intune to the device. It’s all possible using the Intune Management Extension, which cannot be mentioned enough, is a great extension to cloud managed devices. Picture this scenario, you want to provision a new cloud managed device and leverage Windows Autopilot and on top of that have all the supported Visual C++ redistributables installed on that device. Reference images have for ages been the primary choice for many organizations to make sure new devices are installed using a set of predefined applications, also known as baseline applications. These days when we talk about provisioning with Windows Autopilot and manage a device using Microsoft Intune, the reference image doesn’t fit into the picture anymore. Hence, another approach is required to ensure the baseline applications are installed onto the device.
In this blog post we’ll cover how to create a new Win32 application that contains the installation files for all the currently supported Visual C++ redistributables and how PowerShell can be used to create a functioning detection rule for the Win32 application. Essentially the outcome of this blog post should leave you with a method that’s easy to maintain and support for newer Visual C++ applications being released.
Latest supported redistributables
Microsoft provides an article that’s kept up to date with the latest supported releases of Visual C++ redistributables that’s currently available for download, more information below:
https://support.microsoft.com/en-us/help/2977003/the-latest-supported-visual-c-downloads
This article should be deemed the master source of information for what should be installed on devices that will be running some sort of application(s) that’s a prerequisite for Visual C++ redistributables. Always refer back to this article once there’s a new version available and extract the required information. More on that later in this post when we talk about the different pieces involved in this solution.
Download information
Everything in this solution have been published at our GitHub repository available from the link below:
https://github.com/MSEndpointMgr/Intune/tree/master/Apps/Visual%20C%2B%2B
Solution overview
Instead of simply sharing a single script that only installs the desired applications, in this case Visual C++ redistributables, this solution will provide you with the necessary scripts and files to not only install, but also download and perform proper detection required for the Win32 application model in Microsoft Intune. Embedded in this solution are the following components:
- Install-VCRedist.ps1
- This script is used as the main installation engine and will be used for the install command line in the Win32 app.
- Save-VCRedist.ps1
- This script will allow for downloading the required installation files into a Source folder in the same directory where it’s executed.
- Get-VCRedistDetection.ps1
- This script contains the required detection rule logic for the Win32 app.
- VCRedist.json
- This is the master file that should be updated once there’s a new Visual C++ redistributable available. It’s being used by all scripts mentioned above to control download, installation and detection. Hence it’d be required to always have this file accessible from a public URL, for instance Azure Storage Blob.
Publish master file to Azure Storage Blob
Since the VCRedist.json master file is used by all other components in this solution, it’s necessary to make it publicly accessible e.g. using an Azure Storage Blob. If you have other means of making it available from an URL that makes more sense, use that method if so desired.
- Login to the Azure portal (portal.azure.com) and browse the Storage Accounts service.
- Within Storage Accounts, assuming you have an account setup already, use that or create a new with a better purpose for storing the master file.
- Select your Storage Account and scroll down to Containers under Blob Service.
- Click Container in the top menu and create a new container named e.g. vcredist.

- Ensure that you select Blob as the Public access level and click OK.

- Browse the newly created container and click Upload.

- Select the VCRedist.json file downloaded from our GitHub repository and click Upload.
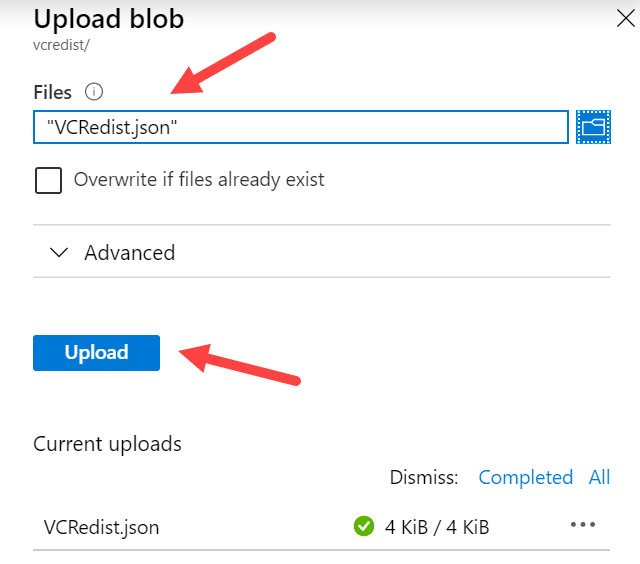
- The master file has now been successfully made available publicly with read-only permissions.
- Browse the uploaded VCRedist.json file to retrieve the URL it’s accessible from. This URL is important and is required further down in this blog post when editing the script components.

Whenever there’s a new Visual C++ redistributable available, simply update the VCRedist.json file and upload it again to the same Azure Storage Blob within the vcredist container. This will ensure that the URL the master file can be accessible from will not change and you’ll not have to think about updating anything else.
Create Win32 application source directory
When packaging Win32 applications for Microsoft Intune, it’s a good practice to have a directory structure that consists of for instance the following:
- Source
- <AppName>
- <Installation files>
- <AppName>
- Detection
- Custom PowerShell detection scripts resides directly underneath this folder
- Output
- This folder will contain the packaged .intunewin file after creation
An example for the Visual C++ redistributable application could be the following:
- Source
- VCRedist
- Save-VCRedist.ps1
- Install-VCRedist.ps1
- VCRedist
- Detection
- Get-VCRedistDetection.ps1
- Output
To follow along in this blog post, it’s required that you create the above mentioned directory structure and place the respective files within each location. The directory structure could for instance be created in C:\Temp\IntuneWinAppUtil, however choose what suits your environment.
Download required installations files
Use the Save-VCRedist.ps1 script from within the Source\VCRedist folder to download all the installation files. The script will automatically create a new folder named Source within the Source\VCRedist folder and divide each Visual C++ redistributable installer into sub folders named after the version (actually, the year, e.g. 2008, 2010, 2012 etc) and underneath that divided by architecture.
- Edit the Save-VCRedist.ps1 script file and insert the Azure Storage Blob URL where the arrow points in the following image:

- Open an elevated PowerShell console and run the following command to download the files:
.\Save-VCRedist.ps1 -Verbose
- Running this command should show the following after it has completed:

Prepare installation script
Just like the Save-VCRedist.ps1 script was updated with the Azure Storage Blob URL, the Install-VCRedist.ps1 script needs to be updated as well. Edit the Install-VCRedist.ps1 script that resides in the Source\VCRedist folder and insert the Azure Storage Blob URL where the arrow points in the following image:

Create the Win32 application
Creating a Win32 application in Microsoft Intune can either be performed manually or automated with the IntuneWin32App PowerShell module. For more information about this module, see its documentation:
https://github.com/MSEndpointMgr/Intune/tree/master/Modules/IntuneWin32App
In this post we’ll create a simple script that’s utilizing the IntuneWin32App module with everything that’s required to automatically create a new Win32 application for Visual C++ redistributables. This script could then be used as a template script and be re-used to create a new Win32 application when updated or new Visual C++ redistributables are released.
The template script will consist of the following steps:
- Take the Source\VCRedist directory and package it into an .intunewin file
- Create required detection rule using the Get-VCRedistDetection.ps1 script embedded in this solution
- Create a new Win32 application in Microsoft Intune
- Add an assignment to the Win32 application
It’s recommended that you modify the script template file provided in this post to suite your environment in regards to the following:
- Directory structure and paths
- Tenant name
- Icon file, ensure that this file exists

Below you’ll find the script template file sample code:
# Create .intunewin package file
$IntuneWin32Package = New-IntuneWin32AppPackage -SourceFolder "C:\Temp\IntuneWinAppUtil\Source\VCRedist" -SetupFile "Install-VCRedist.ps1" -OutputFolder "C:\Temp\IntuneWinAppUtil\Output" -Verbose

# Get MSI meta data from .intunewin file
$IntuneWinMetaData = Get-IntuneWin32AppMetaData -FilePath $IntuneWin32Package.Path

# Create custom display name like 'Name' and 'Version'
$Version = "2008-2019"
$DisplayName = "Visual C++ Redistributables" + " " + $Version

# Create detection rule
$ScriptFile = "C:\Temp\IntuneWinAppUtil\Detection\Get-VCRedistDetection.ps1"
$DetectionRule = New-IntuneWin32AppDetectionRule -PowerShellScript -ScriptFile $ScriptFile -EnforceSignatureCheck $false -RunAs32Bit $false

# Create custom requirement rule
$RequirementRule = New-IntuneWin32AppRequirementRule -Architecture "All" -MinimumSupportedOperatingSystem 1607

# Convert image file to icon
$ImageFile = "C:\Temp\IntuneWinAppUtil\Icons\VisualC.png"
$Icon = New-IntuneWin32AppIcon -FilePath $ImageFile

# Add new EXE Win32 app
$Win32AppArgs = @{
    "TenantName" = "tenantname.onmicrosoft.com"
    "FilePath" = $IntuneWin32Package.Path
    "DisplayName" = $DisplayName
    "Description" = "Install supported Visual C++ Redistributables"
    "Publisher" = "SCConfigMgr"
    "InstallExperience" = "system"
    "RestartBehavior" = "suppress"
    "DetectionRule" = $DetectionRule
    "RequirementRule" = $RequirementRule
    "InstallCommandLine" = "powershell.exe -ExecutionPolicy Bypass -File .\Install-VCRedist.ps1"
    "UninstallCommandLine" = "cmd.exe /c"
    "Icon" = $Icon
    "Verbose" = $true
}
$Win32App = Add-IntuneWin32App @Win32AppArgs

Add-IntuneWin32AppAssignment -TenantName "tenantname.onmicrosoft.com" -ID $Win32App.id -Target AllUsers -Intent available -Notification showAll -Verbose- Save the above script template sample and make any modifications required. You could for instance call it New-VCRedistApp.ps1.
- Install the IntuneWin32App module by running the following command in an elevated PowerShell console:
Install-Module -Name IntuneWin32App
- From the same console, run the New-VCRedistApp.ps1 script and let it do its magic. Once completed, the Win32 application will have been created automatically for you within Microsoft Intune. Below is an excerpt from the verbose output of the scrip template:

Results
When the Win32 application has successfully been created, under the Clients Apps blade in the devicemanagement.microsoft.com portal, you’ll see it sitting there with all the configuration made by the script template you executed earlier.

Summary
At this point the Win32 application for installing the latest supported Visual C++ redistributables are available to you to assign either way you desire. For instance, make it an required application when provisioning Windows Autopilot devices and include it in the Enrollment Status Page. Whenever there’s a new Visual C++ redistributable application available, perform the following tasks:
- Update the VCRedist.json file and re-upload it to your Azure Storage Blob within the existing container named e.g. vcredist
- Cleanup the Win32 application packaging directory structure by removing the Source folder created within the application folder named e.g. VCRedist
- Run the Save-VCRedist.ps1 script from within the Source\VCRedist folder to re-download the installation files
- Remove the existing Win32 application from Microsoft Intune, or at least remove it’s assignment
- Run the New-VCRedistApp.ps1 script template to create a new Win32 application containing the packaged .intunewin file with the latest installation files
Enjoy your deployments!


awesome article… I was excited to try this as we move away from MDT into Intune (MEM) and Autopilot…..but even though i followed everything step x step I still got the error “WARNING: Failed to access JSON file. Error message: The remote server returned an error: (404) Not Found.” when i ran the Save-VCRedist.ps1 script. I am using a “Trial” tenant in our DEV environment …wondering if that made a difference? I’ll take another look at my container etc. to see if I’ve made everything public and accessible…. thanks for all your work and sharing Nickolaj.
Ahhh…. sorry about that. I just realised that my Container did not have the proper “Public access level”… I think I just accepted the default setting and after creating a new Container with the access changed to Blob (anonymous….. it worked. Best!