


Prepopulate MFA phone authentication (Multi-Factor Authentication) details on a user in Azure Active Directory – This is the act of getting a known second factor added to a user’s account details in Azure AD automatically. These details are also known as the user’s “Strong Authentication Methods.”
Normally MFA enrollment is a manual process done with the Microsoft Authenticator App during first sign-in to a Modern Authentication capable app or website. However, a more basic second factor is most often know to IT. And that is the user’s cellular/mobile number, which, in a corporate environment, is usually owned and assigned by HR or IT.
With a recent addition to the Microsoft Graph API, it is now possible to add or replace a user’s strong authentication phone method programmatically. Although still on the Beta endpoint of the Graph API, you can use this with high confidence in production today – although it requires jumping through some hoops, which is why we wrote you this article. So it will be easier for you to configure and maintain.
A little history…
There have been various attempts and solutions for prepopulating MFA details throughout the last few years. In 2015, it became possible to do some parts of what this solution does with the MSOnline PowerShell Module. But when the backends of Self Service Password Reset (SSPR) and Azure Multi-Factor Authentication (MFA) got merged and brought us the magic of “Combined Registration,” the possibility to script against the strong authentication details was lost for some time, and only resurfaced with the option to get insights… Until now!
Overview of the MFA Automation solution
TL; DR; It will enable you to register the users automatically for MFA and SSPR at the same time!
The MFA Automation solution for prepopulating new and existing users with phone authentication details makes use of the following Microsoft technologies:
- Azure Automation.
- Microsoft Graph API (beta).
- PowerShell.
- Azure AD (P1).
- Combined registration
- (optionally) Azure Log Analytics.
- An Azure Subscription.
The cost of running this solution is next to nothing unless you have a considerable amount of users, in which case it is still very cheap compared to the amount of time saved.
Please notice the requirement for Azure AD P1, which is because you need to enable combined registration and have a license for Self-Service Password Reset (SSPR).
This article will cover the following subjects and guide you into a ready state for running in production.
- Required permissions
- Use cases for the MFA Pepopulation solution
- Installation of the solution in Azure
- Output explanation
- Log Analytics for enhanced monitoring
- Script explanation
- Opportunities for enhancements
- Caveats
- Troubleshooting
DISCLAIMER: This solution is provided freely to the community as inspiration only. While we have done our best to test the solution for production use, we cannot take any responsibility for data loss or damage caused by the script or instructions provided in this article.
Required permissions
Permissions for the solution are a bit tricky since we initially wanted this to run with application permissions and not delegated as a user. But as the documentation states, only delegated permissions can be used to update a user’s authentication details. Furthermore, the user that we delegate the permissions to needs to be assigned some pretty hefty permissions (either of the roles listed below will do):
- Global admin
- Privileged authentication admin
- Authentication admin
In the installation guide, you will be using the “Authentication Admin” role. Because you always want to start with the least possible permissions. But in some cases, the “Privileged Authentication Admin” might be your role of choice since it can read the current phone number, which the “authentication admin” can not.
Since you will be working with authentication details and require the highest level of access in your tenant, you must have the “Global Administrators” role during the solution’s implementation. But if you are using Azure PIM, you must be prepared to grant an active, permanent assignment of “Authentication Admin” to the solutions service account.
Use cases for the Prepopulate MFA phone authentication solution
For companies that want to supercharge their MFA enrollment, this solution will allow them to achieve the following:
- Have the user registered for MFA and SSPR as part of the account provisioning process.
- Lockdown MFA registration completely.
- Get to compliant Multi-Factor Authentication state in record time!
- Have SSPR work from the user’s first day of work!
- Register those pesky users that never seem to get caught by
Installation of Prepopulate MFA phone authentication solution in Azure
This is what you came for!
Expand the following accordion items to read the guided steps. And remember that each part should be completed entirely and in order.
NB: As a good measure of caution, the guide assumes that you will be testing this solution on a small group of users. These users should be put in an Azure AD Security group. You will need the name of that security group in the “Configuring the Automation Account” part.
As with most things in Azure, you begin the journey at https://portal.azure.com, and from there, you can follow these simple steps to configure a suitable Azure Automation environment for this solution to run in.
- In the universal search area, search for automation.
- Click on “Automation Accounts” in the results dropdown.

- Click on the “+ Add” button to open the “Add Automation Account” blade.
- Enter a name for the account, like “Automation-MFA,” if you do not follow a cool naming scheme.
- Choose the subscription that you want to the automation account to reside in.
- Choose or Create a new resource group to hold the automation account and the resources that will accompany the solution you are about to deploy.
- Choose the data center location (consider keeping it within Europe to comply with the GDPR).
- Leave the “Create Azure Run As account” on “Yes,” as you will use it.
- Click on “Create.”

Wait for the deployment to complete. Note that the service principal will get added to your subscription access control list (More about this in the last section about opportunities for enhancements).
You are done creating the Automation account!
As you are dealing with highly privileged actions, you will need to assign some permissions to our new RunAs account.
While still in the Azure Resource Manager Portal:
- Go to the “Universal Search” at the top of the web page.
- Search for “App reg“.
- Click on “App registrations” in the results list.

- On the “App registrations” page, click on “All applications.”
- (Optionally) filter the list by entering the name of the Automation account your previously created.
- Click on the app registration that corresponds to your new Automation account.

- On the app page, click on “API permissions.”
- Click on “+ Add a permission“.
- Click on the huge “Microsoft Graph” button (impossible to miss!).

Now comes the part where you actually assign the permissions, and since we will be using both “application” AND “delegated” permissions, we will go ahead and get both types selected before exiting the “Request API permissions” blade. So don’t be hasty and just close things right away!
Delegated permissions
- Click on “Delegated permissions.”
- Search for “UserAuth“.
- Find and tick “UserAuthenticationMethod.ReadWrite.All” which will give access to get and set the strong authentication details of any user in the Azure Active Directory.
- Now, click on “Application permissions,” and don’t worry, the permission you just selected will be remembered.

Application permissions
- You must now be on the “Application permissions” selector.
- Search for the following permissions one at a time:
user.read.all
reports.read.all
groupmember.read.all - Tick the permissions once found.
- Click on “Add permissions” once you have found and ticked the required permissions.

- Back on the main page for the automation app, review the permissions.
- Notice that permissions are not granted for the tenant yet.
- Click on “Grant admin consent for <Tenant name>“.
- Click on “Yes” when prompted.

Default client type
Lastly, you must configure the App registration to treat the application as a public client. Otherwise, delegated access will not work.
- Click on “Authentication” in the left-hand menu.
- Set the “Default client type” option as “Yes” on the lower right.

Don’t forget to click on the “Save” button!

You are done configuring the app registration!
Creating a service account is a crucial part of getting the solution to function correctly. The delegated app permission will only work properly when requested by a user account, so we need to create a service account to act as our delegate. This account needs to be assigned the “Authentication Admin” role as permanently active (if you are using PIM), and steps must be taken to ensure that MFA prompts do not occur.
You can do this part of the guide through either PowerShell or the Azure Portal, as explained in the following steps:
Create user
- Search for “users.”
- Click on “Users” in the results list.

- At the top of the “All users” list, click on “+ New user“.

- Select “Create user.”
- Enter your desired “User name” and choose an appropriate domain.
- Create a good display “Name” for the account.
- Enter an appropriate “First name” and “Last name.”
- Click on “Create” to finish (Don’t worry about the other details right now).

- Click on the “Refresh” button to update the list with our new user.
- “Search” for your new user on the list.
- Click on the user in the list once found.

- Click on “Assigned roles” on the service accounts page.
- Click on “+ Add assignment“.

- Search for “Authentication“.
- Choose “Authentication Administrator“.
- Click on the “Add” button.

If you have Azure PIM enabled, your screen will look like the below image instead, and you will be required to do the following steps, so if you don’t, continue after the second image below.

- Select “Active“.
- Tick “Permanently assigned“.
- Enter a justification that will appease the security gods!
- Click on “Assign“.

Now you just need to configure the account password and policy.
Password policy
You will use Azure Cloud shell (or the Azure AD PowerShell module) to configure the account to have a very secure password – one that never expires.
Edit the following PowerShell code to suit your environment. Pay special attention to:
Line 2. A password needs to be filled in.
Line 4. You will need to enter the Object Id, which is the full UPN username (i.e., [email protected]) that you just created in the previous steps.
$PasswordProfile = New-Object -TypeName Microsoft.Open.AzureAD.Model.PasswordProfile
$PasswordProfile.Password = "Verylongandhardpasswordtoguess1sttimearound"
$PasswordProfile.ForceChangePasswordNextLogin = $false
Set-AzureADUser -ObjectId "[email protected]" -PasswordPolicies DisablePasswordExpiration -PasswordProfile $PasswordProfile

NB: If you are using Conditional Access to either enforce MFA for All users or enforce it for privileged role members, you must ensure that the proper exclusions are made so that the service account is not affected. You can target the Service Principal for the automation account to secure access as much as possible.
You are done with the service account, but please keep the username and password handy for the runbook’s configuration.
Before you add the runbook to your new Automation Account, there are some requirements that need to be met in order for the solution to run successfully.
Credentials and Variables need to be defined, as they will be consumed by the script automatically and in a safer way, than just hardcoding them into the script.
Start by going to your new Azure Automation account (you can use the universal search bar like shown in all the previous parts of the installation).
Credentials
- (optionally) Search for the “Credentials” menu item.
- Click on “Credentials” in the left-hand menu.

DelegateServiceAccount
- Click on “+ Add a credential” to open the “New credential” blade.
- Type precisely “DelegateServiceAccount” into the “Name” field (don’t change this).
- Enter a “Description” that makes sense.
- Fill with the “User name” of your service account.
- Fill with the “Password” of the account and confirm it with a second entry.
- Click on the “Create” button.

Verify that the account has been added to the Automation account credentials page.
Variables
Now you need to setup some required variables – without these the runbook will error.
- (optionally) Search for the “Variables” menu item.
- Click on the “Variables” menu item on the left.
- Click on the “+ Add a variable” button.

You will need to add variables to the automation account, so we will not explain how you click on the “+ Add a variable” button each time. Instead, we just show the variables you need to enter and their values.
EnableStagingGroup
- Enter precisely “EnableStagingGroup” into the “Name” field.
- Enter a good “Description” like in the example picture below.
- Change the “Type” to “Boolean.”
- Set the “Value” as “True” to begin with. Piloting solutions like this should be what you do first.
- Set “Encrypted” as “No.”
- Click on the “Create” button.

StagingGroupName
- Enter precisely “StagingGroupName” into the “Name” field.
- Enter a good “Description” like in the example picture below.
- Change the “Type” to “String.”
- Enter a “Value” with the name of the Azure AD security group of user accounts that you wish to pilot this solution with.
- Leave “Encrypted” on “No.”
- Click on the “Create” button.

That’s it for adding Azure Automation account variables to the solution.
Now we must add a single module that the solution depends on…
Installing the MSAL.PS module
The MSAL.PS module is used for simplifying the authentication with the Microsoft Graph API and it is a hard requirement of the MFA automation solution.
You should still be in the Azure automation Account from the last part of this guide.
- (optionally) Search for Modules in the menu.
- Click on the “Modules gallery” item.
- Search for “MSAL.PS” in the search field on the right.
- Click on the “MSAL.PS” module in the results pane.

- Click on the “Import” button (you accept the license terms at the same time).

Click “Ok” on the next page and wait for the import to complete. You can follow the progress by clicking on the notifications icon.

You have now configured all the dependencies and are ready to deploy the actual runbook script!
You can download the AzAutomationScript4MFAPrePopulate.ps1 script directly from the MSEndpointMgr GitHub account if you are proficient in Azure Automation runbook import, or follow this part step-by-step (uh baby) like the new kids on the block.
https://github.com/MSEndpointMgr/AzureAD/tree/master/AzureMFAProvisioning
NB: if you choose to import the Runbook manually, please name it “AzAutomationScript4MFAPrePopulate“, so you can avoid changing the Log Analytics queries that we are going to show you later in this article.
Automated deployment of the Prepopulate MFA phone authentication solution
You can also click this link to start the import process automatically in the Azure portal:
You will be asked to fill in some details about the automation account you just created – most of which will be prefilled with the settings used in this article.
- Select the “Subscription” you create the Automation Resource Group in.
- Select the “Resource Group” that the automation account lives in.
- Enter the “Automation Account Name” of your automation account if you choose a different name.
- Select the “Automation Region” you deployed the automation account into.
- Click on the “Review + create” button.

Now review the setting s and click on the “Create” button to start the deployment.
Once it completes, click on the “Go to resource” button.

- You can now click on “Start” to execute the runbook.
- (optional) Create a schedule by clicking on “Schedules” in the left-hand menu.
- (optional) Afterward, link the schedule to the runbook by clicking on “Link to schedule.“
(Scheduling is not in the scope of this guide)

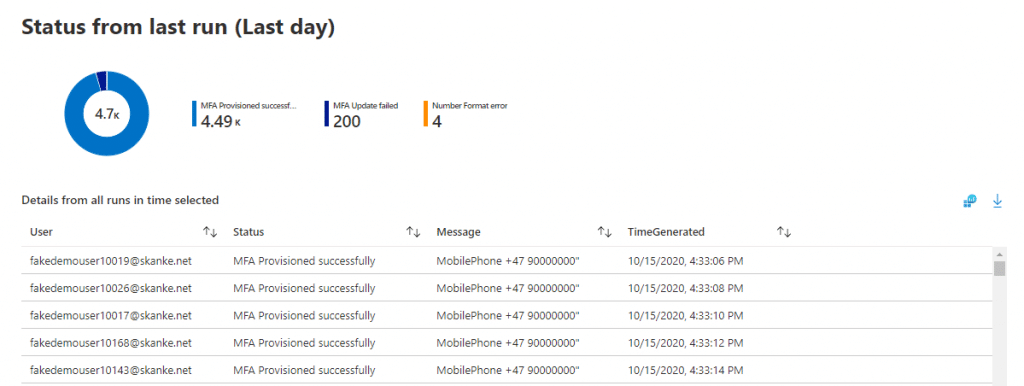
Output explanation
The script will output statistics and results in a specific format. This is to enable easy parsing by Log Analytics and enable a monitoring workbook for the results. Some example outputs from the script:
In addition to this output, the script also generates verbose logging, if enabled, for troubleshooting purposes.
Log Analytics for enhanced monitoring
Logging is important, especially when dealing with highly privileged details such as Multi-Factor Authentication. But accessing the logs in the Azure Automation account requires permission to read details on the job.
You might not want too many people to have access to the automation account itself. Forwarding the job stream to log analytics gives you the option to delegate access to the job logs.
This article’s scope does not include configuring Log Analytics – The following examples are provided as a recommendation on how to use Log Analytics with this MFA automation solution.
The recommended queries are as follows:
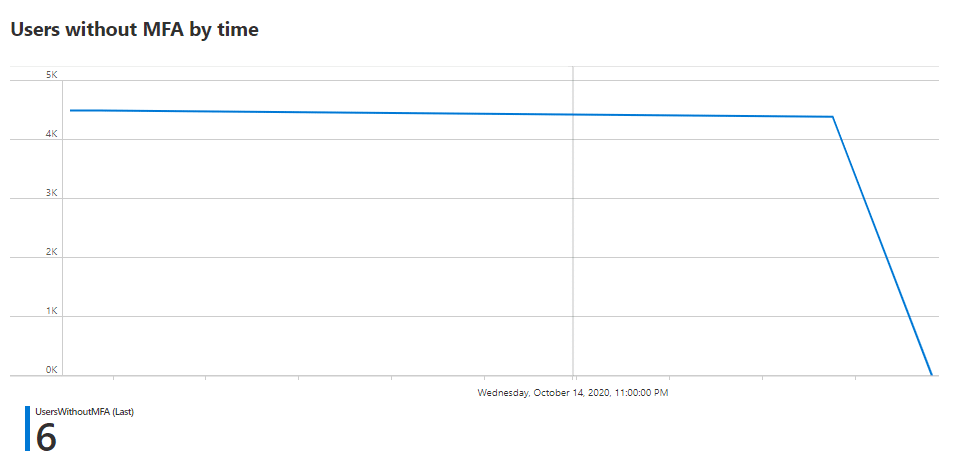
You can manually run all these queries or create a workbook containing all the queries above to have your own monitoring dashboard for the solution.
The monitoring dashboard could end up looking like this:
The workbook example can be downloaded from the same Github repository as the MFA Prepopulate script and imported into your monitoring workspace in Azure.
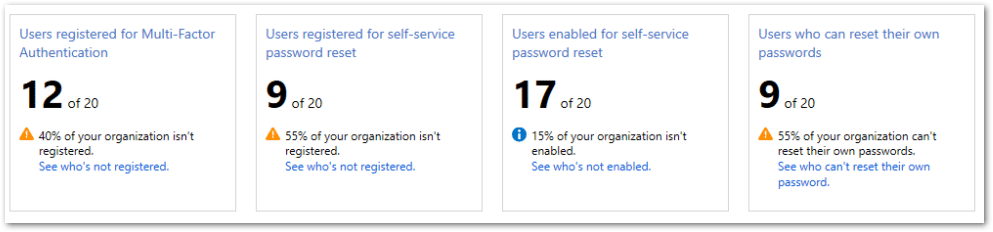
Authentication methods – Usage and Insights (Preview)
Microsoft recently released a dashboard into public preview, that allows you to monitor the overall status of your MFA and SSPR deployment. This dashboard can also help you asses how far your are with your journey, but keep in mind, the data also includes guest/external accounts.
https://portal.azure.com/#blade/Microsoft_AAD_IAM/AuthMethodsOverviewBlade
Script explanation
We have been generous with inline comments, so please look at the source code in our GitHub repository if you would like to understand the inner workings.
Opportunities for enhancements
Some thins we never got around to automating.
Securing the Automation account
If you followed the guide explicitly, you now have a RunAs account with “Contributor” access to the subscription you provisioned the automation account into. For this solution, we are not using much of that access. If you want to limit the permissions of the account, look at the official documentation here:
https://docs.microsoft.com/en-us/azure/automation/manage-runas-account#limit-run-as-account-permissions
Auto Renewing the RunAs account’s self-signed certificate
The RunAs account you created in this guide has a self-signed certificate that expires in one year. It would be best if you considered monitoring certificate expiration or adding some auto-renew solution.
https://docs.microsoft.com/en-us/azure/automation/manage-runas-account#cert-renewal
Caveats
Dealing with new Microsoft features often comes with some caveats that you must know before implementing and running this solution.
Final words
This has been a fun collaboration in the community between @michael_mardahl, @jankeskanke, and @sandy_tsang. Feel free to reach out to any of us should you require professional assistance with EMS.
We hope you appreciate the tool we have provided to the community and will do us the honor of following us on Twitter and Linkedin for more great EMS content in the future!


Hey I have a question here
In the new UI, creating an Automation account has a few differnet options.
The main one being a networking setting, whether the Automation account is public or private (requiring a private endpoint).
What would you recommend for this?
Cheers
-SC
We have an updated version of the script in the GitHub repository.
It uses a System Managed Identity. you should follow the instructions in that script instead. 🙂
Hey,
This is awesome!!!
Could you provide some examples for update phone format for US/India/Singapore?
I’m having a hard time trying to add these country codes and adding missing space.
Thanks,
Justin
Any tips to why MSALP.PS fails on importing with this output?
Error importing the module MSAL.PS. Import failed with the following error: Orchestrator.Shared.AsyncModuleImport.ModuleImportException: While importing the module, an error occurred while processing the module content. Internal error message: Unable to load one or more of the requested types. Retrieve the LoaderExceptions property for more information.. at Orchestrator.Activities.SetModuleVersion.ExecuteInternal(CodeActivityContext context, String moduleName, ModuleLanguage moduleLanguage, String pythonModuleVersion, String modulePath, Guid accountId, Guid moduleVersionId, Int64 moduleContentByteSize, String storageUri, Int32 moduleVersion) at Orchestrator.Activities.SetModuleVersion.Execute(CodeActivityContext context) at System.Activities.CodeActivity.InternalExecute(ActivityInstance instance, ActivityExecutor executor, BookmarkManager bookmarkManager) at System.Activities.Runtime.ActivityExecutor.ExecuteActivityWorkItem.ExecuteBody(ActivityExecutor executor, BookmarkManager bookmarkManager, Location resultLocation)
An update to MSAL.PS could have broken the import in Azure Automation – this has happened from time to time with popular modules.
I can see that Sandy has already assisted you here: https://github.com/AzureAD/MSAL.PS/issues/37
So hopefully others can follow that thread.
I continually get the
Warning
Graph request failed with status code ”. Error message: Neither tenant is B2C or tenant doesn’t have premium license
I have AAD P1 licenses and even used then on the automation account to retest. What am I doing wrong here?
Hi there!
I´m having this issue as below mentioned:
Could u plse help me with it?
Get-AutomationVariable : Variable not found. To create this Variable, navigate to the Variables blade and create a Variable named: StagingGroupName. Refer doc for more details (https://docs.microsoft.com/en-us/azure/automation/shared-resources/variables#create-and-get-a-variable) At line:37 char:21 + … ngGroupName = Get-AutomationVariable -Name “StagingGroupName” #Set th … + ~~~~~~~~~~~~~~~~~~~~~~~~~~~~~~~~~~~~~~~~~~~~~~~ + CategoryInfo : ObjectNotFound: (:) [Get-AutomationVariable], AssetManagementClientException + FullyQualifiedErrorId : 3,Orchestrator.AssetManagement.Cmdlets.GetAutomationVariableCmdlet
Hi alex.
You need to follow the guide carefully, it requires everything to be set just right.
As the error indicates, you need to define a name for the Staging Group.
In the Azure Automation account you must define that variable called “StagingGroupName”. just as described in the link from the error.
This is great, thank you!
Since you published the article, have you learnt more re the Service Principals subscription role?
I’m just starting to look at locking that down but don’t fully understand what role perms it would need … trying a number of the existing roles first …
also, here is my powershell to cover phone numbers in my region (AU/HK/SG mainly) that may be of help to others:
hopefully displays ok:
#Fixing incorrectly formated phone numbers
function update-phoneFormat ($phoneNumber) {
if ($phoneNumber -notmatch ‘((\+[0-9]{1,3}[ ])[0-9]{8,})’){
#the number does not comply with graph requirements, so this will try to fix it.
$parsedPhone = $phoneNumber -replace ‘\s’,” #remove all spaces
if ($parsedPhone -match “^(\+61)()?[4]\d{8}$”) {
$parsedphone = $parsedPhone.Insert(3,” “) # AU starts with 61 then a 4 and then 8 digits
} elseif ($parsedPhone -match “^(\+65)()?\d{8}$”) {
$parsedphone = $parsedPhone.Insert(3,” “) # SG starts with 65 and then 8 digits
} elseif ($parsedPhone -match “^(\+44)()?\d{8}$”) {
$parsedphone = $parsedPhone.Insert(3,” “) # UK starts with 44 then 8 digits
} elseif ($parsedPhone -match “^(\+852)()?\d{8}$”) {
$parsedphone = $parsedPhone.Insert(4,” “) # HK starts with 852 and then 8 digits
} elseif ($parsedPhone -match “^(\+853)()?\d{8}$”) {
$parsedphone = $parsedPhone.Insert(4,” “) # Macau starts with 853 and then 8 digits
} elseif ($parsedPhone -match “^(\+86)()?[1]\d{10}$”) {
$parsedphone = $parsedPhone.Insert(4,” “) # CN starts with 86 then 1 and then 10 digits
} elseif ($parsedPhone -match “^(\+1)()?\d{10}$”) {
$parsedphone = $parsedPhone.Insert(2,” “) # US/CA starts with 1 and then 10 digits
} elseif ($parsedPhone.Length -eq 13) {
$parsedPhone = $parsedPhone.Insert(3,” “) # assume for 13 digit long the country code is 2 digits and add space
} elseif ($parsedPhone.Length -eq 14) {
$parsedPhone = $parsedPhone.Insert(3,” “) # assume for 14 digit long the country code is 2 digits and add space
} elseif ($parsedPhone.Length -eq 15) {
$parsedPhone = $parsedPhone.Insert(3,” “) # assume for 15 digit long the country code is 2 digits and add space
} elseif ($parsedPhone.Length -eq 16) {
$parsedPhone = $parsedPhone.Insert(3,” “) # assume for 16 digit long the country code is 2 digits and add space
} else {
$parsedPhone = $false
}
} else {
$parsedPhone = $phoneNumber
}
return $parsedPhone
Hi Aengus!
Thanks for the parser code – I will leave it here for others to use.
For the service principals, the permissions assigned are required, but if you are using the runAs account created with the automation account, you will notice that it has been given permissions on the subscription level I Azure, this is not required, and as such you can limit this to just the automation account.
I ended up fixing my other issue but now it says :
“Stats: Number of users without MFA is: 0” and “There are no eligible users for this run. Exit Script”.
I have zero users that have mfa so it’s a little bit strange right? I have put in different methodes for the mobile phone number with no luck.
Please assist as this solution looks to be really helpfull!
Hi Ouss,
I hope you managed to fix this by updating the code from Github and making sure that you have mobile phone numbers populated in your Azure AD for the users.
Hello,
I followed the steps but I am getting 3 errors:
runasaccount not found
certificate not found
and neither a secret or a client certificate was provided! Terminating.
I am not sure what steps are causing this.
Soo many things need to come together for this to work – please follow the steps closely.
Maybe start all over.
The RunAs account is indeed mentioned in the section called:
Creating the Automation Account – step 6
Hello
Thanks for this great solution.
This was working great. But now I get the following error message.
Status: MFA Phonemethod provisioning failed; User: [email protected]; Message: accessDenied: Request Authorization failed
Any ideas to what might have happend?
Well it seems to work now, without me doing anything.
Hi Anders,
We often encounter small but passing bugs with the service that we can only attribute to the fact that this is BETA Graph API and that “Speed fo the cloud” is not always synonymous with being fast on the backend 😉
I also get this error and it is randomly happening but I still cant get the script to work as the other error it throws out now is the Graph request failed with status code ”. Error message: Neither tenant is B2C or tenant doesn’t have premium license. I get those two only and the results look good when it runs but never changes the values.
Hi Eric.
Just for testing, try increasing the permission of the automation account Directory.Read.All to be able to read all directory information.
Ideally, all your users targeted by the script should have Premium licenses assigned, to be compliant with the feature. Just remember we are using the BETA endpoint, and things might be buggy.
Also note that we have a V2 of the script available here: https://github.com/MSEndpointMgr/AzureAD/blob/master/AzureMFAProvisioning/AzAutomationScript4MFAPrePopulate_v2.ps1