


As this technology is so new, this article may be updated to reflect inaccuracies or new information
Windows 365 is a new service from Microsoft that greatly simplifies deploying Windows 10 (and soon Windows 11) desktops to end users. While Microsoft’s Azure Virtual Desktop solution can accomplish the same tasks, Windows 365 makes the process far easier, with a predictable cost. This post will walk through the topics one needs to know to get started with this technology.
How is Windows 365 different from Azure Virtual Desktop?
Azure Virtual Desktop brings many options for provisioning Windows desktops and applications through Azure. The most widely known is true Windows 10 multi-session hosting, which helps lower the monthly cost per user with AVD’s consumption based billing. But with great flexibility comes administration intervention, and AVD admins have to manage redundancy, user profile handling, and OS updates to the hosts, to name a few tasks.
Windows 365 has limited options, but offers them as a full service, not just infrastructure. When deploying Windows 365 machines, Microsoft handles the redundancy. Since these systems are not multi-session, only a single user is assigned. Since the machines are not shared with other users, managing of profile disks with FSLogix is not required. As these systems can be treated like any other Windows 10 device, Windows Update for Business policies can be applied, where WUfB for Multi-Session Windows 10 is not supported.
Besides technical differences, there are cost difference too. For users to access Azure Virtual Desktop, they need to have an appropriate Windows 10 Enterprise license. Along with user license costs, the Azure subscription is billed for the resource consumption from the session hosts running.
With Windows 365, the only requirement is the user license. There is no charge for resources consumed. This means that every Cloud PC an admin deploys costs the same weather they run for 10 minutes or are left on all month.
Prerequisites
Licensing
Access to Windows 365 is done with a user license, which has a flat rate per month. This brings a predictable cost each month as this service is not based on consumption. The costs for the Enterprise flavor of Windows 365 are as such.

Networking
The networking requirements for Windows 365 is largely the same as Azure Virtual Desktop. To start, the service needs at least one Virtual Network to attach endpoints to. The subnet placement doesn’t really matter and this can be carved up to suit the needs of the organization. What is important is that the network has line of sight to an Active Directory Domain Controller.
Windows 365 machines require domain membership to an Active Directory domain. Azure Active Directory Domain Services is not supported. Further, the endpoints must be Hybrid Azure AD Joined. As such, Azure AD Connect must be installed and configured for Hybrid-Join, and of course functioning correctly.
It is anticipated that the Active Directory domain membership requirement will eventually be dropped as Azure Virtual Desktop has just recently released a preview feature allowing session hosts to be only Azure AD Joined.
Deploying Machines
User Licenses
In order for a user to be eligible for a Cloud PC, they need to have a license assigned. This can be accomplished like any other Azure based license. Once the users’ licenses have been applied, their name will be listed in the All Cloud PCs tab, but showing as “Not provisioned”.

On-Premises Network Connection
The On-Premises Network Connection Policy is how one determines which network segment the systems will reside on. Once a OPNC Policy is created, the health and suitability of the network connection is validated automatically. If something is incorrect, the issue will be flagged and the admin can resolve the conflict.
To create a OPNC, click on “On-premises network connection”, then click “Create connection”.

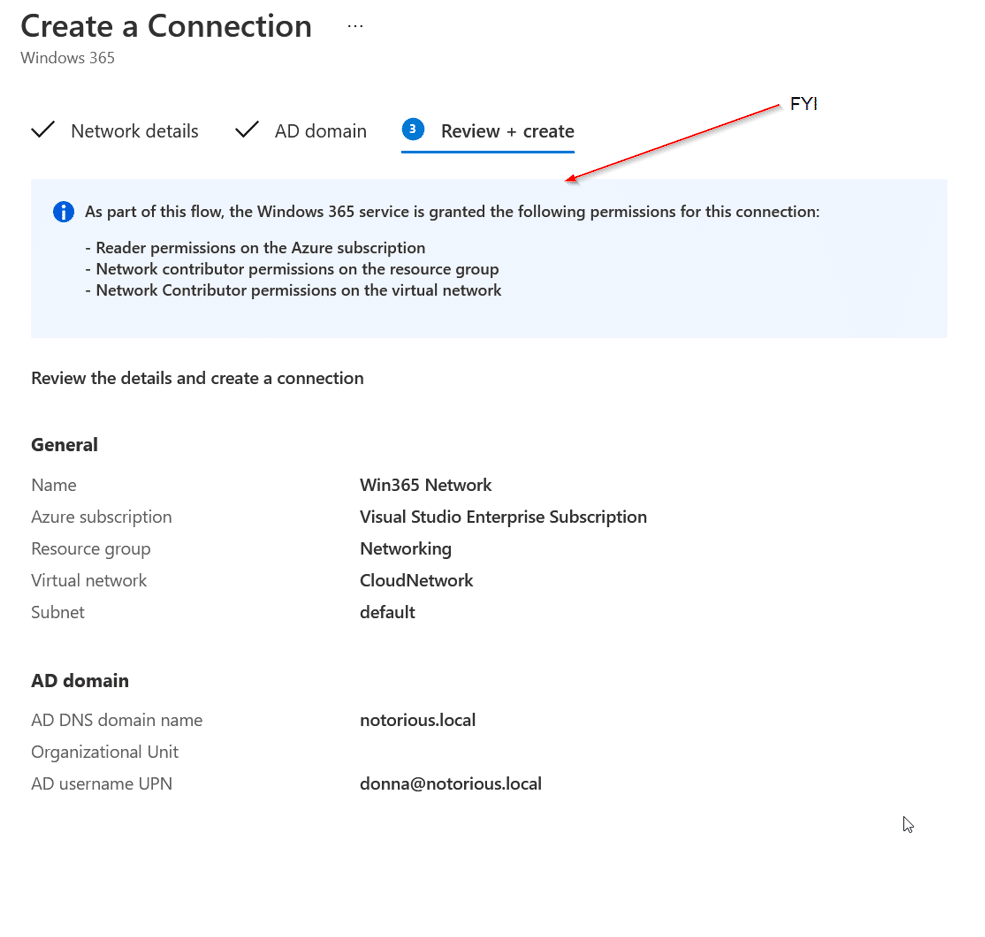
This will spawn a blade that will walk through supplying the required parameters. The first pane “Network Details” is where the Name, Subscription, Resource Group that contains the Virtual Network to be used, the Virtual Network, and the Subnet are all specified.

The next tab “AD domain” is where the local AD domain information is provided. The only field listed as optional is the Organizational Unit. If this setting isn’t supplied, the computer object will be placed in the Computers Container.

The last tab is the typical “Review and Create” tab we see in Azure. It displays a summary of the options selected. Note the informational banner that displays what permissions will be applied to the Windows 365 service.
Once the wizard has completed, the service will start to create the network connection. What is really nice about Windows 365 is it provides a list of the tests it performs during validation, and links to potential fixes if errors or warnings are present.

If the deployment of the network connection is successful, this will be reflected in the OPNC tab.

Device Images
When deploying Cloud PCs, the admin can choose a Gallery Image, which is a basic Windows image (with or without Office 365) or a Custom Image of their own creation. Using a custom image is optional but may be useful in deploying systems with a large amount of applications or customization.
If a custom image is required, the image must be published to the tenant’s image gallery. Images that are to be uploaded must be Windows 10 Enterprise (not multi-session) and from a Gen 1 Virtual Machine.
The process of creating a Golden Image for Azure Virtual Desktop and Windows 365 is a topic worthy of its own post, so the details of creation will be skipped for now and will assume the reader understands the topic.
To upload a custom image to Windows 365, click on the Device Images tab, then click “Add”

A side blade will appear that will allow the image to be selected, a name to be prescribed, and a version number specified. Enter what makes sense, and select the appropriate image to continue.

Provisioning Policies
The provisioning policy is how all of the earlier components are tied together, which triggers the build. The options are very simple to understand. The admin must select which On-Premises Network Connection Policy to apply, which image to apply, and which users or groups should get a Cloud PC.
To create a Provisioning Policy, click on the “Provisioning policies” tab, then click “Create policy”

This will spawn the Create a provisioning policy wizard. The first tab contains a field to provide a name for the policy, a description of the policy, and which On-premises network connection to attach the Cloud PCs to.

The next pane is “Image”, which lets the user select which type of image, and then which image, to use when building the Cloud PCs. If Gallery Image is selected, the user is provided a list of Windows 10 versions, along with their suggested machine size.

If Custom Image is selected, the user will be presented with a list of uploaded images.
The next tab is “Assignments” which allows the admin to select which users should get this Cloud PC policy.

The last tab is Review and Create. Once the policy has been created, the Cloud PCs should start provisioning. In order for the machines to be provisioned, the users must have had an appropriate license applied.
If there are failures during the provisioning process, the status of the Cloud PC will be Failed. If all is well, it will show Provisioned, in a lovely and happy shade of green.

User Settings
This is fairly basic setting, with essentially one option (at least for today). This option is to allow the user to have Local Administrator rights on their Cloud PC.
To create the Local Administrator policy, select the “User settings” tab, then click “Add”.

The “Add user setting” tab allows the admin to create a name for the policy, and whether or not to enable Local Admin rights to the targeted users.

As is typical, the assignments tab allows the admin to apply to a user or an Azure Active Directory User Group. The final tab is Review and Create. Once the policy has been created, the targeted users will get local admin rights on their Cloud PC.
Basic Management and Windows 365 Options
From within Endpoint Manager portal, the Cloud PC can be managed like any other Windows 10 device. Selecting the device from within Intune allows the admin to perform the standard tasks, but there are a few new ones specific to Windows 365.

Administrators can re-provision the device, which means the machine will be rebuilt according to the crafted policies. The device can also be resized to provide the user with optimal resources to be productive. There is also an option to start a Remote Assistance Session which should be helpful for IT Technicians to help end users.
End User Experience
Users are able to connect to the Cloud PC’s from either an HTML5 web browser or through a Remote Desktop App. Mac, iOS, and Android all have first party Remote Desktop Apps in their respective app stores. The Windows app can be download from the Windows 365 user portal.
Web Portal
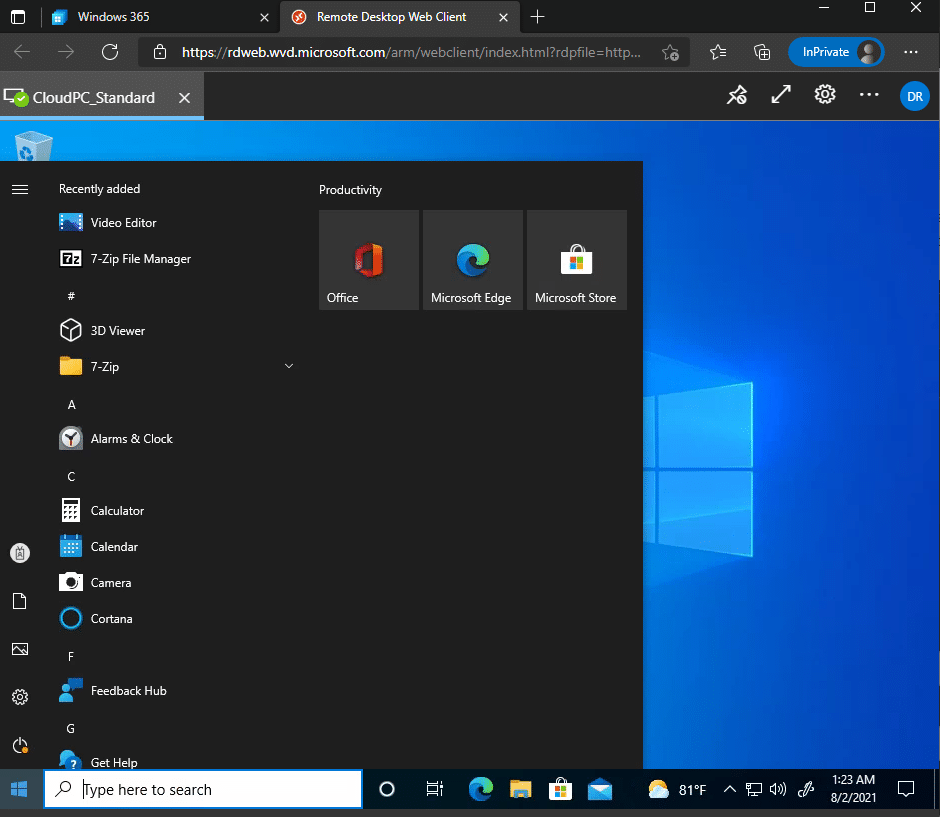
The web portal can be found at windows365.microsoft.com. Once the user has logged into the service, they are presented with the Cloud PCs their administrator has provisioned. To initiate a session, the user can click “Open in Brower” to connect to their cloud PC. If the user wishes to download an app instead, there is a download icon in the portal.

After clicking the “Open in browser” button, a new tab will spawn in the browser window. This tab will contain the user session. First though, the users will be asked what options they would like to share with their session from their local system.

Once the options have been selected and the “Allow” button clicked, the user will be prompted to enter their credentials again. This is unavoidable as Single-Sign On is not supported with Windows 365.

Once the user has provided their credentials and they have been verified, the user will be logged into their computer and they can start to use their Cloud PC.
Remote Desktop Client
The Windows Remote Desktop client, (not to be confused with the legacy “Remote Desktop Connection” client aka “RDP Client” aka “MSTSC”), provides access not only to the users’ Cloud PCs, but also any other desktops and applications published in Azure Virtual Desktop. The client for Windows, iOS, MacOS, and Android can be downloaded from the Windows 365 user portal.

For Windows users of the client, they will need to subscribe to a feed to get the published resources. Fortunately, all they need is their Azure AD login. They will need to start the Remote Desktop application, then click the Subscribe button.

Once the user has authenticated, their resources will be published within the app itself. Not only does this include Windows 365 Cloud PCs, but also their resources in Azure Virtual Desktop.

One of the things that is beneficial about the locally installed client is that it publishes the deployed resources right to the users Start Menu, making the experience even easier for the end user.

Windows 365 makes provisioning Windows 10 PCs in Azure to end users anywhere very simple. This is a refreshing change from the complexities of Azure Virtual Desktop, or even physical deployments such as traditional Operating System Deployment and Autopilot.
Look for more posts on Windows 365 in the future as we get to know this useful solution.


Add comment