


In this blog post we cover the unusual characteristics of the Intel Optane drive, and how we need to approach task sequence builds to ensure we do not hit an unforeseen issue when it comes to in-place upgrades later in the device lifecycle.
Intel Optane Technology
Unveiled back in 2017, Intel’s Optane solution is a memory module that provides a burst of high speed data throughput using a new memory technology called 3D XPoint. Using built-in intelligent algorithms the solution works by keeping the data you use most frequently in the higher speed cache, reducing loading time and improving overall system performance.
More information on the specifics can be found on Intel’s site – Information about the Intel® Optane™ Memory M Series
Cache Disk Configuration
The cache disk is typically delivered in one of two flavours, these being a 16GB and 32GB, and this is where we can start to run into issues. The issue stems from the fact you need to run a utility to enable the cache association prior to running through your standard formatting and OS deployment, without doing this, the drive will be seen by your OS and this sets the scene for something very strange.
The utility in question is the Intel RST Configuration Utility (RstCliPro.exe) and this is where OEM instructions on the use of this tool, and the required versions, get a little bit blurred. For example, HP have their own post on how you should use the RST utility as part of your task sequence (HP PCs – How to Configure an OSD Task Sequence to Deploy Intel Optane in SCCM | HP® Customer Support), but in my testing I found that the sequence of events contained within and the versioning of their tools / WinPE drivers also fall short of providing an optimal working task sequence.
In-Place Upgrade Issues
Whilst working on an in-place upgrade task sequence upgrade for a client, I found in this instance that the documentation from HP in this instance was used, exactly as described, with one key failure however.
During an in-place upgrade from 1909 to 21H2, something happened which I had not seen before. During the task sequence when a restart step was run post OS upgrade, the device would fail the task sequence. When looking at the SMSTS log and status messages, it stated the following;

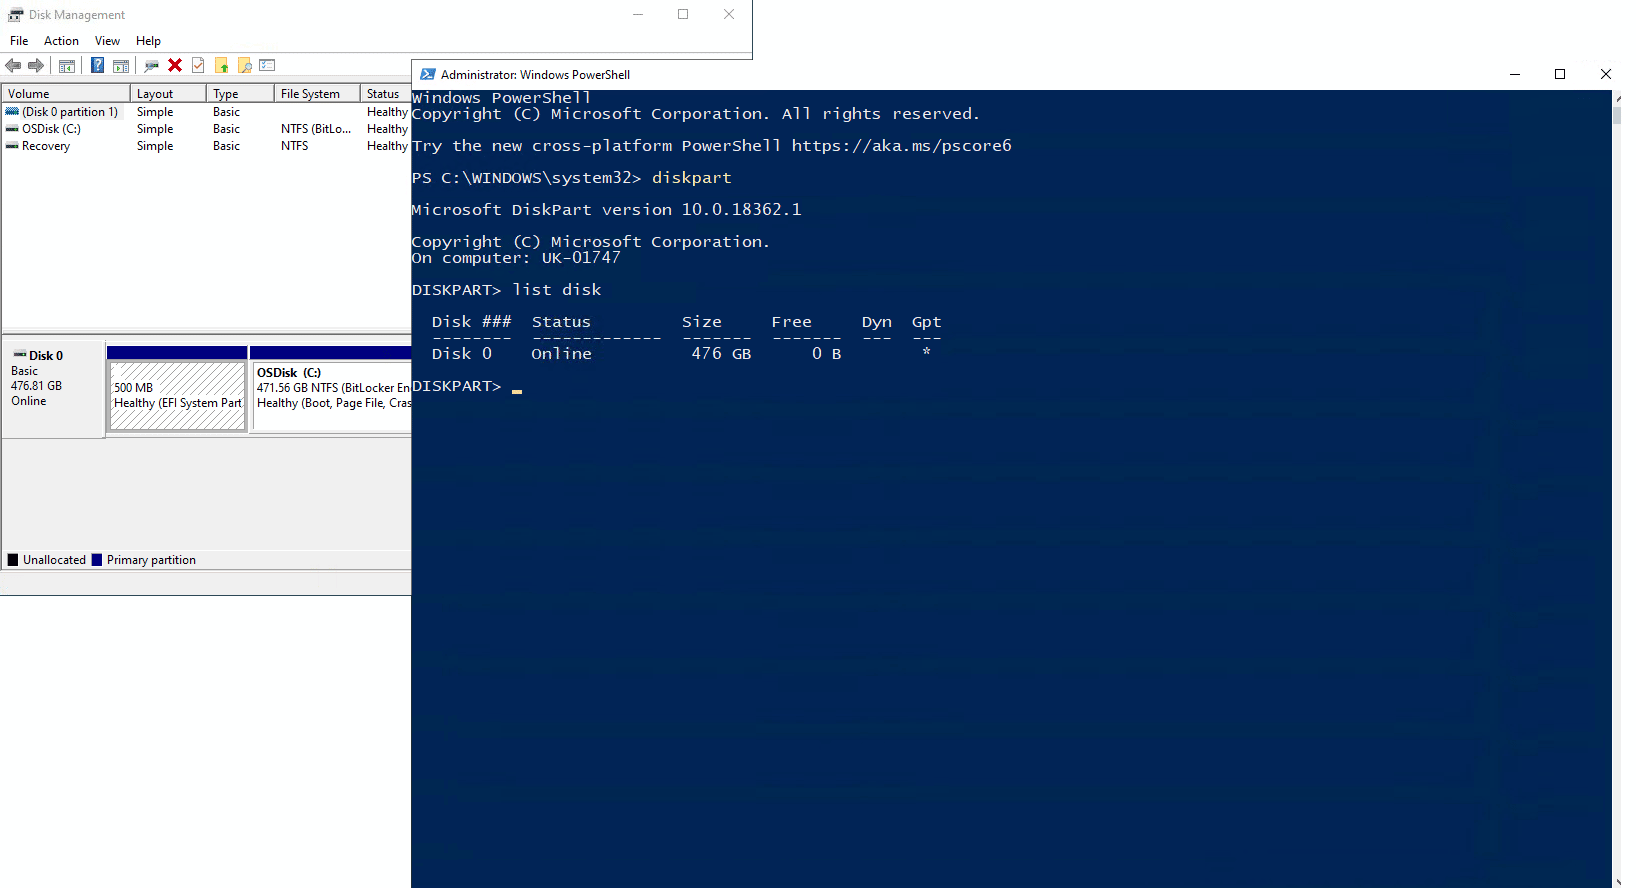
When I started to investigate this issue, I started to look at the disk partitioning, and it suddenly became evident as to why this was the case. The cache drive was still seen to the OS and was seen as Disk 0
In the below screenshot you can see that the drive is visible to the OS;
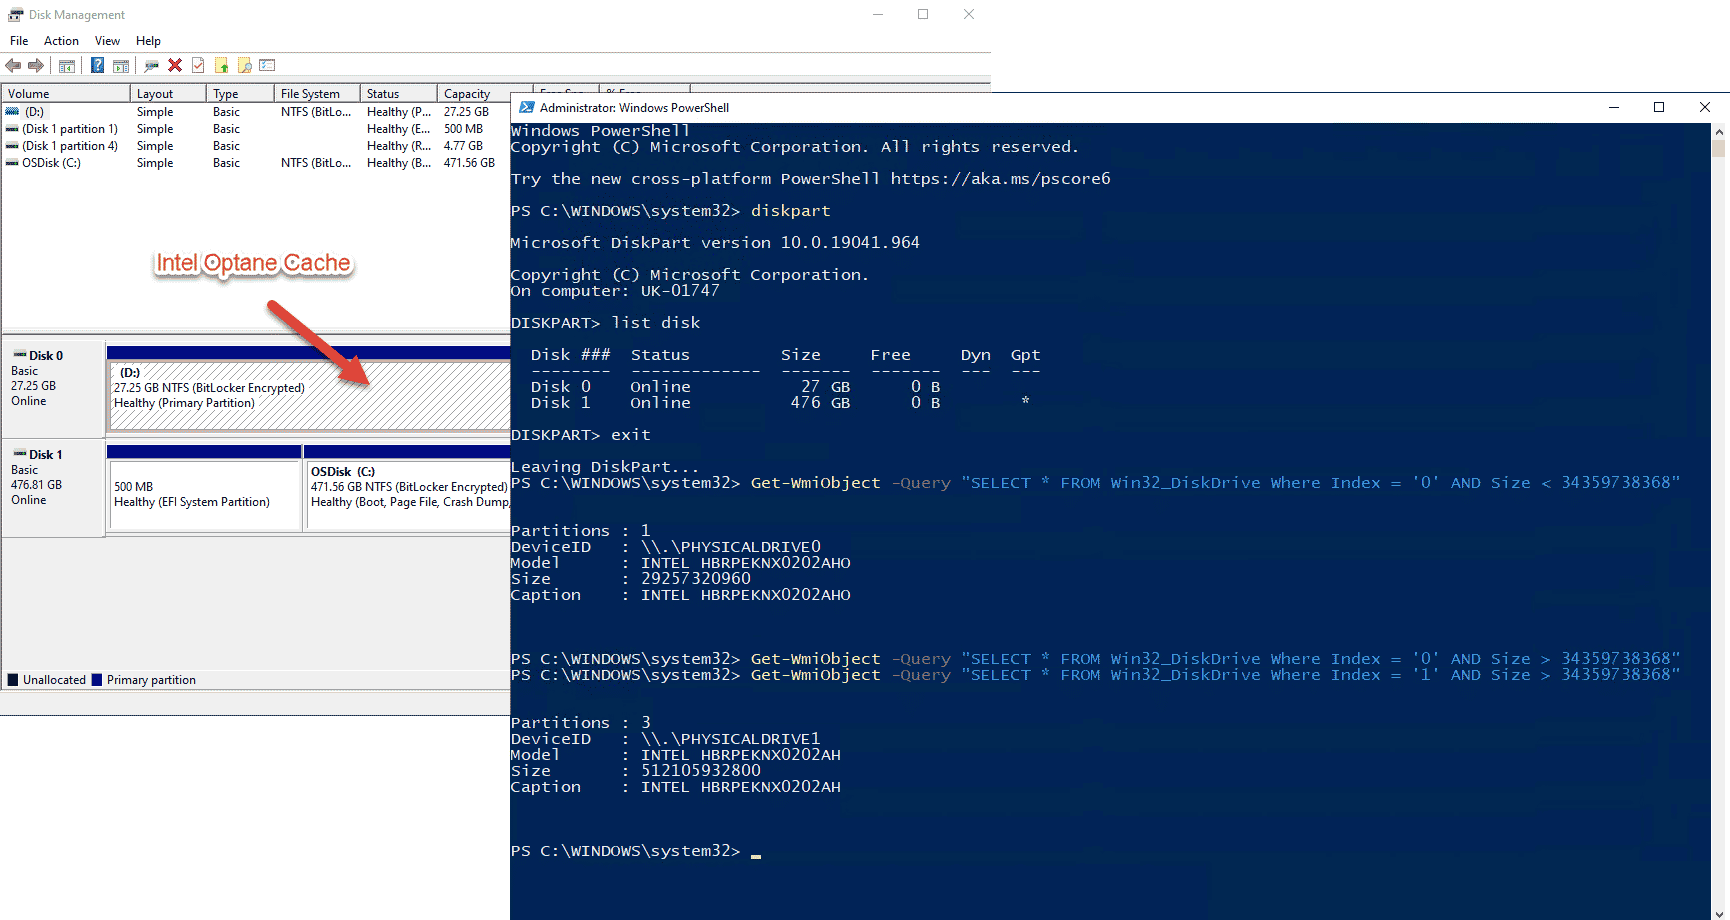
Given that the cache drive was being seen as disk 0, this caused the unexpected behaviour. If the Intel RST configuration was successfully run during the initial build, the disk would not be visible to the OS.
Root Cause Issue
Following the documentation, the first thing we need to ensure is that we have two key components available in order to image a machine with this drive, these being;
- Intel RST WinPE Driver
- Intel RST Configuration Utility
Taking a HP Dragonfly Max for example, the documentation by that vendor states the following;
- Go to the HP Software and Drivers page for your computer or download HP Image Assistant to obtain the Intel RST driver softpaq.
- Extract and save RSTCLI64.exe to the SPXXXXX\bin\src\Tools\WinPE folder.
- Copy the RSTCLI64.exe utility to a shared location on the SCCM server to use as a source folder for the package.
Doing this verbatim, we end up with the following file;

Packaging up this tool however is only the first step. We need to ensure that the tool is supported by the Intel RST controller driver in WinPE, otherwise we end up with a failure like the one pictured below;

When this occurs, the association is not completed, and the cache partition is not configured correctly. In this instance the continue on error flag was enabled and it resulted in the machine being deployed in an incorrect state, resulting in the task sequence upgrade failure pictured above.
Documentation Variations
As the OEM’s instructions were used in this instance, I started to look over Intel’s own documentation and found discrepancies in the guidelines being offered.
In HP’s documentation, the task sequence flows as per the below screenshot;
At the start of the TS where the Optane disk is detected, the following WMI filters are suggested;
Intel Optane Cache Drive
SELECT * FROM Win32_DiskDrive Where Index = “0” AND Size < 34359738368
Intel Non-Optane Drive
SELECT * FROM Win32_DiskDrive Where Index = “0” AND Size > 34359738368
In comparison to Intel’s documentation (Intel® Optane™ Memory System Acceleration Corporate Re-imaging Guide), the difference is that they are also filtering based on the model;
Intel Optane Cache Drive
SELECT * FROM Win32_DiskDrive Where Index = “0” AND Size < 300000000000 AND Model LIKE ‘%intel%’
SELECT * FROM Win32_DiskDrive Where Index = “1” AND Size < 300000000000 AND Model LIKE ‘%intel%’
In Intel’s own documentation it covers if the drive is detected both as disk 0 and disk 1, but it also refers to the Intel RST tool as RSTCliPro.exe, which HP’s documentation referencing at the start but changes to RSTCLI64.exe later in their post.
The sequence of enabling the Intel association also is different, ensuring that the OS is only layered down to the OS disk once the association has been completed. I much prefer this approach as it ensures that your pre-requisites are met before you format your disks in preparation for the OS being installed.
Putting It Together – Task Sequence Deployment
Intel RST Configuration Tool
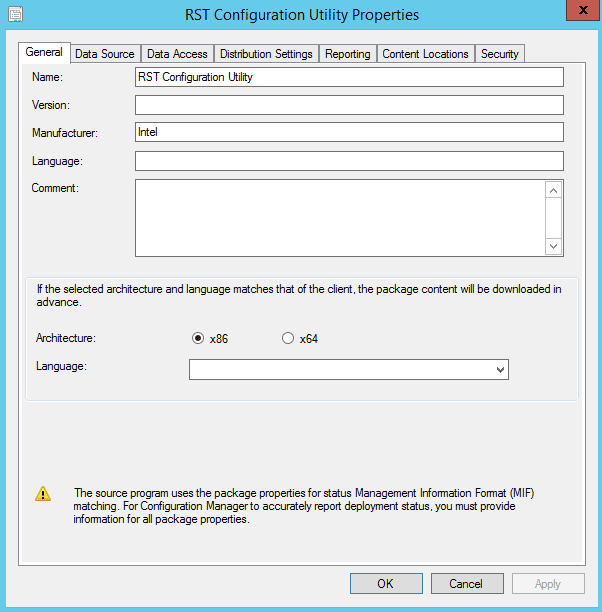
In order to ensure that you have the most update to date configuration utility, you should use the latest version from your chosen vendor, alternatively you can download it direct from Intel’s website – Intel® Rapid Storage Technology Driver Installation Software with Intel® Optane™ Memory (10th and 11th Gen Platforms)
After you have extracted the RST tool, package it up in Configuration Manager, and distribute it to your imaging DPs
WinPE Drivers
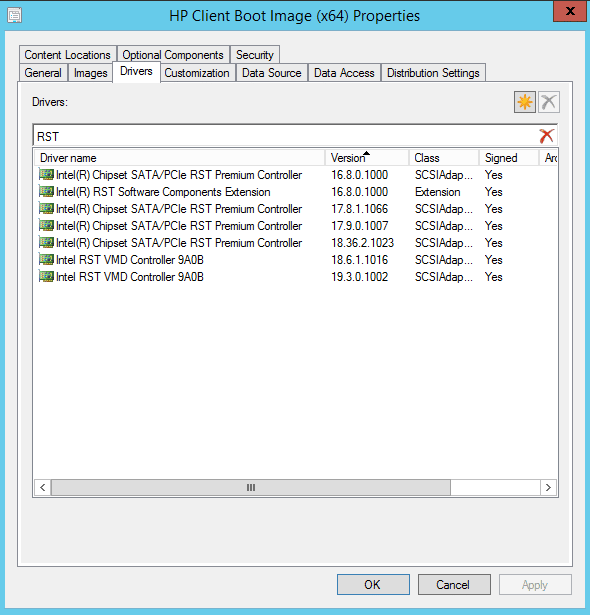
The next step is to ensure you have the latest WinPE storage drivers in your boot image. Below are a list of common OEMs and their associated WinPE driver site;
Extract, import, and update your boot image;
Task Sequence Flow
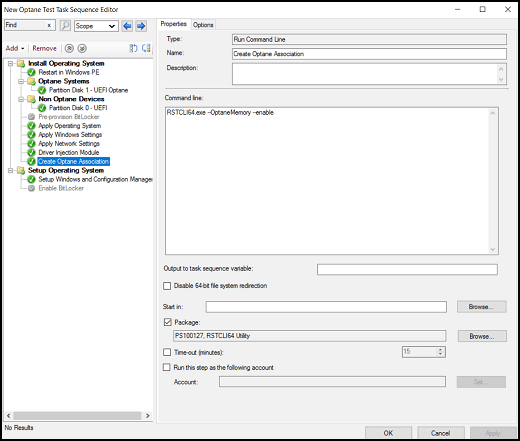
With the pre-requisites in place, you should now edit your task sequence to use the Intel WMI filters as referenced above. My recommendation is to create a child task sequence for this element of your task sequence, as part of a pre-OS deployment phase;
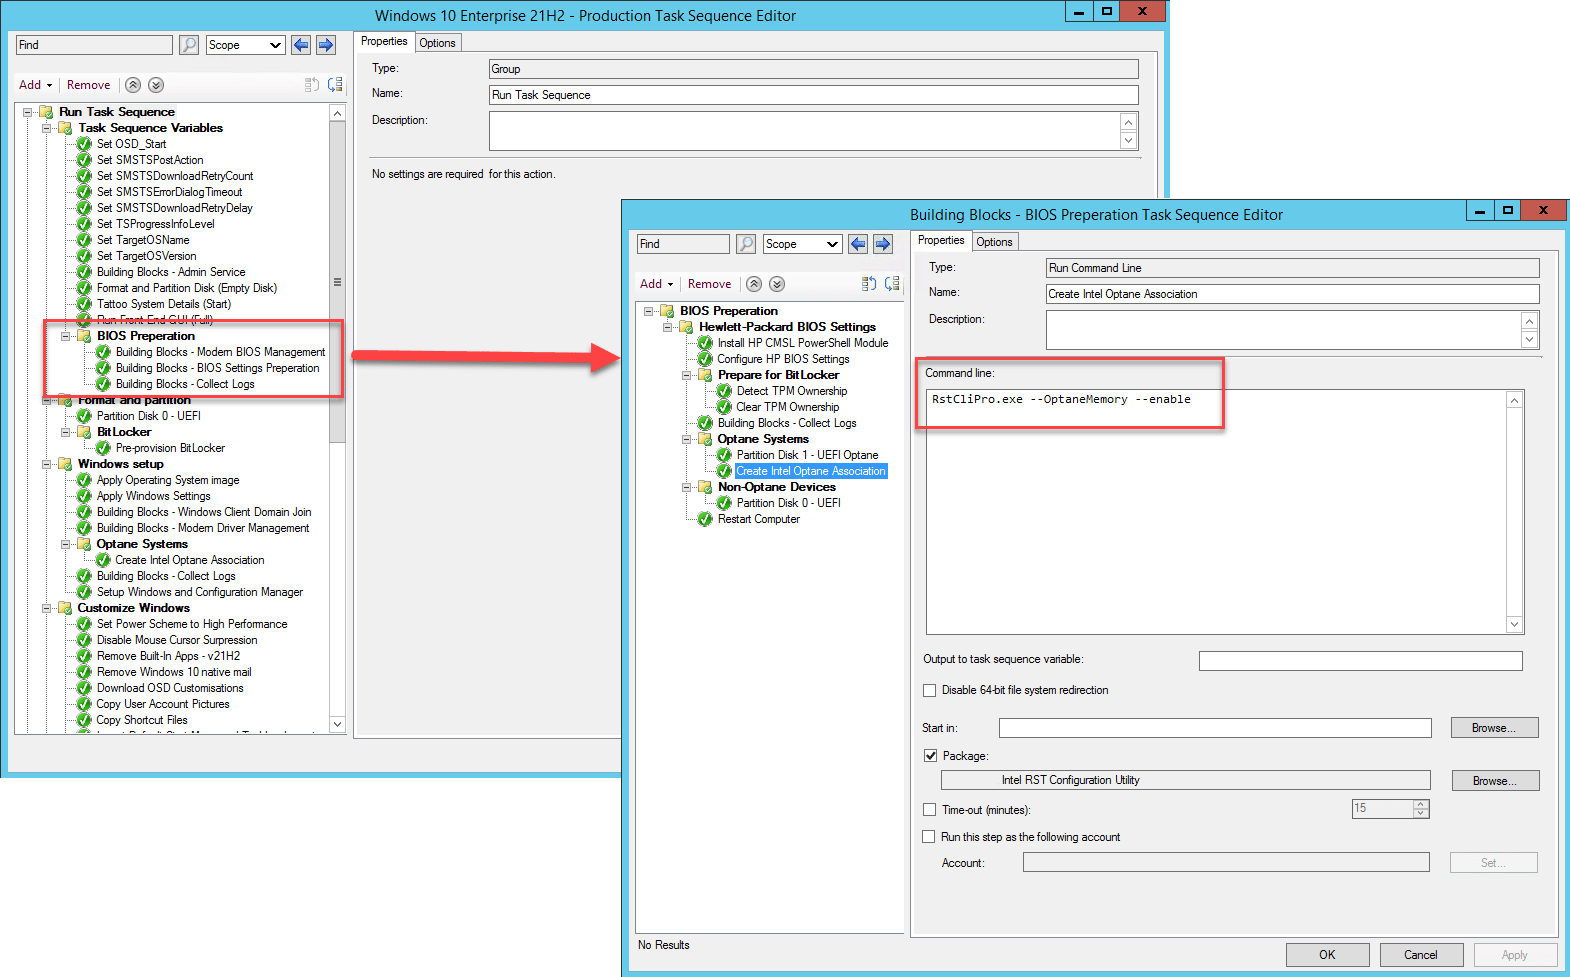
Note in the above screenshot, I am using the latest version from Intel, but you can substitute the tool naming from your OEM. In that instance the enable association command is as follows;
RstCliPro.exe –OptaneMemory –enable
WMI Filters Applied:

Running the tool interactively to ensure it is working, we should see something like the below;

Post Deployment
Post OS deployment you should no longer see the cache drive in disk manager;
At this point the Intel Optane cache drive is working as intended and you should have no longer have any issues during your in-place upgrade task sequence.
Conclusion
Intel Optane’s disk configuration is something that might catch you out, so if you have deployed these devices and did not perform the association, update your task sequences accordingly and re-image those devices.
I hope this post helps you!


Add comment