


Whether you’re running quick, one-off, tests from your desktop or building scripts for automated workflows, the Microsoft Graph SDK provides a versatile way to interact with Microsoft Graph. However, selecting the right authentication method is key to ensuring secure and seamless access.
In this post, we’ll walk through the most common authentication methods, their use cases, and the trade-offs, helping you make informed decisions when building your automation workflows.
Background
The Microsoft Graph SDK is a large, modular toolset designed to make it easier to interact with Microsoft Graph. It contains over 6,500 commands spread across various modules, enabling access to everything from user management to SharePoint shenanigans. However, for many automation scenarios, especially when you’re just looking to authenticate and make API calls, you don’t need to install the entire SDK “goliath.”
Why Minimal Modules Matter
Instead, you can selectively install only the modules relevant to your use case. For example, if your primary goal is to obtain tokens and make simple calls to Microsoft Graph, you only need the Microsoft.Graph.Authentication module. This approach only installs around 18 commands (a mix of cmdlets and functions) which is much leaner than pulling in unnecessary modules. When you order a cheese board, do you eat the whole tower or just slice off what fits on your cracker?

This approach isn’t just useful for local automation, it’s also what I would consider ‘best practice’ for Azure Automation scenarios too. When running PowerShell scripts in Azure Automation, minimizing the modules you load can significantly improve the startup time of your runbooks and function apps. Azure Automation environments spin up PowerShell sessions on demand, and loading unnecessary modules can exacerbate the spin-up time, leading to delays and complaints from users that the thing you wrote performs like a circus ferret trapped in tar.
Why minimal modules?:-
- Faster Session Start-up
Avoid long delays caused by loading unnecessary modules. - Lower Costs
Optimized runbook runtimes lead to lower execution costs in Azure Automation. After you exceed your free 500 minutes, you are charged a whopping $0.002/minute
Example: Installing Minimal Modules for Authentication
If you’re planning to authenticate and pull basic user information, your installation can be as simple as this:-
Install-Module (  `
                'Microsoft.Graph.Authentication', `
                'Microsoft.Graph.Users' `
)
Note: The use of backticks in code examples in this blog is purely for readability and is unnecessary in your scripts. The above command would simply look like this for you:-
Install-Module (‘Microsoft.Graph.Authentication’, ‘Microsoft.Graph.Users’)
You might be aware that you can pass multiple modules to Install-Module as an array of strings, making it easy to install several modules at once. For example, you can pass an array explicitly using @(), or () like the example above and below:-
Install-Module -Name @('Microsoft.Graph.Authentication', 'Microsoft.Graph.Users'),
or use a simple comma-separated list without parentheses, like:-
Install-Module -Name 'Microsoft.Graph.Authentication', 'Microsoft.Graph.Users'.
PowerShell treats both approaches the same, as the -Name parameter is designed to accept arrays, allowing for a clean way to specify multiple module names in one command.
Are SDK Cmdlets as Reliable as Direct API Calls?
The Microsoft.Graph.Authentication module is a must when your primary focus is handling token acquisition and making direct calls to Microsoft Graph. It simplifies authentication, manages token lifetimes. The module also provides useful aliases like Invoke-MgGraphRequest and Invoke-MgRestMethod to make direct CRUD requests against the Graph API.
This is quite important to consider before thinking about other modules you might need for your project. For example, using Invoke-MgGraphRequest, you can perform REST API calls such as GET, POST, PATCH, and DELETE directly. This approach can give you the flexibility to construct precise API requests and avoid some limitations of the SDK’s pre-built cmdlets, specifically development lag and bugs.
You should be acutely aware that calling the API directly and using an SDK cmdlet can, and will, produce different results. In this example, we call the API directly:-
# Authenticate and make a Graph request to retieve your apps
Connect-MgGraph
$uri = "https://graph.microsoft.com/beta/deviceAppManagement/mobileApps?`$filter=(isof('microsoft.graph.win32LobApp'))"
Invoke-MgGraphRequest -Method 'GET' -Uri $uri
If we then use the Microsoft.Graph.Devices.CorporateManagement module and cmdlet Get-MgDeviceAppManagementMobileApp, it does not return additional app types like we got with the direct API call. e.g. microsoft.graph.win32CatalogApp
# Authenticate and make a Graph request to retieve your apps
Connect-MgGraph
Get-MgDeviceAppManagementMobileApp -Filter "(isof('microsoft.graph.win32LobApp'))" | Measure-Object | Select-Object -ExpandProperty Count
You can see the number of results differ. The native API call returned more results even though it looked like we were using the same filter.

By using Invoke-MgGraphRequest with a more precise filter of parameters, we can refine the query to exclude other app types to return the same number of results as the SDK cmdlet does.
# Authenticate and make a Graph request to retieve your apps
Connect-MgGraph
# The Mg cmdlet also returns ('microsoft.graph.win32CatalogApp') but the native REST method did not
$uri2 = "https://graph.microsoft.com/beta/deviceAppManagement/mobileApps?`$filter=(isof('microsoft.graph.win32LobApp') and not(isof('microsoft.graph.win32CatalogApp')))&`$orderby=displayName"
$irmApp2 = Invoke-MgGraphRequest -Method 'GET' -Uri $uri2
$irmApp2.value | Measure-Object | Select-Object -ExpandProperty Count
The key takeaway here is that even when making direct API calls, you need to ensure the data returned aligns with your exact expectations. While using SDK cmdlets to retrieve Graph results may seem like the “simpler” approach, it’s far from inferior. The SDK abstracts much of the complexity, but that abstraction can introduce subtle differences compared to direct API calls. Understanding these nuances, such as which filters are applied by default or whether all available properties are retrieved, can help you choose the right method for your task and avoid unexpected results. No one want to receive a cheese board at dinner that is missing the grapes and port!
When to Use Each Approach
- Use SDK cmdlets if you prefer convenience, built-in filtering, and easier syntax for standard operations.
- Use
Invoke-MgGraphRequestfor precise control, to avoid SDK development lag, or when you need access to beta or recently added API features.
Authentication and Authorization
Before diving into the different authentication methods, it’s important to understand how authorization works in Microsoft Graph and how scopes determine what data you can access. When you authenticate using Connect-MgGraph, the level of access to Microsoft Graph APIs is controlled by the scopes you request. Scopes define the permissions granted to your session and are essential in avoiding access errors.
Scopes
A scope is a way to define what specific permissions an application or user has when accessing resources through Microsoft Graph. Scopes represent delegated permissions (acting on behalf of a signed-in user) or application permissions (app-only, performing actions as the application itself). They control the level of access granted by the access token you receive after authentication.
For example:-
User.Read: Allows read access to the signed-in user’s profile.User.Read.All: Grants read access to all users’ profiles in the directory.Directory.Read.All: Grants read access to directory objects like groups, users, and devices.
Scopes are essential for ensuring principle of least privilege. You should only request the permissions needed for the task at hand.
If you don’t specify any scopes during Connect-MgGraph, the following default scopes are applied.
Connect-MgGraph -Scopes ('User.Read', 'openid', 'profile', 'offline_access')These basic scopes allow you to:-
- User.Read: Read the signed-in user’s profile.
- openid, profile, offline_access: Handle identity claims and refresh tokens for session continuity.
To view the current scopes and authentication context, run Get-MgContext.

Let’s test to see what permissions we have. Note that we are using the Microsoft.Graph.Users module here and the Get-MgUser cmdlet for simplicity 🙂
Get-MgUser -UserId '[email protected]'

Since we are authenticated with User.Read, we will get our own profile information. But what happens when we try to access another user’s data?
Get-MgUser -UserId '[email protected]'

This will likely return a 403 Forbidden error because the default User.Read scope doesn’t provide access to another user’s information.
Fixing Scope Issues
To resolve the issue highlighted above, you need broader permissions, such as User.Read.All, which allows access to all user profiles.
For the requested scopes to work, the client application you use to connect to Microsoft Graph must have the necessary permissions configured. When you authenticate with Connect-MgGraph, the tool will use a client app (also known as an enterprise application) to request access tokens on your behalf. If you don’t specify a custom client app during authentication, Microsoft’s default client app Microsoft Graph Command Line Tools is used. This default app has a predefined set of permissions that may not cover all the scopes you need, especially for elevated permissions like User.Read.All or Directory.Read.All, for example.

Without the right permissions assigned to the client app, even specifying the correct scopes during Connect-MgGraph won’t grant the expected access, resulting in errors such as 403 Forbidden. This highlights the importance of ensuring that the app registration (if using your own) or the default Microsoft-provided client app has been granted consent for the permissions you require.
We’ll explore how to use custom client apps for authentication in more detail later, but for now, it’s important to recognize that your access is influenced by both the scopes you request and the permissions configured on the client app itself.
How Scopes Work with Client Apps – Application vs. Delegated Flow
When authenticating to Microsoft Graph, the way scopes are used differs between the delegated flow and the application flow.
Delegated Flow (Client App is Acting on Behalf of a User)
In the delegated flow, the client application acts on behalf of the signed-in user, meaning the level of access to Microsoft Graph is determined by the combination of the permissions granted to the user and the permissions defined by the scopes you request during authentication. This means that even if you request broad scopes, such as User.Read.All, you are still limited by what the user’s role and permissions in Entra ID allow. In other words, the client app can only perform actions that the signed-in user is authorized to do.
For example, if a user is assigned a role that only permits them to read their own profile, requesting User.Read.All won’t suddenly grant them permission to read all users’ profiles, it will result in an authorization error because the user lacks the necessary role or permissions.
When you authenticate using Connect-MgGraph and specify scopes, you’re effectively granting the client app to perform certain actions on behalf of the user.
Connect-MgGraph -Scopes 'User.Read.All', 'Group.Read.All'
In this flow:-
- You authenticate interactively or with credentials to the Microsoft Graph Command Line Tools because a ClientId was not specified.
- You request specific scopes (
User.Read.All,Group.Read.All), which the signed-in user must consent to or have consented to previously.
If the user doesn’t have sufficient permissions or consent is not granted for the client app to perform a specific action on behalf of the user, you will encounter the 403 Forbidden error.
You can view the permissions the user has delegate to the client app, in Entra ID, under the User Consent tab.

Consented Permissions Are Cumulative. If you’ve granted multiple permissions over time, they accumulate rather than replace each other. Previously granted permissions remain active unless revoked in Entra ID or by the user.
Removing User Consented Permissions
If a user or administrator needs to revoke previously granted permissions for a client app, this can be done either interactively through the My Apps portal or programmatically using PowerShell.
1. Revoking Consent via My Apps Portal
Users can visit myapps.microsoft.com to manage app permissions:
- Sign in with your account.
- Select the app for which you want to remove consent.
- Select Manage Your Application.
- Click Revoke Consent.

This is a simple way for users to control their delegated permissions without needing admin intervention.
2. Revoking Consent as an Admin Using PowerShell
Administrators can remove user-specific permissions for an app using Microsoft Graph PowerShell cmdlets. Here’s an example:
- Install Required Modules
Microsoft.Graph.Identity.SignInsMicrosoft.Graph.Applications,Microsoft.Graph.Authentication. - Connect to Microsoft Graph with the correct Admin Scopes.
- Revoke Permissions by deleting role assignments and OAuth2 permission grants.
In the example below, we are removing User Consented permissions from the Microsoft Graph Command Line Tools client app, identifying it with the Object ID $applicationObjectId.
Install-Module -Name 'Microsoft.Graph.Identity.SignIns', 'Microsoft.Graph.Applications', 'Microsoft.Graph.Authentication'
Connect-MgGraph -Scopes 'Application.ReadWrite.All', 'Directory.ReadWrite.All'
$applicationObjectId = '5f4f7de6-ab64-4791-85c6-33f56a57f2e9' # Microsoft Graph Command Line Tools
$userObjectId = '<User_Object_Id>' # Replace with the object ID of the user.

# Get the service principal for the app
$sp = Get-MgServicePrincipal -ServicePrincipalId $applicationObjectId

# Remove OAuth2 permission grants for the user
$spOAuth2PermissionsGrants = Get-MgServicePrincipalOauth2PermissionGrant -ServicePrincipalId $sp.Id -All
$spOAuth2PermissionsGrants | Where-Object { $_.PrincipalId -eq $userObjectId } | ForEach-Object {
    Remove-MgOauth2PermissionGrant -OAuth2PermissionGrantId $_.Id
}

# Remove app role assignments for the user
$spApplicationPermissions = Get-MgServicePrincipalAppRoleAssignment -ServicePrincipalId $sp.Id
$spApplicationPermissions | Where-Object { $_.PrincipalId -eq $userObjectId } | ForEach-Object {
    Remove-MgServicePrincipalAppRoleAssignment -ServicePrincipalId $sp.Id -AppRoleAssignmentId $_.Id
}
Application Flow (Client App is Acting as Itself)
In the application flow, the client app authenticates as itself rather than impersonating a user. This means the app’s access to Microsoft Graph is controlled entirely by the application permissions assigned to it in Entra ID and not influenced by a user’s role or permissions. In this flow, the app does not request specific granular scopes like in the delegated flow. Instead, it uses a default scope that tells Microsoft Graph to apply the app’s pre-assigned permissions.
When using the application flow, you specify the .default scope:
$Scope = "https://graph.microsoft.com/.default"
Connect-MgGraph -ClientSecretCredential $clientCredential -Scopes $Scope
You cannot request additional permissions beyond what is assigned to the app registration. The app’s access is entirely governed by the roles and permissions that an administrator has explicitly consented to. You can view the permissions the admin has granted to the client app, in Entra ID, under the Admin Consent tab.

When adding permissions to your client app and granting admin consent, ensure you select the appropriate permission type:-
Application Permissions: These require admin-level consent and allow the application to access specific Microsoft Graph resources independently of any user context. Only Global Admins or Application Admins can grant these permissions.
Delegated Permissions: These require user consent, but admins can grant them on behalf of all users to avoid individual consent prompts during interactive or device code authentication flows.

Authentication Methods
Interactive
As we have learned, when you authenticate using Connect-MgGraph without specifying a ClientId, you’re using delegated access through the Microsoft Graph SDK Enterprise Application a.k.a Microsoft Graph Command Line Tools. This default enterprise application has predefined settings already configured to allow an interactive authentication flow. During interactive authentication, the user is prompted to sign in via a browser, and once authenticated, an access token is issued based on the requested scopes.
Why is the http://localhost Redirect URI Required on the Client App?
The redirect URI http://localhost is used for the browser-based authentication flow. This URI points to the local machine and listens for the authentication response from Entra ID after the user signs in. Since interactive authentication is meant for local testing and ad-hoc commands, the redirect URI http://localhost ensures the token is sent securely to the local process which prevents the token from being intercepted by external hosts. Keeps the good cheese from ending up on the stale cracker.
The Microsoft Graph Command Line Tools client app is a service principal that represents an application in Microsoft’s own tenant. This app is provided as a shared resource for customers using Microsoft Graph SDK commands, and since you don’t own the app, you can’t view or modify its configuration, this includes its redirect URIs.
Using your own client app (app registration) in Entra ID is recommended for production environments because it provides complete control over the configuration, including redirect URIs.

Example: Connect using Interactive Authentication
Option 1: Use the Default Microsoft Graph Command Line Tools Client App
Simply running the cmdlet Connect-MgGraph, without any other parameters, will invoke an interactive authentication. A browser will be launched and you will authenticate with an Entra ID account.
In this example, we will perform an interactive authentication and request the scope DeviceManagementApps.Read.All.
Connect-MgGraph -Scopes 'DeviceManagementApps.Read.All'

If the client app hasn’t previously been granted permission to read Microsoft Intune apps using the DeviceManagementApps.Read.All scope, you’ll be prompted to provide consent. This consent allows the client app to perform actions on your behalf using the requested permissions.
Option 2: Use the your own Client App
It’s considered best practice (in my world at least) to use your own client app (app registration) in Entra ID instead of relying on the default Microsoft Graph Command Line Tools client app. By using your own client app, you have full control over how the app is configured, including permissions, redirect URIs, and consent settings. This approach avoids dependency on shared, pre-configured resources and helps tailor the experience for your organization’s automation needs.
Steps to Create Your Own Client App
- Go to the Azure Portal and navigate to Entra ID > App registrations.
- Click + New registration.
- Provide a name for your app (e.g. “Graph SDK Deep Dive”).
- Click Register.
- Click Manage > Authentication.
- Click Add a platform.
- Select Mobile and desktop applications.
- In the Custom redirect URIs text box, enter http://localhost
- Click Configure.

Back on the Overview page, make a note of the Application (client) ID and the Directory (tenant) ID.

Now that we have created our own Client App, lets use it to authenticate.
$tenantId = 'xxxxxxxxxxxxxxxxxxx' #Entra Directory (tenant) ID
$clientId = 'xxxxxxxxxxxxxxxxxxx' #Entra Application (client) ID
Connect-MgGraph -ClientId $clientId -TenantId $tenantId
As with the default Microsoft Graph Command Line Tools client app, when using your own client app, you will still be prompted to grant consent for the permissions (scopes) you request during authentication. This is because delegated access requires user consent to allow the client app to perform actions on your behalf. When you run the Connect-MgGraph command for the first time with your client app, a browser window will open, and you will be asked to approve the requested permissions.

Interactive Authentication Summary
Interactive authentication is ideal for scenarios where you need to quickly authenticate and run ad-hoc commands or test Microsoft Graph API calls. It opens a browser window for user sign-in and requests consent for the necessary permissions, making it simple and convenient for short-term, manual operations. Interactive authentication is often impractical for production automation scripts.
Next, we’ll explore another interactive sign-in method designed for devices without user input, such as airport terminal screens, Teams Room devices, and point-of-sale (POS) systems at cheese counters.
Device Code
Device code authentication is similar to interactive authentication but designed for scenarios where the device cannot easily display a full browser interface or lacks a keyboard and mouse for input. This method is particularly useful for shared devices like airport terminal screens, Teams Room devices, and point-of-sale systems. Instead of signing in directly on the device, the user completes the sign-in process on another device, such as their mobile phone or laptop.
When using -DeviceCode with Connect-MgGraph, the following steps occur:
- A unique device code and URL (e.g.,
https://microsoft.com/devicelogin) are presented in the terminal. - The user visits the URL on a different device and enters the provided code.
- After entering the code, the user is prompted to authenticate and grant the requested permissions.
- Once consent is provided, the original device is granted access, and an access token is issued.
Example: Connect using Device Code Authentication
Simply running the cmdlet Connect-MgGraph, with the parameter -DeviceCode, will invoke an interactive authentication. A browser will be launched and you will authenticate with an Entra ID account.
Connect-MgGraph -DeviceCode


Public Client Flows
You can also, and should, use your own client App with Device Code but you also need to ensure you have configured your client App to support public client flows.

If you have not allowed Public client flows, you will be presented with the following error when trying to authenticate with the Device Code flow on your own client app.

$tenantId = 'xxxxxxxxxxxxxxxxxxx' #Entra Directory (tenant) ID
$clientId = 'xxxxxxxxxxxxxxxxxxx' #Entra Application (client) ID
Connect-MgGraph -ClientId $clientId -TenantId $tenantId -UseDeviceCode

Client Secret
Client secret authentication is a method of authenticating to Microsoft Graph using a client ID, tenant ID, and a client secret (essentially a password). Unlike interactive or device code authentication, this approach doesn’t involve user interaction and is typically used for non-interactive, background processes.
However, client secret authentication is not considered secure, client secret authentication is not considered secure, client secret authentication is not considered secure (triplication of the same sentence to get the point across my friend) for local scripts or on-premises scenarios because you need to include the secret in your code, making it vulnerable to exposure.
Client secret authentication comes with important considerations. It cannot be used with the default Microsoft Graph Command Line Tools client app. You must use your own client app registration for this flow. The client secret itself behaves like a password, meaning if it’s hardcoded into scripts, it can be easily compromised if not securely protected.
It’s not all doom and gloom and no cheese for this authentication method though. It can still be used securely for cloud-native automation, such as Azure Automation, where the secret can be securely retrieved from Azure Key Vault instead of being hardcoded directly in your script.
Create a Client Secret for the Client App
1. Navigate to Entra ID > App registrations.
2. Select Certificates & secrets.
3. Click New client secret.
4. Select the secret validity term.

5. Click Add.
6. Save the Value in your password manager.

Client Credentials
A ClientCredential in PowerShell is an object used to securely pass the client ID (application ID) and client secret to the Connect-MgGraph cmdlet for authentication. It represents the app’s credentials and allows the app to authenticate with Microsoft Graph using the client secret flow.
In Microsoft Graph PowerShell, the Connect-MgGraph cmdlet supports passing a PSCredential object that holds the client ID and client secret.
The client secret, which is initially in plain text, must be converted to a SecureString using the ConvertTo-SecureString cmdlet. After converting the secret, you create a PSCredential object by combining the Client ID (as the username) and the secure client secret. Finally, you pass this PSCredential object to Connect-MgGraph using the -ClientSecretCredential parameter, along with the Tenant ID, to establish a connection with Microsoft Graph.
The PowerShell example below highlights how to create a ClientCredential:-
$clientId = 'xxxxxxxxxxxxxxxxxxx' #Entra Application (client) ID
$clientSecret = "NoPersonMayStealMyCheese!!" # Application secret

# Convert it to a Secure String
$clientSecretSecure = ConvertTo-SecureString -String $clientSecret -AsPlainText -Force

# Create the ClientCredential object
$clientCredential = New-Object -TypeName System.Management.Automation.PSCredential -ArgumentList $clientId, $clientSecretSecure
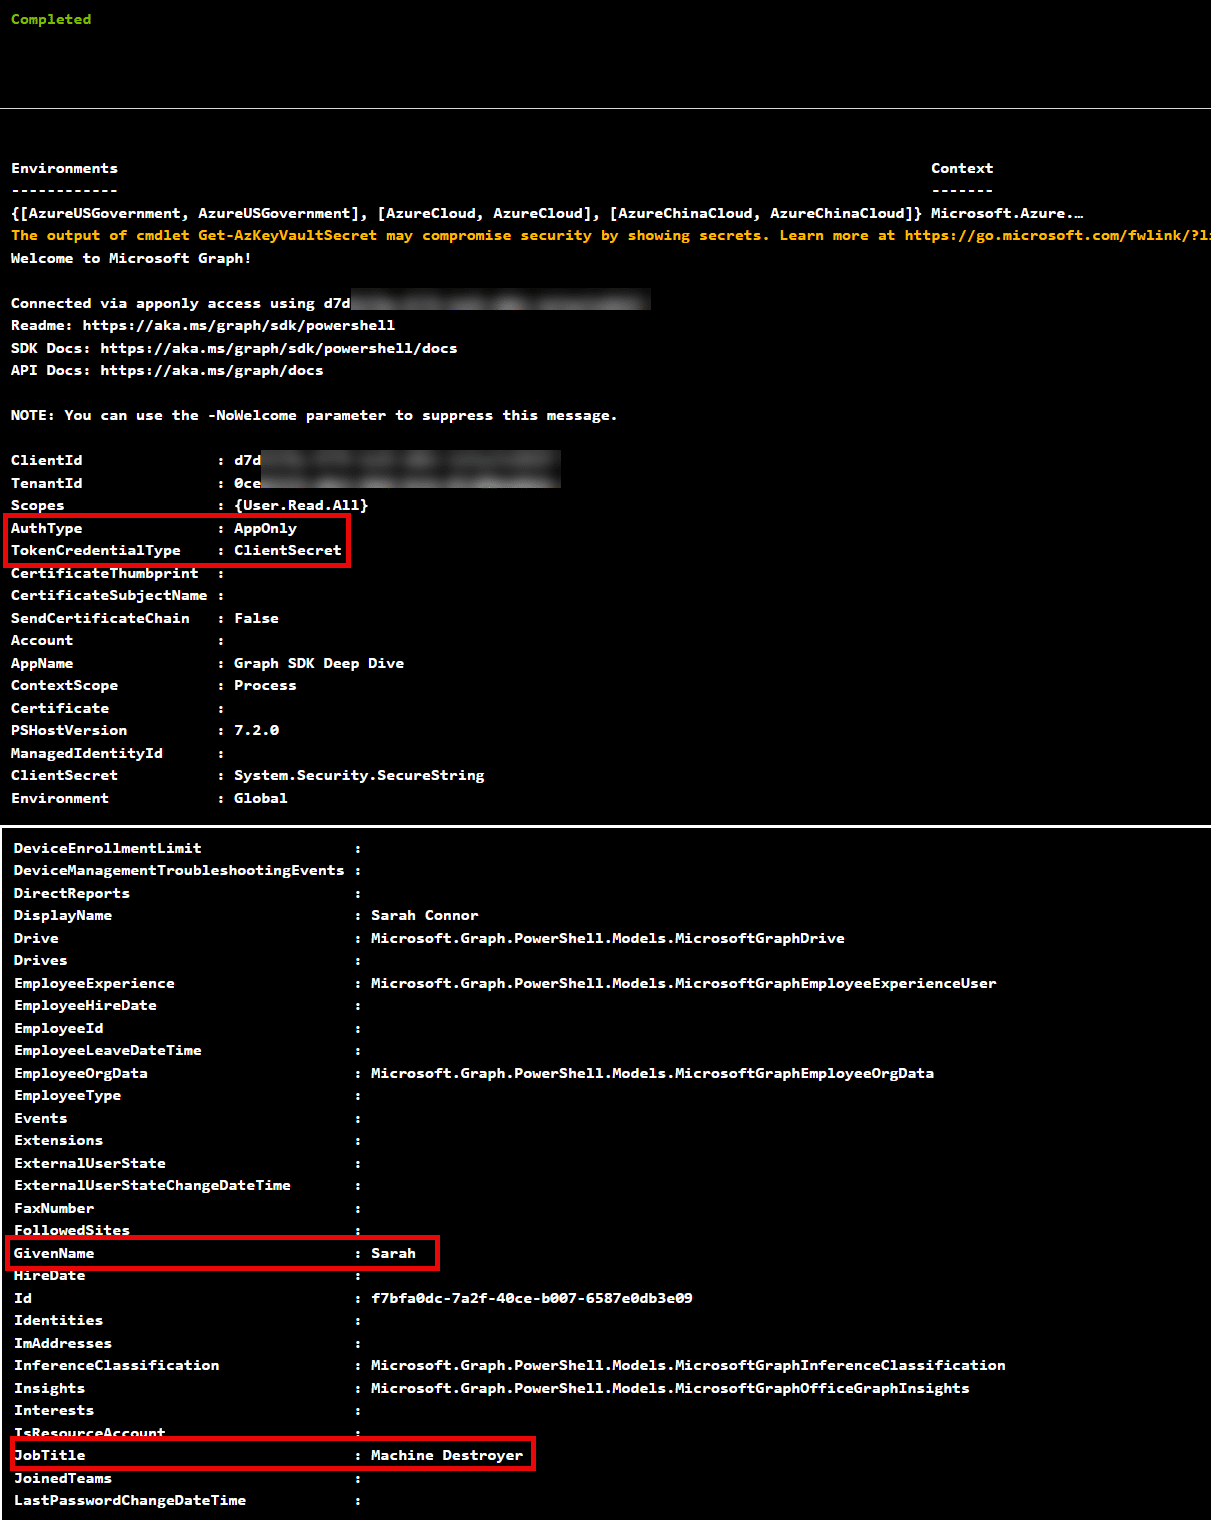
Example: Connect using a Client Secret
# Define the application details
$clientId = "your-client-id"           # Application (client) ID
$tenantId = "your-tenant-id"           # Directory (tenant) ID
$clientSecret = "your-client-secret"   # Application secret

# Convert the client secret to a secure string
$clientSecretSecure = ConvertTo-SecureString -String $clientSecret -AsPlainText -Force

# Create the ClientCredential object
$clientCredential = New-Object -TypeName System.Management.Automation.PSCredential -ArgumentList $clientId, $clientSecretSecure

# Connect to Microsoft Graph using client secret credential
Connect-MgGraph -ClientSecretCredential $clientCredential -TenantId $tenantId

# Check the current context to verify permissions
Get-MgContext

Example: Connect using a Client Secret obtained from an Azure Key Vault
We can use Azure automation services, such as Azure Automation Runbooks, to securely retrieve client secrets and application IDs from Azure Key Vault. This allows you to keep sensitive credentials out of your scripts while still enabling secure access to Microsoft Graph. The runbook’s Managed Identity can be used to authenticate to Azure Key Vault, provided it has been granted Get and List permissions on the Key Vault to read the necessary secrets.
It’s a great question to consider why not just use the Managed Identity directly to authenticate and access Microsoft Graph, avoiding the need for a client secret entirely? In most scenarios, using this the recommended approach for automation in Azure because it provides secure, password-less access. However, there may be situations where using a client secret is preferred, such as when accessing resources in another tenant using Azure Automation.
Ensure the Managed Identity can read from the key vault with Get, List permissions.

Note the name of the variables you want to call with your Runbook.

# Authenticate to Azure using the Managed Identity of the Runbook
Connect-AzAccount -Identity

$keyVaultName = 'kv-byteben-test'

# Get the values from the key vault
$tenantId = Get-AzKeyVaultSecret -VaultName $keyVaultName -Name 'CheeseAlwaysTenantId' -AsPlainText
$clientId = Get-AzKeyVaultSecret -VaultName $keyVaultName -Name 'CheeseAlwaysClientId' -AsPlainText
$clientSecret = Get-AzKeyVaultSecret -VaultName $keyVaultName -Name 'CheeseAlwaysClientSecret' -AsPlainText

# Convert the client secret to a secure string
$clientSecretSecure = ConvertTo-SecureString -String $clientSecret -AsPlainText -Force

# Create the PSCredential object
$clientCredential = New-Object -TypeName System.Management.Automation.PSCredential -ArgumentList $clientId, $clientSecretSecure

# Connect to Microsoft Graph using the client secret in the target tenant
Connect-MgGraph -ClientSecretCredential $clientCredential -TenantId $tenantId

# Verify connection
Get-MgContext

# Example: Retrieve user details
Get-MgUser -UserId '[email protected]'
We can run the runbook in Test pane to view the results.
Certificates (Client Assertion)
Certificate-based authentication offers a more secure way to authenticate to Microsoft Graph by relying on something you have (a private key) rather than something you know (like a client secret). This method, known as client assertion, involves the app sending a signed token using the private key of the certificate to prove its identity to Entra ID instead of using a client secret. However, the security advantages of certificates can be easily undermined by poor private key management.
Self-signed certificates, while convenient, can pose significant security risks if not handled properly. Anyone with access to PowerShell can create certificates, including private keys, without proper oversight or security controls. This increases the risk of certificates being generated and exported carelessly, often without password protection or with weak passwords that can be cracked using readily available tools. An exported private key that isn’t adequately secured becomes as vulnerable as a client secret, allowing unauthorized users to impersonate the app and gain unauthorized access to all your cheese.
Without robust tracking of who generates certificates, how private keys are handled, and where they are stored, the use of certificates can quickly become a security audit nightmare. Although certificate-based authentication is inherently more secure due to its reliance on a physical key, its effectiveness hinges on strict private key management practices, such as using non-exportable keys and secure storage solutions, like a key vault.
It’s also important to note that Entra ID validates the certificate by checking that the public and private keys match and that the certificate has not expired, but it does not check for revocation or validate the full certificate chain. This means that self-signed certificates can be used, as Entra ID doesn’t require the certificate to be issued by a trusted certificate authority.
Create a Self-Signed Certificate using PowerShell
Lets look how we can quickly generate a certificate using PowerShell to authenticate with our client app.
In this example, we will mark the Private Key as exportable because I want to upload it to my Azure Key Vault for another example later. If you intend to generate the certificate on your local computer and ONLY run your test from the same computer, there is no need to mark the private key as exportable.
# Define the certificate details
$certFolder = 'C:\temp\certs'
$subjectName = 'CheeseOnToast'
$certStore = 'CurrentUser'
$validityPeriod = 12

$newCert = @{
        Subject           = "CN=$($subjectName)"
        CertStoreLocation = "Cert:\$($certStore)\My"
        KeyExportPolicy   = 'Exportable'
        KeySpec           = 'Signature'
        NotAfter          = (Get-Date).AddMonths($($validityPeriod))
}
$cert = New-SelfSignedCertificate @newCert
Now we have created the certificate, lets export it so we can upload it to use with our client app.
# Export public key only. Navigate to 'C:\temp\certs' to show .cer generated
# Upload the .cer to the app registration. Open link on line 3 of this script
$certExport = @{
        Cert     = $cert
        FilePath = "$($certFolder)\$($subjectName).cer"
}
Export-Certificate @certExport
Export the Private Key (Optional)
$certPassword = Read-Host -Prompt 'Enter password for your certificate: ' -AsSecureString
$pfxExport = @{
        Cert         = "Cert:\$($certStore)\My\$($cert.Thumbprint)"
        FilePath     = "$($certFolder)\$($subjectName).pfx"
        ChainOption  = 'EndEntityCertOnly'
        NoProperties = $null
        Password     = $certPassword
}

Export-PfxCertificate @pfxExport
Upload the Public Key to your Client App
Now that we have the public key, .cer file, we can upload this to our client app.
1. Navigate to Entra ID > App registrations.
2. Select Certificates & secrets.
3. Select Certificates > Upload certificate.
4. Browse to the public key, .cer file, and clickAdd.


Example: Connect using Client Assertion
# Define certificate details
$subjectName = "CN=CheeseOnToast"  # The subject name of the certificate
$clientId = "your-client-id"       # Your Application (client) ID
$tenantId = "your-tenant-id"       # Your Directory (tenant) ID
$certStore = 'CurrentUser'

# Search for the certificate in the 'CurrentUser\My' certificate store
$cert = Get-ChildItem -Path Cert:\$certStore\My | Where-Object { $_.Subject -like "*$subjectName*" -and $_.NotAfter -gt (Get-Date) }

if ($cert) {
    Write-Host ("Certificate found: {0}" -f $($cert.Subject))-ForegroundColor Green

    # Connect to Microsoft Graph using the certificate
    Connect-MgGraph -ClientId $clientId -TenantId $tenantId -Certificate $cert

    # Verify connection
    Get-MgContext
} else {
    Write-Host ("No valid certificate found with subject: {0}" -f $subjectName)
}

Example: Connect using Client Assertion in Azure Automation
When working with Azure Automation to authenticate to Microsoft Graph, the private key associated with the certificate must be accessible for signing authentication tokens. There are two common ways to achieve this:-
- Importing the private key as an Automation Account resource.
- Obtaining the private key securely from Azure Key Vault.
Importing the Private Key as an Automation Account resource
The drawback of adding the certificate directly to the Automation Account resource is that the certificate becomes tightly coupled to that specific resource, it “lives and dies” with the Automation Account. If the Automation Account is deleted or replaced, the certificate and its private key are lost unless backed up manually.
Nonetheless, this is how it could work.
1. Navigate to Azure Automation Resource > Shared Resources > Certificates.

2. Click + Add a certificate, upload the .pfx file, give it a unique name and provide the password for the private key. Next, click Create.

Once added, the certificate can be referenced in PowerShell using Get-AutomationCertificate.
Connect-AzAccount -Identity

# Get the values from the key vault
$keyVaultName = 'kv-byteben-test'
$tenantId = Get-AzKeyVaultSecret -VaultName $keyVaultName -Name 'CheeseAlwaysTenantId' -AsPlainText
$clientId = Get-AzKeyVaultSecret -VaultName $keyVaultName -Name 'CheeseAlwaysClientId' -AsPlainText

# Retrieve the certificate from the Automation Account
$cert = Get-AutomationCertificate -Name 'CheeseOnToast'

# Connect to Microsoft Graph using the Automation Account certificate
Connect-MgGraph -ClientId $clientId -TenantId $tenantId -Certificate $cert

# Test API call
Get-MgContext

# Verify connection
Get-MgContext

# Example: Retrieve user details
Get-MgUser -UserId '[email protected]'

Obtaining the private key securely from Azure Key Vault
If the private key is stored in an Azure Key Vault, we can obtain that too using a similar principal to above. The advantage of storing the key centrally means it can be used by other Azure Resources too and the lifetime is tied to the vault, not your automation resources.
Ensure the .pfx file is uploaded to the key vault.

Connect-AzAccount -Identity

# Get the Key Vault values
$keyVaultName = 'kv-byteben-test'
$tenantId = Get-AzKeyVaultSecret -VaultName $keyVaultName -Name 'CheeseAlwaysTenantId' -AsPlainText
$clientId = Get-AzKeyVaultSecret -VaultName $keyVaultName -Name 'CheeseAlwaysClientId' -AsPlainText

# Retrieve the certificate from Azure Key Vault (stored as a Base64-encoded secret named 'CheeseOnToast')
# This secret contains the Base64-encoded content of the PFX file (private key + public cert)
$secret = Get-AzKeyVaultSecret -VaultName $keyVaultName -Name 'CheeseOnToast' -AsPlainText

# Convert the Base64 string into a byte array to reconstruct the certificate
$secret64 = [Convert]::FromBase64String($secret)

# Create the X509Certificate2 object directly using the constructor
# Use the MachineKeySet to ensure the certificate is accessible at the machine level and non-exportable
$x509Cert = [System.Security.Cryptography.X509Certificates.X509Certificate2]::new($secret64, $null, [System.Security.Cryptography.X509Certificates.X509KeyStorageFlags]::MachineKeySet)

# Connect to Microsoft Graph using the certificate for authentication
Connect-MgGraph -ClientId $clientId -TenantId $tenantId -Certificate $x509Cert

# Test API call
Get-MgContext

# Verify connection
Get-MgContext

# Example: Retrieve user details
Get-MgUser -UserId '[email protected]'

Why use Certificates Instead of Secrets?
The jury is out on why you would maybe opt to use a certificate in automation instead of a secret, if both credentials are stored in an Azure Key Vault.
The jury is still out on whether you should use a certificate instead of a secret in automation scenarios when both credentials are stored securely in Azure Key Vault. Both approaches offer secure, non-interactive authentication, but the decision often depends on your specific use case and the requirements of the service you’re connecting to.
- Cross-Platform Authentication:
- Some external services, such as AWS or Google Cloud, may support certificate-based authentication where Service Principals in Entra ID are not possible.
- Enhanced Security Requirements:
- Certificates provide proof of possession by requiring a private key to sign requests, making it harder for an attacker to impersonate the application compared to a static secret (which is essentially a password).
- They are useful in scenarios where multi-factor authentication for applications is needed, as the possession of a certificate (private key) acts as an additional security layer.
- Compliance and Governance:
- Some regulatory frameworks may require the use of certificates for authentication due to their improved traceability and security posture.
- Certificates have built-in support for longer expiration periods. There is a limitation on secret validity when secrets are configured in the Entra ID Admin Center UI.
- Multi-Cloud or Third-Party Integrations:
- If you’re using multi-cloud environments, certificates may be the preferred method for interoperability, particularly if the service does not natively support identities from other identity providers.
Summary
In this post, we explored different ways to authenticate to Microsoft Graph using solely the SDK. We covered how to securely retrieve credentials from Azure Key Vault and avoid creating a security “Swiss cheese” situation by using non-exportable private keys. We also discussed when certificates might be a better choice over client secrets for secure, cross-tenant, and multi-cloud scenarios.
While we didn’t focus specifically on Intune, these authentication methods can be applied to your own Intune automation tasks, such as querying device compliance, app management, or configuration profiles.
Automation is powerful, and hopefully, you’ve picked up some useful tips for authenticating to Microsoft Graph
In our next post, we’ll slice deeper into other ways to obtain tokens for interacting with the Microsoft Graph API, especially if you prefer not to use the SDK. Stay tuned!


Managed Identities can use federated credentials now, as an alternative to client/secret for cross-tenant auth
https://devblogs.microsoft.com/identity/access-cloud-resources-across-tenants-without-secrets/
Thanks for the comment Tom. Do you see the development of this preview feature being able to handle auth from an Entra ID tenant resource to other Cloud IDP Providers?