

CloudLAPS Community Edition provides a Log Analytics workbook for a better overview of devices managed with the solution, auditing capabilities, device specific password rotation statistics and CloudLAPS portal sign-in analytics.
This analytics and monitoring workbook of CloudLAPS has been mainly developed by Maurice Daly and co-authored by Nickolaj Andersen.
Table of contents
Download workbook files from GitHub
CloudLAPS analytics and monitoring consists of two workbooks:
- CloudLAPS
- This is the main workbook where all analytics and monitoring data is available
- CloudLAPS-AdminDetails-Template
- This is a template workbook used as a fly out blade for parts of the main CloudLAPS workbook
Both of these workbooks needs to be installed in the Log Analytics workspace used by CloudLAPS. Download the two workbook json files from the CloudLAPS repository using the below link:
CloudLAPS/Workbooks at main · MSEndpointMgr/CloudLAPS (github.com)
Once downloaded, proceed to the next section.
Create new workbooks in the workspace
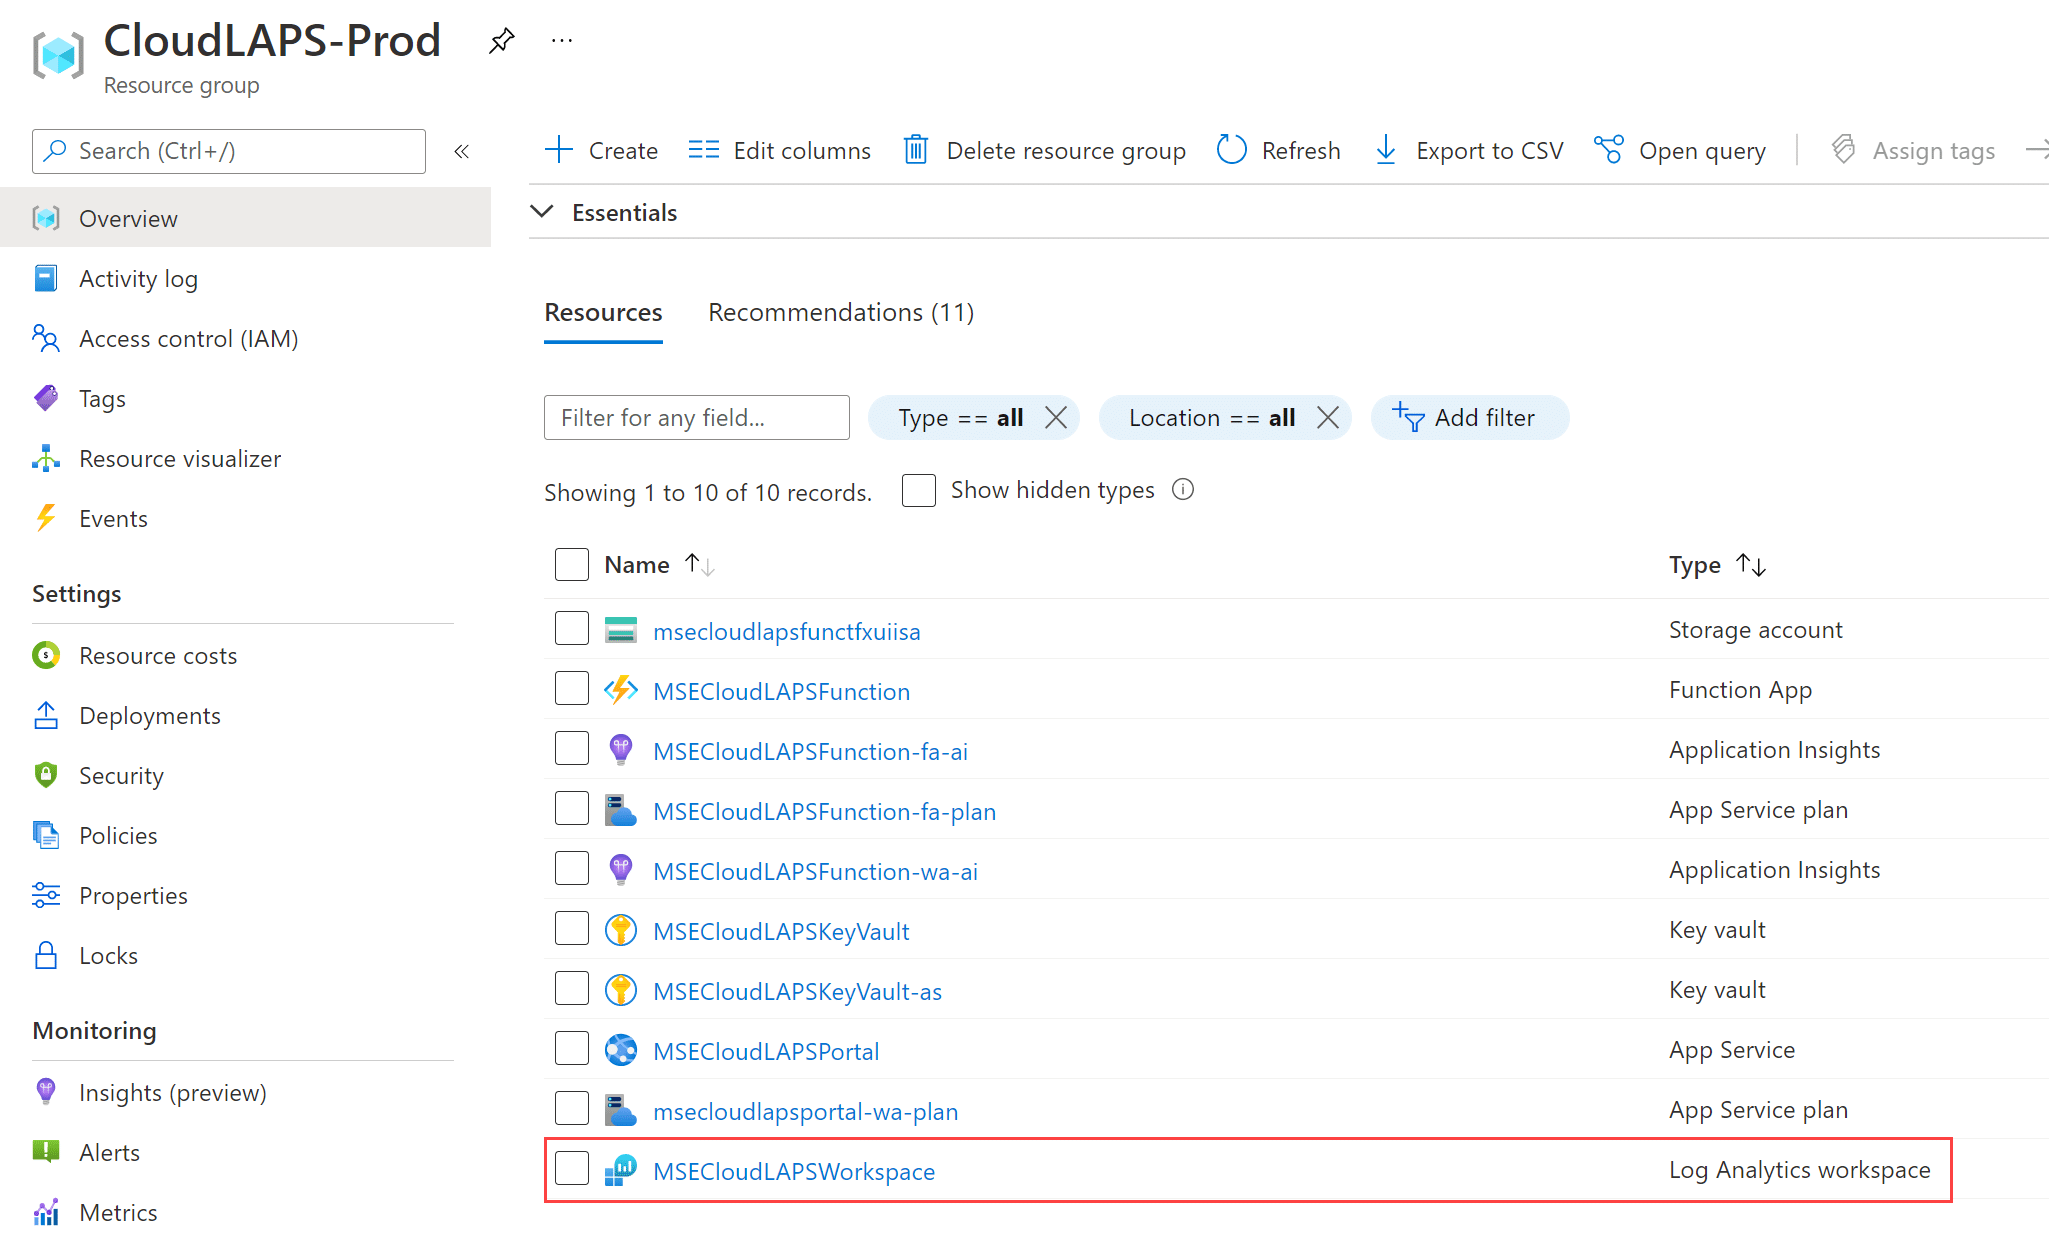
In this section, both of the CloudLAPS analytics and monitor workbooks will be added to the Log Analytics workspace used by CloudLAPS. Start by locating the Log Analytics workspace resource within the resource group.
Click on the Log Analytics workspace resource.
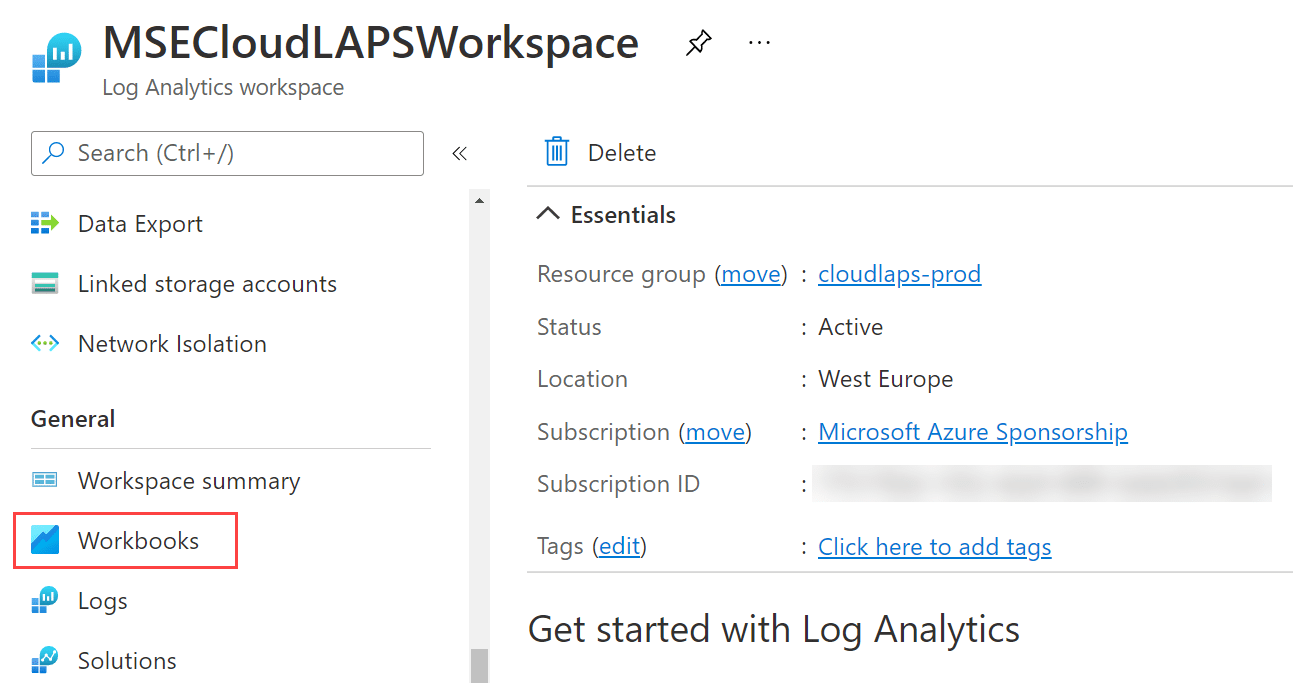
Under General, click on Workbooks.
From here on, follow the guide in the sub-sections below for each workbook.
Create the template CloudLAPS-AdminDetails-Template workbook
Begin with copying the contents of the downloaded CloudLAPS-AdminDetails-Template.json file using any suitable text editor.
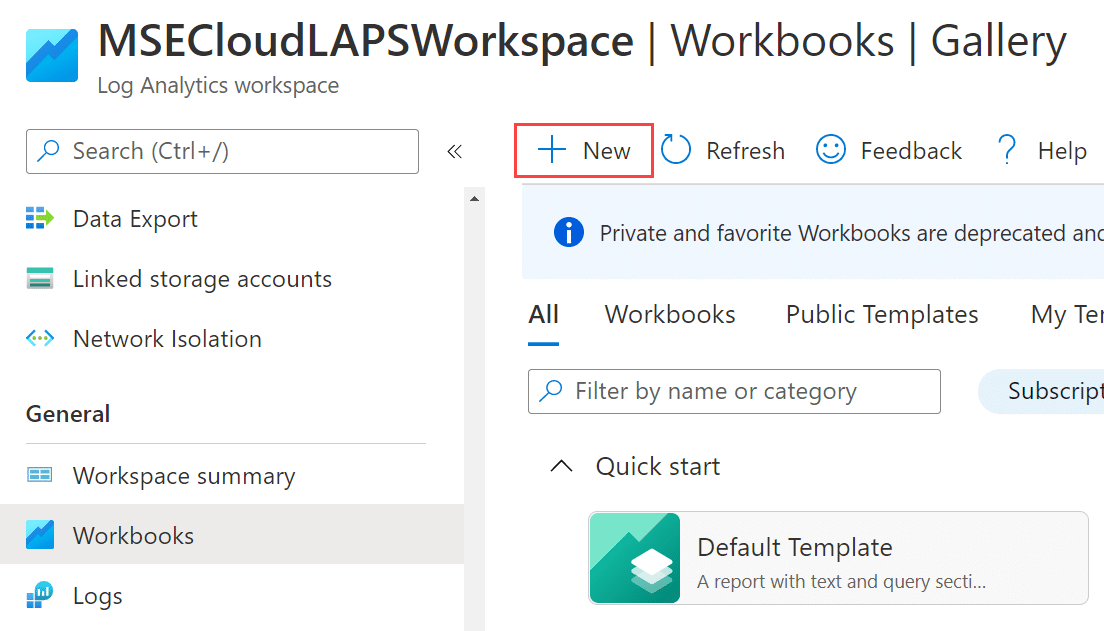
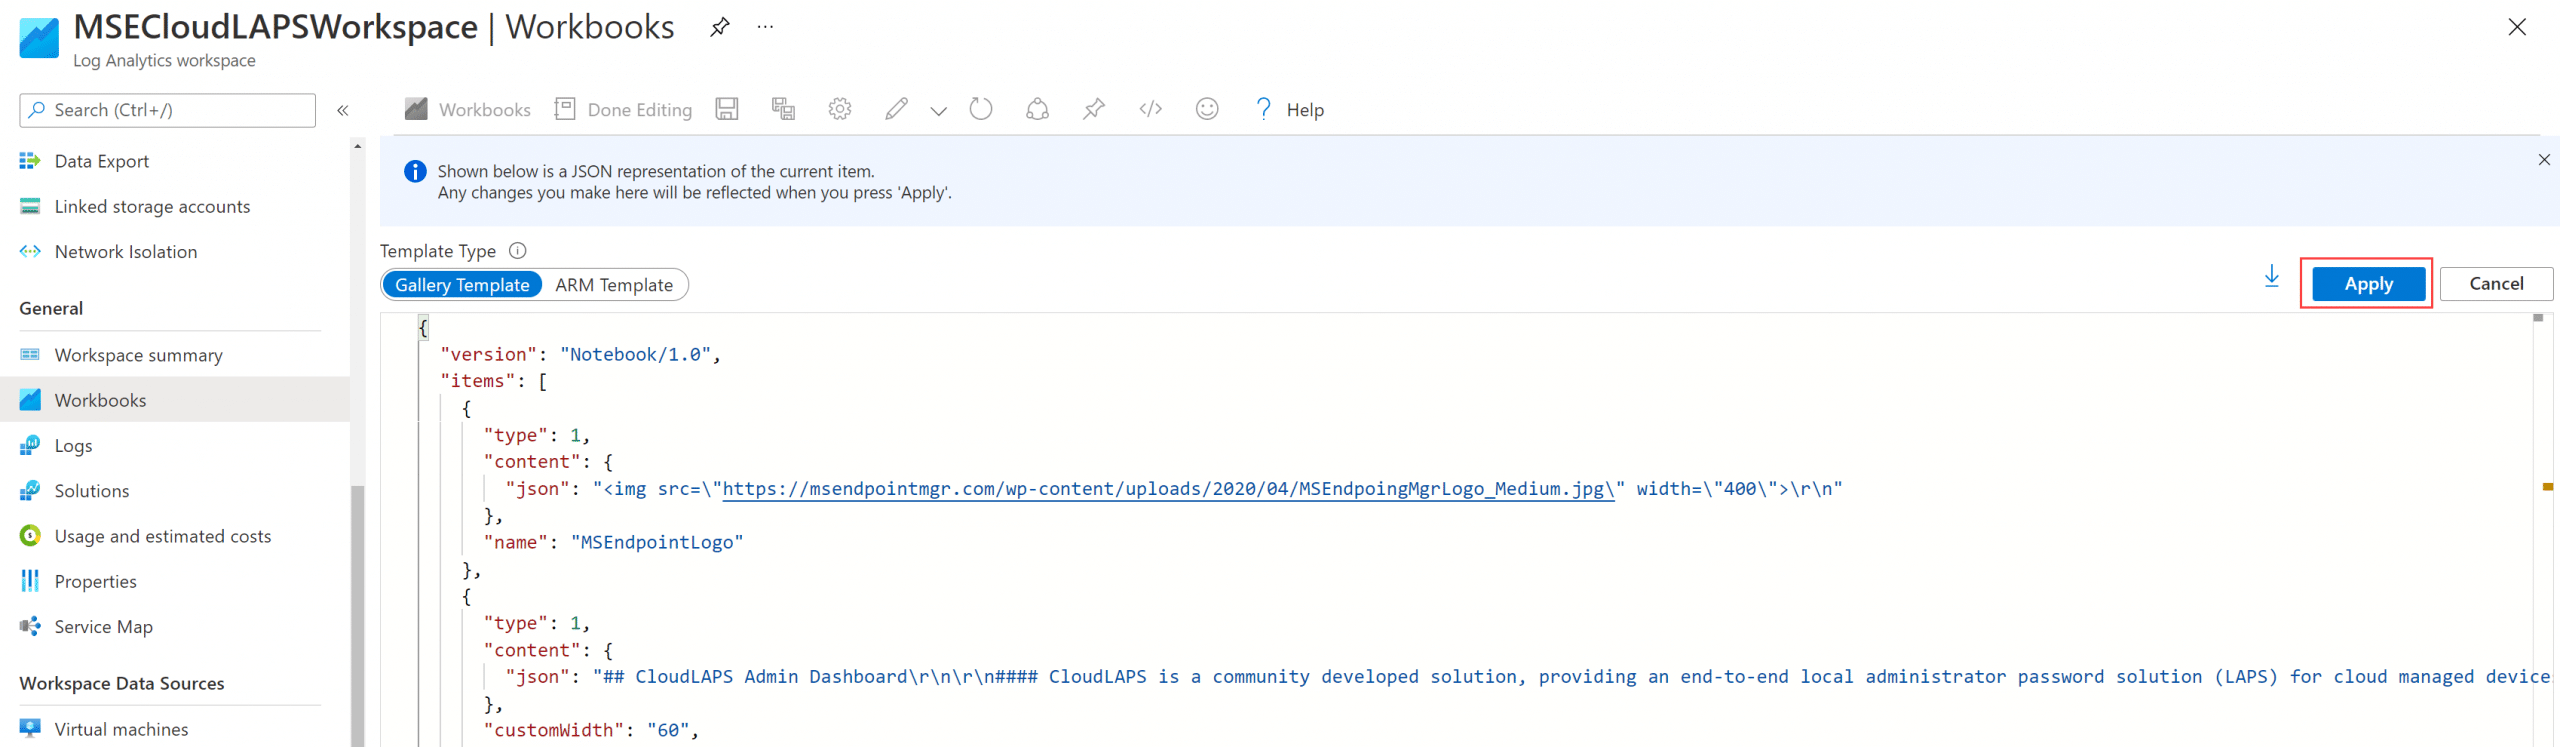
In the General – Workbooks blade of the Log Analytics workspace, click New.
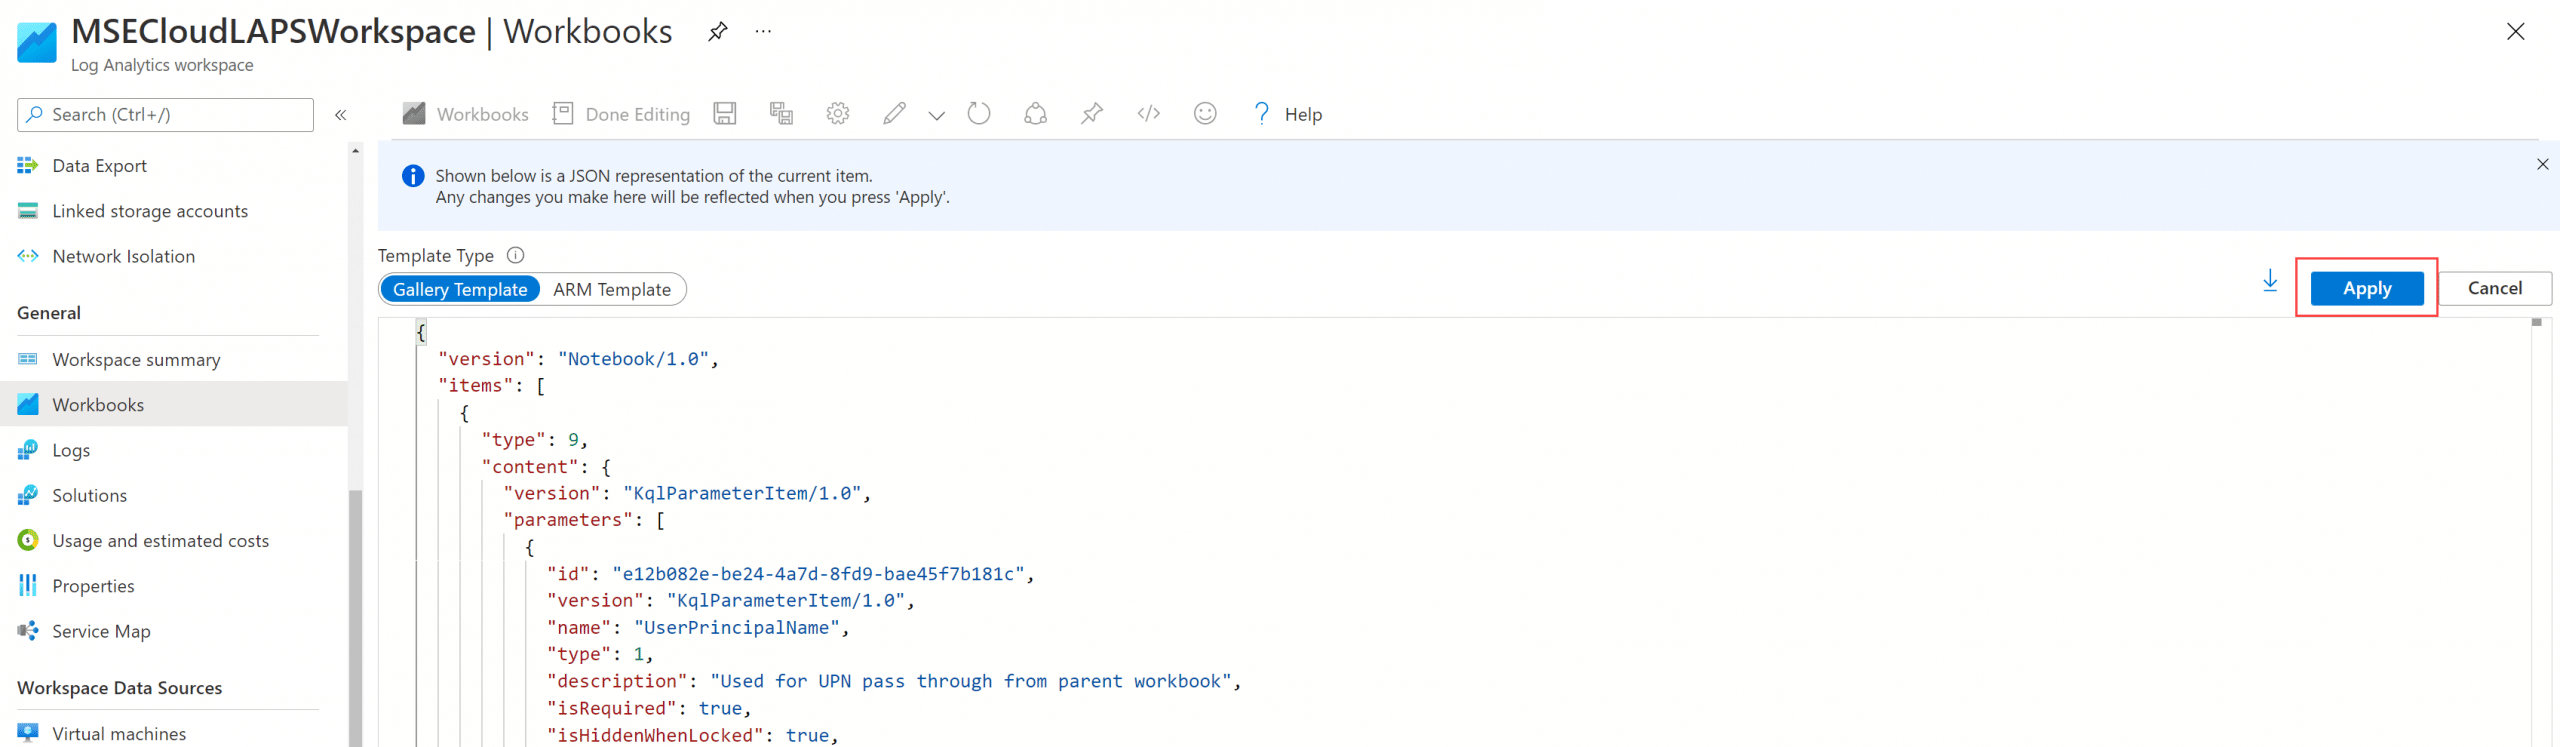
The New workbook template is automatically created. Click the </> sign.
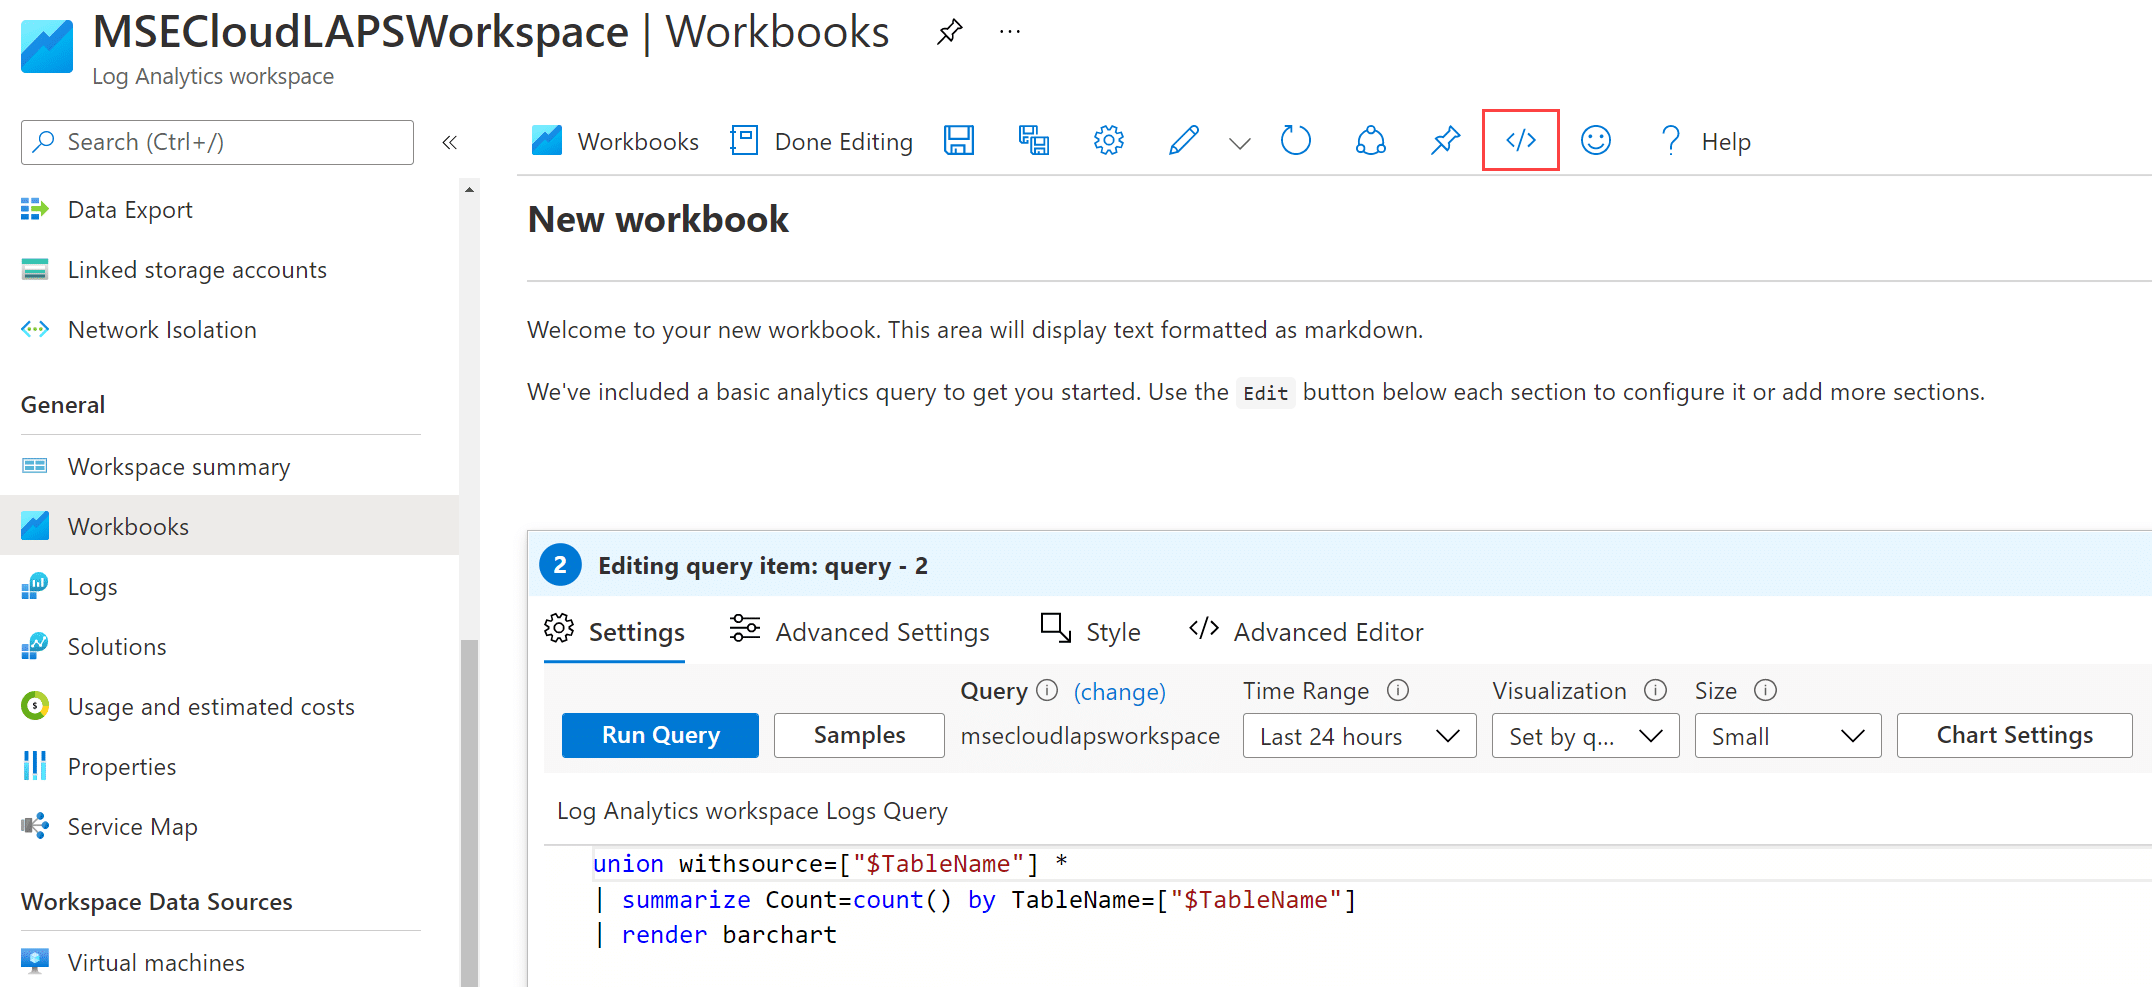
Clear all the existing JSON formatted text in the editor and paste in the copied text from the CloudLAPS-AdminDetails-Template.json file and click the Apply button in the top right corner
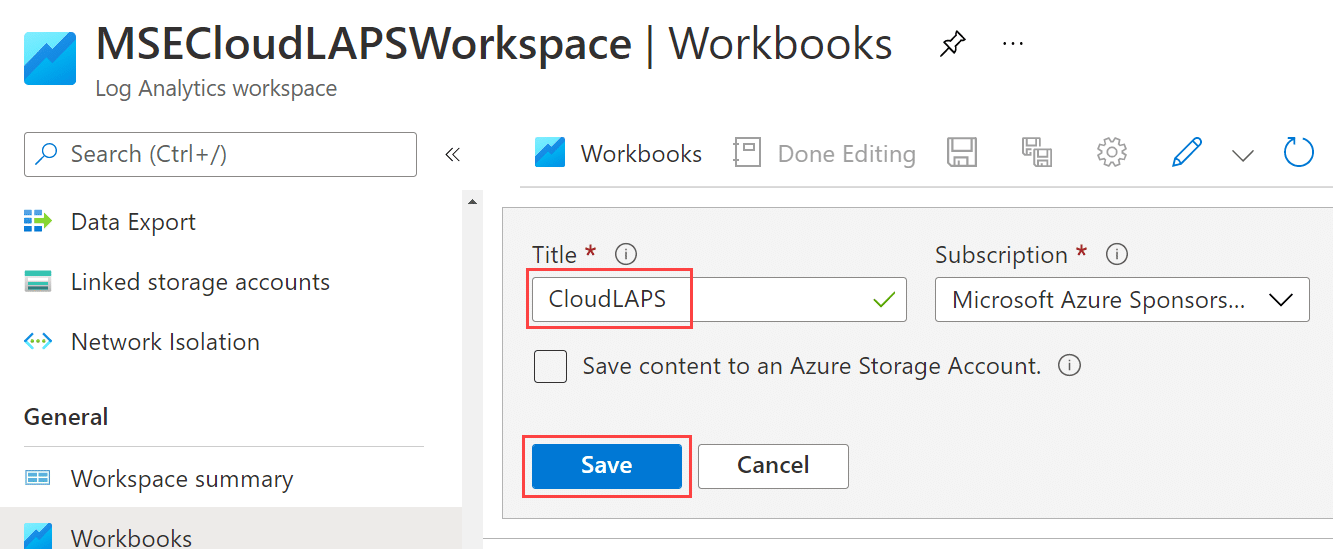
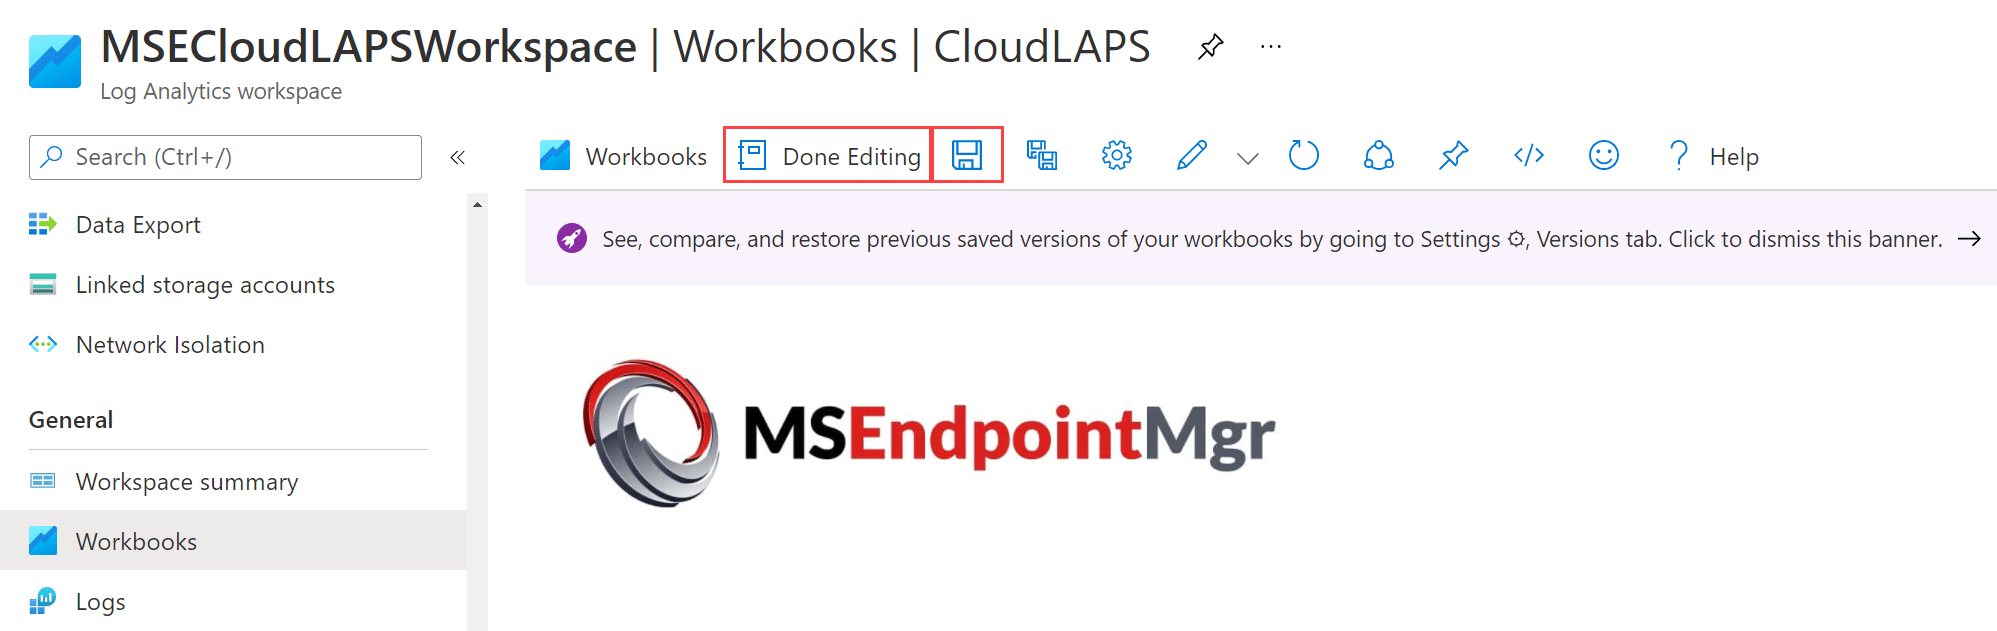
Click the Save button.
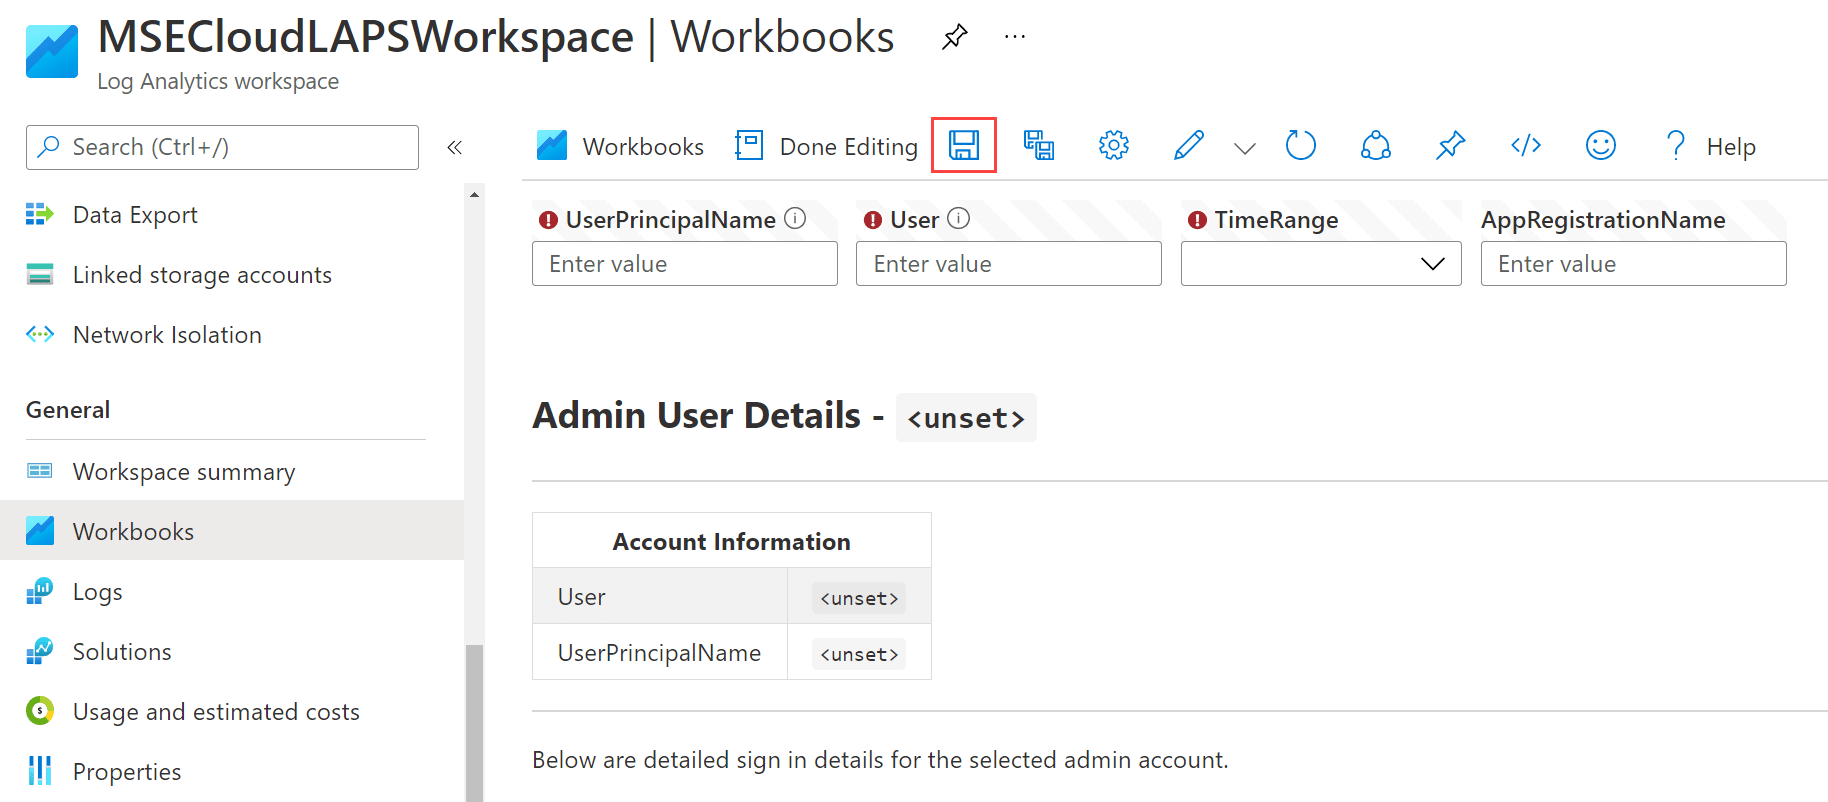
In the Title field, make sure you name the workbook as CloudLAPS-AdminDetails-Template and click Save. If the workbook name is not correct, parts of the main CloudLAPS workbook won’t function properly.

Click Done Editing.
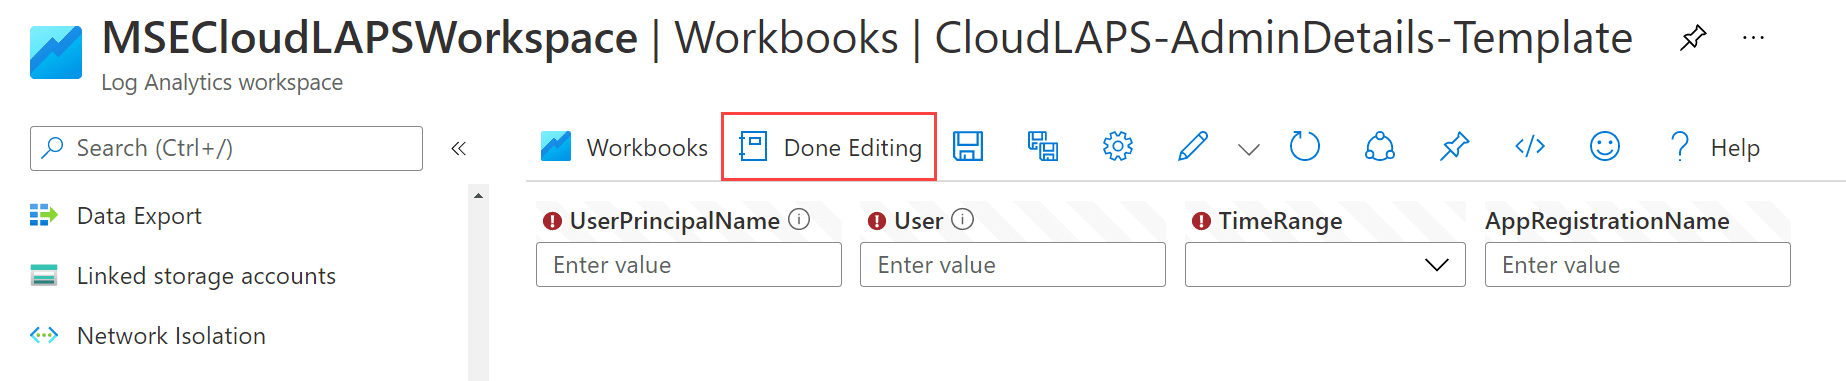
The CloudLAPS-AdminDetails-Template workbook has now been created successfully. Continue with the next section to create the main CloudLAPS workbook.
Create the main CloudLAPS workbook
Begin with copying the contents of the downloaded CloudLAPS.json file using any suitable text editor.
In the General – Workbooks blade of the Log Analytics workspace, click New.
The New workbook template is automatically created. Click the </> sign.
Clear all the existing JSON formatted text in the editor and paste in the copied text from the CloudLAPS.json file and click the Apply button in the top right corner
Click the Save button.

In the Title field, provide a name for the workbook, e.g. CloudLAPS. Since this is the main workbook and is not used as a template, any name will do. Click Save.
Click Done Editing.

The CloudLAPS workbook has now been created successfully. Continue with the next section to configure the main CloudLAPS workbook.
Configure the main CloudLAPS workbook
The CloudLAPS Analytics and monitoring workbooks are now setup in a basic state, meaning that data will be shown automatically by querying the CloudLAPSAudit_CL and CloudLAPSClient_CL custom logs created by deploying the CloudLAPS solution. Although, without any further configuration the following parts of the workbook will not contain any data:
- Web Portal Sign In Details
- Web Portal Geo Location Sign In
To enable these parts of the workbook, the Azure AD Sign-In logs must be linked to the workbook and the AppRegistrationName parameter must be updated with the display name of the app registration created when first setting up the CloudLAPS Community Edition solution. In addition, the workbook can be extended to run in a more detailed view, by also linking the Intune devices data logs. More information is available in the last section regarding how to enhance the workbook experience.
It’s recommended to link at least the Azure AD Sign-In logs to enable all aspects of the workbook.
Enable Web portal and geo location sign-in analytics
To enable the web portal and geo location sign-in details in the main CloudLAPS workbook, complete the prerequisite sub-sections mentioned below:
- Send Azure AD Sign-In logs to a Log Analytics workspace
- Configure the main CloudLAPS workbook prerequisites
- Link Log Analytics workspace with Azure AD Sign-In logs to workbook
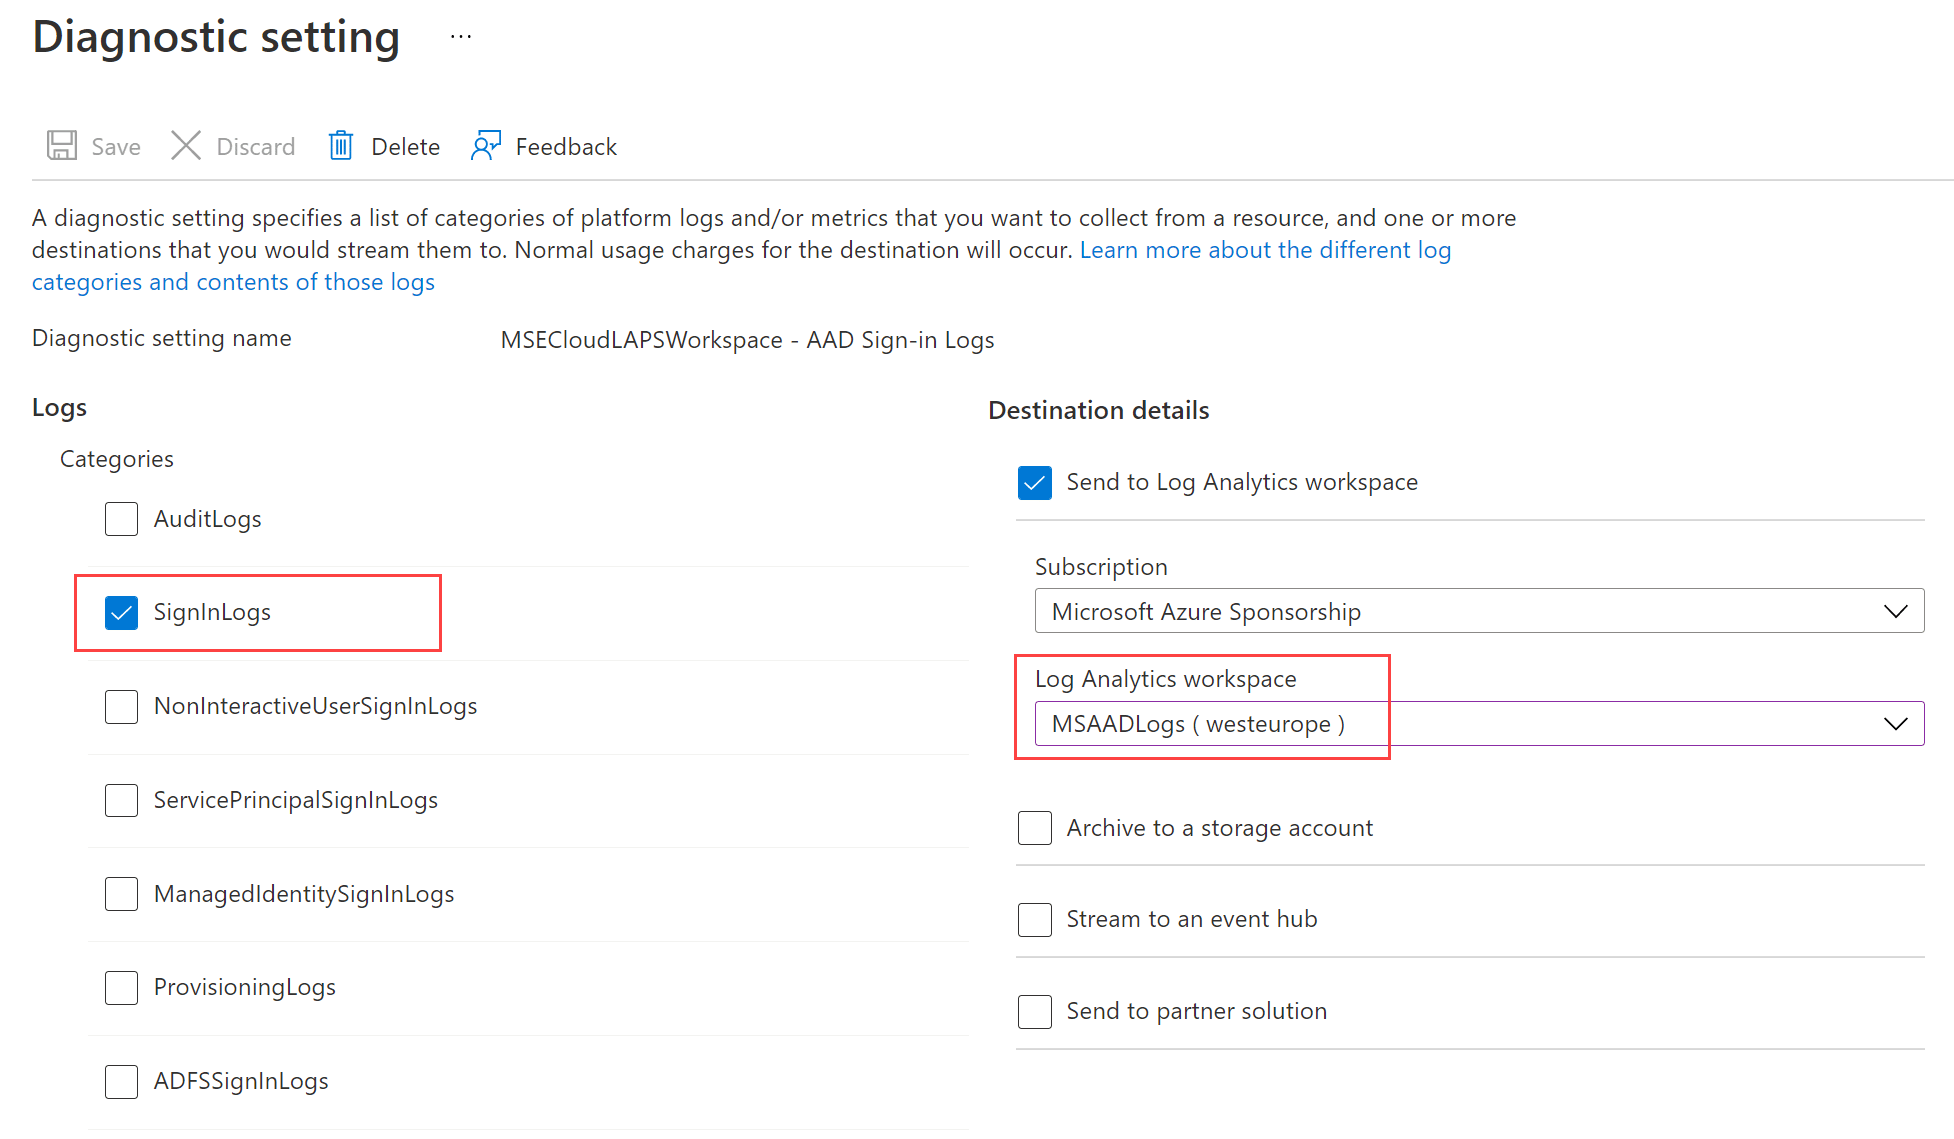
Send Azure AD Sign-In logs to a Log Analytics workspace
Setup instructions for sending the Azure AD Sign-In logs to a Log Analytics workspace, is not covered in these setup instructions. Refer to the official documentation from Microsoft using the links below, for more details on how to send the log data:
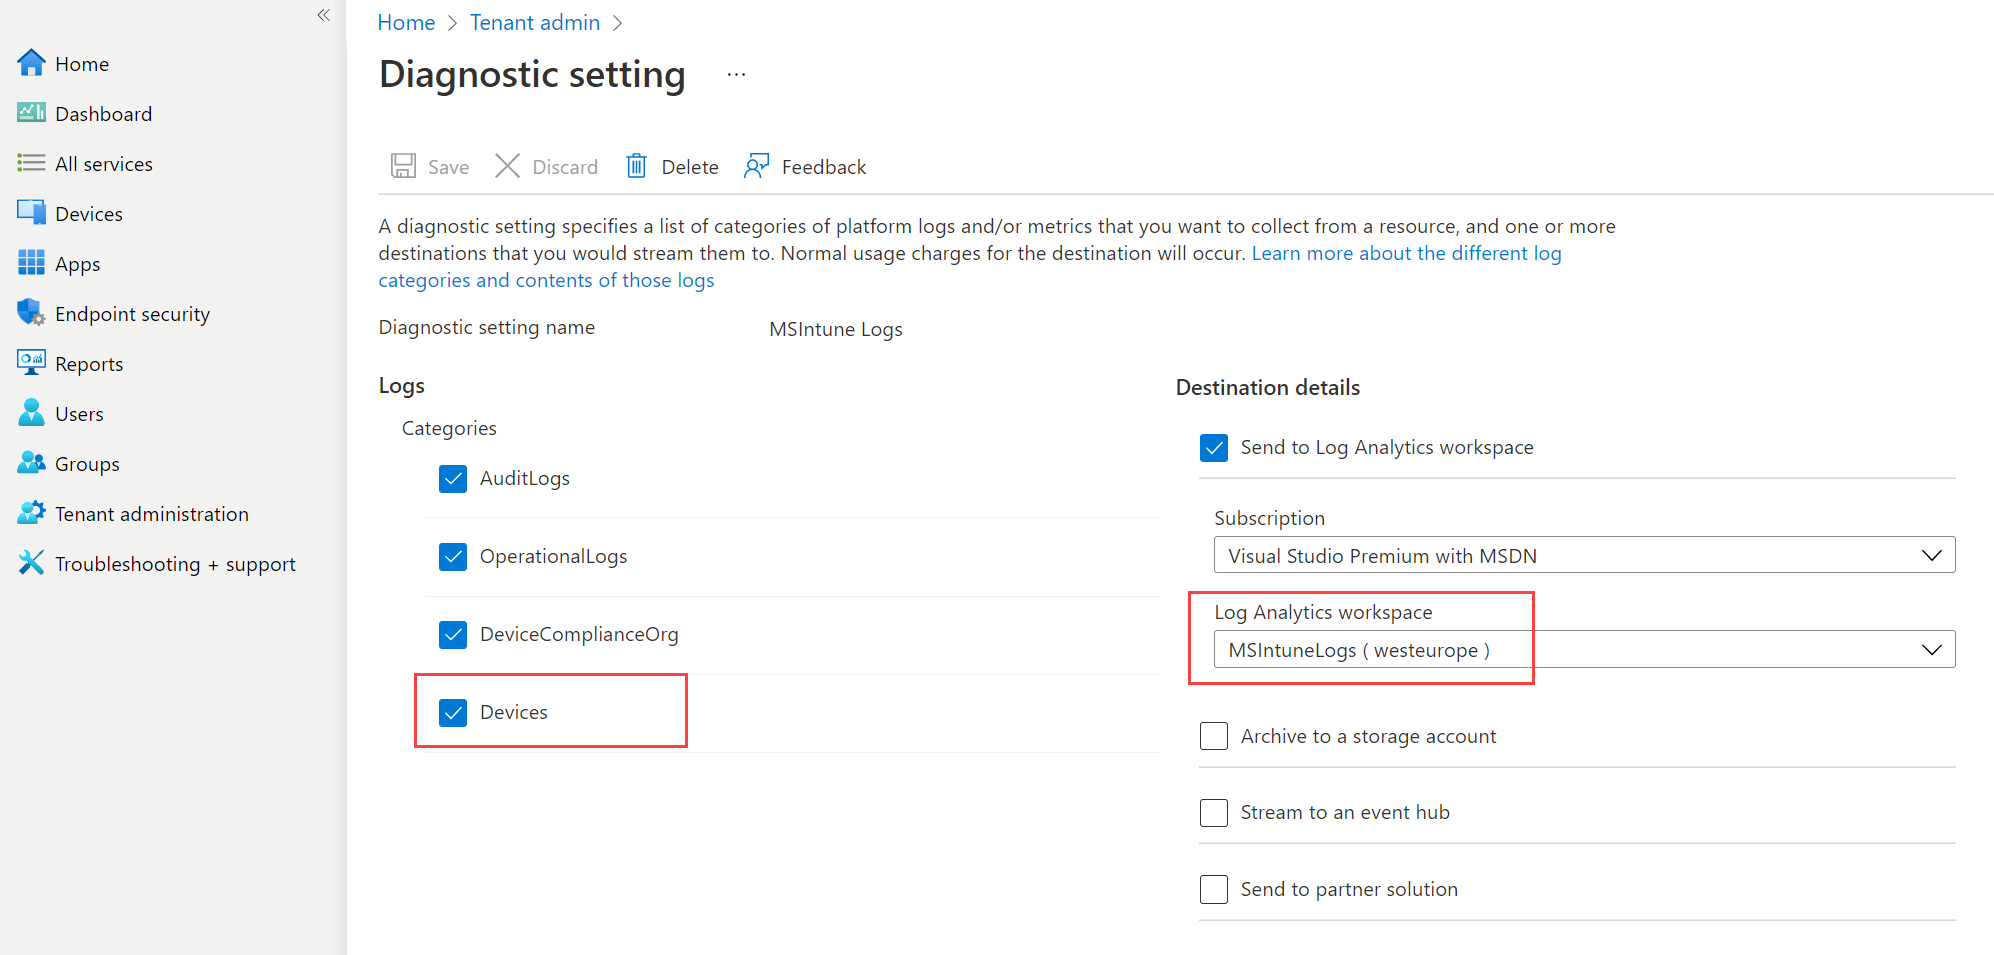
Stream Azure Active Directory logs to Azure Monitor logs | Microsoft Docs
Make sure the SignInLogs is selected to be sent to a Log Analytics workspace when configuring the diagnostics settings
Here’s an example showing how the Azure AD Sign-in logs are being sent to a specific Log Analytics workspace named MSAADLogs:
Configure main CloudLAPS workbook prerequisites
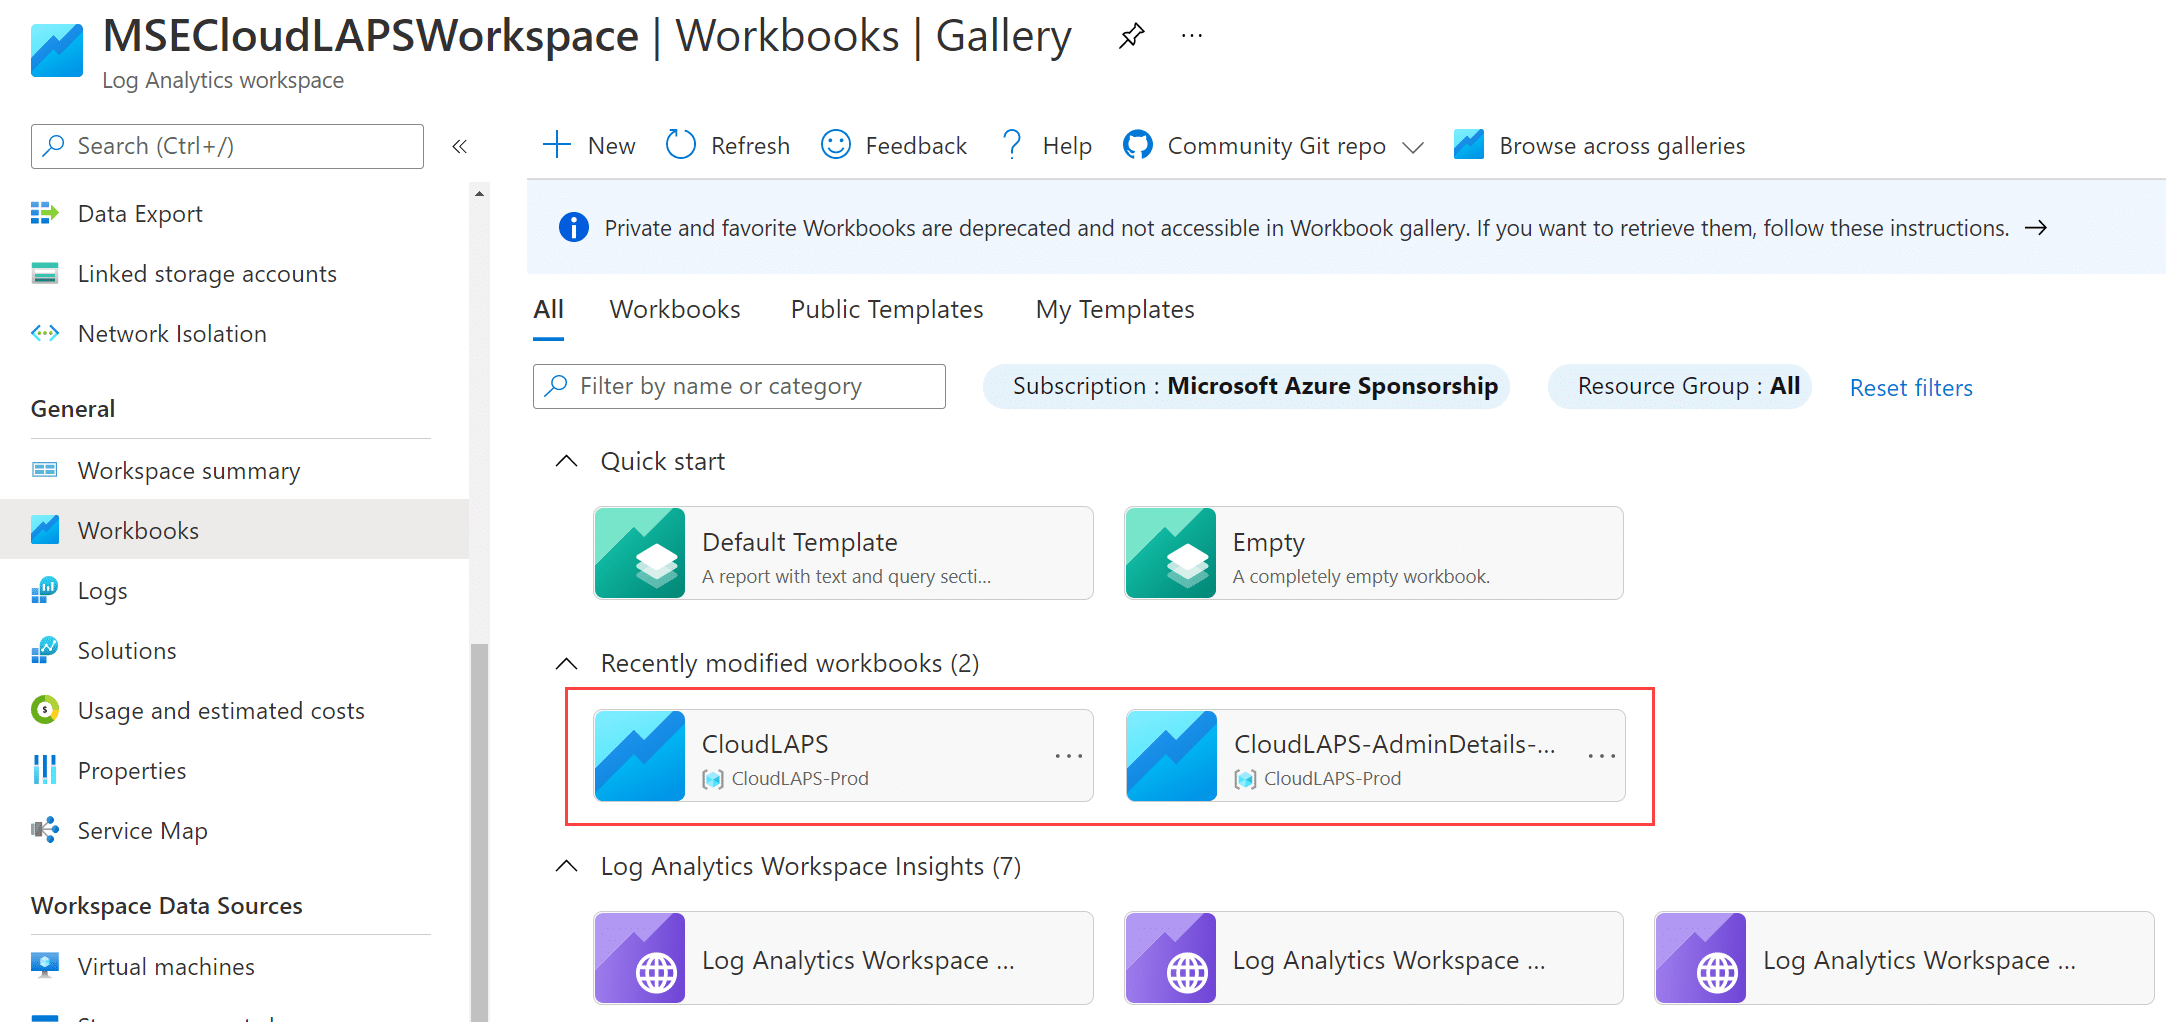
From within General – Workbooks, there should be two workbooks as shown in the example below.
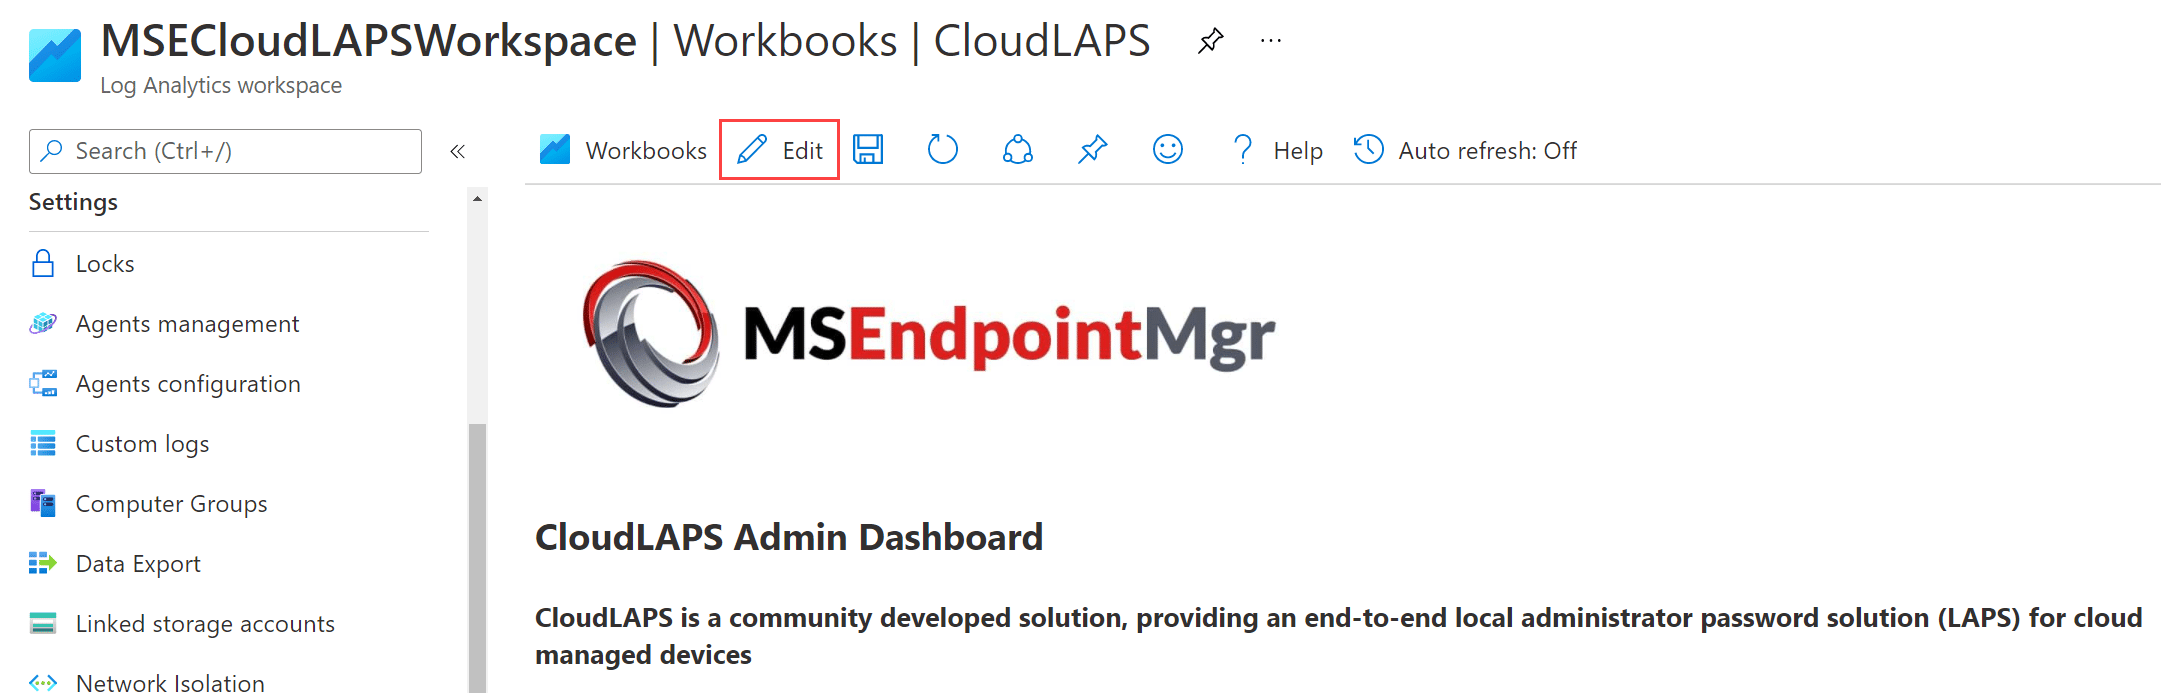
Click on the CloudLAPS workbook and click on Edit.
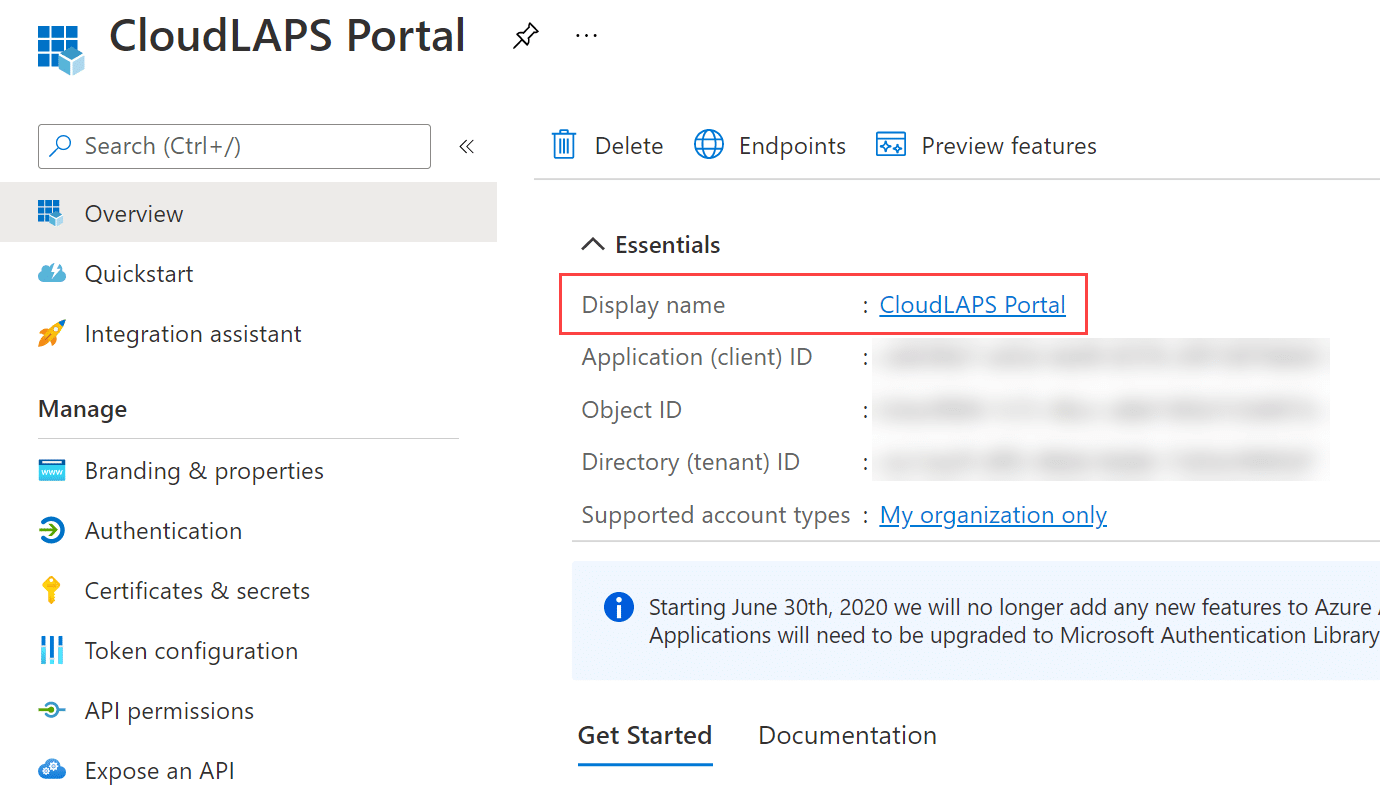
On the right side in the group that contains the workbook parameters, click <unset> next to AppRegistrationName and enter the value for the App registration created when deploying the CloudLAPS Community Edition solution. Throughout the setup instructions for CloudLAPS, an app registration named e.g. CloudLAPS Portal is used as an example, which is the value that should be entered in this field.
Below illustrates where the display name of an app registration can be found.
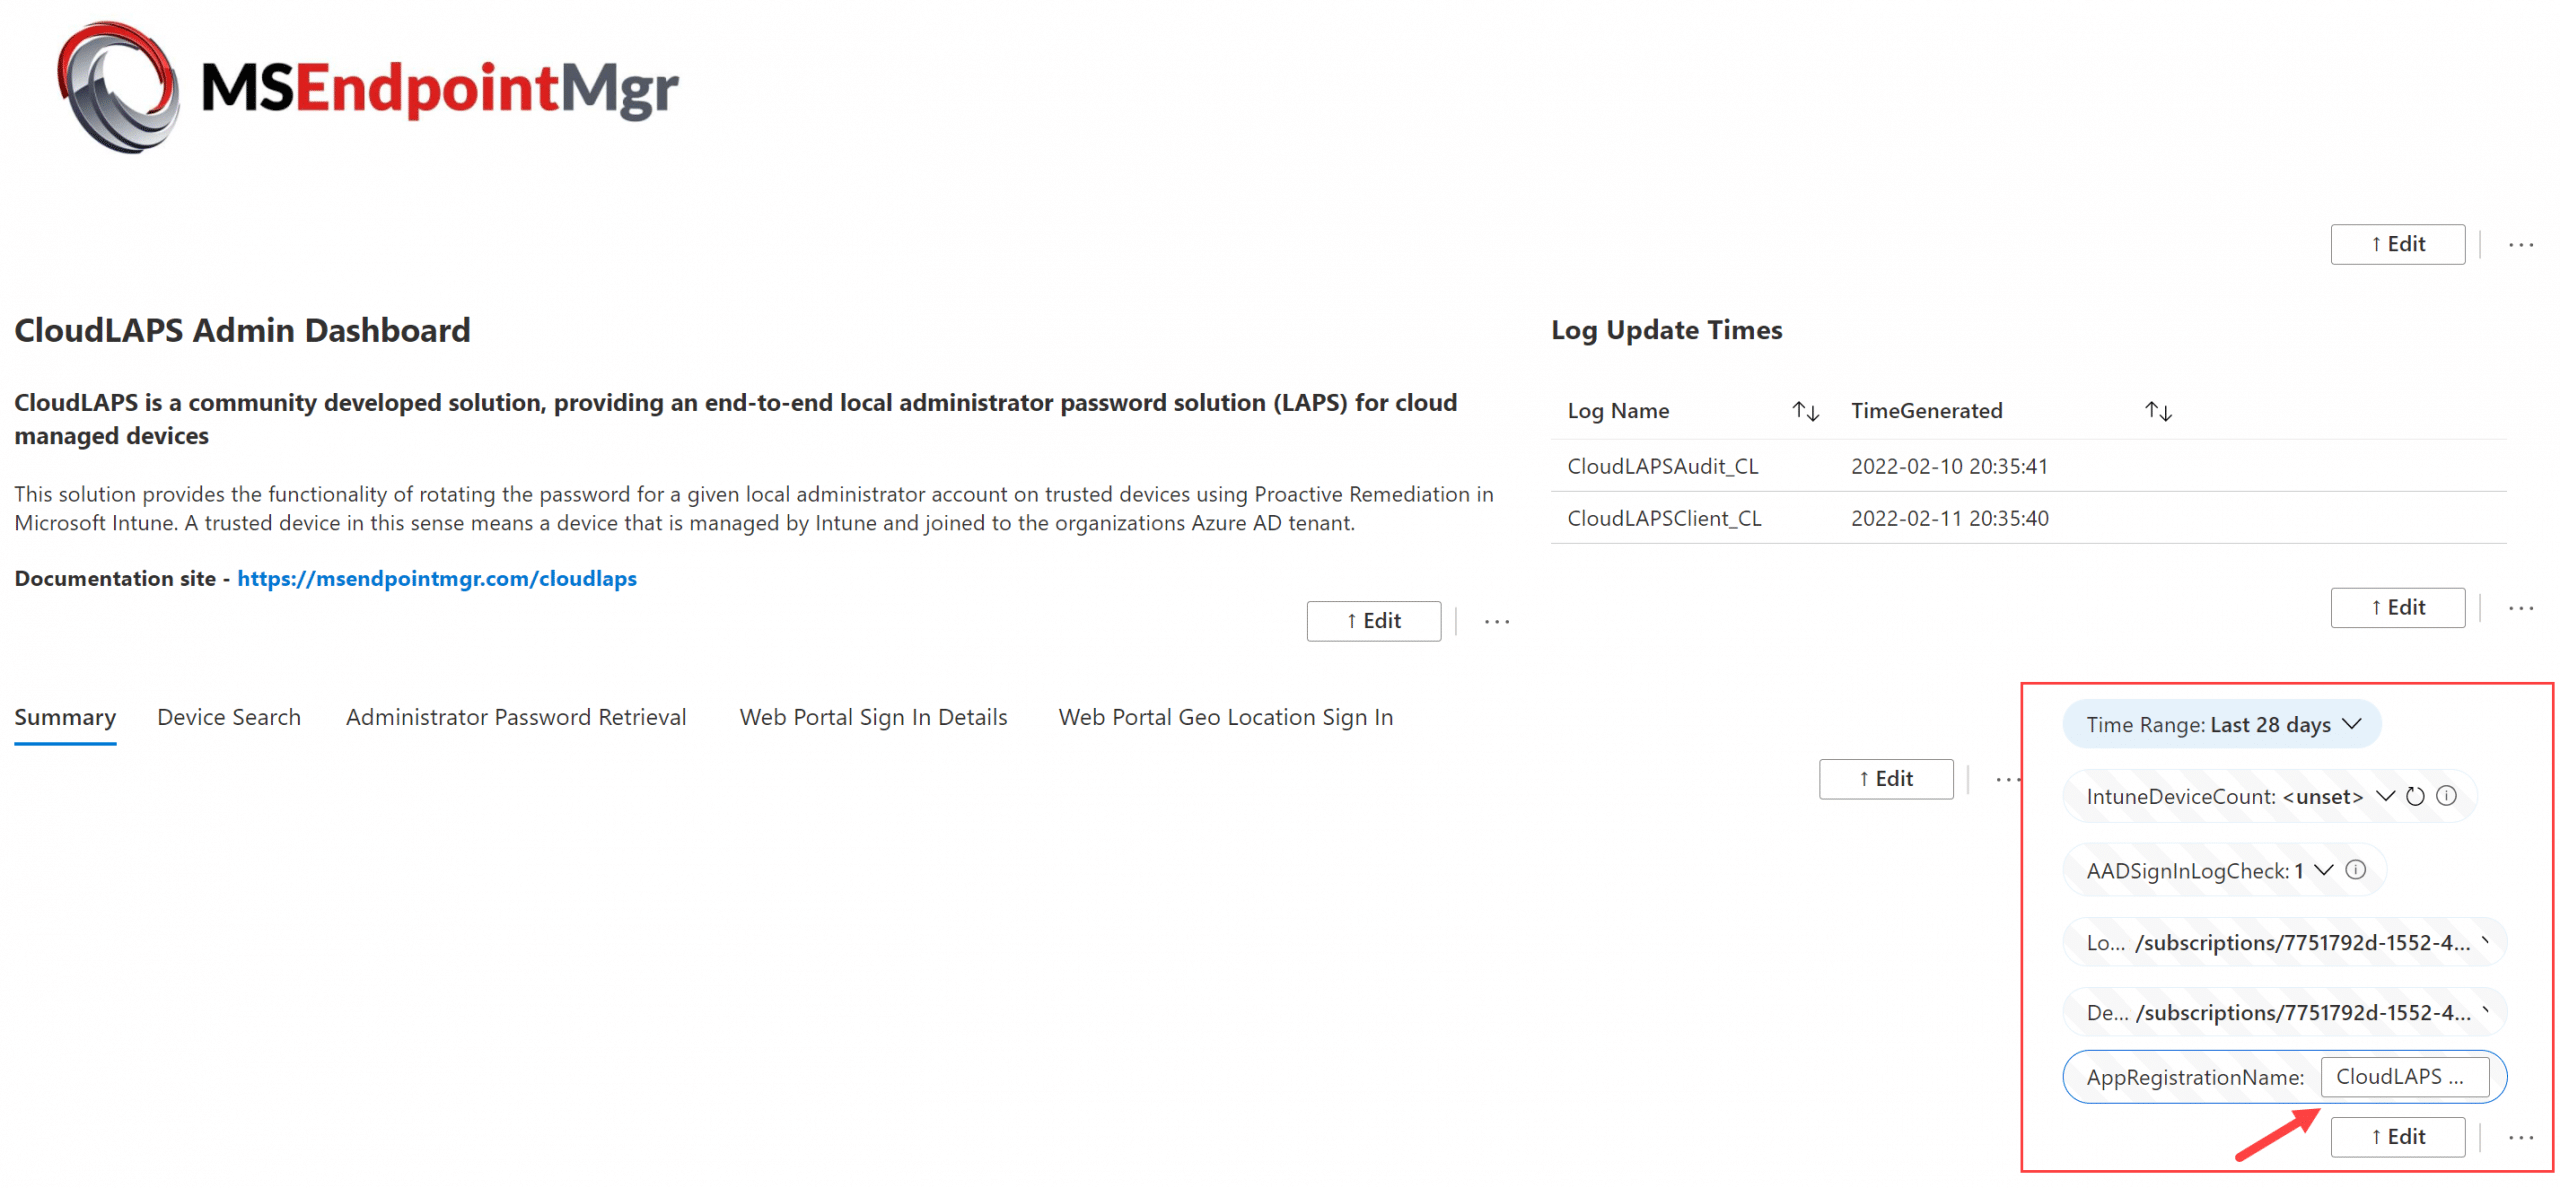
This is how it should look when the app registration name is entered in the AppRegistrationName parameter field:
This completes the prerequisites for the main CloudLAPS workbook, however don’t click on Done Editing. Follow the instructions in the next sub-section.
Link Log Analytics workspace with Azure AD Sign-In logs to workbook
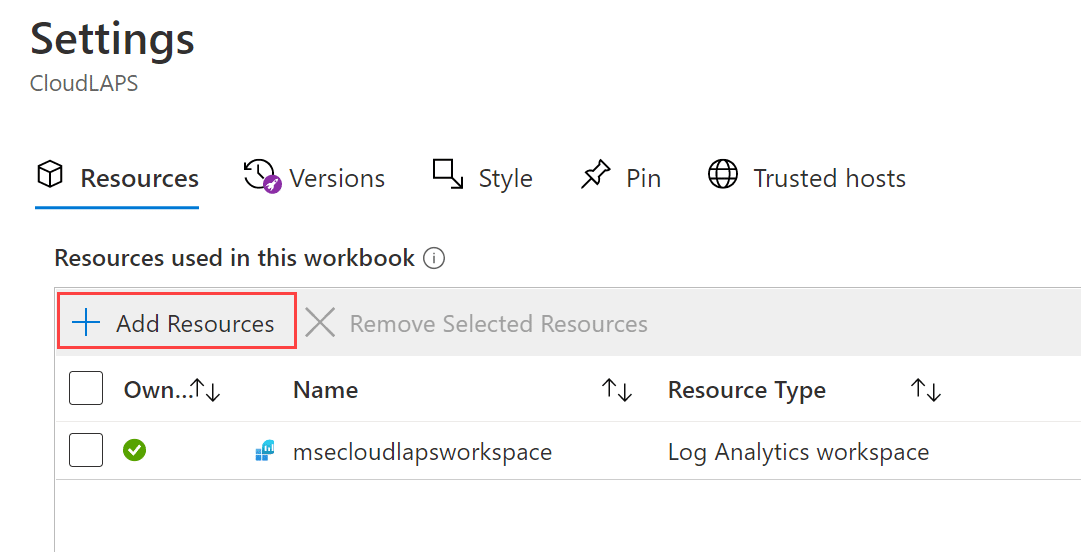
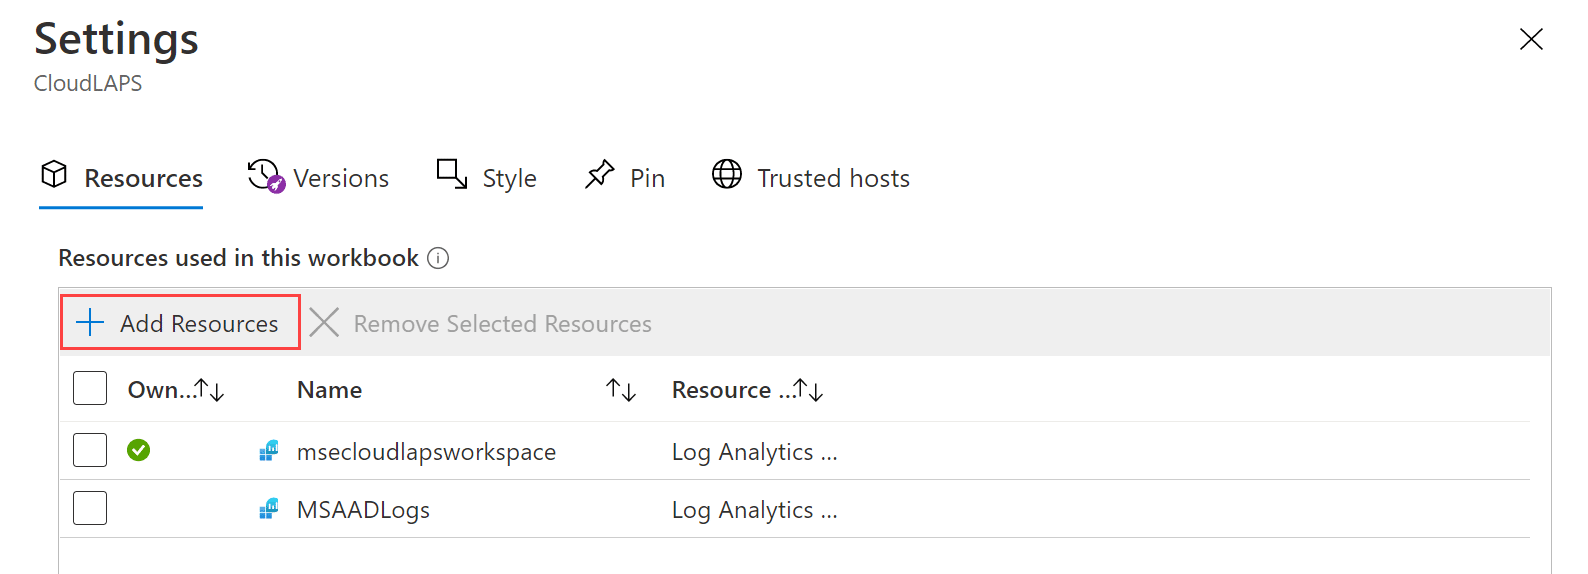
Click the Settings (cog) button.
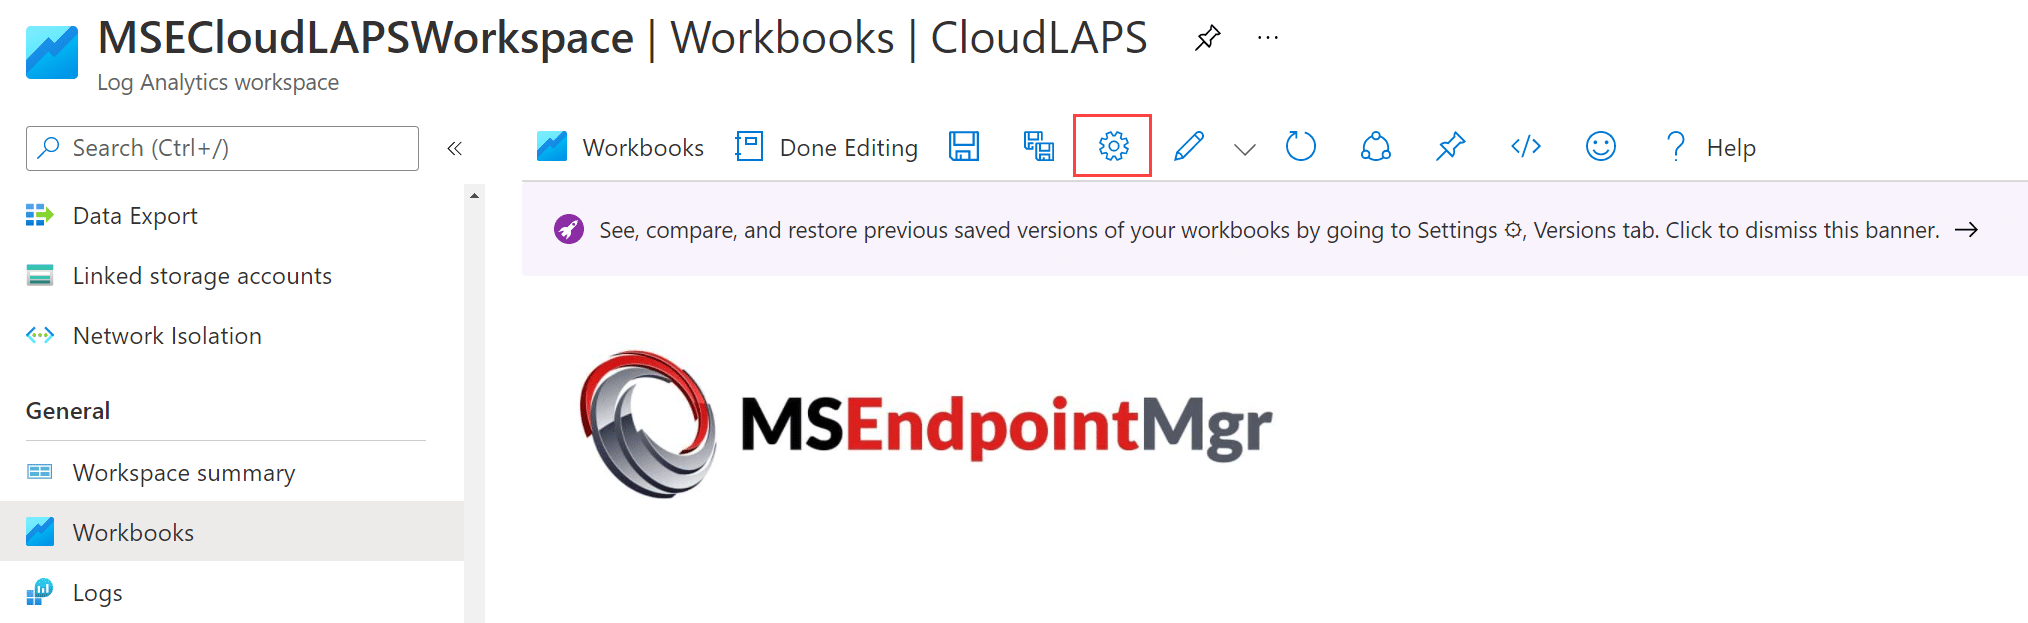
Click Add Resources.
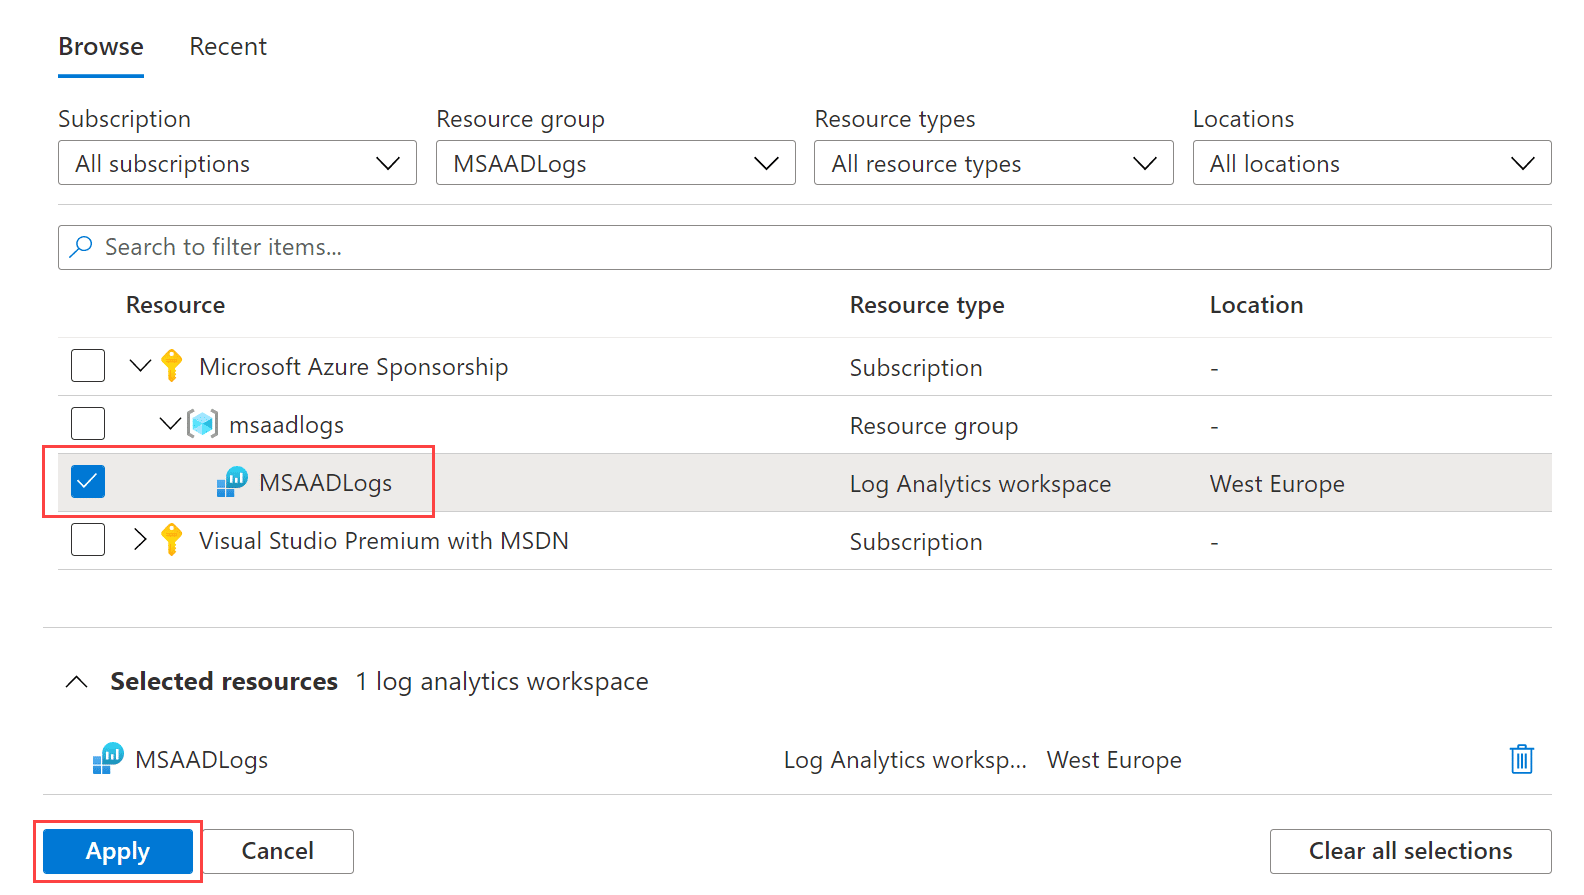
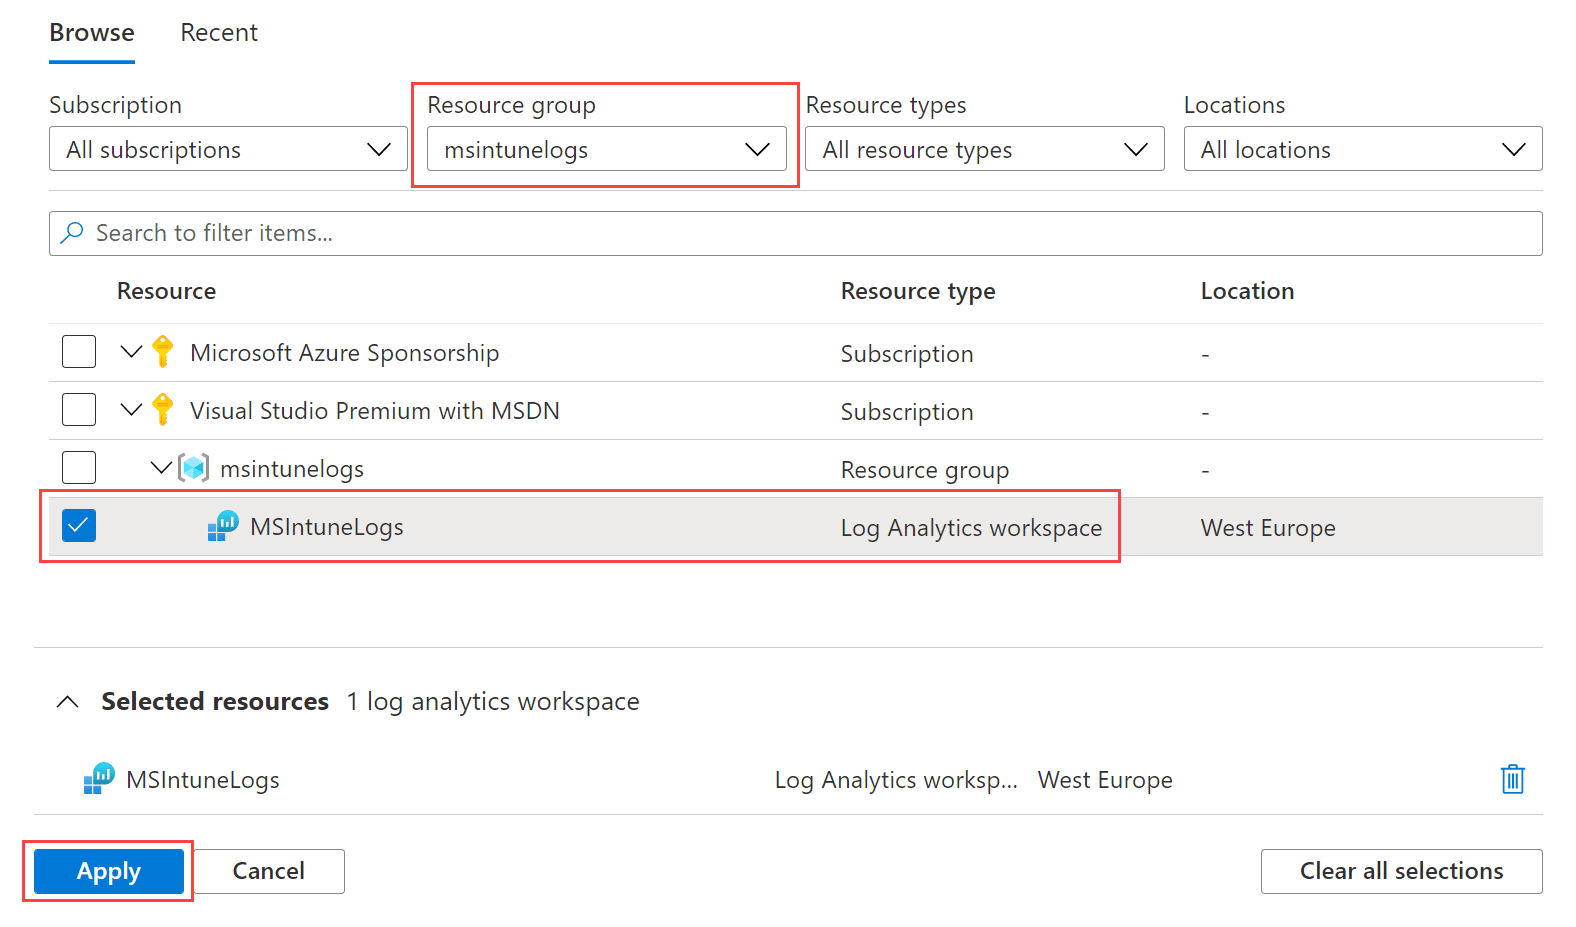
Browse for the Log Analytics workspace resource where the Azure AD Sign-In logs are being sent to. In the example below, the resource group is used to filter and narrow the search possibilities.

Select the desired resource and click Apply.
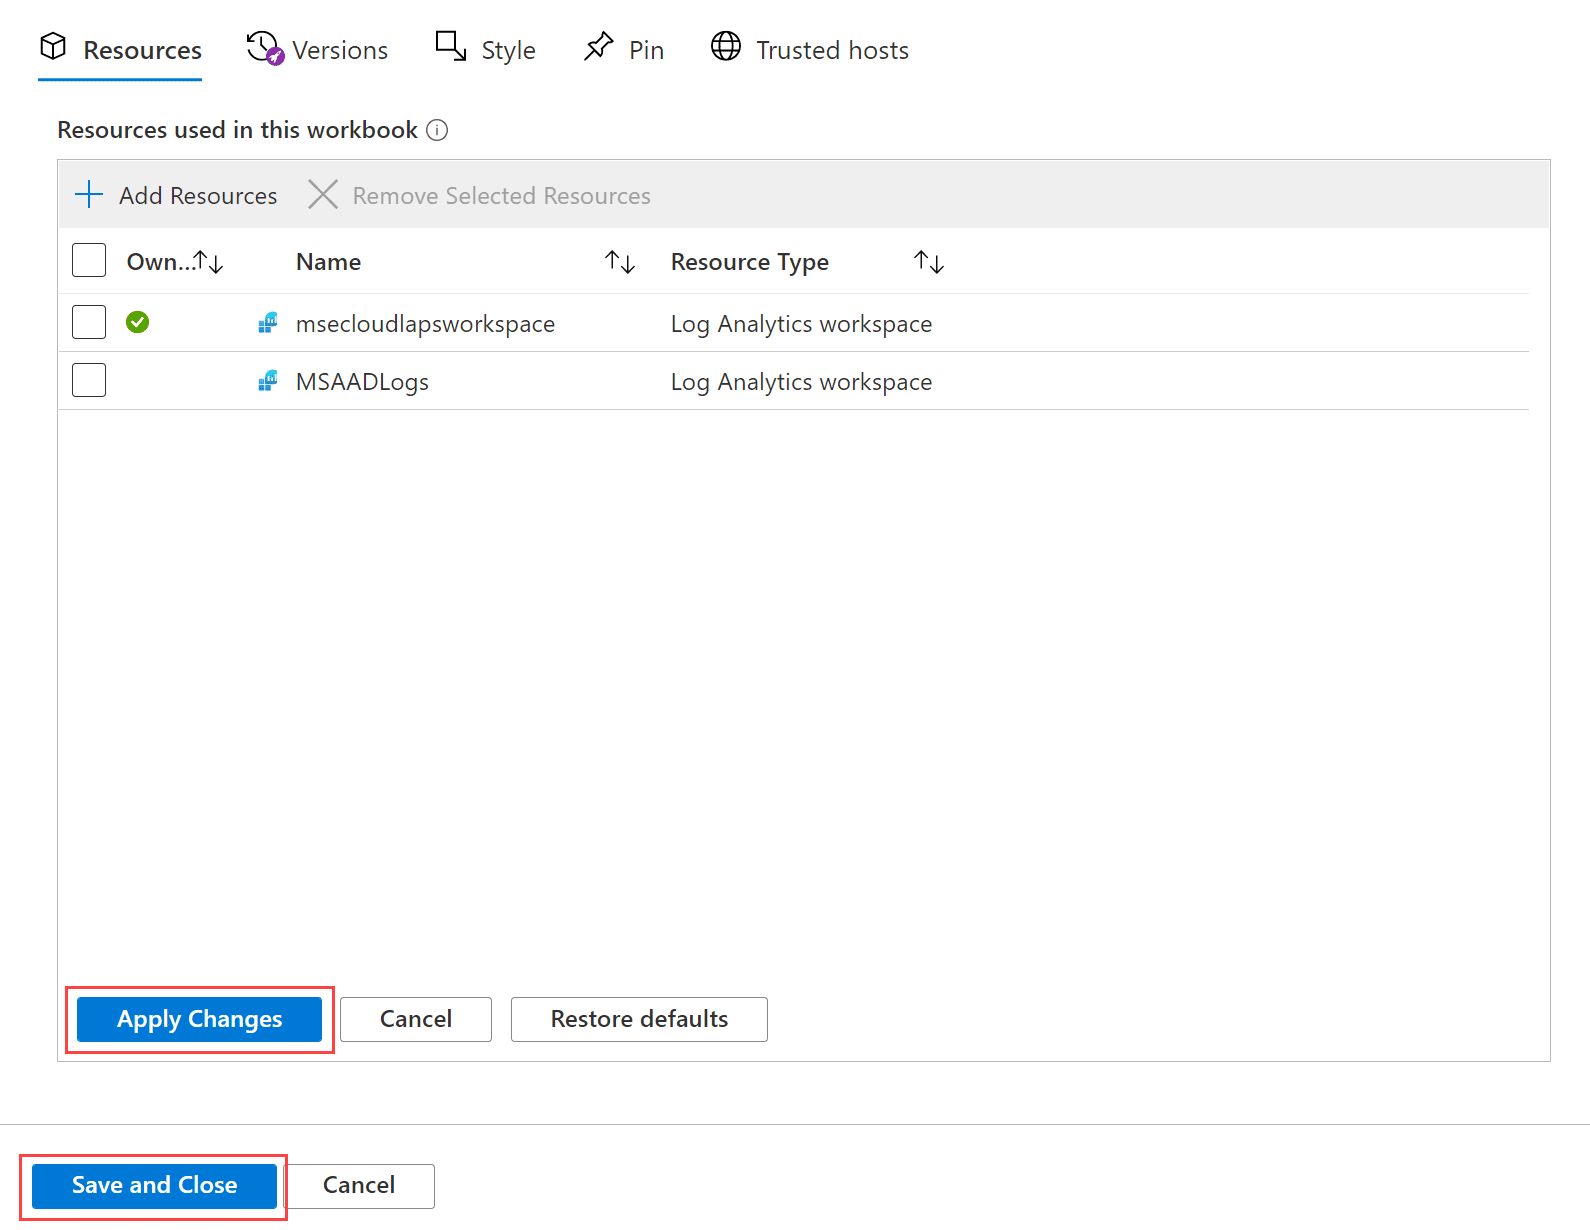
Click Apply Changes and then Save and Close.
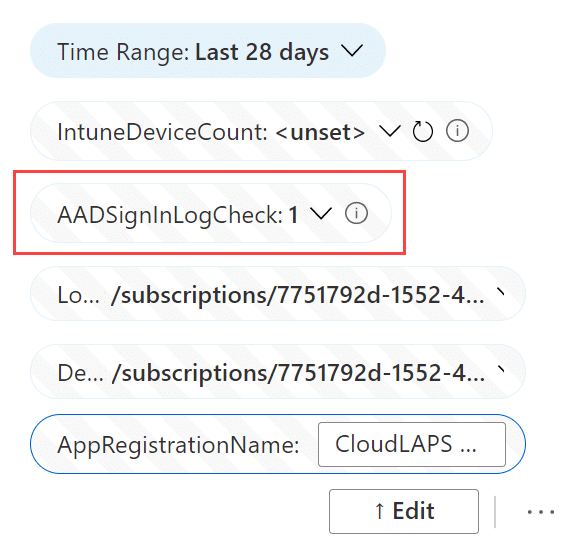
Notice that in the parameters section, the AADSignInLogsCheck parameter should have changed its value to 1.
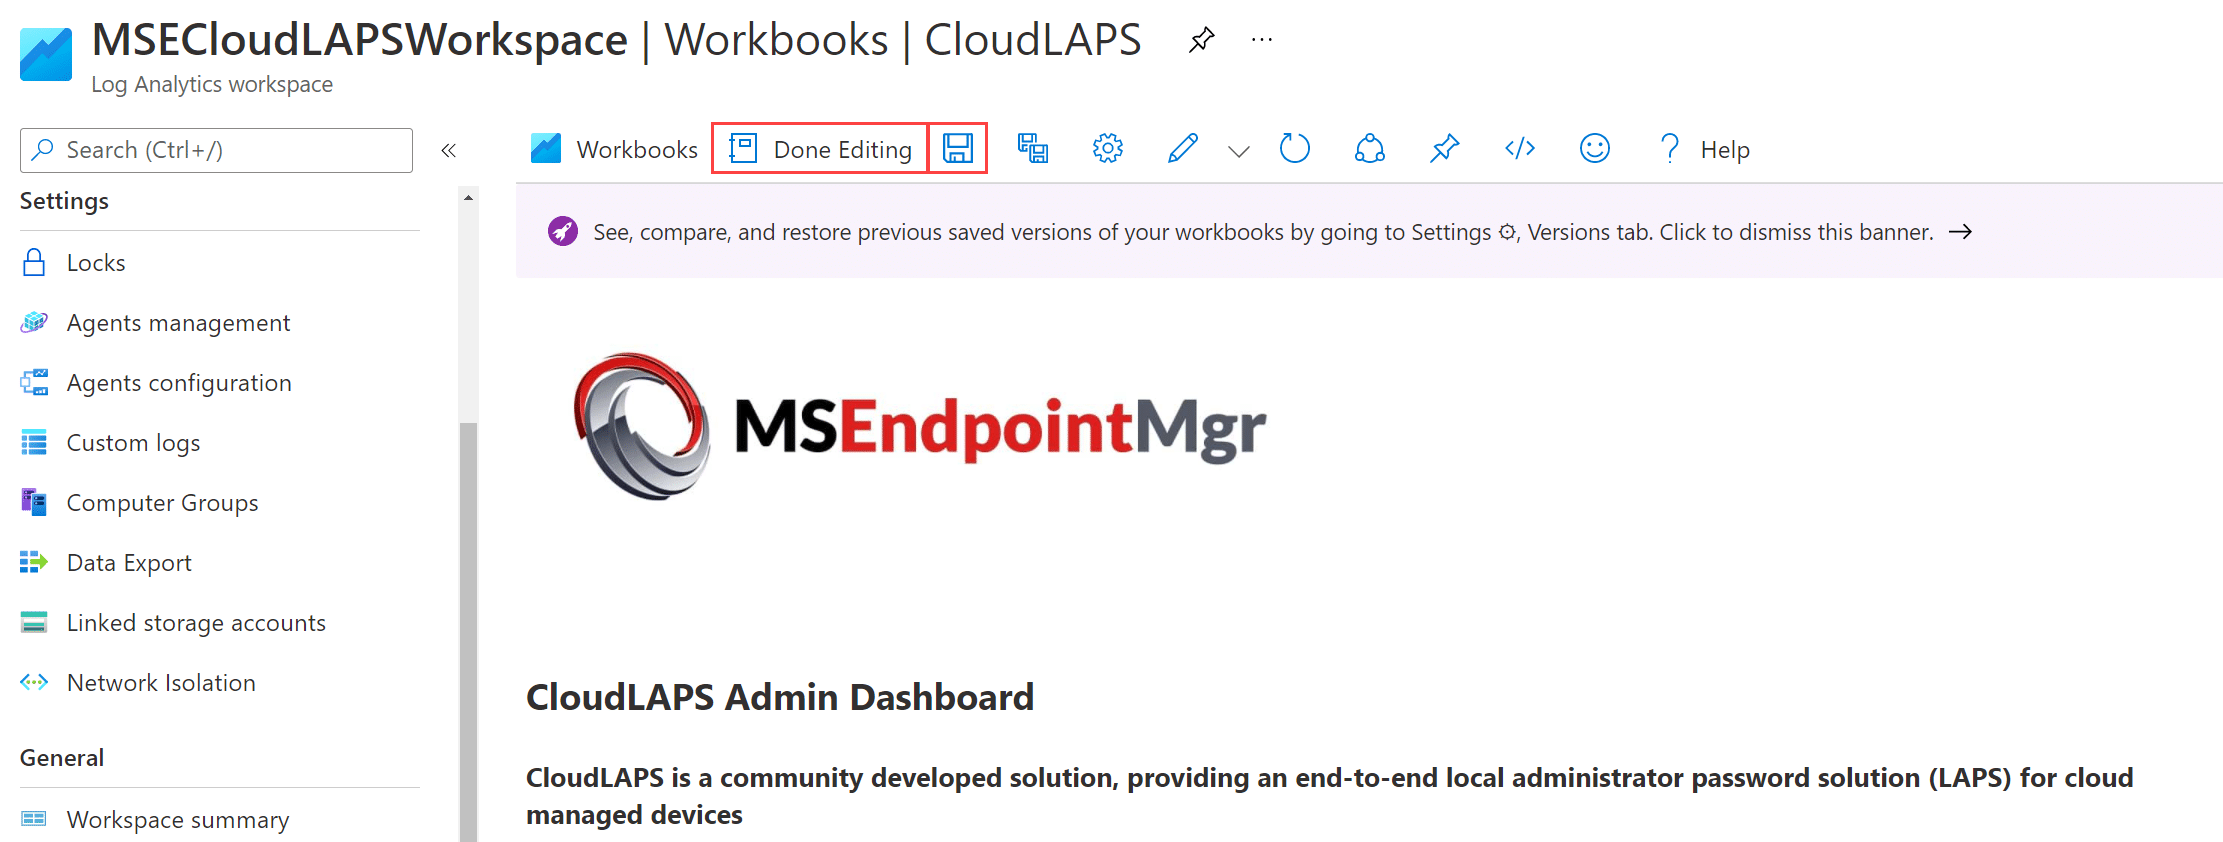
Click the Save button and then the Done Editing button.
Editing of the workbook, to enable the web portal and geo location sign-in data is now complete. Ensure you allow for some time for the data to flow from Azure AD to the selected Log Analytics workspace.
Enhancing the main CloudLAPS workbook with Intune device details
By following the steps outlined below, the main CloudLAPS workbook will contain the following enhancements:
- Extended details in Web portal and geo location sign-ins
- Click-able device names with links to MEM portal
- Additional device data such as compliance state and more
These enhancements have been made available for the purpose of being able to provide a more detailed experience when using the CloudLAPS Analytics and monitoring workbooks. Although it’s worth mentioning again, this functionality is not a requirement and the workbooks will work just fine without the configuration steps in the sub-sections below.
Below are some before and after images of the enhancements added to the workbook when linking the Intune devices log:


To enable the enhancements of the main CloudLAPS workbook, complete the prerequisite sub-sections mentioned below:
- Send Intune Devices logs to a Log Analytics workspace
- Link Log Analytics workspace with Intune devices logs to workbook
Send Intune Devices logs to Log Analytics workspace
Setup instructions for sending the Azure AD Sign-In logs to a Log Analytics workspace, is not covered in these setup instructions. Refer to the official documentation from Microsoft using the links below, for more details on how to send the log data:
Route logs to Azure Monitor using Microsoft Intune | Microsoft Docs
Make sure the Devices log is selected to be sent to a Log Analytics workspace when configuring this
Here’s an example showing how the Intune device logs are being sent to a specific Log Analytics workspace named MSIntuneLogs:
It’s a good practice to let some time pass, e.g. a couple of hours after the logs are sent off to Log Analytics.
Link Log Analytics workspace with Intune Devices logs to workbook
Click the Edit button.
Click the Settings (cog) button.
Click Add Resources.
Apply a desired filtering method, e.g. by resource group and locate the Log Analytics workspace where the Intune Devices logs is being sent to. Select this workspace and click Apply.
Click Apply Changes and then Save and Close.

Notice how the IntuneDeviceCount parameter changes to the number of devices it’s able to find by querying the logs that was just linked.

Click the Save button and then the Done Editing button.
Editing of the workbook, to enable enhanced mode is now complete. Ensure you allow for some time for the data to flow from Intune to the selected Log Analytics workspace.
Table of contents
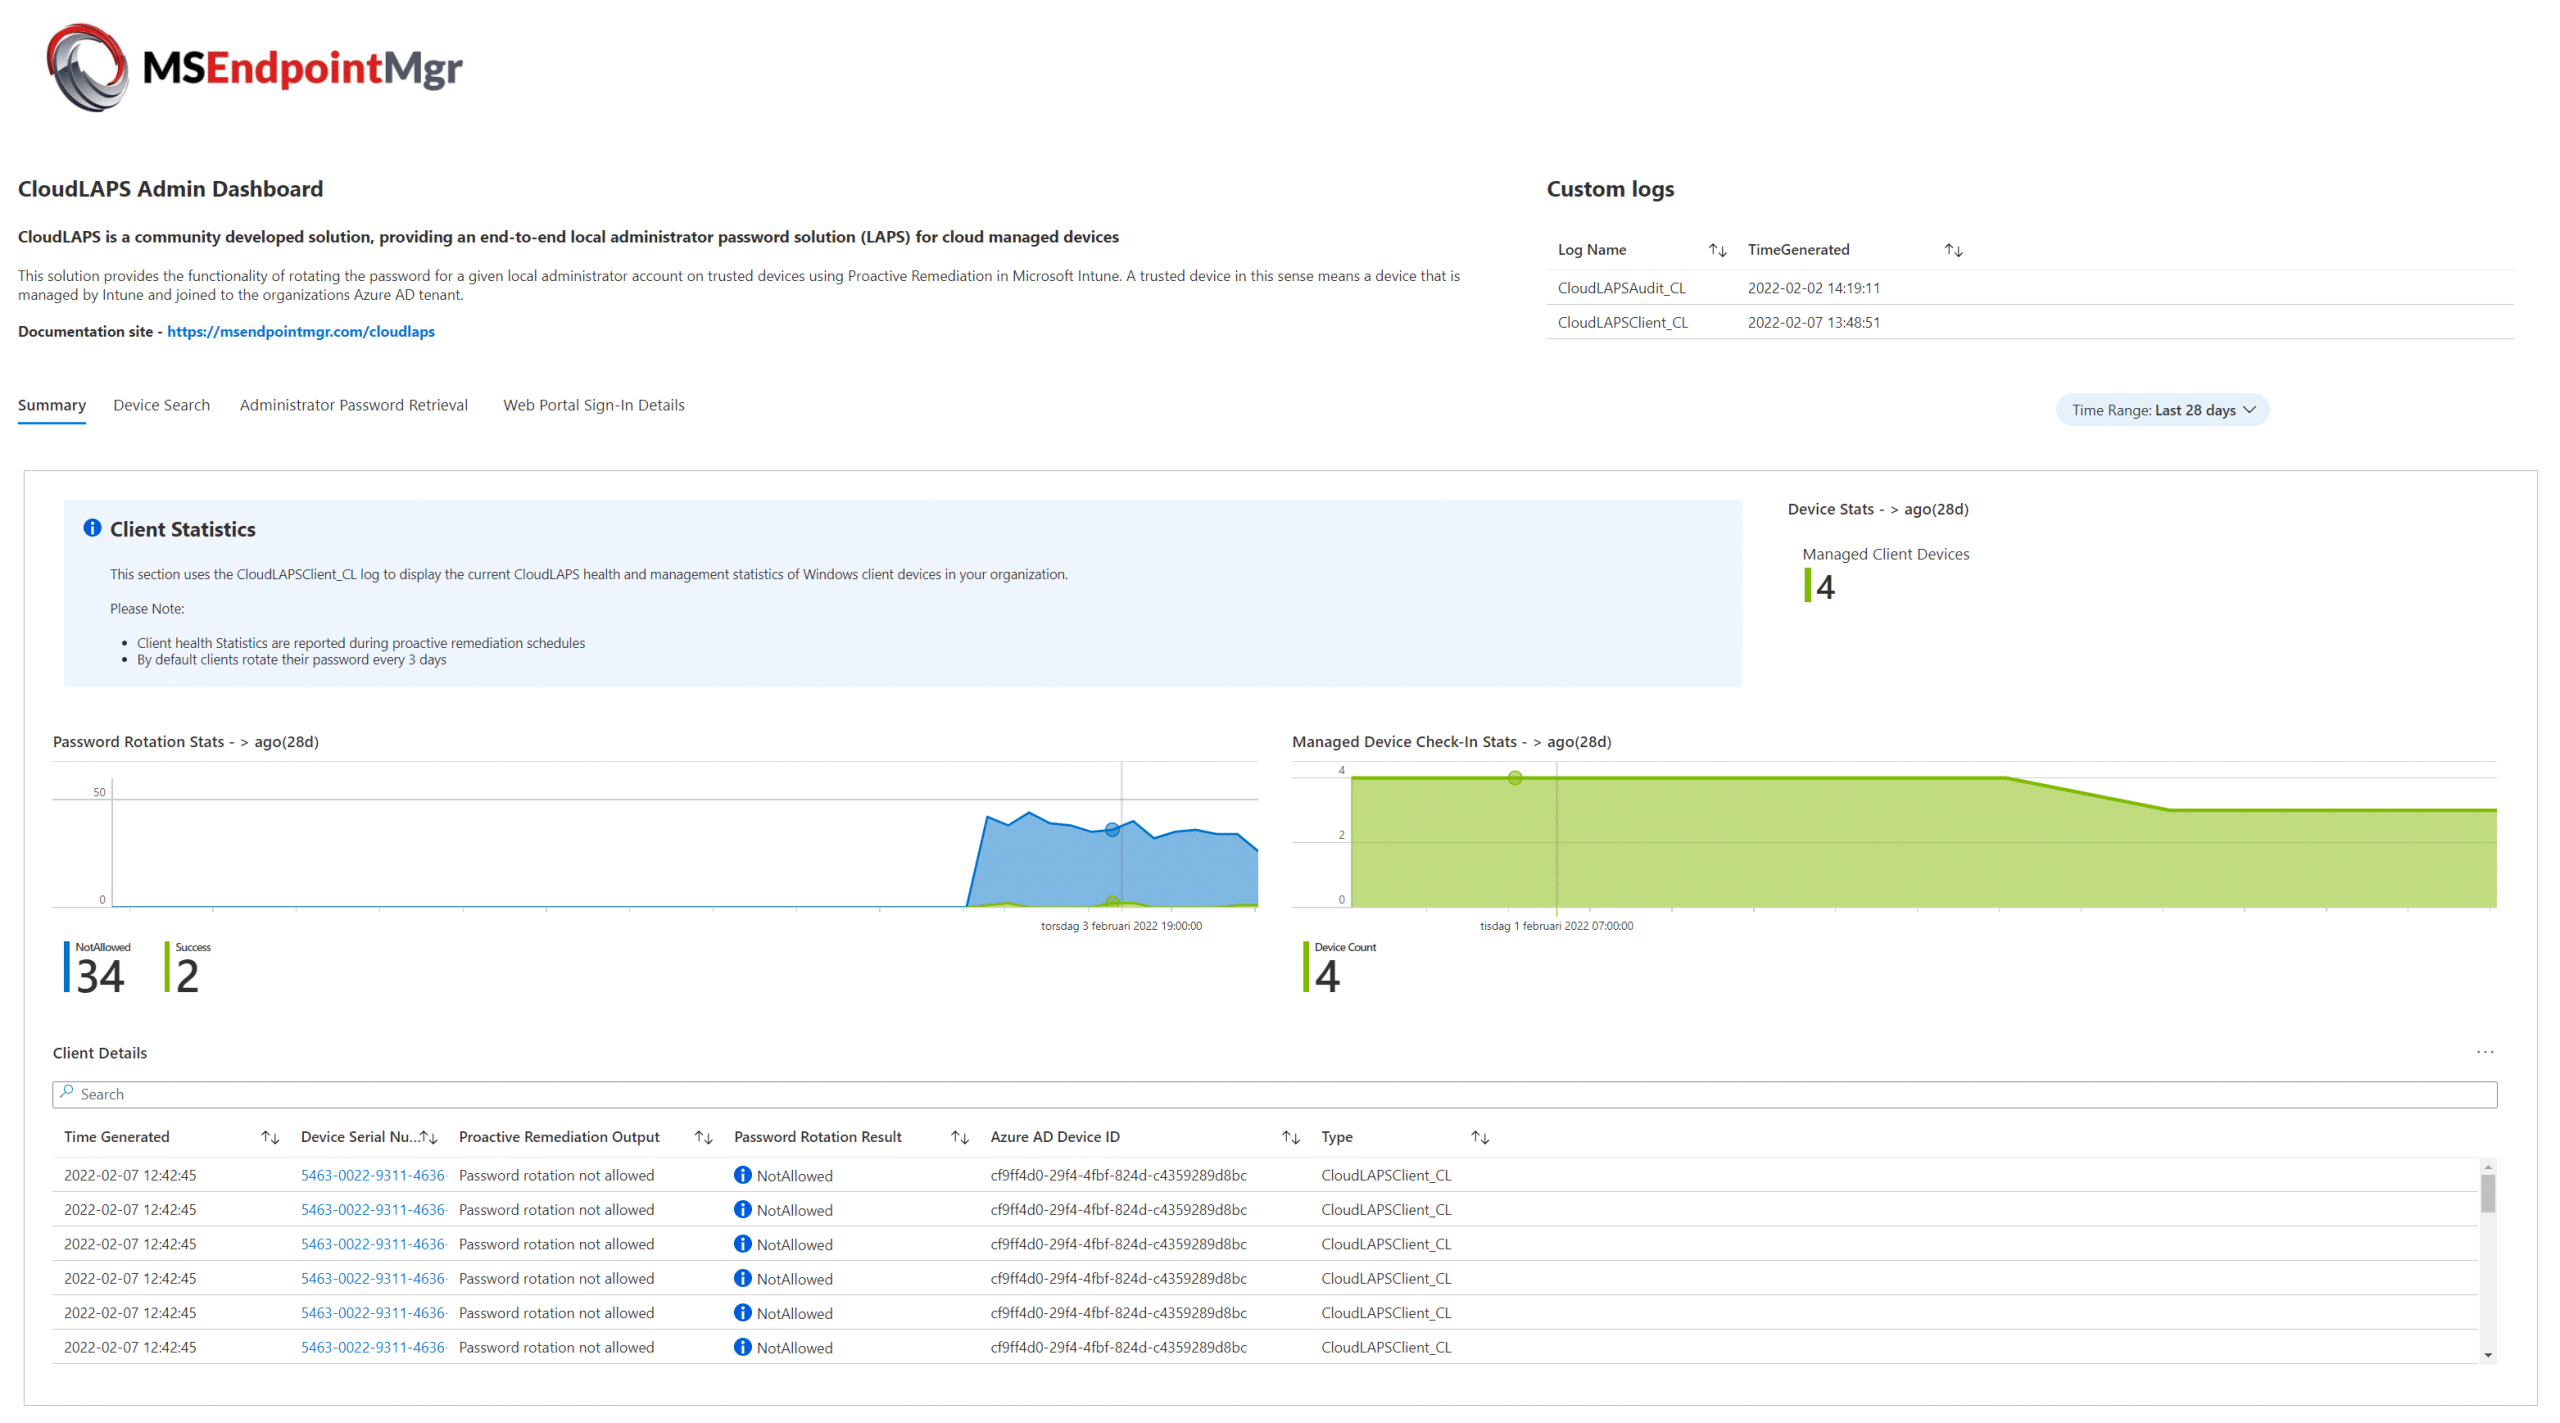
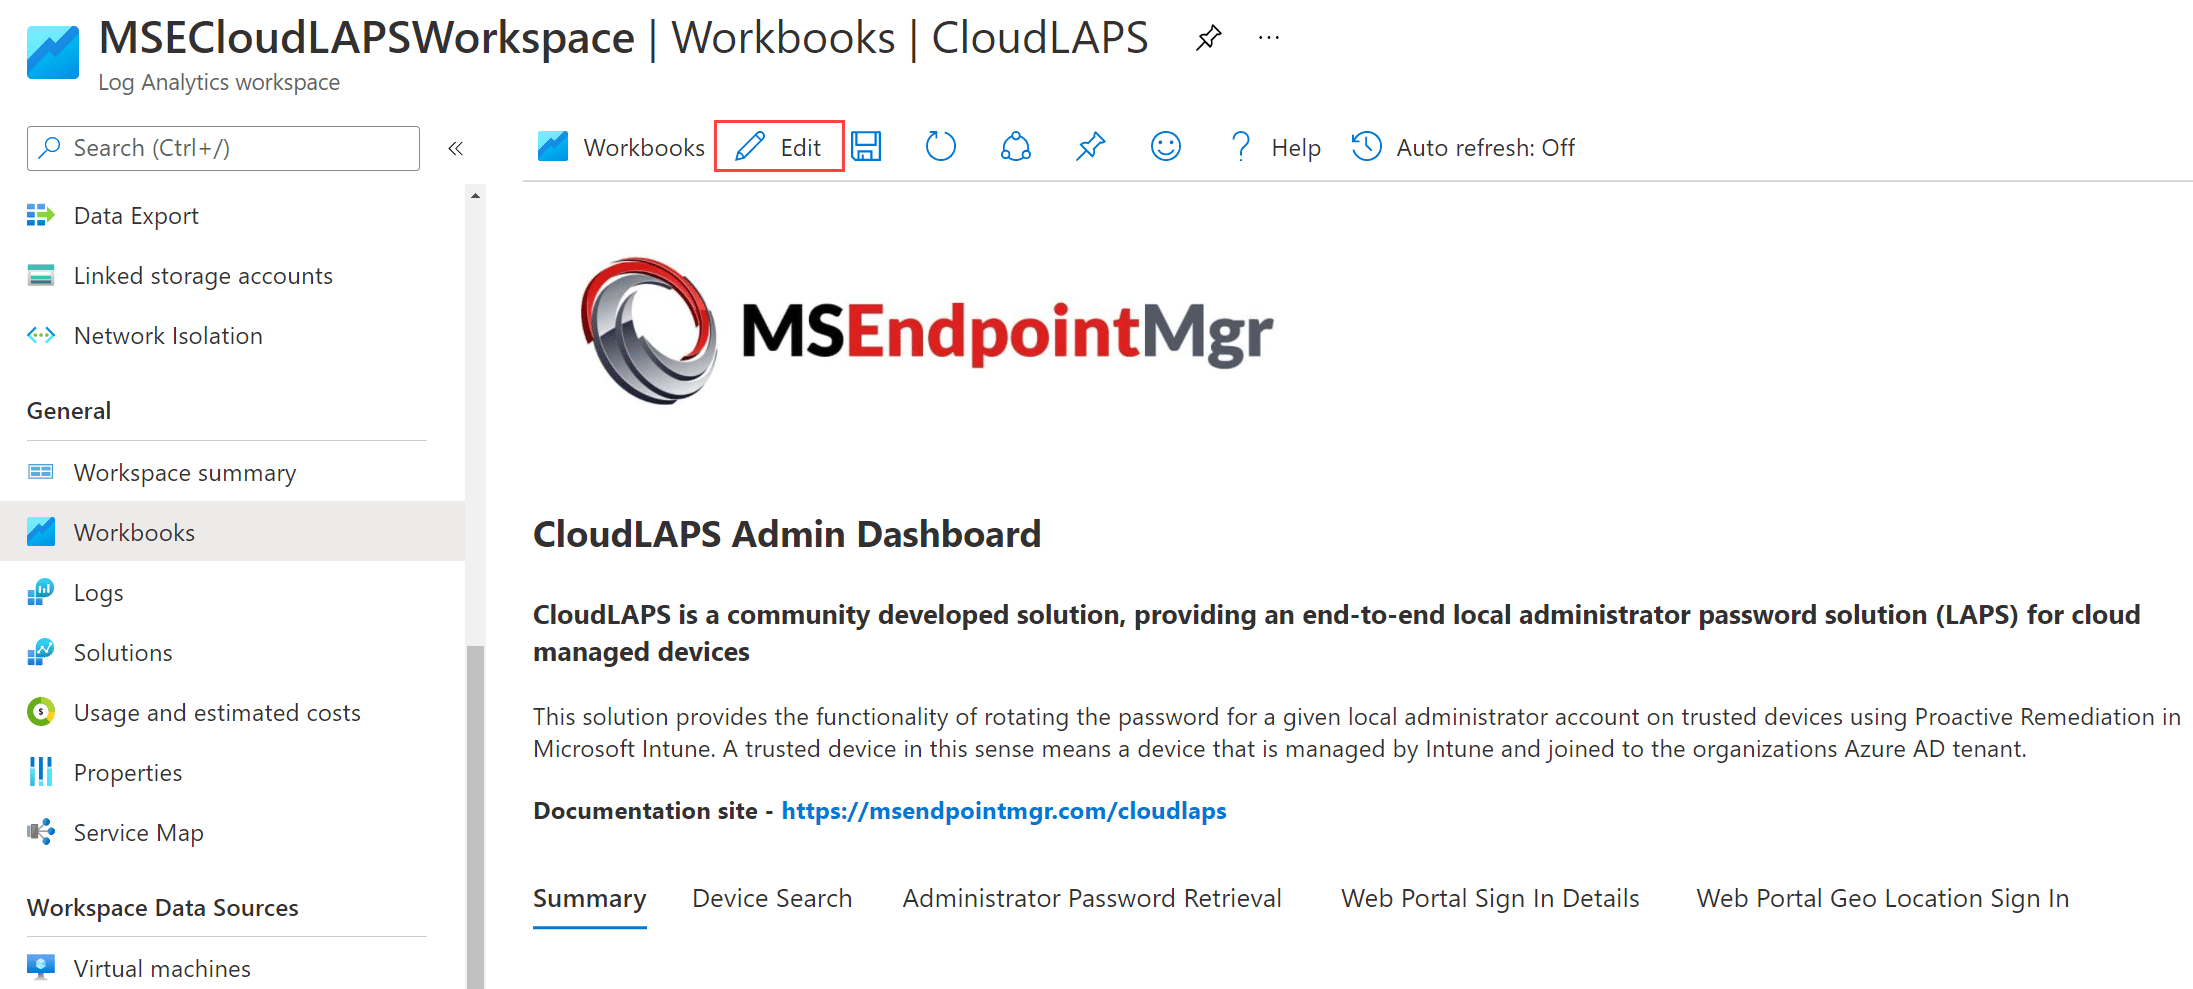
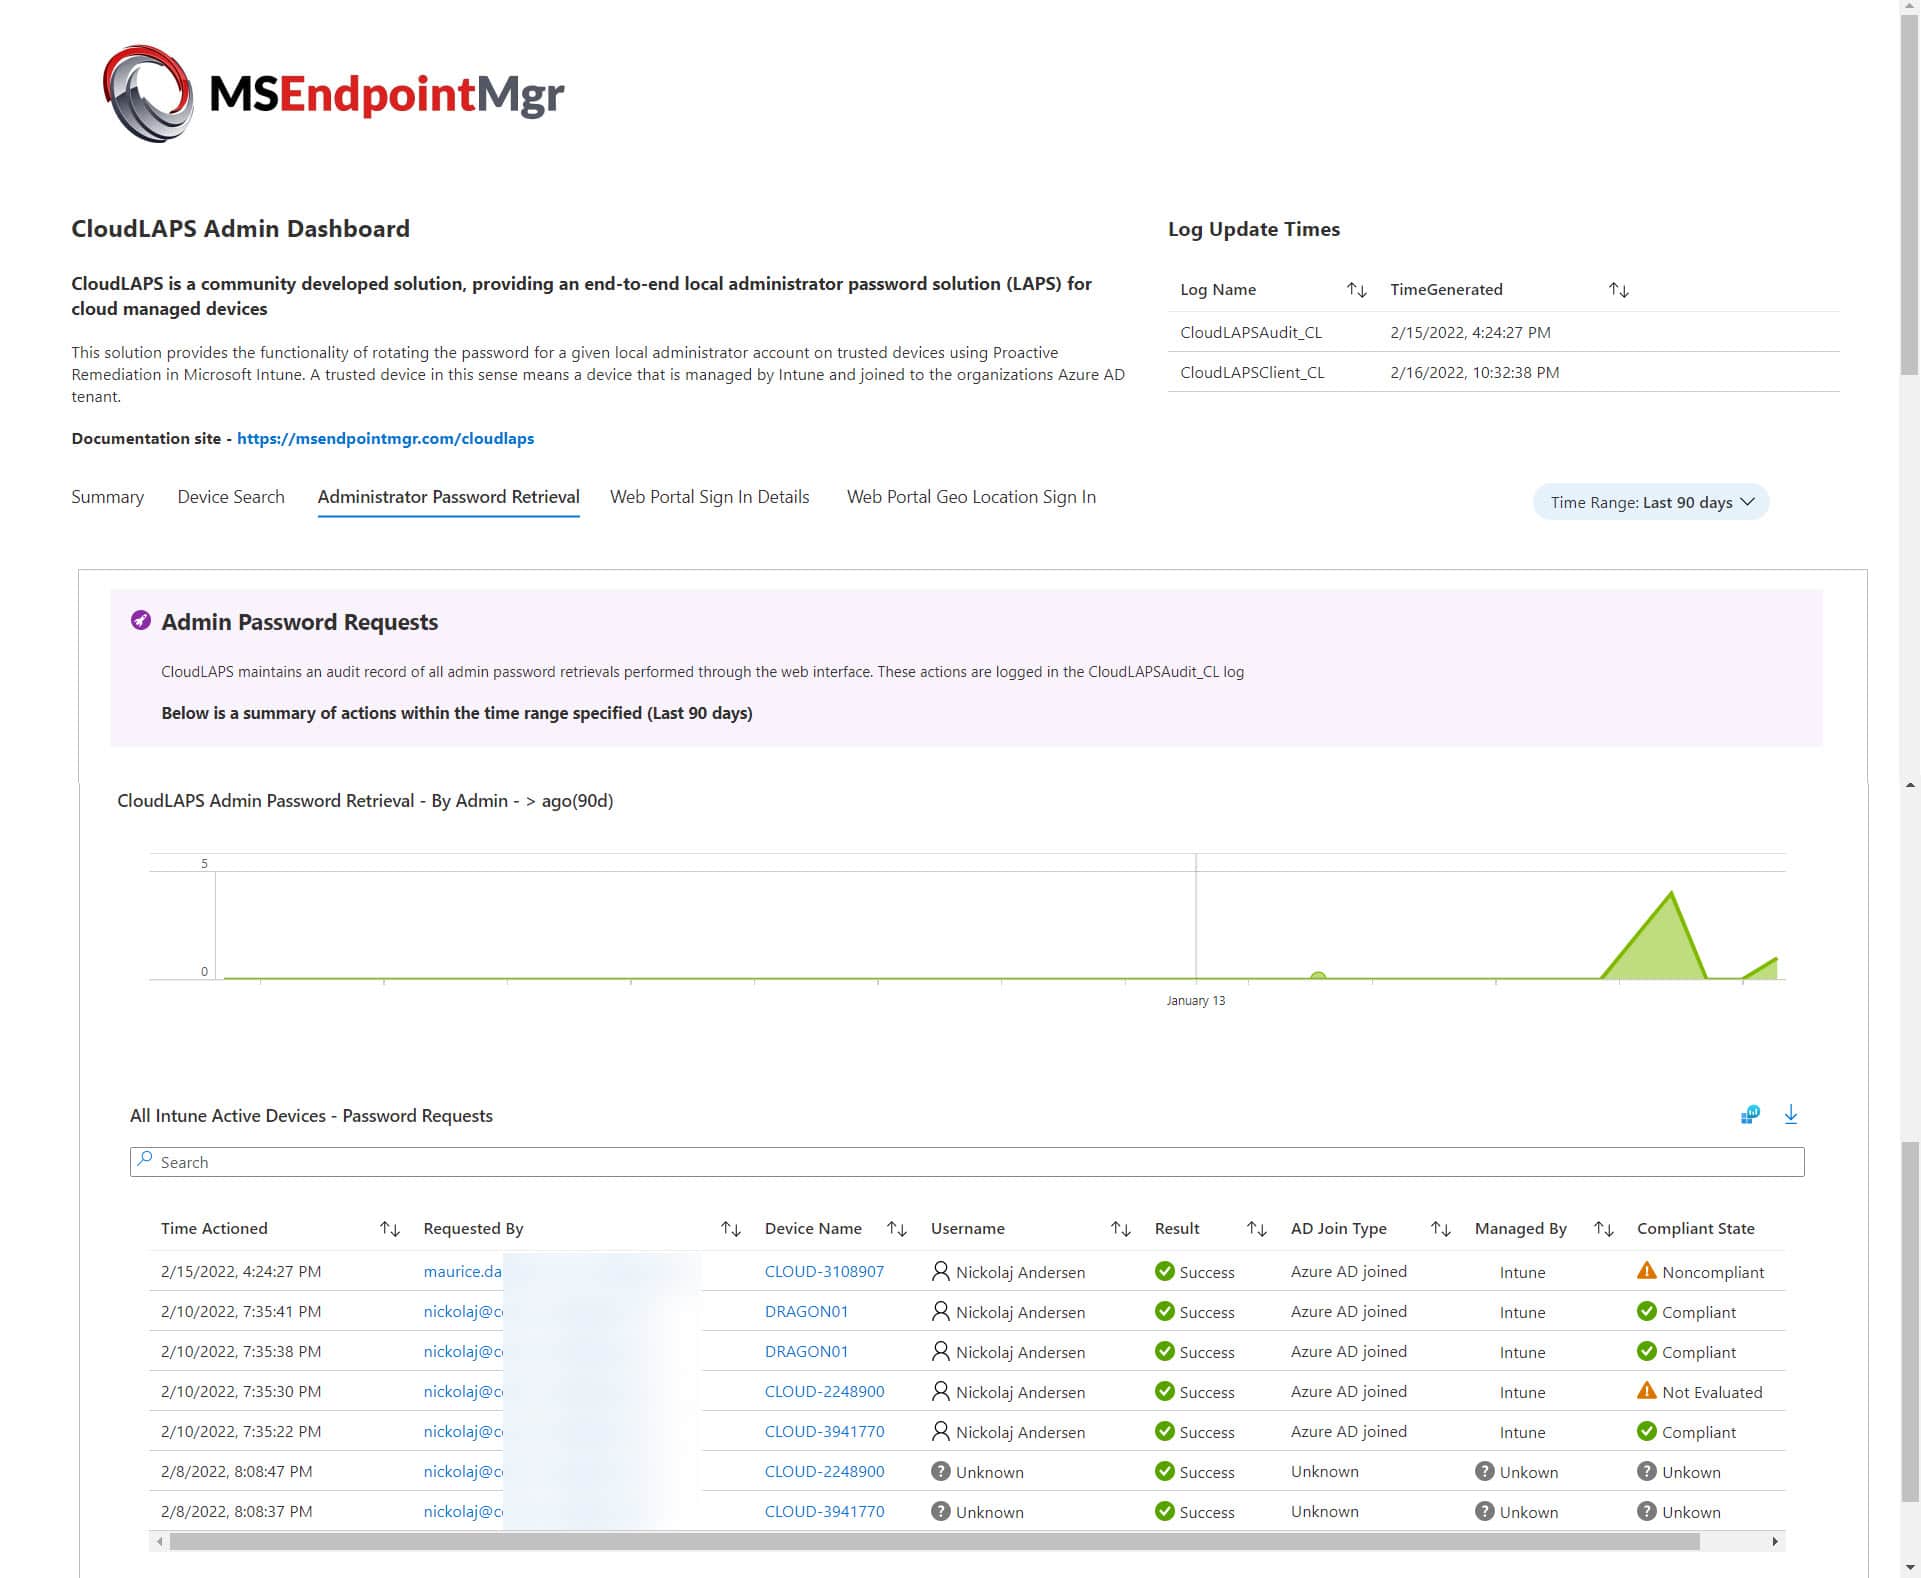
Summary tab
On the main summary page you will see the number of unique devices managed by CloudLAPS within the time frame specified in the drop down time range. Graphical trend graphs show you the password rotation and device check in statistics, allowing you to track CloudLAPS client health states over time.

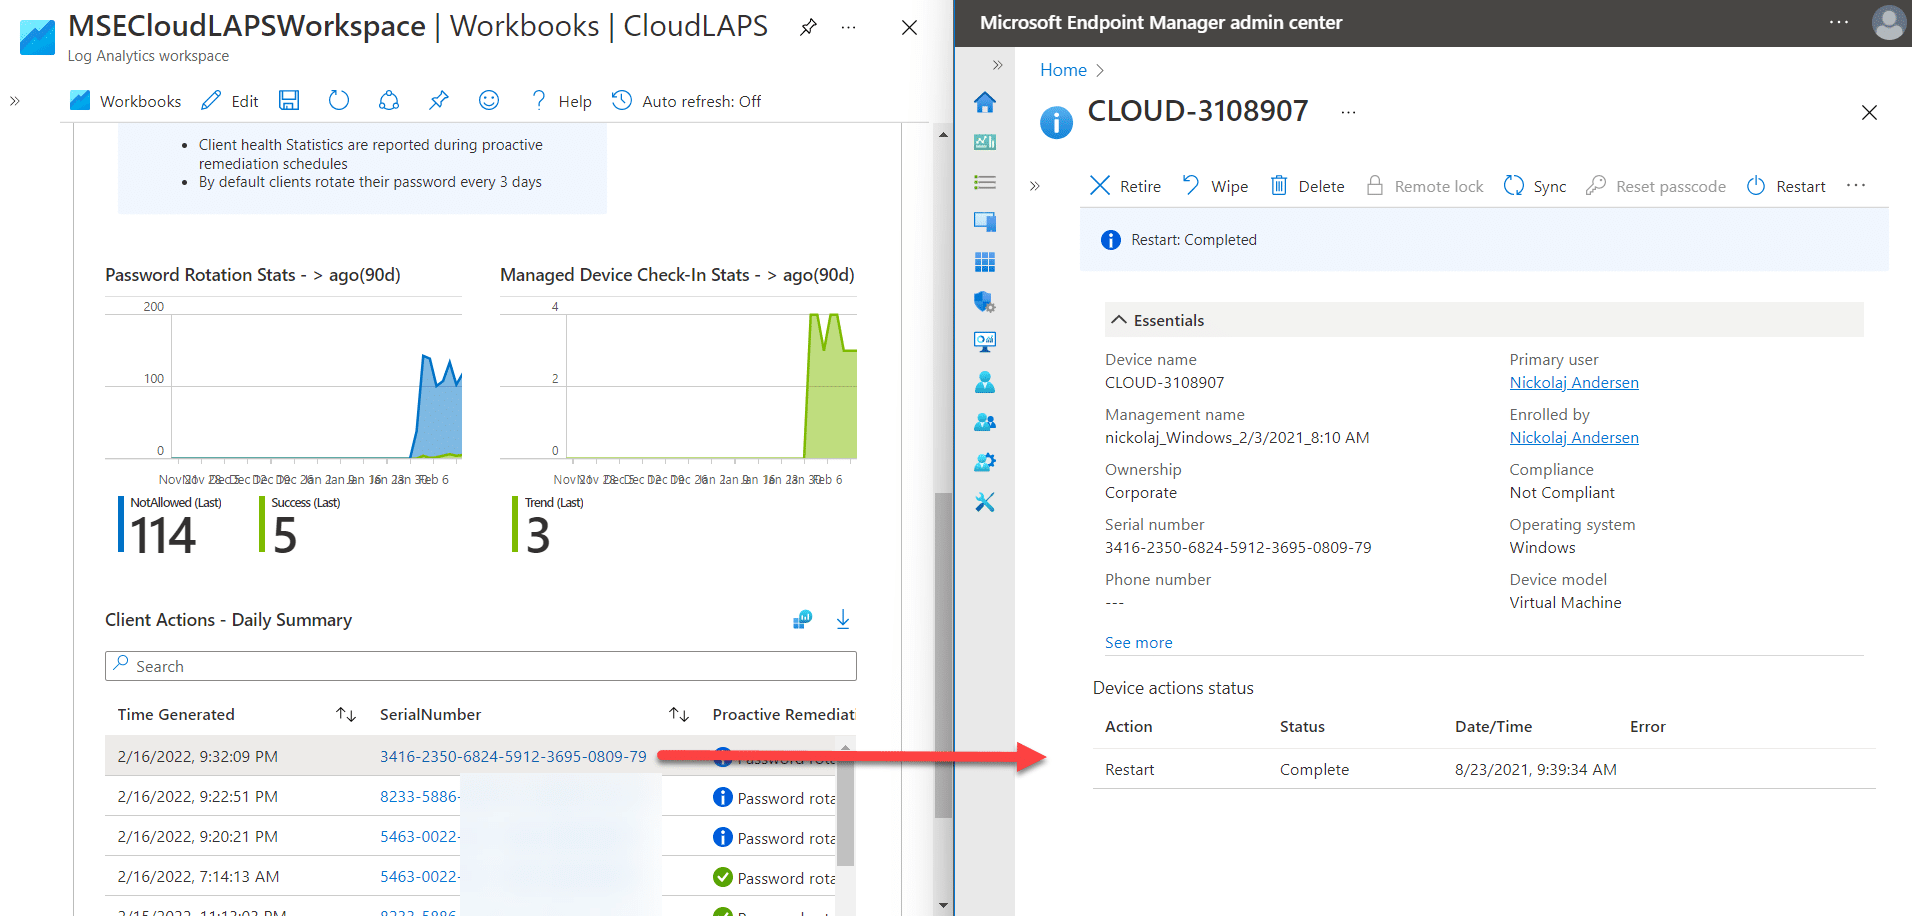
In the client actions section, you can view each event generated by the client, and search based on the serial number of the device. Clicking on a device serial number with the IntuneDevice logs linked to the workbook will invoke a call to the Microsoft Endpoint Manager Admin Center, bringing you to details on that client device:
Device Search tab
Should you need to query events for a specific device, you can use the Device Search tab to enter the serial number of the device (remember the serial is required as computer names can be duplicated, hence the requirement for a unique matching value).

Administrator Password Retrieval tab
On the Administrator Password Retrieval tab you will see all successful password retrievals. Integration with the IntuneDevice logs also displays the primary user and compliance state of the device:
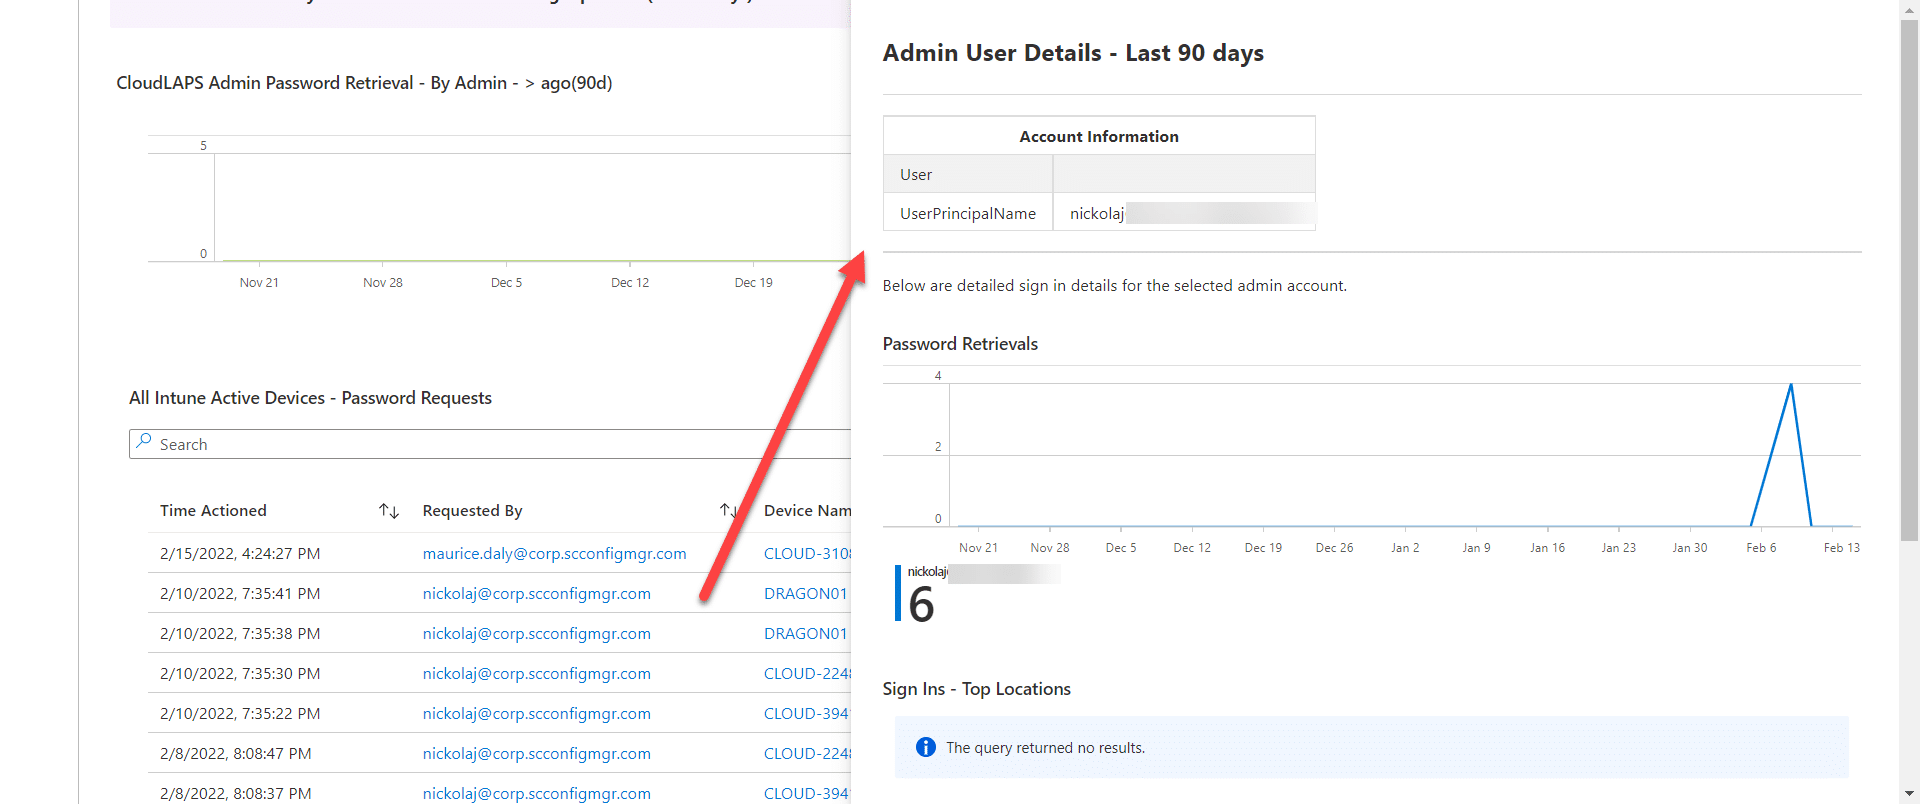
Clicking on the admin who requested the password will result in a slide in workbook showing activity for that admin over time:
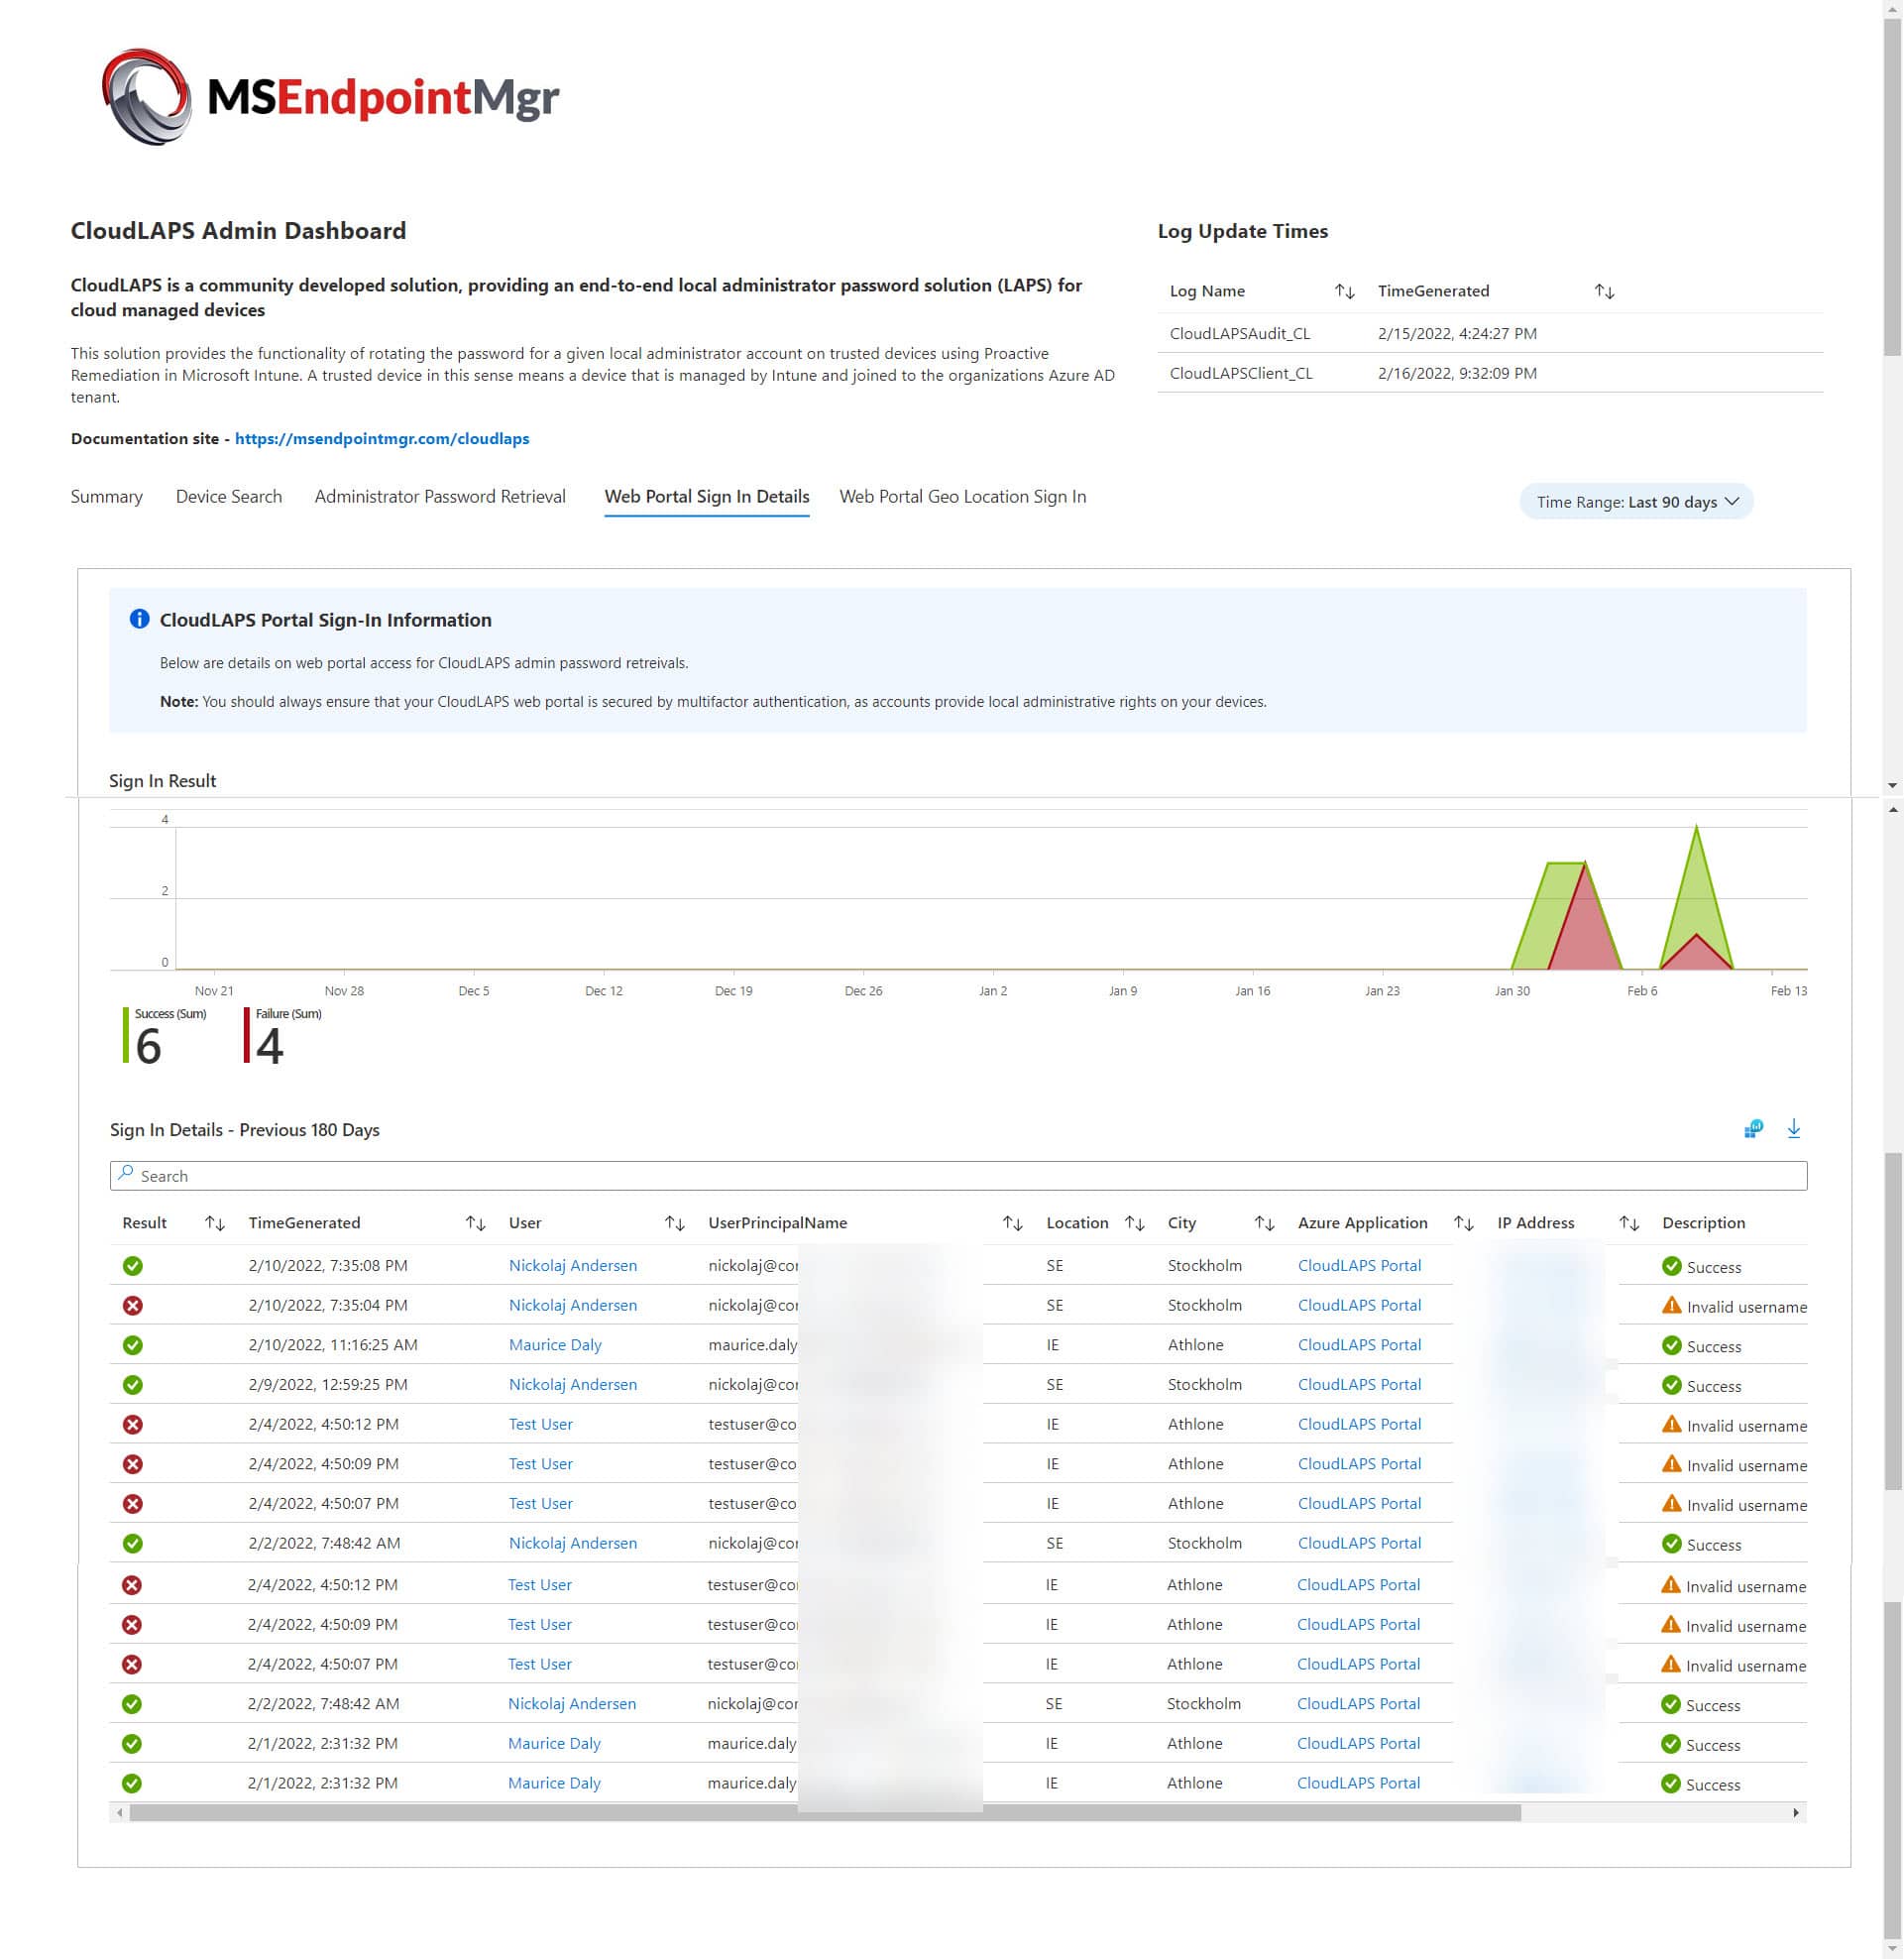
Web Portal Sign In Details tab
This tab extends on the admin sign in page, to include all attempted logins over time. Here you can monitor failures, picking up on users who failed MFA, or who were not allowed to sign into the portal.
Web Portal Geo Location Sign In tab
On the last tab, you can visualize where your admins are signing in from, giving you visibility to ensure that known countries are in use:

Things to note
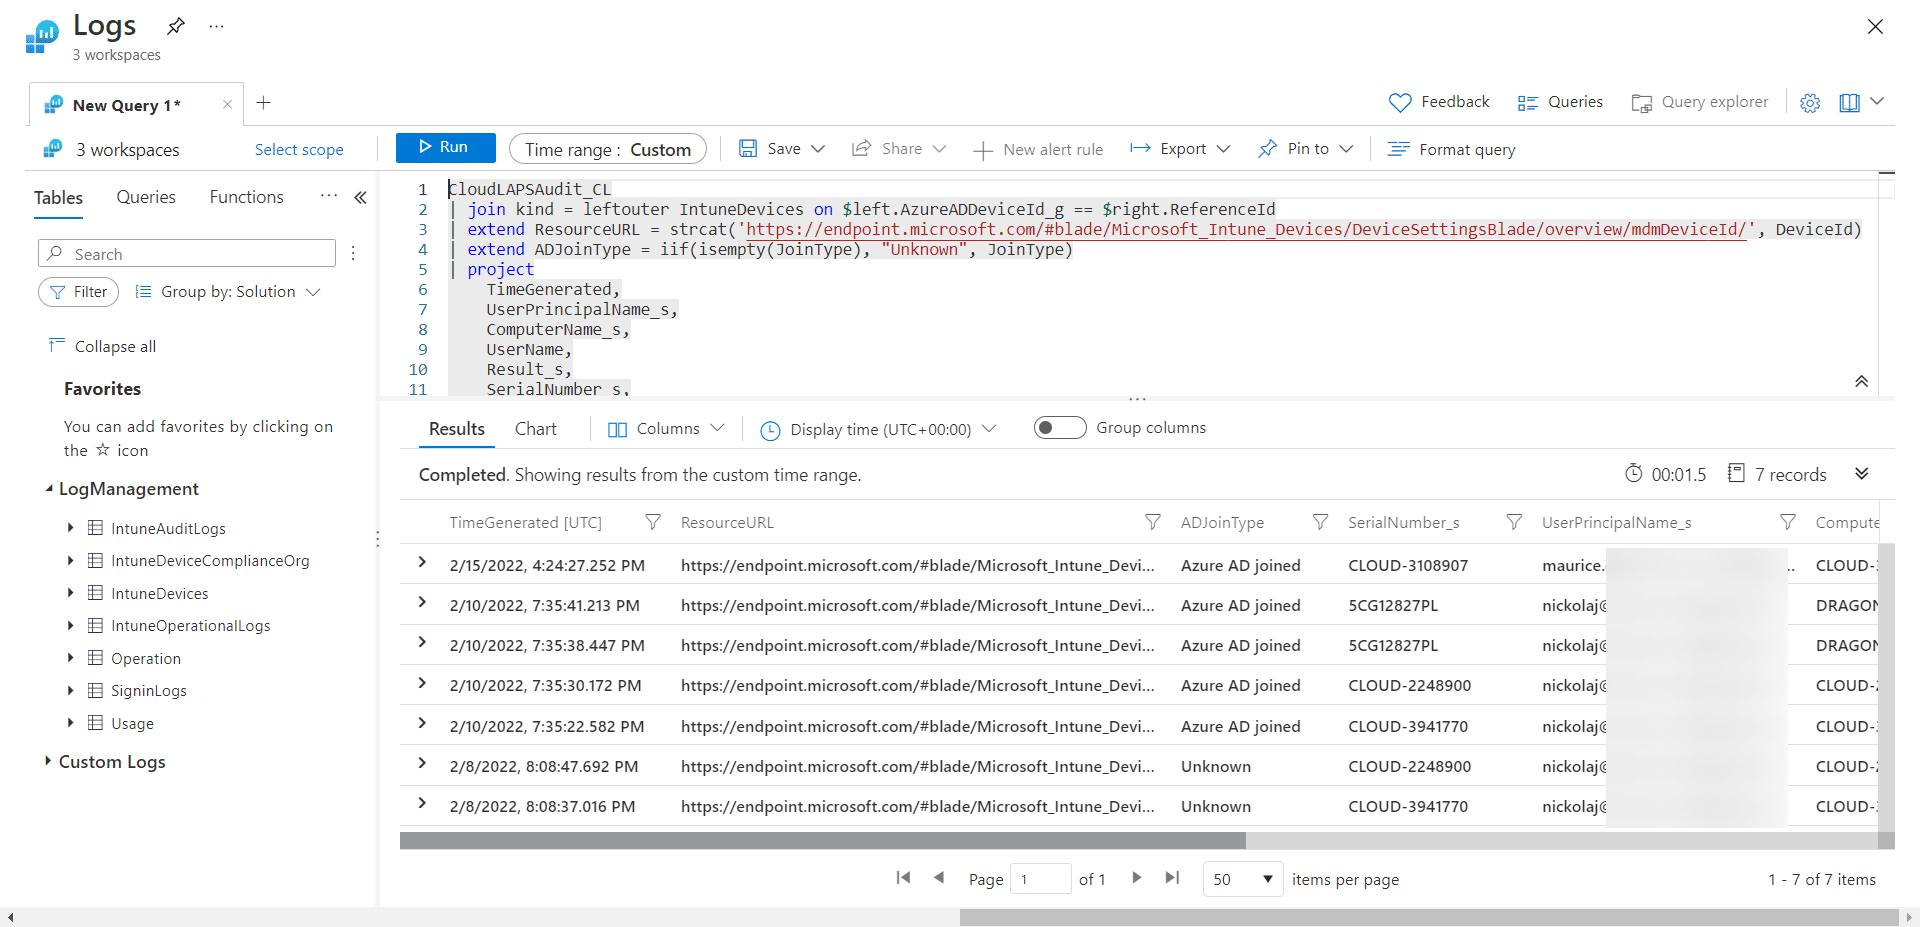
Queries are limited in the number of entries that can be displayed, both by limitation at 10,000 rows, and in order to render the UI effectively. Should you require to gather data beyond this limitation, you can click on the following icon to do direct to the associated query:

Log Analytics page:
Feedback
If you have ideas, suggestions, or bugs, please submit your feedback to us!