


According to my last blogpost on how to get started running PatchMyPC for 3rd Party patching via Intune it became clear that PMPC does not enforce automated patching of available apps in Intune. This could also apply to other mechanisms or products being used have to keep your 3rd Party apps in Intune up to date. So when the apps are assigned as available, how can we make sure that all the devices that currently have them installed are being remediated.
I have solved this particular problem with utilizing Azure automation and Microsoft Graph Api. The solution it self, that I have named IntuneWin32AppRemedy, is a Azure Automation PowerShell script that could run either on a schedule, or being triggered by for instance Azure Monitor. This is all up to you, just make sure that the runbook runs each time one of your apps is updated with a new version.
When the runbook runs, it will first check the current assignment for the app in question, if the app is assigned as available it will create a application remediation group in AzureAD, find all devices that have the old version installed, join these devices to the group and then assign the application as required to that group with a deadline of your choice. The runbook is also checking if there is an existing Azure AD Group for the previous version of the app, and remove this group from Azure AD as it is no longer needed. See drawing below for deeper insight:

I am assuming that the new version is also assigned as available, so if any user on their own updates their app before the deadline is out, the app will not enforced on the user.
This blogpost is now going through each of the steps of the runbook to explain what it does, in the end of the post you will find a link to the PowerShell script used so that you can easily import it into Azure Automation.
Requirements
This solution requires you to have the following in place
- An Azure AD App for Authentication
- ClientID
- ClientSecret
- The Azure AD Application requires the following Graph Api permissions
- Device.Read.All
- DeviceManagementApps.ReadWrite.All
- DeviceManagementConfiguration.ReadWrite.All
- DeviceManagementManagedDevices.Read.All
- Group.ReadWrite.All
- An Azure Automation account
- PowerShell Runbook
- Automation Variables
- Teams Webhook connector defined in Teams (Optional)
Dynamic Group Creation
For each app that gets an update, a Azure AD Group will be created. This group will contain all devices that has the previous version installed from Intune. The app remediation groups will look like this.
(prefix can be modified)

Each device that has the previous version of, for instance Visual Studio Code, will be a member of the AppRemedy-Microsoft Visual Studio Code 1.45.1 (x64) group. Also if there was a group for version 1.45.0, that group is deleted at this stage leaving us with only the latest group in Azure AD.
App Assignment
Now that we have the group created and all devices inside the group, we are ready to assign the newest version of the app to this group. This is done by using Intune Graph Api. It is possible to define your own deadline, reboot grace periods, reboot snooze and more in the script below. When the runbook has done its job, the assignment of the app will look like this, assuming you have through manual or other methods assigned the new version as available to all users:
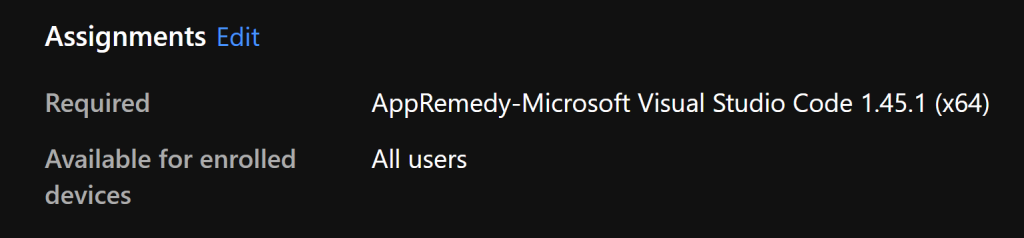
And the details of this assignment with my choices set:

This app group was created on the 24th of May with a 2 days deadline. Meaning that after 2 days this app installation will be enforced on all the machines that had the previous version of Visual Studio Code installed. Very simply explained, this is what this solution does.
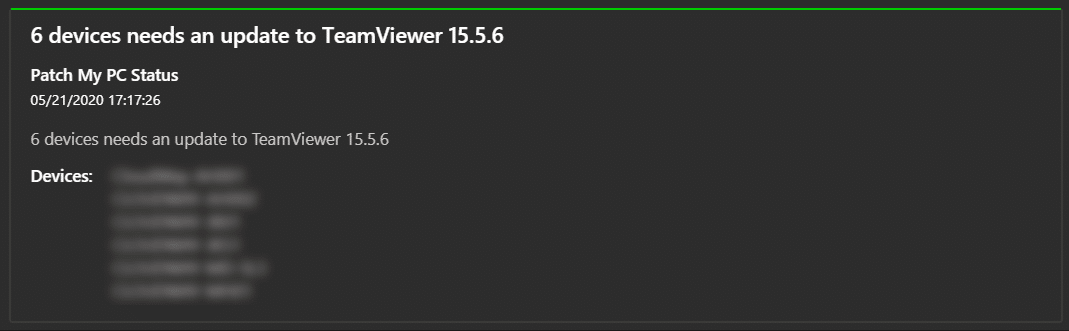
Team Reporting
I have also added an option to report on this via Microsoft Teams. If you enable Teams Reporting it will give you nice reports in Teams on how many devices that is pending update on their apps. The reporting in Teams will look like this:
Implementation
Step 1 Azure AD Application
First create your Azure AD Application that we are going to use for authentication to MS Graph. Go to Azure AD on https://aad.portal.azure.com and click on App Registrations – New registration and give it a name:
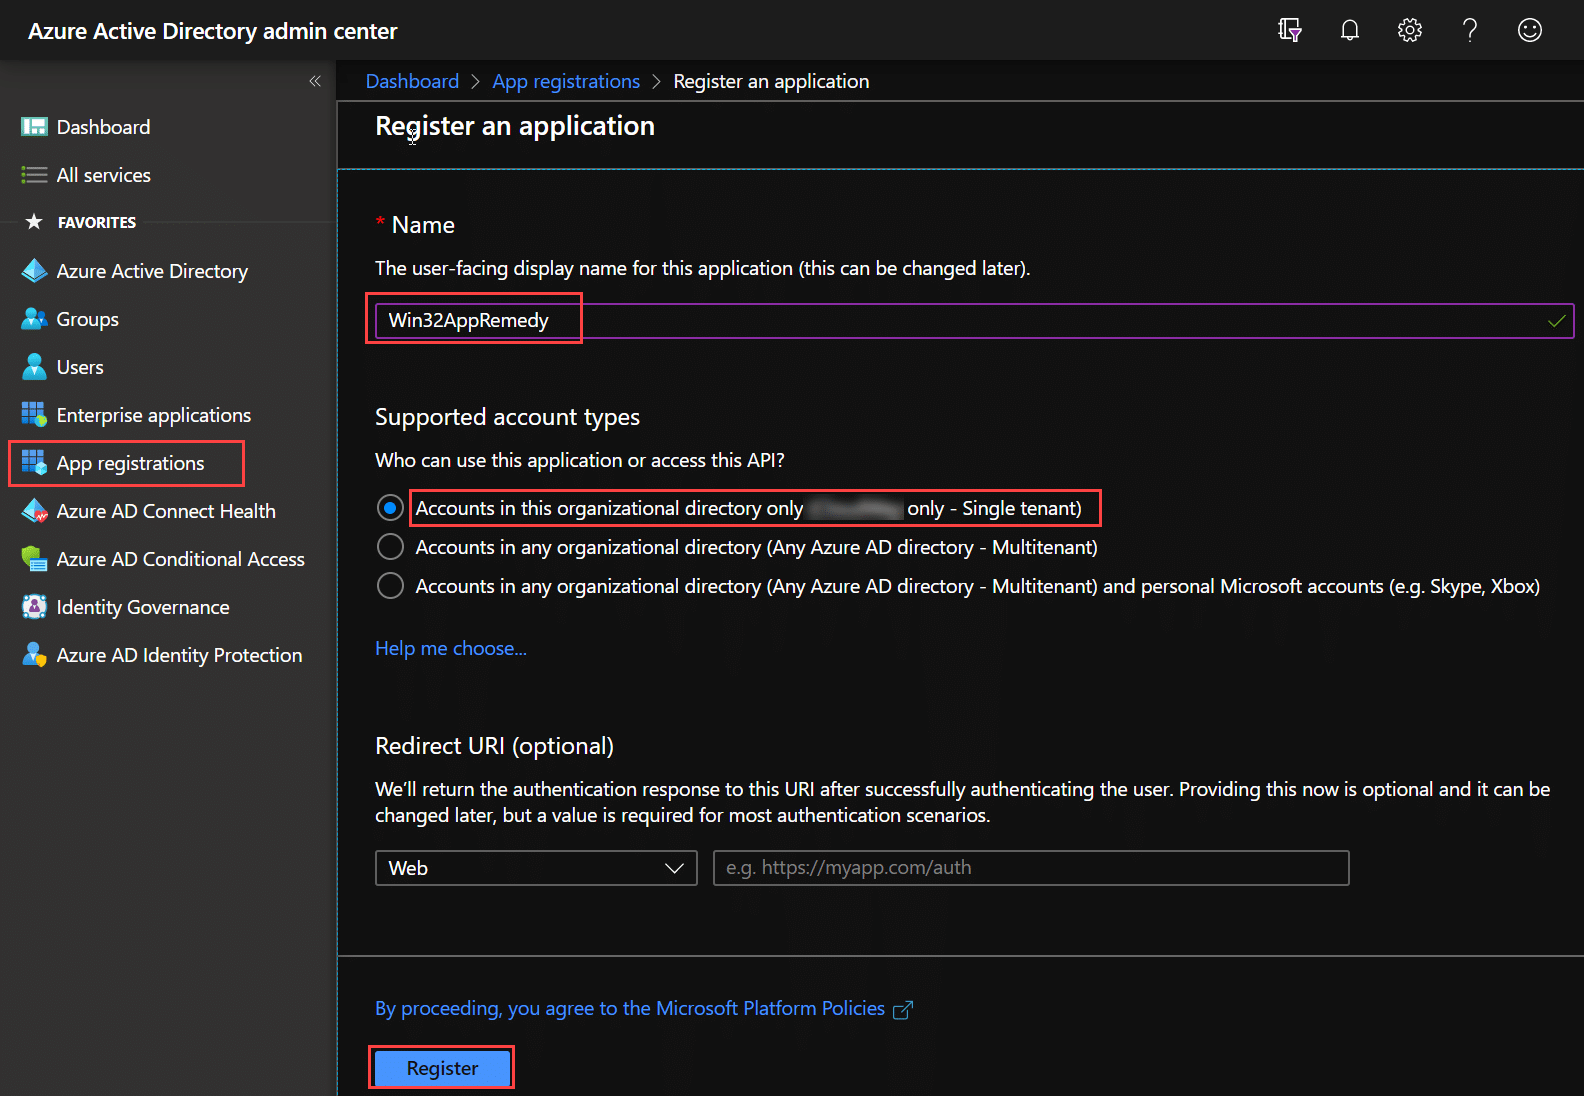
Make a note of the Application (client) ID and the Directory (tenant) ID. We need them later. Now go to API Permissions and select the Permission under Requirements at the top of this post.
(Microsoft Graph – Application Permission)
- Device.Read.All
- DeviceManagementApps.ReadWrite.All
- DeviceManagementConfiguration.ReadWrite.All
- DeviceManagementManagedDevices.Read.All
- Group.ReadWrite.All

Remember to click on Grand admin consent for your tenant.
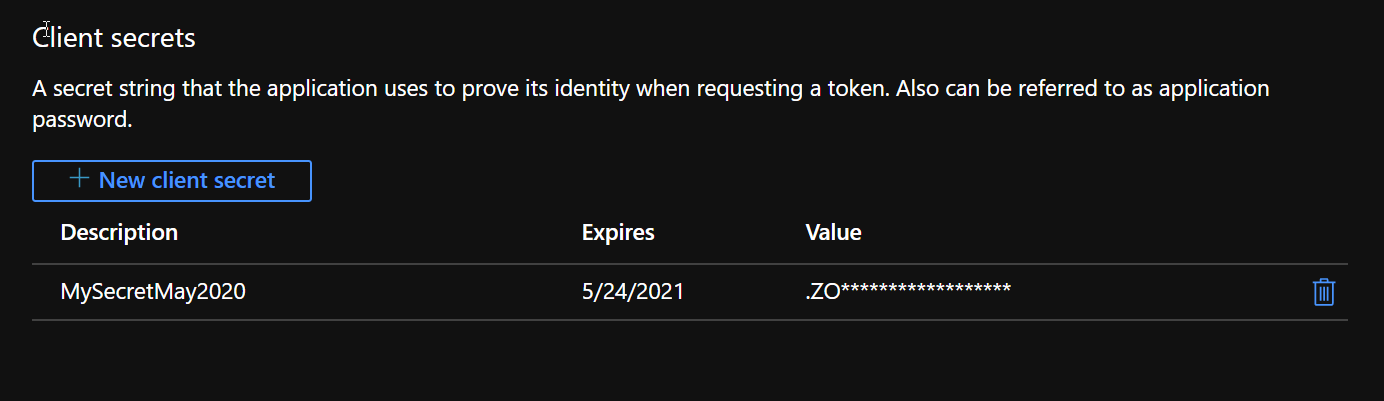
Now go to Certificates & Secrets – Click on New Client Secret. Give it a description and choose the amount of time before expiry. After you click on Add, make sure you copy the value of the secret and store it safely until we need it later. It will not be visible in the portal after you leave this page.
We now have a Azure AD Application with the needed permissions, the Client ID and Client Secret.
Step 2 – Configure the Automation Account
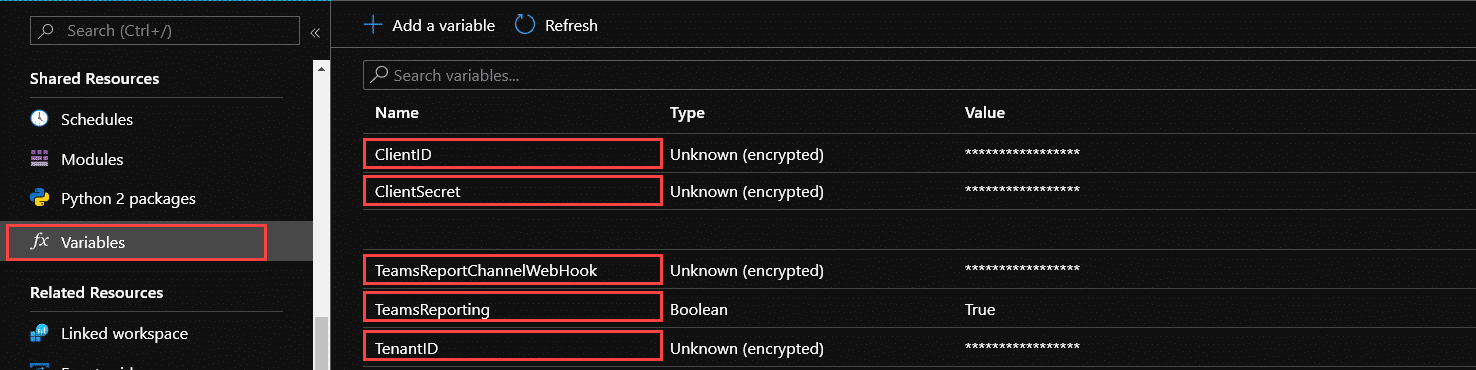
We need to define the following Automation Account variables for the Runbook to work.
- Client ID – The Azure AD Application ID – String – Encrypted
- ClientSecret – The Azure AD Application Client Secret – String – Encrypted
- TenantID – The Azure AD Directory ID – String – Encrypted
- TeamReporting – Boolean – (True enables Teams reporting, False disables)
- Optional (if TeamsReporting is True)
- TeamsReportChannelWebHook – The reporting Teams channels webhook – String – Encrypted
Step 3 – Import the Azure Automation Runbook
Now on to the final step of setting up the RunBook itself. Go to GitHub and download the script from here: https://github.com/MSEndpointMgr/IntuneWin32AppRemedy
In Azure Automation – Runbooks – Click on Import a runbook

Select the WIn32AppRemedy.ps1 that you downloaded from Github, if you want to you can change the name and add a description.
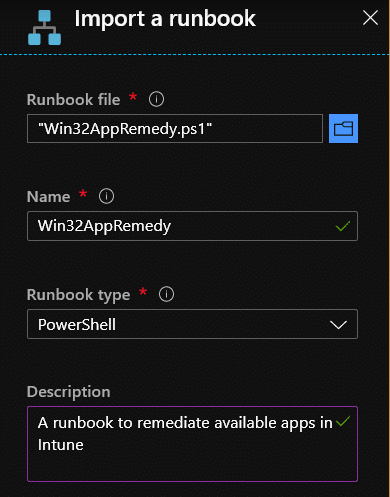
Click on Create and you will be redirected to the imported runbook in edit mode. You can now do a Test Run or just click on Publish.
Step 4 – Validate the Azure Automation Runbook
To validate the runbook do a manual trigger of the runbook either from Test pane or if published, from the Runbook’s overview page:
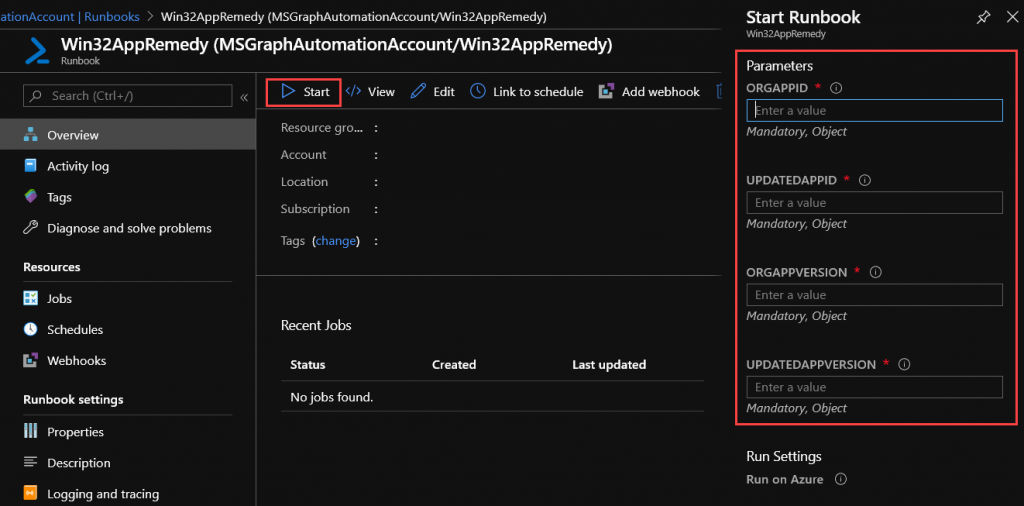
When you click on Start it will require the following:
- ORGAPPID = Intune AppID of the App being patched
- UPDATEDAPPID = IntuneAPPID of the updated version of the App
- ORGAPPVERSION = The App Name (with version) of the App Being patched
- UPDATEDAPPVERSION = The App Name (with version) of the updated version of the App
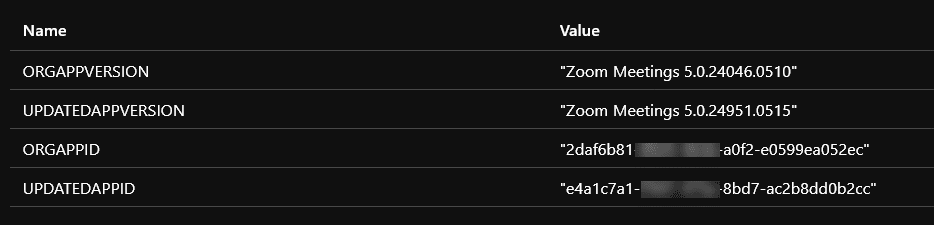
Example:
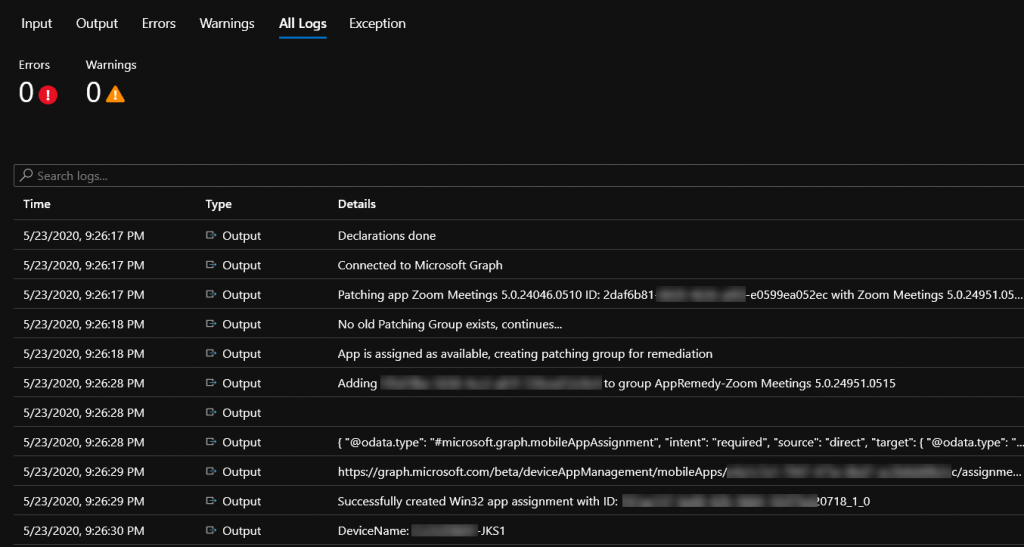
After the script has completed you should see something similar under Jobs – All Logs:
Now we can go look in Azure AD to verify that we have our group created with some possible members (if nobody has installed the previous available app, the group will be empty) and that the App in Intune is assigned as required with our chosen settings to the group in question.
Teams Reporting Webhook
If you want to enable the Teams reporting, have a look at my previous post on how to create your Teams Channel Webhook and insert the URL into the Automation Variable TeamsReportChannelWebHook and enable Teams Reporting in the variable EnableTeamsReporting
https://msendpointmgr.com/2020/01/06/intune-monitoring-and-alerting-to-ms-teams/#teamsalert
Roadmap
This runbook alone is not doing much if it does not have the input parameters required. Following up on this we are soon going to publish how you can for instance integrate this with Patch My PC and Nickolaj Andersen’s IntuneWin32App module.
We are also working on a notification module as part of this, where the End Users will get a notification at the stage where the app is available. If the end user does not install before the deadline, the app remediation will be enforced by Intune.


What is the fastest way to get the app id guid? I am not finding a column that shows that info nor can I find it in the app info itself. Im assuming it is somewhere in Graph, but I have not done much with that yet.
Go to the app in endpoint.microsoft.com and take a look at your url-bar in your browser. Should look like this:
https://endpoint.microsoft.com/#blade/Microsoft_Intune_Apps/SettingsMenu/0/appId/0ea0cc8a-ee1a-4664-bb3f-f037c512643f
The last bit here is the appid. Fastest way.
Do you have any articles on how to create Azure dynamic device groups based on installed applications?
No, not directly. But using graph and looking at the Win32AppRemedy script (function Get-DeviceAppInstallState) you can find this info. Have a try with this in graph:
https://graph.microsoft.com/beta/deviceAppManagement/mobileApps/$($ID)/deviceStatuses?filter=installState eq ‘installed’&Select=deviceID”
Hello Jan,
Thanks for sharing such a useful article. It is going to reduce lot of administration tasks of updating 3rd party patches.
I have a quick question in this script.
I have been trying to execute it for 10 hours but struggling with a warning and error. I am getting below warning and error
An error occurred while creating app assignment. Error message: The remote server returned an error: (400) Bad Request.
Invoke-TeamsMessage : Cannot bind argument to parameter ‘DeviceName’ because it is null. At line:690
I believe, 2nd error will go away if we resolve first warning.
Can you please help me on resolving the issue?
Thank you
Hi, there is a small bug in the current version if your app is not set to either determine reboot behavior based on return codes or intune will force a mandatory device restart. To remediate, either reconfigure your apps to have this reboot behaviour or delete the following following from the Add-IntuneWin32AppAssignment function:
“restartSettings” = @{
“gracePeriodInMinutes” = “$GracePeriod”
“countdownDisplayBeforeRestartInMinutes” = “$RestartCountDown”
“restartNotificationSnoozeDurationInMinutes” = “$RestartSnooze”
}
This will be fixed in the next release.
Bugfix has been committed on Github, script will now be able handle different reboot behaviors.
Thank you very much Jan