


Hardware vendors provide BIOS updates for a reason, it is not just about keeping the BIOS firmware developers busy. Most BIOS updates includes improvements on stability and security, some are more critical than others. The vendors are continuously working on bringing their customers a more stable and secure computer. Most of us also knows that many computers will be needing a firmware update to fully support Windows 11.
There are several approaches you can take to stay on top of this and get this insights into what the status is in your environment. Most vendors have enterprise solutions that allows you to both manage and report on your BIOS versions. The issue with this could be that you have more than 1 vendor in your environment, the solution from the vendor might require a license or that you simply don’t want to be using their solution.
The solution
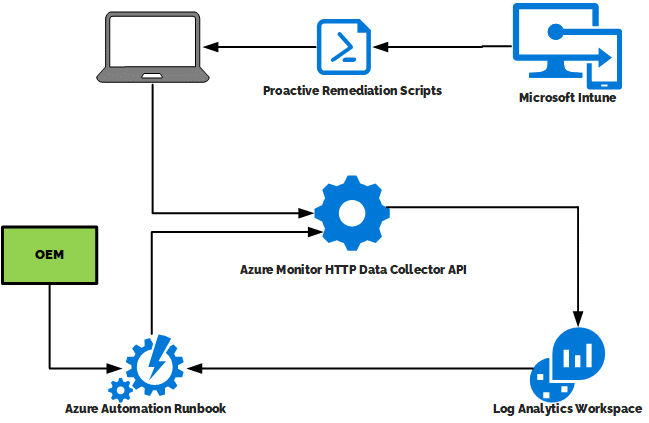
After request from several customers we work with we start digging into how we can create a BIOS Update compliance report supporting multiple vendors and at the same time keeping it as native as possible for our customers using Microsoft Intune. The solution is based on Azure Monitor (Log Analytics) and Azure Automation combined with the latest version of our Custom Inventory scripts using Proactive Remediations.
- Intune runs Proactive Remedations scripts on the clients for Custom Inventory including BIOS information
- Client reports this inventory to the Log Analytics Workspace using the DataCollector API
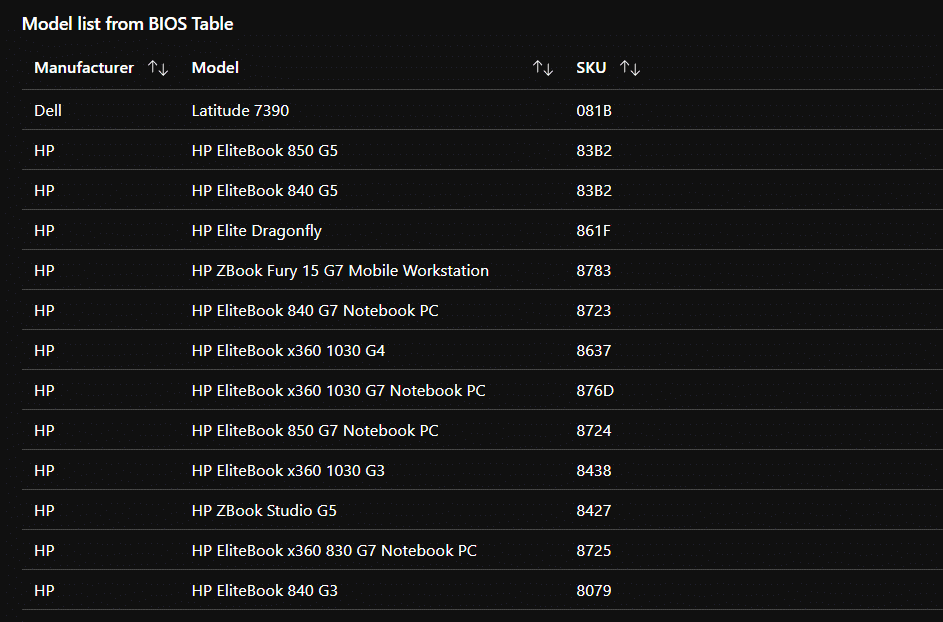
- The Azure Automation Runbook queries the Log Analytics workspace for models in your environment
- The Azure Automation Runbook uses this information to query the vendor about what is the latest BIOS
- Finally the runbook writes this to the Log Analytics Workspace using the DataCollector API
At this stage we will have the current BIOS version of all our clients. We also have the latest BIOS version from the vendors of these clients. Lets build a workbook to get the insight we are after.
Azure Monitor Workbook
With Azure Monitor Workbooks we can combine data from the two required tables with a simple join. This gives us the possibility comparing versions between inventory and OEM data. Example:
OEMBIOSInformation_CL
| summarize arg_max(TimeGenerated, *) by SKU_s
| join DeviceInventory_CL on $left.SKU_s == $right.SystemSKU_s
| summarize arg_max(TimeGenerated, *) by ManagedDeviceID_g
| extend ComputerOEMUpdateStatus = iff((parse_version(BiosVersion_s) < parse_version(OEMVersion_s)), "Update available from OEM", "OK")
| project ComputerName_s, OEM_s, OEMDate_s, BiosDate_s, OEMVersion_s, BiosVersion_s, ComputerOEMUpdateStatus
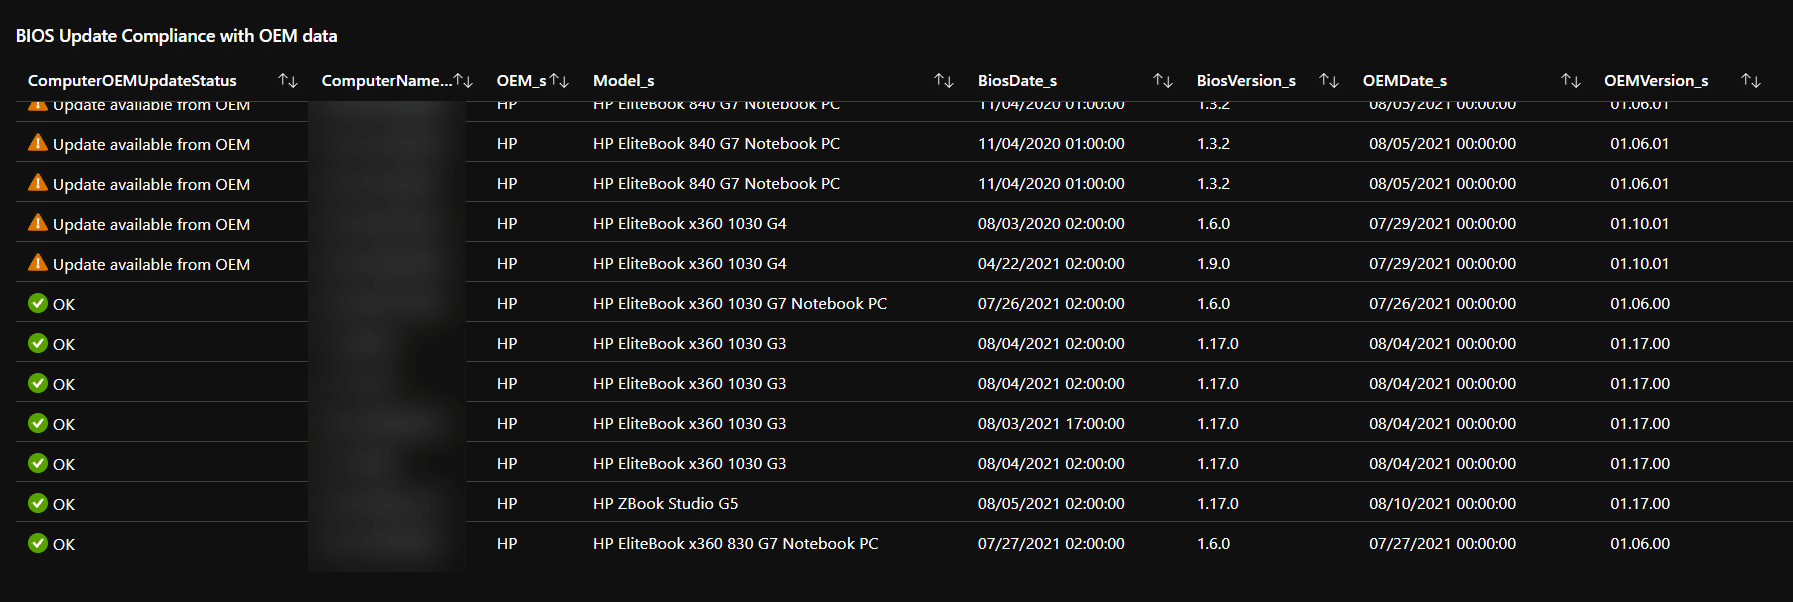
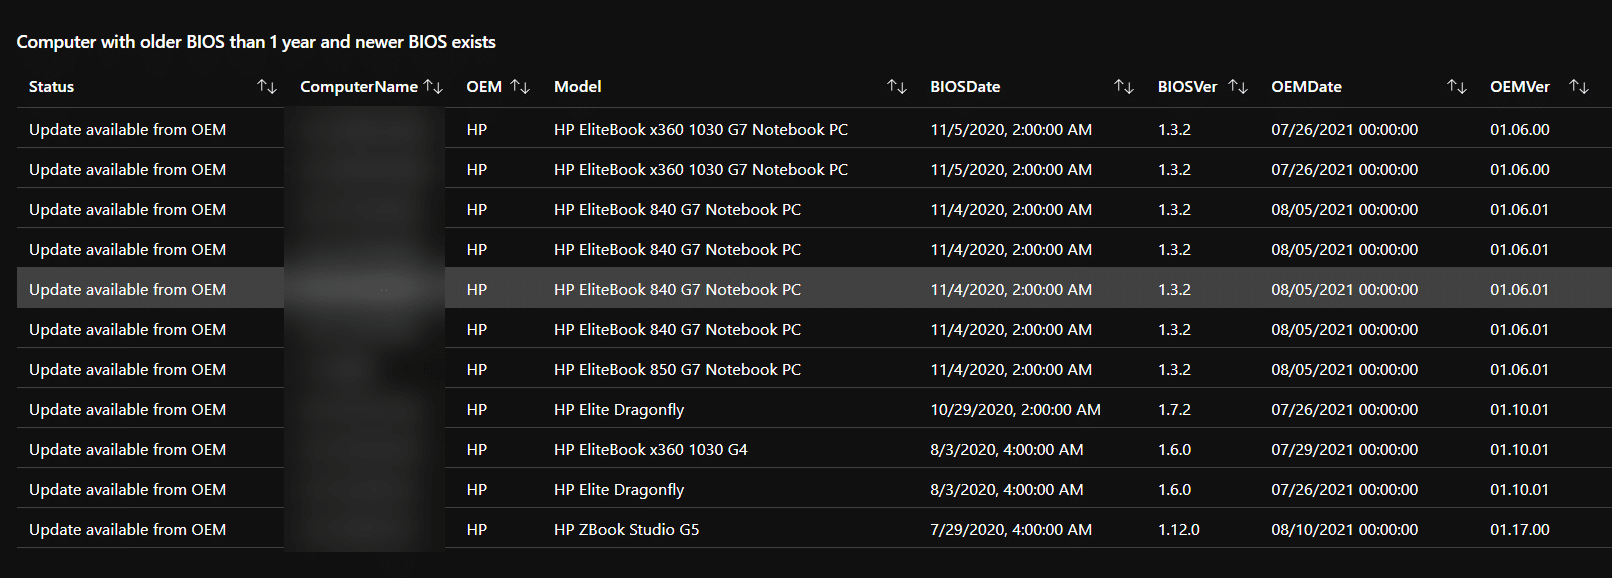
This will give us the following result:

This solution has support for HP, Dell and Lenovo today. We are open for adding more vendors as long as the vendors have a open API or XML data containing the necessary information. You can also see that we have some computers that is behind on their BIOS versions here. Moving this into a Azure Monitor Workbook makes it easier to visualize the impact in your environment.
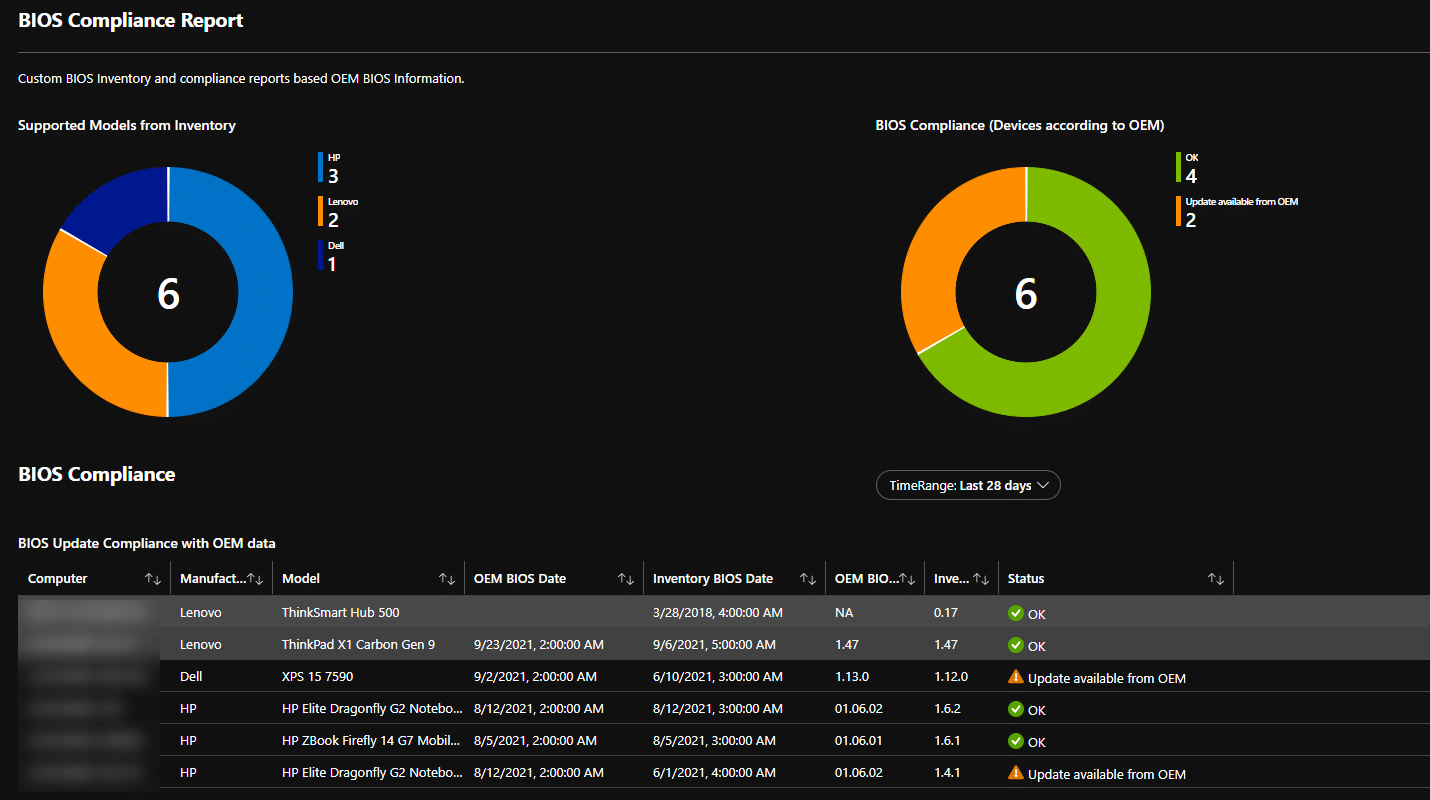
This is a sample report from a environment with only a few devices active. To keep this up to date the daily run of the Proactive Remediation Inventory script is important.
Implementation
Make sure you have the latest version of our Custom Inventory Script running in your environment before you start implementing the rest. This is to make sure that you are collecting the OEM Baseboard SKU value in the same format as the different OEMs release their BIOS information.
Azure Automation Account setup
As the runbook we are using in Azure Automation is querying Log Analytics to ask for what models we have in our environment, we are giving the automation account permissions to read our log workspace. To do that we will be using a system assigned managed identity.
Configuring the managed identity
Assuming you either have an Azure Automation account or know how to make one, we are jumping straight to configure the managed identity. Go to Account Settings -> Identity
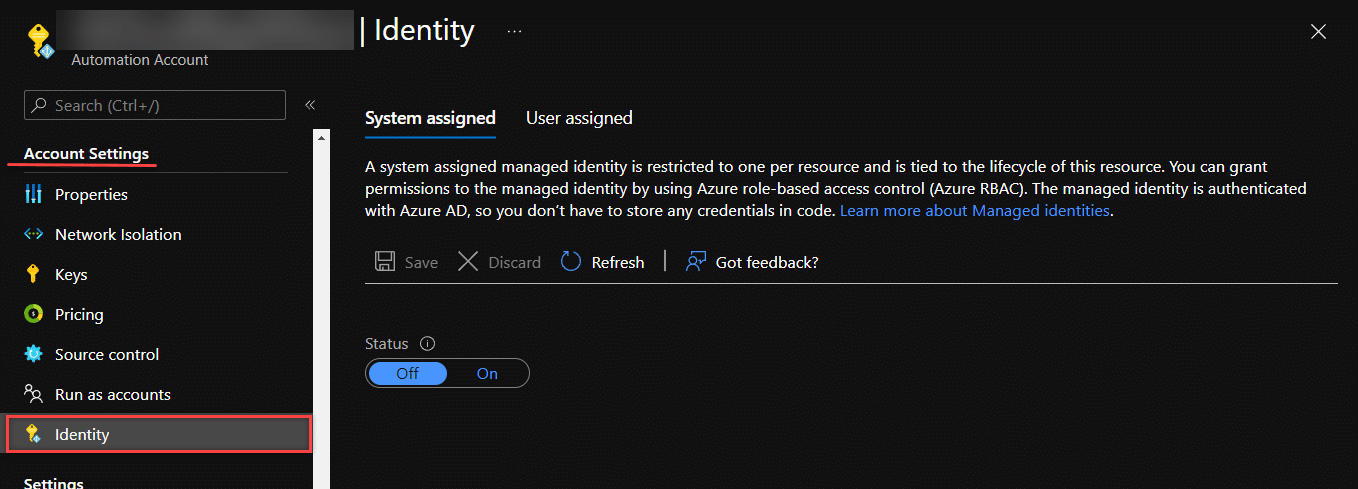
While still on System assigned, flip the selection to On and click on Save. Now you will be notified that the Automation account will be registered in Azure Active Directory. Once it is registered, it can be granted permission to access resources protected by Azure AD. Answer Yes to continue.
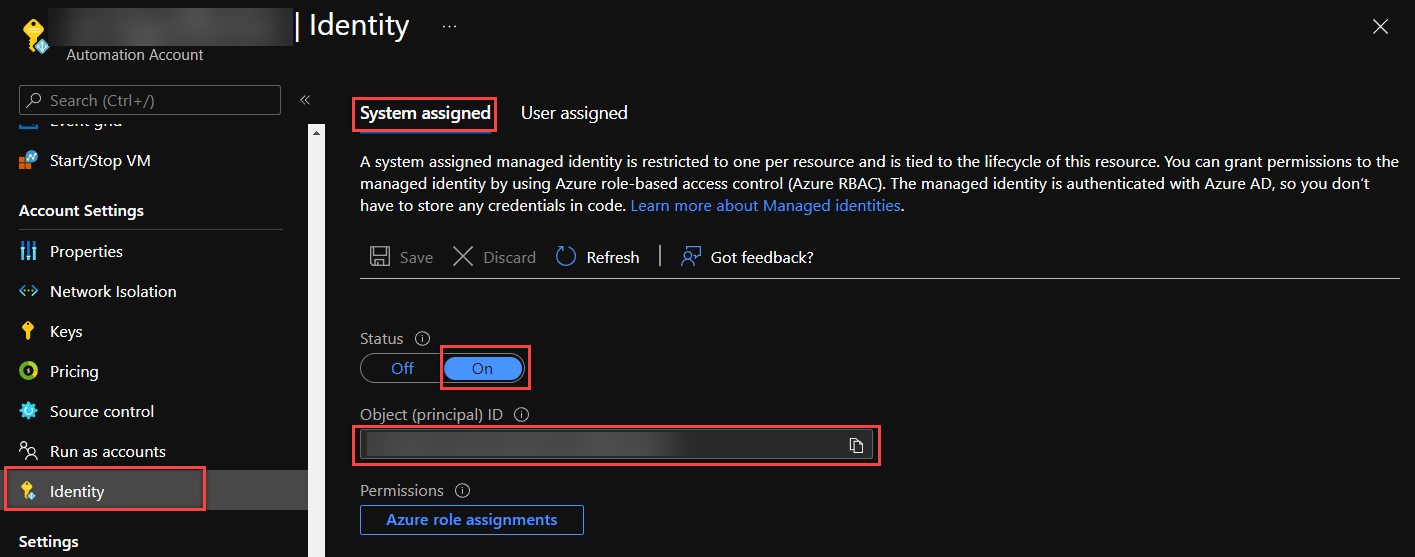
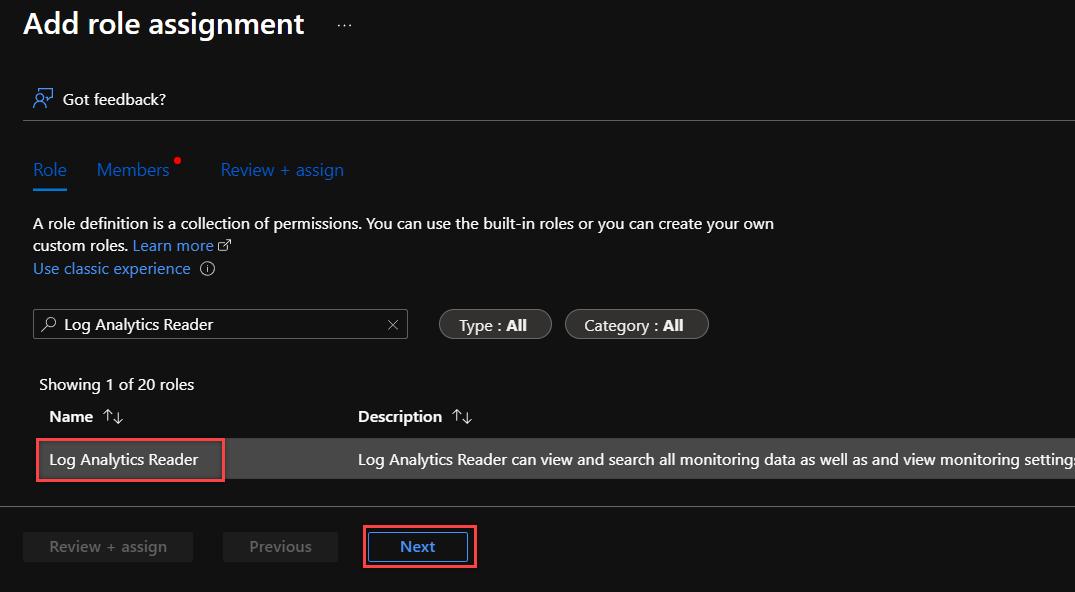
In this picture, you will see your Object (principal) ID. Now that we have this in place, move over to the log workspace where you have your Intune Custom Inventory data. Go to Access control (IAM) -> Add ->add role assignment. Select the Role Log Analytics Reader -> Click Next
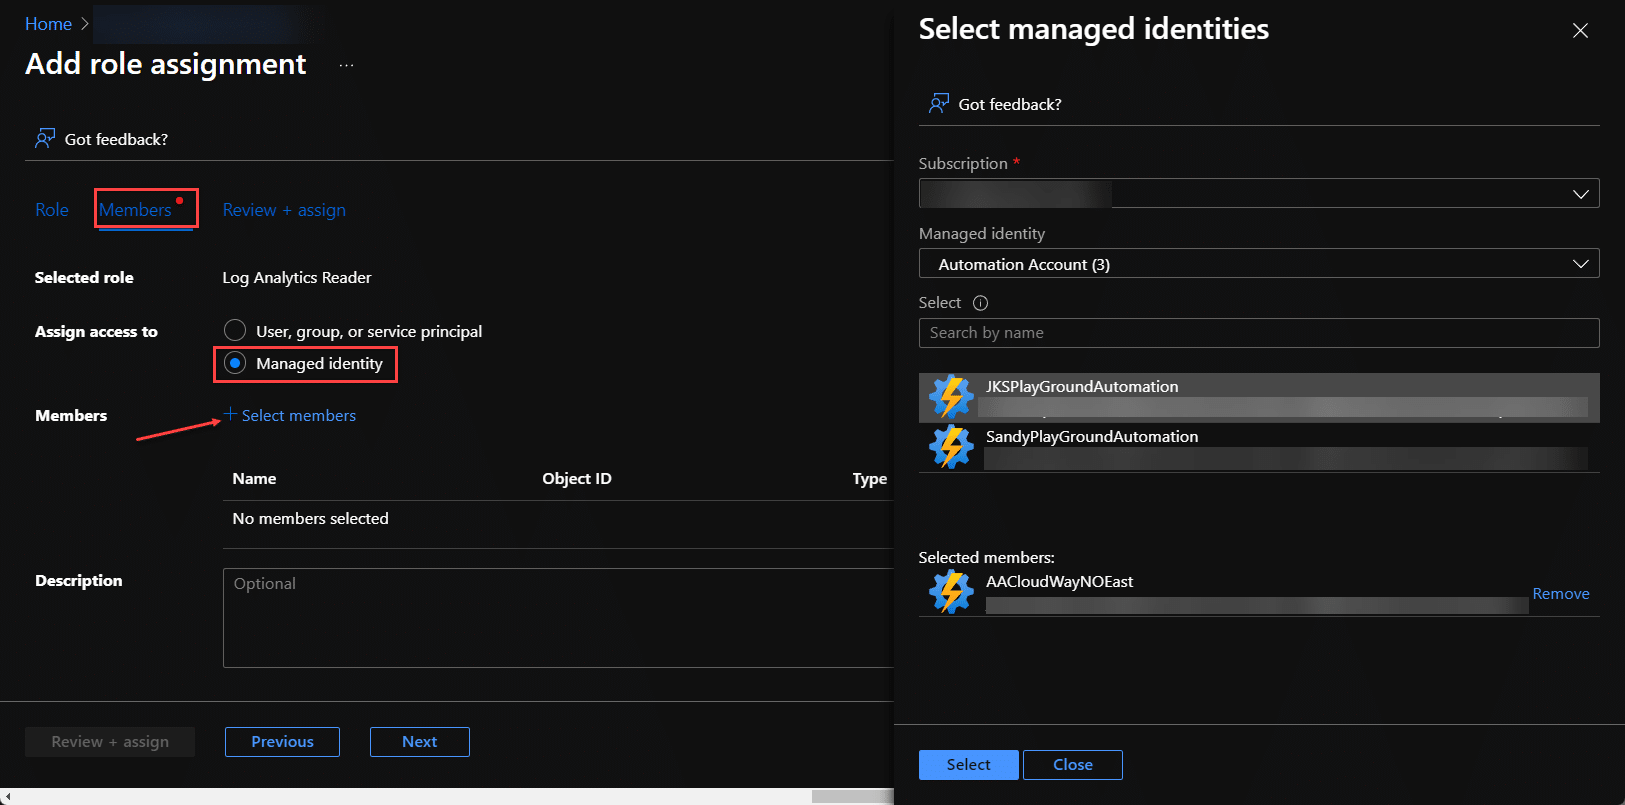
On the next page, tick off on Managed Identity -> Select Members -> Pick your Subscription – Choose Automation Account as type and pick the Automation account to use for the data collection.
Back to the previous blade, remember to click on Review + assign to complete the process. Now the system assigned managed identity is configured and given the necessary permissions.
The runbook
The runbook has, as previously mentioned, 3 tasks to perform. Query our inventory in log analytics, query the OEMs for BIOS information and write this back to a new table in Log Analytics. There are some required setup before you are can publish the runbook.
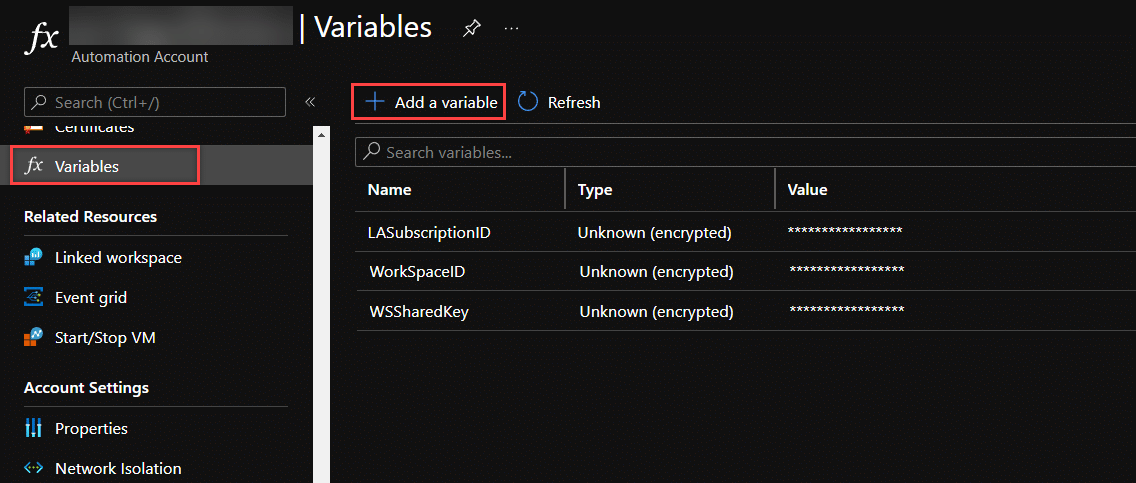
- Automation Variable WorkspaceID: The workspace ID of your Log Analytics workspace
- Automation Variable WSSharedKey: The shared access key to write to Log Analytics using Rest API
- Automation Variable LASubscriptionID: Azure Subscription ID for your workspace
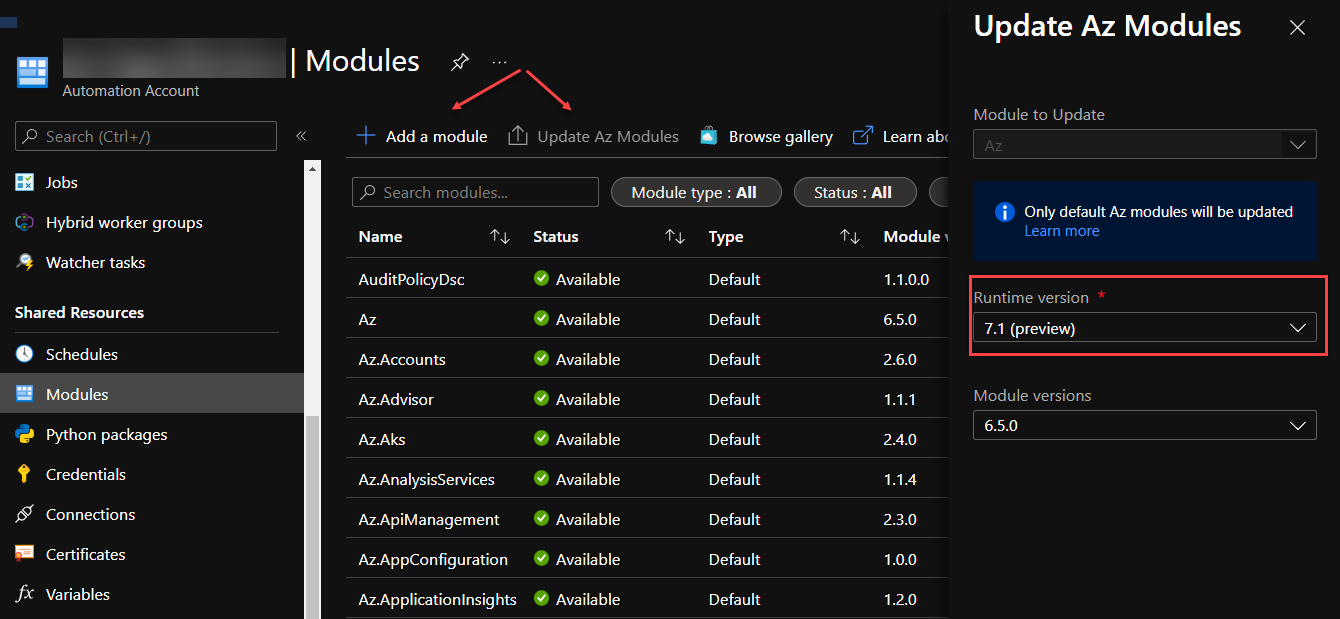
- Module: Az.Accounts
- Module: Az.OperationalInsights
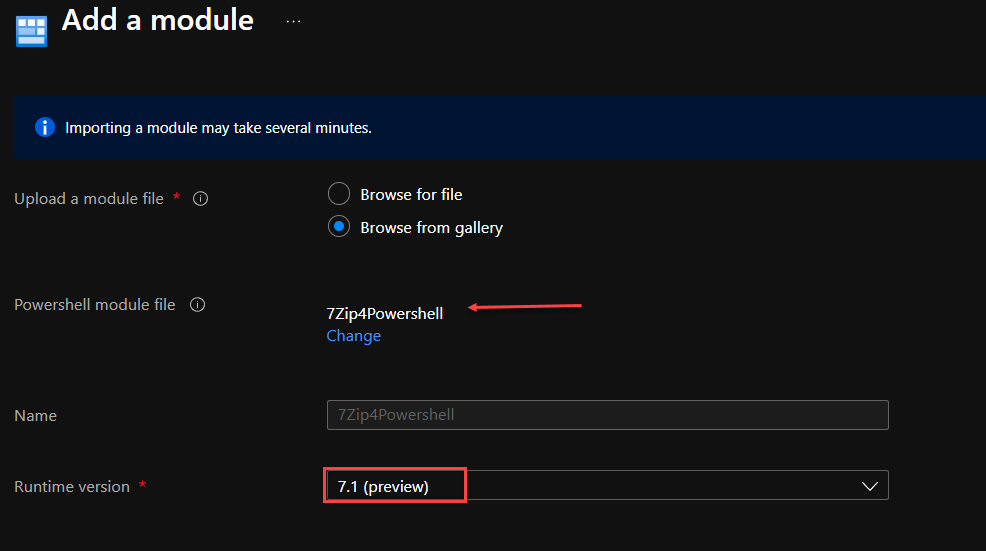
- Module: 7Zip4Powershell
The Az Modules can now easily be added or updated directly from the portal, or for new Automation Accounts they should be there. Recommended runtime version is PowerShell 7.1 so make sure you have the modules added for 7.1.
Now go here on Github: Reporting/Invoke-BIOSDataCollectionToLA.ps1 at main · MSEndpointMgr/Reporting (github.com) and download the script for import. Save it locally and click on Import Runbook.

Publish the runbook and set a schedule to run as often as you wish. To cater for new models in inventory its recommended to run it once a day.
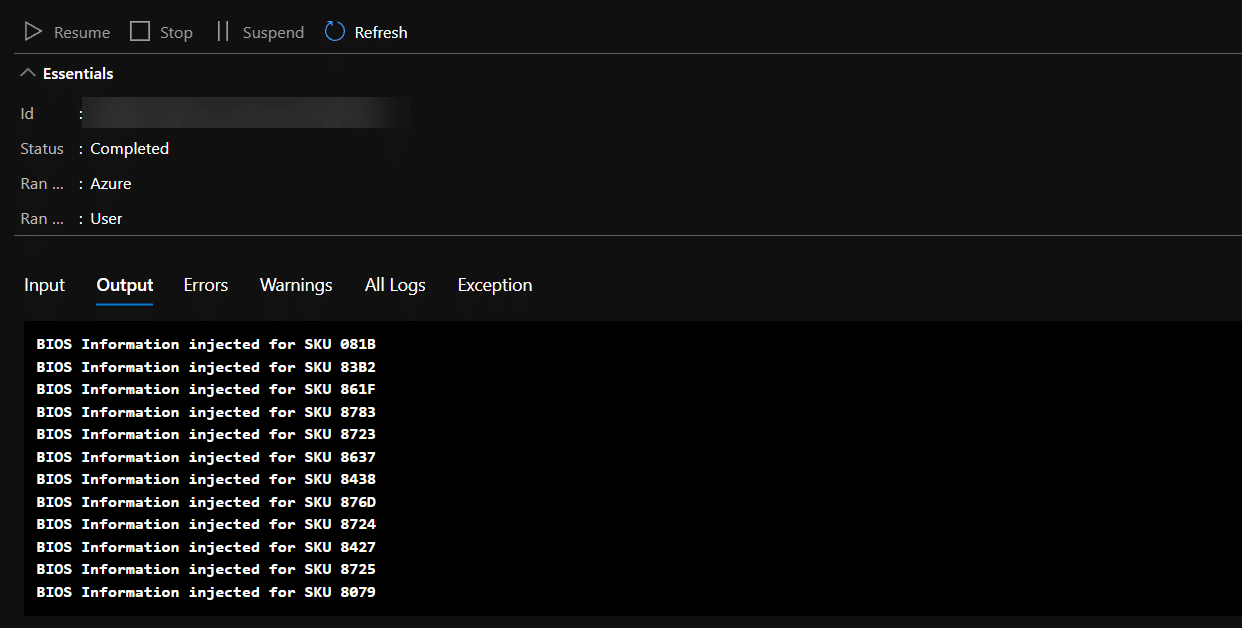
The runbook output should look like this if everything is correct, and you have supported hardware in your inventory.
Workbook
The last step is to import the workbook from here: Reporting/BIOSUpdateComplianceOEM.json at main · MSEndpointMgr/Reporting (github.com) (There is good description on how to do this at this blogpost: Windows Update Compliance Workbook Community Edition)

There is also another workbook coming soon that will also include BIOS Compliance status with data from our Intune BIOS Control solution: Read more here: Introducing Intune BIOS Control
That workbook will include information about what BIOS versions you are currently deploying and update status compared both with OEM data and our control XML.


Hello I find your tools really useful am about to implement some. The Bios Compliance Report has a discrepancy in the property notation and therefore remains empty. In the Remediation Script writes these values Lowercase Biosxxx in the Workbook are these Uppercase written BIOSxxx read out Small adjustment and runs.
I cant find this discrepancy in my workbook. Is is lowercase in both the script (latest) and the workbook. Make sure you use the latest version from here: https://github.com/MSEndpointMgr/Reporting/tree/main/Workbooks
Hi guys
many thanks for your awesome solutions for Intune! I really miss all those BIOS and Update Reports, which you are created. I’m a little stuck on this BIOS Update Compliance Report. When i open the workbook i receive this messages:
‘extend’ operator: Failed to resolve scalar expression named ‘BiosVersion_s’…
Are you able to give me a hint what i could miss to have it working?
Many thanks for your help
Best regards,
Marc
Make sure you are using the lastest version of the script and workbooks:
https://github.com/MSEndpointMgr/Reporting/tree/main/Workbooks
https://github.com/MSEndpointMgr/IntuneEnhancedInventory/tree/main/Proactive%20Remediation
Hi guys,
thank you for sharing this BIOS Reporting. That’s really a missing piece in Intune! I’m struggeling with adding the Module: Az.OperationalInsights in the Runtime Version 7.1. It tells me:
This module has dependencies that are not present in this account. All dependencies must be present before this module can be imported.
Dependencies:
Az.Accounts (≥ 2.7.0)
Before i could successful add the Az.Accounts which is now there with Type=Custom, Module=2.7.0 and Runtime Version=7.1 (Preview).
Can you give me a good advice how i could add also the Az.OperationalInsights?
Many thanks and best regards,
Marc
Hi guys
just an update to this, i was able now to install all the needed Modules. Must have been something temporary, which is already fixed again.
Best regards,
Marc
Found it, in the workbook JSON file there are 2 values not correct:
BiosVersion_s should be BIOSVersion_s
BiosDate_s should be BIOSDate_s
If you use the latest version of the scripts and workbooks it should both be with Bios_xxx
https://github.com/MSEndpointMgr/IntuneEnhancedInventory/tree/main/Proactive%20Remediation
https://github.com/MSEndpointMgr/Reporting/tree/main/Workbooks
Hi,
I have followed your guide and I’m getting some errors in the workbook,
‘extend’ operator: Failed to resolve scalar expression named ‘BiosVersion_s’…
It’s been over 48 hours since implementation (to allow for delays in data appearing) but I’m unable to show any data.
The Custom Inventory has uploaded correctly for My pilot devices and the runbook is giving an output as expected. however the Workbook displays no data.
Any help is appreciated as this is my first look at Log Analytics or Proactive remediations.
Thanks
PAul
If you use the latest version of the scripts and workbooks it should both be with Bios_xxx
https://github.com/MSEndpointMgr/IntuneEnhancedInventory/tree/main/Proactive%20Remediation
https://github.com/MSEndpointMgr/Reporting/tree/main/Workbooks
Hi Guys,
Great post, got this working in my tenant but I did have to change a couple of the queries to get it working. They reference BiosVersion_s where are the table displays it as BIOSVersion_s. This is the same with BiosDate_s and BIOSDate_s. This could be that I was running an older version of the Custom Inventory script until I set this up?
If you use the latest version of the scripts and workbooks it should both be with Bios_xxx
https://github.com/MSEndpointMgr/IntuneEnhancedInventory/tree/main/Proactive%20Remediation
https://github.com/MSEndpointMgr/Reporting/tree/main/Workbooks