

It’s been a while since this series started, but let’s continue. At this point the certificate templates have been configured including the setup and configuration of NDES have been taken care of. The Intune Certificate Connector has also been setup and configured. In this part of the series we’ll go through the configuration of the required profiles needed to get a certificate for either a user or a device distributed.
Blog series overview
- Certificate deployment for mobile devices using Microsoft Intune – Part 1 – Overview
- Certificate deployment for mobile devices using Microsoft Intune – Part 2 – Certificate templates
- Certificate deployment for mobile devices using Microsoft Intune – Part 3 – Install NDES
- Certificate deployment for mobile devices using Microsoft Intune – Part 4 – Install Intune Certificate Connector
- Certificate deployment for mobile devices using Microsoft Intune – Part 5 – Deploy SCEP Certificate profile
- Certificate deployment for mobile devices using Microsoft Intune – Part 6 – Setup High-Availability (Optional)
- Securing SCEP/NDES for Intune with gMSA (Optional)
Export Root Certificate Authority certificate
Before we can go ahead and create any certificate profiles in Intune, we need to have access to the Root Certificate Authority certificate from the internal PKI. If the internal PKI infrastructure consists of more than a stand-alone Root Certificate Authority and includes one or several Intermediate (Issuing) Certificate Authorities, each certificate needs to be exported. There are several ways of exporting the certificate or certificates, two of them listed on the following documentation from Microsoft:
https://support.microsoft.com/en-us/kb/555252
It’s also possible to open a Microsoft Management Console on any domain-joined device and export the certificate from there, that’s however not covered in this series.
Create Trusted Certificate profile
A Trusted Certificate profile is required on every device that will be targeted for a user or device certificate. This is a requirement in order to trust the certificate authority that enrolled the certificate itself. For each of the exported Root Certificate Authority certificates mentioned in the section above, you’ll need to create a Trusted Certificate profile for each certificate authority in order for the device to be able to trust the whole certificate chain. It’s recommended that you name each of the profile appropriately, unless you only have one certificate, for instance like:
- Trusted Root Certificate
- Trusted Issuing CA – <name1>
- Trusted Issuing CA – <name2>
With the exported certificates, let’s take a look at how easy it is to create a Trusted Certificate profile. This post will not cover all the steps required to create each and every Trusted Certificate profile you may require, but it’s pretty self-explanatory when it comes to how to differentiate between the different certificate types when you create the profile.
- Sign in to the Azure portal (portal.azure.com).
- Locate the Intune blade and go into Device Configuration.
- Select Profiles and click Create profile.

- Give the profile a suitable name, select Windows 10 and later as the platform and finally select Trusted certificate as the profile type. Browse to the certificate file (<cert_name>.cer) and select the destination store depending on the type of certificate you’re uploading.

- Click OK to create the profile.
- Assign the Trusted Certificate to your devices and ensure it can be installed successfully.

What is a SCEP Certificate profile
A SCEP Certificate profile is the item that ties this whole series together. It controls the type of certificate being enrolled, either for a user or a device along many other configuration options. Up until now we’ve configured all infrastructure necessary for distributing a certificate on to a device, and within this profile the externally published NDES server url comes into play. As it currently stands, Intune supports SCEP Certificate profile deployment for the following platforms:
- iOS
- Android
- Windows 10
- macOS
Since the configuration options are generally the same, the main difference being that selecting either if the certificate is for a user or device, this post will cover how to distribute a user certificate for iOS devices and a device certificate for Windows 10 devices. It’s important to mention that there’s not really a best practice configuration recommendation for this type of profile. You’ll have to understand how your environment works and what the requirements are for the certificate to hold the proper data required.
For a more detailed run down of all the configuration options and documented values available for certain of the settings, see the Microsoft documentation further down in this link:
https://docs.microsoft.com/en-us/intune/certificates-scep-configure
Create a user SCEP Certificate profile for iOS
- Sign in to the Azure portal (portal.azure.com).
- Locate the Intune blade and go into Device Configuration.
- Select Profiles and click Create profile.
- Name the profile and select iOS as platform, SCEP Certificate as profile type.

- As for the Certificate type, select User. Depending on your certificate requirements and how the certificate is going to be used, select the suitable value for your environment in the Subject name format drop down. The same goes for the Subject alternative name option.

- Configure the Certificate validity period according to your requirements or internal policies. Select both options, Digital Signature and Key Encipherment under Key usage. Select 2048 as for the Key size bits, unless you have other requirements that enforces you to choose a lower key size.

- Click on Select a certificate under Root Certificate and select the Trusted Certificate profile that contains the Root Certificate Authority certificate for the Issuing Certificate Authority, in other words select the root certificate of your internal PKI. In case you only have a stand-alone Root Certificate Authority, select that certificate.

- As for Extended key usage, select Any purpose if you’re not certain of what to choose, but in most of the cases the key usage would be Client Authentication, for instance to authentication for a WiFi or VPN profile. Define another value for the Renewal threshold if desired, or leave the default of 20 percent. Last but not least, enter the external URL for your published NDES server, configured in part 3 of this series.

- Finally, click OK to create the SCEP Certificate profile.
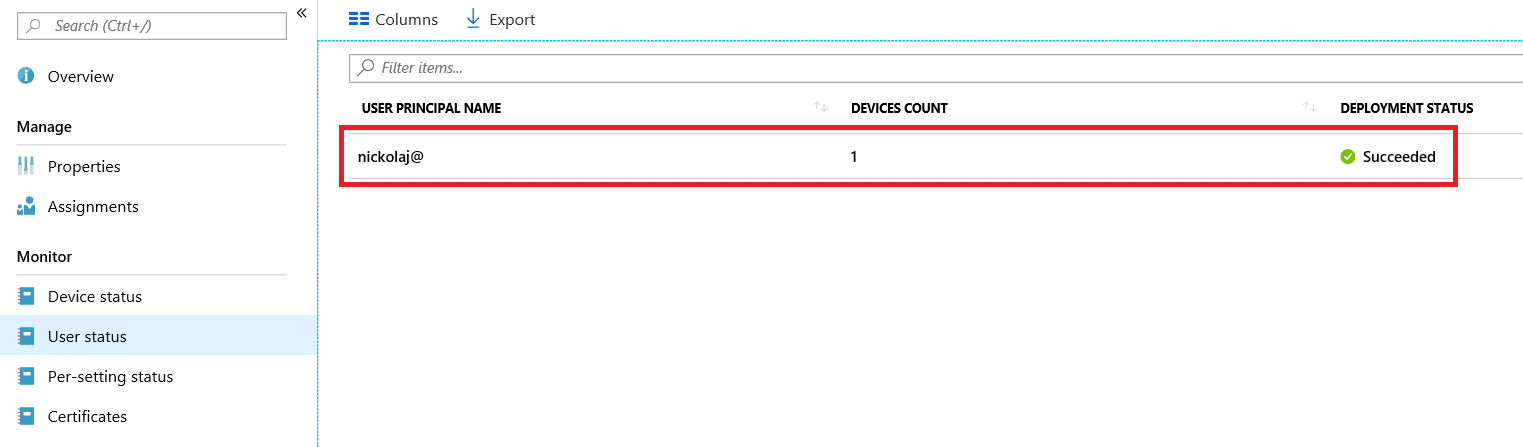
Remember to assign the SCEP Certificate profile to your users, since we’ve create and configured a profile that distribute a user certificate. When the profile have been assigned and a certificate have been enrolled, it’ll look something like this if it was successful:
Create a device SCEP Certificate profile for Windows 10
Like mentioned already, the difference between configuring a SCEP Profile for a user certificate and a device certificate are very small. In this section I’ll only cover the differences, so if something is unclear, see the configuration of the iOS user certificate section above.
- Sign in to the Azure portal (portal.azure.com).
- Locate the Intune blade and go into Device Configuration.
- Select Profiles and click Create profile.
- Give the profile a name, select Windows 10 and later under platform and select SCEP Certificate under profile type.
- Select Device as the Certificate type. Refer to the documentation page from Microsoft mentioned in the first part of this blog post to get a list of potential variable values you have access to in order to construct the Subject name format. Additionally, if required for your environment, construct a combination of the available variables to form the required Subject alternative name.

- Again, depending on the purpose of the device certificate, select the desired Key storage provider. If you’re uncertain, select the Enroll to Software KSP. However the names should be self-explanatory. Select the desired configuration for the Hash algorithm, although a suggestion would be to select SHA-2.
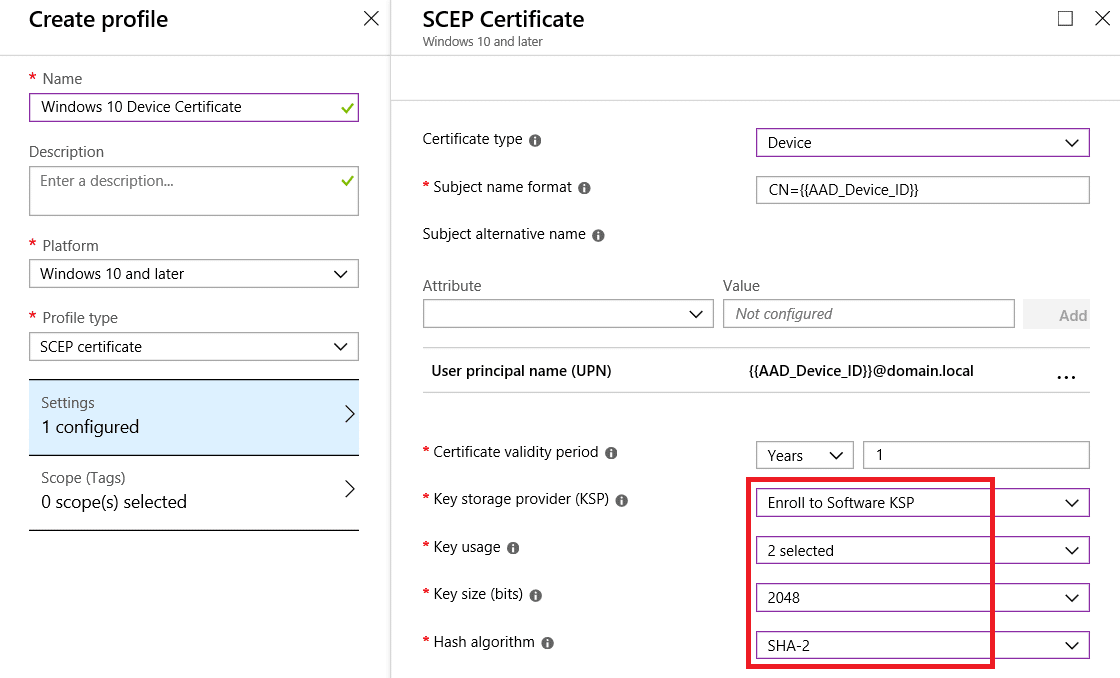
- Remember to configure the remaining settings in accordance with your environment requirements, and don’t forget to specify the NDES server URL.
- Finally, click OK to create the SCEP Certificate profile.
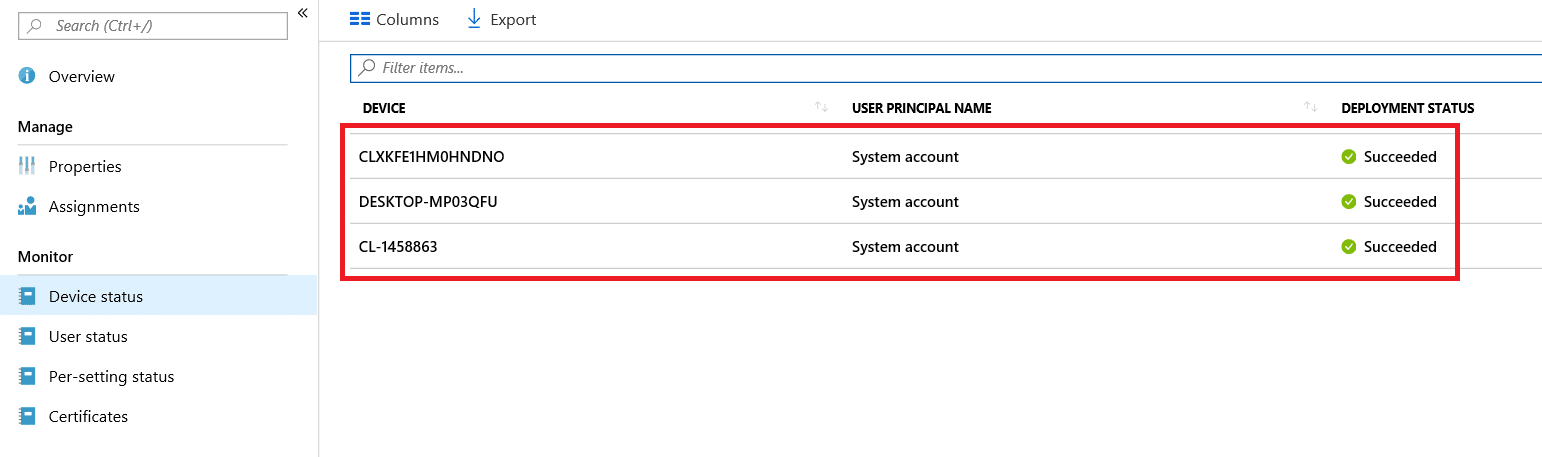
Assign the SCEP Certificate profile to your devices and wait for the certificate to be distributed. Once successfully distributed to the targeted devices, it would look something like this:
And that wraps up part 5 in this series. The next and final part will cover high-availability configuration considerations and configurations, however that part is only optional. At this point certificates have now been distributed to users and or perhaps devices.


Is there a log available? I am getting an error in the Intune console, when I am trying to enroll certs with an Windows 10 device. (device cert, MDM managed)
Great series! I would like to know what the end user experience will be if the AD password is changed. Will it prompt the device or user that is assigned a certificate to re-enter their updated credentials or will it just continue to use the certificate to authenticate?
Thanks sir, was a great ride this series!